1
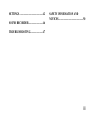
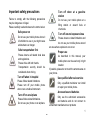
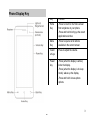
1 Preface Thank you for purchasing this cellular phone. To guarantee your cellular phone works properly, please follow the instructions in this manual to prevent any possible incidents or malfunctions. Follow all safety warnings to avoid injury or property damage. Screen displays and illustrations in this user’s manual are designed to help you to operate your phone. We continuously strive to improve our products. Therefore, we reserve the right to revise this user manual or withdraw it at any time without notice. i Contents CLOCK ................................................. 22 PREFACE .............................................. I CHROME BROWSER ........................ 23 CONTENTS .......................................... II CAMERA .............................................. 26 IMPORTANT SAFETY PRECAUTIONS .................................... 1 FM RADIO ........................................... 28 GETTING STARTED ........................... 6 CONTACTS.......................................... 29 TOUCH SCREEN ................................ 10 PHONE ................................................. 32 HOME SCREEN .................................. 12 GALLERY ............................................ 33 CALLING............................................. 16 MESSAGING ....................................... 36 BLUETOOTH ...................................... 19 MUSIC .................................................. 40 FUNCTION MENU ............................. 21 ii SETTINGS ........................................... 42 SAFETY INFORMATION AND NOTICES .............................................. 50 SOUND RECORDER .......................... 46 TROUBLESHOOTING....................... 47 iii Turn off when at a gasoline station Important safety precautions Failure to comply with the following precautions may be dangerous or illegal. Please carefully read and observe the terms below: Do not use your mobile phone at a filling station or around fuels or chemicals. Safe power on Turn off around exposure Area Do not use your mobile phone where it is forbidden to use or you might cause a disturbance or danger. Please observe related limitations and do not use your mobile phone around an area where explosions can occur. Safe transportation first Proper use Please observe all related local laws and regulations. Please drive with both hands. Transportation security should be considered when driving. As described in this manual, your mobile phone can be used only in right location. If possible, please do not touch the antenna area on your phone. Turn off when in hospital Use qualified after sale service Please follow related limitations. Please turn off your mobile phone when near a medical instrument. Only a qualified maintainer can install or repair your mobile phone. Accessories and batteries Turn off on an airplane Only use the authorized accessories and batteries and do not connect to unmatched manufacturers or products Please follow related limitations. Do not use your phone on an airplane. 1 P Waterproof Introduction Your mobile phone is not waterproof. Please keep it away from water. Packaging Backup There are various accessories for your cellular phone. Your pack will include charger x 1, data cable x 1, and user manual x 1. Please note: Only use accessories and charging devices approved by the phone manufacturer, otherwise there is a risk of serious damage to health and property. Failure to do this may invalidate your warranty. Accessories may vary by region. Do remember to make a backup or keep a written record of all important information saved in your mobile phone. Connect to other devices Please read the user manual of the device to get more detailed security instructions before connecting to other devices and do not connect to unmatched product. SOS emergency calls Make sure your mobile phone is switched on and in a service area. In home screen, tap the dial key, input the SOS number, then press the Dial Key. Tell where you are and do not hang up without permission. 2 P Phone Display Key Key Home Key Menu Key Volum e Keys Power key Function -Press to return to the Home screen from anywhere on your phone. -Press and hold to bring up the recent applications window. -Press to open a list of actions available in the current screen. Press to adjust the volume. -Press (when the display is active): locks the display. -Press (when the display is in sleep mode): wakes up the display. -Press and hold: Access phone options. 3 P Note: “Press” in this manual, means to press and release the key; “press and hold” means to press and hold the key for at least 2 seconds. Icons & Symbols In idle mode, network and battery icons are displayed all the time. The rest of the icons appear if the feature is available. If the network symbol is not displayed, the network is currently unavailable. You may be in a bad reception area; moving to a different location may help. Roaming Vibrate mode 3G connected Ringer is silenced 3G in use Phone microphone is mute Connected to a Wi-Fi network Battery is very low Bluetooth is on Battery is full Airplane mode Battery is charging Alarm is set Receiving location data from GPS New text or multimedia message Uploading data 4 P Probl em with text or multi Missed call media mess age delive ry Downloading data Data is syncing Phone is connected via USB cable open the list of notifications displayed in the sliding window. To close the Notification panel, touch and hold the bottom bar of the Notifications panel, then slide your finger up the screen. An open Wi-Fi network is available Problem with sign-in or sync Notifications When you see a notification in the status bar, touch the bar and slide your finger down the screen to 5 P 2 Getting Started Inserting the SIM Card Please read the safety instructions in the "Safety Information and Notices" section before use. In order to use your phone, you must insert a valid SIM card supplied by your operator or retailer. The SIM card contains your subscription information, your mobile telephone number, and a small amount of memory in which you can store phone numbers and messages. Remove the back cover Make sure that the phone is turned off. You need to remove the back cover of your phone before you can insert the SIM card. Lift the back cover up to remove it. Note: Some SIM cards may not function with your phone. You should consult your wireless service provider for a replacement SIM card. There may be fees for this service. You can also insert a memory card. This provides you with expanded memory capability, which allows you to store additional music, photo, and video files separate from the phone's built-in memory. 6 P Insert the SIM card Power on/off Make sure that the clipped corner of the SIM card is facing the correct direction and the metallic contacts are facing downwards. Slide the SIM card into the card slot until it stops. To power on the phone, press and hold the Power Key. Enter the PIN code if required (the 4 to 8 digit secret code of your SIM card). It is preconfigured and provided to you by your network operator or retailer. If you enter an incorrect PIN code 3 times in succession, your SIM card will be locked. To unlock it, you must obtain the PUK code from your network operator. To power off your phone, press and hold the Power Key. On release, the phone options menu opens, select Power off. Install the back cover Align and hook the back cover to the top of the battery slot and then press the back cover down until it locks into place. Charging the Battery Your phone is powered by a rechargeable battery. The new battery is partially charged. A sound alert will warn you when the battery level becomes low. To charge the battery, plug in the connector at the bottom of your phone (USB interface), and then plug the other end into an AC power socket. The battery symbol indicates the charging status. 7 P During charging, the charge indicators Note: if you are going to remove your SD card, first you must remove it from your will scroll; phone by selecting Home key,then tap When all the scroll bars are steady, the battery is fully charged. You can then disconnect the charger. the application tab to select Settings > Storage >Unmount SD card. Inserting a micro SD Card Transfer files to the SD card Your phone has a slot for a micro SD card. 1. With the metal contacts facing down, gently put the SD card into the slot. Note: The metal contacts are facing forward. 2. If you want to get the T-Flash card out, gently press the SD card, then you can remove it from your phone. To transfer music, picture, and other files from your computer to your phone’s SD card, you need to set the phone’s SD card into a USB drive. 1. Connect the phone to the computer using a USB cable. A notification icon appears in the status bar. 2. Open the notifications panel by touching it and drag it down. 3. In the notifications panel, touch USB connected and then touch Open the USB storage device>confirm check box to turn on the USB storage. 4. To turn off the USB storage, you must touch Turn off the USB storage device to clear the USB storage check box. 8 P Wireless off To turn off all your phone radios, please go to Home, tap the application tab, select Settings > More. Select Airplane mode check box. Your phone will switch to “airplane” mode now. An airplane mode icon will be displayed in the status bar and all wireless connections will be disabled. To enable wireless connections again, return to the settings screen and clear the Airplane mode check box. 9 P 3 you can slide your finger up/down on the screen. Dragging your finger to scroll will not choose or activate anything on the screen. Touch screen Your mobile phone features a touch screen which provides a faster and more intuitive way for you to navigate through lists and menus. The controls on the touch screen change dynamically depending on the task you are performing. Zoom in or out Zoom in / out on a picture when viewed in full screen, web page, or map: 1. You can zoom in and out by placing two fingers on the screen at once and pinching them together (to room out) or spreading them apart(to zoom in) Selection To select an item or button on the screen, touch the item with your fingertip. The color will change on the screen when it is selected, usually to blue. Pattern lock You can increase the security of your phone by setting a screen unlock pattern. Once set, in order to unlock your screen, you’ll have to draw the correct unlock pattern. You can set your screen unlock pattern as follows: 1. Press Home key, then tap the application tab to select Settings. 2. Select security, then scroll down to the Screen lock section. Context menus To open the context menu for an item on the screen, you can: Touch and hold the item on the screen with your fingertip. You must hold for one full second before the context menu appears. Scroll To scroll up or down in a list or page on the screen, 10 P 3. 4. pattern visible check box. Set or change your unlock pattern by selecting screen lock > Pattern, as applicable. Follow the prompts to define your pattern. Note: you must slide your finger along the screen to create the pattern, not select individual dots. Connect at least four dots. Screen sleep After a period of inactivity, your screen will go to sleep (display will turn black). In sleep, your phone uses less battery power. You can go to Home, then tap the application tab to select Settings > Display > Sleep to select a time. Pressing the Power Key can also make your phone sleep or awake immediately. If you unlock your screen, and you want your pattern to be hidden as you draw it, clear the Make 11 P 4 touch the application tab to reveal all the application icons, then touch & hold an application or widget icon and drag it to the home screen. Its shortcut is added to the Home screen. Home Screen The Home screen is your starting point for using all the applications on your phone. You can customize your Home screen to display applications, shortcuts, and widgets as you like. Press the Home button to return to the Home screen. Set wallpaper 1. Extended Home screen After pressing Home key, slide your fingertip left or right along the screen to reveal the full width of the Home screen. This additional space gives you more room to customize Home with applications, shortcuts, and widgets. 2. Find an application quickly From the home screen, tap the application 3. tab . Add a Home screen item 1. 4. To create an application shortcut quickly, Start from the Home screen; press Menu key to access the context menus. You can also touch & hold an empty area of the home screen and in the menu, touch Wallpapers. Tap Wallpapers item. Select one of the pictures. It can be from the Gallery, Live wallpapers, Video Wallpaper or Wallpapers. Gallery contains the pictures you have stored on your SD card. Wallpaper is pre installed on your phone. When you’ve decided on a picture, make sure it is highlighted, and then select Set wallpaper. If you select Gallery, the picture album opens. Slide your fingers to find the picture 12 P you want to use, and then touch it. If this picture is too large ,you must crop it first . Options on home screen In the home screen, press Menu key to access the following options: Remove items from the Home screen To remove a shortcut or widget from your Home screen, touch and hold the item to enter “Remove mode”. The application tab turns into a Trash button. Drag the item to the Trash button. When the icon and application tab turn red, release it. System Settings: Shortcut to the settings menu. Please refer to “Settings” section. Move objects on the Home screen 1. 2. Wallpaper: Select wallpaper from the pictures album, Live wallpapers or wallpaper gallery. Manage Apps: Select to manage Apps. To move an icon or other item on the Home screen, you should touch and hold it to enter the “move mode”. The object will magnify when it is ready to be moved. Keyboard When you select or touch a field that requires text or numbers, the onscreen keyboard becomes available. Without lifting your finger, drag the object to the new position. To move an item to a section of the Home screen not in view, move it to the edge of the screen and hold it there for a moment. The screen view will shift; position the object and release. Adjusting keyboard settings Before you start using the onscreen keyboard, we recommend you set the onscreen keyboard options 13 P such as vibrate and/or emit a sound when you touch a key, auto-capitalization, auto-complete, etc. 1. Press Home key, then touch the application tab, select Settings > Language & input. 2. Touch Android keyboard, you can choose the type method as your favorite, and then set the options you want to use for the onscreen keyboard. 3. If you select the Show correction suggestions, and Auto-correction options, the phone will offer you smart word suggestions as you type, so you can enter text quickly and accurately on the onscreen keyboard. Android Onscreen Keyboard Note: When you do not need the keyboard, you can close it by pressing BACK. To show the keyboard again, touch a text box on the screen. 14 P If you need to insert or delete a character, slide your fingertip to position the cursor next to the character you want to edit. The available keys on the keyboard will be different depending on the type method you select. Settings > Language & input. Smart Onscreen Keyboard Smart Onscreen keypad is an intelligent text editing mode for typing, which includes a comprehensive dictionary. It allows you to quickly enter text. When you enter the first or second letter, the word suggested may be displayed on the screen. 15 P 5 1. Touch and hold the 0 key on the Dialer tab to enter "+". 2. Enter the country code. 3. Enter the area code (normally without the 0 before it), followed by the phone number. Calling Making a Call Note: You can make a call only when the network is available. 1. 2. Tap the Dialer icon on the Home screen. Enter the phone number, select a contact, or a call log. 3. Press the Call icon 4. Press the Call icon On the Dialer tab, enter the emergency number and then press the Call icon on your phone. When the screen is locked, you need to unlock it first before you can make an emergency call. If your phone is in sleep mode, press the power key to wake up the phone and then unlock the screen. to dial the number To end the call, press the End Call icon to call directly. Making an Emergency Call . Adjusting speaker/earpiece volume During a call, press the Volume Keys up / down to increase or decrease the volume. Making a Second Call You can make a second call by putting the current call on hold: 1. During a call with the first caller, select Add call and then enter the second caller’s number using the keypad. Speaker During a call, select Speaker on. Making an International Call 16 P automatically. 2. Select Merge calls. The two calls will be combined and a conference call is established. 2. Press the Call icon to dial the second party’s number. The first caller will be automatically placed on hold. This is a network-dependent feature. Please contact your service provider for more details. During the multi-party call, you can answer a new incoming call or add a new member to the call by selecting Add call to dial the new member (the ongoing multi-party call should be put on hold first). Once the call is established, select Merge calls from menu options. This is a network-dependent feature. Please contact your service provider for more details. Swapping calls When you have one active call and one call on hold, you can touch Swap calls to switch between the 2 calls. Merging calls Calling Hands-Free When you have one active call and one call on hold, you can select Merge calls to make a conference call between the two calls. During a call, select Speaker. Answering a Call Making a Conference Call Drag the green phone icon to the right. When there is a call waiting while you are already on the phone, you can carry out the following operations to establish the multi-party call: 1. Drag the green phone icon to the right to answer the second call. The first call will be put on hold If you were already on a call, the first call is placed on hold while you answer the new call. 17 P To silence the ringer before answering the call, press the Volume Down button. Rejecting a Call Drag the red phone button to the left. Answering a Second Call If you have activated Call Waiting, a new incoming call screen is shown to inform you when there is a second incoming call. You can: 1. Drag the green phone icon to the right. The current call will be put on hold automatically. 2. Drag the red phone button to the left to reject the second call and continue with your current call. Ending a Call Press the End Call icon to end a call. 18 P 6 appears in the status bar. Bluetooth Your phone supports Bluetooth function. Bluetooth is a short-range wireless communications technology that allows Bluetooth devices to exchange information over a short distance without requiring a physical connection. Discover ability By default, your phone is not “discoverable”. This means other Bluetooth devices will not see your phone in their scans for Bluetooth devices. To make your phone discoverable: 1. Make sure you have turned Bluetooth on. Refer to the above chapter for details. 2. Press Home key and tap the application tab. Then select Settings > Wireless & Networks open Bluetooth . 3. Touch your Bluetooth device name and then your phone will be visible to other Bluetooth devices. 4. Press the Menu key and select the Visibility timeout to set your phone visible time to other Bluetooth devices . Note: the phone can connect to a Bluetooth hands-free headset or a Bluetooth car kit and use those devices to send and/or receive calls. Before you can use a Bluetooth hands-free headset or car kit, follow the steps as below. Turn on Bluetooth services 1. 2. Press Home key and tap the application tab. Then select Settings. Select Wireless & Networks, and then directly chang the icon turn on Bluetooth services. 3. When on, the Bluetooth to Name your Bluetooth device 1. 2. icon Make sure you have turned Bluetooth on. Press Home key and tap the application 19 P 3. 4. tab to select Settings > Wireless & networks > open Bluetooth . Press Menu Key and select Rename phone Type the name for your device in the dialog box, then select Rename phone. Rescan for Bluetooth devices If you want to update the list of Bluetooth devices, press SEARCH FOR DEVICES. Pair & connect with Bluetooth devices Before your phone communicate with a Bluetooth headset, your phone should “pair” at first. 1. Make sure you have Bluetooth turned on. 2. Go to Settings > Wireless & Networks > Bluetooth . 3. This phone automatically start scanning for Bluetooth devices. As they are found, the devices will appear in the list of Bluetooth devices. 4. Touch a particular device in the list to pair with it. 5. Once paired, you can select the file to send via Bluetooth. 20 P 7 Function Menu How to Use Select application From the Home screen, tap the application tab . Slide your finger to scroll through the menus and touch a particular destination to enter the selected menu. You can exit a menu by pressing the BACK Key. Main Menu Please read the following sections for a detailed description of the main menu. 21 P 8 to Sunday. Ringtone: Select one ring tone for your alarm. The ring tone plays when selected. Vibrate: Press to set the vibration on or off. Label: Touch it to set a name for the alarm. 4 . Finally, press Back Key to save the settings. In the alarm, verify that you’ve activated either Saturday or Sunday on the Repeat area. If they are set off, your alarm does not notify you on Saturday or Sunday. Clock Your mobile phone has a built-in alarm clock. You can set up to more separate alarms and choose whether or not the alarm should repeat. How to set an alarm To set an alarm: 1. To open Alarm Clock, press Home key to return to the home screen, tap the application tab to enter the main menu, select “Clock”, and then touch the alarm Delete an alarm? To turn alarm off, you can directly chang the icon icon . Touch "+" to add an alarm and you can also edit the existed alarm. 3. You can editing the follow details: Turn Alarm On: you can directly chang the icon to turn alarm off. To delete an alarm, long press the alarm until the trash icon appears and touch the trash icon to delete the alarm. 2. to turn alarm on. Time: You can set the alarm time here. enter the time you want, and then touch ok to finished. Repeat: Press to set the repeat day, from Monday 22 P 9 Contact your service provider for information about data transmission charges. Chrome Browser To open the browser, press Home key, touch the Enter web address application tab and then touch the Chrome. The first time you enter the Browser after powering on, You are required to accept the terms of Google Chrome service before browse web pages . Touch Accept and Continue and then select sign in to sign in Chrome or select No thanks to open a Chrome screen. Sign in Chrome with your google account to bring your open tabs,bookmarks, omnibox data, and more information from your computer to your phone or tablet. 1. 2. 3. 4. Open the Browser screen and tap the Web address tab to open the web address screen. Type within the URL field to enter the web address manually. Possible matches will appear on a list of links as you enter the web address. Select a match or continue entering the web address. Tap the Go icon to follow the link to the selected address. Zoom and navigation in web pages Note: Browser automatically opens when you touch a web link in an email or text message. While viewing a Web page, if you set the web page to force enable zoom: press Menu key and select Settings>Accessibility >Force enable zoom .you can take advantage of the following zoom and navigation techniques: 1. You can place two fingers on the screen at once and pinch them together to zoom out It may involve the transmission of large amounts of data through your service provider’s network. 23 P 2. or spread them to zoom in. Slide your finger on the screen in any direction to navigate and view other areas of the web page. To find text within a web page While viewing a web page, press Menu key and then touch Find in page. Enter the search item. As you enter characters, matching characters will be highlighted. Windows view To copy text on a web page If you wish to open several web pages at the same time and want to view them on the screen, please use the Windows function. 1. while in the web page browsing , touch the 2. 3. 4. 5. To add new windows, press “+”to select Copy text from web pages and then paste them on an email or your SMS/MMS messages. 1. Open the web page where you want to copy text. 2. Locate the text you want to copy and then long press it until the texts are highlighted in blue. 3. Position your finger at the start of the text you want to copy and then drag to the end of the text you want to copy. 4. Release your finger from the screen,touch New tab. On the windows view, you can press Menu key to access Save to bookmarks, Settings and so on. icon in the right corner of the window to copy the text. To paste text on an email or SMS/MMS message, touch and hold the text box on a message or email icon in the right corner of the window . You will now see all web pages that you’ve opened. To close the window, touch the “X” in the right corner of the window that you want to close. 24 P and then touch POSTE on the options menu. Download web files and applications Bookmark 1. 2. 3. 4. 5. Before you download any files or applications using the browser, note the following: 1. Before you can download Web applications, you must go to Settings > Security> Unknown sources, select the check box. 2. All items downloaded from the Web are stored on your SD card or your phone, 3. The browser will only allow you to download items that are supported by an application installed on the phone. On a browser screen, press Menu key to access the option, and then touch . Type the name and URL of the bookmark and touch the Save button to continue. press Menu key to access the option, and then touch Bookmarks.Below the new bookmark it lists all the bookmarks that you have stored. Drag up and down to scroll through the bookmarks. Click one of them to go to browse the website. To edit the bookmark, touch & hold the bookmark that you want to edit in the bookmark screen. The context menu will open. Now, select Edit bookmark. Type your change and select OK. To delete a bookmark in the bookmark screen, touch & hold the bookmark that you want to edit. The context menu will open, and select Delete Bookmark. Warning: Applications downloaded from the web can be from unknown sources. To protect your phone and personal data, only download applications from sources you trust, such as the Android Market. 25 P 10 2. Camera Your mobile phone features a digital camera that allows you to take and share pictures and videos. Please ensure that the camera lens is clean before you take pictures, as small dust particles can strongly affect the picture and video quality. To access this menu, press Home Key, touch the application tab , and select Camera. You phone supports two camera lens: primary camera and secondary camera. One is located at the back of phone and the other in the front. When recording a photo 3. or shoot a video, press to switch camera lens. Frame your subject on the screen. 4. Touch onscreen to take a picture. 5. Touch to start recording the video. Do not take photos of people without their permission. Do not take photos in a place where cameras are not allowed. Do not take photos in a place where you may interfere with another person’s privacy. Taking a photo You can take photos in various modes, the camera produces JPEG photos. 1. Access the Camera menu to turn on the camera. If 26 P View your photos and videos To view the pictures and videos you have captured, as well as any you have stored on your SD card, please go to Gallery menu to view the details. 27 P 11 Your phone supports to auto scan the radio stations and the stations searched will be memorized in the channel list. 1. In the FM radio playing interface,touch FM Radio This feature allows you to listen to your favorite FM radio station anytime with frequencies ranging from 87.5 MHz to 108.0 MHz. To open FM radio, press Home key, touch the application tab and touch FM radio. Note: The FM radio will not work unless the headset is attached. Attach the headset to the headset port located at the top of the phone. >Search to auto scan the available channels. 2. Press or to access previous/next available channels. Add to favorites 1. In the FM radio playing interface, press add to favorites. Turn On/Off FM radio to Touch FM radio icon to turn on FM radio ,When the icon turns to switched on. touch the , it indicates that the FM radio is icon to turn off FM. Auto search 28 P 12 tab, and then select Contacts. Contacts You can store phone numbers on your phone’s memory. This menu gives you quick and easy access to the people you want to search. You can view and create contacts on your phone, and can also import contacts stored on your SIM card. To access this menu, press Home key, and touch the application tab, and then select Contacts. 1. 2. Press and the context menu appear, select the location which you want to store to access the create contact screen . Enter the information to the new contact, such as phone number, email address, first and last name etc. Slide your finger up or down to see more labels. Note: To change a defaulted information label, ie; Home number to Work number, touch the information label button, then select another label on the menu. You can also press the people icon in the home screen and select the Contacts tab. Contact list 3. Use this menu to search for contact information stored in the phone book. Browse through your contacts by sliding your fingertip up and down on the screen. Touch a category of contact information, such as phone numbers and email addresses, to enter that kind of information about your contact. 4. Touch the Picture Frame icon to select a picture to display next to the name in your lists of contacts and in other applications. When you’re finished, touch Done. Creating a contact 5. Use this menu to add a new contact to the Phone book. 1. Press Home key, and touch the application 29 P In the contacts list, press Menu key, touch Import /Export. If you have stored names and phone numbers on your SIM card, you can add these to the contacts stored on your phone by selecting this option. Once the list of names and numbers appears you can: 1. Open your contacts. 2. Press Menu and touch Import/Export > SD Card, 3. Press Next and select Next again when the context menu appears. 4. Touch Ok to Import Edit contact detail 1. 2. 3. From contacts, touch the contact whose information you want to edit. The context menu opens. Select Edit . The Edit contact screen appears. Make your edits, then touch Done. Communicate with a contact From the contacts list, you can quickly call or send an SMS or MMS to a contact. To open a contact’s details screen, simply touch their name from contacts. To dial a number of the contact, touch the contact’s name, then touch it again to dial. To call phone numbers, you switch automatically to the phone application as the number is called. For other kinds of communication, you switch automatically to the appropriate application, with the contact’s address entered. Favorites In the home screen, press the people icon Tapping the Favorites icon Favorite Contacts. . can access your How to set a favorite contact? To import contacts from the SD card 1. Open your contacts. 30 P 2. Touch a contact to view its details. In the call log list, you can press the call log to access the following options: Call back: Touch to call the selected number. Send text message: Touch to send an SMS message to the selected contact. Add to contacts: Touch to add the selected number to a new contact or view the exit contact. Beside the Name field icon indicates contact favorites or not. Tap this icon until it changes color. Now the contact will be copied to Favorites. Call log Use this menu to view the calls you have dialed, received, or missed, and the length of the calls. To access this menu, press Home key, touch the application tab, and select Call icon , tap the Call log tab to access the call log menu. Accessing a call log 1. 2. Slide your finger to scroll through the call list. Touch the selected log to view its detailed information, send an SMS message, or add the number to contacts. Using call log options 31 P 13 Phone 2. Use this menu to call your friends. To access this menu, press Home key , touch the application tab, and select Phone. Or you can press the Call icon screen. 3. in the home 4. Networks to turn Bluetooth on. Get your headset or hands-free car device ready for pairing by following the manufacturer’s instruction. Pair and connect your phone to the Bluetooth headset or car kit. Now you can use your headset or car kit to receive call. How to dial a number? Enter the number you want to dial, and then press the Call icon to dial. To know the detail, see calling in page 17. Dial by using Bluetooth devices You can place and receive calls using a hands-free Bluetooth headset or hands-free car kit. Before you can use your Bluetooth device, follow the following steps: 1. Go to Home , touch the application tab, and select Settings > Wireless & 32 P 14 Gallery Use this menu to access photos and videos you have taken. For photos, you can also do basic editing tasks, set them as wallpaper or contact picture, or share them with your friends. To open pictures and videos, press Home Key and touch the application tab. Then touch the Gallery icon. Viewing an image Gallery presents the pictures and videos on your microSD card or your phone storage, including those you’ve taken with the camera and those you’ve downloaded from the web or other locations. Select an album to view the pictures. Touch an album to open it and view its contents. The pictures and videos in the album are displayed in chronological order. 33 P section on that application. Delete Select this option to delete the selected picture. The picture will be removed after you confirm. Details Select to show detailed information of the picture including its name, type, the date taken, album and location Set picture as Select to set the selected picture as wallpaper or contact icon. Before you do that, you can crop the picture. The operation is the same as the above descriptions. Crop Select to crop the selected picture. Touch and hold an edge of the cropper to reveal the sizing arrows and then drag the edge in or out to size. Touch and drag the center of the cropper to move it within the picture. When you want to save the cropped area, select Save. To cancel the crop,press Menu key to open the context menu and then and select Undo. The cropped picture is saved. Rotate Touch a picture or video in an album to view it. Return to the main Gallery screen at any time by touching its icon screen. at the top left of the Place two fingers on the screen at once pinch them together to zoom-in and spreading them apart to zoom-out Image options You can do the following while in pictures. Share Touch Share icon at the top of the screen. In the menu that opens, touch the application to share the selected albums. The application that you select opens with the pictures from the selected albums or links attached to a new message. For information about addressing and sending the message, see the 34 P Select from rotate left (anti-clockwise) or rotate right (clockwise). Your picture will rotate and is saved automatically. Images Slide show Slide shows include all the pictures in your albums. in pictures, touch menu key to open the context menu and then touch Slideshow. Touch a picture to end the slideshow. To watch videos On the main Gallery screen, touch a video album and then touch the video you want to watch to start playing back the video. 35 P 15 link to open Browser and view the web page. If a phone number is included in a message, touch the message to open the Dialer so you can call the number. Messaging Use the Messages menu to send and receive text messages and multimedia messages. To access this menu, press Home Key, touch the application tab and touch Messaging. Reading multimedia messages If you have selected to auto-retrieve your multimedia messages, both the message header and body will download. To view your message, select the “Play” button. If you are downloading only the headers, then you must first select the Download button to retrieve the message body. If you are concerned about the size of your data downloads, you can check the message size first. Once the message has downloaded, select the “Play” button to view the message. Messages list Touch the Messaging icon screen on the Home The Messaging window opens, where you can create a new message or open an ongoing message thread. Reading text messages Press Home Key, touch and hold the status bar, and then slide it down to open the notifications panel. Touch the new message to open and read it. On the message list, touch the message you want to read. Reply to a message 1. Note: If a link is included in a message, touch the Simply start by typing your message in the text box at the bottom of the screen to reply to a message. 36 P 2. You can press Menu Key and select Add Delete all threads. Create new message 3. Subject or touch to add An Attachment to convert it to a multimedia message. Touch Send when ready. Use this menu to create and send messages. Text message View message details With an SMS-compatible phone number, you can send and receive short message service (SMS) messages. An SMS-compatible number is a phone number that your service provider enables for SMS. You can send SMS messages to contacts that have SMS-compatible phone numbers. 1. Press Home, touch the application tab and select Messaging. Touch the message to to view details about a particular message. Delete a message or a message thread In the message list, touch the message thread that you want to delete. To delete the entire thread, touch and hold a thread you want to delete until the trash icon appears. Touch the trash icon to delete the thread. To delete a message in a thread, touch and hold the message that you want to delete and then touch Delete on the options menu. When prompted to confirm, touch Delete icon. To delete all messages on the message list, press Menu Key on the message list and then touch 2. 3. 4. 5. On the messaging screen, touch . The Compose screen opens. In the Type name or number field, you can enter the receiver’s number by using the onscreen keyboard. In the Type text message field, you should enter the SMS content. Finally, when you have finished writing, you 37 P should tap the message. button to send the Multimedia message Multimedia Message Service (MMS) delivers messages containing a combination of text, image, video, and audio from phone to phone or from phone to email. 1. Press Menu key,touch the application tab and touch Messaging. 2. 3. 4. 5. 6. Touch to compose a new message. In the Type name or number field, you can enter the receiver’s number or email address by using the onscreen keyboard. In the Type text message field, you should enter the MMS content. To add a subject, press Menu Key and touch Add subject. To add an attachment such as picture, melody, video, and so on, you should press . In the following Attach menu: Pictures: Opens the Gallery application where you can choose a picture to insert into MMS. Capture picture: Opens the camera to take a new photo. You can insert the new photo to MMS. Videos: Opens the Gallery application. Touch a video on the screen to attach it to your message. Capture video: Opens the camcorder application. Take a video and then touch to attach it to your message. Audio: Opens the select audio menu. Touch an audio file to select. Record audio: Open a voice recorder to record a new audio. It can also be inserted into MMS. Slideshow: List all the slides that the MMS has. Tap Add Slide to add a new slide. Note: If you want add more attachments, you should add a Slide Show first. Contact : List all the contacts stored in 38 P SD card ,tap to add contacts. 7. 8. 9. Message Settings In a new slide show, you can also press the Menu Key to access the following options: Preview: Touch to preview the slide; Add picture: Touch to go to gallery to add picture. Capture Picture: Touch to open a camera to take a new photo. The photo can be inserted into a MMS. Add Music: Touch to add music to MMS. Add Video: Touch to go to the gallery to add the video into the MMS. More: Tap to set the duration and layout of the current slide. The default duration is 5 secs and the default layout can be found at the bottom. Finally, when you have finished editing the slide, you should tap the Done button to save and return to main editing screen. In the main editing screen, you can tap Send button to send the message. Use this menu to set up various options for using the messaging services. How to access message settings? 1. Press Home Key, touch the application tab and touch Messaging; 2. Press Menu key to access the option menu and touch Settings to configure your message settings ,such as SMS,MMS,Notifications and general. 39 P 16 Music This menu allows you to listens to your favorite music. To open your music library, press Home key and touch the application tab, and then touch Play Music. Your music is organized into three categories: Albums, Songs and Playlists . Select a category to view the lists within each. Once in a category, keep selecting until you reach the music you want to play. For example, if you select the Albums category, you will see a list of Albums in A-Z order. If you select an Albums, the list opens to display . Select an album, and the album’s song list is displayed. Play music At any level in your library, touch and hold a list (Artists, Albums, Songs, and Playlists) to open the context menu. Select to play and go to the playback screen. 40 P The following actions are available on the playback screen: Shuffle songs:Shuffle songs in random order. Create a playlist on your phone 1. 2. Touch to toggle shuffle on or off. When the icon is gray, shuffle is off. Go to any point in song: Slide fingertip in progress bar to desired point in a song. Pause/resume play:Touch pause;touch Repeat mode:Touch modes. 3. to 4. 5. to resume play. 6. to switch the repeat From the home screen, touch the application tab, and then touch Music. Select a category. From the list that appears, navigate to the Albums, Songs,and Playlists that you want to add in the playlist. Touch and hold the Albums, Songs, and Playlists to open the context menu. Touch Add to playlist. In the Add to playlist menu that opens, select New to create a new playlist. Enter the name for your new playlist and then touch Save. Manage your playlists View current playlist: Touch Go to the Library screen and select Playlists. All the playlists appear. Touch and hold the playlist opens a menu asking you to play, delete or rename the playlist etc. Playlists You can create as many playlists as you wish. The “Recently added” playlist is a system playlist and cannot be deleted or renamed. 41 P 17 Settings icon will display in the status bar when airplane mode is selected. This menu allows you to control and customize phone settings on the Settings screen. Press Home Key, tap the application tab and touch Settings. You can also press Menu Key in the home screen and touch System Settings. Wi-Fi: check the icon switch to if you prefer to use Wi-Fi for your data connection. The phone will scan for available wireless networks. Wireless & networks SIM management:Set preference on how you use SIMs inserted in your phone Roaming: Uncheck to prevent your phone from transmitting data on other carriers’ mobile networks when you leave an area where your phone can access your own carrier’s mobile networks. Data connection:touch to turn on or off the data connection Bluetooth: Touch the check box to turn Bluetooth service on or off. Date usage: this feature allows you to count data usage and set mobile data limit. Tethering & portable hotspot In this menu, you can share your phone’s mobile data connection via USB or as a portable Wi-Fi hotspot. VPN settings Airplane mode: When airplane mode is selected, all wireless connectivity is off. This Add VPN: Opens a screen that prompts you to select the type of VPN to add. You are then 42 P prompted for VPN configuration details. our phone provides 4 different profiles, including General, Meeting, Outdoor,and Silent profile. Mobile networks: You can configure how your phone rings,vibrates,or alerts you in other ways when you receive communications and motion sound , ect. Data connection: check to enable data access over the mobile network. Display Access Point Names: Opens the APNs screen, where you can select mobile access point configurations. Let you set the screen brightness,select to switch orientation when you rotate your phone,and configure other screen settings. Use only 2G network: Check to obtain slightly better battery life by preventing your phone from connecting to higher-speed networks. Location access Use the Location settings to set your preferences for using and sharing your location when you search for information and use location-aware applications, such as Maps. Network operators: Opens a screen that searches for and displays mobile networks that are compatible with your phone. Security You can configure settings that help secure your phone and its data. Audio profiles 43 P APPs Backup&reset This menu allows you to manage applications. This feature let you backup app data,wifi passwords,and other settings to google servers. And reset your phone . Accounts Use the Accounts & Sync settings to add, remove, and manage your Google and other supported accounts. You also use these settings to control how and whether all applications send, receive, and sync data on their own schedules, and whether all applications can synchronize user data automatically. Battery storage Accessibility Let you view and manage the data storage on your phone, manage the use of your SD card from this screen.: You use the Accessibility settings to configure any accessibility plug-ins you have installed on your phone. Your phone supports Battery feature. You can use the this settings to turn on or off the displaying of Battery Percentage. In this menu, you can view how many applications are using the battery and used percentage. Date & time Language & Input Set time, time zone, and date: Use Automatic time zone unless you need to override the network values. Use 24-hour format: Select to set 24-hour formats Use the Language & Input settings to select the language for the text on your phone and for configuring the onscreen keyboard, including words that you’ve added to its dictionary. 44 P on or off. Choose Date format: Select from a variety of formats. You can view the model number and version information for your phone. Scheduled power on &off You can set your phone to automatically Power On or to Power Off up to scheduled times. Developer options If you're an application developer, you may be more concerned about this part of the set. About phone View your phone Status. This screen lists a variety of information, including your phone number, the network you are currently using, the type of network, signal strength, roaming status, any Wi-Fi addresses you’re connected to, and more. Select Legal information for copyright and licensing information, as well as the Google Terms of Service for the Google applications on your phone. 45 P 18 Sound recorder The sound recorder is a simple recording tool that provides all of the required functionalities for you to manage voice files. To start recording 1. In any mode, press Home Key, touch the application tab and then touch Sound Recorder. 2. 3. Touch button to start recording. During the recording, you can pause the voice recording anytime by touching button . Then choose to save the recording file to File Manager in the condition that your SD card is inserted. 4. press to play. To exit sound recorder, you can press Back Key . 46 P 19 Troubleshooting Common issue Bad connection After sound or cacophony Idle time becomes short Cause reason Using mobile phone in an area where the network connection is not good, such as around a tower or basement, and radio wave cannot be sent effectively. Using mobile phone when network is busy, such as an on-off duty time, line busy. Related to the distance of the send basis of the network. It is caused by network connection and it’s a regional problem. Network connection is not good in some areas. Idle time is related to network settings. Shooting way Try to avoid. Try to avoid. Ask your operator to provide a map of your service area. Hang up and redial the number. If the mobile phone is in the area where the network connection is not good, please temporarily shut off your phone. 47 P Cannot switch on Wrong SIM card When you cannot receive signals, your mobile phone will continue to send to find a basis. A lot of battery power is used, so as to limit idle time. Battery is drained. SIM card is damaged. SIM card is not inserted properly. Dirt on metal side of SIM card. Cannot connect to network Cannot call Wrong PIN code Cannot charge Please move to an area where signal is strong or temporarily turn off your phone. Check battery volume or charge battery. Contact your operator. Make sure SIM card is inserted properly. Wipe metal point of SIM card with a clean cloth. SIM card is unusable Contact your operator. Out of GSM service area. Feeble signal. Request service area to operator. Please move to an area where signal is stronger and try again. Cancel call barring Cancel fix dialing Contact your operator. Change charging environment. Activate call barring Activate fix dialing Enter the wrong PIN code three times. Charge in area where the temperature is lower than 0℃ or higher than 40℃. 48 P Bad connection Cannot add contact Cannot set some functions Check the connection between the phone and the charger. Delete some contacts. Contacts memory is full. Operator does not support the function or you have not applied the function. Contact your operator. 49 P 20 Safety Information Notices even fire; also prevent the phone and AC adapter from overheating, smoking or short circuiting. Do not use the phone around volatile oil. This may cause fire or damage. To avoid any damage, do not disassemble the phone, battery, charger or internal components by yourself. and Using the Cell Phone and Charger Danger: Only use the battery and charger approved by the manufacturer. Using other brands may cause battery leakage, overheating, explosion or even fire. Caution: Keep the phone away from dust, water and damp areas. Dust, water or other liquids may cause overheating, electrical leakage, and/or phone failure. The phone, battery, charger and AC adapter are not waterproof. Keep them away from liquid. Warning: Do not bump, shake or tamper with the phone or charger. This may cause battery leakage, overheating, explosion or even fire. Do not place the battery, phone or charger near a microwave or high-voltage device. This may cause battery leakage, overheating, explosion or Using the Cell Phone Warning: Do not use the phone while you are driving. Pull over and stop your automobile to dial or listen to a phone call. Usage of cell phones in aircrafts or in hospitals is prohibited. Switch the phone off to prevent interference with electronic medical devices. Follow any rules or regulations in such places. Do not use the phone at a gas station, near fuel or near chemicals. Do not use the phone near electronic medical devices such as hearing aids, pacemakers and auto-control devices such as fire detectors and automatic doors. If you have to use your cell phone near an 50 PA electronic medical device such as a pacemaker, please contact your manufacturer or dealer for information about preventing interference. Caution: Electronic systems in automobiles such as anti-lock brakes, speed control, or fuel spraying systems, are usually not influenced by wireless devices. Manufacturers of these systems will tell you whether they are provided with good screening functions. If you suspect that an automobile failure is caused by a wireless wave, please contact your automobile dealer. Avoid using your phone in crowded places. Do not store your mobile phone near, or together with, a credit card, disk or other magnetic materials. This may effect information stored on your phone. Keep your phone away from pins. Pins can be absorbed by the phone’s receiver magnet, which may cause harm. If you have difficulties installing the battery, do not force the installation. This may cause battery leakage, overheating, explosion or even fire. Keep metal objects away so they don’t come in contact with the battery or its connectors as it may cause the battery to short circuit, overheat or explode. Do not weld the polarities of the battery directly together. This may cause battery leakage, overheating, explosion or even fire. Battery liquid is severely harmful for your eyes. If battery liquid gets in your eyes, do not rub them. Instead, wash your eyes with water first and then go directly to a doctor for help. Do not use or store your phone in high temperature areas. This may cause battery leakage, overheating, explosion or even fire. Warning: If battery liquid leaks onto your skin or clothes, immediately wash the affected parts with water. If the battery begins to leak or emits a strange odor, properly dispose of the battery according to local Using the Battery Danger: Do not dispose of the battery into a fire. Doing so may cause battery explosion or even fire. 51 PA regulations. Do not throw it into a fire. Caution: Do not leave the product or its battery inside a vehicle or in places where the temperature may exceed 60°C (140°F), such as on a car dashboard, window sill, or behind a glass that is exposed to direct sunlight or strong ultraviolet light for extended periods of time. This may damage the product, overheat the battery, or pose a risk to the vehicle. If liquid does spill onto the charger, immediately unplug the power cable to prevent overheating, fire or another type of break. Do not use the charger in places with high humidity like a bathroom. This may cause a fire. Do not touch the charger, power cable or socket with wet hands. This may cause an electric shock. Caution: Keep the environment temperatures within the range of 0ºC ~40ºC while charging. Temperature below 0ºC or higher than 40ºC will cause insufficient charging, terminate charging or even cause the battery to explode. Unplug the charger from its power source before cleaning it. Do not place heavy objects on the power cord. This may cause electric shock or fire. Hold the plug while unplugging the power cord; this will avoid any potential damage or even fire. Using the Charger Danger: Only use the charger that came with the phone. Using a different charger may cause the phone to break or an explosion. If the charger short circuits or breaks, a fire may occur. Do not use a damaged, worn or broken charger. This may cause a fire. Clean dust away from the power socket to avoid the possibility of a fire. Do not store the charger near any liquids. If liquids spill onto the charger it may cause it to overheat or break, Requirements for Cell Phone Avoid using your mobile phone in extremely high or low temperature. Use the phone in a temperature range from -10~55℃and humidity of 35%~85%. 52 PA It is recommended that you do not use your mobile phone near a telephone, TV set, radio or other radio frequency sensitive devices. liquids on the phone, battery or charger. Use a soft cloth to clean the mobile phone, the battery and the charger. Do not use alcohol, diluted liquid or benzene to clean the mobile phone. If dust gets in the sockets the phone can be damaged, short-circuit or even the lose the ability to be re-charged. Be sure to clean the socket regularly. Requirements for the Battery When not in use, store the battery in a cool, well-ventilated place with sunshine. If you won’t be using the cell phone for an extended period of time, charge the battery on a regular basis to avoid battery breakdown. Requirements for the Charger and AC Adapter Do not charge your phone under the following circumstances: sunshine, temperatures equal to or lower than 0ºC, temperatures equal to or higher than 40ºC, high humidity, dust, high vibration areas, or near a TV, a radio, etc. Service center number No: +919560394002 Kindly note please send area code of place through SMS to this No. and in return you will get Cleaning and Maintenance address of service center nearest to you by SMS. The mobile phone, the battery and the charger are not waterproof. Do not use them in places with high humidity like a bathroom and also avoid spilling any 53 PA LAVA WARRANTY CERTIFICATE You shall have to coverage or benefits under this warranty in the event that any of the following Limited warranty: conditions are applicable: The product has been subjected to abnormal use LAVA international Ltd. (LAVA) provides limited warranty for your mobile phone and original or conditions, improper storage, exposure to accessories delivered with your mobile phone excessive moisture or dampness, exposure to (hereinafter referred to as “product”) excessive temperature, unauthorized modification, The warranty period for the transceiver is one (1) unauthorized repair (including but not limited to use year and for battery, charger and headset is six (6) of unauthorized spare parts in repairs),abuse, months from the date of purchase. accidents, Acts of God, spills of food or liquids, improper installation LAVA warranty You have not notified Lava of the defect in the product during the applicable warranty period. Subject to the conditions of this Limited Warranty, The product serial no. code or the accessories LAVA warrants a product to be free from defects in design, material and workmanship at the time of its date code has been removed, defaced or altered. original purchase by you, and for a subsequent The product has been used with or connected to period of one (1) year for transceiver and six (6) an accessory (i) Not supplied by Lava or its months for battery & charger. affiliates, (ii) Not fit for use with the product or (iii) Used otherwise than in manner intended. The seals of the product’s battery enclosure have 54 PA been broken or shown evidence of tempering or the In case Lava product needs service, please visit product’s battery has been used in equipment other the nearest Lava service centers given in the than that for which it has been specified usable by service guide. Please visit our Website LAVA. www.lavamobiles.com for updated list of Authorized All plastic surfaces and all other externally Service Centers near to your location. exposed part that is scratched or damaged due to normal use. Important note: for your warranty to be valid, all information on the warranty certificate has to be completed including the stamp from the authorized To get maximum of your new product, we distributor/retailer. recommend you to: Read the guidelines for safe and efficient use as mentioned in the manual. Read the terms and conditions of your Lava warranty in the manual. Keep your original receipt; you will need it for warranty services if asked to produce. Present this Lava Warranty Certificate along with original proof of purchase whenever you require any warranty services. 55 PA All warranty information, product features and specifications are subject to change without notice. IMEI No.………………………………………… Dealers Stamp…………………………………… Date of purchase Model ………………………………… No. ………………………………… 56 PA