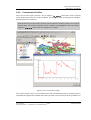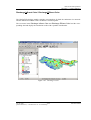
1
http://intevation.net
GREAT-ER
GREAT-ER Desktop Manual
Geo-referenced Regional Exposure Assessment Tool for European Rivers
Intevation GmbH
Georgstrasse 4
D-49074 Osnabrück
Germany
Date: July 28, 2003
GREAT-ER desktop Manual
This document has been designed with LATEX. It is available as source code, PDF- and HTMLformat.
Version: 1.0.0
Date: July 28, 2003
Authors: Jan-Oliver Wagner Frank Koormann
Related documents:
Thuban Manual,
Intevation GmbH, 2003
GREAT-ER II Installation Manual,
TechniData AG, 2003
GREAT-ER II Administration,
TechniData AG, 2003
Copyright (c) 2002, 2003 Intevation GmbH.
Permission is granted to copy, distribute and/or modify this document under the terms of the GNU
Free Documentation License, Version 1.2 or any later version published by the Free Software
Foundation; with no Invariant Sections, no Front-Cover Texts, and no Back-Cover Texts. A copy
of the license is included in the section entitled “GNU Free Documentation License”.
Intevation GmbH
2/95
July 28, 2003
greater-manual.tex,v 1.38 2003/10/01 11:37:03 frank Exp
GREAT-ER desktop Manual
Contents
Contents
1. Installation
1.1. Requirements . . . . . . . . . . . . . . . . . . . . . . . . . . . . . . . . . . . .
1.2. Installation without installer package . . . . . . . . . . . . . . . . . . . . . . . .
2. Tutorial
2.1. Basic Concepts . . . . . . . .
2.1.1. Session Concept . . .
2.1.2. Model system . . . . .
2.1.3. Parameter handling . .
2.1.4. GIS Functionality . . .
2.2. Starting GREAT-ER desktop .
2.3. Authentication . . . . . . . . .
2.4. Setting up a session . . . . . .
2.4.1. Creating a new session
2.4.2. Needed inputs . . . . .
2.4.3. Editing substance data
2.4.4. Editing catchment data
2.5. Environmental Data . . . . . .
2.6. Running a simulation . . . . .
2.6.1. Missing Parameters . .
2.6.2. Start a Simulation . . .
2.7. Saving a session . . . . . . . .
2.8. Analyzing model results . . .
2.8.1. Background data . . .
2.8.2. PEC Calculations . . .
2.8.3. Risk Analysis . . . . .
2.8.4. Mass Flux . . . . . . .
2.8.5. Concentration Profiles
.
.
.
.
.
.
.
.
.
.
.
.
.
.
.
.
.
.
.
.
.
.
.
.
.
.
.
.
.
.
.
.
.
.
.
.
.
.
.
.
.
.
.
.
.
.
.
.
.
.
.
.
.
.
.
.
.
.
.
.
.
.
.
.
.
.
.
.
.
.
.
.
.
.
.
.
.
.
.
.
.
.
.
.
.
.
.
.
.
.
.
.
.
.
.
.
.
.
.
.
.
.
.
.
.
.
.
.
.
.
.
.
.
.
.
3. User Interface
July 28, 2003
3/95
greater-manual.tex,v 1.38 2003/10/01 11:37:03 frank Exp
.
.
.
.
.
.
.
.
.
.
.
.
.
.
.
.
.
.
.
.
.
.
.
.
.
.
.
.
.
.
.
.
.
.
.
.
.
.
.
.
.
.
.
.
.
.
.
.
.
.
.
.
.
.
.
.
.
.
.
.
.
.
.
.
.
.
.
.
.
.
.
.
.
.
.
.
.
.
.
.
.
.
.
.
.
.
.
.
.
.
.
.
.
.
.
.
.
.
.
.
.
.
.
.
.
.
.
.
.
.
.
.
.
.
.
.
.
.
.
.
.
.
.
.
.
.
.
.
.
.
.
.
.
.
.
.
.
.
.
.
.
.
.
.
.
.
.
.
.
.
.
.
.
.
.
.
.
.
.
.
.
.
.
.
.
.
.
.
.
.
.
.
.
.
.
.
.
.
.
.
.
.
.
.
.
.
.
.
.
.
.
.
.
.
.
.
.
.
.
.
.
.
.
.
.
.
.
.
.
.
.
.
.
.
.
.
.
.
.
.
.
.
.
.
.
.
.
.
.
.
.
.
.
.
.
.
.
.
.
.
.
.
.
.
.
.
.
.
.
.
.
.
.
.
.
.
.
.
.
.
.
.
.
.
.
.
.
.
.
.
.
.
.
.
.
.
.
.
.
.
.
.
.
.
.
.
.
.
.
.
.
.
.
.
.
.
.
.
.
.
.
.
.
.
.
.
.
.
.
.
.
.
.
.
.
.
.
.
.
.
.
.
.
.
.
.
.
.
.
.
.
.
.
.
.
.
.
.
.
.
.
.
.
.
.
.
.
.
.
.
.
.
.
.
.
.
.
.
.
.
.
.
.
.
.
.
.
.
.
.
.
.
.
.
.
.
.
.
.
.
.
.
.
.
.
.
.
.
.
.
.
.
.
.
.
.
.
.
.
.
.
.
.
.
.
.
.
.
.
.
.
.
.
.
.
.
.
.
.
.
.
.
.
.
.
.
.
.
.
.
.
.
.
.
.
.
.
.
.
.
.
.
.
.
.
.
.
.
.
.
.
.
.
.
.
.
.
.
.
.
.
.
.
.
.
.
.
.
.
.
.
.
.
.
.
.
.
.
.
.
.
.
.
.
.
.
.
.
.
.
.
.
.
.
.
.
.
.
.
.
.
.
.
.
.
.
7
7
8
9
10
10
11
11
12
12
13
14
14
16
17
20
22
22
24
27
29
30
30
32
35
36
37
41
Intevation GmbH
GREAT-ER desktop Manual
Contents
3.1. Main Window . . . . . . . . .
3.1.1. Title Bar . . . . . . .
3.1.2. Menu Bar . . . . . . .
3.1.3. Tool Bar . . . . . . .
3.1.4. Map . . . . . . . . . .
3.1.5. Legend . . . . . . . .
3.1.6. Status Bar . . . . . . .
3.2. Menu File . . . . . . . . . . .
3.2.1. Authenticate . . . . .
3.2.2. Disconnect . . . . . .
3.2.3. New Session . . . . .
3.2.4. Open Session . . . . .
3.2.5. Edit Session . . . . .
3.2.6. Save Session . . . . .
3.2.7. Save Session As . . .
3.2.8. Close Session . . . . .
3.2.9. Delete Session . . . .
3.2.10. Exit . . . . . . . . . .
3.3. Menu Substance . . . . . . . .
3.3.1. New . . . . . . . . . .
3.3.2. Open . . . . . . . . .
3.3.3. Edit . . . . . . . . . .
3.3.4. Save As . . . . . . . .
3.3.5. Delete . . . . . . . . .
3.4. Menu Catchment . . . . . . .
3.4.1. Select . . . . . . . . .
3.4.2. Edit Emission Data . .
3.4.3. Edit Discharge Data .
3.5. Menu Environment . . . . . .
3.5.1. New . . . . . . . . . .
3.5.2. Open . . . . . . . . .
3.5.3. Edit . . . . . . . . . .
3.5.4. Save As . . . . . . . .
3.5.5. Delete . . . . . . . . .
3.6. Menu Simulation . . . . . . .
3.6.1. Edit Model Parameters
3.6.2. Missing Parameters? .
Intevation GmbH
.
.
.
.
.
.
.
.
.
.
.
.
.
.
.
.
.
.
.
.
.
.
.
.
.
.
.
.
.
.
.
.
.
.
.
.
.
.
.
.
.
.
.
.
.
.
.
.
.
.
.
.
.
.
.
.
.
.
.
.
.
.
.
.
.
.
.
.
.
.
.
.
.
.
.
.
.
.
.
.
.
.
.
.
.
.
.
.
.
.
.
.
.
.
.
.
.
.
.
.
.
.
.
.
.
.
.
.
.
.
.
.
.
.
.
.
.
.
.
.
.
.
.
.
.
.
.
.
.
.
.
.
.
.
.
.
.
.
.
.
.
.
.
.
.
.
.
.
.
.
.
.
.
.
.
.
.
.
.
.
.
.
.
.
.
.
.
.
.
.
.
.
.
.
.
.
.
.
.
.
.
.
.
.
.
.
.
.
.
.
.
.
.
.
.
.
.
.
.
.
.
.
.
.
.
.
.
.
.
.
.
.
.
.
.
.
.
.
.
.
.
.
.
.
.
.
.
.
.
.
.
.
.
.
.
.
.
.
.
.
.
.
.
.
.
.
.
.
.
.
.
.
.
.
.
.
.
.
.
.
.
.
.
.
.
.
.
.
.
.
.
.
.
.
.
.
.
.
.
.
.
.
.
.
.
.
.
.
.
.
.
.
.
.
.
.
.
.
.
.
.
.
.
.
.
.
.
.
.
.
.
.
.
.
.
.
.
.
.
.
.
.
.
.
.
.
.
.
.
.
.
.
.
.
.
.
.
.
.
.
.
.
.
.
.
.
.
.
.
.
.
.
.
.
.
.
.
.
.
.
.
.
.
.
.
.
.
.
.
.
.
.
.
.
.
.
.
.
.
.
.
.
.
.
.
.
.
.
.
.
.
.
.
.
.
.
.
.
.
.
.
.
.
.
.
.
.
.
.
.
.
.
.
.
.
.
.
.
.
.
.
.
.
.
.
.
.
.
.
.
.
.
.
.
.
.
.
.
.
.
.
.
.
.
.
.
.
.
.
.
.
.
.
.
.
.
.
.
.
.
.
.
.
.
.
.
.
.
.
.
.
.
.
.
.
.
.
.
.
.
.
.
.
.
.
.
.
.
.
.
.
.
.
.
.
.
.
.
.
.
.
.
.
.
.
.
.
.
.
.
.
.
.
.
.
.
.
.
.
.
.
.
.
.
.
.
.
.
.
.
.
.
.
.
.
.
.
.
.
.
.
.
.
.
.
.
.
.
.
.
.
.
.
.
.
.
.
.
.
.
.
.
.
.
.
.
.
.
.
.
.
.
.
.
.
.
.
.
.
.
.
.
.
.
.
.
.
.
.
.
.
.
.
.
.
.
.
.
.
.
.
.
.
.
.
.
.
.
.
.
.
.
.
.
.
.
.
.
.
.
.
.
.
.
.
.
.
.
.
.
.
.
.
.
.
.
.
.
.
.
.
.
.
.
.
.
.
.
.
.
.
.
.
.
.
.
.
.
.
.
.
.
.
.
.
.
.
.
.
.
.
.
.
.
.
.
.
.
.
.
.
.
.
.
.
.
.
.
.
.
.
.
.
.
.
.
.
.
.
.
.
.
.
.
.
.
.
.
.
.
.
.
.
.
.
.
.
.
.
.
.
.
.
.
.
.
.
.
.
.
.
.
.
.
.
.
.
.
.
.
.
.
.
.
.
.
.
.
.
.
.
.
.
.
.
.
.
.
.
.
.
.
.
.
.
.
.
.
.
.
.
.
.
.
.
.
.
.
.
.
.
.
.
.
.
.
.
.
.
.
.
.
.
.
.
.
.
.
.
.
.
.
.
.
.
.
.
.
.
.
.
.
.
.
.
.
.
.
.
.
.
.
.
.
.
.
.
.
.
.
.
.
.
.
.
.
.
.
.
.
.
.
.
.
.
.
.
.
.
.
.
.
.
.
.
.
.
.
.
.
.
.
.
.
.
.
.
.
.
.
.
.
.
.
.
.
.
.
.
.
.
.
.
.
.
.
.
.
.
.
.
.
.
.
.
.
.
.
.
.
.
.
.
.
.
.
.
.
.
.
.
.
.
.
.
.
.
.
.
.
.
.
.
.
.
.
.
.
.
.
.
.
.
.
.
.
.
.
.
.
.
.
.
.
.
.
.
.
.
.
.
.
.
.
.
.
.
.
.
.
.
.
.
.
.
.
.
.
.
.
.
.
.
.
.
.
.
.
.
.
.
.
.
.
.
.
.
.
.
.
.
.
.
.
.
.
.
.
.
41
42
42
42
42
42
42
43
43
43
43
43
45
45
46
46
46
46
47
47
47
48
52
53
53
53
54
55
57
57
57
58
61
62
63
63
66
4/95
July 28, 2003
greater-manual.tex,v 1.38 2003/10/01 11:37:03 frank Exp
GREAT-ER desktop Manual
Contents
3.6.3. Start . . . . . . . . . . . . . . . . . .
3.6.4. Select Simulation Server . . . . . . .
3.7. Menu Analysis . . . . . . . . . . . . . . . .
3.8. Menu Help . . . . . . . . . . . . . . . . . .
3.8.1. User Manual . . . . . . . . . . . . .
3.8.2. About . . . . . . . . . . . . . . . . .
3.9. Keyboard Shortcuts . . . . . . . . . . . . . .
3.9.1. General Windows Keyboard Shortcuts
3.9.2. Dialog Box Keyboard Shortcuts . . .
A. SciParam GUI
A.1. Feature List . . . . . . . . . .
A.2. Screenshots . . . . . . . . . .
A.2.1. Dialog . . . . . . . . .
A.2.2. Notebook . . . . . . .
A.2.3. Detailed Information .
A.2.4. Required Parameters .
A.2.5. Usual Ranges . . . . .
A.2.6. Valid Ranges . . . . .
A.2.7. Distributed Parameters
A.2.8. Choice Parameters . .
A.2.9. Grouped Parameters .
.
.
.
.
.
.
.
.
.
.
.
.
.
.
.
.
.
.
.
.
.
.
.
.
.
.
.
.
.
.
.
.
.
.
.
.
.
.
.
.
.
.
.
.
.
.
.
.
.
.
.
.
.
.
.
.
.
.
.
.
.
.
.
.
.
.
.
.
.
.
.
.
.
.
.
.
.
.
.
.
.
.
.
.
.
.
.
.
.
.
.
.
.
.
.
.
.
.
.
.
.
.
.
.
.
.
.
.
.
.
.
.
.
.
.
.
.
.
.
.
.
.
.
.
.
.
.
.
.
.
.
.
.
.
.
.
.
.
.
.
.
.
.
.
.
.
.
.
.
.
.
.
.
.
.
.
.
.
.
.
.
.
.
.
.
.
.
.
.
.
.
.
.
.
.
.
.
.
.
.
.
.
.
.
.
.
.
.
.
.
.
.
.
.
.
.
.
.
.
.
.
.
.
.
.
.
.
.
.
.
.
.
.
.
.
.
.
.
.
.
.
.
.
.
.
.
.
.
.
.
.
.
.
.
.
.
.
.
.
.
.
.
.
.
.
.
.
.
.
.
.
.
.
.
.
.
.
.
.
.
.
.
.
.
.
.
.
.
.
.
.
.
.
.
.
.
.
.
.
.
.
.
.
.
.
.
.
.
.
.
.
.
.
.
.
.
.
.
.
.
.
.
.
.
.
.
.
.
.
.
.
.
.
.
.
.
.
.
.
.
.
.
.
.
.
.
.
.
.
.
.
.
.
.
.
.
.
.
.
.
.
.
.
.
.
.
.
.
.
.
.
.
.
.
.
.
.
.
.
.
.
.
.
.
.
.
.
.
.
.
.
.
.
.
.
.
.
.
.
.
.
.
.
.
.
.
.
.
.
.
.
.
.
.
.
.
.
.
.
.
.
.
.
.
.
.
.
.
.
.
.
.
.
.
.
.
.
.
.
.
.
.
.
.
.
.
.
.
.
.
.
.
.
.
.
.
.
.
.
.
.
.
.
.
.
.
.
.
.
.
.
.
.
.
.
.
.
66
67
68
76
76
76
76
76
76
.
.
.
.
.
.
.
.
.
.
.
77
77
78
78
79
80
80
80
81
82
82
82
B. GNU Free Documentation License
85
C. References
93
D. Errors
95
July 28, 2003
5/95
greater-manual.tex,v 1.38 2003/10/01 11:37:03 frank Exp
Intevation GmbH
GREAT-ER desktop Manual
Contents
Intevation GmbH
6/95
July 28, 2003
greater-manual.tex,v 1.38 2003/10/01 11:37:03 frank Exp
GREAT-ER desktop Manual
CHAPTER 1. INSTALLATION
1. Installation
For the installation of GREAT-ER desktop under Microsoft Windows an installer is provided performing all required steps. Please refer to the GREAT-ER II Installation Manual
for details.
The section below lists the requirements for GREAT-ER desktop if you want to install it on other
platforms like GNU/Linux.
1.1.
Requirements
GREAT-ER desktop is implemented in Python and makes use of various Free Software addons to this programming language. See the README files of the packages GREAT-ER, GREATERModel, GREAT-ER-DB, dagreater and Thuban for details. In conclusion required are:
Python1 (version 2.2.1 or higher)
wxPython2 (version 2.4.0 or higher, this implies a wxWindows of the same version)
SQLite3 (version 2.8)
SQLite Python bindings4 (version 0.4.1)
proj5 (version 4.4)
Python Numeric Package6 (version 23.0)
Python Imaging Library7 (PIL, version 1.14)
ReportLab8 (version 1.17)
Twisted9 (version 1.0.0)
Oracle 8.x client libraries.
1
http://www.python.org
http://www.wxpython.org
3
http://www.hwaci.com/sw/sqlite/
4
http://pysqlite.sourceforge.net/
5
http://www.remotesensing.org/proj/
6
http://numpy.sourceforge.net
7
http://www.pythonware.com/products/pil/
8
http://reportlab.sourceforge.net/
9
http://twistedmatrix.com/
2
July 28, 2003
7/95
greater-manual.tex,v 1.38 2003/10/01 11:37:03 frank Exp
Intevation GmbH
GREAT-ER desktop Manual
CHAPTER 1. INSTALLATION
1.2.
Installation without installer package
1. Install Thuban so that the thubaninit module is on Python’s module path. One way to do that
is to use the python setup.py install local command to build Thuban and to add
the directory containing the Thuban sources to the PYTHONPATH environment variable.
2. Put the packages GREAT-ER-DB, GREAT-ERModel and GREAT-ER into the same directory.
3. Build GREAT-ER-DB (see GREAT-ER-DB/README for details).
Intevation GmbH
8/95
July 28, 2003
greater-manual.tex,v 1.38 2003/10/01 11:37:03 frank Exp
GREAT-ER desktop Manual
CHAPTER 2. TUTORIAL
2. Tutorial
The essential steps to run a first simulation to get an impression of GREAT-ER desktop are
printed within a gray shaded box (like this one). They represent the minimum contents of the
tutorial.
The complete tutorial chapter can be seen as a guided tour through all the main features of
GREAT-ER desktop.
Finally, Chapter 3 serves as a reference manual and provides a complete overview of GREATER desktop features.
Start GREAT−ER II
Create a new Session
Specify a Scenario Name
Specify Substance and Catchment
Specify Environmental Parameters
Specify Simulation Parameters
Run a simulation
Save the Session
Display/Analyse Results
Spatial Distribution
Background Data/Monitoring Data
PEC Calculations
Risk Analysis
Mass Flux Analysis
Concentration Profiles
Figure 2.1: GREAT-ER desktop Session Work-flow
July 28, 2003
9/95
greater-tutorial.tex,v 1.2 2003/07/23 15:50:04 frank Exp
Intevation GmbH
GREAT-ER desktop Manual
CHAPTER 2. TUTORIAL
2.1.
Basic Concepts
2.1.1.
Session Concept
The collection of data needed to perform a simulation (and available simulation results) is called
a ”session”.
Sessions can be stored and loaded and thus offer the quick retrieval of a certain situation. A unique
title for a session is not mandatory but helpful to assist the search of a specific session in a long
list.
Additionally, sessions form the basis of the exchange of complete simulation data sets (see GREATER II Administration, Section Data Exchange).
A session consists of the following data:
1. Title: A significant name for the session.
2. Comment: The comment can more detailed describe the contents and meaning of the session.
3. Catchment ID: The ID (name) of the catchment (e.g. Aire). The catchment data themselves
are not part of a session. Such data (e.g. river network) are fixed and cannot be edited.
4. Substance: The whole substance data set is stored within a session. It is possible to edit and
’play around’ with substance properties to see the effect of the simulation results. This does
not affect the carefully collected substances of the substance database. On the other hand
the session is not affected by changes of data sets in the database which can lead to unrelated
input and result data. However, substance data sets can also be stored as ”templates” into
the database to share a set with other users.
5. Release Data: Although the positions and number of discharge sites within a catchment are
not editable, the attributes of the discharge sites can be modified. For this the set of attributes
is stored with the session. In contrary to the substance database, modified data sets can not
be written back to the GREAT-ER desktop catchment database.
6. Environmental Data A numerous group of parameters (of the higher model modes) is
neither substance nor catchment specific. These are stored as environmental data. A default
set is automatically loaded on creation of a new session and stored with the session. Similar
to the substance data environmental data sets can be stored as ”templates”.
7. Model Parameter: The complete model parameter data set needed by the GREAT-ER
desktop model is stored within a session.
8. Modification Information: Tracks if any element of the session has been changed since the
last save and hence the session is different to the session in the database with the same title.
If results are available for the session it is also tracked if the results are in sync with the
input parameters. When a session is saved after some modifications it still can be necessary
to run a simulation to harmonize input data and results.
Intevation GmbH
10/95
July 28, 2003
greater-tutorial.tex,v 1.2 2003/07/23 15:50:04 frank Exp
GREAT-ER desktop Manual
CHAPTER 2. TUTORIAL
Both informations are displayed in the session’s window status bar (see below).
9. Results: If available, simulation results are stored with the session. This covers as well
analysis results like the PEC values or percentiles.
10. Privileges: The GREAT-ER desktop database provides a fine grained concept of privileges
on data access which: The concept distinguishes owner of the data, the group the owner
belongs to and all users. For each of the categories the owner can set read and write access
selectively.
The most important data of a session are collected in the title bar of the corresponding view
window. This makes the title, catchment ID and substance ID permanently visible helps to identify
the session in a window list.
2.1.2.
Model system
The current version of GREAT-ER desktop comes with a model system covering four sub-models:
emission, sewer, treatment plant and river. There are up to three complexity modes for each of this
sub-models: in the simplest model’s modes only first-order elimination rates are considered, higher
model modes regard elimination processes related to solved or sorbed fractions in various degrees
of detail.
All of the sub-models are deterministic in principle. Using the Monte-Carlo method set on top of
these models, GREAT-ER desktop drives a stochastic approach and model results are returned as
distributions of concentrations. GREAT-ER desktop delivers results for all considered geographic
objects: sewers (i.e. the influent of a treatment plant), all treatment plants (effluent) and all river
stretches within the catchment under investigation. See the model description for more details.
Model results are displayed by coloring river stretches on a map, or as concentration profiles
through a river. GREAT-ER desktop provides users with several options to analyze the results
and to derive further values from them. For further details see below in the tutorial and menu
description.
2.1.3.
Parameter handling
Depending on the selected models, a various amount of parameters are required to run a simulation. These parameters are sorted according to their relation (to a substance, catchment or model).
GREAT-ER desktop provides several dialogs to enter or modify the parameters.
GREAT-ER desktop aids users to enter the parameters required according to the selected model’s
complexity modes with an identifier in the input dialogs and a tool to check for missing parameters.
Both are explained in detail below.
GREAT-ER desktop is delivered with an expert knowledge data base on the parameters to avoid
wrong data entries: Values are compared against two ranges: a warning range and an error range.
The warning range specifies the usual range of a parameter. If an entry exceeds the parameter
warning range, a dialog will point out this possible mistake. Nevertheless, it is possible to run
July 28, 2003
11/95
greater-tutorial.tex,v 1.2 2003/07/23 15:50:04 frank Exp
Intevation GmbH
GREAT-ER desktop Manual
CHAPTER 2. TUTORIAL
a simulation with such settings. Values exceeding a warning range are marked with a yellow
background.
In contrast, the error range defines the logical range of a parameter. Values outside this range are
impossible and will lead to errors. If a entry exceeds the error range it is not possible to leave the
dialog (other than canceling) until a value within the warning range has been entered. A dialog
will give a error message and hints on the logical range of the parameter. The parameter entry is
marked with a red background.
Finally, for better documentation and transparency of simulation results a separate comment can
be entered for each parameter. This comment should mention the data source and might contain
additional information on laboratory practices, etc.
2.1.4.
GIS Functionality
GREAT-ER desktop uses the Free Software GIS data viewer T HUBAN 1 as platform for the user
interface. Various features and analysis functions are available for use with GREAT-ER desktop.
Some are discussed below, for a complete overview see the T HUBAN Manual.
2.2.
Starting GREAT-ER desktop
Select the ”GREAT-ER II” icon from the GREAT-ER folder in the ”Start” menu.
After the start-up GREAT-ER desktop presents the initial screen.
Figure 2.2: GREAT-ER desktop - initial screen
1
http://thuban.intevation.org
Intevation GmbH
12/95
July 28, 2003
greater-tutorial.tex,v 1.2 2003/07/23 15:50:04 frank Exp
GREAT-ER desktop Manual
CHAPTER 2. TUTORIAL
The T HUBAN menu bar is replaced by a specific GREAT-ER desktop menu bar, the number of
buttons and tools reflects the set needed for GREAT-ER desktop. Please note that each menu
item (when highlighted) is explained briefly at the bottom left corner of the GREAT-ER desktop
window.
The menu items are ordered according to the usual work flow of a simulation session: initially you
have to create or select a session. The next step is to modify the data. Usually users will simulate a
specific substance with several catchments and may want to use more detailed models if the simple
ones identify issues. Hence the menu bar reflects this order of steps: Substance, Catchment,
Environment and Simulation. The following items enable you to analyze the simulation results
and offer various options to display accessory data or to modify the presentation of data based on
additional information.
The three menu items Map, Layer, Table provide access on the T HUBAN features with some
additional analysis functionality.
Menu items and tool buttons are enabled or disabled depending on the current settings and data
availability.
2.3.
Authentication
GREAT-ER desktop stores all data in an underlying database and provides a fine grained access
rights management: The system distinguishes between the owner of a data set, the group of users
the user belongs to and all users with access to the database. Read and write access can be granted
individually.
A user has to authenticate before the database is accessible and therewith GREAT-ER desktop is
usable.
Select File / Authenticate. In the dialog enter your user name and password for the (optional)
database.
If no database is specified, the user’s profile default database is used.
Figure 2.3: Authenticate Dialog
After successful authentication the model system is started automatically. The status bar identifies
this phase. Additional menu items are active to initially work on a session. The status bar displays
the user logged in and the group the user belongs to. If not the default, the selected database is
displayed as well.
July 28, 2003
13/95
greater-tutorial.tex,v 1.2 2003/07/23 15:50:04 frank Exp
Intevation GmbH
GREAT-ER desktop Manual
CHAPTER 2. TUTORIAL
2.4.
Setting up a session
The first menu of the GREAT-ER desktop user interface, called File, covers
all options to manage sessions: creating new or loading existing ones, saving
or deleting sessions. As usual for GUI applications, this menu also includes
the exit item.
2.4.1.
Creating a new session
To create a new session, select the corresponding New Session menu item from the File
menu. A new dialog appears:
Figure 2.4: New Session Dialog
To create a new session you have to specify a session name at this stage. The name is used to
identify the session in all further steps of GREAT-ER desktop application. Optionally, you can
select a substance and a catchment from related lists and enter a comment on the session to give
additional remarks. Finally the privileges for the session can be specified. The default value
considers the data as private, changes to the privileges should be done with care.
As an example, enter the name Tutorial Session and select the substance LAS with the
catchment Calder. Leave the dialog with ”OK”.
Intevation GmbH
14/95
July 28, 2003
greater-tutorial.tex,v 1.2 2003/07/23 15:50:04 frank Exp
GREAT-ER desktop Manual
CHAPTER 2. TUTORIAL
The GREAT-ER desktop user interface now changes:
Figure 2.5: Tutorial Session with Catchment Calder
The map now displays the Calder catchment with river network, discharge sites and catchment
boundary, as mentioned in the legend. The discharge-river layer results from the fact that sewage
treatment plants are situated at some distance from the discharged river. Usually the distance is
too small to be seen on the full catchment scale. The picture sites theme is a very special theme
which is only visible if photos are available to give users a better impression of the catchment.
These GREAT-ER desktop specific layers cannot be removed.
The title bar now gives some hints on the displayed data: The name of the session, the substance
and the catchment. The status bar warns users that there are unsaved changes.
July 28, 2003
15/95
greater-tutorial.tex,v 1.2 2003/07/23 15:50:04 frank Exp
Intevation GmbH
GREAT-ER desktop Manual
CHAPTER 2. TUTORIAL
You may play around with the display tools (identify, zoom, pan). The identify tool presents the
attributes of selected geographic objects.
Figure 2.6: Identify Tool Dialog
2.4.2.
Needed inputs
Having now created a new session you may use the settings and data loaded from the data bases
(by selecting substance and catchment) or modify them.
As mentioned above, GREAT-ER desktop provides several complexity modes for the various
models. Obviously, the amount of required data increases with the complexity mode of a model.
The GREAT-ER desktop user interface accentuates this by identifying parameter values within
the dialogs: Parameters marked with a cross are needed in the current model mode selection.
By default all sub-models (sewer, waste water treatment and river) are set to complexity mode
one. The parameters needed at this complexity level are initialized when creating a complete new
session. We step through the various dialogs to examine the GREAT-ER desktop functionality.
Intevation GmbH
16/95
July 28, 2003
greater-tutorial.tex,v 1.2 2003/07/23 15:50:04 frank Exp
GREAT-ER desktop Manual
CHAPTER 2. TUTORIAL
2.4.3.
Editing substance data
Having selected a substance within the session creation, the related data set is loaded from
the database. To view this, select Substance / Edit menu.
The appearing substance dialog covers all directly related substance data split
into eight categories. The dialog opens with the identification card. It is compulsory to give the substance a name; all other parameters which may ease
identification are optional. Only three further cards are relevant at the current
stage: WWTP removal, River removal and Emission data.
For each parameter editable in the GREAT-ER desktop dialogs a ”Details” box provides further
information on the meaning of the parameter, the type of parameter and potential warning and
error ranges. In the also a comment can be entered and if available a default can be set. Finally if
a parameter can be considered as distributed the distribution dialog can be raised.
Figure 2.7: Substance Dialog
As GREAT-ER desktop also considers three plant types in the easiest WWTP sub-model, the
related elimination rates have to be entered. All other parameters are related to higher model
July 28, 2003
17/95
greater-tutorial.tex,v 1.2 2003/07/23 15:50:04 frank Exp
Intevation GmbH
GREAT-ER desktop Manual
CHAPTER 2. TUTORIAL
modes. This also means that in-sewer removal is not considered in mode one. To work with insewer removal, set the sewer sub-model mode to mode two (related dialog is mentioned later in
this tutorial) and enter an elimination rate.
Please note that the plant types currently related to the treatment plant in the various catchments
delivered with GREAT-ER desktop always consider a primary settler as the first step in sewage
treatment. If you only have an overall elimination rate for a plant or one explicitly without a
primary settler, set the related rate to zero and enter the known elimination rate for the plant type
in question.
The WWTP removal card also gives hints on another fundamental GREAT-ER desktop concept
(if you have selected the sample LAS substance data set). As described in the briefly under the
basic concepts, the GREAT-ER desktop models perform a stochastic simulation set on top of a
deterministic model by the Monte-Carlo method. This covers the variations within the catchment’s
hydrological regime but also considers other parameters. I.e. for the selected parameter it is
possible to specify a distribution. This can be either normal, logarithmic normal or uniform.
Depending on the selected distribution a set of values has to be entered to describe the distribution.
These can be edited manually by the experienced users but it is recommended to use the distribution dialog which is invoked by the Edit Distribution button. Leaving the distribution dialog you
may recognize that distributions are coded by the descriptive values separated by a semicolon.
Intevation GmbH
18/95
July 28, 2003
greater-tutorial.tex,v 1.2 2003/07/23 15:50:04 frank Exp
GREAT-ER desktop Manual
CHAPTER 2. TUTORIAL
Figure 2.8: Distribution Dialog
The River removal card enables you to control the elimination processes within the river. Only an
aggregated first-order elimination rate is needed for the simplest river fate model.
The Emission data card enables you to specify a general household consumption value for the
substance. As the consumption values have to be related to both, a substance and a region, the
parameter entered in the substance data dialog is used as a general value. The Edit Emission
Data dialog discussed later in this tutorial enables you to specify consumption values for selected
discharge sites. These consumption values can not be considered as distributed.
Leaving the substance dialog, all substance settings for a first simulation run are made. If you
want to learn more about substance data management within GREAT-ER desktop please refer to
the User Interface description (chapter 3): The menu items invoke functions that are known from
various applications managing documents, with the difference that they do not work for the whole
data but for a subset of a session, the substance data.
July 28, 2003
19/95
greater-tutorial.tex,v 1.2 2003/07/23 15:50:04 frank Exp
Intevation GmbH
GREAT-ER desktop Manual
CHAPTER 2. TUTORIAL
2.4.4.
Editing catchment data
The catchment data consists mainly of spatial data sets which are not editable.
Data management functions are limited to the selection of a new catchment for
the current session and editing of selected attributes.
The main items of the catchment menu, Edit Emission Data and Edit Discharge-site Data, are
also managed by tools: After selection you can click on the map to choose the discharge site to be
edited.
Edit Emission Data
The emission data dialog enables you to specify site-specific consumption data. To cover industrial
sites, users can enter an additional input into the treatment plant. This input reflects discharges
resulting from the production processes and can be calculated from the production volume. Please
note that the calculation of the fraction of the production volume which will be released is not part
of GREAT-ER desktop but must be calculated manually by hand before. The input considered
here is the mass flow into the treatment plant in [kg/a]. Same as loads from usual consumption the
industrial input is processed by the treatment plant models.
Figure 2.9: Edit Emission Data Dialog
Intevation GmbH
20/95
July 28, 2003
greater-tutorial.tex,v 1.2 2003/07/23 15:50:04 frank Exp
GREAT-ER desktop Manual
CHAPTER 2. TUTORIAL
Edit Discharge Data
Similar to the emission data on the first view the discharge-site data dialog enables users to modify
the parameters for a specific treatment plant. I.e. where the emission data dialog lets users enter
site-specific data to overwrite the general information for selected discharge, the discharge-site
dialog enables users to work on a copy of the geo-referenced attribute tables.
This covers population, the elimination rate (used for complexity mode one), the treated fraction
of incoming sewage water (e.g. bypass or overflow) and in general the type of treatment plant.
Incoming water from separate ”sources” is considered : domestic input, non-domestic use (this
covers mainly industrial inputs) and run-off (e.g. from sealed areas). If only an overall value is
available for treatment plants this should be entered as domestic flow.
Please note that domestic flow is given in [liter / (capita day)], where non-domestic flow and
run-off are considered as [cubic meter / second].
Please note furthermore that it is possible to specify a distribution for a general elimination rate, but
not for a site-specific elimination rate. Nevertheless, it is possible to have a distributed elimination
rate for, e.g. activated sludge plants, and a fixed rate for a selected site.
Figure 2.10: Edit Discharge-Site Data Dialog
July 28, 2003
21/95
greater-tutorial.tex,v 1.2 2003/07/23 15:50:04 frank Exp
Intevation GmbH
GREAT-ER desktop Manual
CHAPTER 2. TUTORIAL
2.5.
Environmental Data
Not all parameters needed by the GREAT-ER desktop Models are related to
the substance or the geographic data. These are grouped under ”Environmental
Data” and cover some general data of the compartments under investigation
and some correlation data.
The menu provides management functionalities similar to the features under the substance menu.
Figure 2.11: Edit Environmental Data Dialog
2.6.
Running a simulation
We are now entering the Simulation menu. This menu covers a further dialog on entering
model specific parameters.
The Edit Model Parameters allows you to enter the number of Monte-Carlo
shots and an optional offset concentration and select the complexity modes for
the three sub-models: sewer, WWTP (activated sludge and trickling filter) and
river. A text field provides some hints on the available modes.
Intevation GmbH
22/95
July 28, 2003
greater-tutorial.tex,v 1.2 2003/07/23 15:50:04 frank Exp
GREAT-ER desktop Manual
CHAPTER 2. TUTORIAL
If you change complexity modes, it is usually necessary to go back to earlier data dialogs to enter
additional parameters. E.g. if you need in-sewer removal to be considered, you have to go back to
the substance data dialog to enter a removal rate for sewers (if not entered already). Please note
that in-sewer removal is the only higher model in which only one parameter has to be entered. All
other sub-models require a somewhat larger data set.
As mentioned earlier, GREAT-ER desktop uses the Monte-Carlo method to set a stochastic
approach on top of a deterministic model. The number of Monte-Carlo shots performed
during a simulation also has to be entered within the Edit Model Parameters dialog. For a
sample application take thousand shots.
Figure 2.12: Edit Model Parameters Dialog
Offset Concentrations are included to consider additional loads within the river network which
might be monitored upstream from the first known discharge. Note that the given value is used
as it is and is only added to the model results after the simulation. The offset concentration is not
considered within the elimination processes.
July 28, 2003
23/95
greater-tutorial.tex,v 1.2 2003/07/23 15:50:04 frank Exp
Intevation GmbH
GREAT-ER desktop Manual
CHAPTER 2. TUTORIAL
2.6.1.
Missing Parameters
GREAT-ER desktop supports the user with an enhanced framework to identify missing parameters according to the current model selection: A dialog lists all missing parameters and in the
parameter entry dialogs all required parameters are marked with a cross.
Change the river model to mode 2 (basic removal processes).
Figure 2.13: Model Parameters Dialog - River Model Selection
Intevation GmbH
24/95
July 28, 2003
greater-tutorial.tex,v 1.2 2003/07/23 15:50:04 frank Exp
GREAT-ER desktop Manual
CHAPTER 2. TUTORIAL
After editing the model selection the availability of data for the current model selection can
be check with Simulation / Missing Parameters? In case a list of missing parameters is
displayed, grouped by parameter type and dialog cards.
Figure 2.14: Missing Parameters Dialog
July 28, 2003
25/95
greater-tutorial.tex,v 1.2 2003/07/23 15:50:04 frank Exp
Intevation GmbH
GREAT-ER desktop Manual
CHAPTER 2. TUTORIAL
Open the Edit Substance Data dialog again (Substance / Edit) and select the card River
(Degradation),
(Sedimentation) and
Removal: Now the three removal rates
(Volatilization) are marked with a cross according to the new model selection.
Figure 2.15: Required Parameters River Model Mode 2 - River Removal
Please note that when selecting the card Phys. Chem. Properties the unknown value is
marked as required although it was not listed under the missing parameters. The reason is that the
river model includes an estimate function for the based on the . If neither main value nor
some parameters used in estimate functions is available, the main value is listed as missed. In turn,
if in our example the would be well defined, the would not be listed as missed.
Please refer to the model description for available estimate functions implemented in the various
models.
Change back the river model mode to mode 1 after trying the ”Missing Parameters” tool.
Intevation GmbH
26/95
July 28, 2003
greater-tutorial.tex,v 1.2 2003/07/23 15:50:04 frank Exp
GREAT-ER desktop Manual
CHAPTER 2. TUTORIAL
2.6.2.
Start a Simulation
You are now able to start a simulation. Select the Simulation / Start item. A new window
appears, displaying the progress of the simulation:
Figure 2.16: Running simulation on Calder catchment
A running simulation can be canceled pressing the Cancel button.
July 28, 2003
27/95
greater-tutorial.tex,v 1.2 2003/07/23 15:50:04 frank Exp
Intevation GmbH
GREAT-ER desktop Manual
CHAPTER 2. TUTORIAL
After the simulation has finished, the results will be displayed on the session’s map: The river
stretches on the session’s map will be colored depending on the model results. A new layer is
visible in the legend entitled Csim Mean [unit]. Csim stands for simulated concentration (in
contrast to monitored concentration), mean identifies that the mean value of the concentration
distribution per stretch, resulting from the Monte-Carlo method, is displayed. More specifi are displayed. Please refer to the model description
cally, the mean values of the C to learn more about the various result outputs of the GREAT-ER desktop model system.
Figure 2.17: Visualization of simulation results for the Calder catchment
Intevation GmbH
28/95
July 28, 2003
greater-tutorial.tex,v 1.2 2003/07/23 15:50:04 frank Exp
GREAT-ER desktop Manual
CHAPTER 2. TUTORIAL
2.7.
Saving a session
Before proceeding to analyze the model results it is advisable to return to the beginning, the
File menu, to save the session: select Save from the menu: all session settings and the model
results will be saved. The status bar modification information changes from ”modified” to
”unmodified”, which also identifies the successful saving.
The GREAT-ER desktop user interface provides users with two options to save session data: save
and save as.
Save writes all data from the current session to the database and lets you proceed with the
current session.
Save As works slightly differently. First you have to specify a new name for the session and
optionally enter a new comment and change privileges. Since sessions are mainly identified by
their names unique names are recommended. After saving, the new session is the current session.
Figure 2.18: Save As Dialog
July 28, 2003
29/95
greater-tutorial.tex,v 1.2 2003/07/23 15:50:04 frank Exp
Intevation GmbH
GREAT-ER desktop Manual
CHAPTER 2. TUTORIAL
2.8.
Analyzing model results
After having calculated the results of a model GREAT-ER desktop
provides you with various options to analyze the data: As GREATER desktop results are frequency distributions of concentrations for
river stretches you have the option to calculate percentiles. Additionally the menu provides you with features to modify the presentation
of results: either by classification or a color coded combination of
concentrations with flows. Since GREAT-ER desktop was designed
as a tool in the process of risk assessment, the main items of the
analysis are the functions to calculate PEC values (Predicted Environmental Concentration).
Please note that the GREAT-ER desktop analysis tools are designed
to analyze distributions of values. Although it is possible to run a
simulation with one Monte-Carlo shot probably the analysis functions will fail applied to this simulation results.
2.8.1.
Background data
The first analysis tool in the menu is visual and provides access on various background layers for
a better orientation.
Select Add Background Layers. A dialog is opened presenting all available background
data for the current catchment.
Choose ”Populated Places”, ”Railroads” and ”Roads” to be displayed and leave the dialog
with ”OK”.
Figure 2.19: Add Background Layers Dialog
Three new layers are added to the map displaying the UK populated places, railroads and
roads.
Intevation GmbH
30/95
July 28, 2003
greater-tutorial.tex,v 1.2 2003/07/23 15:50:04 frank Exp
GREAT-ER desktop Manual
CHAPTER 2. TUTORIAL
Figure 2.20: Calder Catchment with background data
The monitoring programs undertaken in the pilot areas of GREAT-ER 1.0 form an integral
part of the GREAT-ER project. The data obtained are stored as geo-referenced data (i.e.
monitoring sites with monitoring data as attributes) within the GREAT-ER desktop database.
To display these data select again Add Background Layers and choose ”River Monitoring”.
Again a new layer is added to the map (with grey circles). These represent the monitoring
sites, attributes can be obtained by the identify tool or by showing the layers attribute table.
Figure 2.21: Calder Catchment with monitoring data
July 28, 2003
31/95
greater-tutorial.tex,v 1.2 2003/07/23 15:50:04 frank Exp
Intevation GmbH
GREAT-ER desktop Manual
CHAPTER 2. TUTORIAL
2.8.2.
PEC Calculations
As GREAT-ER 1.0 introduced a novel method to estimate environmental concentrations (calculations are made on real-world data instead of large-scale generic data sets) with frequency distributions, the calculation of PEC values must be different from the known methods.
The methods the PEC values calculations of GREAT-ER desktop are based on published methods
(see Boeije et al, 1999). Not just one but a collection of values are provided to characterize the
and
different aspects of exposure in river catchments The are split into two categories: PEC
.
PEC
PEC
is the spatial aggregation of concentrations in the river directly after emission. This is
similar to PEC as defined in the EU Technical Guidance Documents, although its calculation
mean values, the mean is calculated for all stretches receiving
is different. Based on the C treated or untreated discharges:
C is the concentration at the beginning of river stretch , directly receiving treated or
untreated waste water emissions.
By definition, the PEC
is calculated on the base of the C mean values. Selecting
the item PECinitial the calculation starts.
A dialog displays the analysis results with some further information.
Figure 2.22: PEC
Intevation GmbH
32/95
calculation results
July 28, 2003
greater-tutorial.tex,v 1.2 2003/07/23 15:50:04 frank Exp
GREAT-ER desktop Manual
CHAPTER 2. TUTORIAL
PEC is the average of representative concentrations over the entire catchment. This is
a new concept for geo-referenced exposure assessment, although there is some analogy with the
in the EU Technical Guidance Documents.
PEC
(the
The ”most representative” value for the concentration in the stretch is taken as C average concentration for the stretch). However, different approaches could be used and in order
to demonstrate the effect of using different possible definitions, GREAT-ER desktop computes
different different PEC values. These values differ in the set of stretches selected for the
calculation and in the weighting of concentrations.
All PEC values are defined as the mean of the weighted concentrations of the selected
stretches. Possible selections are (A) all stretches within a catchment or (B) only polluted stretches.
Option (A) is more comparable to the current regional exposure assessment approach (unit world
models) in which all surface waters in a region are considered for the dilution of the chemical
mass loading. Clearly different, option (B) considers only the loaded river stretches. The intention
of this approach in the meaning of risk assessment is to focus on the river stretches potentially at
risk: the loaded stretches.
Both approaches have to deal with different issues concerning scale dependencies or data requirements. These items are discussed in the referred article.
1. Weighting by stretch volume for both stretch selections. The volume is calculated (assuming a rectangular cross section) by flow, flow velocity and length. The weighting method
focuses on large rivers and therefore on high dilution situations where exposure (and risk)
levels may be lower than the representative rate for the entire catchment.
2. Weighting by stretch length for both stretch selections. The interpretation of the weighting method is that stretches with equal length are of equal importance. Small rivers are
considered to be equally valuable as large rivers.
Methods 1 and 2 depend on the scale and detail of the underlying digital river network, and the
will be. Conmore (unpolluted) headwaters are included, the lower the aggregated PEC versely, in a low detailed river network, small (and possibly more valuable) stretches are neglected.
3. Weighting by flow increment considers all stretches within a catchment. The weighting
of a stretch is calculated by the difference of flow in relation to its upstream stretch (two
stretches in the case of a confluence). Thus the values related to stretches are similar to
those in weighting by length. A slight accentuation might be given to receiving stretches
because, besides the natural flow increment, these are artificially influenced by the waste
water flow.
The initial stretch of a river is considered with its complete flow (there is no longer an
upstream stretch and thus the increment is the flow). If these stretches are unpolluted, the
weighting method is more or less independent of the scale of detail of the digital river
network: no matter how detailed rivers are digitized, the flow of a given stretch can be
considered as the sum of all its upstream stretches and therefore the stretch representing the
headwaters is of the same value as all stretches regarded separately.
July 28, 2003
33/95
greater-tutorial.tex,v 1.2 2003/07/23 15:50:04 frank Exp
Intevation GmbH
GREAT-ER desktop Manual
CHAPTER 2. TUTORIAL
The PEC is based on the C mean value. The calculation is started by
selecting the item PEC Catchment.
A dialog displays the analysis results with some further information.
Figure 2.23: PEC Intevation GmbH
34/95
calculation results
July 28, 2003
greater-tutorial.tex,v 1.2 2003/07/23 15:50:04 frank Exp
GREAT-ER desktop Manual
CHAPTER 2. TUTORIAL
2.8.3.
Risk Analysis
A new analysis tool introduced with GREAT-ER desktop is the Risk Analysis tool.
The risk analysis tool (available via Analysis / Risk Analysis) calculates the ratio of
C mean value and the substance specific predicted no effect concentration (PNEC,
see card Risk Assessment of substance dialog).
The analysis results in a new map layer with two classes displaying the river stretches with a
ratio greater than 1.0 and with less or equal 1.0.
If no PNEC value is available you are asked first to enter a value in the substance dialog.
Figure 2.24: Risk Analysis results
July 28, 2003
35/95
greater-tutorial.tex,v 1.2 2003/07/23 15:50:04 frank Exp
Intevation GmbH
GREAT-ER desktop Manual
CHAPTER 2. TUTORIAL
2.8.4.
Mass Flux
Selecting menu item Analysis / Mass Flux or corresponding tool bar button the mass flux
tool is activated. It allows you to retrieve the mass flux for a selected stretch based on the
mean flow (
) and the
mean value.
This tool is helpful if single values have to be taken over into other applications.
Figure 2.25: Mass Flux
Intevation GmbH
36/95
July 28, 2003
greater-tutorial.tex,v 1.2 2003/07/23 15:50:04 frank Exp
GREAT-ER desktop Manual
CHAPTER 2. TUTORIAL
2.8.5.
Concentration Profiles
The Concentration Profile provides a tool to sample C mean values from a selected
stretch downstream to the root of the catchment. The sampled values are displayed in a diagram
plotted against river kilometers.
Activate the Concentration Profile from the tool bar and select with the pointer a river stretch
from the map. The stretches considered for he sampling are highlighted in the map and the
sampled C mean values are displayed in a xy-plot.
Figure 2.26: Concentration Profile
The xy-plot intends to give you a first impression of the concentration profile. For further analysis
and enhanced diagrams the sampled data can be exported to be processed with the spreadsheet of
July 28, 2003
37/95
greater-tutorial.tex,v 1.2 2003/07/23 15:50:04 frank Exp
Intevation GmbH
GREAT-ER desktop Manual
CHAPTER 2. TUTORIAL
your choice:
Running the concentration profile tool a temporary table is derived collecting the records
of sampled river stretches. Such tables are named applying a Concentration Profile
(start stretch <stretch num>) scheme.
A table can be shown using the Table / Show menu item: Select the tables to be shown and
confirm with OK. A new windows is opened showing the table contents.
The table does not only display the river kilometers and C mean values but the
basic results and all additional analysis results (percentiles, risk analysis) derived so far.
Applying the Export button in the upper right corner of the table window the data can be
exported as comma separated values (CSV) or dBase file (DBF), both convenient to be
imported into a spreadsheet.
Figure 2.27: Concentration Profile Table with Export
An even more enhanced option is provided by joining further data on the sampled table before
export, e.g. the table of discharge sites:
Select Table / Join. A dialog is opened allowing you to specify the two tables to be joined
and the two fields the join has to be based on.
Intevation GmbH
38/95
July 28, 2003
greater-tutorial.tex,v 1.2 2003/07/23 15:50:04 frank Exp
GREAT-ER desktop Manual
CHAPTER 2. TUTORIAL
Figure 2.28: Join Dialog
Specify the concentration profile table (which has been derived earlier) as the left table
and the ”Join of DISCHARGES and Discharge Attributes” (which contains the necessary
identification data and attributes) as the right.
Both tables should be joined on their stretch id field.
By default a join results in a new table with only those records which could be joined based
on the selected field successfully. This would result in a table with only those river stretches
directly receiving a discharge.
Since we are interested in all sampled river stretches with the discharge data as additional
information we select the check button Outer Join, which preserves all records from the
left table and leave fields from the right table empty where no matches are found.
Pressing the Join button a new table window is opened. The results of the join can now be
exported for further processing.
July 28, 2003
39/95
greater-tutorial.tex,v 1.2 2003/07/23 15:50:04 frank Exp
Intevation GmbH
GREAT-ER desktop Manual
CHAPTER 2. TUTORIAL
For additional analysis concepts see the chapters below and the T HUBAN Manual.
Figure 2.29: Projected Calder Catchment with Background and Monitoring Data
Intevation GmbH
40/95
July 28, 2003
greater-tutorial.tex,v 1.2 2003/07/23 15:50:04 frank Exp
GREAT-ER desktop Manual
CHAPTER 3. USER INTERFACE
3. User Interface
The chapter ”User Interface” describes the functionality of the current version (Milestone 3) of the
GREAT-ER desktop Client.
3.1.
Main Window
The main window is the core of the GREAT-ER desktop Client, it consists of the Title Bar, Menu
Bar, Tool Bar, Map and Status Bar.
Title Bar
Menu Bar
Tool Bar
Legend
Map
Status Bar
Figure 3.1: GREAT-ER desktop Main Window
July 28, 2003
41/95
greater-manual.tex,v 1.38 2003/10/01 11:37:03 frank Exp
Intevation GmbH
GREAT-ER desktop Manual
CHAPTER 3. USER INTERFACE
3.1.1.
Title Bar
If you have already a open simulation session in your user client, the title bar shows some information to identify the session: session name - substance - catchment.
3.1.2.
Menu Bar
The menu bar provides access to the various actions needed to perform a simulation (i.e. session
management, substance editing, catchment selection, etc.). Depending on the current status of a
simulation session menu items are enabled or disabled (grayed out).
3.1.3.
Tool Bar
The tool bar covers first some self-explaining buttons to navigate on the geographic data displayed
on the map. The last five buttons provide GREAT-ER desktop specific tools to edit the market
data and discharge data by selecting discharge points on the map as well as analysis functions.
These features are also available via the ’Catchment’-Menu and the ’Analysis’-Menu respectively.
3.1.4.
Map
If already specified the map displays the catchment area: river network, discharge points and catchment boundary. Further map layers and the result data will be added in the future development
phases of the GREAT-ER desktop client.
3.1.5.
Legend
The legend describes the map contents and provides control over the layers appearance (colors,
line width, classification, order).
If a sufficient projection information is available, the legend also displays a scale bar to illustrate
distance relations on the map.
3.1.6.
Status Bar
The status bar is split into three sections: The first section displays either the map coordinates
related to the mouse pointer position or if browsing through the menu bar small help texts on the
highlighted menu items. The second section provides information on the status of the database
connection: If connected the user-name used for the authentication is displayed along with the
users’ group. The third section indicates if there are unsaved modifications for the current session.
Intevation GmbH
42/95
July 28, 2003
greater-manual.tex,v 1.38 2003/10/01 11:37:03 frank Exp
GREAT-ER desktop Manual
CHAPTER 3. USER INTERFACE
3.2.
3.2.1.
Menu File
Authenticate
This menu item is available if no database connection is established. A dialog for setting up connection to a GREAT-ER desktop database allows to enter database, user-name and password for
the authentication process. If you don’t have an account yet, please read section 1.2.
Figure 3.2: Authentication Dialog
Successful authentication will activate availability of menu items now reasonable for further operations, namely the session management (New, Open, Save As and Delete). Also, the Authenticate
menu item is disabled and connection information are added to the session info-tree. Furthermore, a local simulation server is started as a background process to allow simulations without
connecting to a remote server, see section 3.6.4 for configuration options.
The database connection can be closed via the menu item Disconnect and is automatically closed
when the GREAT-ER desktop application is closed (e.g. via menu item Exit).
3.2.2.
Disconnect
Once a database connection has been established, this menu item is active. It will close the current
session and then disconnect from the database. If the session is modified, the user is offered an
option to save the modifications before disconnecting from the database.
3.2.3.
New Session
The menu item is enabled once a database connection is established. The Edit Session-Dialog (see
section 3.2.5) is raised to enter the session’s name, substance and catchment and comment. All
but the name is optional and can also be specified later.
If a session is open with unsaved modifications the user is offered a dialog to save the session
before creating a new one.
3.2.4.
Open Session
This menu item is enabled if a database connection has been established (via Authenticate). The
dialog that appears is separated into two areas: on the left a list is presented containing all available
July 28, 2003
43/95
greater-manual.tex,v 1.38 2003/10/01 11:37:03 frank Exp
Intevation GmbH
GREAT-ER desktop Manual
CHAPTER 3. USER INTERFACE
sessions, public and personal ones.
In the right area, additional information on the currently selected scenario is displayed: substance
and catchment name as well as the session comment. Furthermore, the access rights are shown
with the owner of the session, his group and the privileges for the session. Sessions without the
privileges for you to at least view them are not listed.
To load a session, either hit the OK button or double-click on the session name.
Figure 3.3: Open Session Dialog
If the previously loaded session was modified but not saved, a dialog is raised to allow saving of
the previous session.
If no sessions are found in the database, the user is notified accordingly with a simple message
dialog. The user should start with a new session.
Intevation GmbH
44/95
July 28, 2003
greater-manual.tex,v 1.38 2003/10/01 11:37:03 frank Exp
GREAT-ER desktop Manual
CHAPTER 3. USER INTERFACE
3.2.5.
Edit Session
If there is a current session, this menu item is enabled. A dialog is raised to modify the session’s
name, substance, catchment, comment and privileges.
Figure 3.4: Edit Session Dialog
The changes are not stored in the database unless a Save Session operation is performed.
The substance and catchment can alternatively be changed in the corresponding menus. Those
dialogs show more details on the actual substance or catchment during the selection.
3.2.6.
Save Session
This item is enabled if there is an open session and it has been modified. All session data in the
database will be overwritten with the current session without further request.
Note, that when saving a session, your ID will be applied overwriting the user ID of the previous
owner.
Saving a session may fail for two reasons:
1. You don’t have the permission to write.
This happens if you opened a session where you have only privileges to view. In this case,
use ’Save Session As’ to create your own copy.
2. Another user opened the same session and saved it meanwhile. In this case, use ’Save
Session As’ to create your own copy.
July 28, 2003
45/95
greater-manual.tex,v 1.38 2003/10/01 11:37:03 frank Exp
Intevation GmbH
GREAT-ER desktop Manual
CHAPTER 3. USER INTERFACE
3.2.7.
Save Session As
If a session has been opened this menu item is enabled and allows to store the current session
separate from the original session.
Note, that the new session will be the one which will be loaded in the client after a ’Save Session
As’.
A dialog similar to the Edit Session dialog (see section 3.2.5) is raised allowing to change name,
comment and privileges of the session so that it can be distinguished from the original one.
Note, that the session’s name does not need to be unique in the database and hence multiple
sessions with the same name may exist. You should avoid this situation by specifying different
names.
3.2.8.
Close Session
This menu item is always active if there is an open session.
If the current session is modified, the user is offered the option to save the changes before actually
closing the session.
3.2.9.
Delete Session
This option is always available with an established database connection.
A dialog similar as for Open Session (see section 3.2.4 is opened allowing to select the session
that should be removed from the database.
After selection, the user is required to confirm the action.
3.2.10.
Exit
This item is always enabled and will quit the application. If the current session is not saved, a
dialog is raised to do so now.
Intevation GmbH
46/95
July 28, 2003
greater-manual.tex,v 1.38 2003/10/01 11:37:03 frank Exp
GREAT-ER desktop Manual
CHAPTER 3. USER INTERFACE
3.3.
Menu Substance
The Substance Menu provides access to the substance data. The menu items ’New’, ’Open’ and
’Delete’ are enabled if a database connection has been established and a session been open or
newly started. The ’Edit’ and ’Save As’ items are only enabled if the session already contains
substance data.
3.3.1.
New
The Edit Substance-Dialog (see section 3.3.3) is raised to enter the substance name, comment and
its various parameters. All but the name is optional and can also be specified later.
If the open session already contains substance data a warning dialog will be raised.
Note, that adding a new substance implies to delete all market and result data as well as userdefined discharge data from the current session since they potentially don’t have a valid link to the
session data with the new substance data.
3.3.2.
Open
The dialog that appears is separated into two areas: on the left a list is presented containing all
available substances.
In the right area, the comment on the highlighted substance is displayed together with owner and
privileges.
To load a substance, either hit the OK button or double-click on the substance name.
Figure 3.5: Open Substance Dialog
If the previously loaded substance was modified but not saved, a dialog is raised to allow saving
of the previous substance.
July 28, 2003
47/95
greater-manual.tex,v 1.38 2003/10/01 11:37:03 frank Exp
Intevation GmbH
GREAT-ER desktop Manual
CHAPTER 3. USER INTERFACE
If no substances are found in the database, the user is notified accordingly with a simple message
dialog. The user should start with a new substance.
Note, that opening another substance data set implies to delete all market and result data as well
as user-defined discharge data from the current session since they potentially don’t have a valid
link to the session data with the new substance data.
3.3.3.
Edit
This action is only available if a substance has been selected.
A dialog is opened for entering all properties of the substance. See section A to read more on how
entering scientific parameters is supported by the graphical user interface.
The substance data are separated into various sections note, that the structure and contents is
defined in the database and may have been changed by the database administrator):
Identification The substance name, CAS and EINECS number and additional synonyms can be
specified to aid identification. The substance name is obligatory, all other parameters are optional.
Figure 3.6: Edit Substance Dialog, page Identification
Intevation GmbH
48/95
July 28, 2003
greater-manual.tex,v 1.38 2003/10/01 11:37:03 frank Exp
GREAT-ER desktop Manual
CHAPTER 3. USER INTERFACE
Physico-chemical Properties General physico-chemical properties can be edited on this
page. More process-specific physico-chemical parameters are placed on the related pages.
Figure 3.7: Edit Substance Dialog, page Physico-chemical Parameters
Partitioning The necessity of declaring partitioning coefficients depends on the selected model.
Figure 3.8: Edit Substance Dialog, page Partitioning
July 28, 2003
49/95
greater-manual.tex,v 1.38 2003/10/01 11:37:03 frank Exp
Intevation GmbH
GREAT-ER desktop Manual
CHAPTER 3. USER INTERFACE
WWTP Removal Depending on the selected models various parameters have to be entered to
describe the substance fate in sewers and the different treatment plants.
Figure 3.9: Edit Substance Dialog, page WWTP Removal
Bio-Degradation The bio-degradation page covers some very specific parameters for biodegradation kinetics. They are required for WWTP and river models. See the model’s technical
documentation for a more detailed explanation of the parameters.
Figure 3.10: Edit Substance Dialog, page Bio-Degradation
Intevation GmbH
50/95
July 28, 2003
greater-manual.tex,v 1.38 2003/10/01 11:37:03 frank Exp
GREAT-ER desktop Manual
CHAPTER 3. USER INTERFACE
River Removal As with WWTP removal, more or less detailed elimination rates have to be
entered, depending on the selected mode for the river sub-model.
Figure 3.11: Edit Substance Dialog, page River Removal
Emission Data You can specify a default domestic consumption (kg per capita and year) of
the substance assumed for any discharge site in the simulation area.
Figure 3.12: Edit Substance Dialog, page Emission Information
July 28, 2003
51/95
greater-manual.tex,v 1.38 2003/10/01 11:37:03 frank Exp
Intevation GmbH
GREAT-ER desktop Manual
CHAPTER 3. USER INTERFACE
Risk Assessment The card Risk Assessment contains an entry for the predicted no effect
concentration (PNEC) used in the Risk Analysis (Analysis menu).
Figure 3.13: Edit Substance Dialog, page Risk Assessment
3.3.4.
Save As
The Save Substance As Dialog is raised allowing to specify the name, comment and privileges for
the new substance entry.
Figure 3.14: Save Substance As Dialog
Intevation GmbH
52/95
July 28, 2003
greater-manual.tex,v 1.38 2003/10/01 11:37:03 frank Exp
GREAT-ER desktop Manual
CHAPTER 3. USER INTERFACE
3.3.5.
Delete
A dialog similar to the Open Substance Dialog (see section 3.3.2) is raised allowing to select a
Substance from the database to be removed.
3.4.
3.4.1.
Menu Catchment
Select
This menu item is enabled if a database connection has been established and a session been opened
or newly started.
A dialog is raised where you can select a new catchment for the active session from the list of
catchments in the database.
Note, that with a the new catchment selection current market and result data as well as user-defined
discharge data will be deleted.
Figure 3.15: Select Catchment Dialog
July 28, 2003
53/95
greater-manual.tex,v 1.38 2003/10/01 11:37:03 frank Exp
Intevation GmbH
GREAT-ER desktop Manual
CHAPTER 3. USER INTERFACE
3.4.2.
Edit Emission Data
This menu item is enabled if a database connection has been established and a session been opened
or newly started and a catchment been selected.
This command activates the Edit Emission Data tool. You can now select a discharge site with the
mouse pointer to change its specific consumption and release attributes.
The Edit Emission Data dialog enables you to specify site-specific consumption data. To cover
industrial sites, users can enter an additional input into the treatment plant. This input reflects
discharges resulting from the production processes and can be calculated from the production
volume.
Figure 3.16: Edit Emission Data Dialog
Please note that in case of an ’unknown’ specific value the general value will be applied for a
simulation1 .
Please note that the calculation of the fraction of the production volume which will be released is
not part of GREAT-ER desktop but must be calculated manually beforehand. The input considered here is the mass flow of substance into the treatment plant in kg/a. As with the loads from
domestic inputs, the industrial input is subsequently processed by the treatment plant model, if
present, for the selected location.
Leaving the dialog, the Edit Emission Data tool remains active. Selecting another tool will deactivate it.
1
E.g. for an unknown consumption the simulation falls back to the consumption specified under the Substance Data
Dialog
Intevation GmbH
54/95
July 28, 2003
greater-manual.tex,v 1.38 2003/10/01 11:37:03 frank Exp
GREAT-ER desktop Manual
CHAPTER 3. USER INTERFACE
3.4.3.
Edit Discharge Data
This menu item is enabled if a database connection has been established and a session been opened
or newly started and a catchment been selected.
This command activates the Edit Discharge Data tool. You can now select a discharge site with
the mouse pointer to change its specific properties.
Similar to the Edit Emission Data dialog, the Edit Discharge Data dialog enables users to modify
the parameters of a specific treatment plant.
Several site-specific parameters can be changed. These include population, the elimination rate
(used for complexity modes), the treated fraction of incoming sewage water (e.g. bypass or overflow) and in general the type of treatment plant. Incoming water from separate sources is also
considered such as domestic input, non-domestic use (this covers mainly industrial inputs) and
runoff. If only an overall value is available for treatment plants this should be entered as domestic
flow.
Figure 3.17: Edit Discharge Data Dialog
Please note that domestic
flow is given in liter/(capita*day), where non-domestic flow and run-off
are considered as
.
Please note that in case of an unknown specific values the general values will be applied for a
July 28, 2003
55/95
greater-manual.tex,v 1.38 2003/10/01 11:37:03 frank Exp
Intevation GmbH
GREAT-ER desktop Manual
CHAPTER 3. USER INTERFACE
simulation2 .
Please note furthermore that it is possible to specify a distribution for a general removal efficiency,
but not for a site-specific removal efficiency. Nevertheless, it is possible to have a distributed
general removal efficiency for e.g. activated sludge plants, and a fixed rate for a selected site.
Leaving the dialog, the Edit Discharge Data tool remains active. Selecting another tool will deactivate it.
2
E.g. for an unknown WWTP removal the simulation falls back to the WWTP removal specified under the Substance
Data Dialog
Intevation GmbH
56/95
July 28, 2003
greater-manual.tex,v 1.38 2003/10/01 11:37:03 frank Exp
GREAT-ER desktop Manual
CHAPTER 3. USER INTERFACE
3.5.
Menu Environment
The Environment Menu provides access to the environment data. The menu items ’New’, ’Open’
and ’Delete’ are enabled if a database connection has been established and a session been open
or newly started. The ’Edit’ and ’Save As’ items are only enabled if the session already contains
environment data.
3.5.1.
New
The Edit Environment-Dialog (see section 3.5.3) is raised to enter the environment parameters.
A warning request is raised, that the previous data are lost.
3.5.2.
Open
The dialog that appears is separated into two areas: on the left a list is presented containing all
available environment datasets.
In the right area, the comment on the highlighted environment dataset is displayed together with
owner and privileges.
To load a environment, either hit the OK button or double-click on the environment name.
Figure 3.18: Open Environment Dialog
If the previously loaded environment was modified but not saved, a dialog is raised to allow saving
of the previous environment.
If no environment datasets are found in the database, the user is notified accordingly with a simple
message dialog. The user should start with a new environment.
July 28, 2003
57/95
greater-manual.tex,v 1.38 2003/10/01 11:37:03 frank Exp
Intevation GmbH
GREAT-ER desktop Manual
CHAPTER 3. USER INTERFACE
3.5.3.
Edit
The dialog allows the user to edit various environmental data and specific properties of the sewer,
wastewater treatment plant and river models. Please refer to the model documentation for more
detailed information on the model’s parameters.
Figure 3.19: Edit Environment Dialog - page Environment
Intevation GmbH
58/95
July 28, 2003
greater-manual.tex,v 1.38 2003/10/01 11:37:03 frank Exp
GREAT-ER desktop Manual
CHAPTER 3. USER INTERFACE
Figure 3.20: Edit Environment Dialog - page Sewer
Figure 3.21: Edit Environment Dialog - page Primary settler
July 28, 2003
59/95
greater-manual.tex,v 1.38 2003/10/01 11:37:03 frank Exp
Intevation GmbH
GREAT-ER desktop Manual
CHAPTER 3. USER INTERFACE
Figure 3.22: Edit Environment Dialog - page Secondary settler
Figure 3.23: Edit Environment Dialog - page Activated sludge
Intevation GmbH
60/95
July 28, 2003
greater-manual.tex,v 1.38 2003/10/01 11:37:03 frank Exp
GREAT-ER desktop Manual
CHAPTER 3. USER INTERFACE
Figure 3.24: Edit Environment Dialog - page WWTP mass transfer
Figure 3.25: Edit Environment Dialog - page River
3.5.4.
Save As
The Save Environment As Dialog is raised allowing to specify the name, comment and privileges
for the new environment entry.
July 28, 2003
61/95
greater-manual.tex,v 1.38 2003/10/01 11:37:03 frank Exp
Intevation GmbH
GREAT-ER desktop Manual
CHAPTER 3. USER INTERFACE
Figure 3.26: Save Environment As Dialog
3.5.5.
Delete
A dialog similar to the Open Environment Dialog (see section 3.5.2) is raised allowing to select a
environment from the database to be removed.
Intevation GmbH
62/95
July 28, 2003
greater-manual.tex,v 1.38 2003/10/01 11:37:03 frank Exp
GREAT-ER desktop Manual
CHAPTER 3. USER INTERFACE
3.6.
Menu Simulation
This menu provides items for simulation control. The items are only enabled if there is an active
session.
3.6.1.
Edit Model Parameters
This dialog allows you to specify the model complexity and execution. If you increase complexity
modes, it may be necessary to go back to earlier data dialogs to enter additional parameters. For
example, if you need in-sewer removal to be considered, you have to go back to the substance
data dialog to enter a removal rate for sewers. Please note that in-sewer removal is the only
’higher’ model in which only one parameter has to be entered. All other ’higher’ models require a
somewhat larger data set.
Background concentrations are included to consider additional loads within the river network
which might be monitored upstream from the first known discharge. Note that the given value
is simply added to the model results after simulation. The background concentration is not considered within the elimination processes.
The concentration has to be entered before running a simulation. The unit is always mg/L. After
the simulation the specified background concentration will be added to the model results. If the
model results are displayed in a different unit an automatic conversion will be activated for the
background concentration.
A Monte-Carlo-Shot number of 0 is equal to a conventional, non-stochastic simulation where for
all distributed parameters the mean values are applied.
Figure 3.27: Edit Model Parameters Dialog - page General
July 28, 2003
63/95
greater-manual.tex,v 1.38 2003/10/01 11:37:03 frank Exp
Intevation GmbH
GREAT-ER desktop Manual
CHAPTER 3. USER INTERFACE
Figure 3.28: Edit Model Parameters Dialog - page Sewer
Figure 3.29: Edit Model Parameters Dialog - page Activated Sludge WWTP
Intevation GmbH
64/95
July 28, 2003
greater-manual.tex,v 1.38 2003/10/01 11:37:03 frank Exp
GREAT-ER desktop Manual
CHAPTER 3. USER INTERFACE
Figure 3.30: Edit Model Parameters Dialog - page Trickling Filter WWTP
Figure 3.31: Edit Model Parameters Dialog - page River
July 28, 2003
65/95
greater-manual.tex,v 1.38 2003/10/01 11:37:03 frank Exp
Intevation GmbH
GREAT-ER desktop Manual
CHAPTER 3. USER INTERFACE
3.6.2.
Missing Parameters?
Using the current model selection, the simulation server is asked which parameters still need to be
specified in order to perform a simulation.
Figure 3.32: Missing Parameters
The dialog informs about the according parameters and where to find them. All necessary parameters are marked in the dialogs with a cross, so that you can quickly identify them.
3.6.3.
Start
This command will start the simulation for the active session if all required data have been specified. If the parameters are not sufficiently specified, the same dialog as for Missing Parameters
(see section 3.6.2) is raised.
Figure 3.33: Simulation Status Dialog
The Progress dialog informs about the current state of the simulation.
If you want to run another simulation concurrently, you just need to launch another instance of the
GREAT-ER desktop application.
Intevation GmbH
66/95
July 28, 2003
greater-manual.tex,v 1.38 2003/10/01 11:37:03 frank Exp
GREAT-ER desktop Manual
CHAPTER 3. USER INTERFACE
3.6.4.
Select Simulation Server
The GREAT-ER desktop client application does not perform simulations on its own. Instead it
connects to a simulation server, which again will connect to the database to retrieve parameters
and write the results.
Figure 3.34: Select Simulation Server
There are two options to connect to a simulation server. The default is a locally running simulation
server. The performance is then corresponding to your local hardware.
Alternatively, you may access a remote simulation server. Those can be set up with a cluster
configuration to radically increase performance and allow multiple users to run simulations concurrently.
To connect to a remote simulation server you need to enter the the IP address or domain name
(e.g. greater.simulserver.example) and the port number for the server (e.g. 12345).
Therewith the connection string for the server is:
http://greater.simulserver.example:12345
You can test the correctness of your settings with the ’Test Server Connection’ button. On success
the number of workers connected to the selected server is listed. On failure an according error
message is raised.
Figure 3.35: Select Simulation Server - Test Server Connection Success
Figure 3.36: Select Simulation Server - Test Server Connection Failure
July 28, 2003
67/95
greater-manual.tex,v 1.38 2003/10/01 11:37:03 frank Exp
Intevation GmbH
GREAT-ER desktop Manual
CHAPTER 3. USER INTERFACE
3.7.
Menu Analysis
The Analysis menu provides further functions for the analysis of model results. The menu items
are only enabled if the active session contains model results.
Add Background Layer
GREAT-ER desktop is installed with some background layers stored in the database for better
orientation. These layers can be loaded on demand and are displayed with predefined settings
(which can be changed manually later on).
The database also provides the results of the monitoring campaigns undertaken in the pilot areas
of GREAT-ER 1.0 as layers. The layer identifies the location of monitoring sites, the monitoring
results are available by showing the layers attribute table.
Figure 3.37: Add Background Layers Dialog
In addition to the layers provides with GREAT-ER desktop layers from other sources can be
loaded via the T HUBAN menu Map / Add Layer. Please refer to the T HUBAN manual for details.
Calculate River Csim X
Since GREAT-ER desktop calculates a distribution of concentrations for each stretch (based on
the Monte-Carlo simulation) this menu item enables users to calculate any percentile from the
distribution of
. The model results are considered as log-normal distributed. After
specifying a percentile (the unit is per cent, hence the specified value must be greater than 0 and
less than 100) the values will be derived per stretch and a new field will be added to the results
table. After calculation a new layer is displayed in the scenarios view, entitled ”Csim xx [unit]”.
The coloring is the same as that used for the mean values.
Intevation GmbH
68/95
July 28, 2003
greater-manual.tex,v 1.38 2003/10/01 11:37:03 frank Exp
GREAT-ER desktop Manual
CHAPTER 3. USER INTERFACE
Figure 3.38: Calculate River Csim
Csim Classes River
The dialog enables the user to change the classification ranges and numbers, optionally on a new
Csim percentile.
Figure 3.39: Csim Classes River
Additional classification features are available via the T HUBAN Layer Properties dialog. Please
refer to the T HUBAN manual for details.
July 28, 2003
69/95
greater-manual.tex,v 1.38 2003/10/01 11:37:03 frank Exp
Intevation GmbH
GREAT-ER desktop Manual
CHAPTER 3. USER INTERFACE
Combine Csim/Flow
The Combine Csim / Flow feature generates a new layer considering both
mean and
mean classification by color-coding
mean flow. The resulting layer will display the
the legend and the mean flow by stretch width: Stretches with zero concentration fall into the
default class, all other stretches are grouped in four classes for concentration and five classes for
flow:
Figure 3.40: Classification generated by Combine Csim/Flow tool
Intevation GmbH
70/95
July 28, 2003
greater-manual.tex,v 1.38 2003/10/01 11:37:03 frank Exp
GREAT-ER desktop Manual
CHAPTER 3. USER INTERFACE
PEC Initial
PEC
is the spatial aggregation of concentrations in the river directly after emission. This is
similar to PEC as defined in the EU Technical Guidance Documents, although its calculation
is different. Based on the C mean values, the mean is calculated for all stretches receiving
treated or untreated discharges (compare Boeije et al., 1999.):
Figure 3.41: PEC initial
July 28, 2003
71/95
greater-manual.tex,v 1.38 2003/10/01 11:37:03 frank Exp
Intevation GmbH
GREAT-ER desktop Manual
CHAPTER 3. USER INTERFACE
PEC Catchment
PEC is the average of representative concentrations over the entire catchment. The ”most
representative” value for the concentration in the stretch is taken as C (the average concentration for the stretch). However, different approaches could be used and in order to demonstrate the effect of using different possible definitions, GREAT-ER desktop computes different
different PEC values. These values differ in the set of stretches selected for the calculation and in the weighting of concentrations (compare Boeije et al., 1999.):
Figure 3.42: PEC catchment
This is a new concept for geo-referenced exposure assessment, although there is some analogy
with the PEC regional in the EU Technical Guidance Documents (EU, 1996).
Intevation GmbH
72/95
July 28, 2003
greater-manual.tex,v 1.38 2003/10/01 11:37:03 frank Exp
GREAT-ER desktop Manual
CHAPTER 3. USER INTERFACE
Discharge Influent Csim / Discharge Effluent Csim
The GREAT-ER desktop models calculate concentrations for both the catchment river network
and the influent and effluent of the catchment’s treatment plants.
The two menu items Discharge Influent Csim and Discharge Effluent Csim load the corresponding data and display the simulation results with a quantile classification.
Figure 3.43: Discharge results
July 28, 2003
73/95
greater-manual.tex,v 1.38 2003/10/01 11:37:03 frank Exp
Intevation GmbH
GREAT-ER desktop Manual
CHAPTER 3. USER INTERFACE
Mass Flux
This menu item is enabled if the current session contains simulation results. It corresponds with
the mass flux button from the tool bar.
Selecting menu item or tool bar button the mass flux tool is activated. It allows you to retrieve the
mass flux for a selected stretch based on the mean flow (
) and the
mean value.
This tool is helpful if single values have to be taken over into other applications.
Figure 3.44: Mass Flux
Intevation GmbH
74/95
July 28, 2003
greater-manual.tex,v 1.38 2003/10/01 11:37:03 frank Exp
GREAT-ER desktop Manual
CHAPTER 3. USER INTERFACE
Concentration Profile
This menu item is enabled if the current session contains simulation results.
This command activates the Concentration Profile tool. You can now select a river stretch with the
mouse pointer to generate the profile.
After selecting a stretch, calculated concentrations are collected downstream. The concentrations
are plotted against the river kilometers (starting at the selected stretch). The stretches considered
for the profile sampling are highlighted.
Figure 3.45: Concentration Profile
July 28, 2003
75/95
greater-manual.tex,v 1.38 2003/10/01 11:37:03 frank Exp
Intevation GmbH
GREAT-ER desktop Manual
CHAPTER 3. USER INTERFACE
3.8.
Menu Help
3.8.1.
User Manual
The menu item displays the on-line version of this manual, if a PDF-viewer (Portable Document
Format) is installed on your computer.
3.8.2.
About
The dialog displays the version for the GREAT-ER desktop Client, the used versions of Python,
wxPython, of SciParam (scientific parameter module) and the version of the database API the
client is using to access the GREAT-ER desktop database.
3.9.
3.9.1.
Keyboard Shortcuts
General Windows Keyboard Shortcuts
<F10>
<Shift-F10>
<Alt-letter>
<Alt-F6>
3.9.2.
Activate the application menu.
Open a context menu for the current item.
Open the menu for the underlined shortcut letter. You don’t
need to press <Alt> if the menu or a sub-menu is already
active.
Switch to other application windows.
Dialog Box Keyboard Shortcuts
<Tab>
<Shift-Tab>
<Ctrl-Tab>
<Shift-Ctrl-Tab>
<Enter>
<Escape>
<Space>
<Alt-Down>
<Cursor>
<Alt-D>
Intevation GmbH
Move to the next control.
Move to the previous control.
Move to the next notebook page.
Move to the previous notebook page.
Equivalent to clicking the OK button.
Equivalent to clicking the Cancel button.
Equivalent to clicking the current button or radio button.
Drop down the list box of a selection list.
Change the current item in a selection list.
Toggle the input focus between a parameter and its details
box in parameter dialogs.
76/95
July 28, 2003
greater-manual.tex,v 1.38 2003/10/01 11:37:03 frank Exp
GREAT-ER desktop Manual
APPENDIX A. SCIPARAM GUI
A. SciParam GUI
A.1.
Feature List
Parameter entry fields:
for different types of values
float values
are numbers, which can can be limited to ranges which specify a usual range (see
A.2.5) and/or a valid range (see A.2.6). Ranges can be specified in scientific notation,
e.g. ]-oo;1.2E5] for a range from minus infinity upto and including 120000.
distributed values
are like float numbers, but you can optionally have distribution type (see A.2.7) like
normal, log-normal or uniform.
integer values
can have ranges like float number, too.
strings
can contain any characters.
choices
allow to select a value with radiobuttons or from a drop down list (see A.2.8).
Details on values:
A special details box (see A.2.3) provides helpful information on a currently focused entry.
Default values:
For each entry a default can be specified, which is visible in the details box (see A.2.3). A
button allows to apply the default to the current entry.
Comment:
It is possible to enter a comment for the current entry in the details box (see A.2.3).
Status “unknown”:
For any value it is possible to enter the status “unknown” by deleting the current value.
This avoids concepts where a special and potentially misinterpreted number represents an
unknown value.
Status “required”:
A small cross (“sign here”; see A.2.4) informs about whether a parameter is necessary in a
certain context (e.g. to complete a parameter set for a simulation equation). Giving a value
here is not forced by the GUI, since this is only an indicator.
July 28, 2003
77/95
sciparam-manual-gui.tex,v 1.3 2003/07/21 17:15:40 tkoester Exp
Intevation GmbH
GREAT-ER desktop Manual
APPENDIX A. SCIPARAM GUI
A.2.
Screenshots
A.2.1.
Dialog
This dialog is created by running python dialog.py from inside the SciParam/UI directory:
Figure A.1: SciParam Dialog SciParam Dialog
Intevation GmbH
78/95
July 28, 2003
sciparam-manual-gui.tex,v 1.3 2003/07/21 17:15:40 tkoester Exp
GREAT-ER desktop Manual
APPENDIX A. SCIPARAM GUI
A.2.2. Notebook
This dialog is created by running python notebook.py from inside the SciParam/UI directory:
Figure A.2: SciParam Notebook SciParam Notebook
July 28, 2003
79/95
sciparam-manual-gui.tex,v 1.3 2003/07/21 17:15:40 tkoester Exp
Intevation GmbH
GREAT-ER desktop Manual
APPENDIX A. SCIPARAM GUI
A.2.3.
Detailed Information
A box will show additional details for the currently selected parameter. Here you see the parameter
“Volume” with a long description “Volume of used samples”. It only allows float values greater or
equal zero up to infinity.
There was no distribution active, but now the user selected “uniform”, therefore a new dialog
shows up which asks for the maximum value.
The user already noted a comment to the value he’s typing now, so nobody should wonder where
it came from.
Using the “Apply Default” button, you can also set this value to a default value, which would be
2;20/uniform in this case. This long format of “value;distribution parameter/distribution type” can
be used in the input field, too, to save the user from putting his hands away from the keyboard to
the mouse.
Figure A.3: Details Box Details Box
A.2.4.
Required Parameters
The small cross indicates that this is a required parameter:
Figure A.4: Required Parameter Required Parameter
A.2.5.
Usual Ranges
If you enter a value which is theoretically possible, but usually wrong (like an atomic number far
higher than any known chemical element’s number), the input field changes its color to yellow as
Intevation GmbH
80/95
July 28, 2003
sciparam-manual-gui.tex,v 1.3 2003/07/21 17:15:40 tkoester Exp
GREAT-ER desktop Manual
APPENDIX A. SCIPARAM GUI
soon as you leave the input field.
If you try to save this value using the “OK” button or switch to another notebook page, a warning
dialog asks if you really want to use this value. The input field will stay yellow to warn you, even
if you confirm this value, but the warning dialog will only appear again if you change the value.
Figure A.5: Outside Usual Range Outside Usual Range
A.2.6. Valid Ranges
If you enter a value which is outside the valid range (like less than -273.15 C for a temperature),
the input field changes its color to red as soon as you leave the input field.
If you try to save this value using the “OK” button or switch to another notebook page, an error
dialog forces you to either enter a correct value or discard changes using the “Cancel” button.
Figure A.6: Outside Valid Range Outside Valid Range
July 28, 2003
81/95
sciparam-manual-gui.tex,v 1.3 2003/07/21 17:15:40 tkoester Exp
Intevation GmbH
GREAT-ER desktop Manual
APPENDIX A. SCIPARAM GUI
A.2.7.
Distributed Parameters
When choosing a distribution type, a small dialog asks for additional parameters like standard
deviation or maximum value. Illegal values for these parameters will be rejected:
Figure A.7: Distributed Parameter Distributed Parameter
A.2.8.
Choice Parameters
If you have a short list of choices, you can select one of them using radiobuttons. Choices include
questions like Yes/No, or selecting one of few values like 3/5/7 meters.
Figure A.8: Short Choice Short Choice
If you have a long list of choices, selecting one of them is done in a different way. Otherwise they
might not fit inside the input field.
Figure A.9: Long Choice Long Choice
A.2.9.
Grouped Parameters
Parameters that belong together can be grouped.
Intevation GmbH
82/95
July 28, 2003
sciparam-manual-gui.tex,v 1.3 2003/07/21 17:15:40 tkoester Exp
GREAT-ER desktop Manual
APPENDIX A. SCIPARAM GUI
Figure A.10: Grouped Parameters Grouped Parameters
July 28, 2003
83/95
sciparam-manual-gui.tex,v 1.3 2003/07/21 17:15:40 tkoester Exp
Intevation GmbH
GREAT-ER desktop Manual
APPENDIX A. SCIPARAM GUI
Intevation GmbH
84/95
July 28, 2003
gnufdl.tex version 1.2
GREAT-ER desktop Manual
APPENDIX B. GNU FREE DOCUMENTATION LICENSE
B. GNU Free Documentation License
Version 1.2, November 2002
Copyright c 2000,2001,2002 Free Software Foundation, Inc.
59 Temple Place, Suite 330, Boston, MA 02111-1307 USA
Everyone is permitted to copy and distribute verbatim copies of this license document, but changing it is not allowed.
PREAMBLE
The purpose of this License is to make a manual, textbook, or other functional and useful document
“free” in the sense of freedom: to assure everyone the effective freedom to copy and redistribute it,
with or without modifying it, either commercially or noncommercially. Secondarily, this License
preserves for the author and publisher a way to get credit for their work, while not being considered
responsible for modifications made by others.
This License is a kind of “copyleft”, which means that derivative works of the document must
themselves be free in the same sense. It complements the GNU General Public License, which is
a copyleft license designed for free software.
We have designed this License in order to use it for manuals for free software, because free software needs free documentation: a free program should come with manuals providing the same
freedoms that the software does. But this License is not limited to software manuals; it can be
used for any textual work, regardless of subject matter or whether it is published as a printed book.
We recommend this License principally for works whose purpose is instruction or reference.
APPLICABILITY AND DEFINITIONS
This License applies to any manual or other work, in any medium, that contains a notice placed
by the copyright holder saying it can be distributed under the terms of this License. Such a notice
grants a world-wide, royalty-free license, unlimited in duration, to use that work under the conditions stated herein. The “Document”, below, refers to any such manual or work. Any member of
the public is a licensee, and is addressed as “you”. You accept the license if you copy, modify or
distribute the work in a way requiring permission under copyright law.
A “Modified Version” of the Document means any work containing the Document or a portion of
it, either copied verbatim, or with modifications and/or translated into another language.
July 28, 2003
gnufdl.tex version 1.2
85/95
Intevation GmbH
GREAT-ER desktop Manual
APPENDIX B. GNU FREE DOCUMENTATION LICENSE
A “Secondary Section” is a named appendix or a front-matter section of the Document that deals
exclusively with the relationship of the publishers or authors of the Document to the Document’s
overall subject (or to related matters) and contains nothing that could fall directly within that
overall subject. (Thus, if the Document is in part a textbook of mathematics, a Secondary Section
may not explain any mathematics.) The relationship could be a matter of historical connection
with the subject or with related matters, or of legal, commercial, philosophical, ethical or political
position regarding them.
The “Invariant Sections” are certain Secondary Sections whose titles are designated, as being those
of Invariant Sections, in the notice that says that the Document is released under this License. If
a section does not fit the above definition of Secondary then it is not allowed to be designated as
Invariant. The Document may contain zero Invariant Sections. If the Document does not identify
any Invariant Sections then there are none.
The “Cover Texts” are certain short passages of text that are listed, as Front-Cover Texts or BackCover Texts, in the notice that says that the Document is released under this License. A FrontCover Text may be at most 5 words, and a Back-Cover Text may be at most 25 words.
A “Transparent” copy of the Document means a machine-readable copy, represented in a format
whose specification is available to the general public, that is suitable for revising the document
straightforwardly with generic text editors or (for images composed of pixels) generic paint programs or (for drawings) some widely available drawing editor, and that is suitable for input to text
formatters or for automatic translation to a variety of formats suitable for input to text formatters.
A copy made in an otherwise Transparent file format whose markup, or absence of markup, has
been arranged to thwart or discourage subsequent modification by readers is not Transparent. An
image format is not Transparent if used for any substantial amount of text. A copy that is not
“Transparent” is called “Opaque”.
Examples of suitable formats for Transparent copies include plain ASCII without markup, Texinfo
input format, LATEX input format, SGML or XML using a publicly available DTD, and standardconforming simple HTML, PostScript or PDF designed for human modification. Examples of
transparent image formats include PNG, XCF and JPG. Opaque formats include proprietary formats that can be read and edited only by proprietary word processors, SGML or XML for which
the DTD and/or processing tools are not generally available, and the machine-generated HTML,
PostScript or PDF produced by some word processors for output purposes only.
The “Title Page” means, for a printed book, the title page itself, plus such following pages as are
needed to hold, legibly, the material this License requires to appear in the title page. For works
in formats which do not have any title page as such, “Title Page” means the text near the most
prominent appearance of the work’s title, preceding the beginning of the body of the text.
A section “Entitled XYZ” means a named subunit of the Document whose title either is precisely
XYZ or contains XYZ in parentheses following text that translates XYZ in another language.
(Here XYZ stands for a specific section name mentioned below, such as “Acknowledgements”,
“Dedications”, “Endorsements”, or “History”.) To “Preserve the Title” of such a section when you
modify the Document means that it remains a section “Entitled XYZ” according to this definition.
The Document may include Warranty Disclaimers next to the notice which states that this License
applies to the Document. These Warranty Disclaimers are considered to be included by refer-
Intevation GmbH
86/95
July 28, 2003
gnufdl.tex version 1.2
GREAT-ER desktop Manual
APPENDIX B. GNU FREE DOCUMENTATION LICENSE
ence in this License, but only as regards disclaiming warranties: any other implication that these
Warranty Disclaimers may have is void and has no effect on the meaning of this License.
VERBATIM COPYING
You may copy and distribute the Document in any medium, either commercially or noncommercially, provided that this License, the copyright notices, and the license notice saying this License
applies to the Document are reproduced in all copies, and that you add no other conditions whatsoever to those of this License. You may not use technical measures to obstruct or control the reading
or further copying of the copies you make or distribute. However, you may accept compensation
in exchange for copies. If you distribute a large enough number of copies you must also follow
the conditions in section B.
You may also lend copies, under the same conditions stated above, and you may publicly display
copies.
COPYING IN QUANTITY
If you publish printed copies (or copies in media that commonly have printed covers) of the Document, numbering more than 100, and the Document’s license notice requires Cover Texts, you
must enclose the copies in covers that carry, clearly and legibly, all these Cover Texts: Front-Cover
Texts on the front cover, and Back-Cover Texts on the back cover. Both covers must also clearly
and legibly identify you as the publisher of these copies. The front cover must present the full title
with all words of the title equally prominent and visible. You may add other material on the covers
in addition. Copying with changes limited to the covers, as long as they preserve the title of the
Document and satisfy these conditions, can be treated as verbatim copying in other respects.
If the required texts for either cover are too voluminous to fit legibly, you should put the first ones
listed (as many as fit reasonably) on the actual cover, and continue the rest onto adjacent pages.
If you publish or distribute Opaque copies of the Document numbering more than 100, you must
either include a machine-readable Transparent copy along with each Opaque copy, or state in or
with each Opaque copy a computer-network location from which the general network-using public has access to download using public-standard network protocols a complete Transparent copy
of the Document, free of added material. If you use the latter option, you must take reasonably
prudent steps, when you begin distribution of Opaque copies in quantity, to ensure that this Transparent copy will remain thus accessible at the stated location until at least one year after the last
time you distribute an Opaque copy (directly or through your agents or retailers) of that edition to
the public.
It is requested, but not required, that you contact the authors of the Document well before redistributing any large number of copies, to give them a chance to provide you with an updated version
of the Document.
July 28, 2003
gnufdl.tex version 1.2
87/95
Intevation GmbH
GREAT-ER desktop Manual
APPENDIX B. GNU FREE DOCUMENTATION LICENSE
MODIFICATIONS
You may copy and distribute a Modified Version of the Document under the conditions of sections B and B above, provided that you release the Modified Version under precisely this License,
with the Modified Version filling the role of the Document, thus licensing distribution and modification of the Modified Version to whoever possesses a copy of it. In addition, you must do these
things in the Modified Version:
Use in the Title Page (and on the covers, if any) a title distinct from that of the Document,
and from those of previous versions (which should, if there were any, be listed in the History
section of the Document). You may use the same title as a previous version if the original
publisher of that version gives permission.
List on the Title Page, as authors, one or more persons or entities responsible for authorship
of the modifications in the Modified Version, together with at least five of the principal
authors of the Document (all of its principal authors, if it has fewer than five), unless they
release you from this requirement.
State on the Title page the name of the publisher of the Modified Version, as the publisher.
Preserve all the copyright notices of the Document.
Add an appropriate copyright notice for your modifications adjacent to the other copyright
notices.
Include, immediately after the copyright notices, a license notice giving the public permission to use the Modified Version under the terms of this License, in the form shown in the
Addendum below.
Preserve in that license notice the full lists of Invariant Sections and required Cover Texts
given in the Document’s license notice.
Include an unaltered copy of this License.
Preserve the section Entitled “History”, Preserve its Title, and add to it an item stating at
least the title, year, new authors, and publisher of the Modified Version as given on the Title
Page. If there is no section Entitled “History” in the Document, create one stating the title,
year, authors, and publisher of the Document as given on its Title Page, then add an item
describing the Modified Version as stated in the previous sentence.
Preserve the network location, if any, given in the Document for public access to a Transparent copy of the Document, and likewise the network locations given in the Document
for previous versions it was based on. These may be placed in the “History” section. You
may omit a network location for a work that was published at least four years before the
Document itself, or if the original publisher of the version it refers to gives permission.
Intevation GmbH
88/95
July 28, 2003
gnufdl.tex version 1.2
GREAT-ER desktop Manual
APPENDIX B. GNU FREE DOCUMENTATION LICENSE
For any section Entitled “Acknowledgements” or “Dedications”, Preserve the Title of the
section, and preserve in the section all the substance and tone of each of the contributor
acknowledgements and/or dedications given therein.
Preserve all the Invariant Sections of the Document, unaltered in their text and in their titles.
Section numbers or the equivalent are not considered part of the section titles.
Delete any section Entitled “Endorsements”. Such a section may not be included in the
Modified Version.
Do not retitle any existing section to be Entitled “Endorsements” or to conflict in title with
any Invariant Section.
Preserve any Warranty Disclaimers.
If the Modified Version includes new front-matter sections or appendices that qualify as Secondary
Sections and contain no material copied from the Document, you may at your option designate
some or all of these sections as invariant. To do this, add their titles to the list of Invariant Sections
in the Modified Version’s license notice. These titles must be distinct from any other section titles.
You may add a section Entitled “Endorsements”, provided it contains nothing but endorsements of
your Modified Version by various parties–for example, statements of peer review or that the text
has been approved by an organization as the authoritative definition of a standard.
You may add a passage of up to five words as a Front-Cover Text, and a passage of up to 25 words
as a Back-Cover Text, to the end of the list of Cover Texts in the Modified Version. Only one passage of Front-Cover Text and one of Back-Cover Text may be added by (or through arrangements
made by) any one entity. If the Document already includes a cover text for the same cover, previously added by you or by arrangement made by the same entity you are acting on behalf of, you
may not add another; but you may replace the old one, on explicit permission from the previous
publisher that added the old one.
The author(s) and publisher(s) of the Document do not by this License give permission to use their
names for publicity for or to assert or imply endorsement of any Modified Version.
COMBINING DOCUMENTS
You may combine the Document with other documents released under this License, under the
terms defined in section B above for modified versions, provided that you include in the combination all of the Invariant Sections of all of the original documents, unmodified, and list them all
as Invariant Sections of your combined work in its license notice, and that you preserve all their
Warranty Disclaimers.
The combined work need only contain one copy of this License, and multiple identical Invariant
Sections may be replaced with a single copy. If there are multiple Invariant Sections with the
same name but different contents, make the title of each such section unique by adding at the end
of it, in parentheses, the name of the original author or publisher of that section if known, or else
July 28, 2003
gnufdl.tex version 1.2
89/95
Intevation GmbH
GREAT-ER desktop Manual
APPENDIX B. GNU FREE DOCUMENTATION LICENSE
a unique number. Make the same adjustment to the section titles in the list of Invariant Sections in
the license notice of the combined work.
In the combination, you must combine any sections Entitled “History” in the various original
documents, forming one section Entitled “History”; likewise combine any sections Entitled “Acknowledgements”, and any sections Entitled “Dedications”. You must delete all sections Entitled
“Endorsements”.
COLLECTIONS OF DOCUMENTS
You may make a collection consisting of the Document and other documents released under this
License, and replace the individual copies of this License in the various documents with a single
copy that is included in the collection, provided that you follow the rules of this License for
verbatim copying of each of the documents in all other respects.
You may extract a single document from such a collection, and distribute it individually under this
License, provided you insert a copy of this License into the extracted document, and follow this
License in all other respects regarding verbatim copying of that document.
AGGREGATION WITH INDEPENDENT WORKS
A compilation of the Document or its derivatives with other separate and independent documents
or works, in or on a volume of a storage or distribution medium, is called an “aggregate” if the
copyright resulting from the compilation is not used to limit the legal rights of the compilation’s
users beyond what the individual works permit. When the Document is included in an aggregate,
this License does not apply to the other works in the aggregate which are not themselves derivative
works of the Document.
If the Cover Text requirement of section B is applicable to these copies of the Document, then if
the Document is less than one half of the entire aggregate, the Document’s Cover Texts may be
placed on covers that bracket the Document within the aggregate, or the electronic equivalent of
covers if the Document is in electronic form. Otherwise they must appear on printed covers that
bracket the whole aggregate.
TRANSLATION
Translation is considered a kind of modification, so you may distribute translations of the Document under the terms of section B. Replacing Invariant Sections with translations requires special
permission from their copyright holders, but you may include translations of some or all Invariant
Sections in addition to the original versions of these Invariant Sections. You may include a translation of this License, and all the license notices in the Document, and any Warranty Disclaimers,
provided that you also include the original English version of this License and the original versions of those notices and disclaimers. In case of a disagreement between the translation and the
original version of this License or a notice or disclaimer, the original version will prevail.
Intevation GmbH
90/95
July 28, 2003
gnufdl.tex version 1.2
GREAT-ER desktop Manual
APPENDIX B. GNU FREE DOCUMENTATION LICENSE
If a section in the Document is Entitled “Acknowledgements”, “Dedications”, or “History”, the
requirement (section B) to Preserve its Title (section B) will typically require changing the actual
title.
TERMINATION
You may not copy, modify, sublicense, or distribute the Document except as expressly provided
for under this License. Any other attempt to copy, modify, sublicense or distribute the Document
is void, and will automatically terminate your rights under this License. However, parties who
have received copies, or rights, from you under this License will not have their licenses terminated
so long as such parties remain in full compliance.
FUTURE REVISIONS OF THIS LICENSE
The Free Software Foundation may publish new, revised versions of the GNU Free Documentation
License from time to time. Such new versions will be similar in spirit to the present version, but
may differ in detail to address new problems or concerns. See http://www.gnu.org/copyleft/.
Each version of the License is given a distinguishing version number. If the Document specifies
that a particular numbered version of this License “or any later version” applies to it, you have the
option of following the terms and conditions either of that specified version or of any later version
that has been published (not as a draft) by the Free Software Foundation. If the Document does
not specify a version number of this License, you may choose any version ever published (not as
a draft) by the Free Software Foundation.
ADDENDUM: How to use this License for your documents
To use this License in a document you have written, include a copy of the License in the document
and put the following copyright and license notices just after the title page:
Copyright c YEAR YOUR NAME. Permission is granted to copy, distribute and/or
modify this document under the terms of the GNU Free Documentation License, Version 1.2 or any later version published by the Free Software Foundation; with no
Invariant Sections, no Front-Cover Texts, and no Back-Cover Texts. A copy of the
license is included in the section entitled “GNU Free Documentation License”.
If you have Invariant Sections, Front-Cover Texts and Back-Cover Texts, replace the “with...Texts.”
line with this:
with the Invariant Sections being LIST THEIR TITLES, with the Front-Cover Texts being LIST,
and with the Back-Cover Texts being LIST.
If you have Invariant Sections without Cover Texts, or some other combination of the three, merge
those two alternatives to suit the situation.
July 28, 2003
gnufdl.tex version 1.2
91/95
Intevation GmbH
GREAT-ER desktop Manual
APPENDIX B. GNU FREE DOCUMENTATION LICENSE
If your document contains nontrivial examples of program code, we recommend releasing these
examples in parallel under your choice of free software license, such as the GNU General Public
License, to permit their use in free software.
Intevation GmbH
92/95
July 28, 2003
gnufdl.tex version 1.2
GREAT-ER desktop Manual
APPENDIX C. REFERENCES
C. References
Boeije, G., Wagner, J.O., Koormann, F., Vanrolleghem, P.A., Schowanek, D.R., Feijtel, T.C.J.
(2000). New PEC definitions for river basins applicable to GIS-based environmental exposure assessment. Chemosphere 40(2000), 255-265.
EU (1996). Technical Guidance Documents in Support of The Commission Directive 93/67/EEC
on Risk Assessment For New Notified Substances and the Commission Regulation (EC)
1488/94 on Risk Assessment For Existing Substances. ECB, Ispra, Italy.
July 28, 2003
93/95
sciparam-manual-gui.tex,v 1.3 2003/07/21 17:15:40 tkoester Exp
Intevation GmbH
GREAT-ER desktop Manual
APPENDIX C. REFERENCES
Intevation GmbH
94/95
July 28, 2003
sciparam-manual-gui.tex,v 1.3 2003/07/21 17:15:40 tkoester Exp
GREAT-ER desktop Manual
APPENDIX D. ERRORS
D. Errors
The GREAT-ER desktop quality has been ensured by various quality management measures, such
as unit tests, manual test protocols and code revisions. Nevertheless, a software system as complex
as GREAT-ER desktop may still contain some errors.
The GREAT-ER desktop user interface has been designed to support the error fixing by generating
’tracebacks’. These tracebacks give the developers some hints where the error is located. In case,
a dialog is raised displaying the traceback:
Figure D.1: Traceback GREAT-ER desktop User Interface
Please report these tracebacks (you can mark them with the mouse and copy with Ctrl-C) as well
as other problems together with (if possible) a list of the last steps performed before the error
occurred (to better reproduce the problem) to:
http://great-er.intevation.org/bugtracker.html
July 28, 2003
95/95
greater-manual.tex,v 1.38 2003/10/01 11:37:03 frank Exp
Intevation GmbH