1
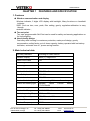
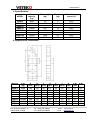
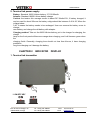
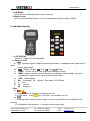
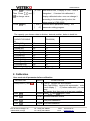
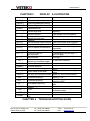
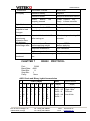
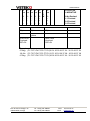
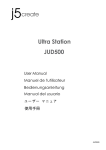
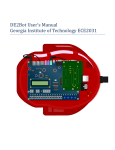
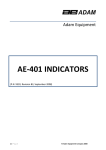
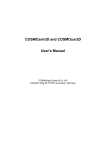
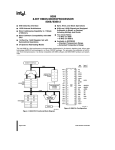
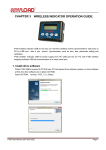
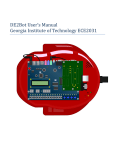
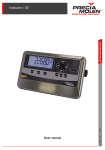
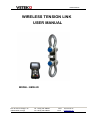
USER MANUAL
WIRELESS TENSION LINK
USER MANUAL
MODEL: EBW-2D
Box 79 Hantverksvägen 15
76040 Väddö, Sverige
Tel. +46 (0)176-208920
Fax +46 (0)176-208929
Web
Email
www.vetek.se
[email protected]
1
USER MANUAL
TABLE OF CONTENTS
SAFE OPERATION GUIDE-------------------------------------------------------------------------------2
CHAPTER 1 FEATURES AND SPECIFICATION------------------------------------------------3
1 Features---------------------------------------------------------------------------------------------------3
2 Main technical data-------------------------------------------------------------------------------------3
3 Specification----------------------------------------------------------------------------------------------4
4 Appearance illustration--------------------------------------------------------------------------------4
5 Power supply------------------------------------------------------------------------------------------ -5
CHAPTER 2 INDICATOR DISPLAY----------------------------------------------------------------5
1 Transmitter---------------------------------------------------------------------------------------------5
2 Indicator display ------------------------------------------------------------------------------------- 6
CHAPTER 3 OPERATION GUIDE-----------------------------------------------------------------8
1 Turn on/off-------------------------------------------------------------------------------------------------8
2 Zero--------------------------------------------------------------------------------------------------------8
3 Tare---------------------------------------------------------------------------------------------------------8
4 Hold--------------------------------------------------------------------------------------------------------8
5 Accumulation---------------------------------------------------------------------------------------------9
6 Accumulation Search----------------------------------------------------------------------------------9
7 Accumulation Clear-------------------------------------------------------------------------------------9
8 Battery Voltage-------------------------------------------------------------------------------------------9
9 Unit--------------------------------------------------------------------------------------------------------10
10 Return----------------------------------------------------------------------------------------------------10
11 Set Point-------------------------------------------------------------------------------------------------10
CHAPTER 4 PARAMETER SETTING & CALIBRATION-------------------------------------12
1 Parameter setting-------------------------------------------------------------------------------------12
2 Calibration----------------------------------------------------------------------------------------------15
CHAPTER 5 DISPLAY ILLUSTRATION-----------------------------------------------------------16
CHAPTER 6 TROUBLESHOOTING GUIDE-----------------------------------------------------17
CHAPTER 7 RS232 PROTOCOL-----------------------------------------------------------------18
Box 79 Hantverksvägen 15
76040 Väddö, Sverige
Tel. +46 (0)176-208920
Fax +46 (0)176-208929
Web
Email
www.vetek.se
[email protected]
2
USER MANUAL
SAFE OPERATION GUIDE:
1. The capacity of tension link have been showed on the overlay, Don’t make
lifts beyond rated capacity of the tension link.
2. Operators should not maneuver a loaded tension link over personnel.
3.The tension link must be routinely checked for operation. Don’t operate
if shackle, sling, cable, etc show any sign of defects or excessive wear.
4. If the tension link is not going to be used for long time, recharging the battery
every three months to preserve the life-span of the battery and recharge it
before operation.
5. The battery charger is included in the tension link package. Please use this
charger, It’s normal that the charger will become warm when the battery is charging.
6. Please note when the digits flash on the display, it means that the battery needs
to be recharged.
7. Check shackle, safety pins, and latches periodically. Contact your dealer
for parts replacement in case defect, deform or wearing is found.
Box 79 Hantverksvägen 15
76040 Väddö, Sverige
Tel. +46 (0)176-208920
Fax +46 (0)176-208929
Web
Email
www.vetek.se
[email protected]
3
USER MANUAL
CHAPTER 1
FEATURES AND SPECIFICATION
1. Features
◆ Wireless communication and display
Wireless indicator, 5 digits LCD display with backlight, Many functions on handheld
indicator
280D. Such as tare, zero, peak, filter setting, gravity regulation.calibration is easy
through
wireless indicator. ,
◆ Two set point
Two user programmable Set-Point can be used for safety and warning applications or
for limit weighing.
◆ User-friendly design:
Cast alloy steel housing for maximum protection; water proof design, gravity
compensation; safety factor up to 4 times capacity; battery operated with low battery
indication; automatic turn off , power-saving function.
2. Main technical data
Accuracy Standard
According to OIML class III
Indicator Display
25mm(1”) 5digits LCD
Water Proof Class
IP66
Zero Range
4% F.S.
Tare Range
100% F.S.
Stable Time
≤5 seconds
Overload Indication
100% F.S. + 9e
Max. Safety Load
125% F.S.
Ultimate Load
400% F.S.
Tension link battery Life
Continous using 90 hours after recharged
Tension link battery type
Indicator Battery
Standard
18650
Lithium
3.7V/3100mAh
SC3300mAh NiH Battery. 1.2Vx4
Tension link Charger
DC4.2V/1000mA
battery,
Nominal operating Temp. - 10℃ ~ + 40℃
Operating Humidity
≤85% RH under 20℃
Wireless Distance
100M without obstacle
Wireless Frequency
433MHz
Box 79 Hantverksvägen 15
76040 Väddö, Sverige
Tel. +46 (0)176-208920
Fax +46 (0)176-208929
Web
Email
www.vetek.se
[email protected]
4
USER MANUAL
3. Specification
MODEL
EBW-5
EBW-10
EBW-20
EBW-30
EBW-50
EBW-100
EBW-150
EBW-200
Max.
capacity
(kg)
5000
10000
20000
30000
50000
100000
150000
200000
Min. weigh
(kg)
Division
(kg)
Total display
counts (n)
40
100
200
200
400
1000
1000
2000
2
5
10
10
20
50
50
100
2500
2000
2000
3000
2500
2000
3000
2000
4. Appearance illustration
MODEL
EBW-5
EBW-10
EBW-20
EBW-30
EBW-50
EBW-10
0
EBW-15
EBW-20
0
0
Cap.
(kg)
5000
10000
20000
30000
50000
100000
150000
200000
A
(mm)
190
245
312
370
460
580
690
800
Box 79 Hantverksvägen 15
76040 Väddö, Sverige
B
(mm)
110
110
110
110
110
110
110
110
C
(mm)
60
70
94
114
140
180
220
250
D
(mm
)
137
168
206
246
309
389
456
534
Tel. +46 (0)176-208920
Fax +46 (0)176-208929
E
(mm)
65
65
65
65
65
65
65
65
F
(mm)
30
36
45
50
60
80
90
100
Web
Email
G
(mm
)
70
76
85
90
100
120
130
140
2-Φ
(mm)
27
41
54
60
73
99
112
134
N.W
.
(kg)
2.6
4.3
8.5
14
25
53
89
128
www.vetek.se
[email protected]
5
USER MANUAL
5. Tension link power supply
Battery: Standard 18650 Lithium battery, 3.7V/3100mAh
Adapter: Standard 18650 Lithium battery charger
Current: the tension link average current is about DC 30mA±10%, if battery charged, it
can be used for about 90hours.the battery voltge should be between 3.40-4.20, When the
voltage below
3.40, it means the battery needs to be recharged. User can remove the battery cover to
change
new battery, and charge the old battery with adapter.
Charging method: Take out the18650 Lithium battery, put in the charger for charging, the
charge
lamp on the front panel will become orange when charging, and it will become green when
the
charging finish. Generally, charging time should not less than 4hours, it have charging
protection,
long time charging can’t damage the battery.
CHAPTER 2
INDICATOR
DISPLAY
1. Tension link transmitter
1. ON/OFF KEY
Box 79 Hantverksvägen 15
76040 Väddö, Sverige
Tel. +46 (0)176-208920
Fax +46 (0)176-208929
Web
Email
www.vetek.se
[email protected]
6
USER MANUAL
When the key is pressed ON, the red light will flash
2. ANTENNA
The antenna is install with water proof connector.
3. Battery cover
User can removed the battery cover to change battery (lithium battery 18650)
2. Indicator display
1. LCD DISPLAY
25mm(1”) 5digits LCD with backlight
2. Signal on LCD
a.
: Wireless signal, it Appear means signal stable, it disappear while signal miss. it
flash
means signal weak.
b.
: Battery Voltage,
: Full,
: Low,
: Empty
c.
PEAK:Current value is Peak Hold value(maximum value).
d.
MEM:Appear one time when Parameter or calibration value storage. long time
appearance means current value is Accumulation data.
e.
STB: Stable Status.
f.
kN: “kilonewton”, N:“Newton”. Tare status “N” will flash.
g.
t :“ton”.
h.
lb :“pound”.
i.
kg :“kilogram ”.
3.Key
a.
,
1. Press
Key 1 Second, the indicator turn on.
2. In ON status,Press
Key 1 Second,the indicator turn off.
b.
1. In testing status ,there are small digits on screen, press this key to obtain the zero
reading.
2.In Parameter Setting status,it used as scrolling down digit.
Box 79 Hantverksvägen 15
76040 Väddö, Sverige
Tel. +46 (0)176-208920
Fax +46 (0)176-208929
Web
Email
www.vetek.se
[email protected]
7
USER MANUAL
c.
1. When there is tare weight such as container, after the reading stable, press this key, it will
display “0”, and “N” indicator Flash.
2. Put the goods into container, the tension link will display goods net weight.
3. If move goods and container, the tension link will display minus value of tare weight.
4. In Parameter Setting status, it used as digits movement.
d.
Used as function shift, or be combined with other keys.
key once, it display “P0000”, press
◆ Press
key , it can
be input password to access parameter setting or calibration status.(refer to
P12 CHAPTER 4)
key twice, it display “unit”, Press
◆ Press
status. Press
key access unit Setting
key to select unit (kg,lb,N,kN,t,), After setting finish, press
key to confirm setting and back to test mode.
key 3 times, it display “SACCU”, Press
◆ Press
key to read
accumulate data, it will display “no.xxx” and “Hxxxx”,”Lxxxx”, “no.xxx” means
accumulate numbers, “Hxxxx”,”Lxxxx” means accumulate data, if there is no
accumulate data ,it will display “noACC”, press
key 4 times, it display “SEttr”, Press
◆ Press
value setting. Press
press
key back to test mode.
key access pre-tare
key to adjust digit, press
key to move digit,
key again back to test mode. after Pre-tare value setting, the “N”
will flash on LCD.(NOTE: All pre-tare value will set by unit kg)
◆ Press
key 5 times, i t display “dISrU”, Press
tension link voltage, press
key back to test mode.
key 6 times, it display “dISLU”, Press
◆ Press
voltage, press
◆ Press
key will display
Key will display indicator’s
key back to test mode.
key 7 times, it display “dIS 0”, Press
Key will display tension link’s
AD Value. After 2 seconds,it auto back to test mode.
◆ Press
key 8 times, it display “dISOL”, Press
Key will display
Key back to
“OL=xx” it means tension link’s overload numbers,Press
test mode.
e.
Used as function selection, normally combined with
Key.
f.
When load is changing, press this key will catch and display the maximum reading of
the load.
Press this key again, reading will return to normal.( in setting mode it can move digit to
left).
Box 79 Hantverksvägen 15
76040 Väddö, Sverige
Tel. +46 (0)176-208920
Fax +46 (0)176-208929
Web
Email
www.vetek.se
[email protected]
8
USER MANUAL
g.
It is LCD backlight switch. Press once, LCD backlight ON, press again, LCD
backlight OFF.
h.
It is accumulation key,In weighing status press this key will accumulate data(the value
must
be stable and more than 20e)
I.
Press
key one time, it will display “CLr 1” Press
accumulation value, Press
key to clear single
key 2 times, it will display “CLr 2” Press
key to
key 3 times, it will display “CLr 3” Press
key to
clear all
Accumulation value, Press
clear
over load records,
CHAPTER 3
OPERATION GUIDE
Note: 〖 〗means the display content
1 TURN ON/OFF
◆Turn on tension link
Press ON/OFF key ,the key light will flash.
◆Turn on indicator( Turn on tension link at first)
OPERATIO DISPLAY
ILLUSTRATION
N
〖88888〗 Display twice, self test
〖 Ert 〗 Display twice, abbreviation of Everight
〖u 2.03〗 Display current software version
〖 5000〗 Display maximum capacity
〖U=4.80〗Display current indicator battery voltage
〖–––––〗 Waiting stable
〖 0〗or If display 0, means the indicator can communicate with the
〖noSIG〗 tension link, if display noSIG, means no signal from tension
link
◆Turn off tension link
Press ON/OFF key when power ON status, ,the key light will not flash
◆Turn off indicator
1
Manual Power OFF
Press
Key 1 Second
The indicator will turn off automatically
2
Auto Power OFF
after
3 minutes if no operation
2 ZERO
Box 79 Hantverksvägen 15
76040 Väddö, Sverige
Tel. +46 (0)176-208920
Fax +46 (0)176-208929
Web
Email
www.vetek.se
[email protected]
9
USER MANUAL
OPERATION
Press
DISPLAY When tension link turn on, generally tension link
〖
0〗 displays〖 0〗,if display small digits when no load,
press this key.
3 TARE
◆ TARE DIRECTLY
OPERATION
DISPLAY After turn on, hanging tare weight such as sling,
1
〖
0〗 cable at first, press this key, “TARE” light on,
Press
then the tension link will display net weight of
the goods.
4 PEAK HOLD
OPERATION
Press
Press
ILLUSTRATION
Hold the maximum weight reading when load
changing
Return to normal weighing status
again
USER MANUAL
ERT10.022 SSE
8
5.ACCUMULATION
OPERATION
DISPLAY
ILLUSTRATION
〖No***〗 Current accumulation time
Press
〖H****〗 Front four digits of total value
〖L****〗 Rear four digits of total value
After display above contents twice, the tension link will return automatically. maximum
Accumulation times is 999.
6.ACCUMULATION SEARCH
OPERATION
DISPLAY
〖SACCU〗
Press
key 3 times
〖No***〗
〖*****〗
〖H****〗
〖L****〗
Press
ILLUSTRATION
Current accumulation time
Current weight reading
Front four digits of total value
Rear four digits of total value
Return
Press
key again
Press
key can check different times weight and accumulation.
7. ACCUMULATION CLEAR
Box 79 Hantverksvägen 15
76040 Väddö, Sverige
Tel. +46 (0)176-208920
Fax +46 (0)176-208929
Web
Email
www.vetek.se
[email protected]
10
USER MANUAL
OPERATION
ILLUSTRATION
key
〖CLr 1〗
Ask if you want to clear or not
key again
〖CLr 2〗
Ask if you want to clear or not
Presss
Presss
DISPLAY
〖noCLr〗
Press
key Cancel clear
〖88888〗
Press
key Confirm clear
8. TENSION LINK & INDICATOR BATTERY VOLTAGE
OPERATION
DISPLAY
ILLUSTRATION
Press
key 5 times,
〖dISrU〗
display tension link voltage
press
key.
〖U *.**〗
tension link voltage
Press
key
Press
key 6 times,
〖dISLU〗
display indicator voltage
press
key.
〖U *.**〗
Indicator voltage
Press
key
Return
Return
Note:Tension link and indicator battery voltage normally between 〖U 3.40〗to 〖U 4.20〗,
if
tension link battery below 〖U 3.40〗, indicator will show 〖-Lb-〗,it means user need to change
new battery.if indicator battery voltage below 〖U 4.20〗, the display will flash, and battery
signal
: Empty, indicator should be recharged immediately
show
9. UNIT
OPERAT
DISPLAY
ION
Press
key 4 times 〖UnIt 〗
ILLUSTRATION
Press
press
key
〖Un=0〗
Press
key
〖
to select unit from 0-4, 0 means kg
1 means lb,2 means N, 3 means KN, 4means
ton.
Confirm unit chosen and return
0〗
10. RETURN
OPERATION
DISPLAY
Press
〖
0〗
ILLUSTRATION
Return to normal testing
status
11. SET POINT
There are two user programmable Set-Point can be used for safety and warning
applications
Box 79 Hantverksvägen 15
76040 Väddö, Sverige
Tel. +46 (0)176-208920
Fax +46 (0)176-208929
Web
Email
www.vetek.se
[email protected]
11
USER MANUAL
or for limit weighing.
_
1 LO
SP1
OPERATION
1 HI
2 LO
DISPLAY
Press
key
〖P0000〗
Press
12 times
〖SP1
Press
to confirm
〖1 OFF〗
SP2 2 HI
ILLUSTRATION
Press
and
input P8088
〗 Set point 1
New tension link, it display 1 OFF, if
parameter set, it display set value.
Press
to choose
〖1 HI〗or
〖1 LO〗
Press
to confirm
〖02000〗
There are 3 choice,1 OFF means you don’t
set point, 1 HI means the indicator will alarm
when load exceed the value you set, 1 LO
means the indicator will alarm when load
smaller than the value
New tension link it display 02000, if
parameter set, the screen display set value.
to
〖01000〗
Set “1 HI” or “1
Press
to confirm
〖 SP2〗
Set point 2
Press
to confirm
〖2 OFF〗
New tension link, it display 2 OFF, if
Press
and
LO” Value. e.g. 1000kg
change value
parameter set, it display set value.
Press
to choose
〖2 HI〗or
There are 3 choice,2 OFF means you don’t
〖2 LO〗
set point, 2 HI means the indicator will alarm
when load exceed the value you set, 2 LO
means the indicator will alarm when load
smaller than the value
Press
to confirm
Press
and
to
〖01200〗
New tension link it display 01200, if
parameter set, the screen display set value.
〖03000〗
Set “2 LO” or “2
〖 End 〗
Confirm above parameter setting,Exit
〖
parameter setting program.
HI” Value. e.g.3000kg
change value
Press
key
Box 79 Hantverksvägen 15
76040 Väddö, Sverige
0〗
Tel. +46 (0)176-208920
Fax +46 (0)176-208929
Web
Email
www.vetek.se
[email protected]
12
USER MANUAL
If you needn’t to set point, you only need to press 【ENTER】until it display next function
〖g= 〗
CHAPTER 4
PARAMETER SETTING &CALIBRATION
1. PARAMETER SETTING
OPERATION
DISPLAY
ILLUSTRATION
Press(ON/OFF) and
〖
Press
〖P0000〗 Press
Press
0〗 Turn on tension link and indicator
and
input P8088
〖FS=06
New tension link, it display FS=06 ,if tension
〗
link calibrated, it will display capacity.
Choose capacity, the screen
Press
to choose
〖FS=05
〗
display02/03/05/06/10/
15/20/30/50/60/75/80/A0/F0 circularly,take
cap:5000kg/2kg as example, choose FS=05,
See following list about FS, Id, Pt chosen.
New tension link ,the
Press
to confirm
screen
display
〖Id=02〗 Id=02, if tension link calibrated, it will display
calibrated division.
Choose division, it display
Press
to choose
〖Id=02〗 01/02/05/10/20circularly. 5000kg tension link
division is 2kg, so choose Id=02
〖Pt=0〗
Press
New tension link, it display Pt=0, if tension link
calibrated, it will display calibrated decimal
position
Press
to choose
〖Pt=0〗
Choose
screen
decimal
position,
the
display 0/1/2/3 circularly,
0=xxxxx, 1=xxxx.x, 2=xxx.xx, 3=xx.xxx,
Cap.5000kg ,we choose Pt=0
Box 79 Hantverksvägen 15
76040 Väddö, Sverige
Tel. +46 (0)176-208920
Fax +46 (0)176-208929
Web
Email
www.vetek.se
[email protected]
13
USER MANUAL
Press
to confirm
〖Ab=24〗 Display zero range , A: zero range by hand;
B: zero range
6
options:
2=4%F.S;
5=50%F.S,
automatically,
0=0%F. S;
3=10%F.S;
0~5
total
1=2%F.S;
4=20%F.S;
Generally Don’t change
this
parameter.
Press
to confirm
〖Cd=11
New tension link, the screen display
〗
Cd=11,if Tension link calibrated, it display
calibrated value.
Press
to choose
〖Cd=12
C: zero-tracking
〗
options;
range, 0~5
total
6
0=0d; 1=0.5d; 2=1d; 3=1.5d; 4=2d; 5=2.5d
d: display speed,0~2
total
3
options;
0=slow; 1=average; 2=fast; before
calibration, set Cd=00 to achieve high
accuracy, after calibration, set Cd=11 again,
generally choose Cd==12 when ex-stock..
Press
to confirm
〖LL=2〗 New tension link, it display LL=2, if tension
link calibrated,it display calibrated value.
Press
to choose
〖LL=1〗 LL:filter parameter,0~5 total 6 options, from
smallest to biggest , before
calibration,
set
LL=0, after
calibration,
set
LL=1 ,
generally choose LL=1 when ex-stock..
Press
to confirm
New tension link, it display Un=0,
if
〖Un=0〗 dyna-link calibrated,the screen display
calibrated unit.
Press
to choose
〖Un=0〗 Choose unit,Un=0:kg, Un=1: lb, Un=2:
N,Un=3: KN, Un=4: ton, Generally, choose
Un=0 when ex-stock.
Press
to confirm
〖OFF 1〗 New tension link, it display OFF 1,if tension
link calibrated,it display calibrated value.
Box 79 Hantverksvägen 15
76040 Väddö, Sverige
Tel. +46 (0)176-208920
Fax +46 (0)176-208929
Web
Email
www.vetek.se
[email protected]
14
USER MANUAL
Press
to choose
Press
to confirm
〖OFF 2〗 Choose turn off method, 0~2 total 3 options; 0:
turn off by hand; 1: if no operation, the
screen display ----- after 15minutes to save
power; 2: if no operation, the screen display
----- after 15minutes, and turn off
automatically after 60minutes. Generally,
choose OFF=2 when ex-stock.
〖SP1 〗 Set point 1
Press
to confirm
〖1 OFF〗 New tension link, it display 1 OFF, if
parameter set, it display set value.
Press
to choose
Press
to confirm
〖1 HI〗or There are 3 choice,1 OFF means you don’t
set point, 1 HI means the indicator will alarm
〖1 LO〗
when load exceed the value you set, 1 LO
means the indicator will alarm when load
smaller than the value
〖02000〗 New tension link it display 02000, if
parameter set, the screen display set value.
Press
and
to 〖01000〗 Set “1 HI” or “1 LO” Value. e.g. 1000kg
change value
Press
to confirm
〖 SP2〗 Set point 2
Press
to confirm
〖2 OFF〗
Press
to choose
〖2 HI〗
There are 3 choice,2 OFF means you don’t
or
set point, 2 HI means the indicator will alarm
〖2 LO〗
when load exceed the value you set, 2 LO
means the indicator will alarm when load
Press
to confirm
〖01200〗 New
smaller
than the
tension
link value
it display 01200, if
parameter set, the screen display set value.
Press
and
to 〖03000〗 Set “2 LO” or “2 HI” value. e.g.3000kg
change value
Press
to confirm
Box 79 Hantverksvägen 15
76040 Väddö, Sverige
〖g= 〗
Acceleration of gravity
Tel. +46 (0)176-208920
Fax +46 (0)176-208929
Web
Email
www.vetek.se
[email protected]
15
USER MANUAL
Press
to confirm 〖9.7930
Then Press
and 〗
to change value
New tension link , it display 9.7930(here in
Hangzhou), if tension link calibrated, it
display calibrated value. user can change it
according to local area gravity value, the
value range is 9.783-9.832,
Press
key
〖 End 〗 Confirm above parameter setting,Exit
〖
0〗 parameter setting program.
The capacity you choose relate to division, decimal position, below is detail list:
FS (CAP) Id
Pt(DECIMAL POSITION)
CAPACITY/DIVISIO
(DIVISION)
N
1000kg/0.5kg
10
05
1
2000kg/1kg
02
01
0
3000kg/1kg
03
01
0
5000kg/2kg
05
02
0
10000kg/5kg
10
05
0
15000kg/5kg
15
05
0
20000kg/10kg
20
10
0
30000kg/10kg
30
10
0
50000kg/20kg
50
20
0
100000kg/50kg
A0
50
0
1500000kg/50kg
F0
50
0
200t use specail software, no need to set FS,Id,Pt.
2. Calibration
User must set all parameter before calibration
OPERATION
DISPLA
ILLUSTRATION
Y
Press(ON/OFF) and
〖
0〗Turn on tension link and indicator .
Press
Take Cap:5000kg tension link as example , make
0〗before calibration, you can
sure it display〖
hang
tare weight first, then turn on to get zero reading
〖P0000 Press
and
input P1358
〗
〖CLIbr〗 Access calibration Status
Press
〖CALSP Zero point calibration
Press
〗
〖LoAd
First load calibration
1〗
Press
Box 79 Hantverksvägen 15
76040 Väddö, Sverige
Tel. +46 (0)176-208920
Fax +46 (0)176-208929
Web
Email
www.vetek.se
[email protected]
16
USER MANUAL
Hanging first standard
weight, e.g. 1000kg
Display capacity you choose in parameter setting,
〖05000〗
and first digit flash,Do wait until “STB” signal display
Press
Press
Waiting until STB signal on screen
and
on
screen. to change value, press
Press
〖01000〗
to move the digit, input actual weight 1000kg
Waiting until stable Press 〖 LoAd2Confirm and storage, into second load calibration
Hanging second standard 〗
Second load must exceed Load 1+20% capacity,
weight, e.g. 3000kg
Mention
you Load2 must exceed 2000kg ,and first
on screen,
〖02000〗
digit flash,Do wait until “STB” signal display
Press
Press
Waiting until STB light on.Waiting until STB signal
and
on
screen. to change value, press
Press
〖03000〗
to move the digit, input actual weight 3000kg
Waiting until stable Press 〖 LoAd3Confirm and storage, into third load calibration
〗
Hanging third standard
Third load must exceed Load 2+20% capacity,
weight, e.g. 5000kg
on
screen,
Mention
you Load3 must exceed 4000kg ,and first
〖04000〗
digit flash,Do wait until “STB” signal display
Press
Press
Waiting until STB light on.Waiting until STB signal
and
Press
on
screen. to change value, press
Press
〖05000〗
to move the digit, input actual weight 5000kg
〖 End 〗
〖05000〗Calibration finish
Attention:
1. LOAD1 must larger than 20% capacity,and LOAD1<LOAD2<LOAD3,
at the same
time, between LOAD1 and LOAD2, LOAD2 and LOAD3, the interval must bigger
than 20% capacity
2. If LOAD1 is bigger than 80% capacity, such as full capacity, after first load
calibration, it will finish automatically,. Generally, we strongly recommend you to
use this one point calibration program if you have 100% capacity standard weight
3. If you only have 20% standard weight, after first load calibration, when it display
〖LoAd2〗, press【ESC】, it will display End. Calibration finish.
Box 79 Hantverksvägen 15
76040 Väddö, Sverige
Tel. +46 (0)176-208920
Fax +46 (0)176-208929
Web
Email
www.vetek.se
[email protected]
17
USER MANUAL
CHAPTER 5
DISPLAY ILLUSTRATION
DISPLAY
ILLUSTRATION
REMARK
〖noSIg〗
Without wireless signal
Distance too far.
〖SEtUP〗
Enter into parameter setting
〖UAdJ 〗
Enter voltage calibration
〖LoAd〗
Calibration point
〖¯ ¯ ¯ ¯ ¯ 〗
Exceed high limit
〖﹍﹍ 〗
Exceed low limit
〖----- 〗
Waiting stable
Weight less than Min.
Can’t accumulate the value
Capacity
Accumumated times overflow Can’t accumulate after 30times
〖Err10〗
〖Err11〗
〖Err12〗
〖Err13〗
〖no***〗
〖H****〗
〖L****〗
〖 CLr 〗
Accumulated weight overflow Can’t accumulate after 99999
accumulate one weight
Error in repeat accumulation Can’t
repeatedly
Current accumulation times
Total weight=front four digit +
Front four digit of
accumulated
rare four digit
Total weight=front four digit + rare
Rare four digit of
accumulated
four digit
Ask if you really want to
In case error deletion
delete accumulated weight
〖noCLr〗
Give up deletion
〖88888〗
〖 ¯¯¯ 〗
Confirm deletion
Input value is too large
〖
﹍ 〗
〖noACC〗
〖-oL0- 〗
〖-oL1- 〗
〖-Lb- 〗
〖U*.**〗
〖 End 〗
〖 OFF 〗
〖Unstb〗
Tare weight can’t exceed full
capacity
Tare weight can’t be negative
When you input tare or weight
value
When you input tare or weight
Input value is too small
value
No any accumulated content when you check accumulation
Tare + Net weight exceed full
Overload warning
capacity + 9e
Tare + Net weight exceed full
Overload warning
capacity 125%
Turn off automatically one minute
Low battery warning
later
The voltage of current
battery
when parameter setting or
End
calibration ready
Turn off
Input value before STB light
on
CHAPTER 6
Box 79 Hantverksvägen 15
76040 Väddö, Sverige
TROUBLESHOOTING GUIDE
Tel. +46 (0)176-208920
Fax +46 (0)176-208929
Web
Email
www.vetek.se
[email protected]
18
USER MANUAL
PROBLEM
No display
POSSIBLE CAUSE
SOUTION
Defective battery
Replace
Defective button
Requires authorized service
Power
button
properly pressed
not
Press ON/OFF key
firmly in three seconds
Digits flash
Low battery
Replace battery
Display doesn’t
respond to load
changes
Faulty load cell or PCB
Requires authorized service
Out of calibration
Re- calibration
Display
experiences
excessive Zero
drift between
Displayed weight
weighment
shows large error
tension link do not stabilize
after turning on
After turning on, heating 3-5
tension link not Zeroed
before applying weight
Depress ZERO
before applying
weight
See calibration
Requires recalibration
Kg/lb wrong selection
Wireless indicator’s battery is
low
Wireless distance
shortened
CHAPTER 7
Port :
Baud Rate:
Data Bits :
Stop Bits :
Parity :
RS232
minutes.
See operation
Replace battery.
PROTOCOL
COM1
4800
8
1
None
ASCII Code and Binary hybrid transmission
=
FLAG (1Byte)
Unit
p
r
e
a
m
b
l
e
F1
F2
F3
F4
F5
F6
F7
S
T
A
BL
E
O
V
E
R
L
O
A
D
T
A
R
E
H
O
L
D
P
E
A
K
B
E
T
T
E
R
Y
SP
A
L
A
R
M
Box 79 Hantverksvägen 15
76040 Väddö, Sverige
Tel. +46 (0)176-208920
Fax +46 (0)176-208929
F8
(1Byte)
0x30:kg
0x31:Lb
0x32:N
0x33:kN
0x34:t
Web
Email
Sign and Decimal
(1Byte)
(+ and -) sign:
High 4 bits
Decimal:
Low 4 bits
www.vetek.se
[email protected]
19
USER MANUAL
=
0: 0: 0: 0:
no no no no
1:
1:
1:
1:
0: 0:
no L
O
1: W
0:
no
0:POSITIVE
1:NEGATIVE
Y
Y
Y
Y
Y
1:
Y
0:No Decimal
1:1 Decimal
2:2 Decimal
3:3 Decimal
E
E
E
E
E
E
S
S
S
S
S
S
TTTTT
5Byte
,
1Byte
NNNNN/PPPPP
5Byte
Tare value
Separate
symble
Net value and Peak value
0x30~0x39
Overload:
3SP+OL
0x30~0x39
Overload:
3SP+OL
Example:
67.8kg: (F1 F2 F3 F4 F5 F6 F7 F8 )30 01 30 30 36 37 38,30 30 36 37 38
-68.1lb: (F1 F2 F3 F4 F5 F6 F7 F8 )31 F1 30 30 36 37 38,30 30 36 37 38
6.78kg: (F1 F2 F3 F4 F5 F6 F7 F8 )30 02 30 30 36 37 38,30 30 36 37 38
Box 79 Hantverksvägen 15
76040 Väddö, Sverige
Tel. +46 (0)176-208920
Fax +46 (0)176-208929
Web
Email
www.vetek.se
[email protected]
20