1
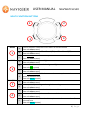
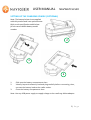
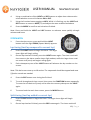
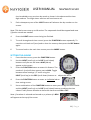
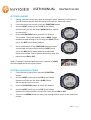
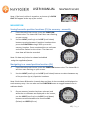
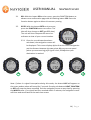
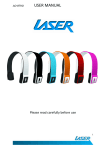
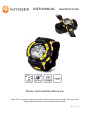
USER MANUAL
NAVWATCH-S10
Please read carefully before use
Note: This is a generic user manual which covers more than one model. You may notice
slightly different screen shots throughout this manual.
1|Page
USER MANUAL
NAVWATCH-S10
Table of Contents
Important safety instructions and precautions ..................................................................... 3
Multi-Function Buttons ........................................................................................................... 4
Setting up the Charging Cradle ............................................................................................... 5
Charging your watch................................................................................................................ 6
Updating your time Zone ........................................................................................................ 7
Setting up the Date and time .................................................................................................. 8
Scheduled GPS time updating / ARC (Automatic Regional Calibration) ........................... 9
Stopwatch .............................................................................................................................. 10
Lap timing (Last lap compared to current lap) ................................................................. 10
Setting a memo ...................................................................................................................... 12
Setting an hourly chime ........................................................................................................ 12
Navigation .............................................................................................................................. 13
Saving favourite position locations (PL) to memory - manually ..................................... 13
Navigating to a saved position location (PL) .................................................................... 13
Designation-free based tracking – Sports Mode ............................................................. 15
NAVWATCH-S10 Software (Track Star) ................................................................................ 16
Installation – Hardware ..................................................................................................... 16
Importing track data records............................................................................................. 17
Selecting a track (a data file) ............................................................................................. 17
Exporting a track ................................................................................................................ 18
Merging tracks .................................................................................................................... 19
Edit a track .......................................................................................................................... 19
Saving favourite position locations (PL) to memory – via software ............................... 19
Information Tabs ................................................................................................................... 21
Track Photos (Advanced Users) .................................................................................... 22
Change a track photo .................................................................................................... 24
Delete a track photo...................................................................................................... 24
2|Page
USER MANUAL
NAVWATCH-S10
Uploading to Picasa And Flicker ................................................................................... 24
Sports Diagram ................................................................................................................... 25
UTC Table ............................................................................................................................... 27
Specifications ......................................................................................................................... 31
Trouble Shooting / Q & A ...................................................................................................... 32
IMPORTANT SAFETY INSTRUCTIONS AND PRECAUTIONS
- Read all instructions carefully before use.
- Retain manuals for future reference.
- Use this product only in the manner described.
- Only use a water-dampened soft-cloth to clean the surface of this product.
- Ensure the watch is not wet before pressing any of the function buttons. Water / moisture can
easily be introduced inside the unit by pressing the buttons in this case, causing damage.
- If charging is required, it is recommended to thoroughly charge electronic devices for the first
time overnight. Subsequent charges can be as needed. During charging, or extended use, the
product may become warm.
- It is ideal to avoid continually running the battery flat before charging.
- There are no user serviceable parts in this product.
- Un-authorized attempts to dismantle or repair this product will void product warranty and
may result in dangerous electric shock.
- Do not use this product if you are in control of dangerous machinery.
- Remove any power or data cords by pulling them from the plug and not the cord.
- Using this device near other electronic devices may cause interference.
- Keep this device away from extended periods of direct sunlight or heat
- Your NAVWATCH-S10 is water proof at 5ATM / 50 meters. It is suitable for most
shallow swimming but not for diving and other deeper water sports.
WHAT’S IN THE BOX
1x NAVWATCH-S10, 1x Charging Cradle, 1x Software CD, 1x USB cable, 1x User Manual
OPERATING SYSTEM REQUIREMENTS (FOR COMPUTER CONNECTION)
System:
Processor:
Windows XP SP2, Windows Vista, Windows 7 or higher
Pentium III CPU 1GHz +, 1GB + free RAM, 500 MB + free space
3|Page
USER MANUAL
NAVWATCH-S10
MULTI-FUNCTION BUTTONS
MODE
1
a.
b.
c.
LIGHT
a.
b.
2
c.
d.
FUNCTION
3
REC
4
a.
b.
a.
b.
c.
1
2
3
4
Press to confirm a selection or to return to the last screen
(from the time screen)
Press to toggle between Time Zone 1 (T1) and Time Zone 2 (T2)
(from the time screen)
Press and hold to enter time setup for T1 and T2
(from the time screen)
Press to turn on background light
(from the time screen)
Press and hold to turn on the background light
(from the GPS screen)
Press and hold for stopwatch
(from the time screen)
Press or press and hold this button to select next option or to increase
values of selected item
(from the menu screen)
Press to enter the menu screen
(from the time screen)
Press repeatedly to navigate through time settings
(from the time screen)
Press this button twice to view location coordinates and time
(from the time screen)
Press or and hold to update coordinates and time
(from the time screen)
Press or press and hold to select last option or to decrease values of
Selected item
(from the menu screen)
4|Page
USER MANUAL
NAVWATCH-S10
SETTING UP THE CHARGING CRADLE (OPTIONAL)
Note: The battery below is not supplied
with this product and is an optional extra.
Refer to the specification table below
for the correct Nokia battery model
number.
2
1
3
1.
2.
3.
Slide one the battery compartment door.
Visually inspect the battery lead and plug carefully before connecting, then,
connect the battery lead to the cradle socket.
Close the battery compartment door.
Note: Use any USB power supply to supply voltage to the cradle eg. Mains adaptor
5|Page
USER MANUAL
NAVWATCH-S10
CHARGING YOUR WATCH
When a recharge is required:
1. Align the cradle with the
power switch facing towards you.
2. Carefully press the watch down
and slide the locking arm into
place until it clicks.
3. Turn the power switch on.
4. The yellow indicator lamp will appear
when the battery requires charging.
5. When charging is completed, the
indicator lamp will change to green.
6. While removing the watch, be mindful
to hold the cradle firmly while pressing the
left-side release button.
Note: Check the cradle has enough power
for another re-charge by switching the
power button on while not connected to
USB power and without the watch in place.
If the indicator lamp is green, there is
enough power for another charge. (used
when optionally battery is fitted)
6|Page
USER MANUAL
NAVWATCH-S10
Note: Through-out making your adjustments in the menu settings screens, this device
will default back to the main time screen if no buttons are pressed for 60 seconds.
UPDATING YOUR TIME ZONE
Note: This unit has 2 time zone settings. The main time zone is Zone 1 (referred to here
on as T1). T1 is always symbolised by an abbreviated day name eg. SUN, MON etc. Time
zone 2 (referred to here on as T2) is symbolised only as T2.
1.
Press and hold the MODE button
until the Day (abbreviation) starts flashing
between T1 (Time Zone 1 abbreviation)
and UTC. (or a + / - number. Eg. +3 or -10)
2.
At this stage you need to input your
current time zone UTC (Coordinated
Universal Time) number. Refer to the UTC
time zone list later in the manual if
required. Use the LIGHT and REC buttons
to adjust this number to your time zone.
Hint: Press both LIGHT and REC buttons
together for rapid advance.
3.
Once you have adjusted your T1
setting, press the MODE button again to
toggle to the T2 setting and adjust as
required (optional). Press the MODE
button again to return to the main time
screen.
Note: Once you have set your time zones and pressed the mode button to return to the
main time screen, use the mode button to toggle between the times in T1 and in T2.
7|Page
USER MANUAL
NAVWATCH-S10
SETTING UP THE DATE AND TIME
Following from the Time Zone setting, you now have two clocks that need to be set.
These are again, called T1 (day name) and T2.
Note 1: If your global location does not support time auto-update you may be required
to manually set the time.
GPS updating
1.
Move outside to a location with clear line of sight to the sky. It is preferable to
be away from any surrounding buildings or structures that may inhibit the GPS
signal.
2.
From the time screen, press and hold the REC button until
the date read out (not the time read out) disappears and
is replaced with 00 (two zeros). The screen will display the
letters GET. The device has now started searching for GPS
satellite signals.
3.
As contact is made with each satellite this number 00 will
start to increase, to as much as 10-15 depending on your
area and conditions. Once the device has confirmed your
location co-ordinates, they will be momentarily displayed
on the screen.
4.
Your current location date and time will now be updated to your watch.
Note 1: You can re-view your location co-ordinates by pressing the REC button (twice)
from the time screen. The first press will take you past a screen titled GET which shows
the last time and date your co-ordinates were updated. You can then press the MODE
button again to take you back to the time screen.)
Note 2: It is suggested that you remain still while this initial GPS satellite connection is
made.
8|Page
USER MANUAL
NAVWATCH-S10
Manual updating
1.
The first step here is the same as the first step with setting
the time zone; press and hold the MODE button until the
Day / Time zone (abbreviation) digits starts flashing
between T1 (Time Zone 1 abbreviation) and UTC.
(or a + / - number. Eg. +3 or -10)
2.
Then press the FUNCTION button. The year number will start flashing. Then use
the LIGHT button to either increase or the REC button to decrease this figure.
3.
Press the FUNCTION button again to move to the next field, MONTHS, and use
the same LIGHT and REC buttons to either increase or decrease this figure.
4.
Repeat again to the sections DAY, HOURS, MINUTE, SECOND, then finally you
have the option to turn ON or OFF DST (Day Light Savings time) accordingly.
5.
Press the MODE button until you return back to the main time menu screen.
Note: Only the time for T1 can be set manually. There is an option to adjust for daylight
savings for T2 only. This can be done by pressing the MODE after point 4 above. The T1
sign will then change to T2. Then press function to start to toggle to the DST field. Then
use the LIGHT and REC buttons to adjust, then finally the MODE button to confirm and
exit.
Scheduled GPS time updating / ARC (Automatic Regional Calibration)
1.
To ensure you have accurate time for each day and in any time zone, simply set
your watch to automatically update itself at a given time each day.
2.
Press the NAVIGATION button once and use the LIGHT
and REC buttons to toggle to ARC. Press the FUNCTION
button to enter this feature. ARC1 will then begin to
flash.
3.
Press the FUNCTION button to begin setting up the
details for ARC1 (T1 Time Zone).
9|Page
USER MANUAL
4.
5.
6.
NAVWATCH-S10
Using a combination of the LIGHT and REC buttons to adjust time values and to
select whether to turn this feature ON or OFF.
Using the function button toggle to ARC1. While it is flashing, use the LIGHT and
REC buttons to move to ARC2 (T2) and adjust the same as described above.
Press the MODE to confirm and exit when finished.
Note: Press and hold the LIGHT and REC buttons to advance more quickly through
minutes and hours.
STOPWATCH
1.
From the time screen, press and hold the LIGHT
button until the digits SPWH (Sports Watch) appears.
Lap timing (Last lap compared to current lap)
1.
2.
3.
Press the LIGHT button to begin the timer. The larger
timer digits will begin rolling.
Once a lap time has finished, press the LIGHT button again. The timer result will
then move to the above smaller timer digit readout, while the larger timer readout resets to 0 (zero) and begins rolling again.
Each subsequent press of the LIGHT button will advance the lap number on the
screen.
Note: This device can store up to 10 entries. The stopwatch should be stopped and reset
if further records are needed.
4.
Press the REC button once timing has finished.
5.
To scroll through each timer record, then press the FUNCTION button repeatedly.
To reset the unit back to 0 (zero) and to clear the memory data press the LIGHT
again.
6.
To return back the main time screen, press the MODE button.
Split timing (Last lap added to current lap)
1.
2.
Press the REC button to begin the timer. The larger timer digits will begin
rolling.
Once a lap time has finished, press the REC button again. The timer result will
10 | P a g e
USER MANUAL
NAVWATCH-S10
then be added to any previous lap result as shown in the above smaller timer
digit readout. The larger timer read-out will continue to roll.
3.
Each subsequent press of the LIGHT button will advance the lap number on the
screen.
Note: This device can store up to 10 entries. The stopwatch should be stopped and reset
if further records are needed.
4.
Press the LIGHT button once timing has finished.
5.
To scroll through each timer record, press the FUNCTION button repeatedly. To
reset the unit back to 0 (zero) and to clear the memory data press the REC button
again.
6.
To return back to the main time screen press the MODE button.
SETTING THE ALARM
1.
2.
3.
From the time screen, press the FUNCTION button.
Use the LIGHT (scroll up) or the REC (scroll down)
buttons until you see the letters ALM (Alarm)
appear on the screen.
Press the FUNCTION button to enter this feature. The
number 1 (one) will then appear next to ALM. Toggle
between alarm settings 1, 2 and 3 using the
LIGHT (scroll up) or the REC (scroll down) buttons to adjust the values.
4.
Press the FUNCTION button to enter an individual alarm
time setting screen.
5.
Use a combination of the FUNCTION button to move you through the alarm fields
and the LIGHT (scroll up) or the REC (scroll down) buttons to adjust the time
values. Finally choose whether to have this alarm turned ON or OFF.
Note: If an alarm is selected and turned on, a picture of a BELL
will appear at the top of the screen.
11 | P a g e
USER MANUAL
NAVWATCH-S10
SETTING A MEMO
1.
2.
3.
4.
5.
Setting a memo is much the same as setting an alarm, however in this feature,
you can select a specific date (as well as time) that an alarm will sound.
From the main timer screen, press the FUNCTION button.
Use the LIGHT (scroll up) or the REC (scroll down)
buttons until you see the letters MEM (Memo) appear
on the screen.
Press the FUNCTION button to enter this feature.
The number 1 (one) will appear next to MEM. Toggle
between memo settings 1 and 2 using the LIGHT (scroll
up) or the REC (scroll down) buttons.
Use a combination of the FUNCTION button to move
you through the memo fields and the LIGHT (scroll
up) or the REC (scroll down) buttons to adjust the
memo time values. Finally choose whether to have this
memo turned ON or OFF.
Note: If a memo is selected and turned on, a picture of a BELL
will also appear at the top of the screen.
SETTING AN HOURLY CHIME
1.
2.
3.
4.
5.
From the main time screen, press the FUNCTION
button.
Use the LIGHT (scroll up) or the REC (scroll down)
buttons until you see the letters CHM (Chime
Alarm) appears on the screen.
Press the FUNCTION button to enter this feature.
Use the LIGHT (scroll up) or the REC (scroll down)
buttons to choose whether to have this chime turned ON or OFF.
Then use the MODE button to save your settings and to return to the main time
screen.
12 | P a g e
USER MANUAL
NAVWATCH-S10
Note: If the hourly chime is turned on, a picture of a CLOCK
FACE will appear at the top of the screen.
NAVIGATION
Saving favourite position locations (PL) to memory - manually
1.
2.
From the main timer screen, press the FUNCTION
button twice. The letters PL--1 will then start flashing
on your screen.
Use the LIGHT (scroll up) or the REC (scroll down)
buttons to select between 9 position locations then
press the FUNCTION to begin GPS sync to this
memory location. Once completed the co-ordinates
and will be flashed on the screen. The date and
time data will also be recorded.
Note: PL data can further be viewed and edited
using the supplied software.
Navigating to a saved position location (PL)
1.
From the main timer screen, press the FUNCTION button twice. The letters PL--1
will then start flashing on your screen.
2.
Use the LIGHT (scroll up) or the REC (scroll down) buttons to select between any
of the previous (up to) 9 position locations.
Note: Each time a PL location is saved, date and time is also recorded and displayed on
each memory entry. You can also use the FUNCTION button to toggle between the coordinate details.
3.
Once a memory location has been selected, and
while the co-ordinates are displayed on the screen,
use the LIGHT (scroll up) or the REC (scroll down)
buttons to select between the functions DEL
(Delete) and GOTO (Go to).
13 | P a g e
USER MANUAL
NAVWATCH-S10
3.1
DEL: With the letters DEL on the screen, press the FUNCTION button to
advance to a confirmation page with the flashing letters YES. Press the
function button again to delete this memory setting.
3.2
GOTO: With the letters GOTO on the screen,
press the FUNCTION button to confirm. The
title will then change to GET (get GPS data).
The unit will then compare the stored coordinates to that of your current location.
3.2.1 Once the co-ordinates have been
calculated, the navigation screen will
be displayed. This screen displays a) the direction of the designation
and the distance between the two points, b) your current speed
(when you start moving), c) if signal is lost, and d) when your
destination is reached.
a
b
c
d
Note: If there is a signal interruption during this mode, the letters LOSS will appear on
the screen and an alarm will sound for 5 seconds. Pressing the buttons LIGHT, FUNCTION
or REC will stop the alarm sounding. Exit the navigation screen at any time by pressing
the MODE button. If no signal has been reached within 5 minutes, the navigation screen
will close and revert back to the main time screen.
14 | P a g e
USER MANUAL
NAVWATCH-S10
Designation-free based tracking – Sports Mode
1.
From the main time screen, press the FUNCTION button ONCE. The letters NAV
will begin to flash.
2.
Use the LIGHT and REC buttons to scroll through the screens; NAV, CHM, MEM,
ALM, SPT and ARC. The two unique screens in this menu view are SPT and ARC.
Press the FUNCTION button to select a feature (in this case we will discuss SPT
as the other features have been discussed previously).
Note: The other features are shared from the main menu as previously described and
are present here purely for convenience. i.e. There are not 2
separate alarm system menus.
3.
SPT: Once the GPS signal has been acquired, TR-XX
(where XX are numbers generated by default from
01 to 99) and START will appear. Press the
FUNCTION button to begin exercising / tracking.
4.
You can use the LIGHT and REC buttons to scroll through information such as
your current speed, distance travelled altitude and your current GPS coordinates.
Note: If there is a signal interruption during this mode, the letters LOSS will appear on
the screen and an alarm will sound for 5 seconds. Pressing the buttons LIGHT, FUNCTION
or REC will stop the alarm sounding. Exit the navigation screen at any time by pressing
the MODE button. If no signal has been reached within 5 minutes, the navigation screen
will close and revert back to the main time screen.
4.
Press the MODE button to stop tracking in sports mode. If no other buttons are
pressed, the screen will revert back to the main time screen after 3 minutes.
15 | P a g e
USER MANUAL
NAVWATCH-S10
NAVWATCH-S10 SOFTWARE (TRACK STAR)
Installation - Software
1.
2.
Insert the CD into your computer.
Click and open the TRACK STAR folder and click the icon called SetUp.exe.
Note: At this point, the software will check to see if “.NET framework” is installed.
Accordingly .NET will either be installed or upgraded if your current version is older than
3.5 SP1.
3.
4.
Follow the on screen installation screens and choose the default or standard
settings where applicable.
Once the installation has been completed click the close button.
Installation – Hardware
1.
2.
3.
Connect your watch to the charging cradle, noting not to force the watch and to
observe for correct orientation. Connect the USB cable to the cradle and then to
your computer. Your computer will typically signal when this/new hardware is
connected.
Run the TRACK STAR software and enter the product key number from the CD
ROM package when prompted. (Typically an icon is loaded to your desktop)
You will then be prompted for your personalised information such as date of
birth, height and weight. This data is later used to calculate your calorie
consumption. To ensure you get the most out of your NAVWATCH-S10 please
enter this information in accurately.
Note: If no weight in entered into the field,
the calorie consumption will not work
correctly.
16 | P a g e
USER MANUAL
NAVWATCH-S10
TRACK STAR
The main screen
Importing track data records
1.
After connecting your device as discussed above, click the IMPORT button.
Stored data file/s will then be transferred to your computer in date order.
Note: It is recommended that the default track names are not changed to avoid naming
conflicts when using applications like Google Earth and potentially replacing files
accidentally.
Selecting a track (a data file)
1.
There are two ways to select a track; by using a tick box mark, or highlighting a
file.
Note: Files are sorted in Year folders, then into sub-folders named in months. The final
file name by default has been date coded in shorthand format YYYY/MM/DD and time
HH:MM:SS .
17 | P a g e
USER MANUAL
NAVWATCH-S10
Note 1: Marking a track allows you to choose more than one track at a time. Actions like
“delete track”, “export track”, “combine tracks” can also be carried out simultaneously in
this way.
Note 2: Highlighting a track allows you to choose only one track at a time, which can be
used to carry out actions like “data diagram”, “view track” and “edit track ”.
Exporting a track
1.
Highlight or Mark the selected tracks accordingly and press the EXPORT
button.
2.
Choose the type of export file ie. KML, KMZ, GPK or CSV. (See the diagram below
for further file information.)
18 | P a g e
USER MANUAL
NAVWATCH-S10
Merging tracks
1.
2.
3
4.
If you choose, individual tracks can be merged. Use the marking technique (tick
box) to select the files then press the MERGE button.
You will then be prompted to
rename and re-categorise the
finished file.
Once finished click OK.
The merged file will appear
under the chosen name in the
file view explorer as discussed
below.
Note 1: You will be prompted with a
warning if the 2 files have been taken
more than 1 hour apart.
Note 2: Files with overlapping times
can not be merged.
Edit a track
1.
2.
Select the required track and click the EDIT button.
Adjust the file name and rename and re-categorise if required (as above) then
click OK.
Delete a track
1.
Simply mark the track/s and click the DELETE button.
Saving favourite position locations (PL) to memory – via software
1.
2.
3.
4.
Connect your watch to your computer and press the MARK button.
The SET MARK screen will then open.
Use the search bar at the bottom of the screen to search for your location.
Once your location has been found, mark it using the right mouse button.
Note: Once the mark has been created, it can be adjusted by simply dragging and
dropping it using your mouse.
19 | P a g e
USER MANUAL
5.
NAVWATCH-S10
Using your mouse, you can then either delete the tag or add information via the
edit option.
Note: The tag can also be deleted by selecting it in the co-ordinates list on the left hand
side of the screen.
6.
The finished file can then be exported back to the watch using the EXPORT
button.
20 | P a g e
USER MANUAL
NAVWATCH-S10
Delete a track from the watch
1.
2.
3.
Connect your watch to your
computer.
Select the required tracks and
click the ERASE button.
Confirm your selection by
pressing Y/OK.
INFORMATION TABS
Data Diagram
1.
Once your watch is connected, select a data file from the left hand file explorer.
2.
Select the DATA DIAGRAM tab. This screen is split into an upper and lower
section.
2.1
The upper data section has a further 5 individual overview tabs to show
Profile, Time, Distance, Speed and Height Diagram data information.
2.2
The lower section offers a graphical user interface to compare 4 data
sets across an X and Y plot axis. Use the drop down boxes to view
selections such as Height versus Distance, Height versus Time, Speed
versus Distance or Speed versus Time.
21 | P a g e
USER MANUAL
NAVWATCH-S10
View Track
1.
2.
3.
4.
5.
Select a track from the left
hand file explorer view and
press the PLAY button.
The software will then begin
stepping you through your
recorded file on a Google
Map display.
While progressing through the
recording, the details such as
Speed, Height, Distance
(travelled), Time, Latitude and
Longitude are displayed at the bottom of the screen.
Also at the bottom of the screen is also the option to Zoom in or Out of the map.
Use the EDIT feature to adjust the track colour and sport type icon.
Track Photos (Advanced Users)
1.
2.
3.
This feature matches dates and times of photos
and plots them along your track.
Start by selecting a track from the explorer view
and click the photo icon.
You will then be prompted
to choose your files from the file manager
screen. Press the OK button to continue.
Note 1: The times/dates of the photos need to match that of the recorded track,
otherwise this feature will not be able to make the match.
Note 2: We refer to the process of transferring images to your GPS watch as GPSed or
GPSing for easy reference.
22 | P a g e
USER MANUAL
4.
A confirmation screen will then open. This
screen allows you to check photos sizes and
to adjust any known or visible time
discrepancies. Click OK to continue.
5.
If there are still some time discrepancies
with the files, you will be prompted with
another screen to make the required
adjustments, where needed. Alternatively,
you may choose to insert other images such
as designs or archived images etc.
6.
Once complete, a confirmation screen will
be shown showing how many files were
successfully updated and how many were
not. These can be reviewed as required.
7.
Once photos have been
successfully uploaded, they are
embedded directly onto the
map. Once embedded, you can
interact with the images by; a)
clicking the image to see expand
the image, b) use the left and right
arrows to move between images.
NAVWATCH-S10
Note: Once images are GPSed a small
image of a camera will appear next to the
track record in the file explorer view.
23 | P a g e
USER MANUAL
NAVWATCH-S10
Change a track photo
1.
While a current image is displayed, click the Re-GPS button. Then
follow the above explained procedure to re select and rename
your new file.
Delete a track photo
1.
While a current image is displayed, click the delete button. Then
follow the prompts to remove the image.
Uploading to Picasa And Flicker
1.
Press the button for either Picasa
wish to upload the click OK.
or Flicker
and select the images you
Note: Use the “select all” or “select none” buttons at the bottom of the pop up window
to help with your selection.
2.
3.
You will then be prompted with a confirmation page to authorise uploads.
Then, log into your account as normal.
Note: The confirmation step in above point 2, is only required for new connections.
4.
5.
A final screen will appear allowing you to select album’s that the selected images.
Once your settings have been completed, press the next button to begin the
24 | P a g e
USER MANUAL
NAVWATCH-S10
upload. The following screens will be seen once the upload has begun and when
it has finished.
Slide show
1.
Click the slide show icon
to begin a slide show in full screen mode for all
images on the selected track recording. Press the ESC button to end the slide
show.
Sports Diagram
1.
2.
This tab displays a column graph of
accrued values for total distance
travelled, time taken, altitude
reached and calories consumed.
Using the drop down boxes, this data
can be viewed in days (a single day or
over 30, 60 or 90 days) weeks (over 8,
16,24 or 32 weeks) and months (over 3,
6, 9 or 12 months).
25 | P a g e
USER MANUAL
NAVWATCH-S10
USER ACCOUNTS
1.
The current user is listed at the top
of the screen.
2.
Use the icons at the bottom of
the screen to create new accounts.
3.
Select between; Add the Account
account
, or switch between users
, Edit an account
, Delete an
.
SETTINGS
1.
Click the drop down arrow at
the top right of screen. As well
as settings options, there are
other shortcuts to previously
discussed options. Select
Settings.
2.
From this screen changes options
such as; a) Language, b) Unit of
measure, c) Background colour, and
d) Default save to location.
3.
The remaining settings such as Help, refers you to a copy of this user manual.
Clicking the about button will show the edition and version of this software.
26 | P a g e
USER MANUAL
NAVWATCH-S10
UTC TABLE
UTC
Differential
-12
-11
-10
-9.5
-9
-8
-7
-6
-5
City Name
Eniwetok Atoll
Pago Pago
Papeete
Honolulu
Marquises
Anchorage
Vancouver
Las Vegas
Los Angeles
San Francisco
San Diego
Seattle-Tacoma
Edmonton
Denver
Phoenix
Winnipeg
San Jose
Guatemala City
Mexico City
Chicago
Dallas
Houston
New Orleans
Rio Blanco
Montreal
Toronto
Bogota
Havana
Panama
Lima
Washington
Atlanta
Boston
Detroit
Indianapolis
Miami
Country Name
DST
American Samoa
Tahiti(French Territory)
United States
United States
Canada
United States
United States
United States
United States
United States
Canada
United States
United States
Canada
Costa Rica
Guatemala
Mexico
United States
United States
United States
United States
Brazil
Canada
Canada
Columbia
Cuba
Panama
Peru
United States
United States
United States
United States
United States
United States
1
1
1
1
1
1
1
1
1
1
1
1
1
1
1
1
1
1
1
1
1
1
1
1
1
27 | P a g e
USER MANUAL
-4
-3.5
-3
-2
-1
0
New York
Philadelphia
La Paz
Manaus
Halifax
San Diego
Caracas
St.John’s
Buenos Aires
Rio de Janeiro
Sao Paulo
Montevideo
South Georgia Islands
Praia
NAVWATCH-S10
United States
United States
Brazil
Brazil
Canada
Chile
Venezuela
Canada
Argentina
Brazil
Brazil
Uruguay
Las Palmas
Dublin
Casablanca
Lisbon
Dakar
London
Edinburgh
Cape Verde
Canary Islands
(Spanish Territory)
Ireland
Morocco
Portugal
Senegal
England
U.K.Scotland
Vienna
Brussels
Prague
Copenhagen
Paris
Berlin
Frankfurt
Hamburg
Munich
Rome
Milan
Amsterdam
Lagos
Oslo
Warsaw
Madrid
Austria
Belgium
Czech Republic
Denmark
France
Germany
Germany
Germany
Germany
Italy
Italy
Holland
Nigeria
Norway
Poland
Spain
1
1
1
1
1
1
1
1
1
1
1
1
1
UTC
1
1
1
1
1
1
1
1
1
1
1
1
1
1
1
1
28 | P a g e
USER MANUAL
2
3
3.5
4
4
4.5
5
5.5
5.75
6
Barcelona
Stockholm
Zurich
Cairo
Helsinki
Athens
Amman
Beirut
Tripoli
Cape Town
Johannesburg
Damascus
Istanbul
Jerusalem
Bahrain
Addis Ababa
Baghdad
Nairobi
Kuwait
Doha
Moscow
Jeddah
Teheran
Muscat
Samara
Abu Dhabi
Dubai
Kabul
Karachi
Yekaterinburg
Delhi
Chennai
Calcutta
Mumbai
Colombo
Katmandu
Dhaka
Alamaty
Novosibirsk
NAVWATCH-S10
Spain
Sweden
Switzerland
Egypt
Finland
Greece
Jordan
Lebanon
Libya
South Africa
South Africa
Syria
Turkey
Bahrain
Ethiopia
Iraq
Kenya
Kuwait
Qatar
Russian Federation
Saudi Arabia
Iran
Oman
Russian Federation
Arab Emirates
Arab Emirates
Afghanistan
Pakistan
Russian Federation
India
India
India
India
Sri Lanka
Nepal
Bangladesh
Kazakhstan
Russian Federation
1
1
1
1
1
1
1
1
1
1
1
1
1
1
1
1
1
29 | P a g e
USER MANUAL
6.5
7
Yangon
Jakarta
Krasnoyarsk
Bangkok
Ho Chi Minh
Perth
Beijing
Hong Kong
8
9
9.5
10
10.5
11
11.5
12
12.75
13
14
Shanghai
Taipei
Kuala Lumpur
Ulaanbaatar
Irkutsk
Singapore
Tokyo
Fukuoka
Osaka
Sapporo
Seoul
Yakutsk
Adelaide
Melbourne
Sydney
Guam
Vladivostok
Lord Howe Island
Noumea
Magadan
Norfolk Island
Wellington
Auckland
Anadyr
Chatham Island (New
Zealand)
Nuku'alofa
Republic of Kiribati
NAVWATCH-S10
Myanmar
Indonesia
Russian Federation
Thailand
Vietnam
Australia
People's Republic of
China
People's Republic of
China
People's Republic of
China
Taiwan
Malaysia
Mongolia
Russian Federation
Singapore
Japan
Japan
Japan
Japan
Republic of Korea
Russian Federation
Australia
Australia
Australia
Guam(U.S. Territory)
Russian Federation
(Australia)*1
Caledonia(French
Territory)
Russian Federation
New Zealand
New Zealand
Russian Federation
1
1
1
1
1
1
1
1
30minutes
1
1
1
1
1
Tonga
30 | P a g e
USER MANUAL
NAVWATCH-S10
SPECIFICATIONS
Time and date display
Displays year, month, day, hour, minute and second
(24 hr format only).
Auxiliary features
Stopwatch, navigation to stored location, navigation
tracking (random location), clock and memo alarms
Number of GPS destinations
9
Storage space
Up to 10-20 hours at the frequency of one waypoint
every 3-6 seconds.
Positioning accuracy
25m radius
Antenna
Embedded
Power
Rechargeable lithium battery 300mAh
Dimensions
51 x 18.8mm
Weight
78 grams
Operating temperature
Between -10°C and 45°C
Charging temperature
Between 0°C and 45°C
Water proof
50 meter depth (5ATM)
Battery life
7 hours with GPS on
90 (2160 hours) days with GPS off
Stop watch accuracy
1/100 second
Background light
Backlight
Cradle battery
(optional accessory)
3.7V Li-ion Rechargeable Battery / Nokia battery
model BL-5B (not supplied)
Timing capacity
Up to 23:59'59.99" (24 hours)
31 | P a g e
USER MANUAL
NAVWATCH-S10
TROUBLE SHOOTING / Q & A
Q. How do I know when the battery is ready for a charge?
A. The battery icon on the screen has no bars left inside it. If you try to turn on the GPS
feature and the word LOW appears, it means there is not enough available power. The
feature will not be able to be turned on.
Q. How long does it take to charge?
A. It takes 4 hours to fully from when the low battery indicators start flashing. The
portable battery charger can fully recharge the watch up to 2 times.
Q. How long will a charge last me?
A. In time mode only, that watch can last for up to 90 days. In continuous GPS mode it
can last up to 7 hours.
Q. Is it better to keep the battery voltage topped up even if I am not using it?
A. Yes. If any battery in general is left for long periods of time and allowed to discharge,
the expected life span does reduce. It is also recommended that to ensure maximum
battery life that the battery is not continuously run flat before charging.
Q. Is there any specific care instructions for the charger?
A. It is advisable to keep the contacts of your charger clean and dry. Avoid touching the
contacts with your finger and do not use any sharp metal objects such as needles or to
clean the contacts. Only use a dry lint free cloth. The standard operating temperature
for the charger is between 0°C and 45°C.
Q. My charger is not charging. What can I do to check that it works?
A. Try turning the charging on and off to see if the power button is sticky.
For further product information and instruction please visit our product web page at
www.laserco.net or email [email protected]
Please note: As continual improvements are made to this product, slight operational
differences may occur. For the most up-to-date user manual, please visit our web site.
32 | P a g e
USER MANUAL
NAVWATCH-S10
Warranty Against Defects
Laser Corporation Pty Ltd (“Laser”) warrants your new product to be free from defects in
materials and workmanship for 12 months, from the date of purchase, provided that the
product is used in accordance with accompanying recommendations or instructions where
provided. The benefit of this warranty is in addition to your rights under the Australian
Consumer Law and to other rights and remedies of the consumer under a law in relation to the
goods or services to which the warranty relates.
Through a network of retailers and resellers, Laser will provide you with your choice of a refund,
repair or exchange (where possible) for this product if it becomes defective within the warranty
period. This warranty will no longer apply where the defect is a result of alteration, accident,
misuse, abuse, normal wear and tear, neglect or improper storage.
Please retain your receipt as proof of purchase
How to make a product warranty claim:
Step 1: Find your receipt which proves the date of purchase. Where the date of purchase
cannot be verified, your place of purchase or Laser will make an assessment based on the date
of manufacture, the condition of the Laser Product and the type of defect.
Step 2a): Contact your place of purchase. They will assess the nature of the fault and refund
or replace the product as per their store refund or warranty policy.
Step 2b): If your place of purchase cannot be contacted, then you can contact Laser . Customer
Service with details of your defective Laser Product: Phone: (02) 9870 3355; or Email:
[email protected] or online www.laserco.net/support/warranty (click on “Consumers
(End Users)”). Our business address is at 1/6-8 Byfield Street, North Ryde, NSW 2113
Step 3: Laser . will issue you with a Return Authorisation (RA) number within 48 hours. When
requested, send us the defective Product and a copy of your receipt. Laser will cover the cost of
the return delivery.
Step 4: Wait for us to contact you. Once we have received your defective Laser Product for
inspection, we will inform you of our assessment of your claim within 7 days. When we contact
you, we will firstly let you know whether you have a valid claim under this Warranty, and if so,
we will inform you whether your defective Laser Product will be replaced or repaired, together
with the number of days you can expect to wait to receive your replaced or repaired Laser
Product.
Our goods come with guarantees that cannot be excluded under the Australian Consumer Law.
You are entitled to a replacement or refund for a major failure and compensation for any other
reasonably foreseeable loss or damage. You are also entitled to have the goods repaired or
replaced if the goods fail to be of acceptable quality and the failure does not amount to a major
failure.
33 | P a g e