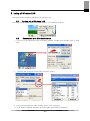
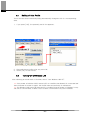
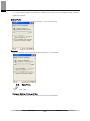
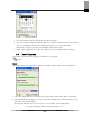
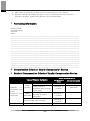
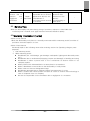
1
XCODE-IU9060 900MHz Handheld Reader Handheld XCODE-IU9060 Users Manual 900MHz Handheld Reader Cautions for Safety ● Please surely read cautions for safety before its use and use it accurately. ● Please store well at a place where people using this product can always see after reading the user’s manual. . . 1. 2. Composition of Products .......................................................................................... 5 Name of each Part ................................................................................................... 5 2.1. Explanation of Buttons ................................................................................. 6 2.2. 3. Contents LED Indication ............................................................................................ 7 Getting Started ........................................................................................................ 8 3.1. How to Use Battery ..................................................................................... 8 3.2. Charging of Battery ..................................................................................... 8 3.3. Using of Battery for long .............................................................................. 9 3.4. Getting Started of Terminal........................................................................... 9 3.4.1. Using of Stylus ..................................................................................... 9 3.4.2. Coordinates Control .............................................................................. 9 3.4.3. Background ......................................................................................... 9 3.5. How to Use Writing Recognition/Keyboard .................................................... 10 4. 5. 3.5.1. How to Use Writing Recognition ............................................................ 11 Connection with PC ................................................................................................. 11 4.1. ActiveSync Installation ................................................................................ 11 4.2. SYNC with PC and Terminal......................................................................... 12 4.3 Exploration of Mobile Device ....................................................................... 13 Ethernet Cradle ....................................................................................................... 13 5.1 Charging ................................................................................................... 13 5.2 6 7 8 9 Performing of USB Sync ............................................................................. 13 Using of Scanner .................................................................................................... 14 Using of UHF RFID Reader ....................................................................................... 15 7.2 Explanation of Main Window ........................................................................ 16 7.3 Reader Setting Window ............................................................................... 17 7.4 Reading/Writing of Tag Memory ................................................................... 18 Using of Wireless LAN ............................................................................................. 22 8.1 Turning-on of Wireless LAN ........................................................................ 22 8.2 Connection with Wireless Network ................................................................ 22 8.3 Setting of Auto Profile ................................................................................ 25 8.4 Turning-off of Wireless LAN ........................................................................ 25 Environment Setting ................................................................................................ 26 9.1 Stylus ....................................................................................................... 26 9.2 Backlight .................................................................................................. 26 9.3 Date/Time ................................................................................................. 27 9.4 Power Properties ....................................................................................... 28 9.5 Button Setting ........................................................................................... 29 9.6 Manager of Repository ................................................................................ 30 9.7 Volume and Sound ..................................................................................... 30 Q&A ............................................................................................................................ 31 1. Scanner ................................................................................................................. 31 2. Power.................................................................................................................... 32 3. Wireless LAN .......................................................................................................... 33 2 4. RFID ..................................................................................................................... 34 5. Others ................................................................................................................... 34 6. Disposal ................................................................................................................ 34 7. Purchasing Information ............................................................................................ 35 8. Compensation Criteria of Quality Compensation Service............................................... 35 9. Guide of Compensation Criteria of Quality Compensation Service .................................. 35 9.1 Service Tips .................................................................................................... 36 9.2 Warranty Information (Terms) ............................................................................. 36 3 Cautions for Safety This is content for keeping safety of users and preventing property damage. Please surely read this well and use this product rightly. 1. Please notice in case of using a battery - If you use an unapproved battery, the battery can explode. - Please don’t drop a battery or apply heavy impact. - Please don’t put a battery at a place that the temperature is high like a stove or a fomentation room or heat it. - Please don’t make a battery wet or submerged. - Please don’t make a battery charging terminal touch metal. - Please don’t modify, separate and repair a battery arbitrarily. Please don’t directly connect with a (+) terminal or a (-) terminal outside a battery 2. Please don’t put a battery, charger and products, etc. near a heating apparatus such as a microwave oven or a stove or a high-pressure vessels or an electric cooking apparatus or don’t put it inside the apparatus. - It makes the product deformed or becomes a reason of explosion or fire. 3. Please don’t use a product at a region of explosion danger. - Please keep regulations, directions and signals inside the region of explosion danger. 4. Please don’t drop products or apply external impact. - The product screen or appearance can be damaged and the internal parts can be broken down. 5. Please don’t modify, separate and repair arbitrarily in case of users. - Please surely use a designated service center for its repair. - When a user modifies, separates and repairs arbitrarily, the person cannot receive its repair for free. 4 1. Composition of Products • • • • • • • IU906x Main body one unit One piece of standard battery One piece of Stylus One piece of Hand Strap One piece of adaptor(for charging) One unit of stand(Ethernet Cradle) One piece of USB Cable 2. Name of each Part No. Name No. Name 1 COVER-FRONT 8 CAP-Ear JACK 2 COVER-REAR 9 SIDE-BUTTON-L/R 3 DECO-TOP 10 CAP-SD 4 WINDOW-SCAN 11 COVER-BATTERY 5 REFLECTOR 12 LOCKER-CENTER 6 DECO-FRONT 13 LOCKER-L/R 7 KEYPAD 5 2.1. Explanation of Buttons Button ESC SCAN ENT Function The cancellation (ESC) function is done. The scanner beam is operated. The selected program is executed. ∧ Moves one column upwardly. ∨ Moves one column downwardly. < Moves one column to the left. > Moves one column to the right. F1 None (If you use this, please set it at button setting of a control panel.) F2 None (If you use this, please set it at button setting of a control panel.) F3 None (If you use this, please set it at button setting of a control panel.) F4 None (If you use this, please set it at button setting of a control panel.) 0~9 . The number or English character or a mark is inputted according to the input mode. . Is inputted. BKSP While moving one column to the left, the inputted character is deleted. CTRL If the CTRL key is tapped, it is indicated like mode of Task bar. 6 in the indication of an input After tapping the CTRL key (or taps simultaneously), and if you tap 1~0, .and BKSP, an allotted mark is inputted. The mode of input characters is changed. The basic value is a number input ALPHA FUNC mode , and if you tap once, it is changed to a large character English input mode , and if you tap once, it is changed to a small character English input mode , and if you tap once more, it is changed to a number input mode. If the FUNC key is tapped, it is indicated like in the indication of an input mode of Task bar. After tapping the FUNC key (or taps simultaneously), and if you tap 1~0, .and BKSP, it is executed as follows. (It can be changed at button setting of a control panel.) None (If you use it, please set at button setting of a control [FUNC]+[1] panel.) None (If you use it, please set at button setting of a control [FUNC]+[2] panel.) None (If you use it, please set at button setting of a control [FUNC]+[3] panel.) [FUNC]+[4] The wireless LAN is turned on. The brightness of a screen can be adjustable more brightly at [FUNC]+[5] the present state. The volume of sound can be adjustable more largely at the [FUNC]+[6] present state. [FUNC]+[7] Tap motion is executed. The brightness of a screen can be adjustable more darkly at [FUNC]+[8] the present state. The volume of sound can be adjustable more lowly at the [FUNC]+[9] present state. [FUNC]+[.] [Start] Menu is executed. [FUNC]+[0] Delete function is carried out. [FUNC]+[SP] A screen for adjusting the screen appears. 2.2. LED Indication Division LED State Explanation red Now charging yellow fully charged red flickering when the main battery is less than 20% red flickering when the scanning is tried red in case of failure of reading barcode yellow in case of success of reading barcode Image Demo red In case of Image Preview Cradle Charging LED (Separate battery charging) red Now charging yellow fully charged Charging LED Scanner LED 7 3. Getting Started 3.1. How to Use Battery Locker L/R Locker Center Insertion of Battery 1. After fixing into a groove of an upper part of a battery cover, close it. 2. Push all Locker L/R to the outside, and turn a Locker Center horizontally. <!> If you don’t turn the Locker Center after closing a battery cover, the cover can be separated. <!> When you first use it after purchase, please use a terminal after buffing. Separation of Battery 1. Turn a Locker Center vertically, and tap all Locker L/R to the inside. 2. After you raise a lower part of a battery cover and remove the cover, take out a battery. 3.2. Charging of Battery Charging with Adapter After you connect a terminal to a charger to be provided, please insert a plug into an outlet. Charging at an ethernet cradle After you connect a terminal to an ethernet cradle to be provided, please connect it to a charger. After you insert a battery into an ethernet cradle to be provided, please connect a charger. After you insert a terminal and a battery into a stand, please connect a charger. If it is fully charged, LED (in case that a battery is inserted into a stand, LED of a stand) of a terminal is turned on. - Yellow : Fully charged - Red : Now charging <!> Please never use other charger except a charger to be provided. 8 3.3. Using of Battery for long If you use a battery longer, please use as follows. - When you first use a terminal, please don’t turn on a terminal until it is charged for minimum 13 hours. - When you don’t use it, please turn off power of a wireless device (WiFi). - Please use screen brightness/keyboard brightness as minimum brightness. - In case of scanning, vibration is not set. - When a terminal is not used, please turn off power by pushing a power button. - Use it while reducing the volume and setting not to generate sound. 3.4. Getting Started of Terminal 3.4.1. Using of Stylus When you execute a menu or select an item in the screen, use stylus. • Tap - Taps programs to be executed or items to be selected • Drag – If you designate a block, drag to the end part while tapping the first part. • Tap and Hold –If you open a menu, tap and hold the corresponding items for long. 3.4.2. Coordinates Control FUNC + BKSP or Start Set Control Panel Executed at Stylus. It is OK if you accurately tap along (+) indicated in the screen with Stylus. <!> If you use a substance with a sharp end like sharp and tweezers, a scar can occur in the screen. 3.4.3. Background The using method is the same as Windows which is an operating system of Microsoft. Start Programs can be executed at a program or background. 9 3.5. How to Use Writing Recognition/Keyboard To input characters, select Writing Recognition or Keyboard. 10 3.5.1. How to Use Writing Recognition When you write each character (English character, number) into an input panel directly, the characters inputted will be displayed on screen. <!> When you write characters, write them in right sequence. <!> If you stop before a character is completed, its input can proceed as it is. 3.6. Reset (Reboot) 3.6.1. WARM(S/W)RESET - Press Reset Home and release using stylus to reboot the terminal. After warm reset, all data that are not saved will be deleted and all programs being implemented will be ended. However, data and files that are saved will be preserved as they are. 3.6.2. COLD (H/W) RESET - While Power Button is pressed, press Reset Home and release the two simultaneously. After cold reset, all data that are not saved will be deleted and all programs being implemented will be ended. However, data and files that are saved will be preserved as they are. And as both date and time are initialized, date/time setting screen will appear after rebooting. Reset Power 4. Connection with PC 4.1. ActiveSync Installation ActiveSync and Windows Mobile Center are a PC Sync Tool provided by Microsoft Company. Installation Method 1. Please install after selecting to conform to PC OS at http://www.microsoft.com/windowsmobile/en-us/help/synchronize/device-synch.mspx 11 (Recommended specification is that a thing less than XP is more than ActiveSync v. 4.5 and Windows 7 and Vista are Windows Mobile Center) and downloading it. 2. After completion of its installation, please insert a terminal into an ethernet cradle and connect PC with USB Cable. 3. PC automatically installs a drive of a terminal. 4. If the drive installation is complete, ActiveSync is automatically executed at PC.. 4.2. SYNC with PC and Terminal 1. Connect PCs with USB Cable and insert a terminal at an ethernet cradle. 2. ActiveSync or Windows Mobile Device Center appears at PC, and the USB state appears at the terminal and automatically connects with PC and a terminal. 3. Please select “Cancel” at ActiveSync and “connection without setting a device” at the Windows Mobile Device Center respectively. Active Sync Windows Mobile Device Center USB State – Now connecting Complete state of USB Sync 12 4.3 Exploration of Mobile Device After Sync, you can use through opening the Windows explorer of the terminal at PC. Opening of Explorer The respective “Explorer” and “File Management” are executed at a menu of ActiveSync or Windows Mobile Device Center. Because PC recognizes the corresponding terminal as an external device, it can be explored, and the action such as file copy and deletion, etc. can be used. <!> When the Reboot, Suspend/Resume are performed at a state of Active Sync, its connection is cut at the moment of Power off, even if USB Cable is connected, so if it becomes power on, its connection is again tried. 5. Ethernet Cradle 5.1 Charging Charging of Terminal 1. Place a terminal at an ethernet cradle. 2. Insert an adapter into the rear of an ethernet cradle and connect it. 3. LED of a terminal shows charging display. <!> When charging is not carried out in spite of sticking an adapter, please stick well once again. Charging of Battery 1. Insert a battery into an ethernet cradle. 2. Insert an adapter into the rear of an ethernet cradle and connect it. 3. LED of an ethernet cradle shows charging display. <!> When charging is not carried out in spite of sticking an adapter, please stick well once again. Simultaneous Charging of Terminal/Battery 1. Place a terminal at an ethernet cradle and insert a battery. 2. Insert an adapter into the rear of an ethernet cradle and connect it. 3. LED of an ethernet cradle and a terminal shows charging display. <!> When charging is not carried out in spite of sticking an adapter, please stick well once again. Charging of USB 1. Place a terminal at an ethernet cradle. 2. Insert an adapter into the rear of an ethernet cradle and connect it. 3. LED of a terminal shows charging display. Simultaneous Charging of USB/Adapter 1. Place a terminal at an ethernet cradle. 2. Insert USB Cable and an adapter simultaneously into the rear of an ethernet cradle and connect it. 3. LED of a terminal shows charging display. 5.2 Performing of USB Sync 13 1. Place a terminal at an ethernet cradle. 2. Connect a USB Cable at the rear of an ethernet cradle. 3. The terminal and PC can be sync each other. Please refer to Active sync Manual regarding the corresponding content. 5.3 Connection of Wired Ethernet. 1. Place a terminal at an ethernet cradle. 2. The Wired Icon is indicated like in a Task Bar line 3. Usable LAN Cable is connected to the rear of an ethernet cradle. 4. If IP is brought after a moment, it is changed to . 5. The connection of network is done. You can use the Internet. 6 Using of Scanner Scanning 1. Start Program Demos Scan Demo is executed. 2. Adjust to make laser beam positioned near Bar-cord to be read while pressing a [SCAN] button. 3. And touch off the [SCAN] button. Scan success - The read-on Barcode information is outputted from Barcode Type and Barcode Value. - The success sound is generated and yellow LED is turned on. Scan failure - The SCAN_Fail is outputted from Barcode Type and Barcode Value. - The failure sound is generated and red LED is turned on. Scan beam focus - Right using method: All the Bar-cords should be included inside laser beam. - Wrong using method: If the laser beam and Bar-cord are not matched, scan failure occurs. 14 7 Using of UHF RFID Reader The XCODE-IU906X can use function of UHF RFID Portable Reader. The method that confirms UID of multiple/single tag and Read/Write/Lock/Kill the memory of single tag by using a program mounted basically in the product shipment state of XCODEIU906X is explained. In addition, the method setting a related environment is also explained. 7.1 Driving of Program and Reading of simple Tag - Lower End’s Window Icon -> Programs -> Demos -> RFID DEMO, Double click the Short Icon of RFID DEMO. - If the screen like Fig. 2 appears after around 2 seconds, it means that the reader is normally operated. - When reader programs of more than 2 pieces are driven or a reader is abnormally operated, an error massage is first seen. Fig.1. Short Icon on Background, Fig.2. Start Screen in case of normal driving - When you want read multiple or single tags without any setting change, its reading starts if you click a [READ] button inside Fig.2 . If you click Fig.3, its reading stops. 15 Fig.3. Shape that the tag is read. 7.2 Explanation of Main Window The function on each part is explained at a main window which is a main screen of a program. Version of Driving Program V 2 1 3 6 4 7 5 8 9 Fig.4. Main Screen of Reader Program 1. The UID (PC + EPC Data) of a tag is displayed. The CRC of a tag is not displayed. The list of a tag displayed at this time appears differently according to selection of [All], [Accumulated] of No. 2. 2. Select a method listing a tag to be seen at No. 1. All : All tags to be read are displayed according to the order that all tags are read. It is displayed from the tag read lastly to maximum 128 pieces. The same tag’s UID can be seen several times at this time. Accumulated : This is displayed on the basis of UID of tags. If the UID of tags to be read doesn’t exist at the present list, new registration is carried out, and if it already exists, it is displayed as much as the number that only Cnt(COUNT) was read at No. 3. Namely, it isn’t seen several times. The order of UID of tags is arranged in the non- 16 increasing order. 3. The read number of each tag to be displayed at No. 1 is indicated. 4. When the SOUND is checked, the beep sound is generated at PDA whenever a tag is read. The strength and weakness of sound is adjusted at a PDA control panel. The CONTINUE check is used only when No. 2 is Accumulated. If CONTINUE is not checked, SOUND is generated only when a new tag is read except UID of tags in the existing List, thereby increasing COUNT. The point to notice is that it is not a state that a reader stopped reading of tags at this time. 5. This is a button capable of starting and stopping tag reading. [READ] is the start and [STOP] is stoppage. When reading starts after clicking [READ], only [STOP] button can be clicked. 6. This is a button that is used when the memory of tags are read or written, or when tags are locked or killed. The respective detailed setting window is generated and this is explained in detail as below. 7. The number of tags to be read until present is displayed. In case of All, it means the number of tags that UID is different from each other regardless of the number of a list, and in case of Accumulated, it is the same as the number of a list. 8. All The tag lists being displayed at present are deleted. 9. 7.3 The [Cfg] button can set output of a reader or frequency of Q value, etc., and the [Ver] button indicates a firmware version of an UHF RFID reader module. Reader Setting Window The window shown below is a window capable of setting use of modes of output of a reader/G value/operating frequency/reader RF test. 1 2 3 3.2 3.1 3.3 4 Fig.5. Reader Setting Window 17 1. This adjusts attenuation of reader output. 0 means that there is completely no attenuation at output. It can be adjusted from -3 to +30, moves in one unit and means around 1dBm. The [-] value might have adverse influence on performance of a reader. As the way of using, it is all right if you adjust by moving a slide with a pen or directly input a number and click other point. The increase of an attenuation value means reduction of output, so the tag reading performance is also decreased generally. 2. The Q Value is a parameter of a necessary algorithm when multiple EPC Gen2 tags are read. Because the UHF RFID reader module of XCODE-IU906X is a method that necessary Q value is automatically adjusted according to the quantity of tags to be read, the setting of this parameter value doesn’t have big influence on its performance except a short moment in case of initial starting. 3. The operating frequency of a reader is selected. FHSS : The frequency hopping is executed in a unit of 3.3 from the frequency designated at a window corresponding to 3.1 and the tag is read. The frequency hopping method is pseudo-random hopping. FIX : The tag is read by continuously using only the frequency designated at a window corresponding to 3.1. The way of using is that you select a necessary part respectively and click the [Set Freq.] button. LBT: LBT motion is executed among frequencies designated in a unit of 3.3 from the frequency designated at a window corresponding to 3.1 to the frequency designated at a window corresponding to 3.2. 4. As the TEST MODE is a part necessary for various certifications, its use is prohibited except a corresponding engineer. The way of using is that you select a necessary menu and click the [Set] button. - No Modulation ON/OFF: The frequency should use only FIX and the transmission of the output un-modulated with the frequency designated at 3.1 is ON/OFF. - Modulation ON/OFF: Data are transmitted, namely, modulated output is transmitted. All of FIX and FHSS are possible. - Fix Modulation ON/OFF: The continuously modulated output is transmitted. Only FIX is possible. 7.4 Reading/Writing of Tag Memory This is a window that can read and write for memory of a single piece of tag. 18 Data to be read Memory Bank Position to start reading or writing Size to be read or written Data to be written Fig. 6. Window of Tag Reading/Writing Tag Reading - In case of EPC Gen2 Tag, there exist 4 kinds of Banks. Select the Bank that you want to read at Bank. - Input a memory starting position (Start: Byte unit) of the corresponding you want to read and the size to be desired from a starting position to the window. - Click the [Read] button. - The [Reading] status is displayed like the below picture and the [Read] button is displayed as [Stop]. If you want to stop, click the [Stop] button. - The status is continuously maintained until reading is successful or reading is stopped by clicking the [Stop] button by a user. - If it is complete, data read at [Tag Memory] is displayed (hexadecimal number), and the Status displays [Reading OK]. - Fig. 7. Tag Reading 19 Tag Writing - Like the first and second processes of tag reading, select or input Bank/starting position/size. - Data that you want to write are additionally inputted to a column of [Write Data] as hexadecimal number. ‘.’ of an input window is a separator and doesn’t affect in case of input. - Click [Write] button. - [Writing] is displayed at its Status, and the state is continuously maintained until stoppage of a user or writing success of all data like reading. - If writing succeeds, the Status displays [Writing OK]. Fig. 8. Tag Writing 7.5. Tag Lock/Kill In case of EPC Gen2 Tags, the setting on the possibility of memory reading and writing of a tag can be designated to each tag. In addition, it can designate to make a tag not respond permanently. The function of the former is called “LOCK” and the latter is called “KILL”. The below window is a window for designating the function on it to a tag. Fig. 9. Window of Tag LOCK/KILL 20 KILL - Lock - If you make a tag lose its function completely, the Password necessary for it should be set with a value that is not “0” in the Reserved domain of memory Bank. It is called Access Password and Kill Password, and for its detailed explanation, please refer to EPC-related documents. If you don’t know Password set at a tag, you cannot KILL the tag. If you know password, click the [Kill] button after inputting the value to the corresponding domain with hexadecimal number. Its success is displayed through a Pop-Up window. In case of Lock, only the Access Password is necessary, and it is already designated as a value that is not “0” at a tag, and users should know it. Lock sets Lock field called Payload and sets Lock function. Please refer to EPC documents for its detailed explanation on Payload. Check necessary Payload, and input already designated Access Password at a tag of Access PW with hexadecimal number, and then click the [Lock] button. Its success is displayed through a Pop-Up window. <!> Although the RFID Demo can be executed in a state that a battery is very low, you cannot bring reading of Tag. If RFID falls to a very low state in an executed state, it doesn’t bring reading of Tag. 21 8 Using of Wireless LAN The wireless LAN supports IEEE 802.11b and 802.11g. 8.1 Turning-on of Wireless LAN After selecting an arrow mark of Task Bar, select “Turn Wireless LAN On” 8.2 Connection with Wireless Network 1. If you try to set connection with a wireless network, double-click the WiFi Icon of Task Bar. 2. [Profile] tab at Summit Client Utility Press [Scan]. 3. After selecting arbitrary SSID, double-click or click Configure. <!> If AP doesn’t appear, perform AP Scan again by pressing [Refresh]. 22 4. Please press “Yes” at the scu window. <!> The method putting into Network Key becomes different according to Encryption of AP to be set. 5. If the Profile installation was complete, it is OK if you store when moving to the [Main] tab. 23 6. If you change Active Profile from the [Main] tab to AP set just now, it is connected automatically. If the setting on wireless LAN is complete, select [Main]. 7. If you change Active Profile from the [Main] tab to AP set just now, it is connected automatically. 24 8.3 Setting of Auto Profile This is function that connects by being automatically changed to AP of a corresponding area. 1. If you press [List], the presently set AP List appears. 2. After selecting a Profile to be set, press OK. 3. Check [On] of Auto Profile. 8.4 Turning-off of Wireless LAN After selecting an arrow mark of Task Bar, select “Turn Wireless LAN Off”. <!> If the power of wireless LAN is turned off in a condition that Network is connected and then the power is turned on again, the Profile value set previously is maintained. <!> The wireless LAN cannot be executed in a condition that the power of a battery is very low, but if it is executed, it doesn’t turn off even if it becomes a very low condition. 25 9 Environment Setting You can set using environment or perform system management at Start Set Control Panel. The control panel added basic menus, scanner setting and SysInfo provided by Windows CE.NET. 9.1 Stylus Stylus .You can adjust touch sensitivity, accuracy and double-click speed. 9.2 Backlight backlight Battery When you use a terminal as a battery, please set screen adjustment. 26 <!> If you reduce power consumption, please set turning-off of backlight shortly and set brightness darkly. External Power When you use a terminal as external power, set screen lighting. Keyboard This is a function adjusting lighting and brightness of a keyboard. 9.3 Date/Time Date /Time Change or Setting of Date and Time 1. Open Start Set Control Panel Date/Time Attributes. 27 2. The date and time can be changed to the date you want. 3. You can change the desired national time zone from the standard time zone list, and in case of changing a summer time-designated country, you can set automatic adjustment of time to conform to the daylight saving time system. 4. Save: Select [application] or OK, and select [X] if you complete without saving it. 9.4 Power Properties Set a power environment according to a condition of a terminal. Power Battery Open Start Set Control Panel Power or double-click a batter icon at the task bar. 1. The USB charging mode can charge only a main battery when USB cable is connected. 2. The Backup battery Charging is a function that can charge when a backup battery is less than 90% from a main battery. Its Default is 500mA, and if you set it Off, it isn’t charged from a main battery. If you save a battery, please use after setting it “Off”. 28 <!> It can be charged even when the backup charging is more than 90% due to the intensity of voltage. 3. When it is charged, “now charging” is displayed, and if it is fully charged, “AC Power (100%)” is displayed. <!> When it is charged after removing a main battery, the main battery may display “good(80%)” and “now charging” , but because it is due to the intensity of voltage, it is normal operation. Power Off 1. Select Start Set Control Panel Power Power off Tab 2. When the idle state (state without touch or using of keypad) continues in a condition of battery or external power (when it is being charging), set an automatic power-off function . 3. The Default is being set when it is not used for 3 minutes in case of using battery power, and you can select up to maximum 5 minutes according to selection of a user. <!> If you save battery power, it is good to set idle time as shortly as possible. 4. You can select up to maximum 30 minutes in case of using external power. 9.5 Button Setting Button Setting You can change function of FUN button as well as all buttons. The changed functions are not recovered by warm reset (SW Reset) and cold reset(HW Reset), so if you want to return to Default again, it is overall changed to Default if it is changed to “basic value” again at Button Setting. 1. Select Start Set Control Panel Button Setting 29 2. Select a function after selecting application program key. - Default – Basic value. - Scan Key – use as Scan Key. - No Function – There is no function. - Application – If you set, the [OPEN] button is activated and an application program is selected. If you complete without changing it, press [X] button. And if you complete the changed content, press [OK] or [Application] button. 9.6 Manager of Repository This is a function capable of confirming memory information of NAND and Storage Card 1. Select Start Set Control Panel Manager of Repository 9.7 Volume and Sound This sets the size of volume and sound of event & application programs, etc. 1. Select Start Set Control Panel Volume and Sound 30 Q&A 1. Scanner Q. When I scan, the laser beam doesn’t come out. A. This is a phenomenon capable of being generated when a Scanner is not activated. 1. Is the Scanner Icon non-activated at the task bar like the below picture? Then please press the Scanner Icon and pop-up the Scanner menu like below picture. If you activate Scanner by pressing Enable Scanner, it is changed to an activated Icon like the below picture. Please try Scan once again. 2. Isn’t there the Scanner Icon at the task bar like the below picture? Then if you double-click Start Program Demos Quick Scan Demo, the Scanner Icon is changed to an activated Icon like the below picture. Please try Scan once again. 3. If the laser beam is not generated by the above 1 and 2 methods in case of Scanning, please inquire to our A/S Center. 31 Q. Although I scan, the Bar-cord isn’t printed out. A. This is a phenomenon appearing when Scan failed or Result Type is enabled. 1. Isn’t it Scan failure probably? The failure phrase isn’t inputted in case of Scan failure at other Word Program except ScanDemo. Please execute Start Program Demos ScanDemo. Please try Bar-code Scan. If anything isn’t still inputted, go to No. 2… 2. Please press “Result Type” at Scanner Menu. Is the Result Type set as Keyboard Evert or Copy & Paste like the below picture? If it doesn’t exist, please select one among the two. Although the scanner beam comes out, the bar code value is not printed. Q. I’d like to initialize Scanner setting. A. It is all right if you execute setting as a factory basis 1. It is all right if you select “setting as a factory basis” at general tap of Scanner setting. 2. Power Q. The power doesn’t turn on. A. It occurs when a battery is discharged or is not entered properly. 32 1. Please turn on power after taking out a battery and put it again. If it is not turned on, go to No. 2… 2. Please charge a terminal. Please press a Power button in a charged state. If the power is not turned on even with the Power button, please press a Reset Home. If the power is turned on, please buffer it. Q. The power was not turned on. Q. Even if the power of a battery remains, the screen is not turned on. A. It occurs when a battery is not properly entered or the cover is not closed. 1. Please open the battery cover again and properly insert the battery well. And please press the Power button. If the screen is not turned on continuously, please press the Reset Home. If the screen is not turned on in spite of doing the above action, the battery discharge might be taken place. Please charge the terminal. Q. The terminal is often turned off. A. When it is a battery use mode, it is a case that Power Off was set automatically. 1. Execute power properties by pressing the Battery Icon at the Task Bar. 2. When “If the idle state continues for the following time in case of using the battery power, it is complete” is set at the Power Off Tab, it becomes automatically Power off if the terminal is not used and the set time passes by in case of using battery power. <!> The present action is recommended as a menu saving battery consumption. Q. When the power of a battery is very low, the Phone, WiFi, RFID, Image Demo doesn’t act. A. It is normal action. The power consumption is high in case of Phone, WiFi, RFID, Image Demo action This is an action made for saving battery consumption and stability of a terminal. 3. Wireless LAN Q. The Internet is not connected. A. If the network is not connected even when the wireless LAN is turned off or on, the Internet isn’t connected. 1. Please turn on the wireless LAN and connect the network. Please refer to the part of wireless LAN Manual. If the Internet is not connected continuously, go to No. 2… 2. If its sensitivity state is not good much, the Internet might be not connected. Open Summit Client Utility, move to Status Tab and confirm Signal Strength. When the sensitivity is close to -70dBm or lower, please raise its signal intensity more by moving the region. 33 Q. Even if the wireless LAN is turned on, the wireless LAN Icon doesn’t come out. A. First, please make the Power of the wireless LAN turned off. After performing COLD Reset (HW Reset), please turn on the Power of the wireless LAN again. If it is not working, please inquire to our A/S Center. Q. Auto Profile is not searched. A. There might be no AP in the corresponding region. 1. Please move to a region where AP of the wireless LAN is provided. Please search AP again after movement. If it is not searched, go to No. 2… 2. Please search again after Reset. If it is not searched, please inquire to our A/S Center. 4. RFID Q. Tag cannot be read. A. If there is an obstacle in front of a terminal or there is a scar at Tag, the phenomenon that cannot read is generated. 1. Please remove an obstacle between the front of a terminal and Tag. 2. Please confirm whether there is a scar or foreign matters at Tag to be read. The Tag containing a scar or foreign matters might not read Tag. 3. Please confirm the distance between a terminal and Tag. As there is the distance to be assisted per Tag, please try again at the proximity distance (within 20cm). 4. Please confirm the present battery state. If the Power is very low, it is basically set not to read Tag, so please charge the battery. 5. Others Q. The terminal stopped without any motion. A. Please Reset Q. The error report comes out. A. The error report provided by MS can be assisted at the terminal. Even if you don’t send the error report, it is all right.. 6. Disposal 1. Please separate non-iron material (liquid, liquid phase), etc. based on ISO 14000 regarding RFID Reader, divide materials causing environmental pollution and reusable materials and dispose it to a designated place. 34 2. When there are materials you want to reuse, please inquire to our company. 3. Because materials generating toxic gas in case of incineration become a reason of respiratory diseases, please surely dispose it at an allowed place. 7. Purchasing Information Name of Model Purchasing Date Serial No Memo __________________________________________________________________________________ __________________________________________________________________________________ __________________________________________________________________________________ __________________________________________________________________________________ __________________________________________________________________________________ __________________________________________________________________________________ __________________________________________________________________________________ __________________________________________________________________________________ __________________________________________________________________________________ __________________________________________________________________________________ __________________________________________________________________________________ __________________________________________________________________________________ __________________________________________________________________________________ __________________________________________________________________________________ __________________________________________________________________________________ __________________________________________________________________________________ 8. Compensation Criteria of Quality Compensation Service 9. Guide of Compensation Criteria of Quality Compensation Service Types of Warranty Complaints Types of Warranty Complaints Breakdown of performance and function generated in the normal state Breakdown of In case of flaw generation The same flaw was Repair repaired, but the possible breakdown was recurred. (fourth time) Although parts for repair Repair are held, its repair is impossible impossible. Case immediately needing a repair at important parts after purchase Repair possible Within warranty period After warranty period free repair Free repair Exchange of products Paid repair Exchange of products - Exchange of products - Paid repair 35 performance and function due to intention and negligence of consumers Repair impossible The case that its repair is impossible due to inferior appearance which is not a breakdown of performance and function is excluded. Exchange of products after collection of the amount corresponding to paid repair - 9.1 Service Tips When the abnormality tool place during using of products, request to 1544-2080 after confirming user’s manual once again and then we would handle it rapidly. 9.2 Warranty Information (Terms) Guide of Free Service When the abnormality tool place in a normally used state within a warranty period from date of purchase, we would repair it for free. Guide of Paid Service We would repair in the following cases after receiving service fee (repairing charges, parts payment) 1. After warranty period 2. Within warranty period Breakdown (fire, salt damage, gas damage, earthquake, lighting and abnormal power, etc.) Breakdown due to carelessness(dropping, impact and damage) in handling and using Breakdown of when a person who is not a technician at Service Center of our company repairs. When products are disassembled or a name plate is not attached When a breakdown occurred due to the abnormality of utility Power When it was not used as designated usage Breakdown generated due to arbitrary internal reconstruction of a user When a reason that cannot predict occurred at a level of science and technology in case of shipment from our company We are not responsible for the accidents due to negligence of a customer 36 Certificate of Warranty Name of Products XCODE of LS Industrial Systems Name of Model XCODE-IU9060 Customer Store Date of Purchase Warranty Period Name Address Phone Name Address Phone The present product was made through strict quality control and inspection process of engineers of LS industrial Systems. The product warranty period is usually 12 months from its purchase, and when the purchase date was not written, 12 months are applied from the date of manufacture. But it can be changed according to terms of a contract. Revision History of Users Manual RReviosn No. Date of Issue Changed Content Version No. 1 September 2010 First Edition 1.00 Remarks Guide on Disposal of Products Environmental Management LS Industrial sets environmental conservation LS Industrial Systems’ Reader is a product designed to protect the environment. If products are disposed, it can be divided into iron, aluminum and synthetic resin (cover) group and can be recycled, as top priorities of management, and all officials and employees are doing their best for environmental conservation of comfortable Earth. 37