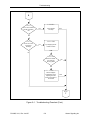
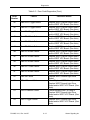
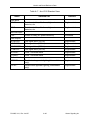
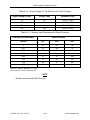
1
Genrakode™ II Track
Circuit and
Communications
System
Copyright © 1997, 2001, 2002, 2003, 2007 Alstom Signaling Inc.
System Operation and Maintenance Manual
P2160B, Volume 1 of 2
Genrakode™ II Track
Circuit and
Communications
System
Copyright © 1997, 2001, 2002, 2003, 2007 Alstom Signaling Inc.
Operation and Maintenance Manual
Alstom Signaling Inc.
P2160B, Volume 1 of 2, Rev. January 2007, Printed in U.S.A.
LIST OF EFFECTIVE PAGES
P2160B, Volume 1 of 2, Genrakode™ II Track Circuit and Communications System
Operation and Maintenance Manual
ORIGINAL ISSUE DATE:
Nov/1997
CURRENT REVISION AND DATE:
Jan/07
CURRENT CHANGE AND DATE:
Jan/07, Updated format and drawings.
PAGE
CHANGE OR REVISION LEVEL
Cover
Jan/07
Title page
Jan/07
Preface
Jan/07
i thru viii
Jan/07
1–1 thru 1–6
Jan/07
2–1 thru 2–40
Jan/07
3–1 thru 3–40
Jan/07
4–1 thru 4–6
Jan/07
5–1 thru 5–10
Jan/07
6–1 thru 6–20
Jan/07
A-1 thru A-76
Jan/07
B-1 thru B-32
Jan/07
C-1 thru C-12
Jan/07
P2160B, Vol.1, Rev. Jan/07
Alstom Signaling Inc.
THIS PAGE INTENTIONALLY LEFT BLANK.
P2160B, Vol.1, Rev. Jan/07
Alstom Signaling Inc.
PREFACE
NOTICE OF CONFIDENTIAL INFORMATION
Information contained herein is confidential and is the property of Alstom
Signaling Incorporated. Where furnished with a proposal, the recipient
shall use it solely to evaluate the proposal. Where furnished to customer, it
shall be used solely for the purposes of inspection, installation or
maintenance. Where furnished to a supplier, it shall be used solely in the
performance of the contract. The information shall not be used or
disclosed by the recipient for any other purposes whatsoever.
FOR QUESTIONS AND INQUIRIES, CONTACT CUSTOMER SERVICE AT
1–800–717–4477
OR
WWW.ALSTOMSIGNALINGSOLUTIONS.COM
ALSTOM SIGNALING INC.
1025 JOHN STREET
WEST HENRIETTA, NY 14586
REVISION LOG
Revision
Date
Checked
Approved
0
November 1997
Original issue
JMF
1
December 1997
Update
JMF
2
February 2001
Update
PD
RIH
HWM
3
September 2002
Re-organized
PD
RIH
HWM/TCH
4
January 2003
Update
PD
RIH
HWM
5
June 2003
Update
PD
RIH
HWM
6
January 2007
MAS
RIH
NI
P2160B, Vol.1, Rev. Jan/07
Description
Update format and
drawings
By
Alstom Signaling Inc.
THIS PAGE INTENTIONALLY LEFT BLANK.
P2160B, Vol.1, Rev. Jan/07
Alstom Signaling Inc.
ABOUT THE MANUAL
This manual is intended to provide the necessary information to maintain and ensure
proper operation of an Alstom Genrakode II DC System. The information provided is not
limited to the components of the switch machine.
The information in this manual is arranged into sections. The title and a brief description
of each section follow:
Section 1 – GENERAL DESCRIPTION: This section gives general information on the
components of the Genrakode II DC System. Safety precautions are also provided in
this section.
Section 2 – THEORY OF OPERATION: This section gives general information on the
operation of the Genrakode II DC System and components. Safety precautions are also
provided in this section.
Section 3 – INSTALLATION: This section describes the field installation and setup of
the Genrakode II DC System.
Section 4 – PREVENTIVE MAINTENANCE: This section describes the tools,
preventive maintenance procedures, and functional tests used on Genrakode II DC
System. The frequency and interval, for the performance of the given information, are
also included.
Section 5 – TROUBLESHOOTING: This section describes possible failures/symptoms
along with the corrective action for the Genrakode II DC System.
Section 6 – DIAGNOSTICS: This section describes the diagnostics functions of the
Genrakode II DC System.
Appendix A – MODULE BOARD REFERENCE DATA: This section contains
reference data for the boards used in the Genrakode II DC System.
Appendix B – CPU HARDWARE AND SOFTWARE: This section contains supporting
details for the Genrakode II DC System CPU hardware and software.
Appendix C – SYSTEM SPECIFICATIONS: This section summarizes the system
specifications to consider when applying the Genrakode II DC System.
P2160B, Vol.1, Rev. Jan/07
Alstom Signaling Inc.
THIS PAGE INTENTIONALLY LEFT BLANK.
P2160B, Vol.1, Rev. Jan/07
Alstom Signaling Inc.
MANUAL SPECIAL NOTATIONS
In the Alstom manuals, there are three methods used to convey special informational
notations to the reader. These notations are warnings, cautions, and notes. Both
warnings and cautions are readily noticeable by boldface type two lines beneath the
caption.
Warning
A warning is the most important notation to heed. A warning is used to tell the reader
that special attention needs to be paid to the message because if the instructions or
advice is not followed when working on the equipment then the result could be either
serious harm or death. The sudden, unexpected operation of a switch machine, for
example, or the technician contacting the third rail could lead to personal injury or death.
An example of a typical warning notice follows:
WARNING
WHENEVER THE GEAR COVER IS REMOVED DISCONNECT THE
MOTOR ENERGY. OTHERWISE, THE SWITCH MACHINE MAY
OPERATE UNEXPECTEDLY AND POSSIBLY CAUSE PERSONAL
INJURY.
Caution
A caution statement is used when an operating or maintenance procedure, practice,
condition, or statement, which if not strictly adhered to, could result in damage to or
destruction of equipment. A caution statement is also used when personnel could be
surprised if shocked by a circuit operating at a low current. A typical caution found in a
manual is as follows:
CAUTION
Turn power off before attempting to remove or insert circuit boards into a
module. Boards can be damaged if power is not turned off.
Note
A note is normally used to provide minor additional information to the reader to explain
the reason for a given step in a test procedure or to just provide a background detail. An
example of the use of a note follows:
NOTE
A capacitor may be mounted on the circuit board with a RTV adhesive.
Use the same color RTV.
P2160B, Vol.1, Rev. Jan/07
Alstom Signaling Inc.
THIS PAGE INTENTIONALLY LEFT BLANK.
P2160B, Vol.1, Rev. Jan/07
Alstom Signaling Inc.
TABLE OF CONTENTS
TOPIC
PAGE
1. SECTION 1 – GENERAL DESCRIPTION ............................................................. 1–1
1.1. SCOPE OF MANUAL ....................................................................................... 1–1
1.2. GENRAKODE II SYSTEM DESCRIPTION....................................................... 1–1
1.2.1. Genrakode II Modules ...................................................................................... 1–2
1.2.2. CODES............................................................................................................. 1–2
1.3. GENRAKODE II SYSTEM FEATURES ............................................................ 1–3
1.3.1. Interoperability .................................................................................................. 1–4
1.4. SYSTEM SAFETY DESIGN ............................................................................. 1–5
1.4.1. Memory Integrity Verification ............................................................................ 1–5
1.4.2. Programmable CPU Board ............................................................................... 1–6
2. SECTION 2 – THEORY OF OPERATION............................................................. 2–1
2.1. GENERAL ........................................................................................................ 2–1
2.2. SYSTEM OPERATION..................................................................................... 2–1
2.3. CODE DEFINITIONS ....................................................................................... 2–2
2.3.1. Non-Vital Code T .............................................................................................. 2–8
2.4. CONTROL POINT MODULE.......................................................................... 2–10
2.4.1. Hardware Configurations ................................................................................ 2–11
2.5. 4-TRACK CONTROL POINT MODULE ......................................................... 2–15
2.5.1. Hardware Configurations ................................................................................ 2–16
2.6. INTERMEDIATE MODULE............................................................................. 2–19
2.6.1. Colorlight Control............................................................................................ 2–20
2.6.2. Searchlight Control ......................................................................................... 2–21
2.6.3. Hardware Configurations ................................................................................ 2–23
2.7. REPEATER MODULE .................................................................................... 2–28
2.7.1. Asynchronous Repeater ................................................................................. 2–29
2.7.2. Hardware Configurations ................................................................................ 2–30
2.8. SWITCH LOCK MODULE .............................................................................. 2–31
2.8.1. Switch Lock Inputs And Outputs..................................................................... 2–32
2.8.2. Series Overlay Function ................................................................................. 2–33
2.8.3. Hardware Configurations ................................................................................ 2–33
2.9. CAB SIGNAL MODULE.................................................................................. 2–37
2.9.1. Hardware Configuration.................................................................................. 2–38
3. SECTION –3 INSTALLATION............................................................................... 3–1
3.1. GENERAL ........................................................................................................ 3–1
3.2. INSTALLATION REQUIREMENTS .................................................................. 3–1
3.3. COMPATIBILITY WITH OTHER TRACK EQUIPMENT ................................... 3–3
3.3.1. Overlay Equipment ........................................................................................... 3–3
3.3.2. Motion Sensors and Constant Warning Time Equipment ................................. 3–3
3.3.3. Filter Requirements .......................................................................................... 3–4
3.4. PRELIMINARY CHECKS AND SETTINGS ...................................................... 3–5
3.4.1. Site ID And Revision ID .................................................................................... 3–5
3.4.2. Hardware and Software Settings ...................................................................... 3–6
P2160B, Vol.1, Rev. Jan/07
i
Alstom Signaling Inc.
TABLE OF CONTENTS (CONT.)
TOPIC
3.5.
3.6.
3.7.
3.7.1.
3.7.2.
3.7.3.
3.7.4.
3.8.
3.8.1.
3.8.2.
3.8.3.
3.8.4.
3.9.
3.9.1.
3.9.2.
3.9.3.
3.9.4.
3.9.5.
3.9.6.
PAGE
FINAL CONNECTIONS .................................................................................... 3–7
RECOMMENDED INSTALLATION CHECKLIST ............................................. 3–8
HARDWARE ADJUSTMENT PROCEDURES ............................................... 3–11
Track Circuit Adjustment ................................................................................ 3–11
Line Wire Circuit Adjustment .......................................................................... 3–16
Line Wire Circuit Resistance Setting Calculation............................................ 3–22
Series Overlay Track Circuit Adjustment ........................................................ 3–23
CAB SIGNAL TRACK CIRCUIT ADJUSTMENT ............................................ 3–26
Power Supply Board Adjustments .................................................................. 3–27
Software Settings ........................................................................................... 3–32
On-Board Controls And Displays.................................................................... 3–33
Mode Descriptions:......................................................................................... 3–33
RS-232 SERIAL PORT INTERFACE ............................................................. 3–37
Code T Location ID......................................................................................... 3–37
Code T Enable Settings.................................................................................. 3–37
Code T Expiration Time .................................................................................. 3–38
Code 5 Format................................................................................................ 3–38
Filament Error Reporting ................................................................................ 3–38
Non-vital Inputs............................................................................................... 3–38
4. SECTION 4 – SCHEDULED MAINTENANCE ...................................................... 4–1
4.1. GENERAL ........................................................................................................ 4–1
4.2. MAINTENANCE APPROACH .......................................................................... 4–1
4.2.1. Track Circuit Maintenance ................................................................................ 4–3
4.2.2. Recommended Equipment ............................................................................... 4–3
4.2.3. Maintenance Test Procedure............................................................................ 4–4
5. SECTION 5 – TROUBLESHOOTING.................................................................... 5–1
5.1. GENERAL ........................................................................................................ 5–1
5.1.1. Recommended Equipment ............................................................................... 5–1
5.1.2. Troubleshooting Approach................................................................................ 5–2
5.2. TROUBLESHOOTING FLOWCHART .............................................................. 5–3
5.2.1. Flowchart Term Definitions ............................................................................... 5–4
6. SECTION 6 – DIAGNOSTICS ............................................................................... 6–1
6.1. GENERAL ........................................................................................................ 6–1
6.1.1. Software Errors................................................................................................. 6–1
6.1.2. Hardware Errors ............................................................................................... 6–1
6.2. ON-BOARD CONTROLS AND DISPLAYS ...................................................... 6–2
6.2.1. Displaying Errors .............................................................................................. 6–3
6.2.2. Clearing Errors ................................................................................................. 6–3
6.3. RS-232 SERIAL PORT INTERFACE ............................................................... 6–5
6.3.1. Desktop Computer or Laptop............................................................................ 6–5
6.3.2. Handheld Terminal ........................................................................................... 6–5
P2160B, Vol.1, Rev. Jan/07
ii
Alstom Signaling Inc.
TABLE OF CONTENTS (CONT.)
TOPIC
6.3.3.
6.3.4.
6.4.
6.5.
PAGE
Error Queue...................................................................................................... 6–6
Event Queue..................................................................................................... 6–6
INTERRUPTING A RESET LOOP ................................................................... 6–6
ERROR CODES............................................................................................... 6–8
A. APPENDIX A - MODULE AND BOARD REFERENCE DATA..............................A–1
A.1. OVERVIEW ...................................................................................................... A–1
A.2. MODULE TERMINAL DEFINITIONS ............................................................... A–1
A.2.1. Control Point Module Terminal Definitions........................................................ A–1
A.2.2. 4-Track Control Point Module Terminal Definitions (P/N 55899-134-XX) ......... A–8
A.2.3. 4-Track Control Point Module Terminal Definitions (P/N 55899-141-XX) ....... A–13
A.2.4. Intermediate Module Terminal Definitions ...................................................... A–16
A.2.5. Repeater Module Terminal Definitions ........................................................... A–24
A.2.6. Switch Lock Module Terminal Definitions ....................................................... A–26
A.2.7. Cab Signal Module Terminal Definitions......................................................... A–29
A.3. SWITCH LOCK MODULE UNLOCK CODE SELECTION .............................. A–30
A.3.1. Interpreting Switch Lock I/O LEDs.................................................................. A–31
A.4. TYPICAL APPLICATION CIRCUITS .............................................................. A–33
A.5. CIRCUIT BOARD DESCRIPTIONS ............................................................... A–41
A.5.1. Auxiliary I/O Boards........................................................................................ A–41
A.5.2. Color Light Driver Board (P/N 59473-864-01, -02) ......................................... A–49
A.5.3. Converter/Receiver Board (P/N 59473-833-01).............................................. A–51
A.5.4. Converter/Receiver Board (P/N 59473-833-02).............................................. A–53
A.5.5. CPU Board (P/N 31166-141-XX) .................................................................... A–55
A.5.6. DC Code Select Input Board (P/N 59473-895-01).......................................... A–62
A.5.7. Decode/Output Board (P/N 59473-838-01, -02) ............................................. A–63
A.5.8. Driver Board (P/N 59473-907-01)...................................................................A–64
A.5.9. High Power Vital Power Controller (VPC) Board (P/N 59473-872-01)............ A–65
A.5.10. Low Power Vital Power Controller (VPC) Board (P/N 59473-835-01).......... A–66
A.5.11. Oscillator/Filter Board (P/N 59473-906-01).................................................. A–67
A.5.12. Power Supply Regulator/Filter Board (P/N 31166-338-01) .......................... A–67
A.5.13. Regulator/Filter (Standard) Board (P/N 59473-834-01) ............................... A–70
A.5.14. Relay Code Select Input Board (P/N 59473-830-01) ................................... A–71
A.5.15. Series Overlay Board (P/N 59473-877-01) .................................................. A–71
A.5.16. Searchlight Driver Board (P/N 59473-863-01, -02) ...................................... A–72
A.5.17. Switch Lock I/O Board (P/N 59473-878-01)................................................. A–74
B. APPENDIX B - CPU HARDWARE AND SOFTWARE ..........................................B–1
B.1. GENERAL ........................................................................................................ B–1
B.2. CPU HARDWARE AND SOFTWARE DETAILED REFERENCE ..................... B–1
B.2.1. CPU Comm Port - RS232 Interface.................................................................. B–1
B.2.2. Board Jumpers ................................................................................................. B–1
B.2.3. CPU LED Indicators ......................................................................................... B–2
B.2.4. CPU 7-Segment Displays ................................................................................. B–3
P2160B, Vol.1, Rev. Jan/07
iii
Alstom Signaling Inc.
TABLE OF CONTENTS (CONT.)
TOPIC
B.2.5.
B.3.
B.3.1.
B.3.2.
B.4.
B.4.1.
B.4.2.
B.4.3.
B.5.
B.5.1.
B.5.2.
B.5.3.
PAGE
Manual Reset ................................................................................................... B–3
SERIAL PORT MODES AND COMMANDS .....................................................B–4
Monitor Mode.................................................................................................... B–4
PGK Mode ........................................................................................................ B–6
DOWNLOADING AN APPLICATION TO THE PGK CPU .............................. B–19
Running the Download Utility.......................................................................... B–19
Establishing Communications Prior to Download ........................................... B–22
Starting the Download Process ...................................................................... B–23
CODE T REFERENCE ...................................................................................B–26
Code T Advantages........................................................................................B–27
Background .................................................................................................... B–28
Enabling and Using Code T............................................................................ B–30
C. APPENDIX C - SYSTEM SPECIFICATIONS ........................................................C–1
C.1. POWER SPECIFICATIONS .............................................................................C–1
C.1.1. Control Point Module ........................................................................................C–1
C.1.2. Intermediate Module.........................................................................................C–2
C.1.3. Repeater Module ..............................................................................................C–2
C.1.4. Switch Lock Module..........................................................................................C–3
C.1.5. Lightning Protection..........................................................................................C–3
C.2. TRACK CODE SPECIFICATIONS – STANDARD RATE .................................C–4
C.2.1. Cycle Time........................................................................................................C–4
C.2.2. Transmit Code Timing ......................................................................................C–4
C.2.3. Receive Code Decoding ...................................................................................C–5
C.3. TRACK CODE SPECIFICATIONS – TRANSIT RATE......................................C–6
C.3.1. Cycle Time........................................................................................................C–6
C.3.2. Transmit Code Timing ......................................................................................C–6
C.3.3. Receive Code Decoding ...................................................................................C–7
C.4. ASPECT FLASHING ........................................................................................C–7
C.5. INSTALLATION WIRING..................................................................................C–8
C.6. TRACK / LINE WIRE CURRENT......................................................................C–8
C.7. MAXIMUM TRACK CIRCUIT LENGTHS..........................................................C–9
C.8. CAB SIGNAL CODE RATES..........................................................................C–10
C.9. AUDIO FREQUENCY COMPATIBILITY.........................................................C–11
C.10. ENVIRONMENTAL SPECIFICATION ............................................................C–11
C.11. PHYSICAL SPECIFICATIONS .......................................................................C–12
C.11.1. Connections .................................................................................................C–12
C.11.2. Accessories .................................................................................................C–12
P2160B, Vol.1, Rev. Jan/07
iv
Alstom Signaling Inc.
LIST OF FIGURES
DESCRIPTION
PAGE
Figure 1–1. Genrakode II™ System ........................................................................... 1–1
Figure 2–1.
Figure 2–2.
Figure 2–3.
Figure 2–4.
Figure 2–5.
Figure 2–6.
Figure 2–7.
Code 1 Pulse........................................................................................... 2–2
Bi-directional Code Communication ........................................................ 2–3
Vital Code Pulses .................................................................................... 2–4
Example Code 5 Pulses .......................................................................... 2–5
Code 6 Pulse........................................................................................... 2–6
Control Point Module AAR Terminals.................................................... 2–13
LED / Test Point Locations for Control Point Module Boards
(An optional Auxiliary I/O I board is shown as an example) ................. 2–14
Figure 2–8. 2 Configurations of 4-Track Control Point Module Terminals ................ 2–17
Figure 2–9. LED / Test Point Locations for 4-Track Control Point Module Boards
(An optional Auxiliary I/O I boards are shown as an example)............. 2–18
Figure 2–10. Three - and Four - Wire Searchlight Check Circuits............................ 2–21
Figure 2–11. Connections for Double Track Approach Lighting (using Aux I/O #2) . 2–25
Figure 2–12. Intermediate Module AAR Terminals................................................... 2–26
Figure 2–13. LED / Test Point Locations for Intermediate Module Boards
(An optional Auxiliary I/O I board is shown as an example) ................. 2–27
Figure 2–14. Switch Lock Module AAR Terminals ................................................... 2–35
Figure 2–15. LED / Test Point Locations for Switch Lock Module Boards
(An optional Auxiliary I/O I board is shown as an example) ................. 2–36
Figure 2–16. Cab Signal Module AAR Terminals ..................................................... 2–39
Figure 2–17. LED / Test Point Locations for Cab Signal Module Boards ................. 2–39
Figure 3–1.
Figure 3–2.
Figure 3–3.
Figure 3–4.
Figure 3–5.
Figure 3–6.
Figure 3–7.
Typical Genrakode II Module Dimensions............................................... 3–1
ID Jumpers.............................................................................................. 3–6
Track Converter/Receiver Board Adjustment Locations........................ 3–12
Line Wire Converter/Receiver Board Adjustment Locations.................. 3–17
Series Overlay Adjustment Locations ................................................... 3–25
Power Supply Board Edge .................................................................... 3–28
Rocker Switch Display Modes............................................................... 3–36
Figure 4–1. Sample Track Maintenance Log.............................................................. 4–6
Figure 5–3. Troubleshooting Flowchart ...................................................................... 5–4
Figure 6–1. Rocker Switch Display Modes................................................................. 6–4
Figure 6–2. PGK DB9 Connector Wiring .................................................................... 6–5
P2160B, Vol.1, Rev. Jan/07
v
Alstom Signaling Inc.
LIST OF FIGURES (CONT.)
DESCRIPTION
PAGE
Figure A–1. Track Layout Example: Code and Aspect Chart ...................................A–33
Figure A–2. Location 1: Control Point Module..........................................................A–34
Figure A–3. Location 2: Intermediate Module Driving Staggered Colorlight Signal ..A–35
Figure A–4. Location 3: Intermediate Module Driving Staggered Colorlight Signal ..A–36
Figure A–5. Location 4: Demonstrating Application of Repeater ..............................A–37
Figure A–6. Location 5: Intermediate Module Driving Searchlight............................A–38
Figure A–7. Location 7: Control Point Module..........................................................A–39
Figure A–8. 100 Hz External Filter Application .........................................................A–40
Figure A–9. CPU Board Normal Mode Displays.......................................................A–58
Figure A–10. CPU Board Maintenance Mode Displays............................................A–59
Figure A–11. CPU Board Code 5 EAST Mode Displays
(Code 5 Always Example) ..................................................................A–60
Figure A–12. CPU Board Code 5 WEST Mode Displays
(Code 5 Always Example) ..................................................................A–61
Figure B–1. Dloadwin (File Mode) ............................................................................B–19
Figure B–2. COM Port Setting Change ....................................................................B–20
Figure B–3. Dloadwin (Terminal Mode)....................................................................B–22
Figure B–4. File Mode with application loaded .........................................................B–23
Figure B–5. Status Window During Download .........................................................B–24
Figure B–6. Example Railroad Control Block ............................................................B–28
Figure B–7. Bi-directional Communication On A Track Circuit .................................B–28
P2160B, Vol.1, Rev. Jan/07
vi
Alstom Signaling Inc.
LIST OF TABLES
DESCRIPTION
PAGE
Table 2–1. Control Point Module Component Part Numbers ................................... 2–12
Table 2–2. 4-Track Control Point Module Components............................................ 2–16
Table 2–3. Intermediate Module Components ......................................................... 2–24
Table 2–4. Repeater Module Components............................................................... 2–30
Table 2–5. Switch Lock Module Components .......................................................... 2–34
Table 2–6. Cab Signal Module Hardware Composition............................................ 2–38
Table 3–1. Safety Critical Checklist............................................................................ 3–8
Table 3–2. Operational Checks Checklist .................................................................. 3–9
Table 3–3. Recommended Checks Checklist............................................................. 3–9
Table 3–4. Optional Checks Checklist...................................................................... 3–10
Table 3–5. Converter/Receiver Board Adjustment Procedure.................................. 3–13
Table 3–6. Transmit and Receive Settings for Rail Lengths..................................... 3–14
Table 3–7. Track Lead Increases versus Track Length Reductions......................... 3–14
Table 3–8. Receiver Current Adjustment Procedure ................................................ 3–19
Table 3–9. Transmit and Receive Settings for Wire Lengths (6 Gauge) .................. 3–20
Table 3–10. Transmit and Receive Settings for Wire Lengths (8 Gauge) ................ 3–20
Table 3–11. Transmit and Receive Settings for Wire Lengths (10 Gauge) .............. 3–21
Table 3–12. Series Overlay Track Circuit Setup Procedure ..................................... 3–24
Table 3–13. Cab Signal Module Output Adjustment Procedure ............................... 3–26
Table 3–14. Low Signal Battery Threshold Adjustment Procedure .......................... 3–29
Table 3–15. Ground Fault Monitor Fault Detection Threshold Adjustment
Procedure ............................................................................................ 3–30
Table 3–16. Ground Fault Monitor Potentiometer Adjustment Procedure ................ 3–31
Table 3–17. Code 5 EAST ....................................................................................... 3–34
Table 3–18. Code 5 WEST ...................................................................................... 3–35
Table 3–19. Site Configuration Sheet....................................................................... 3–39
Table 4–1. Board Replacement Procedure ................................................................ 4–3
Table 4–2. Current Measurement Procedure ............................................................. 4–4
Table 5–1. Troubleshooting Flowchart Symbols......................................................... 5–3
Table 6–1. Enter Monitor Mode With a PC................................................................. 6–6
Table 6–2. Enter Monitor Mode Without a PC............................................................ 6–7
Table 6–3. Error Code Diagnostics ............................................................................ 6–8
Table A–1.
Table A–2.
Table A–3.
Table A–4.
Table A–5.
Table A–6.
Table A–7.
Table A–8.
Aux I/O Boards and Uses.......................................................................A–41
Aux I/O I Input/Output Types..................................................................A–43
Aux I/O II Input/Output Types.................................................................A–43
Aux I/O III Input/Output Types................................................................A–43
Aux I/O I Standard Uses ........................................................................A–44
Aux I/O II Standard Uses .......................................................................A–45
Aux I/O III Standard Uses ......................................................................A–46
Aux I/O I Board LEDs.............................................................................A–47
P2160B, Vol.1, Rev. Jan/07
vii
Alstom Signaling Inc.
LIST OF TABLES (CONT.)
DESCRIPTION
PAGE
Table A–9. Aux I/O II Board LEDs............................................................................A–47
Table A–10. Aux I/O III Board LEDs.........................................................................A–48
Table A–11. Converter/Receiver Board LEDs ..........................................................A–51
Table A–12. Output Voltage vs. Tap Selection for Track Converter .........................A–52
Table A–13. Receiver Input Resistance and Switch Positions .................................A–52
Table A–14. Output Voltage vs. Tap Selection for Line Wire Converter...................A–54
Table A–15. Receiver Input Resistance and Switch Positions .................................A–54
Table A–16. PGK CPU Board Types........................................................................A–56
Table A–17. Driver Board LEDs ...............................................................................A–64
Table A–18. High Power VPC Board LED................................................................A–65
Table A–19. Low Power VPC Board LED ................................................................A–66
Table B–1. CPU LED Indicators .................................................................................B–2
Table C–1. Control Point Module Input Power Requirements ....................................C–1
Table C–2. Intermediate Module Input Power Requirements.....................................C–2
Table C–3. Repeater Module Input Power Requirements ..........................................C–2
Table C–4. Switch Lock Module Input Power Requirements......................................C–3
Table C–5. Transmit Code Timing..............................................................................C–4
Table C–6. Receive Code Decoding Specifications ...................................................C–5
Table C–7. Transmit Code Timing..............................................................................C–6
Table C–8. Receive Code Decoding Specifications ...................................................C–7
Table C–9. Track Lead Increases vs. Track Circuit Length Reductions .....................C–9
Table C–10. Cab Signal Code Rates .......................................................................C–10
Table C–11. Audio Frequency Versus Track Input Impedance ................................C–11
Table C–12. Module Dimensions and Weight ..........................................................C–12
.
P2160B, Vol.1, Rev. Jan/07
viii
Alstom Signaling Inc.
General Description
1. SECTION 1 – GENERAL DESCRIPTION
1.1.
SCOPE OF MANUAL
The purpose of this manual is to describe the features of the Genrakode™ II system
and to explain how to properly inspect, service, test, remove, and replace the
recommended spare parts.
The Genrakode II system is available in DC or AC versions. This manual discusses the
DC version of the system. The operation and maintenance manual for AC Genrakode is
identified as P2160AC.
1.2.
GENRAKODE II SYSTEM DESCRIPTION
The Genrakode II System, shown in Figure 1–1, is a microprocessor-based system
used for train detection, vital communication through the rails, and cab signaling. The
system is based on microprocessors that vitally direct the operation of control modules.
Figure 1–1. Genrakode II™ System
P2160B, Vol.1, Rev. Jan/07
1–1
Alstom Signaling Inc.
General Description
1.2.1.
Genrakode II Modules
The Genrakode II System consists of four main module types that provide all functions
for complete wayside signaling. The modules consist of boards located within an
enclosure, as shown in Figure 1–1.
The standard system includes the following modules: Control Point module,
Intermediate module, Repeater module, and Switch Lock module. If cab signaling is
required, an optional Cab Signaling module is used with and controlled by one of the
four main module types to apply cab signal to the rails.
•
The standard Control Point module can handle one or two independent track
circuits. Control Point modules either interface with the interlocking relay logic at the
location or can be linked directly to a Vital Processor Interlocking (VPI®) system unit.
A 4-track Control Point module is also available for use as part of the Alstom
Control-Point-in-a-Box (CPIB) system that interfaces to VPI using a Vital Serial Link.
•
The Intermediate module controls two track circuits and the signals for both
directions at a location. No relays are required, and the stick logic for following
moves can be easily implemented in application logic created graphically with the
PGKCAA (application development tool).
•
The Repeater module is used at cut sections to repeat code information in both
directions.
•
The Switch Lock module is used at hand-throw switches with electric locks to control
the electric lock mechanism based on a local unlock request input and received
track codes to ensure the safety of siding-to-mainline and mainline-to-siding train
moves.
•
An optional Cab Signal module is used in conjunction with one of the four main
module types to overlay 60, 100, or 250 Hz cab signaling on the track circuit. The
Cab Signal module generates the 60, 100, or 250 Hz carrier signal that is controlled
(modulated by the required code rate) directly by the Control Point, Intermediate,
Repeater, or Switch Lock module at a given location.
1.2.2.
CODES
The system provides nine codes that are used for detecting trains, signal clearing, and
block indication. These codes can be sent on the tracks or line wire. The coding format
consists of unipolar pulses and utilizes pulse spacing and pulse width variation to signify
different codes. The Alstom Code T mode (patented) is also available to provide
communication between Genrakode modules of location-specific information such as
commercial power status and lamp filament failures. Code T provides this non-vital
communication channel without interfering with the standard vital codes and block
indications.
P2160B, Vol.1, Rev. Jan/07
1–2
Alstom Signaling Inc.
General Description
1.3.
GENRAKODE II SYSTEM FEATURES
The Genrakode II system includes features that improve system performance,
application, and maintenance compared to the original Genrakode.
•
The system is user programmable.
•
The system can be applied to existing relay and signal systems.
•
Fail-safe operation is acheived by applying Numerically Integrated Safety Assurance
Logic (NISAL). NISAL is used for the design of fail-safe, microprocessor-based
products and systems to insure system safety.
•
The systems CPU board is user programmable with computer aided application
(CAA) software, provides integrated data logging, many field-configurable settings,
and excellent diagnostic features.
•
A cable integrity check provides additional security by detecting external cable
failures.
•
Real-time independent Code 5 selection for each track circuit allows for compatibility
with adjacent coded track circuits.
•
Automatic receiver checking eliminates the need for manual periodic verification.
•
Diagnostics are programmed into the CPU software, enabling troubleshooting of a
module by observing LED indicators on the CPU board. These indicators provide
quick identification of the board or function that is not operating properly.
•
A PC based simulator is available to assist with development of the application
programming.
•
A PC based configuration tool simplifies ordering by generating the appropriate part
number.
•
Vital outputs and the logic power supply are completely isolated from the signal
battery. This improves lightning and noise immunity.
•
Direct filament and mechanism drive are provided for colorlight and searchlight
signals at intermediate locations. Regulated lamp drive voltage maximizes signal
bulb life. Filament checking and power-out detection are also provided.
•
Vital inputs provide downgrade of signals as a result of switch circuit controller
status, slide fence failure, high water detector activation, or other location-specific
conditions.
•
A track-to-line board simplifies application when applying Genrakode in dark territory
with existing DC crossing circuits.
P2160B, Vol.1, Rev. Jan/07
1–3
Alstom Signaling Inc.
General Description
•
A serial communications link between Genrakode and VPI is available that
eliminates relay interfaces and the number of discrete wires required for installation.
•
AAR posts are readily accessible, making installation quick and easy.
•
Long track circuit length minimizes the number of track circuits required; track circuit
lengths of up to 29,000 ft are attainable on welded rail with 10 ohms DC ballast.
•
100% solid state construction reduces maintenance costs by eliminating relays.
•
A vital code, Code 9 provides additional vital signaling capabilities.
•
A non-vital code, Code T provides up to four individual indications for advanced
diagnostic and maintenance functions.
•
There are three available cab signal generators each capable of generating the 5
standard cab signal rates- 75, 120, 180, 270, and 420ppm. Carrier frequencies of
60Hz, 100Hz, and 250Hz are available.
•
Remote operation is available via serial communications link at intermediate signal
locations, permitting remote control of signals and codes.
•
A Genrakode™ Test Unit can be used in conjunction with a module being put into
service or under test to simulate the opposite end of a track circuit. This allows
functional testing of transmission and reception of codes so operation can be
checked prior to the module's connection to the rails without requiring a person at
the opposite end of the track circuit.
1.3.1.
Interoperability
Genrakode II is capable of being applied in any application where interface to existing
relay and signal systems is required in the performance of coded track circuit
functionality. With regard to other supplier’s electronic coded track circuit products,
Genrakode II provides the flexibility to adapt to track coding patterns utilized for train
detection, block indication, signal clearing, maintenance and block tumble-down
functions. Specifically, Genrakode II is fully compatible with the ElectroCode Series of
coded track circuits provided by GE/Harmon Industries. This has been demonstrated on
several North American railroad properties.
P2160B, Vol.1, Rev. Jan/07
1–4
Alstom Signaling Inc.
General Description
1.4.
SYSTEM SAFETY DESIGN
Genrakode II operates in a fail-safe manner employing a single microprocessor.
Numerically Integrated Safety Assurance Logic (NISAL) techniques are utilized within
the product design to vitally assure product safety when applied correctly.
Numerically based safety systems, like most vital transportation control systems, utilize
the concept of diversity as a prime mechanism upon which the vital system design is
constructed. A NISAL, single processor approach uses independent calculations
involving diverse data sets (data channels) rather than diverse hardware or software. In
order for a system result to assume a permissive state, both data sets must be
permissive. Vital parameters are represented within the system as diverse and uniquely
coded 32-bit values. More detailed characteristics of the data representations and the
mathematical concepts employed are not included in this manual.
Vital parameters such as application logic results, the states of inputs and outputs, and
internal system processing checks are formed through the execution of vital software
algorithms under direction of the system executive program. NISAL software algorithms
are designed to account for any and all failures in processing hardware or software
coding. Any processing failure that could adversely affect the safe execution of a vital
process leads to the corruption of one or both of the diverse results of that process.
Lack of proper and diverse permissive results directly leads the system to attain a more
restrictive operating state. Verification of processor integrity is accomplished through the
generation of system checkwords.
1.4.1.
Memory Integrity Verification
One advantage of a NISAL-based system design is that failures to data or system
program memory can lead to an erroneously permissive output only with an extremely
low probability. In other words, the safety of the system is not compromised by random
errors in data or program memory. For this reason, continuous data or program memory
verification is not required to assure safety of the system.
For software configuration verification, program memory checksums and CRCs (CyclicRedundancy Checks) are computed as part of the application compilation (using the
Genrakode II Computer Aided Application Package (CAA)), during download of the
application and (if required) system software to the Programmable Genrakode (PGK)
CPU, and on-line during Genrakode II operation. See Appendix B for PGK CPU serial
commands to query this information.
P2160B, Vol.1, Rev. Jan/07
1–5
Alstom Signaling Inc.
General Description
1.4.2.
Programmable CPU Board
The heart of the Genrakode II system is the Programmable Genrakode (PGK) CPU
board. This board offers many advantages over the previous conventional Genrakode
CPU board including easy user-programmability of application logic, integrated data
logging, many field-configurable settings, and excellent diagnostic features.
User-defined application programs are downloaded to the PGK CPU board using a
standard RS-232 connection from a PC using the Alstom software utility DloadWin. The
application program and system (executive) software are stored in Flash memory but on
physically separate memory devices. The system software version required by the
application is also downloaded to Flash memory if required (if the proper version is not
already present on the CPU board). Application and system checksums and CRCs are
displayed after downloading and on request from the CPU serial port interface by
entering the command “CRC”.
See Appendix B for a listing of the configuration and diagnostic commands available
with the PGK CPU board. See Section 3 for instructions on installation and configuring
specific settings. Be aware that as new features continue to be introduced with the
Genrakode II system, older software versions may not support all features currently
described in this manual. The Release Notes supplied with the current version of the
Genrakode II CAA package contain a listing of which versions support which features.
1.4.2.1.
Application Programming
User-programmability is provided with the Genrakode II system using the Genrakode II
CAA package, a suite of application development tools that allow graphical development
of application logic, full simulation and testing, and software downloading to the
Genrakode II hardware. Additionally, full on-line help and a training tutorial are provided
to help new users gain proficiency with the tools. The CAA installation package is
supplied to customers on a single CD.
P2160B, Vol.1, Rev. Jan/07
1–6
Alstom Signaling Inc.
Theory of Operation
2. SECTION 2 – THEORY OF OPERATION
2.1.
GENERAL
This section contains the Theory of Operation of the Alstom Genrakode II system.
Genrakode II is a DC-coded, bi-directional track circuit and communications system
using the rails for train detection, communication of vital and non-vital signal control and
status information, and block indication. The system eliminates the need for line wire
circuits in most cases which are both costly to install and costly to maintain by railroads.
2.2.
SYSTEM OPERATION
Bi-directional train detection and signal control circuits operate in a time sharing mode
with regard to usage of the rails within a track circuit. The basic system period operates
on a 2.8 second cycle, with operation in one direction for 1.4 seconds and operation in
the opposite direction for the remaining 1.4 seconds. All EAST direction transmissions
occur every 2.8 seconds when no code is received. All WEST direction transmissions
occur every 2.9 seconds when no code is received. After the two sides are
synchronized the cycle reverts to 2.8 seconds. The difference in unsynchronized cycle
periods between the tracks helps both ends of a track circuit synchronize in the
minimum period of time when the modules are powered up or when a train vacates the
track circuit.
The coding format is unipolar DC type pulses with pulse pairs used to signify vital signal
clearing codes. The time between leading edges of a pulse pair signifies the specific
signal clearing code being transmitted and received. Nine distinct codes are provided;
six for vital signal clearing codes, one for vital train detection, one for non-vital block
indication, and one for non-vitally initiating the tumble-down of signals in one direction.
The polarity of pulses transmitted on the rails from either end of a track circuit is the
same. The system is a unipolar pulse polarity system; therefore reversing the polarity of
rail connections to track circuits adjacent to the insulated joints provides insulated joint
protection.
P2160B, Vol.1, Rev. Jan/07
2–1
Alstom Signaling Inc.
Theory of Operation
2.3.
CODE DEFINITIONS
The Genrakode system transmits and receives DC current pulses to enable each
Genrakode module to communicate vitally with its adjacent modules using the tracks as
the communication medium. This is an advantage over the miles of line wire that had to
be strung and maintained along the tracks for use in communication previously.
The coding scheme gives the railroad (and thus the application programmer) the ability
to send both vital and non-vital codes from location to location along the tracks. These
codes can be used for control of signal aspects, block occupancy indication, and other
purposes. The application logic at each location allows complete control over the
communications between each module.
Code 1: When transmitted by itself and decoded at the receive end of a track circuit,
Code 1 indicates that the track circuit is unoccupied. It is also decoded in the same
manner when pulse pairs are transmitted, since any code received other than a Code 1
implies a Code 1. From no code received, reception of Code 1 pulses in two
consecutive 2.8 second Genrakode cycles is required to validate Code 1, except for the
Fast Repeater option which validates in one cycle. Validation of Code 1 is dropped
when Code 1 pulses are not received in two out of three consecutive Genrakode cycles.
Code 1 by itself is a single 112 ms pulse, but can also carry a Code 5 (non-vital code)
which extends the single pulse length to 224 ms or 352 ms depending on the type of
Code 5 selected.
112 msec
2.8 sec
Figure 2–1. Code 1 Pulse
The 2.8 second Genrakode cycle includes both a transmit portion and a receive portion.
This enables two modules to communicate bi-directionally on a track circuit. For
example, while module 1 is transmitting, module 2 is receiving, and vice-versa.
P2160B, Vol.1, Rev. Jan/07
2–2
Alstom Signaling Inc.
Theory of Operation
1
2
2.8 sec
Module 1 Transmit
Module 2 Receive
Module 1 Receive
Module 2 Transmit
Figure 2–2. Bi-directional Code Communication
Codes 7, 4, 3, 2, 9, 8: These are the six vital two-pulse codes, also known as signal
clearing codes. Code 8 typically represents the most restrictive code and Code 7
represents the least restrictive code, although there is no safety requirement to observe
this order. Code 8 has the longest time period between the pulse pair, and Code 7 has
the shortest time period between the pulse pair. Vital spacing between the pulses is
measured from leading edge of the first pulse to leading edge of the second pulse.
The standard validation rules for the signal clearing codes state that from no code
received (track previously shunted), reception of a signal clearing code in three
consecutive 2.8 second Genrakode cycles is required to validate the clearing code
(Code 1 validates after the second Genrakode cycle). If Code 1 or another signal
clearing code is currently validated, reception of a new signal clearing code in two
consecutive Genrakode cycles is required to validate that code. Validation of a signal
clearing code is dropped when that code is not received in two out of three consecutive
Genrakode cycles. Note that these validation rules only apply to the application logic
parameters representing the validated state of each code (for example parameter
ECR_RECCODE_7 for Code 7 received on the East). A corresponding set of logic
parameters representing the cycle-by-cycle received code on each track are also
provided for use by the application programmer. These parameters should not be used
to directly drive vital outputs but can be used to repeat codes where maximum speed is
required.
P2160B, Vol.1, Rev. Jan/07
2–3
Alstom Signaling Inc.
Theory of Operation
112 msec
CODE 7
224 msec
CODE 4
320 msec
CODE 3
496 msec
CODE 2
688 msec
CODE 9
816 msec
CODE 8
944 msec
Figure 2–3. Vital Code Pulses
The vital spacing between the two pulses is the fail-safe property of this coding scheme,
not the pulse widths. Only non-vital information (such as Code 5) can be encoded by
varying the pulse widths. As with Code 1, these codes can be transmitted bidirectionally by the modules at each end of the track circuit.
P2160B, Vol.1, Rev. Jan/07
2–4
Alstom Signaling Inc.
Theory of Operation
Code 5: This non-vital code provides the ability to indicate block occupancy starting at
any track circuit boundary location desired within a Control Point-to-Control Point block.
The information is decoded at the Control Point location. Code 5 information can be
transmitted to either or both Control Point locations with a track block boundary defined
in both directions. Code 5 is added to Code 1 or to a signal clearing code by
lengthening the first or second transmitted pulse from 112 ms to either 224 ms
(standard) or 352 ms (long). It is therefore possible to send three codes at one time
along the track: Code 1, Code 5, and a signal clearing code. Three Code 5 formats are
supported: Standard (standard length pulse transmitted every cycle when selected),
Alternating (standard length pulse transmitted every cycle when selected), and Long
(long length pulse transmitted every cycle when selected). The Code 5 format used in
an application for each track can be selected during the development of an application
program with the Genrakode II CAA, but can also be changed in the field without
changing the application program. Different format settings on each track at a location
are supported, but the format at each end of a track circuit must be same for proper
Code 5 performance.
Standard Code 5 is generally used where maximizing the propagation speed of Code 5
is paramount, while Alternating Code 5 provides the most reliable operation especially in
poor ballast conditions but is slightly slower than Standard Code 5. Long Code 5 is not
generally used except where it is necessary to interface to older equipment using this
format.
2.8 sec
CODE 3
496 msec
CODE 3
and
CODE 5
496 msec
CODE 3
and
ALT CODE 5
496 msec
Figure 2–4. Example Code 5 Pulses
P2160B, Vol.1, Rev. Jan/07
2–5
Alstom Signaling Inc.
Theory of Operation
Code 6: This non-vital code decreases the tumbledown time of signals in one traffic
direction. Traffic direction and the tumble-up of signals are initiated by sending a signal
clearing code from a Control Point module. This sets the traffic direction towards the
Control Point module. To tumble down the signals in that direction, the signal clearing
code transmission from the Control Point module is stopped and Code 6 is transmitted
from the Control Point module. The Code 6 transmission causes the Code 1 pulse to
lengthen to 600 ms and to stop transmission of the signal clearing code. The Code 6
pulse is transmitted for one Genrakode cycle only and is immediately validated at the
opposite track circuit end. The user-defined application logic normally has signal
aspects set to stop in the appropriate direction on validation of Code 6, and initiates a
repeating of Code 6 to the next track circuit during the next Genrakode cycle.
The fact that the signal clearing code transmission at the Control Point is stopped
initiates a fail-safe tumbledown of signals. In this case, signal drop out time is 4.2 to 5.6
seconds. The transmission of no code or Code 1 only from the Control Point also
triggers a tumbledown of signals. Typical user-defined application logic also initiates
Code 6 transmission in both directions if a train enters a track circuit from a siding or if a
NWP input drops.
600 msec
2.8 sec
Figure 2–5. Code 6 Pulse
Train detection is provided by the wheel axle shunting method with shunting sensitivities
designed for 0.06 Ω shunting. Receiver sensitivity is fixed at a 0.5 ampere threshold that
is consistent with many prior relay coded track circuits. Since the track circuit is a DCpulse format, the "pick" point and "drop away" point of track circuit operation is
essentially the "pick" point current level of the receiver, and hysteresis or receiver "drop
away" plays no important part in track circuit operation. This is also consistent with relay
coded track circuits.
P2160B, Vol.1, Rev. Jan/07
2–6
Alstom Signaling Inc.
Theory of Operation
The frequency content of the coding format is a very low frequency, and the track circuit
is not a DC relay track circuit, so very long track circuits can be used. This minimizes
the number of insulated joints and cut section repeater locations needed. Many factors
influence the maximum obtainable track circuit length. These include track circuit lead
length and wire size, rail size, welded or railhead bonding, and the minimum ballast
resistance conditions. See Section 3, heading 3.7.1., Track Circuit Adjustment for a
discussion of maximum track circuit lengths. See Table 3-7 for a summary of how track
lead length affects track circuit lengths.
Track circuits often have to share the rails with other types of equipment such as
overlay circuits, motion detectors, and predictors and are also subjected to induced
levels of 60 Hz interference and lightning surges. These factors have been considered
in the design of the Genrakode II system to minimize their influence and thereby
produce a reliable and compatible system.
Track filters are provided within the modules to accommodate the majority of situations
encountered.
Genrakode II modules operate from a nominal 12VDC signal battery source. For the
track circuit operation, Genrakode II converts this 12V power source to a lower voltage
that is completely isolated from the signal battery, to operate the track circuit. The
voltage can be selected from 1.5 Volts to 4 Volts. This feature allows operation of the
track circuit without the necessity of a separate track circuit battery.
Signal lighting and light out detection is provided internally to Genrakode II modules at
Intermediate locations. No relays are required at such a location, and an isolated,
regulated lamp voltage drive is provided to maximize signal lamp life.
At Control Point locations, where the interlocking logic is performed by vital relays,
Genrakode II modules provide decoded outputs for driving relays and code select
circuits which operate with relay contact closures or a DC input voltage.
If the interlocking logic is performed by a VPI (Vital Processor Interlocking) system,
relays are not required for the interface between VPI and Genrakode II. A direct
connection or Vital Serial Link performs the interface of VPI to Genrakode II. For a direct
connection, the decoded outputs from Genrakode II are connected to vital input circuits
of VPI and double-break outputs of VPI are connected to vital DC code select inputs of
Genrakode II. For a Vital Serial Link, a two-wire serial connection is connected between
the VPI Vital Serial Controller board and the Programmable Genrakode CPU board (a
4-track Genrakode module chassis is required for Vital Serial Link operation).
P2160B, Vol.1, Rev. Jan/07
2–7
Alstom Signaling Inc.
Theory of Operation
The Genrakode II system also incorporates the facility for cab signaling, if desired. The
traditional 100 Hz coded, or two-aspect ON-OFF control system is implemented by
overlaying the cab signal system on the Genrakode II track circuit. To transmit the cab
signal aspect onto the rails, the Genrakode II modules, by way of the track codes being
decoded or selected, produce a code rate signal that controls a separate module
containing the 100 Hz generator and power amplifier. Maximum track circuit length is
necessarily shortened in a cab signal system due to increased signal attenuation along
the rails at the 100 Hz carrier frequency. Filtering is provided in the Cab Signal module
to isolate signals to and from the Genrakode unit, the Cab Signal module and other
track circuit equipment. 60 and 250 Hz cab signal equipment are also available.
See Appendix A for typical application circuits and a typical control line diagram for
applying Genrakode II through the rails.
2.3.1.
Non-Vital Code T
The Genrakode II Code T mode allows transmission of specific Trouble Codes from
PGK Intermediate, Repeater, and Switch Lock modules in a block to PGK Control
Points at the ends of the block. The use of Code T is only available with PGK CAA
versions 2.01 and above. Each module in the block is assigned unique Trouble Codes
(up to eight per location) which can be transmitted to alert maintenance personnel to
such conditions as failed lamp filaments, loss of commercial power, stuck searchlight
signal mechanisms, and other problems. Unlike a single, generic, maintenance code,
the Code T mode provides specific information on the location and nature of events
requiring maintenance action. The Genrakode II modules in the block store the Trouble
Codes received from other modules in the block and these Trouble Codes can be
accessed through the PGK serial port interface. Trouble Code information received at
the Control Points can be transmitted to the office (as an option) through various
means.
Use of Code T requires all modules in a contiguous section of a block to be PGK
modules with appropriate software versions and enable settings – the mode is not
compatible with conventional Genrakode, PGK without Code T enabled, or other
manufacturers’ equipment. Code T operation can be enabled or disabled for an
application program through the PGKCAA, as well as enabled or disabled in the field
through the serial port interface. See the software settings discussion in Section 3,
Installation.
Code T, like Code 5, is not a standalone code but can be encoded on all standalone
codes except Code 6. Trouble Code information is encoded using Code T in a multicycle frame. The number of code cycles required to transmit one frame is based on the
number of track circuits in a block this mode can support (currently 28) and the number
of unique Trouble Codes per location (selectable between 4 and 8).
P2160B, Vol.1, Rev. Jan/07
2–8
Alstom Signaling Inc.
Theory of Operation
Only properly configured PGK Intermediate, Repeater, and Switch Lock modules can
transmit Trouble Codes. If Code T operation is fully enabled, a Trouble Code is
transmitted by a module when either of the following conditions is met:
•
One of the module’s trouble code parameters is set True by the application logic.
This trouble code is sent in both directions (unless otherwise configured).
•
A Trouble Code is received from an adjacent module. This trouble code is not sent in
both directions; it is only repeated. The code is received on the East and is
transmitted to the West.
•
See Appendix B for more information concerning Code T enabling options.
If the track circuit drops for even a single Genrakode cycle while a Trouble Code is
being sent, both ends of the circuit reset their Code T processes. The transmitting end
waits until the track is up again to restart the same Trouble Code that was interrupted,
and the receive end ignores the incomplete Trouble Code frame and waits for another
valid frame to begin.
When any module (including Control Point) receives a complete, valid, Trouble Code
frame, that Trouble Code is logged to the module’s Block Trouble Queue. For
Intermediate, Repeater, and Switch Lock modules that Trouble Code is also queued up
for transmit on the other track if the repeating function for that direction is enabled.
Several serial port commands are available to configure Code T operation and display
Trouble Code information. See Appendix B for complete details.
P2160B, Vol.1, Rev. Jan/07
2–9
Alstom Signaling Inc.
Theory of Operation
2.4.
CONTROL POINT MODULE
The Control Point module is used at end-of-block signal locations to initiate code
transmission to other signal locations through the rails, to decode signals from the rails,
to energize relay outputs to reflect the decoded codes, and provides the option to
generate cab signal rates.
The Control Point module is available in three basic configurations. Two of the
configurations (EAST-only and WEST-only) interface with a single-track circuit,
decoding and transmitting signals from one direction only. Both configurations operate
similarly but differ in three areas: 1) terminals used to connect the module to external
circuits, 2) location of the PC boards in the module, 3) the "free running" cycle time. All
EAST direction transmissions occur every 2.8 seconds when no code is received. All
WEST direction transmissions occur every 2.9 seconds when no code is received. After
the two sides are synchronized the cycle reverts to 2.8 seconds. The difference is
required so that both ends of a track circuit can synchronize as quickly as possible
when the modules are powered up or when a train vacates the track circuit.
The third configuration is a combination of both the EAST and the WEST configurations.
This module contains all the hardware necessary to interface with two track circuits. The
operation of EAST and the WEST functions of this configuration are totally independent.
One CPU board runs both the EAST and the WEST programs simultaneously.
Selecting a code to be transmitted can be accomplished in two ways, depending upon
the type of Code Select board installed. Using the Relay Code Select board (P/N
59473-830-01), a connection is made between a common select terminal, called a
REFERENCE terminal, to one or more code select terminals through a relay contact or
a network of relay contacts. This Code Select board is used in the majority of
applications.
A single Code Select board contains the required circuitry to select the codes to be
transmitted to the EAST and the WEST directions. If a single direction configuration is
used, the unused code select terminals are typically left unconnected, but can be used
as general purpose inputs.
When any code is to be transmitted, Code 1 must also be selected along with the
desired code.
Codes received from the rails are decoded and typical user-defined application logic
energizes a relay output(s) to reflect the received code(s). There are eight relay outputs
per direction. As there are nine codes, either one must not cause a relay output to be
energized at all or a combination of relay outputs must be used to represent the
reception of that code. If such combinations are used, they must be implemented vitally,
so that if any single relay output fails, a less permissive code must be indicated.
With the addition of an Auxiliary I/O Board, a number of functions can be added to the
Control Point module. Two vital auxiliary inputs are provided for general use
(determined by user-defined application logic), such as downgrading the transmitted
P2160B, Vol.1, Rev. Jan/07
2–10
Alstom Signaling Inc.
Theory of Operation
codes based on external conditions. This could typically include input from equipment
such as switch controllers, slide fences, high water detectors, dragging equipment
detectors, etc. Cab signal outputs are provided for the EAST and WEST directions.
These outputs, controlled by the Auxiliary I/O Board, interface with the Genrakode Cab
Signal module and provide the coded cab signal rates.
NOTE
No other inputs or outputs of the Auxiliary I/O board are available in the
Control Point module except for the ones listed above.
2.4.1.
Hardware Configurations
The Genrakode II Control Point module is available in three basic hardware
configurations. These are the EAST-only configuration, the WEST-only configuration,
and the dual EAST/WEST configuration. Each module requires a PGK CPU board and
a Code Select board from the start. The Code Select board also has two options -- it
can be a Relay Code Select or a DC Code Select board. Relay-type code select inputs
are the standard type and only require a contact or group of contact closures to select a
code. DC-type code select inputs require the presence of a DC voltage to select a code.
DC code select inputs are required when the code selection is generated by another
electronic device, such as VPI, as opposed to relays.
Each module requires either a Standard Regulator/Filter board or a Power Supply
Regulator/Filter board. If Low Signal Battery and Ground Fault Monitoring functions are
needed, a Power Supply board must be used. Otherwise, a Standard Regulator/Filter
board is sufficient. Note that a Power Supply board can be used to provide the
Regulator and Filter functions even if the additional functions are not needed.
In addition, for each direction (EAST and/or WEST) for which the module interfaces, a
VPC board, a Decode Output board, and a code interface board are required. The
Decode Output board can be the Group 01 high AC-noise immunity version or the
Group 02 Cable Integrity Check version. The code interface board can be the
CONV/RCVR Group 01 for interfacing to track or the Group 02 line drive/receiver if
connecting to line wire.
P2160B, Vol.1, Rev. Jan/07
2–11
Alstom Signaling Inc.
Theory of Operation
A Control Point module can also include an Auxiliary I/O board, the AUX I/O I, II, or III.
The addition of an Auxiliary I/O Board provides EAST and WEST two wire auxiliary
inputs and EAST and WEST cab signal outputs. Auxiliary inputs are typically used to
downgrade the signaling system due to an external condition. The cab signal outputs
interface with the Cab Signal module and generate the appropriate cab signal rates. An
Auxiliary I/O Board is required if the auxiliary inputs/outputs or cab signal outputs are
used.
Table 2–1. Control Point Module Component Part Numbers
Name
Part Number
CONV/RCVR
59473-833-01 or –02
DECODE OUT
59473-838-01 or -02
VPC
59473-835-01
RLY CODE SEL
59473-830-01
DC CODE SEL
59473-895-01
REG/FILTER
59473-834-01 or
31166-338-02
POWER SUPPLY REG/FILTER
31166-338-01
CPU
31166-141-04
AUXILIARY I/O I
59473-837-01
AUXILIARY I/O II
59473-958-01
AUXILIARY I/O III
31166-043-01
P2160B, Vol.1, Rev. Jan/07
2–12
Alstom Signaling Inc.
TB3
P2160B, Vol.1, Rev. Jan/07
W
C2RLY
W
C3RLY
TB2
2–13
B
WEST
TK+
WEST
TK-
W
W C5RLY WHR
C7RLY
(W C6 RLY)
W
C1RLY
W
RLY+
W
C8RLY
W
C4RLY
W
CNT5
W
CNT2
W
REF
W
CNT4
W
AUX+
W
W CNT7
CNT6
(SER.1)
W
CNT3
W
CNT1
W
CNT8
(SER.2)
W CAB
W
AUX-
E CNT5
E CAB
E
AUX+
E
CNT6
E CNT2
E
AUX-
E
CNT7
E
CNT3
E
REF
E
CNT8
E
CNT4
E
CNT1
E
E C3RLY
C2RLY
EAST
TK+
EAST
TK-
EHR E C7RLY
(E C6RLY)
E RLY+
E
C5RLY
E
C1RLY
N
E
C8RLY
E
C4RLY
Theory of Operation
TB1
Figure 2–6. Control Point Module AAR Terminals
Alstom Signaling Inc.
Theory of Operation
XMIT
CODE DET
+4V
COM
RCV
TEST
EAST RECEIVER/CONVERTER
PC10
EAST DECODE OUT
PC9
EAST LOW-POWER VPC
PC8
VPC OUT- OUT+
PC7
EAUX
IN
EEXO
EEXI
ECAB
WEXI
WCAB
WAUX
IN
WEXO
PGK - CPU
PC6
AUX I/O I
PC5
REGULATOR FILTER
E-W CODE SELECT
PC4
WEST LOW-POWER VPC
PC3
WEST DECODE OUTPUT
PC2
VPC OUT- OUT+
XMIT
CODE DET
+4V
WEST RECEIVER CONVERTER
COM
RCV
TEST
PC1
Figure 2–7. LED / Test Point Locations for Control Point Module Boards
(An optional Auxiliary I/O I board is shown as an example)
P2160B, Vol.1, Rev. Jan/07
2–14
Alstom Signaling Inc.
Theory of Operation
2.5.
4-TRACK CONTROL POINT MODULE
The 4-Track Control Point module is used with a VPI module in a Control Point in a Box
(CPIB) enclosure. It enables the CPIB system to interface with up to 4 separate track
circuits to transmit and receive codes through the rails and provides the option to
generate cab signal rates.
The 4-Track Control Point module can be thought of as two traditional Control Point
modules combined into one module except that the decode output and code select input
functions are provided by a Vital Serial Link to the VPI module. The A side makes up
one Control Point, and the B side makes up the other, with two tracks controlled by
each side. Each of the two sides, A and B, are independent except for the
Regulator/Filter board which they share in common. Each side contains two
Converter/Receiver boards, a CPU board, a VPC (Vital Power Controller) board, and an
optional Aux I/O board.
With the 4 track circuits labeled 1A, 2A, 3B, and 4B, CPU A interfaces to track circuits
1A and 2A through Converter/Receiver boards 1A and 2A, respectively, and CPU B
interfaces to track circuits 3B and 4B through Converter/Receiver boards 3B and 4B,
respectively. Note that some system documentation still refers to the tracks in terms of
East and West. For CPU A, track 1A is the “West” track and track 2A is the “East” track.
Likewise for CPU B, track 3B is “West” and track 4B is “East”. It is still advised, though
not required, to follow this East/West nomenclature in the sense that “East” tracks
should talk to “West” tracks and vice versa.
Each CPU board then communicates to the VPI module via the Vital Serial Link, and the
VPI module handles all of the decode output and code select input functions of a typical
Control Point module. The CPU boards must be either PGK CPU Group 01 or Group
03; only those two versions of the PGK CPU board contain the Vital Serial Link
hardware.
With the addition of an Auxiliary I/O Board, a number of functions can be added to the
4-Track Control Point module. Vital inputs are provided (both single-ended and
differential) for general use. Vital outputs are also provided, including ones that can be
used to interface with the Genrakode Cab Signal module and provide coded cab signal
rates.
P2160B, Vol.1, Rev. Jan/07
2–15
Alstom Signaling Inc.
Theory of Operation
2.5.1.
Hardware Configurations
The Genrakode II 4-Track Control Point module requires (as previously described) a
PGK CPU board, a VPC board, and two Converter/Receiver boards for each side, along
with a common Regulator/Filter board. In addition, each side can include an optional
Aux I/O board to provide additional vital input and outputs. The list of boards (from left to
right facing the module) is as follows:
•
PC01
Converter/Receiver 1A
•
PC02
Converter/Receiver 2A
•
PC03
Aux I/O A (optional)
•
PC04
VPC A
•
PC05
CPU A
•
PC06
Regulator/Filter (common)
•
PC07
CPU B
•
PC08
VPC B
•
PC09
Aux I/O B (optional)
•
PC10
Converter/Receiver 3B
•
PC11
Converter/Receiver 4B
Table 2–2. 4-Track Control Point Module Components
Name
Part Number
CONV/RCVR
59473-833-01 or –02
VPC
59473-872-01
REG/FILTER
59473-834-01 or
31166-338-02
CPU
31166-141-03
AUXILIARY I/O I
59473-837-01
AUXILIARY I/O II
59473-958-01
AUXILIARY I/O III
31166-043-01
P2160B, Vol.1, Rev. Jan/07
2–16
Alstom Signaling Inc.
Theory of Operation
1A
TRK+
1A
TRK+
TB2
TB2
1A
TRK-
1A
TRK-
2A
TRK+
2A
TRK+
J1
J1
+VPC A
9
5
5
6
6
1
1
J4
9
J6
+
+
-
J3
-
VSL+
TB1
TB1
J3
VSL9
5
5
6
6
1
1
S1
J5
J7
S1
3B
TRK+
+VPC B
TB3
3B
TRK-
TB3
3B
TRK4B
TRK+
4B
TRK+
4B
TRK-
4B
TRK-
P/N 55899-134-XX
J2
CAB 3B
CAB 4B
AUX 3B+
AUX 3BAUX 4B+
AUX 4B-
J2
3B
TRK+
CAB 4B
CAB 3B
AUX 3B+
AUX 3BPOW DET B+
POW DET BEXO 3B
EXI 3B
EXO 4B
EXI 4B
AUX 4B+
AUX 4B-
ON
OFF
9
ON
OFF
RTS A
TX A
CTS A
RX A
+VSL
-VSL
RTS B
TX B
CTS B
RX B
CAB 1A
CAB 2A
AUX 1A+
AUX 1AAUX 2A+
AUX 2A-
2A
TRK-
2A
TRK-
CAB 2A
CAB 1A
AUX 1A+
AUX 1APOW DET A+
POW DET AEXO 1A
EXI 1A
EXO 2A
EXI 2A
AUX 2A+
AUX 2A-
P/N 55899-141-XX
Figure 2–8. 2 Configurations of 4-Track Control Point Module Terminals
P2160B, Vol.1, Rev. Jan/07
2–17
Alstom Signaling Inc.
Theory of Operation
XMIT
CODE DET
+4V
COM
RCV
TEST
CONVERTER/RECEIVER 4B
CONVERTER/RECEIVER 3B
WAUX
IN
VPC OUT+
VPC OUT+
WEXI
EEXI
RCV
TEST
EAUX
IN
PC10
EEXO
COM
ECAB
+4V
WCAB
CODE DET
WEXO
XMIT
PC11
AUX I/O I - B
PC9
HIGH-POWER VPC B
PC8
PGK CPU B
PC7
REGULATOR FILTER
PC6
PGK CPU A
PC5
OUT-
OUT-
HIGH-POWER VPC A
AUX I/O I - A
XMIT
CODE DET
PC3
+4V
COM
RCV
TEST
CONVERTER/RECEIVER 2A
XMIT
CODE DET
EEXO
ECAB
EEXI
WCAB
WEXI
PC4
EAUX
IN
WEXO
WAUX
IN
+4V
CONVERTER/RECEIVER 1A
PC2
COM
RCV
TEST
PC1
Figure 2–9. LED / Test Point Locations for 4-Track Control Point Module Boards
(An optional Auxiliary I/O I boards are shown as an example)
P2160B, Vol.1, Rev. Jan/07
2–18
Alstom Signaling Inc.
Theory of Operation
2.6.
INTERMEDIATE MODULE
The Intermediate module is used at intermediate signal locations to decode signals from
the rails, drive various types of signals, transmit signals to other modules through the
rails, and provides the option to generate cab signal rates. No relays are necessary at
an intermediate location. Genrakode II can drive lamps and mechanisms directly and
perform all required light out detection. One Intermediate module receives, transmits,
and drives signals for both the EAST and WEST directions.
The Intermediate module can drive two types of signals: searchlight and colorlight.
Codes received from the rails are decoded. Then, based on these, and any other data
such as open filaments, stuck mechanisms, auxiliary inputs, etc., the application in the
PGK CAA (Computer-Aided Application) determines what aspect(s) to display and what
codes to transmit to the next location.
Signal lamp filaments are tested to be intact every 512 ms. Typically if a filament is
determined to be open, the displayed aspect and the code transmitted to the next
location can be downgraded. For colorlight signals, only lamps that are required to be
on and that have open filaments cause the system to be downgraded. Open filaments in
lamps required to be off have no effect on the signaling system. Such decisions of
downgrading in response to open filaments are left to the application programmer
according to the operating rules of an individual railroad.
For searchlight operation, the position of the mechanism is checked every 512 ms.
Typically if a mechanism is determined to be out of correspondence, the signal is set
dark and the signaling system is downgraded. These decisions are made at the
application level.
Options are provided to allow the signals to be approach lit. When signals are approach
lit, they are normally off until the track circuit is shunted.
With the addition of an Auxiliary I/O Board, more functions can be added to the
Intermediate module. An EAST and a WEST auxiliary input is provided that allows the
displayed aspect and the transmitted code to be downgraded. These inputs are typically
used for equipment such as switch controllers, slide fences, high-water detectors, or
dragging equipment detectors where the signaling system must be informed of various
external conditions. These inputs can also be used for other functions where special
signaling conditions arise, such as double track approach lighting.
A dedicated input, called the power detect input, is provided on three versions of the
Auxiliary I/O Board to detect the presence/absence of 110-VAC power. This input can
be used to approach-light signals if AC power is lost; reducing drain on their batteries.
Cab signal outputs are provided for both the EAST and WEST directions. These
outputs, located on the Auxiliary I/O Board, interface to the Genrakode cab-signaling
module and provide the coded cab signal rates. An available option is to use cab signal
outputs to energize a relay when a particular code or set of codes is decoded.
P2160B, Vol.1, Rev. Jan/07
2–19
Alstom Signaling Inc.
Theory of Operation
2.6.1.
Colorlight Control
The Intermediate module can drive from one to six lamps (per direction) via the
Colorlight Driver Board. All outputs are checked to be in the correct state (on or off). All
lamps are checked to insure that the filaments are intact.
Lamps are checked once every 512 ms to insure that the filament is intact. If a filament
is determined to be open, both the displayed aspect and the transmitted code typically
are downgraded according to the application program.
The state of the lamps (on or off) is checked every 64 ms to insure that the lamp drive
circuitry has not failed. If this hardware failure does occur, energy is removed from all
outputs in a fail-safe manner and no code is transmitted to the next signal locations
(EAST and WEST).
The Colorlight Driver Group 2 board differs from the Group 1 version by the added
function of Cable Integrity Check (CIC). When two outputs are shorted together the data
returned to the CPU is corrupted, making the short detectable. The trade-off for this
added feature is that the circuit is now more susceptible to transients (noise). So in
high-noise environments, the Group 1 board, which has very high AC noise immunity
but no CIC function, is the solution.
To allow Cable Integrity Check to operate properly, it is necessary to impose some
application requirements that should not be unreasonable in the vast majority of
applications. These requirements are as follows:
1. Must use independent dropping resistors.
2. Must keep cable resistance less than 0.2 Ohms (200 feet with #10 wire).
3. Must set each dropping resistor to provide between 9.5 and 10.5 Volts at each bulb
(when ON).
P2160B, Vol.1, Rev. Jan/07
2–20
Alstom Signaling Inc.
Theory of Operation
2.6.2.
Searchlight Control
The Intermediate module can drive one or two searchlight mechanisms (per direction)
via the Searchlight Driver Board. Bipolar drive circuits provide the necessary drive to
control the mechanism(s) and lamp drive circuits control the lamp(s).
The position of the mechanism is checked via three inputs read back from the
mechanism contacts. If a four wire check circuit is used, all positions of the mechanism
are proven. If a three wire check circuit is used, it is possible for the mechanism to be
stuck in the green position and not be detected if the yellow position is called for. This
condition may be acceptable if the "green" position and the "yellow" position display the
same aspect. See Figure 2–10.
B12
WA-RG (RED)
WA-HG (YELLOW)
WA-DG (GREEN)
Four - Wire Check Circuit.
B12
WA-HG
Three - Wire Check Circuit.
WA-DG
(YELLOW
OR
GREEN)
WB-RG (RED)
Figure 2–10. Three - and Four - Wire Searchlight Check Circuits
P2160B, Vol.1, Rev. Jan/07
2–21
Alstom Signaling Inc.
Theory of Operation
The position of the mechanism(s) is checked every 512 ms to prove that the correct
aspect is being displayed. If the mechanism has been called to a new position, the new
position is checked for correspondence after a typical delay of two seconds and every
512 ms thereafter.
Lamps are checked once every 512 ms to insure that the filament is intact. If a filament
is determined to be open, both the displayed aspect and the transmitted code are
typically downgraded according to the application program.
The state of the lamps (on or off) is checked every 64 ms to insure that the lamp drive
circuitry has not failed. If this hardware failure does occur, energy is removed from all
outputs in a fail-safe manner and no code is transmitted to the next signal locations
(EAST and WEST).
The Group 2 of the Searchlight Driver board differs from the Group 1 due to the added
function of Cable Integrity Check (CIC). When two outputs are shorted together the data
returned to the CPU is corrupted, making the short detectable. The trade-off for this
added feature is that the circuit is now much less resistant to AC noise immunity. So in
high-noise environments, the Group 1 board, which has very high AC noise immunity
but no CIC function, is the solution.
To allow Cable Integrity Check to operate properly, it is necessary to impose some
application requirements that should not be unreasonable in the vast majority of
applications. These requirements are as follows:
1. Must use independent dropping resistors
2. Must keep cable resistance less than 0.2 Ohms (200 feet with #10 wire)
3. Must set each dropping resistor to provide between 9.5 and 10.5 Volts at each bulb
(when ON)
P2160B, Vol.1, Rev. Jan/07
2–22
Alstom Signaling Inc.
Theory of Operation
2.6.3.
Hardware Configurations
The Genrakode II Intermediate module is available in many hardware configurations.
There are four basic units: a colorlight configuration with and without an Auxiliary I/O
board and a searchlight configuration with and without an Auxiliary I/O board. Each
module requires a PGK CPU board, and then for each direction (EAST and WEST) a
VPC board and a code interface board are required. The code interface board can be
the CONV/RCVR Group 01 for interfacing to track or the CONV/RCVR Group 02 line
drive/receiver if connecting to line wires.
Each module requires either a Standard Regulator/Filter board or a Power Supply
Regulator/Filter board. If Low Signal Battery and Ground Fault Monitoring functions are
needed, a Power Supply board must be used. Otherwise, a Standard Regulator/Filter
board is sufficient. A Power Supply board can be used to provide the Regulator and
Filter functions even if the additional functions are not needed.
Each direction has the option of the type of signal it controls. The options are colorlight,
searchlight, or none. The two directions can control the same type of signal or different.
For example, one Intermediate module could control EAST/WEST colorlights, EAST
colorlight / WEST searchlight, EAST searchlight / WEST none, etc. Both the Colorlight
and Searchlight boards have the option to be the Group 01 Standard (higher AC-noise
immunity) version or the Group 02 Cable Integrity Check version.
An Intermediate module can also include an Auxiliary I/O board, the AUX I/O I, II, or III.
If an AUX board is added, the module must have both EAST and WEST VPC boards,
regardless of single or dual direction. The addition of an Auxiliary I/O Board provides
EAST and WEST two wire auxiliary inputs and EAST and WEST cab signal outputs.
Auxiliary inputs are typically used to downgrade the signaling system due to an external
condition. The cab signal outputs can interface with the Cab Signal module and
generate the appropriate cab signal rates. An Auxiliary I/O Board is required if the
auxiliary inputs/outputs, the AC power detect inputs, the cab signal outputs, or approach
lighting is used.
P2160B, Vol.1, Rev. Jan/07
2–23
Alstom Signaling Inc.
Theory of Operation
Table 2–3. Intermediate Module Components
Name
Part Number
REGULATOR/FILTER
59473-834-01 or
31166-338-02
POWER SUPPLY REG/FILTER
31166-338-01
CPU
31166-141-04
CONVERTER/RECEIVER
59473-833-01 or -02
HIGH POWER VPC
59473-872-01
SEARCHLIGHT DRIVER
59473-863-01 or -02
COLORLIGHT DRIVER
59473-864-01 or -02
AUXILIARY I/O I
59473-837-01
AUXILIARY I/O II
59473-958-01
AUXILIARY I/O III
31166-043-01
P2160B, Vol.1, Rev. Jan/07
2–24
Alstom Signaling Inc.
Theory of Operation
E EXO
E EXO
TB3-12
TB3-12
EAST LAMP +
EAST LAMP +
TB1-10
TB1-10
INTERMEDIATE
1
INTERMEDIATE
2
W EXO
W EXO
TB3-5
TB3-5
WEST LAMP +
WEST LAMP +
TB1-7
TB1-7
For EAST Double Track Approach Lighting:
- Connect E EXO Terminals (TB3-12) From Module 1 to Module 2
- Connect EAST Lamp + Terminals (TB1-10) From Module 1 to Module 2
For WEST Double Track Approach Lighting:
- Connect W EXO Terminals (TB3-5) From Module 1 to Module 2
- Connect WEST Lamp + Terminals (TB1-7) From Module 1 to Module 2
Figure 2–11. Connections for Double Track Approach Lighting (using Aux I/O #2)
P2160B, Vol.1, Rev. Jan/07
2–25
Alstom Signaling Inc.
P2160B, Vol.1, Rev. Jan/07
TB3
WA HG WA DG
TB2
2–26
B
WEST
TK+
WEST
TK-
WB RG WB HG WB DG
WB SEARCHLIGHT
WA RG
WA SEARCHLIGHT
LAMP
2W
LAMP
3W
LAMP
4W
LAMP
5W
LAMP
6W
LAMP
WEST
+
POWER
DETECT
+
-
W CAB W AUX+ W AUX- E AUX+
WB SEARCHLIGHT
LAMP
COIL -
LAMP
1W
+
W EXO
WA SEARCHLIGHT
+ COIL
LAMP
-
W EXI
AUX I/O
EAST
LAMP
+
E AUX-
-
E CAB
LAMP
3E
LAMP
LAMP
4E
LAMP
5E
LAMP
6E
EB SEARCHLIGHT
LAMP
+ COIL -
LAMP
2E
COIL
LAMP
1E
+
E EXO
EA SEARCHLIGHT
E
EXI
EA HG
EA DG
EAST
TK+
EB RG
EAST
TK-
EB HG
N
EB DG
EB SEARCHLIGHT
EA RG
EA SEARCHLIGHT
Theory of Operation
TB1
Figure 2–12. Intermediate Module AAR Terminals
Alstom Signaling Inc.
Theory of Operation
VPC OUT+
XMIT
COM
RCV
TEST
EAST RECEIVER/CONVERTER
PC9
EAST SEARCHLIGHT (COLOR LIGHT)
PC8
OUT-
PC7
PGK - CPU
PC6
WEXI
EEXI
EAUX
IN
EEXO
EAST HIGH-POWER VPC
ECAB
WAUX
IN
+4V
WCAB
VPC OUT+
CODE DET
WEXO
XMIT
AUX I/O I
PC5
REGULATOR FILTER
PC4
WEST HIGH-POWER VPC
PC3
WEST SEARCHLIGHT (COLORLIGHT)
PC2
OUT-
CODE DET
+4V
WEST RECEIVER CONVERTER
COM
RCV
TEST
PC1
Figure 2–13. LED / Test Point Locations for Intermediate Module Boards
(An optional Auxiliary I/O I board is shown as an example)
P2160B, Vol.1, Rev. Jan/07
2–27
Alstom Signaling Inc.
Theory of Operation
2.7.
REPEATER MODULE
The Repeater module, a regenerative repeater, receives signals from the rails on one
side of an insulated joint and transmits a regenerated copy of the same signal to the
other side of the joint. The Repeater module transmits and receives from both the EAST
and the WEST directions.
The Repeater module uses the same motherboard as the dual Control Point module,
but not all of the AAR posts are present. This allows a Repeater case to be used as a
Control Point case if the missing AAR posts are installed. Likewise, a dual Control Point
case can be used as a Repeater case. Another way to create a Repeater module is to
use an Intermediate module chassis without any signal driver boards. Then, if signals
are added to that location, the module can easily be converted to an Intermediate. If an
Intermediate module chassis is used to implement the Repeater module, see Appendix
A for terminal definitions.
P2160B, Vol.1, Rev. Jan/07
2–28
Alstom Signaling Inc.
Theory of Operation
2.7.1.
Asynchronous Repeater
The Asynchronous Repeater transmits on one side anywhere between 0 and 2.8
seconds after receiving a code on the other side. The received code is fully decoded
and, if it falls within the tolerances of a valid code, is transmitted to the next track circuit
at the next transmission cycle. Since transmission is started after a code has been
completely decoded, no code is transmitted if an invalid code is received.
The application program sets the default Code 5 type. It can be set as repeated,
terminated, or initiated and set as standard, long, or alternating. These choices can be
changed during module operation by using the rocker switch on the front of the CPU
board. See Section 6 for instructions on the operation of the rocker switch.
The number of consecutive Asynchronous Repeaters that can be used in one block is
unlimited. The transmission time on one side of the Repeater is not synchronized to the
reception of codes on the other side.
With the addition of an Auxiliary I/O Board, a number of functions can be added to the
basic repeating function. EAST and WEST auxiliary inputs are provided typically to
cause the transmitted code to be downgraded due to such things as switch circuit
controllers, slide fences, high-water detectors, dragging equipment detectors, etc.,
especially where the signaling system must be informed of various external conditions.
This input can also be used for other functions where special signaling conditions arise.
Cab Signal outputs are provided for the EAST and the WEST direction. These outputs,
located on an Auxiliary I/O Board, interface with the Genrakode Cab Signal module and
provide the coded cab signal rates. An available option is to use cab signal outputs to
energize a relay when a particular code or set of codes are decoded. The application
programmer determines the use of these outputs.
NOTE
No Auxiliary I/O board inputs or outputs are available in the Repeater
module other than the ones listed above.
P2160B, Vol.1, Rev. Jan/07
2–29
Alstom Signaling Inc.
Theory of Operation
2.7.2.
Hardware Configurations
The Genrakode II Repeater module is available in two hardware configurations. The first
configuration includes all the required hardware to operate a Repeater module without
any auxiliary functions (auxiliary inputs, cab signal outputs, decoded outputs). The
second configuration is identical to the first, with the addition of an Auxiliary I/O Board.
Each module requires a PGK CPU board, and then, for each direction (EAST and
WEST), both a VPC board and a code interface board are required. The code interface
board can be the CONV/RCVR Group 01 for track interfacing or the CONV/RCVR
Group 02 line drive/receiver if connecting to line wires.
Each module requires either a Standard Regulator/Filter board or a Power Supply
Regulator/Filter board. If Low Signal Battery and Ground Fault Monitoring functions are
needed, a Power Supply board must be used. Otherwise, a Standard Regulator/Filter
board is sufficient. A Power Supply board can be used to provide the Regulator and
Filter functions even if the additional functions are not needed.
A Repeater module can also include an Auxiliary I/O board, the AUX I/O I, II, or III. If an
AUX board is added, the module must have both EAST and WEST VPC boards,
regardless of single or dual direction. The addition of an Auxiliary I/O Board provides
EAST and WEST two wire auxiliary inputs and EAST and WEST vital outputs (typically
used for cab signaling). Auxiliary inputs are typically used to downgrade the signaling
system due to an external condition. The vital outputs (W CAB and E CAB) can
interface with the Cab Signal module and generate the appropriate cab signal rates. Or
as an option, these outputs can be used to energize a relay when a particular code (or
set of codes) is decoded.
Table 2–4. Repeater Module Components
Name
Part Number
CONV/RCVR
59473-833-01 or -02
VPC
59473-835-01
REGULATOR/FILTER
59473-834-01 or
31166-338-02
POWER SUPPLY REG/FILTER
31166-338-01
CPU
31166-141-04
AUXILIARY I/O I
59473-837-01
AUXILIARY I/O II
59473-958-01
AUXILIARY I/O III
31166-043-01
P2160B, Vol.1, Rev. Jan/07
2–30
Alstom Signaling Inc.
Theory of Operation
2.8.
SWITCH LOCK MODULE
The Switch Lock Module is used at hand-throw switches equipped with electric locks to
safely control siding-to-mainline and mainline-to-siding train moves. Whenever a train
crew wishes to unlock the switch, they must issue an unlock request by opening the
door on the switch lock stand and issuing the request. The Switch Lock Module only
energizes the lock relay, releasing the lock, if conditions defined in the application logic
are met to ensure safety. When the lock relay is energized, the switch lever can be
moved (and thus the points) so that the train can move between the mainline and the
siding.
The Switch Lock Module inputs are:
•
Unlock request
•
NWP (Normal Switch Position) from the switch circuit controller
•
Internal overlay
•
Remote overlay
•
Codes received from EAST and WEST
•
Field programmable long timer, not yet implemented in Genrakode II
•
Field programmable unlock code selection, not yet implemented in Genrakode II
Unlike the Genrakode I Switch Lock module, the safety conditions under which a lock
relay can be energized are entirely under the control of the application programmer
using the PGKCAA application design package.
P2160B, Vol.1, Rev. Jan/07
2–31
Alstom Signaling Inc.
Theory of Operation
2.8.1.
Switch Lock Inputs And Outputs
The primary I/O circuits that are unique to the Switch Lock module type are located on
the Switch Lock I/O Board which contains 3 inputs, 4 outputs, and jumpers for EAST
and WEST Lock/Unlock Code selection. See Appendix A for how to select and interpret
switch lock codes.
2.8.1.1.
Inputs
Unlock Request Input - This vital input is referenced to 12V common. Application of
battery +12V energy indicates to the system that an unlock request has occurred. This
input terminal is usually connected to the unlock request terminal on the lock stand.
AAR label and location: UNL REQ INP, TB1-4.
Remote Overlay Input - This non-vital input is isolated and presence of energy indicates
that the external overlay equipment is indicating occupancy. AAR labels and locations:
+RMTE OL INP, TB2-4. -RMTE OL INP, TB2-5.
NWP Input - This vital input is connected to the switch circuit controller and if energy is
removed, indicates to the application logic that the switch is not in the normal position.
AAR labels and locations: +NWP INP, TB2-2. -NWP INP, TB2-3.
2.8.1.2.
Outputs
The following outputs are current sinking and referenced to +VPC.
Lamp Output - This non-vital output provides energy return for a lamp of up to 25 watts.
This lamp output is normally turned on when the lock relay is energized. AAR label and
location: PBKE LMP OUT, TB1-6.
Lock Relay Output - This vital output provides energy return for the lock coil. Coil
resistance can be as low as 50 ohms. AAR label and location: LK RLY OUT, TB1-5.
Remote Overlay Output - This non-vital output is energized to provide current sinking
output whenever the internal overlay shows occupancy. Coil resistance can be as low
as 50 ohms. AAR label and location: OL RLY OUT, TB2-7.
Relay Output - This vital output is used as a general purpose relay output for certain
applications. Coil resistance can be as low as 50 ohms. AAR label and location:
OUTPUT, TB2-6.
P2160B, Vol.1, Rev. Jan/07
2–32
Alstom Signaling Inc.
Theory of Operation
2.8.2.
Series Overlay Function
The Series Overlay board detects the presence of a train in the vicinity of the switch on
the mainline using a short-range AC track circuit. LED (CR1) on the board indicates
when the overlay circuitry has detected the presence of a train. The LED turns on when
occupancy has been detected. AAR labels and locations: SERIES TK+, TB1-12;
SERIES TK-,TB1-13.
2.8.3.
Hardware Configurations
The Genrakode II Switch Lock module is available in many hardware configurations.
Each module requires a PGK CPU board, a Switch Lock I/O board, a VPC board, and
two code interface boards. The code interface boards can be the CONV/RCVR Group
01 for interfacing to track or the CONV/RCVR Group 02 line driver/receiver if connecting
to line wires.
Each module requires either a Standard Regulator/Filter board or a Power Supply
Regulator/Filter board. If Low Signal Battery and Ground Fault Monitoring functions are
needed, a Power Supply board must be used. Otherwise, a Standard Regulator/Filter
board is sufficient. Note that a Power Supply board can be used to provide the
Regulator and Filter functions even if the additional functions are not needed.
Furthermore, a Switch Lock module can also include an Auxiliary I/O board, the AUX
I/O I, II, or III. The addition of an Auxiliary I/O Board provides EAST and WEST two wire
auxiliary inputs and EAST and WEST cab signal outputs. Auxiliary inputs are typically
used to downgrade the signaling system due to an external condition. The cab signal
outputs can interface with the Cab Signal module and generate the appropriate cab
signal rates. An Auxiliary I/O Board is required if the auxiliary inputs/outputs, the AC
power detect inputs, or the cab signal outputs are used.
If only the remote overlay input on the Switch Lock I/O Board is used, then the Series
Overlay Board is not required. When this board is used the Switch Lock Module checks
the remote overlay input and the Series Overlay Board for track occupancy. In typical
application logic for a mainline to siding move, if either of these indicates occupancy,
then the lock relay is energized without running time.
P2160B, Vol.1, Rev. Jan/07
2–33
Alstom Signaling Inc.
Theory of Operation
Table 2–5. Switch Lock Module Components
Name
Part Number
REGULATOR/FILTER
59473-834-01 or
31166-338-02
POWER SUPPLY REG/FILTER
31166-338-01
CPU
31166-141-04
CONVERTER/RECEIVER
59473-833-01 or –02
HIGH POWER VPC
59473-872-01
SWITCH LOCK I/O
59473-878-01
SERIES OVERLAY
59473-877-01
VITAL TIMER
59473-879-01
AUXILIARY I/O I
59473-837-01
AUXILIARY I/O II
59473-958-01
AUXILIARY I/O III
31166-043-01
P2160B, Vol.1, Rev. Jan/07
2–34
Alstom Signaling Inc.
B
P2160B, Vol.1, Rev. Jan/07
WEST
TK+
+NWP
WEST
TK-
-NWP
UNL
REQ
INP
+ RMTE
OL
LK RLY
OUT
- RMTE
OL
PBKE
LMP
OUT
OUTPU
T
+ VPC
OL RLY
OUT
W
CAB
W
EXO
E
CAB
W
EXI
W
AUX -
TB2
2–35
TK +
TK -
OL / XMIT
W
AUX +
E
EXI
TK +
TK -
OL / RCVR
E
EXO
EAST
TK+
E
AUX +
EAST
TK-
E
AUX-
N
Theory of Operation
TB1
Figure 2–14. Switch Lock Module AAR Terminals
Alstom Signaling Inc.
Theory of Operation
CODE DET
XMIT
+4V
COM
RCV
TEST
PC9
OL
SEN
COM
OL
OUT
EAST RECEIVER/CONVERTER
PC8
SERIES OVERLAY
EEXO
EAUX
IN
ECAB
EEXI
AUX I/O I
PC6
PGK - CPU
PC5
REGULATOR FILTER
PC4
HIGH-POWER VPC
PC3
WA
WB
EA
EB
ST
LR
OL
OT
LP
RMTE OL
NWP
OUT+ OUT-
UN REQ
VPC
WEXI
WCAB
WAUX
IN
WEXO
PC7
PC2
SWITCH LOCK I/O
CODE DET
+4V
XMIT
WEST RECEIVER CONVERTER
COM
RCV
TEST
PC1
Figure 2–15. LED / Test Point Locations for Switch Lock Module Boards
(An optional Auxiliary I/O I board is shown as an example)
P2160B, Vol.1, Rev. Jan/07
2–36
Alstom Signaling Inc.
Theory of Operation
2.9.
CAB SIGNAL MODULE
The Cab Signal module is used in conjunction with the Control Point module,
Intermediate module, Repeater module, or the Switch Lock module to provide cab
signaling to the rails. If an aspect changes while a suitably equipped train is in a block,
cab signaling allows the engineer to adjust the speed of the train accordingly without
waiting for the next wayside signal.
The module uses one Oscillator/Filter Board and one Driver Board. See Table 2–6. The
module contains a 5-Ampere fuse for the low power used by the electronic components
and a 15-Ampere fuse for the high power required to drive the cab signal.
Coded cab signal rates are supplied by the Genrakode II track module using a vital
power source. The carrier frequency is generated internally on the Oscillator/Filter
Board. There are two versions of the Cab Signal module for DC-coded track circuits
based on this carrier frequency. One is 100 Hz and the other is 60 Hz. The transmitted
signal then is 100% modulation of this carrier frequency at rates provided by a Control
Point, Intermediate, Repeater, or Switch Lock module. See Appendix C for a listing of
those rates.
The signal is transformer-coupled to the track to provide isolation from the battery. It
then passes through a series pass filter to convert the coupled square wave to a
sinusoidal waveform and also to reduce the loading of other equipment on the track. To
prevent the cab signal from affecting the track module, a parallel blocking filter is used
between the track module inputs and the track outputs.
There are four selectable power output taps available at the AAR posts, 100%, 80%,
50%, and 25% to allow adjustment for track circuit length and ballast condition. See
Table 3–13 for the Cab Signal Module Output Adjustment Procedure. The Cab Signal
module can supply 3 Amperes (for the 100 Hz module or 2 Amperes for the 60 Hz
version) into a .06 Ohm shunt at 6,500 feet with 3 Ohms/1000 feet of ballast resistance.
P2160B, Vol.1, Rev. Jan/07
2–37
Alstom Signaling Inc.
Theory of Operation
2.9.1.
Hardware Configuration
The Cab Signal module contains two circuit boards – a Driver board and an Oscillator
board. Three Oscillator board groups provide the different cab signal frequencies.
Table 2–6. Cab Signal Module Hardware Composition
Name
Part Number
Driver Board
59473-907-01
Oscillator Board, 100 Hz
59473-906-01
Oscillator Board, 250 Hz
59473-906-02
Oscillator Board, 60 Hz
59473-906-03
P2160B, Vol.1, Rev. Jan/07
2–38
Alstom Signaling Inc.
Theory of Operation
TP1
SW1
TP2
TB2
TK -
100%
80%
VPC
CAB
50%
25%
ON
B
N
TB1
OFF
FU1
5A
GKODE + GKODE -
FU2
15A
TK +
Figure 2–16. Cab Signal Module AAR Terminals
COM
500Hz /
200Hz
+12V
PC2
OSC/FILTER
CR
OUT
CODE
+12V
FFO
DRIVER
DRIVE
COM
PC1
Figure 2–17. LED / Test Point Locations for Cab Signal Module Boards
P2160B, Vol.1, Rev. Jan/07
2–39
Alstom Signaling Inc.
Theory of Operation
THIS PAGE INTENTIONALLY LEFT BLANK.
P2160B, Vol.1, Rev. Jan/07
2–40
Alstom Signaling Inc.
Installation
3. SECTION –3 INSTALLATION
3.1.
GENERAL
This section contains the installation information for the DC version of the Genrakode II
system.
3.2.
INSTALLATION REQUIREMENTS
Genrakode II modules are either shelf-mounted or mounted on a wall, except for the
4-track Control Point module, which is rack-mounted. Module dimensions vary slightly,
depending on application. A typical module is approximately 19 inches wide by 10.0 to
10.5 inches tall. Figure 3–1 shows an intermediate module. All modules come with
mounting holes.
10.09 in
19.00 in
Figure 3–1. Typical Genrakode II Module Dimensions
Besides space requirements, several basic rules must be heeded during installation if
the system is to operate properly.
1. Power Supply – Genrakode II modules operate on input power ranging from 9 to 16
Volts DC. The standard power source is a 12.0 Volt signal battery. Battery
connections to the module should be made with AWG #10 or larger copper wire.
P2160B, Vol.1, Rev. Jan/07
3–1
Alstom Signaling Inc
Installation
2. Signal Wiring – Output connections from the modules to signal lights should be
made with at least AWG #10 copper wire. The output voltage to the signal lights is
12.5 ± 0.4 Volts and the resistance of #10 copper wire is 1.0 Ohm per 1000 feet. If
the distances are long, it may be necessary to use heavier wire. Signal lamp wiring
should be sized to allow at least 10 Volts at the signal lamps. External resistance in
the wire and the lamp adjustment resistor should be about 1.0 Ohm.
3. Track Wiring – For wiring to the track, AWG #6 or larger copper wire should be
used. The resistance of both leads added together should be less than 0.15 Ohm.
The resistance of #6 copper wire is 0.4 Ohm per 1000 feet. Special considerations
for maximum track circuit lengths must be taken into account per Table B–2 for lead
lengths above 200 feet.
− For the Switch Lock module, AWG #6 twisted pair copper wire should be used to
connect the module series overlay input/output to the rails. If AWG #9 twisted
pair is used, then the lead length should not exceed 300 feet. (Twisted pair to
have a minimum of 1 twist per foot).
− For line wire between Genrakode II modules (used with Converter/Receiver Bd.
P/N 59473-833-02), AWG #6 copper wire should be used for distances up to
15000 ft. For other wire sizes at reduced distances for line wire, see Tables B–3
through B-5. Use twisted pair for buried cable line wire.
4. Other Wiring – For other communications, such as outputs to relays or inputs such
as code selects or auxiliary vital inputs, use AWG #16 or larger copper wire.
5. Protection – Secondary lightning and surge protection is provided within the
module. Primary arrestors and equalizers are required on the battery input and all
track input/outputs. Arrestors are recommended for inputs and outputs that travel on
line wire circuits and/or over long distances and may be subjected to primary
lightning strikes.
6. Insulated Joints – Track polarity must be staggered on alternate track circuits. If the
polarity of the received pulse is not correct, the receiver does not detect it. This
feature provides insulated joint (IJ) breakdown protection but only if the polarity on
the opposite side of the IJ is reversed.
7. Cab Signal – For wiring the Cab Signal module, the above rules apply. B and N are
the Power Supply connections. GKODE +, GKODE-, TK+, and TK- are the Track
Wiring, and VPC and CAB are “Other Wiring” and can use AWG #16 or larger
copper wire. AWG #10 copper wire or larger should be used for jumpering the
percentage output terminal to the TK- terminal.
P2160B, Vol.1, Rev. Jan/07
3–2
Alstom Signaling Inc
Installation
3.3.
COMPATIBILITY WITH OTHER TRACK EQUIPMENT
Under some conditions, other types of signal equipment may share the rails with
Genrakode. This group of equipment includes overlay track circuits, motion sensors,
and constant warning time systems. Although the specific characteristics of each type
and brand of equipment varies, the following general statements can be made:
•
Any interference that may occur between Genrakode and other equipment most
likely effects the other equipment and not Genrakode. This is due to the relative
signal levels applied to the rails; Genrakode signals are high (1 - 2 Amperes)
whereas signals from other equipment are low.
•
The distance between the rail connections of Genrakode and the rail connections of
other equipment has a large impact on the ability for the equipment to co-exist. The
further apart the two connections, the lower the level of interference.
•
The lower the Genrakode transmit level, the lower the level of interference. The
higher the operating frequency of the other equipment, the lower the level of
interference.
3.3.1.
Overlay Equipment
Audio frequency overlay equipment is typically not a problem for either Genrakode or
the AF equipment. Genrakode operates without interference with signal amplitude up to
25 V RMS and frequencies between 1 kHz and 20 kHz. See Table C–11 in Appendix C
for frequency versus track input impedance data for AF equipment.
3.3.2.
Motion Sensors and Constant Warning Time Equipment
Motion sensors and constant warning time equipment (GCP, HXP) determine motion
and speed by measuring small changes in applied signals over relatively long periods of
time. This process makes the equipment susceptible to any changes of impedance that
may appear across the rails. During the transmission and reception of codes, the
Genrakode input impedance may experience small changes. Depending on a number of
variables, the changes may be sufficient to disturb the MS/CWT equipment. Although it
is impractical to attempt to address all possible applications, the following guidelines
reduce the potential for interference:
•
Where practical, maximize the rail distance between Genrakode and MS/CWT
equipment
•
Use the highest MS/CWT frequency possible to achieve the desired operation
•
When Genrakode and MS/CWT equipment reside at the same location, use
separate track leads to connect each to the rails
•
Use the lowest possible Genrakode transmit setting that produces reliable track
circuit operation
P2160B, Vol.1, Rev. Jan/07
3–3
Alstom Signaling Inc
Installation
For proper Genrakode operation, all terminating shunts must be of the narrow band
style. Wide band shunts should be avoided, as they distort the Genrakode signals and
cause intermittent operation. Refer to the manufacturer’s specific requirements when
bypassing insulated joints.
3.3.3.
Filter Requirements
As a general rule of thumb, if Genrakode is installed at the same location as a motion
sensor or constant warning time system, a filter should be installed, regardless of the
operating frequency. The Safetran Track Isolation Unit (6A-342-5) is the preferred
device. This unit is not frequency dependent, and as such can be used in all
applications. Alternatively, a Harmon tuned filter (TF-xxx) can be used. Refer to each
manufacturer’s instruction for installation details.
If Genrakode resides within the MS/CWT approach track circuit, but not at the same
location (a few hundred feet or more between the two), a filter may or may not be
required. A number of variables including specific operating characteristics (such as
software “enhancements”) of the various manufacturers product impact the need for a
filter. In general, the newer versions of the microprocessor based MS/CWT products are
less susceptible to interference, and as such may not require any filtering. It is
recommended that a filter be readily available, if it is not initially designed in.
If Genrakode resides outside the approach track circuit, a filter is typically not required.
Again, a number of variables impact the need for a filter, and it is conceivable that with
older style non-microprocessor based equipment a filter may still be required. The
greater the distance between Genrakode and the terminating shunt, the less likely a
filter is required.
P2160B, Vol.1, Rev. Jan/07
3–4
Alstom Signaling Inc
Installation
3.4.
PRELIMINARY CHECKS AND SETTINGS
Before turning on the power, check the set of plans associated with the installation
location to verify:
•
Correct type and number of modules and boards are present
•
Battery power connections to B and N are correct
•
All auxiliary inputs are wired correctly
3.4.1.
Site ID And Revision ID
In the PGK CAA the user can designate a Site ID (SID) and a Revision ID (REV). SID
defaults to 100 and REV defaults to 1. The Application Programmer can choose any
SID they wish for their own unique configuration management. They may even wish to
use the same SID for multiple modules (for example contiguous Intermediates). The
REV is for general use by the Application Programmer to keep track of changes
(Revisions) to the application. By then subsequently wiring the REV jumpers
accordingly, the individual installing the newest Revision can be forced to recognize the
change at the module before it functions. These jumpers are located behind the existing
CPU board edge (the side that meets the Motherboard) on the 70 pin board edge
connector, shown in Figure 3–2. There are 3920 possible SID’s and 28 possible REV’s.
There are always a total of nine jumpers regardless of the SID and REV values. The
PGK CAA generates a wiring list for the selected SID and REV of an application. See
the CAA User’s Manual.
NOTE
The Site ID and Rev ID (and therefore the ID jumper list) are completely
under the control of the Application Programmer, who must determine
whether an ID change is required (for safety reasons) when an application
program is modified.
NOTE
The ID jumpers are located on the back of the module and should be
set/checked prior to mounting the chassis. ID jumpers can be either wirewrap or “push-on” jumpers.
P2160B, Vol.1, Rev. Jan/07
3–5
Alstom Signaling Inc
Installation
VIEW FROM REAR OF GENRAKODE MODULE
69
70
63
64
GREYED REGION SHOWS
PINS USED FOR POSSIBLE
JUMPER POSITIONS
33
34
1
2
Figure 3–2. ID Jumpers
3.4.2.
Hardware and Software Settings
Once the module is properly wired, there are hardware adjustments that must be
performed, and there are field-selectable software settings that may need to be adjusted
(usually indicated on the set of plans for the location).
See Heading 3.7., Hardware Adjustment Procedures, for details on the adjustments that
must be performed.
See Heading 3.8.2., Software Settings, for details on displaying or modifying the fieldselectable module settings.
P2160B, Vol.1, Rev. Jan/07
3–6
Alstom Signaling Inc
Installation
3.5.
FINAL CONNECTIONS
Before making the final connections to the track, check that the operation of the module
is in accordance with the requirements of the plans for that location.
If available, a Genrakode Test Unit can be used to verify a module’s operation. See the
Genrakode Test Unit User’s Manual (P2160TU) for more details on connecting and
using the test unit.
Once preliminary testing is finished, connect the track or line wire leads to the module
and adjust the track circuits using the procedures provided in Tables 3–5 through 3–8. It
is recommended that pertinent Maintenance Data be recorded in a log. Suggested
recorded data includes track length, type of rail (bonded or welded), converter settings
(primary and secondary), and receiver screw switch settings. Also, record the peak
receiver current, the peak transmit current and the peak transmit voltage. There is a
sample Maintenance Log provided in Figure 4–1 at the end of Section 4, Preventive
Maintenance.
WARNING
THE P/N 59473-833-02 CONVERTER/RECEIVER LINE DRIVER BOARD
IS ONLY INTENDED TO BE USED FOR LINE WIRE APPLICATIONS
AND MUST NOT BE USED IN APPLICATIONS FOR NORMAL TRACK
OPERATION. USAGE MAY RESULT IN EXCESSIVE TRACK CURRENT,
CAUSING THE INABILITY TO DETECT TRAINS IN THE TRACK
CIRCUIT.
P2160B, Vol.1, Rev. Jan/07
3–7
Alstom Signaling Inc
Installation
3.6.
RECOMMENDED INSTALLATION CHECKLIST
Upon installation verify the safety critical checks in Table 3–1, operational checks in
Table 3–2, to verify functionality and recommended checks in Table 3–3. Table 3–4
contains additional optional checks that may be required by your authority. The tables
are provided in checklist format.
Table 3–1. Safety Critical Checklist
Safety Check
Track Circuit
Adjustment
Description
Completion
Date
The track circuits must be properly adjusted to
ensure that no codes are received when a 0.06
Ohm shunt is applied, follow the procedure
provided in Table 3–5.
Track Lead Polarity
Track polarity must be staggered on alternate track
circuits for insulated joint (IJ) breakdown
protection. See the Installation Requirements
provided on Page 3–1.
Line Wire Circuits
The P/N 59473-833-02 Line Driver
Converter/Receiver board is only intended to be
used for line wire applications and must not be
used in applications for normal track operation.
Usage may result in excessive track current,
causing the inability to detect trains in the track
circuit. See the Installation Requirements provided
on Page 3–1.
P2160B, Vol.1, Rev. Jan/07
3–8
Alstom Signaling Inc
Installation
Table 3–2. Operational Checks Checklist
Operational Check
Description
Completion
Date
Input Battery
Voltage
Genrakode modules operate on input power
ranging from 9 to 16 Volts DC, nominally a 12 Volt
signal battery. Check the B12 and N12 terminals.
See the Installation Requirements provided on
Page 3–1.
External Wiring
Check for proper connections from external
apparatus to the Genrakode module and verify the
module inputs have proper polarity and voltage
level. See the Installation Requirements provided
on Page 3–1.
Software Settings
There are various software options that must be
set upon installation in accordance with the plans
for the location, such as Code 5 and optional Code
T settings. See the Installation Requirements
provided on Page 3–1.
System Diagnostics The system diagnostics should be checked to
verify that there are no system errors. This
includes the board LEDs and the Error Queue. See
the Section 6 for diagnostics instructions.
Table 3–3. Recommended Checks Checklist
Recommended
Check
Set CPU Date and
Time
Clear CPU Logs
Description
Completion
Date
Set the date and time of the PGK CPU board for
more accurate data logging. See Heading 3.8.2.,
Software Settings.
Clear the Error and Event Queues of the PGK CPU
board so future logs only contain post-installation
data. See Heading 3.8.2., Software Settings.
P2160B, Vol.1, Rev. Jan/07
3–9
Alstom Signaling Inc
Installation
Upon installation and during normal operation, it is not necessary to verify the items in
Table 3–4. The safety design of the system prevents the module from running if any of
these do not match the expectations of the application and location.
Table 3–4. Optional Checks Checklist
Optional Check
Correct Boards in
Correct Slots
Description
Completion
Date
The Genrakode module does not run if a board is
in the incorrect slot or if an expected board is
missing. Board keying and module labels are also
available to aid in preventing incorrect board
placement. Damage to a board can occur if placed
into an incorrect slot, so care should be taken.
CAUTION
As per the Safety Critical item above,
do not use a Line Wire Converter/
Receiver board when connecting to
track.
Correct Software
CRCs
The Genrakode module only runs if the CRCs of
the software match the expected values.
Correct Rev/Site ID
The Genrakode module only runs if the wire-wrap
(or push-on jumper) signature matches the
Revision and Site ID of the loaded application.
P2160B, Vol.1, Rev. Jan/07
3–10
Alstom Signaling Inc
Installation
3.7.
3.7.1.
HARDWARE ADJUSTMENT PROCEDURES
Track Circuit Adjustment
The P/N 59473-833-01 Converter/Receiver board must be used in track circuit
applications, one at each end of the track circuit. Do not use P/N 59473-833-02 boards
for track circuits. Track circuits must be adjusted to be able to detect a train with a
worst-case shunting impedance of 0.06 Ohm. The receiver sensitivity is 0.5 ampere for
shunting. The receiver current should be adjusted higher to take into consideration track
variations and signal battery power supply variations. Receive current should be
adjusted to fall between 1.0 and 1.4 amperes. The current should be adjusted closer to
the low value if the adjustment is made on a wet track and closer to the high value if the
track is adjusted under arid conditions. Under normal weather, the current should be
adjusted to about 1.2 amperes.
Set the receiver current by adjusting both the converter output voltage and the receiver
input resistance. Adjust screw switches to perform the adjustments. There are four
adjustments for the converter output voltage and eight receiver input adjustments. A
peak reading meter, a Simpson® TS-111 or equivalent is needed to read the pulsed DC
current.
NOTE
If using a digital peak reading multimeter, verify that the sample rate is
sufficiently high (<10ms per sample). The Fluke® 187 “fast min-max” peak
measurement is one recommendation. The converter output is adjustable
from 1.5 to 4.0 Volts and the receiver input resistance is adjustable from 0
Ohm to 1.65 Ohms.
Figure 3–3 lists the converter output voltages and the corresponding switch positions
and the receiver input resistance and the corresponding switch positions required.
The module itself adds about 0.36 Ohm besides the listed values in Figure 3–3. Usually,
the converter output voltage only needs to be adjusted during the module installation.
Table 3–6 lists a convenient starting point for converter output voltages and receiver
input resistances for given lengths of tracks at 3, 5, and 10 Ohm per 1000 feet ballast
resistance for bonded or welded rails. If track circuit readjustment is required, the
adjustment can probably be achieved at only the receiver location, without changing the
transmit location.
To perform adjustment of the receiver current, adjusting the track circuit, follow the
procedure provided in Table 3–5 while referencing the adjustment locations indicated in
Figure 3–3.
P2160B, Vol.1, Rev. Jan/07
3–11
Alstom Signaling Inc
Installation
Track Converter/Receiver Board Adjustment Locations
59473-833-01
Transmitter Converter adjustment by screw-switch selection on transformer T2
Primary Side
Screw-Switch
(tap)
Selection
L-L
H-H
L-L
H-H
Output
(volts)
1.5
2.0
3.0
4.0
Secondary Side
Screw-Switch
(tap)
Selection
1.5-2.0 & 1.5-2.0
1.5-2.0 &1.5-2.0
3.0-4.0 & 3.0-4.0
3.0-4.0 & 3.0-4.0
Receiver adjustment by screw-switch selection of resistors SS1, SS2 and SS3.
SS2
SS3
0.00
0.27
0.56
0.83
0.82
1.09
1.38
1.65
IN
IN
OUT
OUT
IN
IN
OUT
OUT
IN
OUT
IN
OUT
IN
OUT
IN
OUT
IN
IN
IN
IN
OUT
OUT
OUT
OUT
Storage Area for Unused Receiver
Adjustment Screws.
H L
H 4.0 2.0 2.0 4.0
|
| |
|
L 3.0 1.5 1.5 3.0
L H
SS2
SS1
Secondary
SS1
Primary
Receiver
Resistance
(ohms)
Primary Side
Secondary Side
L
L/H
3.0 / 4.0
H
1.5 / 2.0
H
1.5 / 2.0
L
3.0 / 4.0
T2
SS3
Converter/Receiver Board
Component Layout - 59473-833-01
T2 Screw - Switch Taps
Converter/Receiver Board
Figure 3–3. Track Converter/Receiver Board Adjustment Locations
P2160B, Vol.1, Rev. Jan/07
3–12
Alstom Signaling Inc
Installation
Table 3–5. Converter/Receiver Board Adjustment Procedure
Step
Action
1
Starting at either end of the track circuit, set the output voltage and the
receiver resistance switch positions as indicated in Figure 3–3 for the track
circuit length, rail type, and minimum ballast conditions. To do this, turn the
module power off and remove the receiver/converter board. Referring to
Figure 3–3, place the screw switches in their respective positions. Replace the
receiver/converter board and turn the module power on.
2
At the other end of the track circuit, set the output voltage and the receiver
resistance switch positions as indicated in Figure 3–3, which are the same
settings as the opposite end of the track circuit. Turn the module power off
and remove the receiver/converter board. Referring to Figure 3–3, place the
screw switches in their respective positions. Replace the receiver/converter
board and turn on the module power.
3
Disconnect the TK- (negative track) lead from the Genrakode II module and
connect the peak reading meter in series such that the negative meter
terminal is connected to the negative rail and the positive meter terminal is
connected to the TK- terminal on the module.
Rather than removing the track lead from the Genrakode module to measure
current, it may be more convenient to use a ‘gold nut’ connection on the TKlead on the entrance panel (if available). If any other track equipment shares
the track lead at this entrance panel connection (overlay circuit, for example)
the measurement should made at the Genrakode module connection as
described above.
4
Verify the received peak current is between 1.0 to 1.4 amperes. If it is not, turn
off the module power, remove the receiver/converter board, and re-adjust the
receiver resistance as required by moving the screw switch positions.
Remember to keep the track circuit conditions (wet/dry) in mind. Repeat this
step until the receiver current is correct.
5
After the receiver current is correctly adjusted, place a 0.06 Ohm shunt rail-torail across the track circuit and note that the track occupancy LED (OCC) on
the CPU board is on. If it is not, the receiver current is too high. Repeat Step 4
to decrease the receiver current. If the OCC LED is on, remove the shunt and
note that the track occupancy LED is off. If it is not, the receiver current is too
low. Repeat Step 4 to increase the receiver current.
6
Return to the other end of the track circuit and set the screw switch to the
same position as the opposite end.
7
Repeat Steps 3 through 5 at this location.
8
This completes the track circuit adjustments.
P2160B, Vol.1, Rev. Jan/07
3–13
Alstom Signaling Inc
Installation
Table 3–6. Transmit and Receive Settings for Rail Lengths
MINIMUM
BALLAST
RESISTANCE
(Ohms/1000 FT)
XMIT
OUTPUT
VOLTAGE
(Volts)
RCVR
RESISTANCE
(Ohms)
RAIL LENGTH (FT)
10
1.5
0.27
under 8000
under 11000
10
1.5
0.00
8000 to 11500
11000 to 17000
10
2.0
0.00
11500 to 16000
17000 to 23000
10
3.0
0.27
16000 to 21000
23000 to 29000
5
1.5
0.27
under 5500
under 7500
5
1.5
0.00
5500 to 8500
7500 to 12000
5
2.0
0.00
8500 to 12000
12000 to 18000
5
3.0
0.27
12000 to 15000
18000 to 20000
3
1.5
0.27
under 4000
under 5000
3
1.5
0.00
4000 to 6500
5000 to 10000
3
2.0
0.00
6500 to 11000
10000 to 14000
BONDED
WELDED
Track circuit adjustments are based on 50-foot track leads (100 feet of wire) of AWG #6
copper wire at each end of the track circuit. Table 3–7 provides a correlation between
track ballast resistance and the type of rail-to-rail connections and gives a value to be
used for figuring track length reductions for each additional 100 feet of track lead.
Table 3–7. Track Lead Increases versus Track Length Reductions
RAIL LENGTH REDUCTION (FT)
PER ADDITIONAL 100 FT OF TRACK LEAD
Ballast (Ohms)
Bonded
Welded
3
700
1100
5
800
1300
10
900
1500
3–14
Alstom Signaling Inc
P2160B, Vol.1, Rev. Jan/07
Installation
The following is an example of how to use the information in Table 3–7. If a track circuit:
•
Is rail head bonded, with 5-Ohms ballast
•
Has a Genrakode II module 150 feet from the rails at one end of the track circuit
(thus totaling 300 feet of wire, 150 feet of track lead)
•
Has another Genrakode II module located 50 feet from the rails at the other end of
the track circuit (thus totaling 100 feet of wire, 50 feet of track lead)
The configuration used for Table 3–7 includes two Genrakode II modules (one at each
end), each 50 feet from the rails, for a total of 100 feet of track lead. The example
configuration above has a total of 200 feet of track lead. This is 100 extra feet of track
lead compared to the configuration used for the table. Therefore, taking into
consideration the extra 100 feet of track lead, the length of this track circuit should be
reduced by 800 feet.
P2160B, Vol.1, Rev. Jan/07
3–15
Alstom Signaling Inc
Installation
3.7.2.
Line Wire Circuit Adjustment
The P/N 59473-833-02 Converter/Receiver board is intended for use in line wire circuit
applications, one at each end of the line wire circuit. The receiver sensitivity is 0.25
ampere, however, the receiver current should be adjusted higher to take into
consideration line variations and battery power supply variations. Receive current
should be adjusted to fall between 0.6 and 0.8 amperes. Under normal conditions the
current should be adjusted to about 0.7 amperes.
Receiver current is set by adjusting the converter output voltage and the receiver input
resistance. There are four adjustments for the converter output voltage and eight
receiver input adjustments. A peak reading meter, a Simpson® TS-111 or equivalent, is
needed to read the pulsed DC current. The converter output is adjustable from 3.0 to
8.0 Volts and the receiver input resistance is adjustable from 0 Ohm to 3.56 Ohms.
Adjustments are made with screw switches.
Figure 3–4 lists the converter output voltages and the corresponding switch positions as
well as the receiver input resistance and the corresponding switch positions required.
Figure 3–4 also shows the screw switch positions on the board.
NOTE
The actual output voltage is 2x the value shown at the secondary screw
switch position.
P2160B, Vol.1, Rev. Jan/07
3–16
Alstom Signaling Inc
Installation
Track Converter/Receiver Board Adjustment Locations
59473-833-02
Transmitter Converter adjustment by screw-switch selection on transformer T2
Primary Side
Screw-Switch
(tap)
Selection
L-L
H-H
L-L
H-H
Output
(volts)
3.0
4.0
6.0
8.0
Secondary Side
Screw-Switch
(tap)
Selection
1.5-2.0 & 1.5-2.0
1.5-2.0 &1.5-2.0
3.0-4.0 & 3.0-4.0
3.0-4.0 & 3.0-4.0
Receiver adjustment by screw-switch selection of resistors SS1, SS2 and SS3.
SS2
SS3
0.00
0.56
1.00
1.56
2.00
2.56
3.00
3.56
IN
IN
OUT
OUT
IN
IN
OUT
OUT
IN
OUT
IN
OUT
IN
OUT
IN
OUT
IN
IN
IN
IN
OUT
OUT
OUT
OUT
Storage Area for Unused Receiver
Adjustment Screws.
H L
H 4.0 2.0 2.0 4.0
|
| | |
L 3.0 1.5 1.5 3.0
L H
SS2
SS1
Secondary
SS1
Primary
Receiver
Resistance
(ohms)
Primary Side
Secondary Side
L
L/H
3.0 / 4.0
H
1.5 / 2.0
H
1.5 / 2.0
L
3.0 / 4.0
T2
SS3
Converter/Receiver Board
Component Layout - 59473-833-02
T2 Screw - Switch Taps
Converter/Receiver Board
Figure 3–4. Line Wire Converter/Receiver Board Adjustment Locations
P2160B, Vol.1, Rev. Jan/07
3–17
Alstom Signaling Inc
Installation
Each module itself adds about 0.36 Ohm besides the preceding listed values. Usually,
the converter output voltage only needs to be adjusted during the module installation.
Table 3–9 includes a convenient starting point for converter output voltages and
receiver input resistances for given lengths of line wire. The starting point values are
only approximate; they largely depend on the actual wire resistance per 1000 ft. If line
wire circuit readjustment is required, the adjustment can probably be achieved at only
the receiver location, without changing the transmit location.
NOTE
When installing a P/N 59473-833-02 board in a slot of a Genrakode
module, which had been previously configured for a P/N 59473-833-01
board, it is necessary to modify the motherboard slot keying to accept the
P/N 59473-833-02 board. There are two key plugs in each slot, and since
both the –01 and –02 board versions share one of the plug positions, it is
only necessary to move one of the plugs (the lower of the two). Extract
this plug from its current position using small needle nose pliers or
equivalent tool, and replace it in the proper position to align it with the
upper key slot on the P/N 59473-833-02 board edge (between the 14th
and 15th gold fingers, counting from the bottom). Visually check the
position and alignment of the key plug in the slot to verify it is centered
between the correct gold fingers before inserting the P/N 59473-833-02
board to verify the installation.
Figure 3–4 shows Converter/Receiver Board adjustment locations. To facilitate
adjustment of the receiver current, follow the procedure in Table 3–8.
P2160B, Vol.1, Rev. Jan/07
3–18
Alstom Signaling Inc
Installation
Table 3–8. Receiver Current Adjustment Procedure
Step
Action
1
Starting at one end of the line wire circuit, set the output voltage and the
receiver resistance switch positions as indicated in Table 3–9 for the line wire
circuit length (distance between units). Table 3–9 is for AWG #6 copper wire
only, Table 3–10 and 3–11 are for AWG #8 and #10 copper wire respectively.
For a wire gauge not listed refer to Calculating Converter Voltage and
Receiver Res. settings. To change settings turn the module power off and
remove the receiver/converter board. Referring to Figure 3–4, place the screw
switches in their respective positions. Replace the Converter/Receiver board
and turn the module power on.
2
At the other end of the line wire circuit, set the output voltage and the receiver
resistance switch positions to the same settings as in Step 1. Turn the module
power off and remove the receiver/converter board. Referring to Figure 3–4,
place the screw switches in their respective positions. Replace the
converter/receiver board and turn the module power on.
3
Disconnect the TK- (negative track) lead from the Genrakode II module and
connect a peak reading meter in series such that the negative meter terminal
is connected to the negative line wire and the positive meter terminal is
connected to the TK- terminal on the module. If the current test board is used,
the line wire lead does not have to be disconnected. Loosen the terminal nut
and pull the washer away from the copper trace to open the circuit. Then
connect the positive and negative meter leads to the meter+ and meterterminals respectively.
4
Turn on the module power and verify the received current is between 0.6 to
0.8 amperes. If it is not, turn off the module power, remove the
converter/receiver board, and re-adjust the receiver resistance as required by
moving the screw switch positions.
Repeat this step until the receiver current is correct.
5
Return to the other end of the line wire circuit and set the screw switches to
the same positions as those just set.
6
Repeat Steps 3 and 4 at this location.
7
This completes the line wire circuit adjustments.
P2160B, Vol.1, Rev. Jan/07
3–19
Alstom Signaling Inc
Installation
Table 3–9. Transmit and Receive Settings for Wire Lengths (6 Gauge)
For AWG #6 Copper Wire Only
XMIT VOLTS (V)
RCVR RES (Ohms)
WIRE LENGTH (Ft)
3.00
2.00
under 2000
3.00
0.00
2000 to 4000
4.00
0.56
4000 to 6000
6.00
2.00
6000 to 8000
6.00
0.56
8000 to 10000
8.00
2.00
10000 to 12000
8.00
0.56
12000 to 14000
8.00
0.00
14000 to 15000
Table 3–10. Transmit and Receive Settings for Wire Lengths (8 Gauge)
For AWG #8 Copper Wire Only
XMIT VOLTS (V)
RCVR RES (Ohms)
WIRE LENGTH (Ft)
3.00
1.00
under 2000
4.00
0.00
2000 to 4000
6.00
1.00
4000 to 6000
8.00
1.56
6000 to 8000
8.00
0.00
8000 to 9400
P2160B, Vol.1, Rev. Jan/07
3–20
Alstom Signaling Inc
Installation
Table 3–11. Transmit and Receive Settings for Wire Lengths (10 Gauge)
For AWG #10 Copper Wire Only
XMIT VOLTS (V)
RCVR RES (Ohms)
WIRE LENGTH (Ft)
3.00
0.56
under 1500
4.00
0.00
1500 to 2500
6.00
1.00
2500 to 3500
8.00
0.00
3500 to 5500
P2160B, Vol.1, Rev. Jan/07
3–21
Alstom Signaling Inc
Installation
3.7.3.
Line Wire Circuit Resistance Setting Calculation
The settings for the converter voltage and receiver resistance can be approximately
determined using the following equation:
Vxmit
1000 * ( ---------- - ( 2 * Rmod + Rrcvr) )
Ircv.
L = ------------------------------------------------------------2 * Rwire
Where L is the distance between modules in feet, Vxmit is the converter output voltage
setting in Volts, Ircv. is the desired received current: 0.6A, Rmod is the module
resistance: 0.5 Ohms, Rrcvr is the Receiver input resistance setting, Rwire is the
Resistance per 1000 ft of the wire between the modules.
To perform a Line Wire Circuit Resistance setting calculation:
1. Determine the wire resistance per 1000 ft.
2. Use the lowest converter voltage setting for Vxmit: 3.0 V.
3. Use 0 for Rrcvr.
4. Calculate L with the formula below
L
=
Vxmit
1000 * ( ---------- - ( 1 + Rrcvr) )
0.6
----------------------------------------------------2 * Rwire
5. A distance of 0 - 1500 feet over the target distance is required. If L is too small
increase the converter voltage Vxmit to the next higher setting. Repeat Step 4 and 5
until the desired length is found.
6. Now use resistance values from Table 3–9, Table 3–10, or Table 3–11 as
appropriate, for Rrcvr starting with the smallest value.
7. Calculate L using formula adjusting Rrcvr to get to L closest to the desired length as
possible.
P2160B, Vol.1, Rev. Jan/07
3–22
Alstom Signaling Inc
Installation
For the example: Target distance is 3200 feet, #8 gauge wire is used. Actual measured
wire resistance per 1000 feet = 0.653 Ohms.
1. Start with Vxmit = 3.0 V and Rrcvr = 0.0, Calculated L = 3062 feet. This is not long
enough to support the target distance of 3200 feet, so go to the next voltage setting.
2. Now use Vxmit = 4.0 V and Rrcvr = 0.0, Calculated L = 4339 feet. This is long
enough to support the target distance of 3200 feet.
3. Increase Rrcvr to 0.56 Ohms, Calculated L = 3910 feet. Perform another calculation
to see if a closer result can be obtained.
4. Increase Rrcvr to 1.00 Ohms, Calculated L = 3573 feet. Perform another calculation
to see if a closer result can be obtained.
5. Increase Rrcvr to 1.56 Ohms, Calculated L = 3144 feet. This result is just below
3200 feet so it is acceptable to choose 1.00 or 1.56 Ohms, to just be over 0.6A at
the receiver, choose Rrcvr = 1.00 Ohms and Vxmit = 4.0 V setting.
WARNING
THE P/N 59473-833-02 CONVERTER/RECEIVER LINE DRIVER BOARD
IS ONLY INTENDED TO BE USED FOR LINE WIRE APPLICATIONS
AND MUST NOT BE USED IN APPLICATIONS FOR NORMAL TRACK
OPERATION. USAGE MAY RESULT IN EXCESSIVE TRACK CURRENT,
CAUSING THE INABILITY TO DETECT TRAINS IN THE TRACK
CIRCUIT.
NOTE
The P/N 59473-833-02 Converter/Receiver Line Driver board is not
compatible with the Electrocode Line Wire boards (2L Line Converter, 7L
Receiver, and 9L Track Choke). Use the P/N 59473-833-02 board at both
ends of a line circuit.
3.7.4.
Series Overlay Track Circuit Adjustment
A Series Overlay is used at Switch Lock locations to provide quick release of the lock
when the mainline track is occupied. AWG #6 twisted pair copper wire should be used
to connect the module series overlay input/output to the rails. The Series Overlay Board
can accommodate up to 500 feet of AWG #6 twisted pair. If AWG #9 twisted pair is
used, then the lead length should not exceed 300 feet. A three position screw switch is
provided to compensate for lead-length to the track. It is important for proper operation
that the overlay track lead wires be a twisted pair with a minimum of 1 twist per foot to
minimize the inductance of the wires.
P2160B, Vol.1, Rev. Jan/07
3–23
Alstom Signaling Inc
Installation
The procedure in Table 3–12 is performed to set up the series overlay track circuit.
Figure 3–5 shows the screw switches for the series overlay.
Table 3–12. Series Overlay Track Circuit Setup Procedure
Step
Action
1
When initially setting up the series overlay track circuit, check that the screw
switch is in the SS1 position.
2
Turn the sensitivity pot adjustment R101 fully counterclockwise.
3
Connect a shunt strap with a 0.06-ohm resistor across the rails 80 feet from
the overlay track connection.
4
Turn on the module power. The LED on the Series Overlay Board is not
illuminated (is dark).
5
Turn R101 slowly clockwise until the LED illuminates. If LED illuminates, go to
Step 6.
If the LED remains dark, turn off the module power and place the screw switch
in position SS2. Repeat Step 4. If LED illuminates, go to Step 6.
If the LED remains dark, turn off the module power and place the screw switch
in position SS3. Repeat Step 4. If LED illuminates, go Step 6.
If the LED still remains dark, troubleshoot the system:
• verify module wiring
•
wayside cables and hardware
•
repeat this procedure
SS1 is normally used for cable lengths up to 300 feet.
SS2 is usually used for lengths of 200 to 400 feet.
SS3 is used for lengths of 300 feet to 500 feet; always start with the switch at
SS1.
6
Measure the overlay RMS output voltage between J1 and J2. Record the
output voltage and the switch setting.
7
Remove the shunt strap and note that the LED turns off. This completes the
overlay track circuit adjustment.
P2160B, Vol.1, Rev. Jan/07
3–24
Alstom Signaling Inc
Installation
Figure 3–5. Series Overlay Adjustment Locations
P2160B, Vol.1, Rev. Jan/07
3–25
Alstom Signaling Inc
Installation
3.8.
CAB SIGNAL TRACK CIRCUIT ADJUSTMENT
The cab signal output power should be adjusted to provide 3 Amps for the 100 Hz Cab
Signal module and 2 Amps for the 60 Hz version at the entering end of the track circuit
through a shunt.
The procedure in Table 3–13 is performed to adjust the output power of the Cab Signal
module.
Table 3–13. Cab Signal Module Output Adjustment Procedure
Step
Action
1
Set the output power by placing a jumper, AWG #10 copper wire or larger,
across AAR terminal TK- and the AAR terminal output power setting according
to the rail length:
Output Power Setting
Rail Length (ft)
0 to 1000
25%
1000 to 3500
50%
3500 to 6000
80%
6000 to 7500
100%
CAUTION
For steady cab do not use the 100% power setting for either the
100 Hz or 60 Hz modules. If the module is operated for too long,
an internal PC board may overheat and fail.
2
Turn on the power for the Cab Signal module and for the module controlling
the track (Control Point, Intermediate, or Repeater module).
3
At the entering end of the track circuit, place a shunt across the rails with the
Simpson® TS-111 meter or equivalent in series, set at 30 Amps AC.
4
Verify that the current is 3 Amps or greater (for the 100 Hz module, but 2
Amps or greater for the 60 Hz version). If the current is too low, then remove
the shunt, turn off the module power, place the jumper on the next higher
setting, and repeat Steps 2 and 3.
P2160B, Vol.1, Rev. Jan/07
3–26
Alstom Signaling Inc
Installation
3.8.1.
Power Supply Board Adjustments
If a Power Supply Regulator/Filter board (P/N 31166-338-01) is present in the system
and the Low Signal Battery and Ground Fault Monitoring functions are being used by
the application, adjustments must be performed to these circuits. If the Power Supply
board is not present or is being used solely for its Regulator/Filter functions, then the
following adjustment procedures do not apply.
To prevent any Low Signal Battery, Ground Fault, or Test Failure conditions from
generating system errors prior to adjustment, place the LSB switch (S1) in the “SET”
position and the GFM switch (S2) in the “POS TEST” (up) position before powering up
the module. Perform the battery and ground fault monitor adjustment procedures
provided in Tables 3–14, 3–15, and 3–16. See Figure 3–6 for a diagram of the board
edge.
P2160B, Vol.1, Rev. Jan/07
3–27
Alstom Signaling Inc
Installation
12V
+12VDC
FILTER
12VCOM
LSB
LOW BAT
LSB ADJ
RUN
SET
LEVEL
LVL ADJ
GFM
POS
FAIL
POS
ADJ
POS
TEST
OPERATE
NEG
TEST
NEG
FAIL
NEG
ADJ
TESTING
5V
+5VDC
5VCOM
Figure 3–6. Power Supply Board Edge
P2160B, Vol.1, Rev. Jan/07
3–28
Alstom Signaling Inc
Installation
To adjust the low signal battery threshold, perform the procedure in Table 3–14.
Table 3–14. Low Signal Battery Threshold Adjustment Procedure
Step
Action
1
Move the LSB switch (S1) down to the “SET” position. The “supply” voltage for
the LSB circuit is now based on the wiper of potentiometer “LEVEL ADJ”.
2
Connect a DC voltmeter to the test jacks on the front edge of the Power
Supply board, positive to test point TP3 (LEVEL), negative to test point TP2
(12VCOM).
3
Adjust the “LEVEL ADJ” potentiometer so that the voltage from TP3 to
12VCOM is equal to the desired low signal battery detection voltage. Note that
this level is initially factory preset to 9.5VDC.
4
The “LOW BAT” LED should be off. If it is on, rotate the “LSB ADJ”
potentiometer counter-clockwise until the LED extinguishes.
5
Adjust the “LSB ADJ” potentiometer clockwise so that the “LOW BAT” LED
lights solid.
6
Return the LSB switch (S1) to the “RUN” position.
7
This completes the adjustment procedure. The “LOW BAT” LED now
illuminates when the actual signal battery goes below the voltage set in Step 3
above.
P2160B, Vol.1, Rev. Jan/07
3–29
Alstom Signaling Inc
Installation
To change the Fault Detection Threshold so that the Ground Fault Monitor detects a
lower or higher ground fault resistance, perform the procedure in Table 3–15.
Table 3–15. Ground Fault Monitor Fault Detection Threshold Adjustment Procedure
Step
Action
1
Power down the module using the main power switch on the left side of the
module. This prevents transmission and reception of codes, so it requires
track time.
2
Remove the Power Supply Regulator/Filter board from the module.
3
The six jumper positions on jumper block TB3 are labeled “A” through “F”. The
factory default is position “B” which corresponds to a detection threshold of 20
kOhms (0.6mA).
The position of the jumper must be verified present in the correct location
(even if the factory default is desired) prior to installation. Move the jumper to
the desired position as follows:
position “A” = 30 kOhms (0.4mA)
position “B” = 20 kOhms (0.6mA) – factory default
position “C” = 10 kOhms (1.2mA)
position “D” = 6.0 kOhms (2mA)
position “E” = 3.0 kOhms (4mA)
position “F” = 1.5 kOhms (8mA)
4
Return the Power Supply board to its proper slot. Move the GFM Switch (S2)
to the “POS TEST” (up) position. Then power up the module.
5
Once the module is running (the LED on the East and/or West VPC board is
on), follow the procedure in Table 3–16 beginning at Step 3.
P2160B, Vol.1, Rev. Jan/07
3–30
Alstom Signaling Inc
Installation
To set the “POS ADJ” and “NEG ADJ” potentiometers so that the Ground Fault Monitor
detects ground faults, perform the procedure in Table 3–16
Table 3–16. Ground Fault Monitor Potentiometer Adjustment Procedure
Step
Action
1
With the GFM Switch (S2) is in “OPERATE” (center) position, make sure that
the “TESTING” LED is dark before proceeding. If it is illuminated, an automatic
test is being performed. Wait for the “TESTING” LED to extinguish before
proceeding.
2
Move the GFM Switch (S2) to the “POS TEST” (up) position and wait 5
seconds.
3
The “POS LED” should be off. If it is on, rotate the “POS ADJ” potentiometer
counter-clockwise slowly until the LED turns off.
4
Adjust the “POS ADJ” potentiometer clockwise slowly until the LED just
illuminates. Due to the filtering on the input, wait a couple seconds between
adjustments while approaching the final point. Be aware that there is some
hysteresis as well. Once the LED illuminates, rotate the “POS ADJ”
potentiometer another 1/4 turn clockwise
5
Move the GFM Switch (S2) to the “NEG TEST” (down) position and wait 5
seconds.
6
The “NEG LED” should be off. If it is on, rotate the “NEG ADJ” potentiometer
counter-clockwise slowly until the LED turns off.
7
Adjust the “NEG ADJ” potentiometer clockwise slowly until the LED just
illuminates. Due to the filtering on the input, wait a couple seconds between
adjustments while approaching the final point. Be aware that there is some
hysteresis as well. Once the LED just illuminates, rotate the “NEG ADJ”
potentiometer another 1/4 turn clockwise.
8
Move the GFM switch (S2) to “OPERATE”. The automatic test begins
momentarily and the “TESTING” LED illuminates.
9
When the automatic test completes the “TESTING” LED turns off. Verify that
the test passed by observing the “POS FAIL” and “NEG FAIL” LEDs. Both
should be off. If the automatic test fails, the “POS FAIL” and “NEG FAIL” LEDs
both blink. If this occurs, repeat the adjustment steps above, starting at Step
1.
P2160B, Vol.1, Rev. Jan/07
3–31
Alstom Signaling Inc
Installation
3.8.2.
Software Settings
Many system settings of a Genrakode II module are field-selectable with the PGK CPU
board P/N 31166-141-XX. The two methods for viewing or modifying system settings
are:
1) On-board Controls and Displays: Rocker Switch and LED displays, see Figure A–9
2) RS-232 serial port interface using a PC; see the pages that follow for more details on
each method
It may be required to verify or change any field-selectable system settings upon
installation of the Genrakode module. See the plans for the location for details. The
following settings are field-selectable (some are only able to be modified using the
Rocker Switch and others only by using the Serial Port):
•
Code 5 Default Send Mode
(Rocker Switch only – see Modes 5 and 6)
•
Code T Location ID
(Rocker Switch – see Mode 7, Serial Port – TID)
•
Code T Enable Settings
(Serial Port only – DTS/MTS)
•
Code T Expiration Time(Serial Port only – MTX)
•
Code 5 Format
(Serial Port only – DC5/C5)
•
Filament Error Reporting
(Serial Port only – CFR)
•
Non-vital Inputs
(Serial Port only – NVI)
Besides field-selectable system settings, it is also recommended practice to set the date
and time of the PGK CPU board and clear the error and event queues upon installation.
These actions are performed using the serial port. For instructions on setting up and
using the RS-232 serial port interface, see Appendix B. The commands are as follows:
•
Set Date
SD MM/DD/YY
•
Set Time
ST HH:MM:SS
•
Clear Error Queue
CEQ
•
Clear Event Queue
CVQ
P2160B, Vol.1, Rev. Jan/07
3–32
Alstom Signaling Inc
Installation
The Error Queue can be cleared using the rocker switch as well. To clear the Error
Queue (assuming it is not empty), press the rocker switch down while in Mode 3 until
the bottom two displays are blank. Then press and hold the rocker switch down until the
Malfunction LED goes OFF (approximately 10 seconds).
NOTE
If a persistent error condition exists, such as an open lamp filament, the
Malfunction LED remains flashing. See the Section 6, Diagnostics, for
more details.
3.8.3.
On-Board Controls And Displays
The Rocker Switch (S1) is used in combination with the four 7-segment LED displays
and the individual LEDs on the CPU board edge to display system information such as
track occupancy, transmitted and received codes, or Error Queue status. S1 is also
used to view and change various system settings. The Rocker Switch controls which
system display or setting information is displayed at any given time. There are several
display modes, but the number of display modes available for a given application
depends on the module type and application settings that are currently in use. Figure 3–
7 shows the display modes and their order for the various module types. Moving the
Rocker Switch to the UP position switches to the next display mode.
3.8.4.
Mode Descriptions:
Mode 1 is the mode the PGK CPU board enters at startup. All LED displays are OFF
except for bottom POWER LED and possibly the other LEDs located above that one in
the ‘SYSTEM’ group of LEDs if warranted by their associated functions.
Mode 2 is the mode that displays the transmitted and received codes on each track
using a combination of 7-segment LED displays and discrete LEDs. The indication of
each LED is labeled on the PGK CPU board.
Mode 3 is the mode that can display any system error codes currently in the Error
Queue. A flashing ‘0’ in the topmost 7-segment LED display (DS2) indicates the system
is in Mode 3. If there are any error codes to be displayed, the Malfunction LED (DS20)
flashes. To view the two-digit hex error codes while in this mode, rock the Rocker
Switch down to display each code on the lower two 7-segment displays. When the
switch is rocked down and those displays go blank, the last error code has been
displayed.
NOTE
To cycle through the error codes again it is necessary to toggle through
the rest of the display modes back to Mode 3.
P2160B, Vol.1, Rev. Jan/07
3–33
Alstom Signaling Inc
Installation
Mode 4 is used for an application using the Vital Serial Link. This mode displays Link
and Drop settings. DS2 shows ‘L’ to indicate that DS3 displays the Link number (1 or 2),
and DS11 shows ‘d’ to indicate that DS12 displays the Drop number (1 or 2). Currently,
Vital Serial Link operation is only supported for CPIB Control Point applications.
Mode 5 is used to display and change (if desired) the Code 5 Default Send mode for the
East Track. It is only present in Intermediate, Repeater, and Switch Lock applications.
This mode is indicated by a flashing ‘C5’ on the top two 7-segment LED displays, and
the current setting for the East track is displayed on the bottom two displays.
Table 3–17 summarizes the settings for the Code 5 Default Send mode for the East
Track. The Code 5 Default Send mode setting is defined by the application programmer
when the application is created using the PGKCAA. This setting can be modified in the
field. To modify the setting, rock the Rocker Switch down to toggle to the next setting
(continue to toggle to get back to the original setting). Stop when the desired setting is
displayed and rock the Rocker Switch up to change to the next display mode.
NOTE
If the East Track Code 5 Default Send mode setting is modified, a special
mode (Confirm Setting Change) appears after the last normal display
mode to let the user confirm that a setting change is desired. If confirmed,
the change is written to non-volatile flash memory followed by an
automatic reset of the module (required for the flash memory update). See
the description of the Confirm Setting Change mode that follows.
Table 3–17. Code 5 EAST
7-segment Displays
(DS11 & DS12)
Code 5 Default Send Mode Setting
0b
Transmit Code 5 (to EAST) Always
00
Transmit Code 5 (to EAST) on Code 1 Received (from WEST)
Ab
Transmit Code 5 (to EAST) under application program control
ONLY
b0
Transmit Code 5 (to EAST) on Code 5 Received (from WEST)
P2160B, Vol.1, Rev. Jan/07
3–34
Alstom Signaling Inc
Installation
Mode 6: This is the mode used to display and change (if desired) the Code 5 Default
Send mode for the West Track. This mode is identical to Mode 5 except that the setting
applies to the West Track. Table 3–18 summarizes the settings for the Code 5 Default
Send mode for the West Track.
Table 3–18. Code 5 WEST
7-segment Displays
(DS2 & DS3)
Code 5 Default Send Mode Setting
0b
Transmit Code 5 (to WEST) Always
00
Transmit Code 5 (to WEST) on Code 1 Received (from EAST)
Ab
Transmit Code 5 (to WEST) under application program control
ONLY
b0
Transmit Code 5 (to WEST) on Code 5 Received (from EAST)
Mode 7: This is the mode used to display and change (if desired) the Code T Location
ID. It is only present in Intermediate, Repeater, and Switch Lock applications if Code T
operation is enabled. This mode is indicated by a flashing ‘C’ on the top 7-segment LED
display, and the current Location ID setting for the module is displayed (as a decimal
number from 0 – 27) on the bottom two displays. To change the Location ID, rock the
Rocker Switch down to increment the ID to the desired value. Incrementing past a value
of 27 wraps back around to a value of 0.
NOTE
If the Location ID setting is modified, a special mode (Confirm Setting
Change) appears after the last normal display mode. This forces the user
to confirm that a setting change is desired, which is written to non-volatile
flash memory followed by an automatic reset of the module (required for
the flash memory update). See the description of the Confirm Setting
Change mode that follows.
Confirm Setting Change Mode only appears if the user has modified a system setting
using the Rocker Switch. A flashing “UP” (for Update) on the lower two 7-segment
displays indicates the system is in Confirm Setting Change Mode. To confirm and apply
the setting changes, the Rocker Switch must be rocked and held in the down position
until the PGK CPU resets (‘P-UP’ is displayed on the 7-segment displays). This takes
approximately 8 seconds to occur. Rocking up to advance the mode back to Mode 1
before resetting the module results in any setting changes being ignored, and the
settings revert back to their previous values.
P2160B, Vol.1, Rev. Jan/07
3–35
Alstom Signaling Inc
Installation
If the settings were changed and the system is reset to apply the new settings, the
newly changed settings are active when the system comes up. The settings are saved
in flash memory, so the system remembers the new settings through future power
up/down sequences (resets), but future application downloads overwrite these settings
For example, the flash settings are reinitialized when an application is downloaded to
the PGK CPU board.
CONTROL POINT
(non-CPIB)
CONTROL POINT
(CPIB)
ALL OTHER MODULES
(non-Code T)
ALL OTHER MODULES
(Code T enabled)
Mode 1
Displays
OFF
(startup)
Mode 1
Displays
OFF
(startup)
Mode 1
Displays
OFF
(startup)
Mode 1
Displays
OFF
(startup)
Mode 2
TX/RX Code
Display
Mode 2
TX/RX Code
Display
Mode 2
TX/RX Code
Display
Mode 2
TX/RX Code
Display
Mode 3
Maintenance
Mode
Mode 3
Maintenance
Mode
Mode 3
Maintenance
Mode
Mode 3
Maintenance
Mode
Mode 4
VSL Link/
Drop
Display
Mode 5
Set/Display
Code 5 East
Mode 5
Set/Display
Code 5 East
Mode 6
Set/Display
Code 5 West
Mode 6
Set/Display
Code 5 West
Confirm
Setting
Change
Mode 7
Set/Display
Code T Loc
ID
Confirm
Setting
Change
Figure 3–7. Rocker Switch Display Modes
P2160B, Vol.1, Rev. Jan/07
3–36
Alstom Signaling Inc
Installation
3.9.
RS-232 SERIAL PORT INTERFACE
The module settings that are field-selectable using the serial port are described below.
For instructions on setting up and using the RS-232 serial port interface, see Appendix
B. For more details and examples of the serial port commands discussed below, see
Appendix B.
NOTE
Except for the non-vital inputs, these field-selectable module settings are
stored in nonvolatile memory. To apply any changes, the user is prompted
to confirm that the changes should be applied, and if the user agrees then
the system resets automatically. If the settings were changed and the
system is reset to apply the new settings, the newly changed settings are
active when the system comes up. The settings are saved in flash
memory, so the system remembers the new settings through future power
up/down sequences (resets), but future application downloads overwrite
these settings. For example, the flash settings are reinitialized when an
application is downloaded to the PGK CPU board.
3.9.1.
Code T Location ID
The TID command allows display and modification of the Code T Location ID for a
module. The default value when Code T is enabled for an application in the PGKCAA is
0. A Location ID of 0 disables Code T since the valid range of IDs is 1 to 27. All the
modules in a Code T-enabled block must have unique Location IDs or it is impossible to
isolate Trouble Codes to one location.
3.9.2.
Code T Enable Settings
The DTS command (Display Code T Enable Settings command) displays the Code T
mode settings relevant to the module type. The settings are modified with the MTS
command (Modify Code T Enable Settings command). These commands are discussed
furthering Appendix B.
The enable settings that can be changed are the following:
•
Code T Operation
(per track)
•
Trouble Code Parameter
(per available parameter)
•
Code T Initiate
(per track)
•
Code T Repeat
(per track)
P2160B, Vol.1, Rev. Jan/07
3–37
Alstom Signaling Inc
Installation
3.9.3.
Code T Expiration Time
The MTX command (Display/modify Code T Expiration Time command) allows display
and modification of the Trouble Queue Expiration Time. The default value when Code T
is enabled for an application in the PGKCAA is 0, which is interpreted as ‘NEVER’. The
Expiration Time can be set between 1 and 96 hours, in one hour steps, or to NEVER
where Block Trouble Queue entries can only be removed with the CTQ command
(Clear Block Trouble Queue command). If the Expiration Time is set to a value between
1 and 96 hours, the value defines the period of time that an entry stays in the Queue
before being deleted automatically. These commands are discussed furthering
Appendix B.
NOTE
If a Trouble Code is continuously being received at a location (due to a
non-intermittent trouble condition at another module), a new Queue entry
with the same Trouble Code is logged within one frame period
(approximately 84 seconds) after the previous entry is deleted.
3.9.4.
Code 5 Format
Use the DC5 command to display the current Code 5 Format settings. To change the
settings, use the C5 command. The Code 5 Format (Standard, Alternating, or Long) can
be selected individually per track.
3.9.5.
Filament Error Reporting
Use the CFR command to display/modify the current status of filament error reporting.
The status of each lamp available in the application is displayed one at a time, and the
user can retain or change each one. This provides the capability to have a lamp defined
in the application but not actually present at the location to not log a filament error.
3.9.6.
Non-vital Inputs
Use the NVI command to display/modify the states of the non-vital inputs. Typing NVI at
the prompt displays the states of all inputs. Typing NVI 4 T, for example, sets input 4 to
true, and NVI 4 F sets it to false.
P2160B, Vol.1, Rev. Jan/07
3–38
Alstom Signaling Inc
Installation
Table 3–19. Site Configuration Sheet
Application Documentation
S/N
APP NAME
APP ID
COMPILE DATE
COMPILE TIME
DESIGNER
CHECKER
REVISION LEVEL
SITE ID
Module Configuration
MODULE TYPE
MODULE CFG ID
AUX IO
DIRECTION
CODE 5 FORMAT
CODE 5 SND EAST
CODE 5 SND WEST
SIG TYPE EAST
SIG TYPE WEST
FLASH RATE
PGK CAA Software
CAA VER NAME
DATE
PGK CAA #
System Flash Configuration Report
SYS VER NAME
DATE
PGK SYS SW#
Application Checksum = (Note 1)
System Software Checksum = (Note 1)
Application File CRC = (Note 2)
Application Logic CRC = (Note 2)
System Software CRC = (Note 2)
(This information can be attained by typing ‘RPT’ at the PGK prompt.)
Note 1: These entries apply only to PGK CAA versions 1.59 and earlier.
Note 2: These entries apply only to PGK CAA versions 2.00 and later.
P2160B, Vol.1, Rev. Jan/07
3–39
Alstom Signaling Inc
Installation
THIS PAGE INTENTIONALLY LEFT BLANK.
P2160B, Vol.1, Rev. Jan/07
3–40
Alstom Signaling Inc
Scheduled Maintenance
4. SECTION 4 – SCHEDULED MAINTENANCE
4.1.
GENERAL
This section provides the preventive maintenance procedure for the Genrakode II
system.
4.2.
MAINTENANCE APPROACH
A systematic approach to preventive maintenance can be used to insure continued
satisfactory operation of the Genrakode II DC-coded equipment.
1. Track circuit adjustment should be verified whenever track work, such as welding,
bonding, ballast cleaning, etc. is performed. See Table 4–2 for the Current
Measurement Procedure.
− Adjustment should also be verified periodically as required by federal and railroad
regulations.
− Track lead polarity should be verified if track work has created the risk of a swap
of the leads.
2. The system diagnostics should be checked whenever a location is visited. This
includes the board LEDs and the Error Queue. A detailed discussion of the use of
diagnostics is provided in Section 6. Software Settings are discussed in Section 3,
Installation.
− Once any errors are resolved or determined not to be current, the Error and
Event Queues should be cleared so that future logs show only new information.
− It is also recommended that the date and time of the PGK CPU board be
checked and updated if necessary for more accurate data logging.
P2160B, Vol.1, Rev. Jan/07
4–1
Alstom Signaling Inc.
Scheduled Maintenance
3. See Section 5, Troubleshooting, for tips, instructions, and a detailed flowchart. The
Genrakode module does not run if a board is in the incorrect slot or if an expected
board is missing. Generic board replacement instructions are found in Table 4–1,
Always heed the warning at the bottom of this page when replacing a board in the
Genrakode module.
− Board keying and module labels are also available to aid in preventing incorrect
board placement.
− Damage to a board can occur if placed into an incorrect slot, so care should be
taken.
− If the CPU board is replaced, there are various software options that must be set
in accordance with the plans for the location, such as Code 5 and optional Code
T settings. See Software Settings in Section 3, Installation.
− If the Converter/Receiver board is replaced, set the screw switches to match the
board that was removed and then verify the adjustment of the track circuit. See
page 4–3 for Track Maintenance instructions. The track circuits must be properly
adjusted to ensure that no codes are received when a 0.06 Ohm shunt is applied.
Important: Do not use a Line Wire Converter/Receiver board when connecting to
track.
CAUTION
When replacing boards in a vital, electronic system, the user should be
guided by the instructions and requirements of the operating agency with
regard to any testing that must be performed before placing the altered
equipment back in service.
CAUTION
Voltage potentials in the Module could damage printed circuit boards if
removed with power applied. Disconnect power from the Module prior to
removing boards. Failure to do so could result in damage to the boards.
Boards in the Module contain Electrostatic Discharge (ESD) sensitive
components which could be damaged by improper handling. Always
ensure boards are transported and stored in static-safe packaging. Before
handling any bare board or connecting diagnostic equipment to any board,
touch something verified to be grounded and work wearing at least a
grounded static-control wrist strap whenever possible. Handle boards only
by their edges and do not touch signal traces, leads or output pins on the
boards.
P2160B, Vol.1, Rev. Jan/07
4–2
Alstom Signaling Inc.
Scheduled Maintenance
Table 4–1. Board Replacement Procedure
Step
Procedure
1
Remove system power.
2
Remove the failed board.
3
Verify that any jumper and switch settings on the replacement board are the
same as the board being replaced.
4
Install the board in the appropriate slot, apply system power, and observe the
processor messages for errors.
5
Set any software options, such as Code 5 or optional Code-T, as appropriate.
4.2.1.
Track Circuit Maintenance
If a permanent record was generated of the track circuit data during the installation of
the equipment, this can serve as a future reference for routine track maintenance or as
an aid for isolating troubles. A maintenance schedule consistent with good railroad
safety practices should be set up and complied with.
A sample Track Maintenance Log form is shown in Figure 4–1. During the installation;
the track length, rail type, initial Converter screw-switch settings, and Receiver screwswitch settings should have been recorded in that log or some equivalent. If
readjustment of the screw-switches is required, the new settings should be noted.
4.2.2.
Recommended Equipment
The recommended equipment needed for track maintenance is a peak reading
multimeter such as a Simpson® TS-111 or equivalent and a track shunt strap with a
0.06 Ohm resistor.
NOTE
If using a digital peak reading multimeter, verify that the sample rate is
sufficiently high (<10ms per sample). The Fluke® 187 “fast min-max” peak
measurement is one recommendation.
P2160B, Vol.1, Rev. Jan/07
4–3
Alstom Signaling Inc.
Scheduled Maintenance
4.2.3.
Maintenance Test Procedure
The procedure provided in Table 4–2 describes making track current measurements by
inserting a meter in series with the track by removing a track lead connected to the
Genrakode module.
NOTE
Although it may be more convenient to use a ‘gold nut’ connection on the
TK- lead on the entrance panel (if available), be aware that if any other
track equipment shares the track lead at this entrance panel connection,
such as an overlay circuit, the measurement should be made at the
Genrakode module connection as described in Table 4–2.
Table 4–2. Current Measurement Procedure
Step
Action
1
Measure Receive Current: Set a peak reading ammeter to its 3-Ampere (or
closest available) scale for receive current measurement. Disconnect the
TK- lead. Connect the positive lead of the meter to the TK- terminal and the
negative lead of the meter to the wire from the minus track. Record the peak
receive current observed over several code cycles.
If the peak receive current is outside of the 1.0 – 1.4 Ampere range or the
receive current is not nominal given current conditions (wet/dry), perform the
Converter/Receiver Board Adjustment procedure in Table 3–5.
2
Measure Transmit Current: Reverse the meter leads from the receive current
measurement (connect the positive lead of the meter to the minus track wire
and the negative lead of the meter to the TK- terminal). Record the peak
transmit current observed over several code cycles. Some railroads may
require transmit current measurements with and without a shunt applied.
After both receive and transmit current have been measured, remove the
meter and restore the track connections. Note that a different meter scale
setting may be required for the transmit current measurement, which can
approach 10A if the measurement is performed with a hardwire shunt
applied.
3
Measure Transmit Voltage: Using a peak reading voltmeter set to the 15 Volt
(or closest available) scale, measure the transmit output by connecting the
positive terminal on the TK+ terminal and the negative lead on the TKterminal. Record the peak transmit voltage reading observed over several
code cycles.
P2160B, Vol.1, Rev. Jan/07
4–4
Alstom Signaling Inc.
Scheduled Maintenance
Table 4–2. Current Measurement Procedure (Cont.)
Step
Action
4
Measure Battery Voltage: Using a DC voltmeter, read and record the battery
voltage from the B terminal to the N terminal.
5
Verify Shunting Sensitivity: Connect the shunt strap with the 0.06 Ohm
resistor across the rails and verify that the TRK LED light for the appropriate
direction comes on within approximately 6 seconds. Remove the shunt strap.
P2160B, Vol.1, Rev. Jan/07
4–5
Alstom Signaling Inc.
BONDED
RECEIVER
CURRENT
TRANSMIT
CURRENT
L
P2160B, Vol.1, Rev. Jan/07
DATE
4.0
Sample Track Maintenance Log
NAME
SECONDARY - -
BATTERY
VOLTS
SS3
H
WELDED
TRANSMIT
VOLTAGE
CONV. SETTING: PRIMARY - SS2
RECEIVER:
SS1
TRACK LENGTH:
TYPE OF RAIL:
LOCATION:
2.0
COMMENTS
Scheduled Maintenance
Figure 4–1. Sample Track Maintenance Log
4–6
Alstom Signaling Inc.
Troubleshooting
5. SECTION 5 – TROUBLESHOOTING
5.1.
GENERAL
This Section includes troubleshooting flowcharts used to facilitate isolation of failures in
the track circuits, Genrakode II utilizes board LEDs and an Error Queue data log. There
are LEDs on the Converter/Receiver, Vital Power Controller (VPC), Auxiliary I/O, and
CPU boards. The PC board arrangement including LEDs and test points is provided in
Appendix A. The Error Queue is stored on the PGK CPU board. See Section 6,
Diagnostics, for instructions on accessing this log. If the problem has been isolated to
the module itself, the diagnostics help to isolate the problem to the board level.
5.1.1.
Recommended Equipment
When going on a trouble call, take the following items: a peak reading multimeter such
as a Simpson® TS-111 or equivalent, a shunt strap with a 0.06 Ohm resistor, and a
complete set of spare boards. Note: if using a digital peak reading multimeter, verify that
the sample rate is sufficiently high (<10ms per sample). The Fluke® 187 “fast min-max”
peak measurement is one recommendation.
To easily display the Error and Event Queues for faster and more accurate diagnosis
bring a laptop with terminal emulation software such as the PGK CAA Download
program or HyperTerminal©.
P2160B, Vol.1, Rev. Jan/07
5–1
Alstom Signaling Inc.
Troubleshooting
5.1.2.
Troubleshooting Approach
If the problem has been isolated to the Genrakode module, use the board LEDs,
especially those on the PGK CPU board, to determine what state the module is in –
Running State, Start-up Sequence, or Reset Loop.
Follow the Troubleshooting Flowchart in Figure 5–1 to diagnose the problem. Here are
some general tips:
•
If there are no LEDs lit on the Genrakode module, then loss of power is the most
likely cause. Check the battery input leads, voltages, fuses, etc.
•
If the module is in the Running State, check the Error Queue for any errors in the
system. See Section 6, Diagnostics, for instructions on displaying and clearing the
Error Queue using the rocker switch on the PGK CPU board or via a laptop
connected to the serial port. A recommended approach for determining if an error
condition still currently exists is to clear the Error Queue, reset the module, and the
check the Error Queue after the module restarts.
•
If the module is in the Reset Loop, the Reset Loop must be interrupted before the
Error Queue can be displayed or cleared. See Section 6 for instructions.
•
If the Error Queue lists an error with a particular board, swap that board with a spare
board. Another useful approach is to swap the suspect board with the other board of
that type in the system. For example, swap the East and West Colorlight Driver
boards. If the error tracks to the other side, the board is the culprit. Otherwise, the
VPC board on the original side may be a suspect.
Resolve the problem by checking wiring, swapping boards, adjusting track circuits, etc.
as required. See Table 4–1 for instructions and the preceding paragraphs in Section 4
for warnings regarding circuit board removal and replacement.
Once any errors are resolved or determined not to be current, the Error and Event
Queues should be cleared so that future access of the logs shows only new information.
It is also recommended that the date and time of the PGK CPU board be checked for
more accurate data logging. See Software Settings in Section 3, Installation.
P2160B, Vol.1, Rev. Jan/07
5–2
Alstom Signaling Inc.
Troubleshooting
5.2.
TROUBLESHOOTING FLOWCHART
Figure 5–1 is a multi-page flowchart to assist in trouble-shooting a Genrakode module.
Definitions of terms used in the flowchart are provided below, and some of the actions
to perform are explained in detail in the Section 6, Diagnostics.
Table 5–1. Troubleshooting Flowchart Symbols
Symbol
Explanation
Malfunction statement as derived from operator..
A basic instruction for preparation of a test, procedure or
observation. The action taken results in a diagnostic
decision.
A decision point; a result from an observation or previous
action that is answered yes or no. If result is within
tolerance, answer yes. If not, answer no. Do not consider
any gray areas between yes or no.
Final step of instructions involving corrective measures.
Reference publication indicates suspected problem area.
An off page reference.
P2160B, Vol.1, Rev. Jan/07
5–3
Alstom Signaling Inc.
Troubleshooting
5.2.1.
Flowchart Term Definitions
The following terms are used in the flowchart provided in Figure 5–1.
Running State – A Programmable Genrakode module is in normal operating mode if the
power LED on the CPU board is lit and the LED on each VPC board present in the
system is lit. This indicates that the 12V battery input and 5V digital input are good and
that the repetitive output and receiver tests are being passed.
Start-up Sequence – When powered up, the Programmable Genrakode module should
go through the following sequence of steps:
•
Power LED on the CPU board illuminates
•
7-segment LEDs on the CPU board read “P-UP”
•
LEDs located above the Malfunction LED on the CPU board illuminate
•
LEDs on the CPU board turn off one at a time
•
Module enters the Running State.
Reset Loop – When a Programmable Genrakode module goes through the Start-up
Sequence repetitively without entering the Running State, the module is in a Reset
Loop.
Malfunction Identified
1
No
Is the module in the
Running State?
Yes
Go To
Go To
A
C
Figure 5–1. Troubleshooting Flowchart
P2160B, Vol.1, Rev. Jan/07
5–4
Alstom Signaling Inc.
Troubleshooting
A
1.1
1.1.1
Are all of the lights
on the CPU board
off?
Startup Sequence
but not in Running
State?
No
1.1.1.1
No
In Reset Loop?
No
Yes
Yes
Yes
1.1.2
1.1.1.2
1.1.1.1.1
Is the Malfunction
LED on the CPU
blinking?
Break out of the Reset
Loop (See Diagnostics
section)
Check battery
connection and voltage
from B to N
If fixed
Yes
If not fixed
No
Then
1.1.3
1.1.1.2.1
1.1.1.1.2
Try replacing the CPU
board
Check the Error Queue
(See Diagnostics
section)
Then
Then
Check fuses
If fixed
If not fixed
1.1.5
Check the 5V output of
the Regulator/Filter
board and swap board
if not good
Go To
B
If fixed
Troubleshooting
Complete
If not fixed
1.1.6
Try replacing the CPU
board
Then
Go To
F
Figure 5–1. Troubleshooting Flowchart (Cont.)
P2160B, Vol.1, Rev. Jan/07
5–5
Alstom Signaling Inc.
Troubleshooting
B
1.1.1.1.3.1
1.1.1.1.3
Is it an error with the
Site ID or Revision
ID?
Yes
Check module
wire wrap
Then
No
1.1.1.1.3.2.1
1.1.1.1.3.2
Is it an error that
involves I/O
board(s)?
Yes
Try swapping the I/O
boards involved
Then
No
1.1.1.1.3.2.2
Does the module
now enter the
Running State?
Yes
No
1.1.1.1.3.2.2.1
Put the swapped
boards back and try
replacing the VPC
board on that side of
the module
Then
Go To
F
Figure 5–1. Troubleshooting Flowchart (Cont.)
P2160B, Vol.1, Rev. Jan/07
5–6
Alstom Signaling Inc.
Troubleshooting
C
1.2.3
1.2
Is the Malfunction
LED on the CPU
blinking?
No
Rocker to Code Display
mode (See Diagnostics
section)
Yes
1.2.4
1.2.1
Is No Code being
received on
a side?
Check Error Queue
(See Diagnostics
section)
Yes
Go To
D
No
Then
1.2.4.1
1.2.2
Is a track circuit
reported as being
down?
Deal with the errors
according to the
actions prescribed in
the error table
Yes
Go To
E
No
Then
1.2.4.1.1
No
Is a downgraded
aspect being
displayed?
Yes
1.2.4.1.1.1.1
1.2.4.1.1.1
Yes
Does the displayed
aspect match the
received code?
No
Check any external
inputs to the module
that might affect the
displayed aspect
If fixed
If not fixed
1.2.4.1.1.1.2
Go To
Then
F
Troubleshooting
Complete
Try swapping the lamp
driver board on that
side of the module
Figure 5–1. Troubleshooting Flowchart (Cont.)
P2160B, Vol.1, Rev. Jan/07
5–7
Alstom Signaling Inc.
Troubleshooting
D
1.2.4.2
Use an ammeter to
check the receive
current on that side
Then
1.2.4.3
1.2.4.3.2
Is the receive current
low?
Adjust the track circuit
accordingly and verify
that the received code
comes back
Yes
Then
No
1.2.4.3.1
Is there no receive
current?
1.2.4.3.1.1.2
1.2.4.3.1.1
Yes
Is the other end of
the track circuit
transmitting?
No
Continue
troubleshooting at
other end of track
circuit
Go Back To
Malfunction
Identified
Yes
No
1.2.4.3.1.1.1.2
1.2.4.3.1.1.1
Is the other end of
the track circuit
receiving from this
module?
Yes
Replace this C/R
board, verify track
current, and adjust as
necessary
Then
No
1.2.4.3.1.1.1.1
Walk the track and look
for problems (e.g.
broken rail, bad bond
wire, etc)
Then
Go To
F
Figure 5–1. Troubleshooting Flowchart (Cont.)
P2160B, Vol.1, Rev. Jan/07
5–8
Alstom Signaling Inc.
Troubleshooting
E
1.2.4.1.2
Is the module
transmitting as
expected?
Yes
No
1.2.4.1.2.1
1.2.4.1.2.1.2.1
1.2.4.1.2.1.2
Is the transmit
7-segment LED
blank?
No
Is the converter LED
on the C/R board
blinking?
Ye
Yes
1.2.4.1.2.1.1
1.2.4.1.2.1.1.2
Is the receive
7-segment LED also
blank?
Yes
No
Replace C/R board,
verify track current,
and adjust as
necessary
Then
Continue
troubleshooting at
other end of track
circuit
No
Go Back To
Malfunction
Identified
1.2.4.1.2.1.1.1
Check any external
inputs to the module
that might inhibit code
transmission
Then
Go To
F
Figure 5–1. Troubleshooting Flowchart (Cont.)
P2160B, Vol.1, Rev. Jan/07
5–9
Alstom Signaling Inc.
Troubleshooting
F
2.1
2
Is the module in the
Running State after
troubleshooting?
Yes
Clear Error Queue
(See Diagnostics
section)
2.2
Then
Replace Watchdog
jumper if it was
removed (See
Diagnostics section)
No
Go To
A
Figure 5–1. Troubleshooting Flowchart (Cont.)
P2160B, Vol.1, Rev. Jan/07
5–10
Alstom Signaling Inc.
Diagnostics
6. SECTION 6 – DIAGNOSTICS
6.1.
GENERAL
All Genrakode II modules have internal diagnostics to help the maintainer return a failed
location to working order.
6.1.1.
Software Errors
When power is first applied to a module, the microprocessor begins to execute a series
of instructions that test basic functions of the system. This software, called the “Boot
Loader”, is stored in an EPROM on the CPU board. The Boot Loader verifies the
application and system software integrity by mathematically computing a checksum that
must agree with the one stored in the CPU programmable FLASH memory. If the
checksum does not agree, the 7-segment LEDs on the CPU board displays “Prog” to
indicate that the unit must be reprogrammed with new software. To accomplish the
download of application and system software, a Personal Computer must be attached to
the RS-232 port on the CPU board. Specific details of this connection and the use of the
Alstom Download program are provided in Appendix B.
6.1.2.
Hardware Errors
As the CPU runs in normal operation, various tests and checks are continuously made
on the hardware internal and external to the PGK CPU board. These tests and checks
must indicate that all phases of operation are being executed correctly for operation to
continue. If anything internal to the Genrakode II module is detected as being incorrect,
the CPU shuts down the VPC(s) to remove vital power from all outputs and to disable
code transmission. After a delay period of approximately twenty seconds, the CPU
restarts the program and continues its tests and checks. If the failure is transient in
nature such as power surges from a nearby lightning storm, the system resumes normal
operation but any detected error condition is recorded in the Error Queue.
To enable the maintainer to diagnose a problem, the CPU places a number (error code)
into a special section of memory called the Error Queue whenever the CPU detects a
fault. The Error Queue may be accessed by either using the 7-segment displays on the
CPU board to display error codes on the board edge or by connecting a personal
computer (PC) to the CPU board serial port. See the following discussions of On-Board
Controls and Displays and of RS-232 Serial Port Interface for more details, respectively.
If a failure mode causes the system to enter a Reset Loop, access diagnostics by
interrupting this repetitive resetting. This is most simply done using a PC connected to
the serial port, but it can also be accomplished by pulling a jumper on the CPU board.
See the Interrupting a Reset Loop discussion for more details.
P2160B, Vol.1, Rev. Jan/07
6–1
Alstom Signaling Inc.
Diagnostics
6.2.
ON-BOARD CONTROLS AND DISPLAYS
The Rocker Switch (S1) is used in combination with the four 7-segment LED displays
and the individual LEDs on the CPU board edge to display system information such as
track occupancy, transmitted and received codes, and Error Queue status. S1 is also
used to view and change various system settings. The Rocker Switch controls which
system display or setting information is displayed at any given time.
The number of display modes available for a given application depends on the module
type and application settings that are currently in use. Figure 6–1 shows the display
modes and their order for the various module types. Moving the Rocker Switch to the
UP position switches to the next display mode. There are eight (8) possible display
modes:
1. Mode 1: This is the mode the PGK CPU board enters at startup. LED displays are
OFF, except for bottom POWER LED and possibly the LEDs in the ‘SYSTEM’ group
of LEDs if warranted by their associated functions.
2. Mode 2: This mode is used to display the transmitted and received codes on each
track using a combination of 7-segment LED displays and discrete LEDs. The
indication of each LED is labeled on the PGK CPU board.
3. Mode 3: This mode is used to display the system error codes currently in the Error
Queue. This mode is indicated by a flashing ‘0’ in the topmost 7-segment LED
display (DS2). If there are any error codes to be displayed, the Malfunction LED
(DS20) flashes. To view the two-digit hex error codes while in this mode, rock the
Rocker Switch down to display each code on the lower two 7-segment displays.
When the switch is rocked down and those displays go blank, the last error code has
been displayed.
Be aware that to cycle through the error codes again it is necessary to toggle
through the rest of the display modes back to Mode 3.
4. Mode 4: For an application using the Vital Serial Link, this mode displays Link and
Drop settings. DS2 shows ‘L’ to indicate that DS3 displays the Link number (1 or 2),
and DS11 shows ‘d’ to indicate that DS12 displays the Drop number (1 or 2).
Currently, Vital Serial Link operation is only supported for CPIB Control Point
applications.
5. Mode 5: This mode is used to display and change (if desired) the Code 5 Default
Send mode for the East Track. It is only present in Intermediate, Repeater, and
Switch Lock applications. This mode is indicated by a flashing ‘C5’ on the top two
7-segment LED displays, and the current setting for the East track is displayed on
the bottom two displays.
P2160B, Vol.1, Rev. Jan/07
6–2
Alstom Signaling Inc.
Diagnostics
6. Mode 6: This mode is used to display and change (if desired) the Code 5 Default
Send mode for the West Track. This mode is identical to Mode 5 except that the
setting applies to the West Track.
7. Mode 7: This mode is used to display and change (if desired) the Code T Location
ID. It is only present in Intermediate, Repeater, and Switch Lock applications if Code
T operation is enabled. This mode is indicated by a flashing ‘C’ on the top
7-segment LED display, and the current Location ID setting for the module is
displayed (as a decimal number from 0 – 27) on the bottom two displays.
8. Confirm Setting Change Mode: This mode only appears if the user has modified a
system setting using the Rocker Switch. A flashing “UP” (for Update) on the lower
two 7-segment displays indicates this mode.
See Section 3 for additional software setting details.
If errors have been stored in the Error Queue, the CPU front edge Malfunction LED
flashes. The procedures for entering Monitor Mode to view the errors are provided in
Tables 6–1 and 6–2.
NOTE
If the Genrakode module is in a reset loop, the Rocker Switch is not able
to access the Error Queue. However, if the Watchdog jumper is removed,
the reset loop stops and the diagnostics can be accessed. See Table 6–2
for instructions on removing the Watchdog jumper.
6.2.1.
Displaying Errors
To display errors using the CPU 7-segment LEDs, move the Rocker Switch up to
Mode 3. See Figures A–9 through A–12 for CPU board LED indicators in normal mode,
maintenance mode, and two code 5 always examples.
Refer back to the mode descriptions for details on how to step through the list of error
codes logged in the Error Queue.
6.2.2.
Clearing Errors
To clear the Error Queue (assuming it is not empty), press the rocker switch down while
in Mode 3 until the bottom two displays are blank. Then press and hold the rocker
switch down until the Malfunction LED goes OFF (approximately 10 seconds). Note: if a
persistent error condition exists such as an open lamp filament, the Malfunction LED
remains flashing.
P2160B, Vol.1, Rev. Jan/07
6–3
Alstom Signaling Inc.
Diagnostics
CONTROL POINT
(non-CPIB)
CONTROL POINT
(CPIB)
ALL OTHER MODULES
(non-Code T)
ALL OTHER MODULES
(Code T enabled)
Mode 1
Displays
OFF
(startup)
Mode 1
Displays
OFF
(startup)
Mode 1
Displays
OFF
(startup)
Mode 1
Displays
OFF
(startup)
Mode 2
TX/RX Code
Display
Mode 2
TX/RX Code
Display
Mode 2
TX/RX Code
Display
Mode 2
TX/RX Code
Display
Mode 3
Maintenance
Mode
Mode 3
Maintenance
Mode
Mode 3
Maintenance
Mode
Mode 3
Maintenance
Mode
Mode 4
VSL Link/
Drop
Display
Mode 5
Set/Display
Code 5 East
Mode 5
Set/Display
Code 5 East
Mode 6
Set/Display
Code 5 West
Mode 6
Set/Display
Code 5 West
Confirm
Setting
Change
Mode 7
Set/Display
Code T Loc
ID
Confirm
Setting
Change
Figure 6–1. Rocker Switch Display Modes
P2160B, Vol.1, Rev. Jan/07
6–4
Alstom Signaling Inc.
Diagnostics
6.3.
RS-232 SERIAL PORT INTERFACE
The RS-232 serial port can be used to access diagnostics.
There are two devices that can be connected to this interface:
•
Desktop computer or laptop with appropriate emulation software
•
Hand Held Terminal (HHT)
6.3.1.
Desktop Computer or Laptop
A computer or laptop with DEC VT-100 compatible terminal emulation software is
required to run the Alstom Download program to download Application software to the
CPU board. For this PC interface, jumper W5 on the CPU board should be OUT. Figure
6–2 shows the complete wiring.
RX
TX
GND
RTS
CTS
2
3
3
2
5
5
7
8
8
7
TX
RX
GND
CTS
RTS
PGK DB9
Connector
PC - DB9 PIN
Figure 6–2. PGK DB9 Connector Wiring
The RTS and CTS lines are not required for accessing the diagnostics of the system.
They are only included since they might be used for future code system interfaces via
modem. Note that a straight through DB9<-->DB9 with a Null Modem then works for all
serial port needs except for that special case.
The required communications protocol for accessing the PGK CPU System Commands
using any terminal emulation software is: 1200 Baud, 8 Data Bits, 1 Stop Bit, no parity.
6.3.2.
Handheld Terminal
A Handheld Terminal (HHT) specifically designed to connect to this interface (P/N
31609-012-00) can be used. This method only allows access to the PGK CPU System
Commands and cannot be used for downloading Application software. For this interface
method, jumper W5 should be IN to provide power to the HHT.
P2160B, Vol.1, Rev. Jan/07
6–5
Alstom Signaling Inc.
Diagnostics
6.3.3.
Error Queue
The error queue can be accessed with the RS-232 Interface Port. Use the DEQ
command to display the entire Error Queue. Use the CEQ command to clear the Error
Queue.
6.3.4.
Event Queue
The Event Queue can be a useful diagnostic tool in addition to the Error Queue. The
Event Queue stores a log of system events and can be used to investigate changes to
system parameters over time. For example, when a lamp is turned on or a track circuit
becomes occupied, the date and time of the event is logged. This information, along
with the comparison of timestamps with the Error Queue, can be valuable. Use the DVQ
command to display the Event Queue.
6.4.
INTERRUPTING A RESET LOOP
Two methods are available for interrupting a reset loop in order to access the system
diagnostics and enter Monitor mode. The preferred method is to connect a PC to the
PGK CPU serial port and enter Monitor Mode as described in Table 6–1. The second
method that should be used with extreme caution is to remove the Watchdog jumper as
described in Table 6–2.
Table 6–1. Enter Monitor Mode With a PC
Step
Action
1
Leave the Watchdog jumper in and connect a null modem DB9 serial cable
from the laptop to the CPU.
2
Run a terminal emulation program at 1200 bps, 8-None-1. See Appendix B
for more details on connecting to the serial port.
3
As the CPU goes through the repeated Startup Sequence, the terminal
displays “Press <Enter> now to enter Monitor Mode”
Press the <Enter> key and the Monitor Mode prompt is displayed (MON>).
Then the DEQ and CEQ commands are available to display and clear the
Error Queue, respectively. Note that the Event Queue is not available in
Monitor Mode.
P2160B, Vol.1, Rev. Jan/07
6–6
Alstom Signaling Inc.
Diagnostics
Table 6–2. Enter Monitor Mode Without a PC
Step
Action
1
Power down the module using the switch located on the left side of the
module.
2
Remove the CPU board from the module.
3
Remove the Watchdog jumper (W8).
CAUTION
The Watchdog jumper (W8) MUST be returned after
troubleshooting is complete. Failure to do so prevents the
module from automatically recovering from future reset
conditions, thus requiring manual reset.
Return the CPU board to its proper slot.
4
Power up the module. The module now performs the Start-up Sequence
once and then stops. The diagnostics are now accessible through the rocker
switch and 7-segment displays. See the previous On-Board Controls and
Displays discussion.
5
Perform the desired diagnostics.
6
When diagnostics are complete the Watchdog jumper MUST be returned.
Power down the module using the switch located on the left side of the
module.
7
Remove the CPU board from the module, re-install the Watchdog jumper
(W8), and return the CPU board to its proper slot.
8
Power up the module. The module should go through the Start-up Sequence
and then enter the Running State. If not, return to the beginning of the
troubleshooting flowchart in Section 5.
P2160B, Vol.1, Rev. Jan/07
6–7
Alstom Signaling Inc.
Diagnostics
6.5.
ERROR CODES
Table 6–3 lists the PGK Error Codes for PGK CAA Versions 1.55 through the current
version.
The following note applies to many of the remedies, as indicated in the Corrective
Action column.
NOTE
If a CIC (Cable Integrity Check) version of the board is present, check that
no cable shorts are present between outputs. Such shorts can cause
state, toggle, and filament check errors. See Section 2, Heading 2.6.1. for
a discussion of the CIC function.
Table 6–3. Error Code Diagnostics
Error
Number
Failure
Corrective Action
00
Warning - Replace CPU Battery
Replace 3V battery on CPU Board.
01
PGK Board Failure
Replace CPU Board if problem
persists.
02
LL Cycle Capacity Warning!
Contact Application Programmer.
03
Incorrect IOC software version
Install correct IOC PROM (U30)
version.
05
IOC Comm Error: Config Report
Replace CPU Board if problem
persists.
06
IOC Comm Error: Op Request
Replace CPU Board if problem
persists.
07
IOC Comm Error: IOC Status
Replace CPU Board if problem
persists.
08
IOC Comm Error: LGC Ready
Replace CPU Board if problem
persists.
09
IOC Comm Error: Op Data
Replace CPU Board if problem
persists.
0F
East Decode Output Failure
Replace EAST Decode Output Board.
10
East DO 1 Toggle Failure
Replace EAST Decode Output Board
and/or EAST VPC Board. (See Note)
11
East DO 2 Toggle Failure
Replace EAST Decode Output Board
and/or EAST VPC Board. (See Note)
P2160B, Vol.1, Rev. Jan/07
6–8
Alstom Signaling Inc.
Diagnostics
Table 6–3. Error Code Diagnostics (Cont.)
Error
Number
Failure
Corrective Action
12
East DO 3 Toggle Failure
Replace EAST Decode Output Board
and/or EAST VPC Board. (See Note)
13
East DO 4 Toggle Failure
Replace EAST Decode Output Board
and/or EAST VPC Board. (See Note)
14
East DO 5 Toggle Failure
Replace EAST Decode Output Board
and/or EAST VPC Board. (See Note)
15
East DO 6 Toggle Failure
Replace EAST Decode Output Board
and/or EAST VPC Board. (See Note)
16
East DO 7 Toggle Failure
Replace EAST Decode Output Board
and/or EAST VPC Board. (See Note)
17
East DO 8 Toggle Failure
Replace EAST Decode Output Board
and/or EAST VPC Board. (See Note)
18
East DO 1 State Failure
Replace EAST Decode Output Board
and/or EAST VPC Board. (See Note)
19
East DO 2 State Failure
Replace EAST Decode Output Board
and/or EAST VPC Board. (See Note)
1A
East DO 3 State Failure
Replace EAST Decode Output Board
and/or EAST VPC Board. (See Note)
1B
East DO 4 State Failure
Replace EAST Decode Output Board
and/or EAST VPC Board. (See Note)
1C
East DO 5 State Failure
Replace EAST Decode Output Board
and/or EAST VPC Board. (See Note)
1D
East DO 6 State Failure
Replace EAST Decode Output Board
and/or EAST VPC Board. (See Note)
1E
East DO 7 State Failure
Replace EAST Decode Output Board
and/or EAST VPC Board. (See Note)
1F
East DO 8 State Failure
Replace EAST Decode Output Board
and/or EAST VPC Board. (See Note)
20
East SA Failure
Replace EAST Search Light Drive
Board.
22
ESL A Filament Failure
Check/Replace EAST A Lamp or
Replace EAST Search Light Drive
Board and/or EAST VPC Board. (See
Note)
P2160B, Vol.1, Rev. Jan/07
6–9
Alstom Signaling Inc.
Diagnostics
Table 6–3. Error Code Diagnostics (Cont.)
Error
Number
Failure
Corrective Action
23
ESL B Filament Failure
Check/Replace EAST B Lamp or
Replace EAST Searchlight Drive
Board and/or EAST VPC Board. (See
Note)
24
ESL A Toggle Failure
Replace EAST Search Light Drive
Board and/or EAST VPC Board. (See
Note)
25
ESL B Toggle Failure
Replace EAST Search Light Drive
Board and/or EAST VPC Board. (See
Note)
26
ESL A State Failure
Replace EAST Search Light Drive
Board and/or EAST VPC Board. (See
Note)
27
ESL B State Failure
Replace EAST Search Light Drive
Board and/or EAST VPC Board. (See
Note)
28
SWL Lock Relay State Failure
Replace Switch Lock I/O Board.
29
SWL Ovly Relay State Failure
Replace Switch Lock I/O Board.
2A
SWL Output Relay State Failure
Replace Switch Lock I/O Board.
2B
SWL Lock Relay Toggle Failure
Replace Switch Lock I/O Board.
2C
SWL Ovly Relay Toggle Failure
Replace Switch Lock I/O Board.
2D
SWL Output Relay Toggle Failure
Replace Switch Lock I/O Board.
2E
SWL Input Drive Failure
Replace Switch Lock I/O Board.
2F
Overlay Input Drive Failure
Replace Series Overlay Board.
30
East CLD Failure
Replace EAST Color Light Drive
Board.
32
ECL Grn A Toggle Failure
Replace EAST Color Light Drive Board
and/or EAST VPC Board. (See Note)
33
ECL Yel A Toggle Failure
Replace EAST Color Light Drive Board
and/or EAST VPC Board. (See Note)
34
ECL Red A Toggle Failure
Replace EAST Color Light Drive Board
and/or EAST VPC Board. (See Note)
35
ECL Grn B Toggle Failure
Replace EAST Color Light Drive Board
and/or EAST VPC Board. (See Note)
P2160B, Vol.1, Rev. Jan/07
6–10
Alstom Signaling Inc.
Diagnostics
Table 6–3. Error Code Diagnostics (Cont.)
Error
Number
Failure
Corrective Action
36
ECL Yel B Toggle Failure
Replace EAST Color Light Drive Board
and/or EAST VPC Board. (See Note)
37
ECL Red B Toggle Failure
Replace EAST Color Light Drive Board
and/or EAST VPC Board. (See Note)
38
ECL Grn A Fil Failure
Check/Replace EAST A Lamp or
Replace EAST Color Light Drive Board
and/or EAST VPC Board. (See Note)
39
ECL Yel A Fil Failure
Check/Replace EAST A Lamp or
Replace EAST Color Light Drive Board
and/or EAST VPC Board. (See Note)
3A
ECL Red A Fil Failure
Check/Replace EAST A Lamp or
Replace EAST Color Light Drive Board
and/or EAST VPC Board. (See Note)
3B
ECL Grn B Fil Failure
Check/Replace EAST B Lamp or
Replace EAST Color Light Drive Board
and/or EAST VPC Board. (See Note)
3C
ECL Yel B Fil Failure
Check/Replace EAST B Lamp or
Replace EAST Color Light Drive Board
and/or EAST VPC Board. (See Note)
3D
ECL Red B Fil Failure
Check/Replace EAST B Lamp or
Replace EAST Color Light Drive Board
and/or EAST VPC Board. (See Note)
3F
West Decode Output Failure
Replace WEST Decode Output Board
40
West DO 1 Toggle Failure
Replace WEST Decode Output Board
and/or WEST VPC Board. (See Note)
41
West DO 2 Toggle Failure
Replace WEST Decode Output Board
and/or WEST VPC Board. (See Note)
42
West DO 3 Toggle Failure
Replace WEST Decode Output Board
and/or WEST VPC Board. (See Note)
43
West DO 4 Toggle Failure
Replace WEST Decode Output Board
and/or WEST VPC Board. (See Note)
44
West DO 5 Toggle Failure
Replace WEST Decode Output Board
and/or WEST VPC Board. (See Note)
P2160B, Vol.1, Rev. Jan/07
6–11
Alstom Signaling Inc.
Diagnostics
Table 6–3. Error Code Diagnostics (Cont.)
Error
Number
Failure
Corrective Action
45
West DO 6 Toggle Failure
Replace WEST Decode Output Board
and/or WEST VPC Board. (See Note)
46
West DO 7 Toggle Failure
Replace WEST Decode Output Board
and/or WEST VPC Board. (See Note)
47
West DO 8 Toggle Failure
Replace WEST Decode Output Board
and/or WEST VPC Board. (See Note)
48
West DO 1 State Failure
Replace WEST Decode Output Board
and/or WEST VPC Board. (See Note)
49
West DO 2 State Failure
Replace WEST Decode Output Board
and/or WEST VPC Board. (See Note)
4A
West DO 3 State Failure
Replace WEST Decode Output Board
and/or WEST VPC Board. (See Note)
4B
West DO 4 State Failure
Replace WEST Decode Output Board
and/or WEST VPC Board. (See Note)
4C
West DO 5 State Failure
Replace WEST Decode Output Board
and/or WEST VPC Board. (See Note)
4D
West DO 6 State Failure
Replace WEST Decode Output Board
and/or WEST VPC Board. (See Note)
4E
West DO 7 State Failure
Replace WEST Decode Output Board
and/or WEST VPC Board. (See Note)
4F
West DO 8 State Failure
Replace WEST Decode Output Board
and/or WEST VPC Board. (See Note)
50
West SA Failure
Replace WEST Search Light Drive
Board.
52
WSL A Filament Failure
Check/Replace WEST A Lamp or
Replace WEST Search Light Drive
Board and/or WEST VPC Board. (See
Note)
53
WSL B Filament Failure
Check/Replace WEST B Lamp or
Replace WEST Search Light Drive
Board and/or WEST VPC Board. (See
Note)
54
WSL A Toggle Failure
Replace WEST Search Light Drive
Board and/or WEST VPC Board. (See
Note)
P2160B, Vol.1, Rev. Jan/07
6–12
Alstom Signaling Inc.
Diagnostics
Table 6–3. Error Code Diagnostics (Cont.)
Error
Number
Failure
Corrective Action
55
WSL B Toggle Failure
Replace WEST Search Light Drive
Board and/or WEST VPC Board. (See
Note)
56
WSL A State Failure
Replace WEST Search Light Drive
Board and/or WEST VPC Board. (See
Note)
57
WSL B State Failure
Replace WEST Search Light Drive
Board and/or WEST VPC Board. (See
Note)
60
West CLD Failure
Replace WEST Color light Driver
Board.
62
WCL Grn A Toggle Failure
Replace WEST Color Light Drive
Board and/or WEST VPC Board. (See
Note)
63
WCL Yel A Toggle Failure
Replace WEST Color Light Drive
Board and/or WEST VPC Board. (See
Note)
64
WCL Red A Toggle Failure
Replace WEST Color Light Drive
Board and/or WEST VPC Board. (See
Note)
65
WCL Grn B Toggle Failure
Replace WEST Color Light Drive
Board and/or WEST VPC Board. (See
Note)
66
WCL Yel B Toggle Failure
Replace WEST Color Light Drive
Board and/or WEST VPC Board. (See
Note)
67
WCL Red B Toggle Failure
Replace WEST Color Light Drive
Board and/or WEST VPC Board. (See
Note)
68
WCL Grn A Fil Failure
Check/Replace WEST A Lamp or
Replace WEST Color Light Drive
Board and/or WEST VPC Board. (See
Note)
69
WCL Yel A Fil Failure
Check/Replace WEST A Lamp or
Replace WEST Color Light Drive
Board and/or WEST VPC Board. (See
Note)
P2160B, Vol.1, Rev. Jan/07
6–13
Alstom Signaling Inc.
Diagnostics
Table 6–3. Error Code Diagnostics (Cont.)
Error
Number
Failure
Corrective Action
6A
WCL Red A Fil Failure
Check/Replace WEST A Lamp or
Replace WEST Color Light Drive
Board and/or WEST VPC Board. (See
Note)
6B
WCL Grn B Fil Failure
Check/Replace WEST B Lamp or
Replace WEST Color Light Drive
Board and/or WEST VPC Board. (See
Note)
6C
WCL Yel B Fil Failure
Check/Replace WEST B Lamp or
Replace WEST Color Light Drive
Board and/or WEST VPC Board. (See
Note)
6D
WCL Red B Fil Failure
Check/Replace WEST B Lamp or
Replace WEST Color Light Drive
Board and/or WEST VPC Board. (See
Note)
70
East Conv/Rcvr Failure
Replace EAST Converter/Receiver
Board.
71
ECR ULD Up Lvl Tst Failure
Replace EAST Converter/Receiver
Board if problem persists.
72
ECR LLD Up Lvl Tst Failure
Replace EAST Converter/Receiver
Board if problem persists.
73
ECR ULD Lo Lvl Tst Failure
Replace EAST Converter/Receiver
Board if problem persists.
74
ECR LLD Lo Lvl Tst Failure
Replace EAST Converter/Receiver
Board if problem persists.
75
ECR Converter Rdbk Failure
Replace EAST Converter/Receiver
Board if problem persists.
7A
ECL Grn A State Failure
Replace EAST Color Light Drive Board
and/or EAST VPC Board. (See Note)
7B
ECL Yel A State Failure
Replace EAST Color Light Drive Board
and/or EAST VPC Board. (See Note)
7C
ECL Red A State Failure
Replace EAST Color Light Drive Board
and/or EAST VPC Board. (See Note)
7D
ECL Grn B State Failure
Replace EAST Color Light Drive Board
and/or EAST VPC Board. (See Note)
P2160B, Vol.1, Rev. Jan/07
6–14
Alstom Signaling Inc.
Diagnostics
Table 6–3. Error Code Diagnostics (Cont.)
Error
Number
Failure
Corrective Action
7E
ECL Yel B State Failure
Replace EAST Color Light Drive Board
and/or EAST VPC Board. (See Note)
7F
ECL Red B State Failure
Replace EAST Color Light Drive Board
and/or EAST VPC Board. (See Note)
80
West Conv/Rcvr Failure
Replace WEST Converter/Receiver
Board
81
WCR ULD Up Lvl Tst Failure
Replace WEST Converter/Receiver
Board if problem persists.
82
WCR LLD Up Lvl Tst Failure
Replace WEST Converter/Receiver
Board if problem persists.
83
WCR ULD Lo Lvl Tst Failure
Replace WEST Converter/Receiver
Board if problem persists.
84
WCR LLD Lo Lvl Tst Failure
Replace WEST Converter/Receiver
Board if problem persists.
85
WCR Converter Rdbk Failure
Replace WEST Converter/Receiver
Board if problem persists.
8A
WCL Grn A State Failure
Replace WEST Color Light Drive
Board and/or WEST VPC Board. (See
Note)
8B
WCL Yel A State Failure
Replace WEST Color Light Drive
Board and/or WEST VPC Board. (See
Note)
8C
WCL Red A State Failure
Replace WEST Color Light Drive
Board and/or WEST VPC Board. (See
Note)
8D
WCL Grn B State Failure
Replace WEST Color Light Drive
Board and/or WEST VPC Board. (See
Note)
8E
WCL Yel B State Failure
Replace WEST Color Light Drive
Board and/or WEST VPC Board. (See
Note)
8F
WCL Red B State Failure
Replace WEST Color Light Drive
Board and/or WEST VPC Board. (See
Note)
90
Code Select Board Failure
Replace Code Select Board.
96
ECS Grp-1 Inp Drive Failure
Replace Code Select Board.
P2160B, Vol.1, Rev. Jan/07
6–15
Alstom Signaling Inc.
Diagnostics
Table 6–3. Error Code Diagnostics (Cont.)
Error
Number
Failure
Corrective Action
99
ECS Grp-2 Inp Drive Failure
Replace Code Select Board.
9C
WCS Grp-1 Inp Drive Failure
Replace Code Select Board.
9F
WCS Grp-2 Inp Drive Failure
Replace Code Select Board.
A0
AUX I/O Failure
Replace AUX/IO Board.
A2
WCAB Toggle Failure
Replace AUX I/O Board.
A3
WEXO Toggle Failure
Replace AUX I/O Board.
A4
ECAB Toggle Failure
Replace AUX I/O Board.
A5
EEXO Toggle Failure
Replace AUX I/O Board.
A6
WCAB100 Toggle Failure
Replace AUX I/O Board.
A7
WCAB250 Toggle Failure
Replace AUX I/O Board.
A8
ECAB100 Toggle Failure
Replace AUX I/O Board.
A9
ECAB250 Toggle Failure
Replace AUX I/O Board.
AC
WCODEP Toggle Failure
Replace AUX I/O Board.
AD
ECODEP Toggle Failure
Replace AUX I/O Board.
B1
FIFO Init Failure
Replace CPU Board.
B2
IOC Init Failure
Replace CPU Board.
B3
Real Time Clock Init Failure
Replace CPU Board.
B4
Real Time Clock not running
Check CPU battery, replace if
necessary. Reset RTC date and time.
Replace CPU if problem persists.
B6
WCAB State Failure
Replace AUX I/O Board.
B7
WEXO State Failure
Replace AUX I/O Board.
B8
ECAB State Failure
Replace AUX I/O Board.
B9
EEXO State Failure
Replace AUX I/O Board.
BA
WCAB100 State Failure
Replace AUX I/O Board.
BB
WCAB250 State Failure
Replace AUX I/O Board.
BC
ECAB100 State Failure
Replace AUX I/O Board.
BD
ECAB250 State Failure
Replace AUX I/O Board.
BE
WCODEP State Failure
Replace AUX I/O Board.
BF
ECODEP State Failure
Replace AUX I/O Board.
C3
Config Req Length Error
Replace CPU Board.
P2160B, Vol.1, Rev. Jan/07
6–16
Alstom Signaling Inc.
Diagnostics
Table 6–3. Error Code Diagnostics (Cont.)
Error
Number
Failure
Corrective Action
C4
Event Log Clr Error
Replace CPU Board.
C5
Error Log Clr Error
Replace CPU Board
C6
RAM Test Failure
Replace CPU Board.
C7
BB-RAM Test Failure
Replace CPU Board.
C8
PD Test Failure
Replace CPU Board.
C9
Code PROM Test Failure
Replace CPU Board.
CA
App PROM Test Failure
Replace CPU Board.
CB
VSL Test Failure
Replace CPU Board.
CC
Power Supply Board Init Failure
Replace Power Supply Board.
D0
Invalid VPCChkWrd
Replace CPU Board.
D1
Unknown FIFO MsgType
Replace CPU Board.
D2
Bad OpData Msg Length
Replace CPU Board.
D4
FIFO not empty on swap
Replace CPU Board.
D5
Low Signal Battery Voltage
Restore signal battery voltage. If error
persists though voltage okay, check
adjustment of Power Supply Board.
Then try replacing the Power Supply
Board.
D6
VSL MED Sync check bad
Troubleshoot PGK to VPI VSC link.
Replace CPU Board if problem
isolated to PGK.
D7
PS POS Fault Test Failure
Verify that no Ground faults are
present. If problem persists, replace
Power Supply Board.
D8
PS NEG Fault Test Failure
Verify that no Ground faults are
present. If problem persists, replace
Power Supply Board.
D9
PS Earth GND Wire Open
Check Ground wire connection to
module and to Earth Ground.
DA
PS Internal Test Failure
Verify that no Ground faults are
present. If problem persists, replace
Power Supply Board.
P2160B, Vol.1, Rev. Jan/07
6–17
Alstom Signaling Inc.
Diagnostics
Table 6–3. Error Code Diagnostics (Cont.)
Error
Number
Failure
Corrective Action
DB
PS POS GND Fault Detected
Remove positive ground fault or readjust Power Supply Board detection
threshold.
DC
PS NEG GND Fault Detected
Remove negative ground fault or readjust Power Supply Board detection
threshold.
DD
VSL Message Drop-Out
No Action Required if this error occurs
when the CPU is powered up when
VPI is already running (not a problem).
Otherwise, trouble-shoot PGK to VPI
VSC link. Replace CPU Board if
problem isolated to PGK.
DE
Ch1 offset sync lost
Troubleshoot PGK to VPI VSC link.
Replace CPU Board if problem
isolated to PGK.
DF
Ch2 offset sync lost
Trouble-shoot PGK to VPI VSC link.
Replace CPU Board if problem
isolated to PGK.
E1
Illegal VSL Link setting
Verify Module Wire-wrap. Replace
CPU if physical wire-wraps are
confirmed with Ohmmeter.
E2
Illegal VSL Drop setting
Verify Module Wire-wrap. Replace
CPU if physical wire-wraps are
confirmed with Ohmmeter.
E3
VSL RecCount Overrun
Troubleshoot PGK to VPI VSC link.
Replace CPU Board if problem
isolated to PGK.
E4
Invalid VSL address byte
Troubleshoot PGK to VPI VSC link.
Replace CPU Board if problem
isolated to PGK.
E5
Invalid VSL control byte
Troubleshoot PGK to VPI VSC link.
Replace CPU Board if problem
isolated to PGK.
E6
Invalid VSL XOFCHG
Troubleshoot PGK to VPI VSC link.
Replace CPU Board if problem
isolated to PGK.
P2160B, Vol.1, Rev. Jan/07
6–18
Alstom Signaling Inc.
Diagnostics
Table 6–3. Error Code Diagnostics (Cont.)
Error
Number
Failure
Corrective Action
E7
Invalid VSL CH1 rec msgs
Troubleshoot PGK to VPI VSC link.
Replace CPU Board if problem
isolated to PGK.
E8
Invalid VSL CH2 rec msgs
Troubleshoot PGK to VPI VSC link.
Replace CPU Board if problem
isolated to PGK.
E9
ERR_VSL_BadMsgGrp
Troubleshoot PGK to VPI VSC link.
Replace CPU Board if problem
isolated to PGK.
EB
VSL Msg CRC Error
Troubleshoot PGK to VPI VSC link.
Replace CPU Board if problem
isolated to PGK.
ED
VSL RxMsg Overrun Error
Troubleshoot PGK to VPI VSC link.
Replace CPU Board if problem
isolated to PGK.
EE
Unknown HL Equation Type
Verify Proper Version of CAA was
used to generate Application.
F0
Switch Lock I/O Failure
Replace Switch Lock I/O Board.
F1
Series Overlay Failure
Replace Series Overlay Board.
F6
FIFO Msg Length Error
Fix Any Other Errors and Retry. If
Persists, Replace CPU Board.
F7
Invalid FIFO Msg Error
Fix Any Other Errors and Retry. If
Persists, Replace CPU Board.
F8
Invalid Rec Msg Type
Replace CPU Board.
F9
SID Image Test Failure
Verify Site ID Wire Wrap. Replace
CPU if physical wire-wraps are
confirmed correct with Ohmmeter.
FA
SID Verify Test Failure
Verify Site ID Wire Wrap. Replace
CPU if physical wire-wraps are
confirmed with Ohmmeter.
FB
REV Image Test Failure
Verify Revision Wire Wrap. Replace
CPU if physical wire-wraps are
confirmed correct with Ohmmeter.
P2160B, Vol.1, Rev. Jan/07
6–19
Alstom Signaling Inc.
Diagnostics
Table 6–3. Error Code Diagnostics (Cont.)
Error
Number
Failure
Corrective Action
FC
REV Verify Test Failure
Verify Revision Wire Wrap. Replace
CPU if physical wire-wraps are
confirmed correct with Ohmmeter.
FD
DCRKEY Failure
Fix Any Other Errors and Retry. If
Persists, Replace CPU Board.
FE
Unknown Equation Type
Verify Proper Version of CAA was
used to generate Application.
FF
Initialization Failure
Replace CPU Board.
P2160B, Vol.1, Rev. Jan/07
6–20
Alstom Signaling Inc.
Module and Board Reference Data
A. APPENDIX A - MODULE AND BOARD REFERENCE DATA
A.1.
OVERVIEW
This appendix includes the following reference information:
•
Module Terminal Definitions
•
Switch Lock Module- Unlock Code Selection
•
Typical Application Circuits
•
Circuit Board Descriptions
A.2.
MODULE TERMINAL DEFINITIONS
A.2.1.
Control Point Module Terminal Definitions
The Genrakode II Control Point module has 48 AAR terminals arranged in three rows of
16. The rows are identified as TB1, TB2, or TB3. Row TB1 is the bottom most row. A list
of all the terminals by function and terminal location in parentheses follows.
B (TB1-1) B12 input connection for the positive battery terminal.
N (TB1-16) N12 input connection for the negative battery terminal.
W TK+ (TB1-2) Connection to the positive rail of the WEST track.
W TK- (TB1-3) Connection to the negative rail of the WEST track.
W RLY+ (TB1-4) WEST Vital Power Controller (VPC) positive voltage terminal (isolated
from the battery) used as the common connection for all WEST decoded output relays.
W C1RLY (TB3-1) Current sink output (active low) to operate a relay when a code
(typically Code 1) is decoded from the WEST. The negative side of the relay coil is
connected to this terminal. The positive side of the relay is connected to
W RLY+ (TB1-4).
W C2RLY (TB3-2) Current sink output (active low) to operate a relay when a code
(typically Code 2) is decoded from the WEST. The negative side of the relay coil is
connected to this terminal. The positive side of the relay is connected to
W RLY+ (TB1-4).
W C3RLY (TB3-3) Current sink output (active low) to operate a relay when a code
(typically Code 3) is decoded from the WEST. The negative side of the relay coil is
P2160B, Vol.1, Rev. Jan/07
A–1
Alstom Signaling Inc.
Module and Board Reference Data
connected to this terminal. The positive side of the relay is connected to
W RLY+ (TB1-4).
W C4RLY (TB3-4) Current sink output (active low) to operate a relay when a code
(typically Code 4) is decoded from the WEST. The negative side of the relay coil is
connected to this terminal. The positive side of the relay is connected to
W RLY+ (TB1-4).
W C5RLY (TB2-1) Current sink output (active low) to operate a relay when a code
(typically Code 5) is decoded from the WEST. The negative side of the relay coil is
connected to this terminal. The positive side of the relay is connected to
W RLY+ (TB1-4).
W HR / W C6RLY (TB2-2) Current sink output (active low) to operate a relay when a
code is decoded from the WEST. This output is usually used with Code 6 or with an HR
code.
W C7RLY (TB2-3) Current sink output (active low) to operate a relay when a code
(typically Code 7) is decoded from the WEST. The negative side of the relay coil is
connected to this terminal. The positive side of the relay is connected to
W RLY+ (TB1-4).
W C8RLY (TB2-4) Current sink output (active low) to operate a relay when a code
(typically Code 8) is decoded from the WEST. The negative side of the relay coil is
connected to this terminal. The positive side of the relay is connected to
W RLY+ (TB1-4).
W REF (TB3-5) Common terminal for all WEST code selections. When using the
contact closure type Code Select Board (P/N 59473-830-01), connect this terminal to
one, two or three code select terminals through a relay contact or a network of relay
contacts to select the appropriate code(s) to be transmitted to the WEST. When using
the DC input code select board (P/N 59473-890-01) connects this terminal to the
negative voltage terminal of the code select network.
W CNT1 (TB3-6) Terminal for selecting a code (typically Code 1) to be transmitted to
the WEST. When using the contact closure Code Select Board (P/N 59473-830-01),
connect this terminal through a relay contact or network of relay contacts to W REF
(TB3-5) to select Code 1. When using the DC input Code Select Board, connect this
terminal to the positive voltage terminal of the code select network to select Code 1.
W CNT2 (TB2-5) Terminal for selecting a code (typically Code 2) to be transmitted to
the WEST. When using the contact closure Code Select Board (P/N 59473-830-01),
connect this terminal through a relay contact or network of relay contacts to W REF
(TB3-5) to select Code 2. When using the DC input Code Select Board, connect this
terminal to the positive voltage terminal of the code select network to select Code 2.
P2160B, Vol.1, Rev. Jan/07
A–2
Alstom Signaling Inc.
Module and Board Reference Data
W CNT3 (TB2-6) Terminal for selecting a code (typically Code 3) to be transmitted to
the WEST. When using the contact closure Code Select Board (P/N 59473-830-01),
connect this terminal through a relay contact or network of relay contacts to W REF
(TB3-5) to select Code 3. When using the DC input Code Select Board, connect this
terminal to the positive voltage terminal of the code select network to select Code 3.
W CNT4 (TB2-7) Terminal for selecting a code (typically Code 4) to be transmitted to
the WEST. When using the contact closure Code Select Board (P/N 59473-830-01),
connect this terminal through a relay contact or network of relay contacts to W REF
(TB3-5) to select Code 4. When using the DC input Code Select Board, connect this
terminal to the positive voltage terminal of the code select network to select Code 4.
W CNT5 (TB1-5) Terminal for selecting a code (typically Code 5) to be transmitted to
the WEST. When using the contact closure Code Select Board (P/N 59473-830-01),
connect this terminal through a relay contact or network of relay contacts to W REF
(TB3-5) to select Code 5. When using the DC input Code Select Board, connect this
terminal to the positive voltage terminal of the code select network to select Code 5.
W CNT6 (TB1-6) Terminal for selecting a code (typically Code 6) to be transmitted to
the WEST. When using the contact closure Code Select Board (P/N 59473-830-01),
connect this terminal through a relay contact or network of relay contacts to W REF
(TB3-5) to select Code 6. When using the DC input Code Select Board, connect this
terminal to the positive voltage terminal of the code select network to select Code 6.
W CNT7 (TB1-7) Terminal for selecting a code (typically Code 7) to be transmitted to
the WEST. When using the contact closure Code Select Board (P/N 59473-830-01),
connect this terminal through a relay contact or network of relay contacts to W REF
(TB3-5) to select Code 7. When using the DC input Code Select Board, connect this
terminal to the positive voltage terminal of the code select network to select Code 7.
W CNT8 (TB1-8) Terminal for selecting a code (typically Code 8) to be transmitted to
the WEST. When using the contact closure Code Select Board (P/N 59473-830-01),
connect this terminal through a relay contact or network of relay contacts to W REF
(TB3-5) to select Code 8. When using the DC input Code Select Board, connect this
terminal to the positive voltage terminal of the code select network to select Code 8.
E TK+ (TB1-14) Connection to the positive rail of the EAST track.
E TK- (TB1-15) Connection to the negative rail of the EAST track.
E REF (TB3-11) Common terminal for all EAST code selections. When using the
contact closure type Code Select Board (P/N 59473-830-01), connect this terminal to
one, two or three code select terminals through a relay contact or a network of relay
contacts to select the appropriate code(s) to be transmitted to the EAST. When using
the DC input Code Select Board (P/N 59473-890-01) connects this terminal to the
negative voltage terminal of the code select network.
P2160B, Vol.1, Rev. Jan/07
A–3
Alstom Signaling Inc.
Module and Board Reference Data
E CNT1 (TB3-12) Terminal for selecting a code (typically Code 1) to be transmitted to
the EAST. When using the contact closure Code Select Board (P/N 59473-830-01),
connect this terminal through a relay contact or network of relay contacts to E REF
(TB3-11) to select Code 1. When using the DC input Code Select Board, connect this
terminal to the positive voltage terminal of the code select network to select Code 1.
E CNT2 (TB2-10) Terminal for selecting a code (typically Code 2) to be transmitted to
the EAST. When using the contact closure Code Select Board (P/N 59473-830-01),
connect this terminal through a relay contact or network of relay contacts to E REF
(TB3-11) to select Code 2. When using the DC input Code Select Board, connect this
terminal to the positive voltage terminal of the code select network to select Code 2.
E CNT3 (TB2-11) Terminal for selecting a code (typically Code 3) to be transmitted to
the EAST. When using the contact closure Code Select Board (P/N 59473-830-01),
connect this terminal through a relay contact or network of relay contacts to E REF
(TB3-11) to select Code 3. When using the DC input Code Select Board, connect this
terminal to the positive voltage terminal of the code select network to select Code 3.
E CNT4 (TB2-12) Terminal for selecting a code (typically Code 4) to be transmitted to
the EAST. When using the contact closure Code Select Board (P/N 59473-830-01),
connect this terminal through a relay contact or network of relay contacts to E REF
(TB3-11) to select Code 4. When using the DC input Code Select Board, connect this
terminal to the positive voltage terminal of the code select network to select Code 4.
E CNT5 (TB1-9) Terminal for selecting a code (typically Code 5) to be transmitted to the
EAST. When using the contact closure Code Select Board (P/N 59473-830-01), connect
this terminal through a relay contact or network of relay contacts to E REF (TB3-11) to
select Code 5. When using the DC input Code Select Board, connect this terminal to the
positive voltage terminal of the code select network to select Code 5.
E CNT6 (TB1-10) Terminal for selecting a code (typically Code 6) to be transmitted to
the EAST. When using the contact closure Code Select Board (P/N 59473-830-01),
connect this terminal through a relay contact or network of relay contacts to E REF
(TB3-11) to select Code 6. When using the DC input Code Select Board, connect this
terminal to the positive voltage terminal of the code select network to select Code 6.
E CNT7 (TB1-11) Terminal for selecting a code (typically Code 7) to be transmitted to
the EAST. When using the contact closure Code Select Board (P/N 59473-830-01),
connect this terminal through a relay contact or network of relay contacts to E REF
(TB3-11) to select Code 7. When using the DC input Code Select Board, connect this
terminal to the positive voltage terminal of the code select network to select Code 7.
E CNT8 (TB1-12) Terminal for selecting a code (typically Code 8) to be transmitted to
the EAST. When using the contact closure Code Select Board (P/N 59473-830-01),
connect this terminal through a relay contact or network of relay contacts to E REF
(TB3-11) to select Code 8. When using the DC input Code Select Board, connect this
terminal to the positive voltage terminal of the code select network to select Code 8.
P2160B, Vol.1, Rev. Jan/07
A–4
Alstom Signaling Inc.
Module and Board Reference Data
E RLY+ (TB1-13) EAST Vital Power Controller (VPC) positive voltage terminal (isolated
from the battery) used as the common connection for all EAST decoded output relays.
E C1RLY (TB3-13) Current sink output (active low) to operate a relay when a code
(typically Code 1) is decoded from the EAST. The negative side of the relay coil is
connected to this terminal. The positive side of the relay is connected to
E RLY+ (TB1-13).
E C2RLY (TB3-14) Current sink output (active low) to operate a relay when a code
(typically Code 2) is decoded from the EAST. The negative side of the relay coil is
connected to this terminal. The positive side of the relay is connected to
E RLY+ (TB1-13).
E C3RLY (TB3-15) Current sink output (active low) to operate a relay when a code
(typically Code 3) is decoded from the EAST. The negative side of the relay coil is
connected to this terminal. The positive side of the relay is connected to
E RLY+ (TB1-13).
E C4RLY (TB3-16) Current sink output (active low) to operate a relay when a code
(typically Code 4) is decoded from the EAST. The negative side of the relay coil is
connected to this terminal. The positive side of the relay is connected to
E RLY+ (TB1-13).
E C5RLY (TB2-13) Current sink output (active low) to operate a relay when a code
(typically Code 5) is decoded from the EAST. The negative side of the relay coil is
connected to this terminal. The positive side of the relay is connected to
E RLY+ TB1-13).
E HR / E C6RLY (TB2-14) Current sink output (active low) to operate a relay when A
code is decoded from the EAST. This output is usually used with Code 6 or with an HR
code.
E C7RLY (TB2-15) Current sink output (active low) to operate a relay when a code
(typically Code 7) is decoded from the EAST. The negative side of the relay coil is
connected to this terminal. The positive side of the relay is connected to
E RLY+ (TB1-13).
E C8RLY (TB2-16) Current sink output (active low) to operate a relay when a code
(typically Code 8) is decoded from the EAST. The negative side of the relay coil is
connected to this terminal. The positive side of the relay is connected to
E RLY+ (TB1-13).
P2160B, Vol.1, Rev. Jan/07
A–5
Alstom Signaling Inc.
Module and Board Reference Data
W AUX+ (TB3-7) An Auxiliary I/O board is required for use of this terminal.
•
For Aux I/O #1 or #2: Positive vital input terminal of an isolated two-wire auxiliary
input, typically used for downgrading the signaling system under various conditions,
including switch controllers, slide fences, high water detectors, dragging equipment
detectors, etc. Referenced to W AUX- (TB3-8).
•
For Aux I/O #3: Local one-wire vital input referenced to the WEST Vital Power
Controller (VPC) voltage, W LAMP + (TB1-7).
W AUX- (TB3-8) An Auxiliary I/O board is required for use of this terminal.
•
For Aux I/O #1 or #2: Negative vital input terminal of an isolated two-wire auxiliary
input, typically used for downgrading the signaling system under various conditions,
including switch controllers, slide fences, high water detectors, dragging equipment
detectors, etc.
•
For Aux I/O #3: WEST 250 Hz Cab Signal Output, connected to the CAB terminal
(TB2-5) on 250 Hz Cab Signal Unit for the WEST track circuit.
E AUX+ (TB3-9) An Auxiliary I/O board is required for use of this terminal.
•
For Aux I/O #1 or #2: Positive vital input terminal of an isolated two-wire auxiliary
input, typically used for downgrading the signaling system under various conditions,
including switch controllers, slide fences, high water detectors, dragging equipment
detectors, etc. Referenced to E AUX- (TB3-10).
•
For Aux I/O #3: Local one-wire vital input referenced to the EAST Vital Power
Controller (VPC) voltage, E LAMP + (TB1-10).
E AUX- (TB3-10) An Auxiliary I/O board is required for use of this terminal.
•
For Aux I/O #1 or #2: Negative vital input terminal of an isolated two-wire auxiliary
input, typically used for downgrading the signaling system under various conditions,
including switch controllers, slide fences, high water detectors, dragging equipment
detectors, etc.
•
For Aux I/O #3: EAST 250 Hz Cab Signal Output, connected to the CAB terminal
(TB2-5) on 250 Hz Cab Signal Unit for the EAST track circuit.
P2160B, Vol.1, Rev. Jan/07
A–6
Alstom Signaling Inc.
Module and Board Reference Data
W CAB (TB2-8)
An Auxiliary I/O board is required for use of this terminal.
•
For Aux I/O #1 or #2: This is a current sink (active low) output referenced to the
WEST Vital Power Controller (VPC) voltage, W RLY + (TB1-4). It can also be used
to interface the module with the optional Cab Signal module, by generating the
appropriate coded cab signal rates for the WEST track circuit.
•
For Aux I/O #3: WEST 100 Hz Cab Signal Output, connected to the CAB terminal
(TB2-5) on 100 Hz Cab Signal Unit for WEST track circuit.
E CAB (TB2-9) An Auxiliary I/O board is required for use of this terminal.
•
For Aux I/O #1 or #2: This is a current sink (active low) output referenced to the
EAST Vital Power Controller (VPC) voltage, E RLY + (TB1-13). It can also be used
to interface the module with the optional Cab Signal module, by generating the
appropriate coded cab signal rates for the EAST track circuit.
•
For Aux I/O #3: EAST 100 Hz Cab Signal Output, connected to the CAB terminal
(TB2-5) on 100 Hz Cab Signal Unit for EAST track circuit.
P2160B, Vol.1, Rev. Jan/07
A–7
Alstom Signaling Inc.
Module and Board Reference Data
A.2.2.
4-Track Control Point Module Terminal Definitions (P/N 55899-134-XX)
The 4-Track Control Point module has AAR terminals and Wago blocks. There are three
groups of AAR terminals: TB1, TB2, and TB3, and three groups of Wago blocks: J1, J2,
and J3. A list of all the terminals by function with terminal location in parentheses
follows.
+ (TB1-1) B12 input connection for the positive battery terminal.
- (TB1-2) N12 input connection for the negative battery terminal.
1A TRK+ (TB2-1) Connection to the positive rail of the 1A track.
1A TRK- (TB2-2) Connection to the negative rail of the 1A track.
2A TRK+ (TB2-3) Connection to the positive rail of the 2A track.
2A TRK- (TB2-4) Connection to the negative rail of the 2A track.
3B TRK+ (TB3-1) Connection to the positive rail of the 3B track.
3B TRK- (TB3-2) Connection to the negative rail of the 3B track.
4B TRK+ (TB3-3) Connection to the positive rail of the 4B track.
4B TRK- (TB3-4) Connection to the negative rail of the 4B track.
RTS A (J3-1) “Ready To Send” signal line for the diagnostic/code system serial port of
CPU A.
TX A (J3-2) Transmit signal line for the diagnostic/code system serial port of CPU A.
CTS A (J3-3) “Clear To Send” signal line for the diagnostic/code system serial port of
CPU A.
RX A (J3-4) Receive signal line for the diagnostic/code system serial port of CPU A.
+VSL (J3-5) Positive connection for Vital Serial Link to VPI module.
-VSL (J3-6) Negative connection for Vital Serial Link to VPI module.
RTS B (J3-7) “Ready To Send” signal line for the diagnostic/code system serial port of
CPU B.
TX B (J3-8) Transmit signal line for the diagnostic/code system serial port of CPU B.
CTS B (J3-9) “Clear To Send” signal line for the diagnostic/code system serial port of
CPU B.
P2160B, Vol.1, Rev. Jan/07
A–8
Alstom Signaling Inc.
Module and Board Reference Data
RX B (J3-10) Receive signal line for the diagnostic/code system serial port of CPU B.
NOTE
The following terminals, in positions J1 and J2 are only provided if the 4Track Control Point module is specifically ordered with an Auxiliary I/O
board.
CAB 2A (J1-1) An Auxiliary I/O board is required for use of this terminal.
•
For Aux I/O #1 or #2: This is a current sink (active low) output. It can also be used to
interface the module with the optional Cab Signal module, by generating the
appropriate coded cab signal rates for the 2A track circuit.
CAB 1A (J1-2) An Auxiliary I/O board is required for use of this terminal.
•
For Aux I/O #1 or #2: This is a current sink (active low) output. It can also be used to
interface the module with the optional Cab Signal module, by generating the
appropriate coded cab signal rates for the 1A track circuit.
AUX 1A+ (J1-3) An Auxiliary I/O board is required for use of this terminal.
•
For Aux I/O #1 or #2: Positive vital input terminal of an isolated two-wire auxiliary
input, typically used for downgrading the signaling system under various conditions,
including switch controllers, slide fences, high water detectors, dragging equipment
detectors, etc. Referenced to AUX 1A- (J1-4).
AUX 1A- (J1-4) An Auxiliary I/O board is required for use of this terminal.
•
For Aux I/O #1 or #2: Negative vital input terminal of an isolated two-wire auxiliary
input, typically used for downgrading the signaling system under various conditions,
including switch controllers, slide fences, high water detectors, dragging equipment
detectors, etc.
POW DET A+ (J1-5) An Auxiliary I/O board is required for use of this terminal.
•
Positive input terminal for detection of external (commercial) power. Use of the
power detect differential, non-vital input provides an input to the application logic
indicating the presence or absence of commercial power. This terminal is usually
connected to BX 110.
POW DET A- (J1-6) An Auxiliary I/O board is required for use of this terminal.
•
Negative input terminal for detection of external (commercial) power. Use of the
power detect differential, non-vital input provides an input to the application logic
indicating the presence or absence of commercial power. This terminal is usually
connected to NX 110.
P2160B, Vol.1, Rev. Jan/07
A–9
Alstom Signaling Inc.
Module and Board Reference Data
EXO 1A (J1-7) An Auxiliary I/O board is required for use of this terminal.
•
For Aux I/O #1: Current sink (active low) output.
•
For Aux I/O #2: Non-vital, bi-directional I/O line, which is typically used for double
track approach lighting (not applicable for Control Point).
EXI 1A (J1-8) An Auxiliary I/O board is required for use of this terminal.
•
For Aux I/O #1 or #2: Local one-wire vital input.
EXO 2A (J1-9) An Auxiliary I/O board is required for use of this terminal.
•
For Aux I/O #1: Current sink (active low) output.
•
For Aux I/O #2: Non-vital, bi-directional I/O line, which is typically used for double
track approach lighting (not applicable for Control Point).
EXI 2A (J1-10) An Auxiliary I/O board is required for use of this terminal.
•
For Aux I/O #1 or #2: Local one-wire vital input.
AUX 2A+ (J1-11) An Auxiliary I/O board is required for use of this terminal.
•
For Aux I/O #1 or #2: Positive vital input terminal of an isolated two-wire auxiliary
input, typically used for downgrading the signaling system under various conditions,
including switch controllers, slide fences, high water detectors, dragging equipment
detectors, etc. Referenced to AUX 2A- (J1-12).
AUX 2A- (J1-12) An Auxiliary I/O board is required for use of this terminal.
•
For Aux I/O #1 or #2: Negative vital input terminal of an isolated two-wire auxiliary
input, typically used for downgrading the signaling system under various conditions,
including switch controllers, slide fences, high water detectors, dragging equipment
detectors, etc.
CAB 4B (J2-1) An Auxiliary I/O board is required for use of this terminal.
•
For Aux I/O #1 or #2: This is a current sink (active low) output. It can also be used to
interface the module with the optional Cab Signal module, by generating the
appropriate coded cab signal rates for the 4B track circuit.
CAB 3B (J2-2) An Auxiliary I/O board is required for use of this terminal.
•
For Aux I/O #1 or #2: This is a current sink (active low) output. It can also be used to
interface the module with the optional Cab Signal module, by generating the
appropriate coded cab signal rates for the 3B track circuit.
P2160B, Vol.1, Rev. Jan/07
A–10
Alstom Signaling Inc.
Module and Board Reference Data
AUX 3B+ (J2-3) An Auxiliary I/O board is required for use of this terminal.
•
For Aux I/O #1 or #2: Positive vital input terminal of an isolated two-wire auxiliary
input, typically used for downgrading the signaling system under various conditions,
including switch controllers, slide fences, high water detectors, dragging equipment
detectors, etc. Referenced to AUX 3B- (J2-4).
AUX 3B- (J2-4) An Auxiliary I/O board is required for use of this terminal.
•
For Aux I/O #1 or #2: Negative vital input terminal of an isolated two-wire auxiliary
input, typically used for downgrading the signaling system under various conditions,
including switch controllers, slide fences, high water detectors, dragging equipment
detectors, etc.
POW DET B+ (J2-5) An Auxiliary I/O board is required for use of this terminal.
•
Positive input terminal for detection of external (commercial) power. Use of the
power detect differential, non-vital input provides an input to the application logic
indicating the presence or absence of commercial power. This terminal is usually
connected to BX 110.
POW DET B- (J2-6) An Auxiliary I/O board is required for use of this terminal.
•
Negative input terminal for detection of external (commercial) power. Use of the
power detect differential, non-vital input provides an input to the application logic
indicating the presence or absence of commercial power. This is typically used to
approach light signals when there is a loss of AC power. This terminal is usually
connected to NX 110.
EXO 3B (J2-7) An Auxiliary I/O board is required for use of this terminal.
•
For Aux I/O #1: Current sink (active low) output.
•
For Aux I/O #2: Non-vital, bi-directional I/O line, which is typically used for double
track approach lighting (not applicable for Control Point).
EXI 3B (J2-8) An Auxiliary I/O board is required for use of this terminal.
•
For Aux I/O #1 or #2: Local one-wire vital input.
EXO 4B (J2-9) An Auxiliary I/O board is required for use of this terminal.
•
For Aux I/O #1: Current sink (active low) output.
•
For Aux I/O #2: Non-vital, bi-directional I/O line, which is typically used for double
track approach lighting (not applicable for Control Point).
P2160B, Vol.1, Rev. Jan/07
A–11
Alstom Signaling Inc.
Module and Board Reference Data
EXI 4B (J2-10) An Auxiliary I/O board is required for use of this terminal.
•
For Aux I/O #1 or #2: Local one-wire vital input.
AUX 4B+ (J2-11) An Auxiliary I/O board is required for use of this terminal.
•
For Aux I/O #1 or #2: Positive vital input terminal of an isolated two-wire auxiliary
input, typically used for downgrading the signaling system under various conditions,
including switch controllers, slide fences, high water detectors, dragging equipment
detectors, etc. Referenced to AUX 4B- (J2-12).
AUX 4B- (J2-12) An Auxiliary I/O board is required for use of this terminal.
•
For Aux I/O #1 or #2: Negative vital input terminal of an isolated two-wire auxiliary
input, typically used for downgrading the signaling system under various conditions,
including switch controllers, slide fences, high water detectors, dragging equipment
detectors, etc.
P2160B, Vol.1, Rev. Jan/07
A–12
Alstom Signaling Inc.
Module and Board Reference Data
A.2.3.
4-Track Control Point Module Terminal Definitions (P/N 55899-141-XX)
The 4-Track Control Point module has AAR terminals and Wago blocks. There are three
groups of AAR terminals: TB1, TB2, and TB3, three groups of Wago blocks: J1, J2, and
J3, and four DB9 serial connectors: J4 through J7. A list of all the terminals by function
with terminal location in parentheses follows.
+ (TB1-1) B12 input connection for the positive battery terminal.
- (TB1-2) N12 input connection for the negative battery terminal.
1A TRK+ (TB2-1) Connection to the positive rail of the 1A track.
1A TRK- (TB2-2) Connection to the negative rail of the 1A track.
2A TRK+ (TB2-3) Connection to the positive rail of the 2A track.
2A TRK- (TB2-4) Connection to the negative rail of the 2A track.
3B TRK+ (TB3-1) Connection to the positive rail of the 3B track.
3B TRK- (TB3-2) Connection to the negative rail of the 3B track.
4B TRK+ (TB3-3) Connection to the positive rail of the 4B track.
4B TRK- (TB3-4) Connection to the negative rail of the 4B track.
+VSL (J3-1) Positive connection for Vital Serial Link to VPI module.
-VSL (J3-2) Negative connection for Vital Serial Link to VPI module.
CAB 1A (J1-1) An Auxiliary I/O board is required for use of this terminal.
•
For Aux I/O #1 or #2: This is a current sink (active low) output. It can also be used to
interface the module with the optional Cab Signal module, by generating the
appropriate coded cab signal rates for the 1A track circuit.
CAB 2A (J1-2) An Auxiliary I/O board is required for use of this terminal.
•
For Aux I/O #1 or #2: This is a current sink (active low) output. It can also be used to
interface the module with the optional Cab Signal module, by generating the
appropriate coded cab signal rates for the 2A track circuit.
P2160B, Vol.1, Rev. Jan/07
A–13
Alstom Signaling Inc.
Module and Board Reference Data
AUX 1A+ (J1-3) An Auxiliary I/O board is required for use of this terminal.
•
For Aux I/O #1 or #2: Positive vital input terminal of an isolated two-wire auxiliary
input, typically used for downgrading the signaling system under various conditions,
including switch controllers, slide fences, high water detectors, dragging equipment
detectors, etc. Referenced to AUX 1A- (J1-4).
AUX 1A- (J1-4) An Auxiliary I/O board is required for use of this terminal.
•
For Aux I/O #1 or #2: Negative vital input terminal of an isolated two-wire auxiliary
input, typically used for downgrading the signaling system under various conditions,
including switch controllers, slide fences, high water detectors, dragging equipment
detectors, etc.
AUX 2A+ (J1-5) An Auxiliary I/O board is required for use of this terminal.
•
For Aux I/O #1 or #2: Positive vital input terminal of an isolated two-wire auxiliary
input, typically used for downgrading the signaling system under various conditions,
including switch controllers, slide fences, high water detectors, dragging equipment
detectors, etc. Referenced to AUX 2A- (J1-12).
AUX 2A- (J1-6) An Auxiliary I/O board is required for use of this terminal.
•
For Aux I/O #1 or #2: Negative vital input terminal of an isolated two-wire auxiliary
input, typically used for downgrading the signaling system under various conditions,
including switch controllers, slide fences, high water detectors, dragging equipment
detectors, etc.
+VPC A (J1-7 to J1-12) Vital power controller positive voltage terminal (isolated from
battery).
•
Used as the common connection for all vital inputs and outputs for CPU A.
CAB 3B (J2-1) An Auxiliary I/O board is required for use of this terminal.
•
For Aux I/O #1 or #2: This is a current sink (active low) output. It can also be used to
interface the module with the optional Cab Signal module, by generating the
appropriate coded cab signal rates for the 3B track circuit.
CAB 4B (J2-2) An Auxiliary I/O board is required for use of this terminal.
•
For Aux I/O #1 or #2: This is a current sink (active low) output. It can also be used to
interface the module with the optional Cab Signal module, by generating the
appropriate coded cab signal rates for the 4B track circuit.
P2160B, Vol.1, Rev. Jan/07
A–14
Alstom Signaling Inc.
Module and Board Reference Data
AUX 3B+ (J2-3) An Auxiliary I/O board is required for use of this terminal.
•
For Aux I/O #1 or #2: Positive vital input terminal of an isolated two-wire auxiliary
input, typically used for downgrading the signaling system under various conditions,
including switch controllers, slide fences, high water detectors, dragging equipment
detectors, etc. Referenced to AUX 3B- (J2-4).
AUX 3B- (J2-4) An Auxiliary I/O board is required for use of this terminal.
•
For Aux I/O #1 or #2: Negative vital input terminal of an isolated two-wire auxiliary
input, typically used for downgrading the signaling system under various conditions,
including switch controllers, slide fences, high water detectors, dragging equipment
detectors, etc.
AUX 4B+ (J2-5) An Auxiliary I/O board is required for use of this terminal.
•
For Aux I/O #1 or #2: Positive vital input terminal of an isolated two-wire auxiliary
input, typically used for downgrading the signaling system under various conditions,
including switch controllers, slide fences, high water detectors, dragging equipment
detectors, etc. Referenced to AUX 4B- (J2-12).
AUX 4B- (J2-6) An Auxiliary I/O board is required for use of this terminal.
•
For Aux I/O #1 or #2: Negative vital input terminal of an isolated two-wire auxiliary
input, typically used for downgrading the signaling system under various conditions,
including switch controllers, slide fences, high water detectors, dragging equipment
detectors, etc.
+VPC B (F2-7 t o J2-12) Vital power controller positive voltage terminal (isolated from
battery).
•
Used as the common connection for all vital inputs and outputs for CPU B.
J4 CPU A serial port
•
Same as serial port on front edge of CPU A.
J5 CPU B serial port
•
Same as serial port on front edge of CPU B.
J6, J7 Reserved for future use.
P2160B, Vol.1, Rev. Jan/07
A–15
Alstom Signaling Inc.
Module and Board Reference Data
A.2.4.
Intermediate Module Terminal Definitions
The Intermediate module has 48 AAR terminals arranged in three rows of 16. The rows
are identified as TB1, TB2, or TB3. Row TB1 being the B1 bottom most row. Since the
Intermediate module is used for driving both searchlight and colorlight signals, 12 of the
terminals have two sets of nomenclature. A list of all the terminals by function and the
terminal location in parentheses follows.
B (TB1-1) B12 input connection for the positive battery terminal.
N (TB1-16) N12 input connection for the negative battery terminal.
WEST TK+ (TB1-2) Connection to the positive rail of the WEST track.
WEST TK- (TB1-3) Connection to the negative rail of the WEST track.
WEST LAMP + (TB1-7) WEST Vital Power Controller (VPC) positive voltage terminal
(isolated from the battery) used as the common connection for all WEST lamps
(searchlight or colorlight).
WA SEARCHLIGHT + COIL / WEST COLORLIGHTS LAMP 1W (TB2-4) The function
of this terminal depends on the type of signal driven. For searchlight operation, this
terminal is the positive coil connection for the WEST A signal mechanism. For color light
operation, this terminal is a current sink output (active low) for one of six lamps for the
WEST signal. Typically, this is the GREEN lamp in the A signal head for the WEST
direction. One side of the lamp is connected to this terminal. The other side of the lamp
is connected to WEST LAMP + (TB1-7)
WA SEARCHLIGHT - COIL / WEST COLORLIGHTS LAMP 2W (TB2-5) The function
of this terminal depends on the type of signal driven. For searchlight operation, this
terminal is the negative coil connection for the WEST A signal mechanism. For color
light operation, this terminal is a current sink output (active low) for one of six lamps for
the WEST signal. Typically, this is the YELLOW lamp in the A signal head for the WEST
direction. One side of the lamp is connected to this terminal. The other side of the lamp
is connected to WEST LAMP + (TB1-7).
WA SEARCHLIGHT LAMP / WEST COLORLIGHTS LAMP 3W (TB2-6) The function
of this terminal depends on the type of signal driven. For searchlight operation, this
terminal is a current sink output (active low) for the WEST A signal lamp. For color light
operation, this terminal is a current sink output (active low) for one of six lamps for the
WEST signal. Typically, this is the RED lamp in the A signal head for the WEST
direction. One side of the lamp is connected to this terminal. The other side of the lamp
is connected to WEST LAMP + (TB1-7).
P2160B, Vol.1, Rev. Jan/07
A–16
Alstom Signaling Inc.
Module and Board Reference Data
WB SEARCHLIGHT + COIL / WEST COLORLIGHTS LAMP 4W (TB1-4) The function
of this terminal depends on the type of signal driven. For searchlight operation, this
terminal is the positive coil connection for the WEST B signal mechanism. For color light
operation, this terminal is a current sink output (active low) for one of six lamps for the
WEST signal. Typically, this is the GREEN lamp in the B signal head for the WEST
direction. One side of the lamp is connected to this terminal. The other side of the lamp
is connected to WEST LAMP + (TB1-7).
WB SEARCHLIGHT - COIL / WEST COLORLIGHTS LAMP 5W (TB1-5) The function
of this terminal depends on the type of signal driven. For searchlight operation, this
terminal is the negative coil connection for the WEST B signal mechanism. For color
light operation, this terminal is a current sink output (active low) for one of six lamps for
the WEST signal. Typically, this is the YELLOW lamp in the B signal head for the WEST
direction. One side of the lamp is connected to this terminal. The other side of the lamp
is connected to WEST LAMP + (TB1-7).
WB SEARCHLIGHT LAMP / WEST COLORLIGHTS LAMP 6W (TB1-6) The function
of this terminal depends on the type of signal driven. For searchlight operation, this
terminal is a current sink output (active low) for the WEST B signal lamp. For color light
operation, this terminal is a current sink output (active low) for one of six lamps for the
WEST signal. Typically, this is the RED lamp in the B signal head for the WEST
direction. One side of the lamp is connected to this terminal. The other side of the lamp
is connected to WEST LAMP + (TB1-7).
WA SEARCHLIGHT WA RG (TB3-1) The function of this terminal depends on the type
of signal driven. For searchlight operation, this terminal is a vital input typically from the
WEST A signal mechanism. Connect it to the mechanism, usually to the RED position
contact. Then, a nominal +12 V DC (reference to the battery N) is present if the
mechanism is in the RED position. Then if the voltage is not present, Genrakode II
interprets the missing input as a stuck mechanism, and the application can use this
indication to downgrade the signaling system For color light operation, this terminal is
unused and no connection is required.
WA SEARCHLIGHT WA HG (TB3-2) The function of this terminal depends on the type
of signal driven. For searchlight operation, this terminal is a vital input typically from the
WEST A signal mechanism. Connect it to the mechanism, usually to the YELLOW
position contact. Then, a nominal +12 V DC (reference to the battery N) is present if the
mechanism is in the YELLOW position. Then if the voltage is not present, Genrakode II
interprets the missing input as a stuck mechanism, and the application can use this
indication to downgrade the signaling system. For color light operation, this terminal is
unused and no connection is required.
P2160B, Vol.1, Rev. Jan/07
A–17
Alstom Signaling Inc.
Module and Board Reference Data
WA SEARCHLIGHT WA DG (TB3-3) The function of this terminal depends on the type
of signal driven. For searchlight operation, this terminal is a vital input typically from the
WEST A signal mechanism. Connect it to the mechanism, usually to the GREEN
position contact. Then, a nominal +12 V DC (reference to the battery N) is present if the
mechanism is in the GREEN position. Then if the voltage is not present, Genrakode II
interprets the missing input as a stuck mechanism, and the application can use this
indication to downgrade the signaling system. For color light operation, this terminal is
unused and no connection is required.
WB SEARCHLIGHT WB RG (TB2-1) The function of this terminal depends on the type
of signal driven. For searchlight operation, this terminal is a vital input typically from the
WEST B signal mechanism. Connect it to the mechanism, usually to the RED position
contact. Then, a nominal +12 V DC (reference to the battery N) is present if the
mechanism is in the RED position. Then if the voltage is not present, Genrakode II
interprets the missing input as a stuck mechanism, and the application can use this
indication to downgrade the signaling system. For color light operation, this terminal is
unused and no connection is required.
WB SEARCHLIGHT WB HG (TB2-2) The function of this terminal depends on the type
of signal driven. For searchlight operation, this terminal is a vital input typically from the
WEST B signal mechanism. Connect it to the mechanism, usually to the YELLOW
position contact. Then, a nominal +12 V DC (reference to the battery N) is present if the
mechanism is in the YELLOW position. Then if the voltage is not present, Genrakode II
interprets the missing input as a stuck mechanism, and the application can use this
indication to downgrade the signaling system. For color light operation, this terminal is
unused and no connection is required.
WB SEARCHLIGHT WB DG (TB2-3) The function of this terminal depends on the type
of signal driven. For searchlight operation, this terminal is a vital input typically from the
WEST B signal mechanism. Connect it to the mechanism, usually to the GREEN
position contact. Then, a nominal +12 V DC (reference to the battery N) is present if the
mechanism is in the GREEN position. Then if the voltage is not present, Genrakode II
interprets the missing input as a stuck mechanism, and the application can use this
indication to downgrade the signaling system For color light operation, this terminal is
unused and no connection is required.
EAST TK+ (TB1-14) Connection to the positive rail of the EAST track.
EAST TK- (TB1-15) Connection to the negative rail of the EAST track.
EAST LAMP + (TB1-10) EAST Vital Power Controller (VPC) positive voltage terminal
(isolated from the battery) used as the common connection for all EAST lamps
(searchlight or colorlight).
P2160B, Vol.1, Rev. Jan/07
A–18
Alstom Signaling Inc.
Module and Board Reference Data
EA SEARCHLIGHT + COIL / EAST COLORLIGHTS LAMP 1E (TB2-11) The function
of this terminal depends on the type of signal driven For searchlight operation, this
terminal is the positive coil connection for the EAST A signal mechanism. For color light
operation, this terminal is a current sink output (active low) for one of six lamps for the
EAST signal. Typically, this is the GREEN lamp in the A signal head for the EAST
direction. One side of the lamp is connected to this terminal. The other side of the lamp
is connected to EAST LAMP + (TB1-10).
EA SEARCHLIGHT - COIL / EAST COLORLIGHTS LAMP 2E (TB2-12) The function of
this terminal depends on the type of signal driven For searchlight operation, this
terminal is the negative coil connection for the EAST A signal mechanism. For color
light operation, this terminal is a current sink output (active low) for one of six lamps for
the EAST signal. Typically, this is the YELLOW lamp in the A signal head for the EAST
direction. One side of the lamp is connected to this terminal. The other side of the lamp
is connected to EAST LAMP + (TB1-10).
EA SEARCHLIGHT LAMP / EAST COLORLIGHTS LAMP 3E (TB2-13) The function of
this terminal depends on the type of signal driven For searchlight operation, this
terminal is a current sink output (active low) for the EAST A signal lamp. For color light
operation, this terminal is a current sink output (active low) for one of six lamps for the
EAST signal. Typically, this is the RED lamp in the A signal head for the EAST direction.
One side of the lamp is connected to this terminal. The other side of the lamp is
connected to EAST LAMP + (TB1-10).
EB SEARCHLIGHT + COIL / EAST COLORLIGHTS LAMP 4E (TB1-11) The function
of this terminal depends on the type of signal driven For searchlight operation, this
terminal is the positive coil connection for the EAST B signal mechanism. For color light
operation, this terminal is a current sink output (active low) for one of six lamps for the
EAST signal. Typically, this is the GREEN lamp in the B signal head for the EAST
direction. One side of the lamp is connected to this terminal. The other side of the lamp
is connected to EAST LAMP + (TB1-10).
EB SEARCHLIGHT - COIL / EAST COLORLIGHTS LAMP 5E (TB1-12) The function of
this terminal depends on the type of signal driven For searchlight operation, this
terminal is the negative coil connection for the EAST B signal mechanism. For color
light operation, this terminal is a current sink output (active low) for one of six lamps for
the EAST signal. Typically, this is the YELLOW lamp in the B signal head for the EAST
direction. One side of the lamp is connected to this terminal. The other side of the lamp
is connected to EAST LAMP + (TB1-10).
EB SEARCHLIGHT LAMP / EAST COLORLIGHTS LAMP 6E (TB1-13) The function of
this terminal depends on the type of signal driven For searchlight operation, this
terminal is a current sink output (active low) for the EAST B signal lamp. For color light
operation, this terminal is a current sink output (active low) for one of six lamps for the
EAST signal. Typically, this is the RED lamp in the B signal head for the EAST direction.
One side of the lamp is connected to this terminal. The other side of the lamp is
connected to EAST LAMP + (TB1-10).
P2160B, Vol.1, Rev. Jan/07
A–19
Alstom Signaling Inc.
Module and Board Reference Data
EA SEARCHLIGHT EA RG (TB3-14) The function of this terminal depends on the type
of signal driven For searchlight operation, this terminal is a vital input typically from the
EAST A signal mechanism. Connect it to the mechanism, usually to the RED position
contact. Then, a nominal +12 V DC (reference to the battery N) is present if the
mechanism is in the RED position. Then if the voltage is not present, Genrakode II
interprets the missing input as a stuck mechanism, and the application can use this
indication to downgrade the signaling system For color light operation, this terminal is
unused and no connection is required.
EA SEARCHLIGHT EA HG (TB3-15) The function of this terminal depends on the type
of signal driven For searchlight operation, this terminal is a vital input typically from the
EAST A signal mechanism. Connect it to the mechanism, usually to the YELLOW
position contact. Then, a nominal +12 V DC (reference to the battery N) is present if the
mechanism is in the YELLOW position. Then if the voltage is not present, Genrakode II
interprets the missing input as a stuck mechanism, and the application can use this
indication to downgrade the signaling system For color light operation, this terminal is
unused and no connection is required.
EA SEARCHLIGHT EA DG (TB3-16) The function of this terminal depends on the type
of signal driven For searchlight operation, this terminal is a vital input typically from the
EAST A signal mechanism. Connect it to the mechanism, usually to the GREEN
position contact. Then, a nominal +12 V DC (reference to the battery N) is present if the
mechanism is in the GREEN position. Then if the voltage is not present, Genrakode II
interprets the missing input as a stuck mechanism, and the application can use this
indication to downgrade the signaling system For color light operation, this terminal is
unused and no connection is required.
EB SEARCHLIGHT EB RG (TB2-14) The function of this terminal depends on the type
of signal driven For searchlight operation, this terminal is a vital input typically from the
EAST B signal mechanism. Connect it to the mechanism, usually to the RED position
contact. Then, a nominal +12 V DC (reference to the battery N) is present if the
mechanism is in the RED position. Then if the voltage is not present, Genrakode II
interprets the missing input as a stuck mechanism, and the application can use this
indication to downgrade the signaling system. For color light operation, this terminal is
unused and no connection is required.
EB SEARCHLIGHT EB HG (TB2-15) The function of this terminal depends on the type
of signal driven For searchlight operation, this terminal is a vital input typically from the
EAST B signal mechanism. Connect it to the mechanism, usually to the YELLOW
position contact. Then, a nominal +12 V DC (reference to the battery N) is present if the
mechanism is in the YELLOW position. Then if the voltage is not present, Genrakode II
interprets the missing input as a stuck mechanism, and the application can use this
indication to downgrade the signaling system. For color light operation, this terminal is
unused and no connection is required.
P2160B, Vol.1, Rev. Jan/07
A–20
Alstom Signaling Inc.
Module and Board Reference Data
EB SEARCHLIGHT EB DG (TB2-16) The function of this terminal depends on the type
of signal driven For searchlight operation, this terminal is a vital input typically from the
EAST B signal mechanism. Connect it to the mechanism, usually to the GREEN
position contact. Then, a nominal +12 V DC (reference to the battery N) is present if the
mechanism is in the GREEN position. Then if the voltage is not present, Genrakode II
interprets the missing input as a stuck mechanism, and the application can use this
indication to downgrade the signaling system. For color light operation, this terminal is
unused and no connection is required.
POWER DETECT + (TB2-8) An Auxiliary I/O board is required for use of this terminal.
Positive input terminal for detection of external (commercial) power. Use of the power
detect differential, non-vital input provides an input to the application logic indicating the
presence or absence of commercial power. This is typically used to approach light
signals when there is a loss of AC power. This terminal is usually connected to BX 110.
POWER DETECT - (TB2-9) An Auxiliary I/O board is required for use of this terminal.
Negative input terminal for detection of external (commercial) power. Use of the power
detect differential, non-vital input provides an input to the application logic indicating the
presence or absence of commercial power. This is typically used to approach light
signals when there is a loss of AC power. This terminal is usually connected to NX 110.
W EX I (TB3-4) An Auxiliary I/O board is required for use of this terminal.
•
For Aux I/O #1 or #2: Local one-wire vital input referenced to the WEST Vital Power
Controller (VPC) voltage, W LAMP + (TB1-7).
•
For Aux I/O #3: WEST Track Relay (CODE 1) Output. Connect the negative side of
relay to this terminal and positive side of relay to W LAMP+ (TB1-7).
W EX O (TB3-5) An Auxiliary I/O board is required for use of this terminal.
•
For Aux I/O #1: Current sink (active low) output referenced to the WEST Vital Power
Controller (VPC) voltage, W LAMP + (TB1-7).
•
For Aux I/O #2 or #3: Non-vital, bi-directional I/O line, which is typically used for
double track approach lighting of the Westbound signal (WDTA).
W AUX+ (TB3-7) An Auxiliary I/O board is required for use of this terminal.
•
For Aux I/O #1 or #2: Positive vital input terminal of an isolated two-wire auxiliary
input, typically used for downgrading the signaling system under various conditions,
including switch controllers, slide fences, high water detectors, dragging equipment
detectors, etc. Referenced to W AUX- (TB3-8).
•
For Aux I/O #3: Local one-wire vital input referenced to the WEST Vital Power
Controller (VPC) voltage, W LAMP + (TB1-7).
P2160B, Vol.1, Rev. Jan/07
A–21
Alstom Signaling Inc.
Module and Board Reference Data
W AUX- (TB3-8) An Auxiliary I/O board is required for use of this terminal.
•
For Aux I/O #1 or #2: Negative vital input terminal of an isolated two-wire auxiliary
input, typically used for downgrading the signaling system under various conditions,
including switch controllers, slide fences, high water detectors, dragging equipment
detectors, etc.
•
For Aux I/O #3: WEST 250 Hz Cab Signal Output, connected to the CAB terminal
(TB2-5) on 250 Hz Cab Signal Unit for the WEST track circuit.
W CAB (TB3-6) An Auxiliary I/O board is required for use of this terminal.
•
For Aux I/O #1 or #2: This is a current sink (active low) output referenced to the
WEST Vital Power Controller (VPC) voltage, W LAMP + (TB1-7). It can also be used
to interface the module with the optional Cab Signal module, by generating the
appropriate coded cab signal rates for the WEST track circuit.
•
For Aux I/O #3: WEST 100 Hz Cab Signal Output, connected to the CAB terminal
(TB2-5) on 100 Hz Cab Signal Unit for WEST track circuit.
E EX I (TB3-11) An Auxiliary I/O board is required for use of this terminal.
•
For Aux I/O #1 or #2: Local one-wire vital input referenced to the EAST Vital Power
Controller (VPC) voltage, E LAMP + (TB1-10).
•
For Aux I/O #3: EAST Track Relay (CODE 1) Output. Connect the negative side of
relay to this terminal and positive side of relay to E LAMP+ (TB1-10).
E EX O (TB3-12) An Auxiliary I/O board is required for use of this terminal.
•
For Aux I/O #1: Current sink (active low) output referenced to the EAST Vital Power
Controller (VPC) voltage, E LAMP + (TB1-10).
•
For Aux I/O #2 or #3: Non-vital, bi-directional I/O line, which is typically used for
double track approach lighting of the Eastbound signal (EDTA).
E AUX+ (TB3-9) An Auxiliary I/O board is required for use of this terminal.
•
For Aux I/O #1 or #2: Positive vital input terminal of an isolated two-wire auxiliary
input, typically used for downgrading the signaling system under various conditions,
including switch controllers, slide fences, high water detectors, dragging equipment
detectors, etc. Referenced to E AUX- (TB3-10).
•
For Aux I/O #3: Local one-wire vital input referenced to the EAST Vital Power
Controller (VPC) voltage, E LAMP + (TB1-10).
P2160B, Vol.1, Rev. Jan/07
A–22
Alstom Signaling Inc.
Module and Board Reference Data
E AUX- (TB3-10) An Auxiliary I/O board is required for use of this terminal.
•
For Aux I/O #1 or #2: Negative vital input terminal of an isolated two-wire auxiliary
input, typically used for downgrading the signaling system under various conditions,
including switch controllers, slide fences, high water detectors, dragging equipment
detectors, etc.
•
For Aux I/O #3: EAST 250 Hz Cab Signal Output, connected to the CAB terminal
(TB2-5) on 250 Hz Cab Signal Unit for the EAST track circuit.
E CAB (TB3-13) An Auxiliary I/O board is required for use of this terminal.
•
For Aux I/O #1 or #2: This is a current sink (active low) output referenced to the
EAST Vital Power Controller (VPC) voltage, E LAMP + (TB1-10). It can also be used
to interface the module with the optional Cab Signal module, by generating the
appropriate coded cab signal rates for the EAST track circuit.
•
For Aux I/O #3: EAST 100 Hz Cab Signal Output, connected to the CAB terminal
(TB2-5) on 100 Hz Cab Signal Unit for EAST track circuit.
GND-1 (TB1-8) Primary ground connection required when the power supply/ground
fault monitor board (P/N 31166-338-01) is used.
GND-2(TB1-9) Secondary ground connection required when the power supply/ground
fault monitor board (P/N 31166-338-01) is used.
(TB2-7) Unused terminal. No connection required.
(TB2-10) Unused terminal. No connection required.
P2160B, Vol.1, Rev. Jan/07
A–23
Alstom Signaling Inc.
Module and Board Reference Data
A.2.5.
Repeater Module Terminal Definitions
A Repeater module can use either a Control Point chassis or an Intermediate chassis.
In a Control Point chassis, the Repeater module uses the same AAR terminal
arrangement as the chassis it occupies. See the previous discussions on the Control
Point and Intermediate Modules for terminal definitions.
In a Control Point chassis, a Repeater module uses the following terminals:
•
B (TB1-1)
•
N (TB1-16)
•
W TK+ (TB1-2)
•
W TK- (TB1-3)
•
W RLY+ (TB1-4)
•
E TK+ (TB1-14)
•
E TK- (TB1-15)
•
E RLY+ (TB1-13)
•
W AUX+ (TB3-7)
•
W AUX- (TB3-8)
•
E AUX+ (TB3-9)
•
E AUX- (TB3-10)
•
W CAB (TB2-8)
•
E CAB (TB2-9)
P2160B, Vol.1, Rev. Jan/07
A–24
Alstom Signaling Inc.
Module and Board Reference Data
In an Intermediate chassis, a Repeater module uses the following terminals:
•
B (TB1-1)
•
N (TB1-16)
•
W TK+ (TB1-2)
•
W TK- (TB1-3)
•
W LAMP+ (TB1-7)
•
E TK+ (TB1-14)
•
E TK- (TB1-15)
•
E LAMP+ (TB1-10)
•
W AUX+ (TB3-7)
•
W AUX- (TB3-8)
•
E AUX+ (TB3-9)
•
E AUX- (TB3-10)
•
W CAB (TB3-6)
•
E CAB (TB3-13)
P2160B, Vol.1, Rev. Jan/07
A–25
Alstom Signaling Inc.
Module and Board Reference Data
A.2.6.
Switch Lock Module Terminal Definitions
The Switch Lock Module has 32 AAR terminals arranged in two rows of 16. The rows
are identified as TB1 or TB2. Row TB1 is the bottom most row. A list of all the terminals
by function and terminal location in parentheses follows.
B (TB1-1) B12 input connection for the positive battery terminal.
N (TB1-16) N12 input connection for the negative battery terminal.
WEST TK+ (TB1-2) Connection to the positive rail of the WEST track.
WEST TK- (TB1-3) Connection to the negative rail of the WEST track.
+ VPC (TB1-7) Vital Power Controller (VPC) positive voltage terminal (isolated from the
battery ) used as the common connection for all outputs (Lock Relay, Overlay Relay,
Lamp Output, EAST and WEST Auxiliary Outputs (if used) and Auxiliary Inputs EEXI
and WEXI (if used) ).
PBKE LMP OUT (TB1-6) Current sink (active low) output referenced to the Vital Power
Controller (VPC) voltage, + VPC (TB1-7). Typical application is connect this terminal to
a lamp which is used to indicate that the unlock relay is energized.
LK RLY OUT (TB1-5) Current sink (active low) output referenced to the Vital Power
Controller (VPC) voltage, + VPC (TB1-7). This terminal is typically used to energize the
lock coil in the switch lock mechanism.
OUTPUT (TB2-6) Current sink (active low) output referenced to the Vital Power
Controller (VPC) voltage, + VPC (TB1-7). This terminal can be used to energize a relay
for any generic application requirement.
OL RLY OUT (TB2-7) Current sink (active low) output referenced to the Vital Power
Controller (VPC) voltage, + VPC (TB1-7). This terminal can be used to energize a relay
to indicate the status of the internal overlay. Typical application is to energize this output
if the internal overlay is shunted.
UNL REQ INP (TB1-4) Single-wire input from positive battery voltage, B (TB1-1)
typically used to indicate a request has been made to unlock the switch lock
mechanism. A positive input is present to indicate an unlock request.
+NWP (TB2-2) Positive input terminal of an isolated two-wire input typically used for
switch circuit controller indication. Referenced to -NWP (TB2-3).
-NWP (TB2-3) Negative input terminal of an isolated two-wire input typically used for
switch circuit controller indication.
P2160B, Vol.1, Rev. Jan/07
A–26
Alstom Signaling Inc.
Module and Board Reference Data
+RMTE OL (TB2-4) Positive input terminal of an isolated two-wire input typically used to
indicate occupancy when an external overlay is used (referenced to -RMTE OL (TB2-5).
There is no connection to this terminal when the remote overlay is not used.
-RMTE OL (TB2-5) Negative input terminal of an isolated two-wire input typically used
to indicate occupancy when an external overlay is used. This input is connected to
negative energy referenced to +RMTE OL (TB2-4). There is no connection to this
terminal when the remote overlay is not used.
EAST TK+ (TB1-14) Connection to the positive rail of the EAST track.
EAST TK- (TB1-15) Connection to the negative rail of the EAST track.
OL/XMIT+ (TB1-10) No connection.
OL/XMIT- (TB1-11) No connection.
SERIES (OL RCVR) TK+ (TB1-12) Connection to the positive rail for Series Overlay.
When the Series Overlay is used, connect to EAST TK+ (TB1-14) or
WEST TK+, (TB1-2).
SERIES (OL RCVR) TK- (TB1-13) Connection to the negative rail for Series Overlay.
When the Series Overlay is used, connect to EAST TK- (TB1-15) or
WEST TK-, (TB1-3).
W EX I (TB2-9) Local one-wire input. This terminal is normally unused and is provided
for special signaling applications that may arise in the future. For normal application, no
connection is required. When used, the input voltage must originate from
+ VPC (TB1-7).
W EX O (TB2-8) Current sink (active low) output referenced to WEST Vital Power
Controller (VPC) voltage, + VPC (TB1-7). This terminal is normally unused and is
provided for special signaling applications that may arise in the future.
W AUX+ (TB2-10) Positive input terminal of an isolated two-wire auxiliary input for
downgrading the signaling system under various conditions. Typical applications include
switch controllers, slide fences, high water detectors, dragging equipment detectors,
etc. Referenced to W AUX- (TB2-11).
W AUX- (TB2-11) Negative input terminal of an isolated two-wire auxiliary input for
downgrading the signaling system under various conditions. Typical applications include
switch controllers, slide fences, high water detectors, dragging equipment detectors,
etc.
W CAB (TB1-8) Current sink (active low) output used to interface the Switch Lock
Module to the optional Cab Signal Module. This output generates the appropriate coded
cab signal rates for the WEST track circuit. This output is referenced to WEST Vital
Power Controller (VPC) voltage, + VPC (TB1-7).
P2160B, Vol.1, Rev. Jan/07
A–27
Alstom Signaling Inc.
Module and Board Reference Data
E EX I (TB2-13) Local one-wire input. This terminal is normally unused and is provided
for special signaling applications that may arise in the future. For normal application, no
connection is required. When used, the input voltage must originate from + VPC (TB17).
E EX O (TB2-12) Current sink (active low) output referenced to EAST Vital Power
Controller (VPC) voltage, + VPC (TB1-7). This terminal is normally unused and is
provided for special signaling applications that may arise in the future.
E AUX+ (TB2-14) Positive input terminal of an isolated two-wire auxiliary input for
downgrading the signaling system under various conditions. Typical applications include
switch controllers, slide fences, high water detectors, dragging equipment detectors,
etc. Referenced to E AUX- (TB2-15).
E AUX- (TB2-15) Negative input terminal of an isolated two-wire auxiliary input for
downgrading the signaling system under various conditions. Typical applications include
switch controllers, slide fences, high water detectors, dragging equipment detectors,
etc.
E CAB (TB1-9) Current sink (active low) output used to interface the Repeater Module
to the optional CAB SIGNAL module. This output generates the appropriate coded cab
signal rates for the EAST track circuit. This output is referenced to Vital Power
Controller (VPC) voltage, + VPC (TB1-7).
(TB2-1) Unused terminal. No connection required.
(TB2-16) Unused terminal. No connection required
P2160B, Vol.1, Rev. Jan/07
A–28
Alstom Signaling Inc.
Module and Board Reference Data
A.2.7.
Cab Signal Module Terminal Definitions
The Cab Signal module has 12 AAR terminals arranged in two rows of six. A list of all
terminals by function, followed by the terminal location in parentheses follows.
B (TB2-6) Positive terminal for primary battery power, nominally 12 Volts.
N (TB1-6) Negative terminal for primary battery power.
VPC (TB2-4) Positive VPC voltage input from the Genrakode II track module which is
used as the modulator power source (W RLY+ / W LAMP+ or E RLY+ / E LAMP+).
CAB (TB2-5) Negative VPC voltage input from the Genrakode II track module that is
modulated at the cab rate (Aux I/O E CAB or W CAB outputs).
GKODE+ (TB2-2) Positive track input from the Genrakode II track module.
GKODE- (TB2-3) Negative track input from the Genrakode II track module.
TK+ (TB2-1) Positive output/input connection to track.
TK- (TB1-1) Negative output/input connection to track.
100% (TB1-2) Transformer output terminal to be jumpered to the TK- terminal for 100%
cab signal output.
80% (TB1-3) Transformer output terminal to be jumpered to the TK- terminal for 80%
cab signal output.
50% (TB1-4) Transformer output terminal to be jumpered to the TK- terminal for 50%
cab signal output.
25% (TB1-5) Transformer output terminal to be jumpered to the TK- terminal for 25%
cab signal output.
P2160B, Vol.1, Rev. Jan/07
A–29
Alstom Signaling Inc.
Module and Board Reference Data
A.3.
SWITCH LOCK MODULE UNLOCK CODE SELECTION
There are two groups of jumper sockets for both directions EAST and WEST. There has
to be one jumper installed for each direction. The jumper sockets are labeled on the
Switch Lock I/O board as:
WEST:
EAST:
A - 8,2,3,4,7
A - 8,2,3,4,7
B - 2,3,4,7
B - 2,3,4,7
C - 3,4,7
C - 3,4,7
D - 4,7
D - 4,7
E-7
E-7
For example, if:
•
in response to an unlock request for a siding to mainline move and
•
the lock is to be released without running time when codes 4 or 7 are received from
the WEST and
•
codes 3, 4 or 7 are received from the EAST,
•
then a jumper is placed in the D slot for the WEST and another in the C slot for the
EAST.
Typical Switch Lock application logic for a siding to mainline move specifies that if
unlock (UC) codes are received from both directions then the lock relay is energized
after tumble down is transmitted in both directions and some short timer has expired.
P2160B, Vol.1, Rev. Jan/07
A–30
Alstom Signaling Inc.
Module and Board Reference Data
A.3.1.
Interpreting Switch Lock I/O LEDs
There are three groups of LEDs on the Switch Lock I/O Board.
The first group is located about two inches from the edge of the board and is used to
indicate the status of the three inputs. These LEDs is on whenever there is energy on
the corresponding input. Input LEDs are designated as follows:
PC Board Label
Function
Location
UN. REQ.
Unlock Request input
--top LED--
NWP
NWP Input
RMTE. OL.
Remote Overlay input
--bottom LED--
The next group contains four LEDs; they identify the states of the outputs. When one of
these LEDs is on, it means the CPU has energized the corresponding output.
PC Board Label
Function
Location
LR
Lock Relay Output
--top LED--
OL
Overlay Relay Output
OT
Output Relay Output
LP
Lamp Output
--bottom LED--
The third group is located on bottom of the board by the edge and is used for LC/UC
indication and short timer status.
NOTE
These LEDs are not currently used in the Genrakode II system.
PC Board Label
Function
Location
WA
WEST LC code received
--top LED--
WB
WEST UC code received
EA
EAST LC code received
EB
EAST UC code received
ST
P2160B, Vol.1, Rev. Jan/07
Short timer
A–31
--bottom LED--
Alstom Signaling Inc.
Module and Board Reference Data
The LEDs indicate the following:
WA-on, WB-off:
WEST LC code received.
WA-off, WB-on:
WEST UC code received.
WA-on, WB-on:
No vital codes (8,2,3,4,7) received from WEST.
EA-on, EB-off:
EAST LC code received.
EA-off, EB-on:
EAST UC code received.
EA-on, EB-on:
No vital codes (8,2,3,4,7) received from EAST.
ST-off:
Short timer is reset (not currently supported in Genrakode II)
ST-flashing:
Short timer is running (not currently supported in Genrakode II)
ST-on:
Short timer has expired (not currently supported in Genrakode II)
P2160B, Vol.1, Rev. Jan/07
A–32
Alstom Signaling Inc.
P2160B, Vol.1, Rev. Jan/07
A–33
TRACK
1
TRACK
1
SINGLE
TRACK
(1)T
(2)H
(4)D
E
B
A
D C
T(1)
R/R
R/G
Y/R
G/R
G/R
R
EA SIG
H(2) R/R
Y/R
R
D(4)
R/G
R/R
R/Y
EB SIG
1E - W
TE
TRACK 1
N
N
R
N
N
SW
W
SIG
SW
(2)H
(1)T
+ -
(1)T
SW. LOCK
&
REP. CUT
D(4)
N
N
N
N
SW
N
N
N
SW
SW. LOCK
&
REP. CUT
H(2)
BK(5)
(3)BD
(4)AD
W
+ -
A
B
(S ) R/R
Y/R
Y/G
G/R
BK(5)
H(2)
D(4)
WBE
A
B
W
SW
(5)BK
N
SW
(2)H
N
(4)D
N
W
SIG
N
R(S )
Y
N
G
N
E
SIG
+ E
+ -
E
+ -
LOC. 4
(5)BK
(2)H
(4)D
REP. CUT
BK(5)
H(2)
D(4)
REP. CUT
+ -
LOC. 5
+ -
(5)BK
(5)BK
(2)H
(4)D
W SIG
(S ) R
(2)H
Y
(4)D
G
E SIG
B
A
N
N
SW
R
R
N/R
N
N
SH
R
R
A
B
W
W
TRACK 2
TRACK 1
AH(2)
AD(4)
ABK(5)
BH(2)
BD(4)
BBK(5)
1 WBE
WD SIG
R/R (2)H
R/Y (3)D
R/G
(1)T
(1)T
WA SIG
(2)H
(4)D
R/R
Y/R
G/R
R/Y
R/G
R/R
Y/R
G/R
C D
LOC. 1
E SIG
E
E SIG
T(1)
Y/G BD(3)
T(1)
BD(3)
Y/R AH(2)
G/R AD(4)
BK(5)
AH(2)
AD(4)
R/R (S )
D(4)
W SIG
H(2)
E SIG
EBE
+ E
B
A
LOC. 2
LOC. 3
+ -
LOC. 6
TRACK
2
TRACK
1
TRACK
2
TRACK
1
DOUBLE
TRACK
A.4.
+ -
LOC. 7
Module and Board Reference Data
TYPICAL APPLICATION CIRCUITS
Figure A–1. Track Layout Example: Code and Aspect Chart
Alstom Signaling Inc.
Module and Board Reference Data
LOC. 1
A B
W
EAT
W
EBT
WT
Searchlight Signals
E
C D
B A
Genrakode II
Control Point Module
W
H
3B
3A
3
D
3C
3E
W
D
3B
3-4
3A
3
D
3C
3E
W
BK
3B
3E
W
C4RL
Y
2-1
W
C5RLY
3A
3
D
3C
2-2
WHR
** W
F
B12
DS
TP
*
W
AS
*
1-4 W
RLY+
1-1
B
3-7
TBDN
W
AUX+
3-9 E
AUX+
1-6 W
CNT6
W
F
W
AS
EA
LD
**
DS
TP
EA
YGP
3-6 W
CNT1
3-5
W
REF
EB
LD
EB
YGP
2-7 W
CNT4
2-6 W
CNT3
2-5 W
CNT2
WRB
WRN
1-2 W
TK+
1-3 W
TK** Contact to be
wired if Traffic is
used.
2-14
EHR
EA
H
3B
3A
3
D
3C
3E
EA
D
3-16
E
C4RLY
3B
3A
3
D
3C
2-13
E
C5RLY
E
RLY+
3E
EA
BK
3B
3A
3
D
3C
1-13
1-16
EA **
F
N12
N
E 3-10
AUXW 3-8
AUXE 1-10
*
DS
TP
*
E
AS
TBDN
RWC
CNT6
E 3-12
CNT1
3-11
E
REF
E 2-12
CNT4
E 2-10
CNT2
EA **
F
RWC
DS
TP
WA
YGP
1-14
EARB
E 1-15
TK-
EARN
E
TK+
3E
E
AS
WA
LD
* Jumpers required
when AUX board is
used.
Figure A–2. Location 1: Control Point Module
P2160B, Vol.1, Rev. Jan/07
A–34
Alstom Signaling Inc.
Module and Board Reference Data
LOC. 2
W
+ - +
WT
Colorlight Signals
ET
Genrakode II
Intermediate Module
1-16
N12
N
3-10
*
3-8
W
AUX2-9
POWER
DETECT
-
*
E
AUX-
B12
*
*
BX110
W
SIGNAL
*
NX110
*
1-1
B
3-7
W
AUX+
3-9
E
AUX+
2-8 POWER
DETECT
+
G
2-4
Y
2-5
LAMP 1W
LAMP 2W
2-6
R
LAMP 3W
1-7
WEST
LAMP+
WRB
1-2
W
TK+
E
TK+
WRN
1-3 W
TK-
E
TK-
1-14
ERB
1-15
ERN
* Jumpers required
when AUX board is
used.
Figure A–3. Location 2: Intermediate Module Driving Staggered Colorlight Signal
P2160B, Vol.1, Rev. Jan/07
A–35
Alstom Signaling Inc.
Module and Board Reference Data
LOC. 3
WT
ET
- +
+ E
Colorlight Signals
B A
Genrakode II
Intermediate Module
1-16
N12
N
3-10
*
3-8
W
AUXPOWER 2-9
DETECT
-
*
E
AUX-
B12
*
*
BX110
*
NX110
*
1-1
B
3-7
W
AUX+
3-9 E
AUX+
2-8 POWER
DETECT
+
EA
SIGNAL
2-11
G
2-12
Y
LAMP 1E
LAMP 2E
2-13
R
LAMP 3E
1-11
G
LAMP 4E
1-13
R
LAMP 6E
EAST
LAMP+
WRB
1-2
W
TK+
E
TK+
WRN
1-3 W
TK-
E
TK-
1-10
1-14
ERB
1-15
ERN
* Jumpers required
when AUX board is
used.
Figure A–4. Location 3: Intermediate Module Driving Staggered Colorlight Signal
P2160B, Vol.1, Rev. Jan/07
A–36
Alstom Signaling Inc.
Module and Board Reference Data
LOC. 4
+ -
WT
ET
+ -
Rep. Cut
Genrakode II
Repeater Module
B12
1-1
1-16
B
WRB
WRN
*
3-7
*
3-9
W
AUX+
E
AUX+
1-2 W
TK+
1-3 W
TK-
N12
N
3-10
E
AUX3-8
W
AUX-
*
*
1-14
ERB
E 1-15
TK-
ERN
E
TK+
* Jumpers required when
AUX board is used.
Figure A–5. Location 4: Demonstrating Application of Repeater
P2160B, Vol.1, Rev. Jan/07
A–37
Alstom Signaling Inc.
Module and Board Reference Data
LOC. 5
A B
W
WT
ET
- +
Searchlight Signals
- +
E
Genrakode II
Dual Intermediate Module
B12
1-1
1-16
B
N12
N
3-8
W
W
AUX+
AUXPOWER
2-8
2-9
DETEC
T
2-4
WA
+COIL
3-10
E
2-5
AUXWA
-COIL
1-4
WB
3-9
E
+COIL
AUX+
3-7
BX110
**
+
WA
SIG
-
+
WB
SIG
WB
-COIL
B
2P
1R
2N 2D
3-2
WB SIG
B12
3-3
1P
2P
2-1
1D
1R
2N 2D
2-3
WA SIG
WRB
WRN
WB
SIG
B12
E SIG
WA
RG
B12
WA
HG
WA
DG
EA
DG
WB
RG
EA
HG
WB
DG
EA
RG
2-6 WA
LAMP
1-6
WB
LAMP
1-7 W
LAMP+
WB SIG
N12
RG
3-1
1D
SW. C.C.
B12
EA 2-11
+COIL
EA 2-12
-COIL
EB 2-14
WA SIG
1P
***
1-5
-
B12
NX110
1-2 W
TK+
1-3 W
TK** B12 If power detect
is not desired.
3-16
1P
1D
1R
2N
3-15
3-14
EA 2-13
LAMP
1-10
E
LAMP+
E SIG
1-14
ERB
E 1-15
TK-
ERN
E
TK+
2P
*** N12 If power detect
is not desired.
Figure A–6. Location 5: Intermediate Module Driving Searchlight
P2160B, Vol.1, Rev. Jan/07
A–38
Alstom Signaling Inc.
Module and Board Reference Data
E
A
B
W
D C
WT
Searchlight Signals
ET
E
B A
LOC. 7
Genrakode II
Control Point Module
W
T
3-1
3B
3A
3
D
3C
3E
W
H
3B
3E
2-2
WHR
W
D
3B
3E
3-4
W
C4RLY
3A
3
D
3C
W
C1RLY
3A
3
D
3C
1-4
** W
F
B
DS
TP
*
W
AS
*
TBDN
3-7
W
AUX+
3-9
E
AUX+
1-6
RWC
3-6
** W
F
RWC
W
AS
EA
LD
W
RLY+
1-1
B12
DS
TP
E 1-13
RLY+
1-16
N
3C
AUXE 1-10
E 3-12
CNT1
3E
E
D
3B
3A
3
D
3C
3E
E
BK
3B
3A
3
D
3C
3E
E **
F
N12
3-10
E
AUXW 3-8
W
CNT1
CNT2
3B
3A
3
D
2-13
E
C5RLY
CNT6
2-7 W
CNT4
2-5 W
E
H
E 3-16
C4RL
Y
W
CNT6
3-5
W
REF
EA
YGP
2-14
EHR
*
DS
TP
*
E
AS
TBDN
**
E
F
DS
TP
3-11
E
REF
E 2-12
CNT4
E 2-11
WB
GP
WB
LD
E
AS
WA
YGP
WA
LD
CNT3
E 2-10
CNT2
WRB
1-2
WRN
1-3 W
TK-
W
TK+
W 1-14
TK+
E 1-15
ERB
ERN
TK-
* Jumpers required
when AUX board is
used.
** Contact to be
wired if Traffic is
used.
Figure A–7. Location 7: Control Point Module
P2160B, Vol.1, Rev. Jan/07
A–39
Alstom Signaling Inc.
Module and Board Reference Data
100 Hz filter Plate
42560-276-02
#6
+
Control Point WEST Module
27359-115-06
#6
A
B
1-2
1APT
W TRK+
-
1-3
#6
W TRK1-4
W RLY+
3-1
Coil Res.
200 to 1800
W C1RLY
2-2
WHR
Coil Res.
200 to 1800
2-4
W C4RLY
3-5
W REF
Coil Res.
200 to 1800
3-6 W CNT1
3-9
3-7
Signal
W AUX+ E AUX+
HR
AND DR
GREEN
HR
AND DR
YELLOW
HR
AND DR
RED
SIG
171.5
3-8
3-10
W AUX- E AUX1-1
#10
B12
1-16
N
#10
N12
NOTE: 12 VDC POWER REQUIRES 10 AMPS AND DOES NOT
INCLUDE POWER TO DRIVE SIGNAL LIGHTS.
AG
1
SCR
1
HSCR
B
#16
AY
AR
N
BR
B
N
Figure A–8. 100 Hz External Filter Application
P2160B, Vol.1, Rev. Jan/07
A–40
Alstom Signaling Inc.
Module and Board Reference Data
A.5.
CIRCUIT BOARD DESCRIPTIONS
Each circuit board available for Genrakode II modules is described in the following
pages. Each board is identified by name, group number, function(s) and the modules
where can be used.
A.5.1.
Auxiliary I/O Boards
Each Genrakode module (except for Cab Signal modules) includes a card slot for an
optional Auxiliary I/O board. Three varieties of Auxiliary I/O board are available for use
with the Genrakode system. The board types and associated part numbers are provided
in Table A–1.
Table A–1. Aux I/O Boards and Uses
Board
Part Number
Used With
Aux I/O I
59473-837-01
All module types.
Aux I/O II
59473-958-01
All module types.
Aux I/O III
31166-043-01
All module types where dual-rate cab signal
(100/250 Hz) or more than four vital outputs
(for any reason) is required.
NOTE
Double-track approach lighting function provided by bi-directional I/O lines
available on the Aux I/O II and III is only applicable to Intermediate
modules.
Each board type is functionally similar, with the major difference between them being
the number and type of inputs and outputs. The Aux I/O I board provides four vital
inputs, one non-vital input, and four vital outputs. The Aux I/O II board provides four vital
inputs, one non-vital input, two vital outputs, and two non-vital bi-directional I/O lines
(normally used for double-track approach lighting). The Aux I/O III board provides two
vital inputs, one non-vital input, six vital outputs, and two non-vital (NV) bi-directional I/O
lines.
The following discussion and tables summarize the I/O capabilities of each board.
Standard application information is provided, although inputs and outputs can be used
to meet any customer requirements, within the limits of the electrical characteristics
listed.
P2160B, Vol.1, Rev. Jan/07
A–41
Alstom Signaling Inc.
Module and Board Reference Data
The two-wire (differential) vital input circuits can be operated from a local or remote
power source.
min.
nominal
max.
Voltage (DC):
9
12
16
Current (mA DC):
7
10
13
The single-ended vital inputs are referenced to VPC common and must obtain their
input energy from the RLY+ (for Control Point and Repeater modules) or the LAMP+
(for Intermediate modules) AAR terminals.
Voltage (DC):
min.
nominal
max.
12.1
12.5
12.9
10
13
Current (mA DC):
7
The single-ended vital outputs are current sink (active low) outputs referenced to VPC
energy obtained from the RLY+ (for Control Point and Repeater modules) or the LAMP+
(for Intermediate modules) AAR terminals.
Voltage (DC):
min.
nominal
max.
12.1
12.5
12.9
–
–
60
Current (mA DC):
The AC power off detection circuit (POR) is a non-vital input circuit which can be
connected to 110 VAC power at an Intermediate location to provide for selectable
approach lighting upon the loss of AC power.
min.
nominal
max.
Voltage (DC):
9
12
16
Current (mA DC):
2
3
4
120
140
4
5
Voltage (V AC rms): 100
Current (mA rms): 3
The two non-vital (NV) bi-directional input/output circuits are used for the Double Track
Approach (DTA) lighting feature available on the Intermediate modules. These circuits
are used for inter-module communications, when one unit must inform a second of an
approaching train.
P2160B, Vol.1, Rev. Jan/07
A–42
Alstom Signaling Inc.
Module and Board Reference Data
The numbers of each type of input/output for Aux I/O I, II, and III are provided in Tables
A–2 through A–4.
Table A–2. Aux I/O I Input/Output Types
I/O Type
Number
Description
Vital Input
4
2 Differential, 2 Single-ended
Non-Vital Input
1
Differential
Vital Output
4
Single-ended
Table A–3. Aux I/O II Input/Output Types
I/O Type
Number
Description
Vital Input
4
2 Differential, 2 Single-ended
Non-Vital Input
1
Differential
Vital Output
2
Single-ended
Bi-directional (NV)
2
Single-ended
Table A–4. Aux I/O III Input/Output Types
I/O Type
Number
Description
Vital Input
2
Single-ended
Non-Vital Input
1
Differential
Vital Output
6
Single-ended
Bi-directional (NV)
2
Single-ended
P2160B, Vol.1, Rev. Jan/07
A–43
Alstom Signaling Inc.
Module and Board Reference Data
Standard uses for Aux I/O I, II, and III are provided in Tables A–5 through A–7.
NOTE
Although the inputs and outputs identified with an asterisk (*) are provided
by the Auxiliary I/O boards, the Control Point module and a Repeater
module configured from a Control Point module chassis (the default) do
not have access to these inputs and outputs due to a shortage of AAR
terminals.
Table A–5. Aux I/O I Standard Uses
Name
Standard Use
Interface
Vital Inputs
WAUX
Switch controller, slide fence, high water
detector, etc.
Differential
EAUX
Switch controller, slide fence, high water
detector, etc.
Differential
WEXI *
Generic input
Single-ended
EEXI *
Generic input
Single-ended
Power-on relay (AC power detection)
Differential
WCAB
Cab signal drive
Single-ended
ECAB
Cab signal drive
Single-ended
WEXO *
Generic output
Single-ended
EEXO *
Generic output
Single-ended
Non-Vital Input
POR *
Vital Outputs
P2160B, Vol.1, Rev. Jan/07
A–44
Alstom Signaling Inc.
Module and Board Reference Data
Table A–6. Aux I/O II Standard Uses
Name
Standard Use
Interface
Vital Inputs
WAUX
Switch controller, slide fence, high water
detector, etc.
Differential
EAUX
Switch controller, slide fence, high water
detector, etc.
Differential
WEXI *
Generic input
Single-ended
EEXI *
Generic input
Single-ended
Power-on relay (AC power detection)
Differential
WCAB
Cab signal drive
Single-ended
ECAB
Cab signal drive
Single-ended
WDTAP *
Double track approach lighting (Intermediate
only)
Single-ended
EDTAP *
Double track approach lighting (Intermediate
only)
Single-ended
Non-Vital Input
POR *
Vital Outputs
Bi-directional
P2160B, Vol.1, Rev. Jan/07
A–45
Alstom Signaling Inc.
Module and Board Reference Data
Table A–7. Aux I/O III Standard Uses
Name
Standard Use
Interface
Vital Inputs
WAUX
Switch controller, slide fence, high water
detector, etc.
Single-ended
EAUX
Switch controller, slide fence, high water
detector, etc.
Single-ended
Power-on relay (AC power detection)
Differential
WCAB100P
Cab signal drive (100 Hz)
Single-ended
ECAB100P
Cab signal drive (100 Hz)
Single-ended
WCAB250P *
Cab signal drive (250 Hz)
Single-ended
ECAB250P *
Cab signal drive (250 Hz)
Single-ended
WCODEP *
Code 1 received status
Single-ended
ECODEP *
Code 1 received status
Single-ended
WDTAP *
Double track approach lighting (Intermediate
only)
Single-ended
EDTAP *
Double track approach lighting (Intermediate
only)
Single-ended
Non-Vital Input
POR *
Vital Outputs
Bi-directional
P2160B, Vol.1, Rev. Jan/07
A–46
Alstom Signaling Inc.
Module and Board Reference Data
The positions and functions for the Aux I/O I, II, and III LEDs are provided in Tables
A–8 through A–10.
Table A–8. Aux I/O I Board LEDs
Component
Position
Description
Function
CR9
Top
Large, recessed
WAUX
CR10
||
Large, recessed
WEXI
CR12
||
Large, recessed
EEXI
CR11
||
Large, recessed
EAUX
CR5
||
Small, on edge
WEXO
CR6
||
Small, on edge
WCAB
CR7
\/
Small, on edge
ECAB
CR8
Bottom
Small, on edge
EEXO
Table A–9. Aux I/O II Board LEDs
Component
Position
Description
Function
CR1
Top
Large, recessed
WAUX
CR2
||
Large, recessed
WEXI
CR3
||
Large, recessed
EEXI
CR4
||
Large, recessed
EAUX
CR5
||
Small, on edge
WDTA
CR6
||
Small, on edge
EDTA
CR7
\/
Small, on edge
WCAB
CR8
Bottom
Small, on edge
ECAB
P2160B, Vol.1, Rev. Jan/07
A–47
Alstom Signaling Inc.
Module and Board Reference Data
Table A–10. Aux I/O III Board LEDs
Component
Position
Description
Function
CR2
Top
Large, recessed
WAUX
CR10
||
Small, on edge
WCODE
CR9
||
Large, recessed
EAUX
CR11
||
Small, on edge
ECODE
CR12
||
Small, on edge
WDTA
CR13
||
Small, on edge
EDTA
CR14
||
Small, on edge
WC250
CR15
||
Small, on edge
EC250
CR16
\/
Small, on edge
EC100
CR17
Bottom
Small, on edge
WC100
P2160B, Vol.1, Rev. Jan/07
A–48
Alstom Signaling Inc.
Module and Board Reference Data
A.5.2.
Color Light Driver Board (P/N 59473-864-01, -02)
Function:
Provide lamp drive capability and filament checking for up to six lamps.
Where Used:
•
Intermediate module
Six identical circuits are provided on this board for driving six different lamps with power
requirements of up to 25 Watts each.
Once every system cycle (2.8 seconds), outputs are cycle-checked (turned on and off)
by the CPU to determine that they are operable, controllable and that the circuitry can
be changed to both the on and off state. In between the 2.8 second period, the CPU
periodically reads the state of each output to determine that it is in the correct state. The
lamp drive board also contains circuitry to perform filament checking for each lamp.
Once each system cycle (2.8 seconds) a lamp filament cycle check is performed.
VPC energy must be present in order for the lamp drive output circuits to operate. VPC
energy is present only when the module is operating in a safe manner.
The Group 2 differs from the Group 1 due to the added function of Cable Integrity Check
(CIC). When two outputs are shorted together the data returned to the CPU is
corrupted, making the short detectable. The trade-off for this added feature is that the
circuit is now much less resistant to AC noise immunity. So in high-noise environments,
the Group 1 board, which has very high AC noise immunity but no CIC function, is the
solution.
To allow Cable Integrity Check to operate properly, it is necessary to make some
application requirements. These requirements are not expected to impose any
unreasonable constraints in most applications. These requirements are as follows:
1. Must use independent dropping resistors
2. Must keep cable resistance less than 0.2 Ohms (200 feet with #10 wire)
3. Must set each dropping resistor to provide between 9.5 and 10.5 Volts at each bulb
(when ON)
P2160B, Vol.1, Rev. Jan/07
A–49
Alstom Signaling Inc.
Module and Board Reference Data
Specifications:
Lamp output drive capabilities - Colorlight:
Regulated Lamp
min.
nominal
max.
Lamp Voltage (DC):
12.1
12.5
12.9
Lamp Wattage (W):
5
18
25
NOTE
Dropping-resistors are required at the signal head (1 per lamp) to adjust
each lamp voltage for 10 V DC.
NOTE
A maximum of 3 - 25 Watt bulbs can be simultaneously lit per direction (6 25 W bulbs max per module).
P2160B, Vol.1, Rev. Jan/07
A–50
Alstom Signaling Inc.
Module and Board Reference Data
A.5.3.
Converter/Receiver Board (P/N 59473-833-01)
Function:
Converter portion creates isolated DC pulses for transmission on the rails.
Receiver portion provides an isolated pulse detection circuit for pulse codes received on
the rails.
Where Used:
•
All module types
The converter is essentially a transformer-isolated, DC to DC converter that converts
the 12V signal battery supply to a track battery voltage level for transmitting. Four
nominal track voltage levels are selectable by screw switches on taps of output
transformer T2. Nominal track voltage levels available are 1.5, 2.0, 3.0 and 4.0 Volts DC
(into a 1 Ohm load). The converter operates at a relatively high frequency above the
audio range. This allows quiet operation and the use of small transformers.
VPC energy must be present in order for CPU code pulses to be transmitted to the rails.
VPC energy is present only when the module is operating in a safe manner.
The receiver is connected and disconnected from the rails for receiving and
transmitting, respectively. 3 screw switches allow the receiver resistance, and thus the
current level, to be adjusted. The receiver resistance can be set to 0, 0.27, 0.56, 0.83,
0.82, 1.09, 1.38, or 1.65 Ohms. The module wiring resistance adds approximately 0.36
Ohms to the selected adjustable resistance value.
The CPU performs a cycle test of the receiver once every system cycle (2.8 seconds) to
insure that the receiver is operating correctly and that its gain has not changed.
Three test posts lugs are placed at the front edge of the board. The top post is the
amplified receive and test current voltage levels that are applied to the input of the level
detectors. This voltage may be viewed with reference to the +4V reference (middle test
lug) or 12V Common (lower test lug).
Table A–11. Converter/Receiver Board LEDs
Component
Position
CR13
top
CR8
middle
Flashes coincident with each received pulse above the
receive threshold level and with the upper level test
current pulse
CR1
bottom
Flashes coincident with receiver test current pulses
P2160B, Vol.1, Rev. Jan/07
Function
Flashes coincident with each transmitted pulse
A–51
Alstom Signaling Inc.
Module and Board Reference Data
Table A–12. Output Voltage vs. Tap Selection for Track Converter
Output Voltage (Volts)
Primary Taps
Secondary Taps
1.5
L-L
1.5/2.0, 1.5/2.0
2.0
H-H
1.5/2.0, 1.5/2.0
3.0
L-L
3.0/4.0, 3.0/4.0
4.0
H-H
3.0/4.0, 3.0/4.0
Table A–13. Receiver Input Resistance and Switch Positions
Total Receiver Resistance
Switch Position
(Ohms)
SS1
SS2
SS3
0
in
in
in
0.27
in
out
in
0.56
out
in
in
0.83
out
out
in
0.82
in
in
out
1.09
in
out
out
1.38
out
in
out
1.65
out
out
out
Receiver sensitivity: pick/drop - 0.5 A DC
60 Hz rejection: 10 V AC rms rail-to-rail
NOTE
Module resistance adds 0.63 Ohm (Ω).
P2160B, Vol.1, Rev. Jan/07
A–52
Alstom Signaling Inc.
Module and Board Reference Data
A.5.4.
Converter/Receiver Board (P/N 59473-833-02)
Function: Converter portion creates isolated DC pulses for transmission on line wires.
Receiver portion provides an isolated pulse detection circuit for pulse codes received on
line wires.
Where Used:
•
All module types
WARNING
THE P/N 59473-833-02 CONVERTER/RECEIVER LINE DRIVER BOARD
IS ONLY INTENDED TO BE USED FOR LINE WIRE APPLICATIONS
AND MUST NOT BE USED IN APPLICATIONS FOR NORMAL TRACK
OPERATION. USAGE MAY RESULT IN EXCESSIVE TRACK CURRENT,
CAUSING THE INABILITY TO DETECT TRAINS IN THE TRACK
CIRCUIT.
NOTE
The P/N 59473-833-02 Converter/Receiver Line Driver board is not
compatible with the Electrocode Line Wire boards (2L Line Converter, 7L
Receiver, and 9L Track Choke). Use the P/N 59473-833-02 board at both
ends of a line circuit.
The P/N 59473-833-02 board is essentially the same as the P/N 59473-833-01 board,
except that it is redesigned to work over line wire instead of over rail. The new output
transformer has different output voltages, 3.0, 4.0, 6.0, and 8.0 Volts DC (into a 1 Ohm
load). The sensitivity of the receiver increases from 0.5A to 0.25A as well. These two
changes allow the Line Driver Converter/Receiver board to communicate over greater
distances, see Section 3 for details. The 3 screw switches now provide the following
levels of receiver input resistance: 0, 0.56, 1.00, 1.56, 2.00, 2.56, 3.00, and 3.56 Ohms.
The module wiring resistance now adds approximately 0.50 Ohms to the selected
adjustable resistance value.
P2160B, Vol.1, Rev. Jan/07
A–53
Alstom Signaling Inc.
Module and Board Reference Data
Table A–14. Output Voltage vs. Tap Selection for Line Wire Converter
Output Voltage (Volts)
Primary Taps
Secondary Taps
3.0
L-L
3.0/4.0, 3.0/4.0
4.0
H-H
3.0/4.0, 3.0/4.0
6.0
L-L
6.0/8.0, 8.0/6.0
8.0
H-H
6.0/8.0, 8.0/6.0
Table A–15. Receiver Input Resistance and Switch Positions
Total Receiver Resistance
Switch Position
(Ohms)
SS1
SS2
SS3
0
in
in
in
0.56
in
out
in
1.00
out
in
in
1.56
out
out
in
2.00
in
in
out
2.56
in
out
out
3.00
out
in
out
3.56
out
out
out
Receiver sensitivity: pick/drop - 0.25 A DC
60 Hz rejection: 10 V AC RMS rail-to-rail
NOTE
Module resistance adds 0.50 Ohm (Ω).
P2160B, Vol.1, Rev. Jan/07
A–54
Alstom Signaling Inc.
Module and Board Reference Data
A.5.5.
CPU Board (P/N 31166-141-XX)
Function:
Controls overall Genrakode II operation in each module. Performs safety
checks, controls all inputs and outputs according to Application Logic, and includes
status indications, configuration functions, and diagnostic functions through CPU
indicators/controls and an RS-232 serial port interface.
Where Used:
•
Control Point module (including CPIB)
Intermediate module
Repeater module
Switch Lock module
The PGK CPU board provides significant enhancements to the Genrakode product. In
addition to user programmability, the CPU also has extensive diagnostic capabilities.
While maintaining most of the front card-edge LED indicators present with the previous
CPU board, the PGK CPU adds 7-segment LEDs for numerical transmit and receive
code display. It has an RS-232 serial port interface for downloading of Application Logic
to Flash memory which eliminates the need for handling EPROMs. This serial interface
gives the user access (via a PC with terminal emulation software) to many configuration
and diagnostic commands, such as displaying the system Event and Error queues. This
serial interface can be extended through the use of a modem to a remote location, and
can be used to interface to a code system using Data Train VIII and Genisys protocols
for non-vital controls and indications.
A.5.5.1. Board Versions
There are four versions of this board: P/N 31166-141-03, and -04.
Groups 01 and 03 are for CPIB (Control Point-In-a-Box) applications since they are
equipped with Vital Serial Link (VSL) capability.
Groups 02 and 04 do not have the VSL capability and are for Genrakode II (non-CPIB)
applications only.
An obsolete part on the Group 02 required a board design change. Therefore Group 3
supersedes Group 1 and Group 4 supersedes Group 2.
Be aware that the Group 01 cannot be used for Genrakode II (non-CPIB) applications –
only for CPIB. However, though the Group 03 supersedes the Group 01, the Group 03
can in fact be used for both CPIB and Genrakode II (non-CPIB) applications. Table A-16
illustrates the capabilities of each board type.
P2160B, Vol.1, Rev. Jan/07
A–55
Alstom Signaling Inc.
Module and Board Reference Data
Table A–16. PGK CPU Board Types
Part Number
Status
Application
31166-141-03
Active
All
31166-141-04
Active
Genrakode II-only (non-CPIB)
The Programmable Genrakode CPU board is designed to provide the customer with a
simple approach to application or system software upgrades or changes. This is
accomplished with a RS232 serial port located on the CPU board. Other added
capabilities include event and error logging, a real time clock and numeric card-edge
displays. The hardware of the CPU is divided into two separate sections, a Logic
Controller and an I/O Controller. Each section contains a microcontroller and memory.
The I/O Controller controls the interface to the Genrakode II bus. It provides input and
output capabilities along the card edge, monitors and controls all I/O (vital and nonvital), and reports that information to the Logic Controller. The Logic Controller carries
out the decision making, event logging, and controls the card edge displays. The two
sections communicate through a bi-directional FIFO (First-In-First-Out buffer) register.
A.5.5.2. I/O Controller
The I/O Controller is a 40-pin DIP version of the Dallas 80C320 microcontroller. The I/O
Controller utilizes an external PROM, RAM, and an Altera Programmable Logic. The I/O
Controller is also the master unit for the interface FIFO though which data is transmitted
to the Logic Controller. An independent timer interface is included to verify the duration
of the I/O Controller cycle.
A.5.5.3. Logic Controller
The Logic Controller is an 84-pin PLCC version of the Intel 80C188EB microprocessor.
The controller uses external Flash memory for the main operation program as well as
the specific application data. System RAM is provided for temporary storage and a
battery-backed RAM is utilized for error and event logging.
A.5.5.4. Interface FIFO
The interface FIFO provides the only means of communication between the Logic
Controller and the I/O Controller. The FIFO is bi-directional. The I/O Controller controls
the direction of data transfer. The FIFO main buffer communicates in only one direction
at a time.
A.5.5.5. Data Logging
P2160B, Vol.1, Rev. Jan/07
A–56
Alstom Signaling Inc.
Module and Board Reference Data
Event and error logging are accomplished using a power management device, a 3 Volt
battery, and static RAM. The power management chip monitors the 5 Volt power supply
and switches the RAM to battery power if it detects low power. The power management
device can also determine a low battery condition. If a low battery is detected, the power
management device sends a signal to the Logic Controller that logs an appropriate error
to the Error queue.
A.5.5.6. Real Time Clock
A real-time clock is also located on the board to provide an accurate time stamping of
logged data. The real time clock is also battery-backed, utilizing an internal power
management section.
A.5.5.7. PGK CPU Board Edge
The PGK CPU board edge displays system information, Figures A–9 through A–12
provide four displays: normal mode, maintenance mode, and two code 5 always
examples.
P2160B, Vol.1, Rev. Jan/07
A–57
Alstom Signaling Inc.
Module and Board Reference Data
EAST RECEIVE CODE 5
EAST RECEIVED CODE
EAST TRANSMIT CODE
EAST TRANSMIT CODE 5
EAST TRACK OCCUPANCY
EAST CODE T RECEIVE
EAST CODE T TRANSMIT
EAST BLOCK TROUBLE QUEUE STATUS
EAST STICK (UNUSED)
WEST RECEIVE CODE 5
WEST RECEIVED CODE
WEST TRANSMIT CODE
WEST TRANSMIT CODE 5
WEST TRACK OCCUPANCY
WEST CODE T RECEIVE
WEST CODE T TRANSMIT
WEST BLOCK TROUBLE QUEUE STATUS
WEST STICK (UNUSED)
POR
MALFUNCTION
LOW POWER
RESET
POWER
ROCKER
SWITCH
DIAGNOSTIC SERIAL LINK
Figure A–9. CPU Board Normal Mode Displays
P2160B, Vol.1, Rev. Jan/07
A–58
Alstom Signaling Inc.
Module and Board Reference Data
EAST RECEIVE CODE 5
FLASHING ZERO
EAST TRANSMIT CODE 5
EAST TRACK OCCUPANCY
EAST CODE T RECEIVE
EAST CODE T TRANSMIT
EAST BLOCK TROUBLE QUEUE STATUS
EAST STICK (UNUSED)
WEST RECEIVE CODE 5
ERROR CODE
(FIRST DIGIT OF ERROR CODE)
ERROR CODE
(SECOND DIGIT OF ERROR CODE)
WEST TRANSMIT CODE 5
WEST TRACK OCCUPANCY
WEST CODE T RECEIVE
WEST CODE T TRANSMIT
WEST BLOCK TROUBLE QUEUE STATUS
WEST STICK (UNUSED)
POR
MALFUNCTION
LOW POWER
RESET
POWER
ROCKER
SWITCH
DIAGNOSTIC SERIAL LINK
Figure A–10. CPU Board Maintenance Mode Displays
P2160B, Vol.1, Rev. Jan/07
A–59
Alstom Signaling Inc.
Module and Board Reference Data
EAST RECEIVE CODE 5
FLASHING 'C'
FLASHING '5'
EAST TRANSMIT CODE 5
EAST TRACK OCCUPANCY
EAST CODE T RECEIVE
EAST CODE T TRANSMIT
EAST BLOCK TROUBLE QUEUE STATUS
EAST STICK (UNUSED)
WEST RECEIVE CODE 5
CURRENT CODE 5 EAST SETTING
(FIRST DIGIT)
CURRENT CODE 5 EAST SETTING
(SECOND DIGIT)
WEST TRANSMIT CODE 5
WEST TRACK OCCUPANCY
WEST CODE T RECEIVE
WEST CODE T TRANSMIT
WEST BLOCK TROUBLE QUEUE STATUS
WEST STICK (UNUSED)
POR
MALFUNCTION
LOW POWER
RESET
POWER
ROCKER
SWITCH
DIAGNOSTIC SERIAL LINK
Figure A–11. CPU Board Code 5 EAST Mode Displays (Code 5 Always Example)
P2160B, Vol.1, Rev. Jan/07
A–60
Alstom Signaling Inc.
Module and Board Reference Data
EAST RECEIVE CODE 5
CURRENT CODE 5 WEST SETTING
(FIRST DIGIT)
CURRENT CODE 5 WEST SETTING
(SECOND DIGIT)
EAST TRANSMIT CODE 5
EAST TRACK OCCUPANCY
EAST CODE T RECEIVE
EAST CODE T TRANSMIT
EAST BLOCK TROUBLE QUEUE STATUS
EAST STICK (UNUSED)
WEST RECEIVE CODE 5
FLASHING 'C'
FLASHING '5'
WEST TRANSMIT CODE 5
WEST TRACK OCCUPANCY
WEST CODE T RECEIVE
WEST CODE T TRANSMIT
WEST BLOCK TROUBLE QUEUE STATUS
WEST STICK (UNUSED)
POR
MALFUNCTION
LOW POWER
RESET
POWER
ROCKER
SWITCH
DIAGNOSTIC SERIAL LINK
Figure A–12. CPU Board Code 5 WEST Mode Displays (Code 5 Always Example)
P2160B, Vol.1, Rev. Jan/07
A–61
Alstom Signaling Inc.
Module and Board Reference Data
A.5.6.
DC Code Select Input Board (P/N 59473-895-01)
Function:
Interface between VPI circuitry at head blocks, which selects codes to be
transmitted by Genrakode II. Operates on circuit contact closures.
Where Used:
•
Control Point module
The DC Code Select Input Board contains 16 vital input circuits (eight for the EAST, and
eight for the WEST direction) by which codes 1 through 8 can be selected for
transmission from the location. Code 1 must be selected to enable transmission of any
of the signal clearing codes. No more than three codes may be selected at one time,
such as code 1, code 5 and code 4. Two signal clearing codes selected simultaneously
inhibits any code transmission.
The DC Code Select Board is capable of detecting DC inputs when interrogated by the
CPU board. The board is divided into the WEST and EAST sections and thus it has
separate digital and analog circuitry for each side. The DC inputs are generated by
other external controlling elements (outside the Control Point module).
Specifications:
Code select inputs - DC input type:
Voltage (DC):
Current (mA DC):
min.
nominal
max.
9.0
12.0
16.0
13
17
10
P2160B, Vol.1, Rev. Jan/07
A–62
Alstom Signaling Inc.
Module and Board Reference Data
A.5.7.
Decode/Output Board (P/N 59473-838-01, -02)
Function:
Output drivers for signals received and decoded at Control Point modules.
Where Used:
•
Control Point module
The Decode Output Board contains eight identical circuits which are used to drive
external relays in response to decoded receive codes. Two boards are used in each
module to provide both EAST and WEST outputs. Each output is a current sinking (or
active low state) output capable of driving relay coils of 200 Ohms to 1800 Ohms. Each
output has surge protection provided.
5V logic circuitry is completely isolated from the 12V output circuitry. VPC energy must
be present in order for the output circuits to be energized. VPC energy is present only
when the module is operating in a safe manner. A separate checking circuit is provided
for each output so that the CPU can determine that each particular output is in its
correct state and that each output is controllable. If the CPU finds that an output has
failed, power to the outputs is removed via the VPC board.
Each output state is rechecked every 8-16 ms and each output is toggled on and off
once each system cycle (2.8 seconds) to determine that the CPU has control of the
output.
The Group 2 differs from the Group 1 due to the added function of Cable Integrity Check
(CIC). When two outputs are shorted together the data returned to the CPU is
corrupted, making the short detectable. The trade-off for this added feature is that the
circuit is now much less resistant to AC noise immunity. So in high-noise environments,
the Group 1 board, which has very high AC noise immunity but no CIC function, is the
solution.
Specifications:
Decoded relay output drive capabilities:
min.
Voltage (DC):
Coil Resistance (Ohms):
P2160B, Vol.1, Rev. Jan/07
12.1
200
nominal
12.5
max.
12.9
250
1800
A–63
Alstom Signaling Inc.
Module and Board Reference Data
A.5.8.
Driver Board (P/N 59473-907-01)
Function:
Cab Signal Driver and 12V High Power Filter
Where Used:
•
Cab Signal module
The Driver Board contains a cab rate modulator, signal divider, power drive section and
a 12V high power filter. The cab rate modulator is a fail-safe control of the input
frequency. The signal divider is a flip-flop, which divides the input frequency by two.
This is to insure that the output frequency duty cycle remains at 50 percent with voltage
variations. The power drive section uses two dual FET drive circuits to handle the
current levels required. There are two LEDs located at the edge of this board.
Table A–17. Driver Board LEDs
Component
Position
Function
CR4
Top
Indicates the Schmitt trigger is holding the outputs disabled
CR1
Bottom
Indicates power is being supplied to the drive transformer
The filter section provides filtering and surge protection for the 12V high power used for
the track circuit. The input power to the filter comes from the module AAR B and N
posts through the ON-OFF switch and the 15 Ampere fuse.
P2160B, Vol.1, Rev. Jan/07
A–64
Alstom Signaling Inc.
Module and Board Reference Data
A.5.9.
High Power Vital Power Controller (VPC) Board (P/N 59473-872-01)
Function:
Provides a positive, vital, disconnect of power from signal lamp drive,
searchlight mechanisms, and vital outputs in the event of failed output circuits or
improper module operation. This board is also a positive disconnect for transmitted
pulses.
Where Used:
•
Intermediate module
•
Switch Lock module
•
4-track Control Point module
The High Power VPC Board produces an isolated DC voltage source regulated to 12.5
Volts at the board, for use as lamp drive and searchlight mechanism outputs. The
output voltage is regulated for both input voltage and lamp load current changes. Thus,
signal lamps can be operated at a constant lamp voltage; this increases life and
decreases signal maintenance. An external resistor is required to set the desired
voltage across the lamp to 10 Volts.
The output voltage is only present when the CPU has determined that the module
hardware and software is operating properly.
Table A–18. High Power VPC Board LED
Component
CR9
Function
Indicates vital power is being generated
P2160B, Vol.1, Rev. Jan/07
A–65
Alstom Signaling Inc.
Module and Board Reference Data
A.5.10. Low Power Vital Power Controller (VPC) Board (P/N 59473-835-01)
Function:
Provides a positive, vital disconnect of power from decoded output circuits
in the event of failed output circuits or improper module operation. Also is a positive
disconnect for transmitted pulses.
Where Used:
•
Control Point module
•
Repeater module
The VPC Board produces an isolated, nominal 12 Volts DC unregulated voltage source
for use by decoded output circuits. The output voltage is only present when the CPU
has determined that the module hardware and software are operating properly.
Table A–19. Low Power VPC Board LED
Component
Function
CR15
indicates vital power is being generated
P2160B, Vol.1, Rev. Jan/07
A–66
Alstom Signaling Inc.
Module and Board Reference Data
A.5.11. Oscillator/Filter Board (P/N 59473-906-01)
Function:
200 Hz Oscillator and 12V Battery Low Power Filter
Where Used:
•
Cab Signal module
The Oscillator/Filter Board contains a fail safe Hartley oscillator that supplies the Driver
Board with a 200 Hz square wave used for cab carrier generation. The tank circuit sets
the oscillation frequency, which has proven to be very stable even with voltage
variations present.
The filter section provides filtering and surge protection for the 12V low power used by
all of the boards. Input power to the filter comes from the module AAR B and N posts
through the ON-OFF switch and the 5-Ampere fuse.
A.5.12. Power Supply Regulator/Filter Board (P/N 31166-338-01)
Function:
12V Battery Supply Filter and 5V Regulator for IC Logic
Low Signal Battery Monitoring
Ground Fault Monitoring
Where Used:
•
All module types for Filter and Regulator functions
All module types (except for 4 Track Control Point) for Low Signal Battery and Ground
Fault monitoring functions.
NOTE
The monitoring functions are only available with PGK applications
compiled with CAA version 2.30 or later and with PGK U30 EPROM P/N
40025-283-23 Revision C or later.
P2160B, Vol.1, Rev. Jan/07
A–67
Alstom Signaling Inc.
Module and Board Reference Data
A.5.12.1.
12V Battery Supply Filter and 5V Regulator for IC Logic:
The Power Supply Regulator/Filter board contains filtering and surge protection from the
12V signal battery for all the PC boards within the module (except the VPC boards
which have their own filtering and surge protection). The Power Supply board also has a
5V regulator (PS2) for operating the digital logic portions of the system. The 5V logic
supply voltage is completely isolated from the 12V signal battery and all other
input/output circuits of Genrakode II. This provides isolation of the 5V logic from noise
on the 12V supply and I/O lines.
The 5V regulator, PS2, also has a low battery detection circuitry that automatically shuts
down the 5V supply at approximately 8 to 8.5 Volts signal battery voltage. This prevents
the system from attempting to operate when the input voltage is too low for proper
operation and removes virtually all Genrakode II module loading from an already
discharged signal battery. The input power to the board comes from the module AAR B
and N posts through the ON-OFF switch (located on the left side of the module) and the
5A fuse (located on the motherboard).
A.5.12.2.
Low Signal Battery Monitoring
The Power Supply Regulator/Filter board includes circuitry to detect a signal battery that
has decreased in voltage below a specified threshold. With the LSB switch (S1) in the
“RUN” position, a low signal battery voltage condition (as set by the “LSB ADJ”
potentiometer) is detected. An adjustable voltage reference circuit is provided to enable
the setting of the detection voltage without having to adjust the actual signal battery
level. Placing the LSB switch (S1) in the “SET” position directs this onboard voltage
reference circuit to the low voltage detection circuit. The Low Signal Battery Threshold
Adjustment Procedure is provided in Table 3–14.
A.5.12.3.
Ground Fault Monitoring:
The Power Supply Regulator/Filter board detects faults between ground and both the
positive (B) and negative (N) terminals to the Genrakode module. A positive ground
fault occurs when there is an electrical path of less than some specified resistance
(nominally 10kOhm) from GND to +12V. Similarly, a negative ground fault is a low
resistance electrical path from GND to 12VCOM.
The ground fault resistance detection value is set with jumper block TB3, and the “POS
ADJ” and “NEG ADJ” potentiometers are adjusted so that the detection circuitry
responds to ground faults at the detection value chosen.
The Power Supply board periodically performs an automatic test to verify that the
hardware is working properly. As part of this automatic test, simulated internal ground
faults (not connected to the actual Earth ground) are created to test the detection
circuitry.
P2160B, Vol.1, Rev. Jan/07
A–68
Alstom Signaling Inc.
Module and Board Reference Data
The user can also perform a manual test of the hardware using the GFM switch (S2) on
the board edge. Similar to the automatic test, placing the manual switch in the “POS
TEST” position creates an internal ground fault to +12V (not connected to the actual
Earth ground). The “POS FAIL” LED lights when the ground fault is detected by the
hardware. Placing the manual switch in the “NEG TEST” position creates an internal
ground fault to 12VCOM (not connected to the actual Earth ground). The “NEG FAIL”
LED lights when the ground fault is detected by the hardware. These manual test
positions are also used to adjust the potentiometers “POS ADJ” and “NEG ADJ” so that
the detection circuitry trips at the desired ground fault resistance.
The adjustment of the “POS ADJ” and “NEG ADJ” potentiometers is necessary since
the Power Supply board provides the ability to detect ground faults of various levels.
Jumper block TB3 provides the ability to set the detection level to one of six ground fault
resistances (corresponding to current levels). The nominal 10kOhm (1.2mA @ 12VDC)
is provided, although 20kOhm (0.6mA) is the default jumper setting in order to give
advance warning of a ground fault condition. Other jumper settings available are
30kOhm (0.4mA), 6kOhm (2mA), 3kOhm (4mA), and 1.5kOhm (8mA). The jumper
position is determined based upon the desired detection level, and the “POS ADJ” and
“NEG ADJ” potentiometers are adjusted so that the automatic testing of the circuitry is
performed at the correct levels.
To change the Fault Detection Threshold so that the Ground Fault Monitor detects a
lower or higher ground fault resistance, perform the Ground Fault Monitor Fault
Detection Threshold Adjustment Procedure provided in Table 3–15.
To set the “POS ADJ” and “NEG ADJ” potentiometers so that the Ground Fault Monitor
detects ground faults, perform the Ground Fault Monitor Potentiometer Adjustment
Procedure provided in Table 3–16.
P2160B, Vol.1, Rev. Jan/07
A–69
Alstom Signaling Inc.
Module and Board Reference Data
A.5.13. Regulator/Filter (Standard) Board (P/N 59473-834-01)
Function:
12V Battery Supply Filter and 5V Regulator for IC Logic
Where Used:
•
All module types
The Standard Regulator/Filter Board contains filtering and surge protection from the
12V signal battery for all the PC boards within the module (except the VPC boards that
have their own filtering and surge protection). The Standard Regulator/Filter Board also
has a 5V regulator for operating the digital logic portions of the system. The 5V logic
supply voltage is completely isolated from the 12V signal battery and all other
input/output circuits of Genrakode II. This provides isolation of the 5V logic from noise
on the 12V supply and I/O lines.
The 5V regulator, IC1, also has a low battery detection circuitry that automatically shuts
down the 5V supply at approximately 7.5 to 8 Volts signal battery voltage. This prevents
the system from attempting to operate when the input voltage is too low for proper
operation and removes virtually all Genrakode II module loading from an already
discharged signal battery. The input power to the filter boards comes from the module
AAR B and N posts through the ON-OFF switch and the 5A fuse.
P2160B, Vol.1, Rev. Jan/07
A–70
Alstom Signaling Inc.
Module and Board Reference Data
A.5.14. Relay Code Select Input Board (P/N 59473-830-01)
Function:
Interface between relay circuitry at head blocks that selects codes to be
transmitted by Genrakode II. Operates on relay contact closures.
Where Used:
•
Control Point module
The Relay Code Select Input Board contains 16 vital input circuits (eight for the EAST,
and eight for the WEST direction) by which codes 1 through 8 can be selected for
transmission from the location. A code reference common AAR terminal (for each
direction) supplies energy to an external relay selection network that selects the desired
codes to be transmitted. Code 1 must be selected to enable transmission of any of the
signal clearing codes. No more than three codes may be selected at one time, such as
code 1, code 5 and code 4. Two signal clearing codes selected simultaneously inhibits
any code transmission. The CPU "cycle checks" the Code Select board in such a
manner that it can determine that only those codes which are indeed selected by the
external relay circuitry are read as selected by the CPU.
Specifications:
Code select inputs - contact closure type:
Voltage (DC):
Current (mA DC):
min.
nominal
max.
12.1
12.5
12.9
6
8
11
A.5.15. Series Overlay Board (P/N 59473-877-01)
Function:
Detects the presence of the train in the vicinity of switchlock on the
mainline (frequency = 13.8 kHz).
Where used:
•
Switch Lock module
The board contains a 13.8 kHz transmitter and receiver combination. The transmitter
generates the 13.8 kHz and drives a parallel tuned transformer (T1). The output of this
tuned transformer is coupled to the transformer (T2) on the receiving side via a series
tuned circuit (L1, C1) and the presence of the train. When the signal is received at the
other side and has enough amplitude, it triggers a threshold detector whose output is
sensed by the CPU. There is also an LED (CR1) on the board to indicate when the
overlay circuitry has detected the presence of the train.
P2160B, Vol.1, Rev. Jan/07
A–71
Alstom Signaling Inc.
Module and Board Reference Data
Three screw-on taps on the board compensate for the inductance of different lead
lengths used; refer to Section 3 for Series Overlay adjustment procedures.
A.5.16. Searchlight Driver Board (P/N 59473-863-01, -02)
Function:
Filament drive and check; mechanism drive; position check for 2
searchlight mechanisms.
Where Used:
•
Intermediate module
Lamp filament drive and filament checking circuitry have the same configuration and
operation as on the color light drive board. Two identical circuits are provided on this
board for driving two different lamps with power requirements of up to 25 Watts each.
Two identical circuits are provided on this board for driving two different searchlight
mechanisms from 200–1800 Ohms each. This design can handle a sustained short and
can handle voltages applied across the outputs: up to 12VDC indefinitely, and up to
16VDC for 10 seconds.
Six vital input circuits are also provided, 3 for each mechanism, to read the mechanism
position contacts.
The Group 2 differs from the Group 1 due to the added function of Cable Integrity Check
(CIC). When two outputs are shorted together the data returned to the CPU is
corrupted, making the short detectable. The trade-off for this added feature is that the
circuit is now much less resistant to AC noise immunity. So in high-noise environments,
the Group 1 board, which has very high AC noise immunity but no CIC function, is the
solution.
To allow Cable Integrity Check to operate properly, it is necessary to make some
application requirements. These requirements are not expected to impose any
unreasonable constraints in most applications. These requirements are as follows:
1. Must use independent dropping resistors
2. Must keep cable resistance less than 0.2 Ohms (200 feet with #10 wire)
3. Must set each dropping resistor to provide between 9.5 and 10.5 Volts at each bulb
(when ON)
P2160B, Vol.1, Rev. Jan/07
A–72
Alstom Signaling Inc.
Module and Board Reference Data
Specifications:
Regulated Lamp
min.
nominal
max.
Lamp Voltage (DC):
12.1
12.5
12.9
Lamp Wattage (W):
5
18
25
NOTE
Dropping resistors are required at the signal head (1 per lamp) to adjust
each lamp voltage for 10 V DC.
NOTE
A maximum of 2 - 25 Watt bulbs can be simultaneously lit per direction (4 25 W bulbs max. per module).
NOTE
A maximum of 2 mechanisms can be simultaneously driven per direction
(4 - mechanisms max. per module).
Regulated Mechanism
min.
Voltage (DC):
Coil Resistance (Ohms):
12.1
nominal
max.
12.5
12.9
200
250
1800
min.
nominal
max.
Voltage (DC):
9.0
12.0
16.0
Current (mA DC):
6
10
13
Check Inputs
P2160B, Vol.1, Rev. Jan/07
A–73
Alstom Signaling Inc.
Module and Board Reference Data
A.5.17. Switch Lock I/O Board (P/N 59473-878-01)
Function:
Contains circuitry to read switch lock inputs, outputs to drive three relays
and one lamp output. Also this board contains jumpers for selecting unlock codes for
EAST and WEST.
Where used:
•
Switch Lock module
The Switch Lock I/O Board contains inputs and outputs to directly connect to electric
lock mechanisms. Both inputs and outputs are isolated from the digital circuitry. Three
inputs are used to bring the following into the Switch Lock Module: unlock request,
remote overlay and NWP.
The unlock request input is referenced to 12V signal common. Applying +12V to this
input indicates to the system of the request. LED CR11 is turned on when 12V is
applied to the Unlock Request input.
The remote overlay input is used to sense track occupancy on the mainline; this input is
isolated, and absence of energy indicates occupancy. When the remote overlay input is
not going to be used, it should be connected to the signal battery terminals. When the
remote overlay input is energized, the LED labeled CR14 is turned on.
The NWP input is tied to the switch controller; the Switch Lock Module expects this
input to be energized when the switch is in correspondence. The NWP input is also
isolated. LED CR13 is on when energy is applied. The CPU detects energy on one of
these inputs when it is able to circulate data "through" that particular input.
The Switch Lock I/O Board contains three outputs used to drive relays with coil
resistance of 50 ohms or more and 1 output used to drive a lamp of 25 watts. The three
relay outputs are used to drive the lock relay coil, the remote overlay output, and the
code 1 relay (optional). The LEDs labeled LR, OL, OT and LP correspond to LOCK
RELAY, OVERLAY RELAY, OUTPUT RELAY and LAMP OUTPUT respectively.
The other section of the Switch Lock I/O Board contains jumpers to select unlock codes
(UC) and lock codes (LC) for WEST and EAST directions. A jumper is required for each
direction to select UC and LC codes. The jumper to select the unlock codes can be
located in one of five locations labeled on the board as A, B, C, D, and E:
P2160B, Vol.1, Rev. Jan/07
A–74
Alstom Signaling Inc.
Module and Board Reference Data
Jumper Setting
Unlock Codes Selected
A
8,2,3,4 or 7
B
2,3,4 or 7
C
3,4 or 7
D
4, or 7
E
7
LEDs on the board are controlled by the CPU to indicate the type of code received from
the rails compared to the jumper setting. These LEDs are labeled on the board as WA,
WB, EA, EB; and they are fully explained in Appendix B. This board also has an LED
labeled ST that flashes when the short timer is running, and remains on when the short
timer times out.
P2160B, Vol.1, Rev. Jan/07
A–75
Alstom Signaling Inc.
Module and Board Reference Data
THIS PAGE INTENTIONALLY LEFT BLANK.
P2160B, Vol.1, Rev. Jan/07
A–76
Alstom Signaling Inc.
CPU Hardware and Software
B. APPENDIX B - CPU HARDWARE AND SOFTWARE
B.1.
GENERAL
This section includes the following reference information:
•
CPU Hardware and Software Reference
•
Serial Port Modes and Commands
•
Code T Reference
B.2.
CPU HARDWARE AND SOFTWARE DETAILED REFERENCE
B.2.1.
CPU Comm Port - RS232 Interface
The RS232 interface (board connector J2) on the board front edge serves three
purposes:
•
Downloading Application software to the PGK CPU (using Alstom Download
program only).
•
Accessing the PGK CPU System Commands for diagnostics and system
configuration (using any terminal emulation software, including the Alstom Download
program).
•
Providing an RS-232 interface for a code system link using Data Train VIII or
Genisys protocols. Contact an Alstom Sales Representative for application
information if use of this capability is desired.
B.2.2.
Board Jumpers
The following jumpers are the only ones that the user needs to be aware of:
•
W5 - +5v power for use with Handheld Terminal (HHT), normally OUT
•
W8 - Automatic restart enable, normally IN
P2160B, Vol.1, Rev. Jan/07
B–1
Alstom Signaling Inc.
CPU Hardware and Software
B.2.3.
CPU LED Indicators
The CPU card edge contains 19 LEDs in addition to the four seven-segment displays.
These indicators are used to display system status and troubleshoot problems such as
board failures, low CPU power, loss of external AC power, etc. A description of each
indicator, as they appear on the board from top to bottom, is provided in Table B–1. See
Figures A–9 through A–12 for CPU board LED indicators in normal mode, maintenance
mode, and two code 5 always examples.
Table B–1. CPU LED Indicators
LED
EAST
Indication
R CD5
lit when Code 5 is received from the EAST
T CD5
lit when Code 5 is sent to the EAST
T OCC
lit when EAST track circuit is occupied
OUT A
Trouble Code receive in process
OUT B
Trouble Code transmit in process
INPUT
- lit steady when Trouble Code logged
• flashing when WEST Approach Flag set
STICK
•
WEST
SYSTEM
lit steady when EAST Stick picked
R CD5
lit when Code 5 is received from the WEST
T CD5
lit when Code 5 is sent to the WEST
T OCC
lit when WEST track circuit is occupied
OUT A
Trouble Code receive in process
OUT B
Trouble Code transmit in process
INPUT
lit steady when Trouble Code logged
STICK
flashing when EAST Approach Flag set
lit steady when WEST Stick picked
POR
lit when Aux I/O POR Input is de-energized (*)
MFCTN
flashing when Error Queue contains one or more errors
LOPWR
lit when 5 V supply is below 4.67 V
RESET
lit when the PGK CPU is in reset
POWER
lit when 5 V power is applied to the board
(*) The POR LED is lit when the POR Input is de-energized, but only after the Input has previously been
energized.
P2160B, Vol.1, Rev. Jan/07
B–2
Alstom Signaling Inc.
CPU Hardware and Software
B.2.4.
CPU 7-Segment Displays
The 7-segment displays are used for several display modes and are controlled by
Rocker Switch (S1) as described in the Sections 6.
B.2.5.
Manual Reset
The PGK CPU can be reset by one of two methods: by 1) turning the module power
OFF and then ON using the switch on the left side of the module or 2) pressing the
reset switch on the bottom right side of the board (designated S2). When the CPU is
reset, the 7-segment displays (from top down) spell out ‘P-UP’ for Power Up.
P2160B, Vol.1, Rev. Jan/07
B–3
Alstom Signaling Inc.
CPU Hardware and Software
B.3.
SERIAL PORT MODES AND COMMANDS
There are two available modes of operation when using an external terminal:
•
Monitor mode
•
PGK mode
B.3.1.
Monitor Mode
The Monitor mode of operation is activated by applying power to the Genrakode II
module and pressing the enter key when prompted. The monitor mode displays the
prompt ( MON> ) and allow a limited number of diagnostic operations as shown below.
Examples are shown for the commonly used commands only.
B.3.1.1. Monitor Mode Command Summary for Boot Loader Rev A [1.0]
and Rev B (1.01]
Press 'D' to Display error queue
Press 'R' to view config Report
Press 'M' to use Memory monitor
Examples
Display Error Queue - ‘D’
MON> EQ: 02/10/97 15:06:45 Err#=A0
EQ: 02/10/97 15:06:45 Err#=60
EQ: 02/10/97 15:06:45 Err#=30
View Configuration Report - ‘R’
Application Documentation:
S/N
GK-0000-154
APP NAME
APP ID
COMPILE DATE
5 / 6 / 1999
COMPILE TIME
16:16:20
DESIGNER
CHECKER
REVISION LEVEL 1
SITE ID
100
press any key to continue...
Module Configuration:
MODULE CFG ID
AUX IO
DIRECTION
29
1
EAST AND WEST
P2160B, Vol.1, Rev. Jan/07
B–4
Alstom Signaling Inc.
CPU Hardware and Software
CODE5 FMT (E/W) ALT/ALT
CODE 5 SND EAST USER DEFINED
CODE 5 SND WEST USER DEFINED
SIG TYPE EAST
SEARCHLIGHT
SIG TYPE WEST
SEARCHLIGHT
FLASH RATE
60
press any key to continue...
PGK CAA Software:
CAA VER NAME
1.54
DATE
05/06/99
PGK CAA #
40025-283-01
Copyright
ALSTOM, 1999
press any key to continue...
System Flash Configuration Report:
SYS VER NAME
Rel 1.13
DATE
04/30/99
PGK SYS SW#
40025-283-31[N]
Copyright
ALSTOM, 1999
Application Checksum = 0BFC
Program Checksum = 189E
Memory Monitor Mode – ‘M’
The ‘M’ command is used for development testing only and is not required for field use.
B.3.1.2. Monitor Mode Command Summary for Boot Loader Rev C [1.02]
RPT
DEQ
CEQ
CHK
MEM
-
Display Configuration Report
Display Error Queue
Clear Error Queue
Display System Checksums and CRCs
Enter Memory Monitor Mode
See the PGK Mode discussion that follows for a description of these commands; these
Monitor Mode commands are merely a subset of the PGK Mode commands.
Note: The ‘MEM’ command is used for development testing only and is not required for
field use.
P2160B, Vol.1, Rev. Jan/07
B–5
Alstom Signaling Inc.
CPU Hardware and Software
B.3.2.
PGK Mode
The PGK (normal) mode of operation is entered when either the PC or HHT is
connected to the CPU board and the Enter Key is not pressed when prompted. The
CPU responds with the Programmable Genrakode Prompt as follows: PGK>.
Commands to access various functions of the system may now be entered using upper
or lower case letters. The functions with definitions and examples follow.
Upon startup the following should appear:
ALSTOM Programmable Genrakode
Boot Loader 1.02
Entering PGK.
ALSTOM PGK 04/30/99
Initializing PGK
SysFLASH is AMD.
AppFLASH is Atmel.
(date is dependent on software version)
(Enter ? for Command Summary)
PGK>
B.3.2.1. PGK Mode System Command Summary
(Enter ? for Command Summary)
PGK> ?
PGK Command Summary
RPT
DVQ
CVQ
DEQ
CEQ
DAC
CAC
DCE
CRC
RES
RWS
DC5
DD
DT
SD
ST
?T
??
-
Display Configuration Report
Display Event Queue
Clear Event Queue
Display Error Queue
Clear Error Queue
Display All Error Counters
Clear All Error Counters
Display Current Errors
Display System CRCs
Display East Rx Code Statistics
Display West Rx Code Statistics
Display Code 5 Format Settings
Display Date
Display Time
Set Date
Set Time
Display Code T Command Summary
Display Advanced Command Summary
(Enter ? for Command Summary)
P2160B, Vol.1, Rev. Jan/07
B–6
Alstom Signaling Inc.
CPU Hardware and Software
PGK> ??
PGK Advanced Command Summary
TDR
DWW
RTD
FEQ
FVQ
NEQ
NVQ
PEQ
PVQ
DEC
CEC
C5
AVQ
BVQ
RVQ
DSA
SSA
MOD
TCS
CFR
NVI
NVU
-
Toggle Time Display Resolution
Detect Wire-Wrap Signature of Module
Toggle Real-Time Display of Events
Display First (oldest) Error Queue entry
Display First (oldest) Event Queue entry
Display Next (newer) Error Queue entry
Display Next (newer) Event Queue entry
Display Previous (older) Error Queue entry
Display Previous (older) Event Queue entry
Display a particular Error Counter entry
Clear a particular Error Counter entry
Enter Code 5 Format Set Mode
Display Event Queue entries After date,time
Display Event Queue entries Before date,time
Display Event Queue entries during date,time Range
Display Station Address for Code System Interface
Set Station Address for Code System Interface
Display the Genisys (Code System) Control Mode byte
Toggle Code System Message Output
Configure Lamp Filament Error Reporting
Display and/or Modify Non-Vital Input Parameters
Store Non-Vital Input Parameter State Changes
(Enter ? for Command Summary)
PGK> ?T
PGK Code T Command Summary
DTQ
CTQ
TID
DTS
MTS
MTX
TTI
MTC
-
Display Block Trouble Queue
Clear Block Trouble Queue
Display/Modify Code T Location ID
Display Code T Enable Settings
Modify Code T Enable Settings
Display/Modify Trouble Queue Expiration Time
Display Code T Transmit Intervals
Monitor Trouble Codes
HEALTH BIT
CODE 1
CODE 2
CODE 3
CODE 4
FORMAT:
Out To VPI CH1
Out To VPI CH2
In From VPI CH1
In From VPI CH2
DIRECTION
Serial Commands
SO1 - Serial Data
SO2 - Serial Data
SI1 - Serial Data
SI2 - Serial Data
West:
1
1
1
0
0
0
>>>
0
15 or 25 Bits
P2160B, Vol.1, Rev. Jan/07
B–7
Alstom Signaling Inc.
CPU Hardware and Software
B.3.2.2. PGK Mode Command Examples
AVQ - Display Events After A Specified Date/Time
The Event Queue can contain many entries that take some time to display to the
screen. To aid the user in displaying only those entries that occurred after a given
date/time, the AVQ command is provided.
PGK> avq 10/04/00
EV: 10/04/00 09:08:06
EV: 10/04/00 09:08:06
EV: 10/04/00 09:08:06
EV: 10/04/00 09:08:07
EV: 10/04/00 09:08:07
EV: 10/04/00 09:08:07
EV: 10/04/00 09:08:07
EV: 10/04/00 09:08:07
EV: 10/04/00 09:08:07
EV: 10/04/00 09:08:10
EV: 10/04/00 09:08:10
E_TRK_OCC goes TRUE
W_TRK_OCC goes TRUE
POWER_UP goes TRUE
ECS_INCODE_1 goes TRUE
ECS_INCODE_2 goes TRUE
WCS_INCODE_1 goes TRUE
ECR_XMTCODE_1 goes TRUE
ECR_XMTCODE_2 goes TRUE
WCR_XMTCODE_1 goes TRUE
E_TXC2_SENT goes TRUE
W_TXC1_SENT goes TRUE
(Enter ? for Command Summary)
PGK> avq 10/04/00,08:00
EV: 10/04/00 09:08:06 E_TRK_OCC goes TRUE
EV: 10/04/00 09:08:06 W_TRK_OCC goes TRUE
EV: 10/04/00 09:08:06 POWER_UP goes TRUE
EV: 10/04/00 09:08:07 ECS_INCODE_1 goes TRUE
EV: 10/04/00 09:08:07 ECS_INCODE_2 goes TRUE
EV: 10/04/00 09:08:07 WCS_INCODE_1 goes TRUE
EV: 10/04/00 09:08:07 ECR_XMTCODE_1 goes TRUE
EV: 10/04/00 09:08:07 ECR_XMTCODE_2 goes TRUE
EV: 10/04/00 09:08:07 WCR_XMTCODE_1 goes TRUE
EV: 10/04/00 09:08:10 E_TXC2_SENT goes TRUE
EV: 10/04/00 09:08:10 W_TXC1_SENT goes TRUE
(Enter ? for Command Summary)
PGK> avq 10/04/00,10:00
EV: No Entries Found Matching Display Criteria.
P2160B, Vol.1, Rev. Jan/07
B–8
Alstom Signaling Inc.
CPU Hardware and Software
BVQ - Display Events Before A Specified Date/Time
The Event Queue can contain many entries that take some time to display to the
screen. To aid the user in displaying only those entries that occurred before a given
date/time, the BVQ command is provided.
PGK> bvq 10/04/00
EV: 10/04/00 09:08:10
EV: 10/04/00 09:08:10
EV: 10/04/00 09:08:07
EV: 10/04/00 09:08:07
EV: 10/04/00 09:08:07
EV: 10/04/00 09:08:07
EV: 10/04/00 09:08:07
EV: 10/04/00 09:08:07
EV: 10/04/00 09:08:06
EV: 10/04/00 09:08:06
EV: 10/04/00 09:08:06
EV: 10/03/00 16:52:58
EV: 10/03/00 16:52:58
EV: 10/03/00 16:52:58
EV: 10/03/00 16:52:47
EV: 10/03/00 16:52:47
W_TXC1_SENT goes TRUE
E_TXC2_SENT goes TRUE
WCR_XMTCODE_1 goes TRUE
ECR_XMTCODE_2 goes TRUE
ECR_XMTCODE_1 goes TRUE
WCS_INCODE_1 goes TRUE
ECS_INCODE_2 goes TRUE
ECS_INCODE_1 goes TRUE
POWER_UP goes TRUE
W_TRK_OCC goes TRUE
E_TRK_OCC goes TRUE
WDO_OUTCODE_7 goes TRUE
WCR_RECCODE_1 goes FALSE
WCR_RECCODE_7 goes TRUE
WDO_OUTCODE_1 goes TRUE
EDO_OUTCODE_1 goes TRUE
(Enter ? for Command Summary)
PGK> bvq 10/04/00,09:00
EV: 10/03/00 16:52:58 WDO_OUTCODE_7
EV: 10/03/00 16:52:58 WCR_RECCODE_1
EV: 10/03/00 16:52:58 WCR_RECCODE_7
EV: 10/03/00 16:52:47 WDO_OUTCODE_1
EV: 10/03/00 16:52:47 EDO_OUTCODE_1
EV: 10/03/00 16:52:47 WCR_RECCODE_1
EV: 10/03/00 16:52:47 ECR_RECCODE_1
goes
goes
goes
goes
goes
goes
goes
TRUE
FALSE
TRUE
TRUE
TRUE
TRUE
TRUE
CAC - Clear All Error Counters
Description: Error Counters keep track of the number of times an error code has been
logged. Clear all of the counters with this command.
PGK> cac
EC: ALL ERROR COUNTERS CLEARED
P2160B, Vol.1, Rev. Jan/07
B–9
Alstom Signaling Inc.
CPU Hardware and Software
C5 - Change Code 5 Format Settings
Description: The Code 5 Format can be field-selectable as Standard, Alternating, and
Long Code 5. Modify the current settings with this command.
PGK> c5
CODE 5 CONFIGURATION MENU
ENTER EAST (RIGHT) TRACK SETTINGS
1 = Standard
2 = Alternating
3 = Long
Enter setting> 1
ENTER WEST (LEFT) TRACK SETTINGS
1 = Standard
2 = Alternating
3 = Long
Enter setting> 1
Code 5 Mode settings were not changed.
CEC - Clear Error Counter (specify upper-case HEX error code to clear specific
counter)
Description: Error Counters keep track of the number of times an error code has been
logged. Clear an individual counter with this command.
PGK> cec FF
EC: FF ERROR COUNTER CLEARED
CEQ - Clear All Entries In Error Queue
Description: The Error Queue is a list of logged system errors. Clear the list with this
command.
PGK> ceq
EQ: QUEUE IS EMPTY
P2160B, Vol.1, Rev. Jan/07
B–10
Alstom Signaling Inc.
CPU Hardware and Software
CFR – Configure Filament Error Reporting
Description: Open filaments are logged as system errors. However, if a lamp or an
entire head is not present at a given location, use this command to configure the system
to not report that “open” filament as an error.
PGK> cfr
<< Filament Configuration Mode >>
East Colorlight Configuration
A
A
A
B
B
B
Head
Head
Head
Head
Head
Head
Green Filament Error Reporting is: ENABLED. Change it?(Y/N): n
Yellow Filament Error Reporting is: ENABLED. Change it?(Y/N): n
Red Filament Error Reporting is: ENABLED. Change it?(Y/N): n
Green Filament Error Reporting is: ENABLED. Change it?(Y/N): n
Yellow Filament Error Reporting is: ENABLED. Change it?(Y/N): n
Red Filament Error Reporting is: ENABLED. Change it?(Y/N): n
West Colorlight Configuration
A
A
A
B
B
B
Head
Head
Head
Head
Head
Head
Green Filament Error Reporting is: ENABLED. Change it?(Y/N): n
Yellow Filament Error Reporting is: ENABLED. Change it?(Y/N): n
Red Filament Error Reporting is: ENABLED. Change it?(Y/N): n
Green Filament Error Reporting is: ENABLED. Change it?(Y/N): n
Yellow Filament Error Reporting is: ENABLED. Change it?(Y/N): n
Red Filament Error Reporting is: ENABLED. Change it?(Y/N): n
Filament Error Reporting settings were not changed.
CTQ - Clear Entire Block Trouble Queue
The Block Trouble Queue is a list of Trouble Codes received at that location. Clear the
list with this command.
PGK> ctq
TQ: QUEUE IS EMPTY
CVQ - Clear All Entries In Event Queue
The Event Queue is a list of system events, such as changes to the states of inputs,
outputs, and other parameters. Clear the list with this command.
PGK> cvq
VQ: QUEUE IS EMPTY
P2160B, Vol.1, Rev. Jan/07
B–11
Alstom Signaling Inc.
CPU Hardware and Software
DAC - Display All Error Counters
Error Counters keep track of the number of times an error code has been logged.
Display all of the counters with this command.
PGK> dac
EC: Searching...,
EC: Err#=22 Cnt=00004
EC: Err#=23 Cnt=00006
EC: Err#=30 Cnt=00003
EC: Err#=52 Cnt=00004
EC: Err#=53 Cnt=00004
EC: Err#=60 Cnt=00003
ESL A Filament Failure
ESL B Filament Failure
East CLD Failure
WSL A Filament Failure
WSL B Filament Failure
West CLD Failure
DC5 - Display Code 5 Format Settings
The Code 5 Format can be field-selectable as Standard, Alternating, and Long Code 5.
Display the current settings with this command.
PGK> dc5
<<< CODE 5 FORMAT SETTINGS >>>
EAST (RIGHT) TRACK SETTING: STANDARD
WEST (LEFT) TRACK SETTING: STANDARD
DCE - Display Current Errors
Use this command to determine if an error in the Error Queue is currently true or if the
condition that caused it to be logged is no longer present.
PGK> dce
EC: Err#=30 East CLD Failure
EC: Err#=60 West CLD Failure
EC: Err#=A0 AUX I/O Failure
DEC - Display Error Counter (specify upper-case HEX error code to display specific
counter)
Error Counters keep track of the number of times an error code has been logged.
Display an individual counter with this command.
PGK> dec FF
EC: Err#=FF Cnt=00000 Initialization Failure
DEQ - Display Entire Error Queue
The Error Queue is a list of logged system errors. Display the list with this command.
PGK> deq
EQ: 02/10/97 15:06:45 Err#=A0 AUX I/O Failure
EQ: 02/10/97 15:06:45 Err#=60 West CLD Failure
EQ: 02/10/97 15:06:45 Err#=30 East CLD Failure
P2160B, Vol.1, Rev. Jan/07
B–12
Alstom Signaling Inc.
CPU Hardware and Software
DTS - Display Code T Enable Settings
The DTS command displays the Code T mode settings relevant to the module type. The
settings are modified with the MTS command.
Example (for an Intermediate or Repeater – see Note below):
PGK> dts
Code T East Track Operation: ENABLED
Code T West Track Operation: ENABLED
Trouble
Trouble
Trouble
Trouble
Code
Code
Code
Code
1
2
3
4
Parameter:
Parameter:
Parameter:
Parameter:
ENABLED
ENABLED
ENABLED
ENABLED
Code T Initiate East: ENABLED
Code T Initiate West: ENABLED
Code T Repeat East: DISABLED
Code T Repeat West: DISABLED
Note: For a Control Point, only the first two settings are displayed as the others are not
defined for the Control Point. Also, for the Intermediate and Repeater, if both Code T
track operation settings are disabled, no other settings are displayed.
DTQ - Display Entire Block Trouble Queue
Description: The Block Trouble Queue is a list of Trouble Codes received at that
location. Display the list with this command.
PGK> dtq
TQ: 12/06/00 09:42:57.40 East received Location ID: 7, Trouble Code: 4
TQ: 12/06/00 09:41:31.00 West received Location ID: 22, Trouble Code: 1
DVQ - Display All Entries In Event Queue
The Event Queue is a list of system events, such as changes to the states of inputs,
outputs, and other parameters. Display the list with this command.
PGK> dvq
EV: 02/10/97
EV: 02/10/97
EV: 02/10/97
EV: 02/10/97
10:41:56
10:41:56
10:41:56
10:41:56
P2160B, Vol.1, Rev. Jan/07
LLM_RCVR001D goes TRUE
LLM_RCVR0016 goes TRUE
W_TX_C4_CONT goes TRUE
IOCOUT_E_CLGHT_B_RED_DR goes TRUE
B–13
Alstom Signaling Inc.
CPU Hardware and Software
MTC – Monitor Trouble Codes
Use this command to display a cycle-by-cycle view of a Code T transmission or
reception. For each cycle of the Code T message, the cycle number and whether that
cycle is a Mark (M) or a Space (S) is displayed.
PGK> mtc
SELECT CODE T COUNT TO DISPLAY
1 = East RX
2 = East TX
3 = West RX
4 = West TX
Enter setting> 4
Location ID: 1, Trouble Code: 1
W TX:1 M
W TX:2 M
W TX:3 S
W TX:4 S
W TX:5 S
MTS - Modify Code T Enable Settings
The MTS command steps the user through each Code T mode settings relevant to the
module type and allows ENABLE/DISABLE selection. If any settings are changed, the
user is notified that the PGK CPU must reset to apply the changes and given a chance
to cancel.
MTX - Display/modify Code T Expiration Time
The MTX command allows display and modification of the Trouble Queue Expiration
Time. The default value when Code T is enabled for an application in the PGKCAA is 0,
which is interpreted as ‘NEVER’. The Expiration Time can be set between 1 and 96
hours, in one hour steps, or to NEVER where Block Trouble Queue entries can only be
removed with the CTQ command. If the Expiration Time is set to a value between 1 and
96 hours, the value defines the period of time that an entry stays in the Queue before
being deleted automatically. Note: If a Trouble Code is continuously being received at a
location (due to a non-intermittent trouble condition at another module), a new Queue
entry with the same Trouble Code is logged within one frame period (approximately 84
seconds) after the previous entry is deleted.
PGK> mtx
Block Trouble Queue Entry Expiration Time = NONE
Do you wish to permanently change the Expiration Time?
Press Y to proceed or N to cancel (Y/N) >n
P2160B, Vol.1, Rev. Jan/07
B–14
Alstom Signaling Inc.
CPU Hardware and Software
NVI – Display/modify Non-Vital Inputs
16 non-vital inputs to the system are provided that can be changed via the serial
interface. Use this command to display/modify the states of all 16.
PGK> nvi
NVI: (16) FFFF FFFF FFFF FFFF (1)
(Enter ? for Command Summary)
PGK> nvi 1 t
NVI: (16) FFFF FFFF FFFF FFFT (1)
(Enter ? for Command Summary)
PGK> nvi 1 f
NVI: (16) FFFF FFFF FFFF FFFF (1)
NVU – Update Non-Vital Inputs to Non-Volatile Memory
16 non-vital inputs to the system are provided that can be changed via the serial
interface. Changes made to the states of these inputs are not updated in non-volatile
memory, which means that the changes are lost upon module reset. Use this command
to update the states of these inputs in non-volatile memory.
(Enter ? for Command Summary)
PGK> nvu
Current Non-Vital Input States will be updated to non-volatile memory.
PGK must RESET to use the new settings.
Press Y to proceed or N to cancel.
CONFIRM (Y/N) >n
RVQ - Display Events During A Specified Date/Time Range
The Event Queue can contain many entries which take some time to display to the
screen. To aid the user in displaying only those entries that occurred during a given
date/time range, the RVQ command is provided.
PGK> rvq 10/03/00,16:45 10/03/00,16:48
EV: 10/03/00 16:45:24 W_TRK_OCC goes TRUE
EV: 10/03/00 16:45:24 WCR_RECCODE_7 goes FALSE
EV: 10/03/00 16:45:25 WDO_OUTCODE_1 goes FALSE
EV: 10/03/00 16:45:25 WDO_OUTCODE_7 goes FALSE
EV: 10/03/00 16:45:47 W_TRK_OCC goes FALSE
EV: 10/03/00 16:45:47 WCR_RECCODE_1 goes TRUE
EV: 10/03/00 16:45:48 WDO_OUTCODE_1 goes TRUE
EV: 10/03/00 16:45:53 WCR_RECCODE_8 goes TRUE
EV: 10/03/00 16:45:53 WCR_RECCODE_1 goes FALSE
EV: 10/03/00 16:45:53 WDO_OUTCODE_8 goes TRUE
(Enter ? for Command Summary)
PGK> rvq 10/03/00,16:50 10/04/00
EV: 10/03/00 16:52:39 E_TRK_OCC goes TRUE
P2160B, Vol.1, Rev. Jan/07
B–15
Alstom Signaling Inc.
CPU Hardware and Software
EV:
EV:
EV:
EV:
EV:
EV:
EV:
EV:
EV:
EV:
EV:
EV:
EV:
EV:
EV:
EV:
EV:
EV:
EV:
EV:
EV:
EV:
EV:
EV:
EV:
EV:
EV:
EV:
EV:
EV:
10/03/00
10/03/00
10/03/00
10/03/00
10/03/00
10/03/00
10/03/00
10/03/00
10/03/00
10/03/00
10/03/00
10/03/00
10/03/00
10/03/00
10/03/00
10/03/00
10/03/00
10/03/00
10/03/00
10/04/00
10/04/00
10/04/00
10/04/00
10/04/00
10/04/00
10/04/00
10/04/00
10/04/00
10/04/00
10/04/00
16:52:39
16:52:39
16:52:40
16:52:40
16:52:40
16:52:40
16:52:40
16:52:40
16:52:43
16:52:43
16:52:46
16:52:46
16:52:47
16:52:47
16:52:47
16:52:47
16:52:58
16:52:58
16:52:58
09:08:06
09:08:06
09:08:06
09:08:07
09:08:07
09:08:07
09:08:07
09:08:07
09:08:07
09:08:10
09:08:10
W_TRK_OCC goes TRUE
POWER_UP goes TRUE
ECS_INCODE_1 goes TRUE
ECS_INCODE_2 goes TRUE
WCS_INCODE_1 goes TRUE
ECR_XMTCODE_1 goes TRUE
ECR_XMTCODE_2 goes TRUE
WCR_XMTCODE_1 goes TRUE
W_TXC1_SENT goes TRUE
E_TXC2_SENT goes TRUE
W_TRK_OCC goes FALSE
E_TRK_OCC goes FALSE
ECR_RECCODE_1 goes TRUE
WCR_RECCODE_1 goes TRUE
EDO_OUTCODE_1 goes TRUE
WDO_OUTCODE_1 goes TRUE
WCR_RECCODE_7 goes TRUE
WCR_RECCODE_1 goes FALSE
WDO_OUTCODE_7 goes TRUE
E_TRK_OCC goes TRUE
W_TRK_OCC goes TRUE
POWER_UP goes TRUE
ECS_INCODE_1 goes TRUE
ECS_INCODE_2 goes TRUE
WCS_INCODE_1 goes TRUE
ECR_XMTCODE_1 goes TRUE
ECR_XMTCODE_2 goes TRUE
WCR_XMTCODE_1 goes TRUE
E_TXC2_SENT goes TRUE
W_TXC1_SENT goes TRUE
SD/ST - Setting The Real Time Clock
Description: The Programmable Genrakode CPU board contains a real time clock to aid
in the analysis of failures or events. To set the time and date, type the following from the
PGK prompt:
PGK>ST hh:mm:ss
PGK>SD mm/dd/yy
where:
hh
mm
ss
mm
dd
yy
= hour (in 24 hour format)
= minute
= second
= month of the year
= day of the month
= year
P2160B, Vol.1, Rev. Jan/07
B–16
Alstom Signaling Inc.
CPU Hardware and Software
TDT - Terminal Display Toggle
Description: If the Hand Held Terminal is used, function TDT must be entered as the
first command to prevent loss of information due to the small display size. In addition to
the error queue, an area in the Genrakode II memory is dedicated to saving information
concerning activity such as signal activation, track occupancy, etc. This information is
contained in the Event Queue and is accessed using the “xVx” commands. Both
Queue’s are structured as LIFO (Last In First Out). This means that when viewing either
the Event or Error queue, the first information printed on the terminal screen is the last
event or error to occur. Programmable Genrakode II also provides the ability to analyze
the total number of errors that have occurred in a period of time. This is accomplished
through the use of the error count commands listed.
PGK> tdt
Display Type = HHT
PGK> tdt
Display Type = PC
TID - Display/modify Code T Location ID
The TID command allows display and modification of the Code T Location ID for a
module. The default value when Code T is enabled for an application in the PGKCAA is
0. A Location ID of 0 disables Code T since the valid range of ID’s is 1 to 27. All the
modules in a Code T-enabled block must have unique Location ID’s or it is impossible to
isolate Trouble Codes to one location.
PGK> tid
Code T Location ID = 7
Do you wish to permanently change the LocationID?
Press Y to proceed or N to cancel (Y/N) >n
TTD – Toggle Code T Debug Mode
The Block Trouble Queue is a list of Trouble Codes received at that location. With the
Code T Debug mode disabled, only the first of given Trouble Code (with Location ID) is
logged – any subsequent reception of the same code is not logged. To enable the
logging of every reception, regardless of duplicates, use this command.
PGK> ttd
Code T Debug Mode = ENABLED
(Enter ? for Command Summary)
PGK> ttd
Code T Debug Mode = DISABLED
P2160B, Vol.1, Rev. Jan/07
B–17
Alstom Signaling Inc.
CPU Hardware and Software
TTI – Display/modify Code T Transmit Intervals
Trouble Codes can be sent continuously (if all conditions are met to set a particular
Trouble Code true), or they can be sent only once every given number of
minutes/hours. The available range for the transmit interval is 3 minutes to 24 hours.
Use this command to display/modify the transmit intervals for each Trouble Code.
PGK> tti
Trouble
Trouble
Trouble
Trouble
Trouble
Trouble
Trouble
Trouble
Code
Code
Code
Code
Code
Code
Code
Code
1:
2:
3:
4:
5:
6:
7:
8:
6 minutes
CONTINUOUS
CONTINUOUS
CONTINUOUS
CONTINUOUS
CONTINUOUS
CONTINUOUS
CONTINUOUS
Do you wish to permanently change any Transmit Intervals?
Press Y to proceed or N to cancel (Y/N) >n
P2160B, Vol.1, Rev. Jan/07
B–18
Alstom Signaling Inc.
CPU Hardware and Software
B.4.
DOWNLOADING AN APPLICATION TO THE PGK CPU
After the Application HEX file has been successfully generated and verified by the
PGKCAA, it can be downloaded.exe). This is a Windows™ application provided with the
PGKCAA installation package and, like the PGKCAA, is compatible with Windows95™,
Windows98™, and WindowsNT™ 4.0.
B.4.1.
Running the Download Utility
On the PC, there are two ways to start the Download utility:
•
Launch the utility from within the PGKCAA by selecting Tools->Download Hex File
from the pull-down menu (if an application is currently open in the PGKCAA, that
application is automatically opened by Dloadwin).
•
Double-click on the Dloadwin.exe file from a File Explorer window (or select from the
Windows™ Start menu). The program should start and display a window similar to
Figure B–1.
Figure B–1. Dloadwin (File Mode)
P2160B, Vol.1, Rev. Jan/07
B–19
Alstom Signaling Inc.
CPU Hardware and Software
The Dloadwin utility requires the use a serial port on the PC for the serial data
connection to the PGK CPU board, and defaults to COM1. If the serial data connection
to the PGK CPU board uses a port other than COM1, it is necessary to change the
COM Port setting in Dloadwin to match the port being used. Figure B–2 shows the pulldown menu selection to change the COM Port setting.
Figure B–2. COM Port Setting Change
Connect a null modem serial cable between the appropriate serial port on your PC and
the DB9 serial port connector on the front edge of the PGK CPU board. See Figure A–9
for serial port location and Section 6, Heading 6.3. for serial port use.
P2160B, Vol.1, Rev. Jan/07
B–20
Alstom Signaling Inc.
CPU Hardware and Software
Apply power to the module. The PGK CPU board should display ‘P-UP’ on its card edge
LED display to indicate the Power-up sequence, which takes around 20 sec to
complete, has begun. The Power-up sequence completes with one of three possible
results:
1. The module enters normal operation (with VPC board LED(s) lit) if the PGK CPU
already contains valid application and system software and the hardware
configuration (including module wire-wrap signature) is valid.
2. The module enters Programming mode and display ‘Prog’ on its card edge LED
display, indicating that the on-board application and/or system software is invalid or
missing and needs to be downloaded to the board.
NOTE:
This is the normal condition when downloading to a new (unprogrammed)
PGK CPU board for the first time.
3. The module attempts to enter normal operation but then automatically resets,
displays ‘P-UP’, and re-runs the Power-up sequence. This ‘reset loop’ indicates that
application and system software are present but some necessary condition is not
being met to allow the module to enter normal operation. This could include a
mismatch between application and system software versions on the PGK CPU
board, an incorrect complement of I/O boards, or an incorrect module wire-wrap
signature.
If cases 1 or 2 occur, go to “Starting the Download Process” to begin the download
process. If case 3 occurs, go to “Establishing Communications Prior to Download”.
P2160B, Vol.1, Rev. Jan/07
B–21
Alstom Signaling Inc.
CPU Hardware and Software
B.4.2.
Establishing Communications Prior to Download
When the PGK module is in a reset loop, it is necessary to manually interrupt the loop to
enable communications with the PC prior to downloading software to the PGK CPU.
Switch from the File mode to the Terminal mode of the Dloadwin utility by selecting
Actions->Terminal Mode from the pull-down menu. During each Power-up attempt,
several lines are written to the terminal screen, similar to Figure B–3. One of the first
lines to be displayed is “Press <Enter> now to use Monitor”. This is displayed only for a
few seconds in each Power-up sequence to give the user a chance to interrupt the reset
loop and enter the Monitor mode. Press <Return> as soon as this message is
displayed on the screen. If <Return> is pressed in time, the reset loop is interrupted,
‘Prog’ is displayed on the PGK CPU card edge display, and the MON> prompt appears
in the terminal window. The Monitor mode (indicated by the PGK CPU displaying the
MON> prompt in the terminal window) is the mode from which software download can
begin. Now go to “Starting the Download Process” to begin the download process.
Figure B–3. Dloadwin (Terminal Mode)
P2160B, Vol.1, Rev. Jan/07
B–22
Alstom Signaling Inc.
CPU Hardware and Software
B.4.3.
Starting the Download Process
The Dloadwin utility automates most of the steps necessary to download application
software (and system software, if required) to the PGK CPU board. To initiate download
of an application, Dloadwin must be in the File Mode (if currently in Terminal Mode,
switch to the File Mode by selecting Actions->Terminal Mode from the pull-down
menu). Open the application HEX file to be downloaded (if the file is not already
opened) by selecting File->Open from the pull-down menu.
NOTE
The System Software HEX file required by the Application HEX file must
be present in the same directory as the application HEX file. Or else an
error message is displayed stating that the program “Cannot open System
HEX file, 402833XX.HEX”, where the two X’s in the filename vary
depending on the software version. If this occurs, manually move this file
to the directory containing the application HEX file and start again.
If the Application HEX file is successfully loaded, the File Mode window of Dloadwin is
updated with application information loaded from the HEX file. See Figure B–4 for an
example.
Figure B–4. File Mode with application loaded
P2160B, Vol.1, Rev. Jan/07
B–23
Alstom Signaling Inc.
CPU Hardware and Software
Begin the download process by selecting Actions->Download from the pull-down
menu (or clicking the Download button). A Status Window appears which provides stepby-step status of the download process and reported its progress in a bar graph format
(see Figure B–5).
Figure B–5. Status Window During Download
The steps in the download process are listed below, in sequential order. The words in
quotations are those which appear at the top of the Status Window as the download
progresses:
1. “Establishing connection” sends commands to the PGK CPU to prepare the system
for download.
2. “Querying Software Versions on the PGK CPU” prompts the Genrakode™ module
for its system software version information. If the version information reported by the
PGK CPU does not match the version required by the application, a warning is
displayed. Abort or continue the download, thereby authorizing the replacement of
the system software. The application cannot run unless the system software is
replaced. The download program enforces compliance between the system software
and the application's .HEX file. If the system software version on the PGK CPU
board does not comply with the application .HEX file and continue is chosen, then
the download program erases the existing system
3. "Erasing application memory” erases any application that is currently installed on the
PGK CPU board.
4. "Erasing system memory" erases any system software that is currently installed on
the PGK CPU board. Note: This step is only performed if the system software
version on-board is not correct for the Application HEX file being downloaded.
P2160B, Vol.1, Rev. Jan/07
B–24
Alstom Signaling Inc.
CPU Hardware and Software
5. "Speeding up communication" increases the baud rate on the serial line from 1200
baud to either 19.2 kbaud or 115 kbaud (depending on PGK CPU version) to
maximize data download speed.
6. "Downloading Application HEX File" sends the currently-selected application HEX
file to the PGK CPU, which stores this applications on the Application Flash memory
IC (U12).
7. "Downloading System HEX File", if required, sends the version of system software
required by the selected application to the PGK CPU board, which stores this
applications on the System Flash memory IC (U15).
When the process is complete, the Application and System Software checksum values
(and CRCs if supported by the PGK CPU version) are displayed in the Status window,
and a command is sent to the PGK CPU board to reset and enter the normal operating
mode.
P2160B, Vol.1, Rev. Jan/07
B–25
Alstom Signaling Inc.
CPU Hardware and Software
B.5.
CODE T REFERENCE
The Genrakode II Code T mode allows transmission of specific Trouble Code
indications from Genrakode II Intermediate, Repeater, and Switch Lock modules in a
block to Genrakode II Control Points at the ends of the block. Each module in the block
is assigned unique Trouble Code indications (up to eight per location) which can be
transmitted to alert maintenance personnel to such conditions as failed lamp filaments,
loss of commercial power, stuck searchlight signal mechanisms, and other problems. It
can also be used to continuously provide positive indications from the modules in a
block to verify normally present inputs. Unlike a single, generic maintenance code, the
Code T mode provides specific information on the location and nature of events
requiring maintenance action. All Genrakode II modules in the block store the Trouble
Codes received from other modules in the block and these Trouble Codes can be
accessed at any module through the PGK CPU serial port interface. Trouble Code
information received at the Control Points can also be transmitted to the control office
through various means.
Use of Code T requires all modules in a contiguous section of a block to be Genrakode
II modules with appropriate software versions and enable settings – the mode is not
compatible with conventional Genrakode, PGK without Code T enabled, or other
manufacturer's equipment. Code T operation can be enabled or disabled for an
application program through the PGKCAA (PC-based application development tool), as
well as enabled or disabled in the field through the serial port interface.
Code T, like Code 5, is not a standalone code but can be encoded on all standalone
codes except Code 6. Trouble Code information is encoded using Code T in a multicycle frame. The number of code cycles required to transmit one frame is based on the
number of track circuits in a block this mode can support (currently 28) and the number
of unique Trouble Codes per location (selectable between 4 and 8).
Only properly configured PGK Intermediate, Repeater, and Switch Lock modules can
transmit Trouble Codes. If all Code T mode enables are set True, a Trouble Code is
transmitted by a module when either of the following conditions are met:
•
One of the module’s trouble code parameters is set True by the application logic.
This trouble code is sent in both directions (unless otherwise configured).
•
A Trouble Code is received from an adjacent module. This trouble code is not sent in
both directions; it is only repeated. If the code received on the East, it is transmitted
to the West.
P2160B, Vol.1, Rev. Jan/07
B–26
Alstom Signaling Inc.
CPU Hardware and Software
If the track circuit drops for even a single Genrakode cycle while a Trouble Code is
being sent, both ends of the circuit reset their Code T processes:
•
the transmitting end waits until the track is up again to restart the same Trouble
Code that was interrupted
•
the receive end ignores the incomplete Trouble Code frame and waits for another
valid frame to begin
When any module (including Control Point) receives a complete and valid Trouble Code
frame, that Trouble Code is logged to the module’s Block Trouble Queue. For
Intermediate, Repeater, and Switch Lock modules, that specific Trouble Code is also
queued up for transmit on the other track if the repeating function for that direction is
enabled.
Several serial port commands are available to configure Code T operation and display
Trouble Code information, as discussed earlier in this section.
B.5.1.
Code T Advantages
Prior to Code T, railroads generally had no remote access to data at modules other than
Control Points. If a railroad desires access to maintenance-related information at every
module in a pulse coded signaling system, the railroad must install telephone lines or
data radios at every module to relay this information back to the control office. This may
be prohibitively expensive for most railroads. In fact, the development of pulse coded
signaling systems using the rails as a transmission medium occurred precisely to
enable the railroads to eliminate the pole-line previously run to every signaling module
to carry vital and non-vital signaling information.
The major advantage of Code T is that maintenance-related data (or any other non-vital
information) can now be conveyed to/from any module using the same transmission
medium (the rails) as the pulse coded vital signaling codes. This data can therefore be
sent to the Control Points where a communication link to the central control office
already exists. Since this new communication capability takes advantage of an existing
transmission medium and existing hardware (the current signaling system), the cost to
utilize this new capability is minimal.
With Code T, if any module in the block experiences a system fault, such as a failed
signal lamp filament, the module transmits data which uniquely identifies both the
location and nature of the fault to one or both of its adjacent modules. This is logged
and repeated as necessary by other modules until the data reaches a Control Point, at
which time this data can be relayed to the control office, providing the exact location and
nature of the fault. This can allow much faster alerting and dispatching of maintenance
personnel to correct the fault and minimize train delays. In many cases, it may allow a
problem to be detected and corrected before it results in train delays.
P2160B, Vol.1, Rev. Jan/07
B–27
Alstom Signaling Inc.
CPU Hardware and Software
B.5.2.
Background
Pulse coded railroad signaling systems using the rails as a transmission medium were
originally developed to provide vital (fail-safe) control of the signaling system without the
use of traditional pole line, which railroads found increasingly expensive and
inconvenient to maintain. These systems are composed of various transceiver stations
or modules at opposite ends of track circuits (discrete sections of track electrically
isolated by insulated joints – typically one to three miles in length), an example of which
is shown in Figure B–6. Each module is located on the boundary of two track circuits
defined by the insulated joints (see Figure B–7). These modules exchange electrical
signals through the track circuit in a time sharing mode with a fixed cycle time (typically
2.8 seconds). Communication is bi-directional, where Module 1 may transmit for 1.4
seconds while Module 2 receives and then Module 2 transmits to Module 1 for the final
1.4 seconds of the cycle. The electrical signals are typically DC current pulses, although
AC pulses are used on railroad properties where electrically powered locomotives
operate and DC pulse operation is not possible.
to control
office
CONTROL
POINT
A
vehicle
running rails
MODULE 1
WAYSIDE
SIGNAL
WAYSIDE
SIGNAL
WAYSIDE
SIGNAL
CONTROL
POINT
B
MODULE 2
MODULE 3
MODULE 4
MODULE 5
to control
office
Figure B–6. Example Railroad Control Block
Figure B–7. Bi-directional Communication On A Track Circuit
P2160B, Vol.1, Rev. Jan/07
B–28
Alstom Signaling Inc.
CPU Hardware and Software
Different combinations of pulses are produced by the transceiver modules by varying
the number of pulses, spacing between multiple pulses (if present), and pulse length, to
represent different codes. These modules transmit and receive these codes to/from
their adjacent modules based on the operating rules of the railroad to control safetycritical wayside equipment such as signals and switch controllers. Except for the
transceiver modules at the end of each control block (the Control Points), each
transceiver module only directly communicates with the two modules on either side of it.
A Control Point module only directly communicates with the module at the end of its
track circuit. In Figure B–6 Module 1 can only directly communicate with Module 2, 2
with 3, and so on.
A fundamental limitation of this design is that the Control Point only has direct
knowledge of the code(s) being transmitted by its one adjacent module, and has no
direct knowledge of the specific codes being transmitted by other modules in the block.
One prior approach to providing maintenance-related data from modules out in the
block to the Control Points has been to define a non-vital maintenance code which can
be added to most of the other codes by modifying pulse widths. In practice, if any
module in the block experiences a system fault , such as a failed signal lamp filament,
the module adds this indication to the code(s) it is currently transmitting. This is
repeated as necessary by other modules until the code reaches a Control Point. At this
time an indication can be generated to the control office to communicate that a fault is
present at a module in the control block, although no information is available on the
nature of the fault or the exact location of the fault. Code T addresses this limitation by
using binary data transmission through the block to transfer specific indications from
modules in the block to the Control Points. Code T provides this new capability by
overlaying a binary data protocol on the existing pulse coding scheme to send binary
data from any module in the block to any other module, while not interfering with the
existing operation of the signaling system.
P2160B, Vol.1, Rev. Jan/07
B–29
Alstom Signaling Inc.
CPU Hardware and Software
B.5.3.
Enabling and Using Code T
For an application program to use Code T, the application must be properly configured
using the PGK CAA application development tool (v2.01 or newer). Because of its
flexibility, there are many options for Code T operation. Configuring an application for
Code T involves two steps:
1. Creating the application logic equations required to control Trouble Code indication
parameters based on particular inputs such as lamp outs, loss of AC power, or
ground fault detection. These equations are created like any other application logic
equations. See the on-line Help in the PGK CAA program for a description of the
Trouble Code indication parameters and how to use them.
2. Setting up Code T enable selections and Trouble Queue expiration times. This is
done through checkboxes and up/down numerical controls to control how Code T
operates. With few exceptions, the selections made in the PGK CAA are merely
default settings for the application and can be modified as desired in the field (using
the PGK CPU serial port interface) without modifying or recompiling the application
program. The available Code T settings are:
− Code T Mode enable – This is a checkbox in the Module Configuration dialog
box. If this box is not checked, Code T operation is disabled for this application
and cannot be enabled in the field. No Code T indication parameters is available
for use in application logic equations. If there is even a chance that an application
program wants to use Code T (even repeating Trouble Codes from other
modules), this checkbox should be checked.
− Code T Operation enables (track-specific) – These checkboxes (one for East and
one for West) are located in the Code T Settings dialog box. If enabled, Code T
waveforms can be received and transmitted on the respective track, and the
definition of Code 6 (both for transmit and receive) is changed from 600ms
(nominal) to 812ms (nominal) For normal Code T operation, all tracks are
enabled. However, certain special circumstances such as interfacing to another
supplier’s equipment on one end of a block may require enabling Code T
operation in one direction only (at that boundary location). These enable settings
may be modified in the field.
− Code T Number of Parameters – Either four or eight Trouble Codes per location
may be specified from a pull-down list in the Code T Settings dialog box. This
setting may not be modified in the field.
P2160B, Vol.1, Rev. Jan/07
B–30
Alstom Signaling Inc.
CPU Hardware and Software
− Individual Parameter Enables and Transmit Intervals – Each Trouble Code
Parameter may be individually enabled or disabled in the Code T Parameter
settings dialog box and a unique Transmit Interval may be specified for each one.
These settings may be modified in the field. The parameter enables control
whether a given Trouble Code is actually sent when the application logic sets its
respective indication parameter True. This allows Trouble Code application logic
to be present in the application that is intended to be used (for example) at a later
date or only if problems are suspected. The transmit interval setting specifies the
minimum interval is zero which enables continuous transmission, but there may
be situations where some other setting could be useful.
− Code T Initiate Enables (track-specific) - These checkboxes (one for East and
one for West) are located in the Code T Settings dialog box. If enabled, a Trouble
Code is sent when its respective indication parameter is set True by the
application logic and that Trouble Code’s Parameter Enable is enabled (and
Code T operation is enabled for the track). If disabled, the Trouble Code just
described is not sent. Trouble Codes received from adjacent modules could still
be repeated if so enabled For normal Code T operation, all tracks are enabled.
These settings may be modified in the field.
− Code T Repeat Enables (track-specific) - These checkboxes (one for East and
one for West) are located in the Code T Settings dialog box. If enabled, a Trouble
Code is repeated to the East when received from an adjacent module on the
West and vice-versa as long as Code T operation is enabled for the track. If
disabled, the Trouble Code is not repeated when received For example, if a
Trouble Code is received on the East but the West Repeat enable is disabled,
the Trouble Code is not transmitted to the West. Trouble Codes initiated from the
module could still be repeated if so enabled. For normal Code T operation, all
tracks are enabled. These settings may be modified in the field.
− Code T Location ID – This is the location identifier (0 to 27) that should be
uniquely assigned to each non-Control Point module in the block. It is
recommended to assign consecutive numbers starting at one end of the block,
but this is not required. A Location ID of 0 disables Code T transmit regardless of
all other enable settings. A Location ID of 1 to 27 is required. This setting may be
modified in the field, and generally must be if a given application is used at more
than one location in the block. It is often common practice to leave the default
value of 0 in the application and only assign the actual Location ID’s in the field.
The only exception is an application that is only used at a single, known location,
so the proper Location ID can be assigned when the application program is
created.
P2160B, Vol.1, Rev. Jan/07
B–31
Alstom Signaling Inc.
CPU Hardware and Software
− Block Trouble Queue Entry Expiration Time – This is a time value specified in
hours and minutes that a received Trouble Code logged in the module’s Block
Trouble Queue remains before it expires and is deleted. The selectable range is
between 3 minutes and 96 hours. If a setting of 0 (default) is selected, Queue
entries never expire, and are only deleted if the appropriate command to clear
the Block Trouble Queue is entered through the PGK CPU serial port interface.
This setting may be modified in the field.
P2160B, Vol.1, Rev. Jan/07
B–32
Alstom Signaling Inc.
System Specification
C. APPENDIX C - SYSTEM SPECIFICATIONS
C.1.
POWER SPECIFICATIONS
C.1.1.
Control Point Module
Table C–1. Control Point Module Input Power Requirements
Voltage (DC)
Single direction Current (amps DC)
Minimum
Nominal
Maximum
9.0
12.0
16.0
*
0.6
0.7
0.8
*
0.9
1.0
1.1
Double direction Current (amps DC)
* These currents are the current requirements for the module electronics only. The decoded relay current
and the peak track transmit current must be added to these values to compute the total module current
requirement.
Fuses:
•
Output drive (FU1):
5A, type 3AG
•
Electronics (FU2):
5A, type 3AG
Board-specific specifications, such as Code Select input and Decoded Output drive
specifications, are provided in Appendix A.
P2160B, Vol.1, Rev. Jan/07
C–1
Alstom Signaling Inc.
System Specification
C.1.2.
Intermediate Module
Input Power Requirements:
Table C–2. Intermediate Module Input Power Requirements
Minimum
Nominal
Maximum
9.0
12.0
16.0
1.4
1.5
1.6
Voltage (DC)
Current Dark (amps DC)
*
* This current does not include the transmit current or the current requirements for the lamp drive outputs.
Total input current for an Intermediate module is a function of the number and wattage of lamps driven.
To compute the nominal 12 V DC input current, sum the TOTAL lamp current for all lamps driven at any
one time (both EAST and WEST) and multiply by 1.25. Then add the Current Dark (amps DC) value
indicated.
Fuses:
•
Output drive (FU1): 30A, type 3AG slow-blow
•
Electronics (FU2): 5A, type 3AG
Board-specific specifications, such as Colorlight lamp drive and Searchlight lamp and
mechanism input/drive specifications, are provided in Appendix A.
C.1.3.
Repeater Module
Table C–3. Repeater Module Input Power Requirements
Voltage (DC)
Current (amps DC)
*
Minimum
Nominal
Maximum
9.0
12.0
16.0
0.6
0.7
0.9
* These currents are the current requirements for the module electronics only. The peak track transmit
current must be added to these values to compute the total module current requirements.
Fuses:
•
Output drive (FU1): 5A, type 3AG
•
Electronics (FU2): 5A, type 3AG
Board-specific specifications, such as Auxiliary I/O specifications, are provided in
Appendix A.
P2160B, Vol.1, Rev. Jan/07
C–2
Alstom Signaling Inc.
System Specification
C.1.4.
Switch Lock Module
Table C–4. Switch Lock Module Input Power Requirements
Voltage (DC)
Current (amps DC)
*
Minimum
Nominal
Maximum
9.0
12.0
16.0
0.6
0.7
0.9
* These currents are the current requirements for the module electronics only. The peak track transmit
current must be added to these values to compute the total module current requirements.
Fuses:
•
Output drive (FU1): 10A, type 3AG
•
Electronics (FU2): 5A, type 3AG
Board-specific specifications, such as Switch Lock I/O and Series Overlay
specifications, are provided in Appendix A.
C.1.5.
Lightning Protection
Primary lightning protection must be provided external to the module. Equalizers and
arrestors are required for the signal battery and track circuit leads. Arrestors are
recommended for inputs and outputs that travel on open line wires and/or over long
distances and may be subjected to primary lightning strikes or high surge levels. All
inputs and output circuits contain surge protection to guard against system malfunction
and/or damage from surges that are normally present at a typical signal location.
P2160B, Vol.1, Rev. Jan/07
C–3
Alstom Signaling Inc.
System Specification
C.2.
TRACK CODE SPECIFICATIONS – STANDARD RATE
C.2.1.
Cycle Time
Synchronized:
2.816 seconds
Unsynchronized:
2.816 seconds (East track)
2.944 seconds (West track)
C.2.2.
Transmit Code Timing
Table C–5. Transmit Code Timing
CODE
1st Pulse Width (ms)
Pulse Spacing
(ms)
2nd Pulse Width (ms)
1
112
---
---
1&7
112
224
112
1&4
112
320
112
1&3
112
496
112
1&2
112
688
112
1&9
112
816
112
1&8
112
944
112
6
600
---
---
1&5
224
---
---
1&7&5
112
224
224
1&4&5
112
320
224
1&3&5
112
496
224
1&2&5
224
688
112
1&9&5
224
816
112
1&8&5
224
944
112
The pulse spacing (indicated in the middle column) is measured from rising edge of 1st pulse to rising
edge of 2nd pulse. Code 5 timing shown assumes standard (224 ms) width. For Long Code 5 timing
substitute 352ms for 224ms. The Code 6 timing shown assumes Code T mode disabled. If enabled,
substitute 812ms for 600ms.
P2160B, Vol.1, Rev. Jan/07
C–4
Alstom Signaling Inc.
System Specification
C.2.3.
Receive Code Decoding
Table C–6. Receive Code Decoding Specifications
CODE
1st Pulse Width
(ms)
Pulse Spacing
(ms)
2nd Pulse Width
(ms)
min.
max.
min.
max.
min.
max.
1
64
160
---
---
---
---
1&7
64
160
176
256
64
160
1&4
64
160
288
368
64
160
1&3
64
160
448
544
64
160
1&2
64
160
640
736
64
160
1&9
64
160
768
864
64
160
1&8
64
160
896
992
64
160
6
496
704
---
---
---
---
1&5
176
272
---
---
---
---
1&7&5
64
160
176
256
176
272
1&4&5
64
160
288
368
176
272
1&3&5
176
272
448
544
64
160
1&2&5
176
272
640
736
64
160
1&9&5
176
272
768
864
64
160
1&8&5
176
272
896
992
64
160
The pulse spacing specifications (indicated in the middle columns) are measured from rising edge of 1st
pulse to rising edge of 2nd pulse. Code 5 timing shown assumes standard (224 ms) width. For Long
Code 5, the same absolute tolerances around the nominal 352ms pulse width apply. The Code 6 timing
shown assumes Code T mode disabled. If enabled, the range is 720ms to 912ms.
P2160B, Vol.1, Rev. Jan/07
C–5
Alstom Signaling Inc.
System Specification
C.3.
TRACK CODE SPECIFICATIONS – TRANSIT RATE
C.3.1.
Cycle Time
Synchronized:
1.920 seconds
Unsynchronized:
1.920 seconds (East track)
1.984 seconds (West track)
C.3.2.
Transmit Code Timing
Table C–7. Transmit Code Timing
CODE
1st Pulse Width (ms)
Pulse Spacing
(ms)
2nd Pulse Width (ms)
1
96
---
---
1&7
96
192
96
1&4
96
272
96
1&3
96
352
96
1&2
96
432
96
1&9
96
592
96
1&8
96
512
96
6
464
---
---
1&5
208
---
---
1&7&5
96
192
208
1&4&5
96
272
208
1&3&5
96
352
208
1&2&5
208
432
96
1&9&5
208
592
96
1&8&5
208
512
96
The pulse spacing (indicated in the middle column) is measured from rising edge of 1st pulse to rising
edge of 2nd pulse. Code 5 timing shown assumes standard (208 ms) width. The Code 6 timing shown
assumes Code T mode disabled. If enabled, substitute 608ms for 464ms.
P2160B, Vol.1, Rev. Jan/07
C–6
Alstom Signaling Inc.
System Specification
C.3.3.
Receive Code Decoding
Table C–8. Receive Code Decoding Specifications
CODE
1st Pulse Width
(ms)
Pulse Spacing
(ms)
2nd Pulse Width
(ms)
min.
max.
min.
max.
min.
max.
1
48
144
---
---
---
---
1&7
48
144
176
208
48
144
1&4
48
144
256
288
48
144
1&3
48
144
336
368
48
144
1&2
48
144
416
448
48
144
1&9
48
144
576
608
48
144
1&8
48
144
496
528
48
144
6
368
560
---
---
---
---
1&5
160
256
---
---
---
---
1&7&5
48
144
176
208
160
256
1&4&5
48
144
256
288
160
256
1&3&5
160
256
336
368
48
144
1&2&5
160
256
416
448
48
144
1&9&5
160
256
576
608
48
144
1&8&5
160
256
496
528
48
144
The pulse spacing specifications (indicated in the middle columns) are measured from rising edge of 1st
pulse to rising edge of 2nd pulse. Code 5 timing shown assumes standard (208 ms) width.. The Code 6
timing shown assumes Code T mode disabled. If enabled, the range is 576ms to 656ms.
C.4.
ASPECT FLASHING
The following aspect flash rates (in pulses per minute) are supported: 40, 45, 50, 55, 60,
and 65. All flashing aspects flash synchronously.
P2160B, Vol.1, Rev. Jan/07
C–7
Alstom Signaling Inc.
System Specification
C.5.
INSTALLATION WIRING
The following module wiring recommendations should be considered during installation:
•
Battery connections to the module should be made with AWG #10 or larger wire.
•
Module to rail connection - #6 wire (nominal 0.4 Ω per 1000 feet).
•
Connections from the modules to signal lights should be made with at least AWG
#10 wire (nominal 1.0 Ω per 1000 feet).
•
For other communications, outputs to relays or inputs such as code selects or
auxiliary vital inputs, use AWG #16 or larger wire.
•
AWG #6 twisted pair should be used to connect the module series overlay
input/output to the rails. Note: AWG #9 twisted pair can be used, but then the lead
length should not exceed 300 feet. (Twisted pair to have a minimum of 1 twist per
foot).
•
AWG #6 twisted pair should be used for line wire between Genrakode II modules
(used with Converter/Receiver Bd. P/N 59473-833-02) for distances up to 15000 ft.
(Twisted pair to have a minimum of 1 twist per foot). For other wire sizes at reduced
distances for line wire, see Section 3.
C.6.
TRACK / LINE WIRE CURRENT
The following current recommendations should be considered during installation:
•
Receive track current should be adjusted to fall between 1.0 and 1.4 amperes.
•
Under average conditions, the current should be adjusted to about 1.2 amperes. Wet
conditions may warrant adjusting closer to 1.0 amperes while very dry conditions
may warrant adjusting closer to 1.4 amperes.
WARNING
EXCESSIVE TRACK CURRENT LEVELS (OVERDRIVE) CAN RESULT
IN FAILURE TO DETECT TRAINS IN THE TRACK CIRCUIT.
•
Receive line wire current should be adjusted to fall between 0.4 and 0.8 amperes.
The line wire current level is not safety-critical.
P2160B, Vol.1, Rev. Jan/07
C–8
Alstom Signaling Inc.
System Specification
C.7.
MAXIMUM TRACK CIRCUIT LENGTHS
The following track circuit length recommendations should be considered during
installation. These guidelines assume a maximum of 50 ft track leads (point-to-point):
Railhead bonded rail (assuming 0.05 Ω/1000 ft rail resistance):
•
11000 ft
@ 3 Ohms DC ballast
•
15000 ft
@ 5 Ohms DC ballast
•
21000 ft
@ 10 Ohms DC ballast
Heavy welded rail (assuming 0.015 Ω/1000 ft rail resistance):
•
14000 ft
@ 3 Ohms DC ballast
•
20000 ft
@ 5 Ohms DC ballast
•
29000 ft
@ 10 Ohms DC ballast
Table C–9. Track Lead Increases vs. Track Circuit Length Reductions
Track Circuit Length Reduction (ft)
Per Additional 100 ft. of Track Lead
Ballast (Ohms)
Bonded
Welded
3
700
1100
5
800
1300
10
900
1500
See the Section 3 for Track/Line Circuit Adjustment instructions.
P2160B, Vol.1, Rev. Jan/07
C–9
Alstom Signaling Inc.
System Specification
C.8.
CAB SIGNAL CODE RATES
The following cab signal code rate pulses per minute date should be considered during
installation:
Table C–10. Cab Signal Code Rates
Code Rate
Pulses Per Minute
Constant ON
0
75
75.0
120
121.0
180
178.6
270
267.9
420 *
416.7
* A code rate of 420 is not available for the 60 Hz Cab Signal module.
CAUTION
For steady cab do not use the 100% power setting for either the 100 Hz or
60 Hz modules. If the module is operated for too long, an internal PC
board may overheat and fail.
P2160B, Vol.1, Rev. Jan/07
C–10
Alstom Signaling Inc.
System Specification
C.9.
AUDIO FREQUENCY COMPATIBILITY
Genrakode III modules have internal filters that allow operation on the same track circuit
with other equipment. The following two columns show frequency versus track input
impedance data for the Genrakode III module to facilitate consideration of compatibility
for specific applications.
Table C–11. Audio Frequency Versus Track Input Impedance
C.10.
Frequency (Hz)
Impedance (Ohms)
DC
2
60
13
150
8
200
11
300
16
500
25
1000
45
ENVIRONMENTAL SPECIFICATION
Operating Temperature range:
-40 degrees F to +158 degrees F
-40 degrees C to +70 degrees C
P2160B, Vol.1, Rev. Jan/07
C–11
Alstom Signaling Inc.
System Specification
C.11.
PHYSICAL SPECIFICATIONS
Table C–12. Module Dimensions and Weight
All Modules Except Cab Signal
Modules
Cab Signal Module
Length
19.0 inches (48.3 cm)
12.0 inches (30.5 cm)
Width
10.1 inches (25.7 cm)
10.1 inches (25.7 cm)
Height
15.0 inches (38.1 cm)
14.5 inches (36.8 cm)
Weight
28.0 pounds (12.7 kg)
29.0 pounds (13.2 kg)
Modules can be either shelf-mounted or wall-mounted.
C.11.1. Connections
All external connections to Genrakode II are made with AAR terminals mounted at the
top of the module. A power switch is provided to remove battery energy from the
module.
C.11.2. Accessories
•
Extender Board (P/N 59473-850-01) is an extender board that can be inserted in any
board slot in any module for troubleshooting and testing purposes. An assembly
drawing of the extender board is provided in P2160B, Volume 2.
•
60 Hz Filter (P/N 42560-276-01) is an optional filter inserted in series with the track
leads to provide greater 60 Hz rejection. An assembly drawing of the 60 Hz filter is
provided in P2160B, Volume 2.
•
100 Hz Filter (P/N 42560-276-02) is an optional filter inserted in series with the track
leads to provide 100 Hz rejection. This is used at a location where 100 Hz cab signal
is present on the rails and there is no Cab Signal module being used. An assembly
drawing of the 100 Hz filter is provided in P2160B, Volume 2.
P2160B, Vol.1, Rev. Jan/07
C–12
Alstom Signaling Inc.
FOR QUESTIONS AND INQUIRIES, CONTACT CUSTOMER SERVICE AT
1-800-717-4477
OR
WWW.ALSTOMSIGNALINGSOLUTIONS.COM
ALSTOM SIGNALING INC.
1025 JOHN STREET
WEST HENRIETTA, NY 14586