1
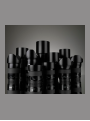
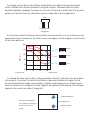
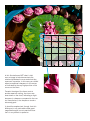
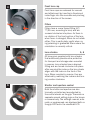
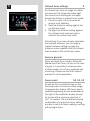
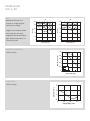
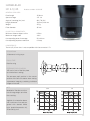
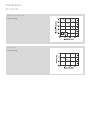
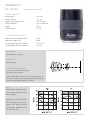
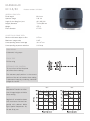
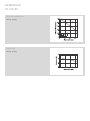
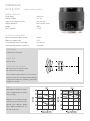
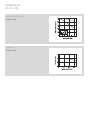
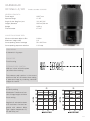
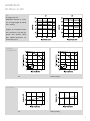
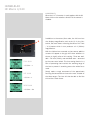
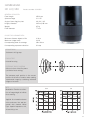
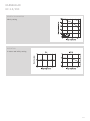
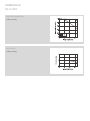
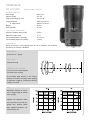
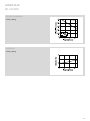
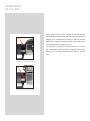
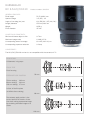
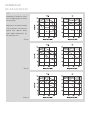
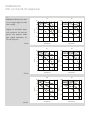
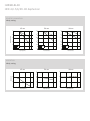
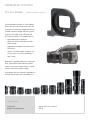
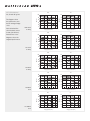
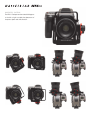
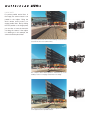
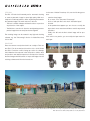
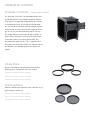
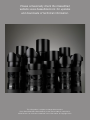
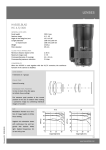
H-system Lenses & H-system Lens Accessories General Information, User Manual Information & Datasheets H-system Lenses All aspects of Hasselblad H-system lenses, optics and related user software are continuously refined to maintain the worldwide leading position in modern medium format imaging. So, congratulations on your new lens purchase. The following will explain why you have just made a decision you will not regret. Photo: Claudio Napolitan © / Hasselblad Master Your new Hasselblad HC lens represents the outstanding result of over fifty years of continuous refinements and improvements. The entire HC lens line, including all lenses, optics and related user software, has been designed to maintain Hasselblad’s leading global position in modern medium format imaging. This booklet will explain some of the factors that make your purchase decision one you will not regret. Naturally, it is the quality of the images that you take with your new lens that will provide the final proof! H-system lenses Hasselblad has produced the best medium format cameras in the world for over fifty years now. We have been able to reach and maintain this high standard thanks to the meticulous attention to detail we apply to each and every Hasselblad product. Attention that is focused on ensuring the highest possible quality. And when we say attention to detail, we mean to all details, from start to finish, covering all aspects of design and production. Just as with all previous Hasselblad products, when designing the H-system lenses, we have utilized the knowledge we have gained over the years by working with the world’s top lens manufacturers, such as Carl Zeiss, Fuji, Kodak, Rodenstock and Schneider. The result is the best lens line available to photographers today. All H-system lenses are engineered to ensure optimal performance and image quality, whether shooting film or digital. Hasselblad closely monitors production quality to ensure that our extremely high specifications are met. H-system lenses have very accurate electronic shutter mechanisms that deliver sync flash at all speeds and a multi-coating treatment that results in efficient stray light elimination. An integral focus drive motor, instant access to manual focus without switching between manual and autofocus, and other functions add to the list of features. In order to ensure their reliability and durability year after year, Hasselblad lenses use metal, not plastic, wherever possible. In short, they are professional level lenses designed for professional level photographers. In the long run, however, these are merely technical details. The true test of any lens is image quality. To objectively define image quality demands that we carry out certain types of measurement. This also means that when comparing lenses, regardless of make, that we must use the same types of measurement, otherwise any comparisons are meaningless. As the saying goes, you can’t compare apples with oranges. So, in order to simplify matters, we use objective measurements, such as MTF curves, for example. We still, however, must take into account certain subjective aspects, such as the quality of the blurred or out-of-focus areas of the image – the bokeh – for example. Subjective aspects are a matter of personal taste, but objective measurements are not. This booklet, therefore, discusses how we at Hasselblad view these scientific measurements and the other related aspects that combine to produce the legendary Hasselblad image quality. The advantage of a larger sensor When using film, there was a great quality advantage in using a larger format as it required less magnification than smaller formats to reproduce any given size image. Simply put, film grain was enlarged less and was therefore less visible in the final image. This advantage is still relevant for digital capture, and for exactly the same reasons. It makes sense, then, that modern professional format lens design is based on the same requirements. It also means that the same advantages of larger format lens design remain. To take just one example, since larger format lenses use smaller apertures to produce the same depth of field as compared to smaller formats, you can get optimum quality at such settings much more often. Basically, a larger format enables easier design of extremely high quality lenses. If you choose, however, to disregard all the practical and mechanical advantages and aspects of Hasselblad lenses, then the proof comes down to the technical data. To compare the technical aspects of larger format lenses with ‘35mm’ lenses demands a common measurement system. Thankfully, such a system, Modulation Transfer Function curves (MTF for short), does exist, but in order to be accurate, lenses must be measured according to firmly established laws of physics that take into account the reality of a given situation. Unfortunately, this isn’t always the way such measurements are carried out and until there is a universal agreement regarding standards and praxis, simple MTF comparisons can be, at best, confusing and, at worst, extremely misleading. What is an MTF curve? Simply put, it is a graph that shows how sharp the lens is at various points across the image in relation to the level of detail in the subject. A simple MTF curve looks like this: 100 MTF [%] 80 60 40 20 0 0 10 20 30 Image position [mm] Image centre Image corner The left side of the diagram represents the central part of the image and the right hand side of the diagram represents the corner of the image. The higher up the diagram the curve is, the more contrast–and thereby sharpness–can be seen. So, from this diagram we see that the lens is very sharp near the central section of the image but drops away as we move out towards the corners–the most common situation. To expand on this idea, three different evaluations are made that represent three levels of detail that could be present in any given subject. Standard practice (often emulated digitally nowadays) has been to use sets of black and white lines that produce patterns at specific lines per millimeter (lp/mm) measured at the image plane: 1mm Example with 10 lp/mm As the level of detail increases, the contrast decreases which in turn produces an apparent decrease in sharpness. So three curves now appear on the diagram, one for each of the three patterns: 40 lp/mm 100 20 lp/mm 10 lp/mm 80 MTF [%] 1 mm 60 40 lp/mm 20 lp/mm 40 10 lp/mm 1 mm 20 40 lp/mm 20 lp/mm 0 Image center 0 10 20 30 Image height [mm] 10 lp/mm Image corner 1 mm To expand the idea even further, other properties inherent in all optics are also taken into account. It involves the actual orientation of perceived patterns in regard to the lens and thereby final image representation. Patterns that appear to be streaming out from the center of the image are called ‘sagittal’ and patterns that appear to be at right angles to the center are called ‘tangential’. Tangential pattern Tangential pattern Examples of tangential and sagittal type patterns at the corners of the image. Image frame Sagittal pattern Sagittal pattern Normally, tangential patterns are not as sharply defined as sagittal patterns and so require a separate curve to provide a fair representation of a real world situation. As both tangential and sagittal valuations are taken from the same lp/mm pattern sets, they are grouped together on the diagram for easier comparative analysis. So now we have three sets of tangential/sagittal grouped curves. A tangential orientation normally causes less resolution than sagittal, and is often represented by a dashed line or different color on the diagram. 100 Near the center and at 40 lp/mm, there is virtually no difference in the sharpness of tangential and sagittal patterns. MTF [%] 80 60 Half way towards the edges of the frame there is a slight difference. 40 20 0 Image center 0 10 20 Image height [mm] 30 Just at this point, this lens would produce slightly better sharpness of tangential patterns. Image corner How do you read MTF diagrams? From the final diagram above you can see how at 10 lp/mm the orientation of patterns in the image is not too significant for good perception of sharpness whereas for finer details at 40 lp/mm, the orientation of patterns in an image plays a larger part. You can also see that at a specific point on the 40 lp/mm curves a tangential orientated pattern would actually produce a slightly sharper result than sagittal patterns. Simply put, if there was a ‘perfect’ lens, then all six curves would be high and flat and across the graph. Being able to read and understand the basics of MTF diagrams will help you compare different lenses and of course aid you in predicting the optimum settings for specific situations. Photo: Chris Simpson © / Hasselblad Master Comparing formats When comparing MTF diagrams representing different formats, cautious interpretation should be used. To make a scientifically correct comparison, test patterns (measured in lines per millimeter) would have to be 15, 30 and 60 lp/mm for 35mm format and 10, 20 and 40 lp/mm for the H System format to compensate for the difference in magnification. You therefore cannot directly compare the MTF diagrams for 35mm format to the diagrams from a larger format using the same test diagrams! The smaller format needs higher magnification to produce a given image size compared to the larger format. If you compare H-system lenses with 35mm lenses with the above in formation in mind, you get the following MTF diagrams. Note that they are based on actual measured data. Canon 16-35/2.8 @ 20 mm and f/2.8 HCD 28/4 @ f/4 100 100 80 80 60 60 40 40 20 20 0 0 0.2 0.4 0.6 0.8 15/30/60 lp/mm 1.0 Canon 50/1,4 @ f/2 100 0 80 60 40 40 20 20 0.2 0.4 0.6 15/30/60 lp/mm 0.8 1.0 21mm 0.4 0.6 0.8 0 1.0 30 mm HC 80/2.8 @ f/2.8 100 60 0 0.2 10/20/40 lp/mm 80 0 0 21mm 0 0.2 0.4 0.6 10/20/40 lp/mm 0.8 1.0 30 mm 100 80 60 40 20 0 In this illustration an MTF chart is laid over an image to help demonstrate the relationship between curves and what they represent in practice. In this case you should expect exceptional sharpness in the center, as indicated by the very high position of the curves on the chart. Towards the edge of the frame, and at another aperture setting, the curves are lower down on the chart, indicating a slight decrease in sharpness compared to the center. Nevertheless, the sharpness remains extremely good. It should be emphasised, though, that this difference is only noticeable under great magnification and in most practical situations is very difficult to perceive. 0 0.2 0.4 0.6 0.8 1.0 In addition, an H-system file, being at least twice as large as a 35 DSLR file, will sample an image with finer pitch as there are many more pixels. This means that the image reaching the H sensor, which is already of a higher quality because of the lenses, is sampled with higher resolution and so provides a far superior image quality. Comparing lenses, therefore, can involve a number of important factors; correctly produced and interpreted MTF diagrams being just one part. Conclusion As mentioned before, there are subjective considerations to add the final equation. Personal taste is impossible to quantify (how sharp should a portrait lens be?) so it’s also down to each photographer to base their valuations on a balanced mix of scientifically correct data, practicalities that match specific requirements and aesthetic considerations. Browse through this folder and you will certainly find another lens that would prove very useful. Your Hasselblad dealer will be glad to demonstrate it for you and perhaps arrange a test run. They are all extremely good; so expect tremendous results! We wish you happy shooting with your new Hasselblad H lens! Visit www.hasselblad.com to download user manuals, datasheets, product brochures, technical information, technical articles, software and firmware updates etc., as well as news about the latest developments at Hasselblad. Photo: Dirk Rees © / Hasselblad Master General Information Rapid and accurate automatic focusing capability Central electronic shutter Instant manual focus override with natural friction Instant automatic-focus return capability Non-rotation of filter or accessory when focusing Non-rotation of lens barrel in automatic focusing mode Flash sync at shutter speeds from 32s to 1/800s Reversed lens shade serves as transportation protection Automatic detection of extension rings and converters All H-system lenses have been specially formulated for the H system to produce the extremely high performance expected from Hasselblad to meet the demands from conventional and digital photography alike. In addition to extreme sharpness, the design also incorporates a soft, pleasant looking boké (the visual quality of the out-of-focus areas of the image). All lenses feature an electronically controlled central shutter designed to extremely fine tolerances for supreme accuracy that also provides flash synchronization with all speeds from 256s to 1/800s. All lenses have a very rapid automatic focus capability with instant manual override. To ensure reliable and fast autofocus in low contrast and low light conditions, a focusing-assist light (on the grip) is automatically activated. Aperture and shutter control is set via the control wheels on the camera grip. As a general rule, lens shades should always be fitted to achieve optimum performance. Protective filters (UV/Sky) should also be considered at least when working outdoors in harsh conditions. Parts1 1 A. B. C. D. E. A B Lens shade index Manual focus ring Focusing distance scales Depth-of-field scales Lens index C D Attaching a lens E Remove the front protective cover on the camera body by depressing the lens release button and keeping it depressed while turning the cover counter-clockwise. Remove the rear lens cap by unscrewing it in a counter-clockwise direction. Align the index on the lens with the index on the camera body and rotate the lens clockwise (bayonet fitting) until it clicks into place. 2 2 Removing a lens 1 3 2, 3 Depress the lens release button and keep it depressed while rotating the lens counter-clockwise until it stops and lift it out. Replace protective caps on the lens immediately and on the camera body if necessary. If you try to rotate the lens before you press the lens release button, it might lock. In this case, rotate the lens clockwise a little first and then re-attempt removal with the correct procedure: button first, then lens. 4 Front lens cap 4 Front lens caps are released for removal and attachment by inserting a thumb and index finger into the recesses and pinching in the direction of the arrows. Filters 5 Filters have a screw thread fitting (67/ 77/95 mm, according to lens) and are screwed clockwise into place. As there is no rotation of the front section of the lens when focus is changed, filters do not rotate either. This is particularly useful when using polarizing or graduated filters where the orientation is normally critical. Lens shades 5, 6 All lenses are supplied with lens shades that additionally provide extra protection for transport and storage when mounted in reverse. Lens shades have a bayonet fitting and are turned clockwise into place after ensuring the index on the lens shade aligns with the index on the front of the lens. When mounted in reverse, they are attached by matching the indexes and turning counter-clockwise. 6 Shutter and aperture control Both the shutter and aperture are electronically controlled and are adjusted by the control wheels on the grip. There are no separate manual setting rings on the lenses or camera body. The settings−manual, automatic or programmed−are displayed both on the grip LCD and in the viewfinder LCD. 7 Depth-of-field calculation 7 There are two distance scales (in feet and metres) visible through the focus distance window on the upper part of the lens barrel. There is also a central lens index mark and a depth-of-field scale. The focusing distance is read off the chosen scale from the central lens index. Depth-of-field can be calculated as follows: 1. Focus the lens as required. 2. Make an exposure reading (auto or manual) and note the aperture setting. 3. Find the markings on either side of the central index that correspond to the chosen aperture. 4. From these two markings, read off on the required lens distance scale the two corresponding distances. 5. The depth-of-field (at that particular aperture and focus setting) will be the area included between these two distances. In the example given here, the focusing distance is set at nearly 3 metres. At an aperture of f/22, the depth-of-field would therefore extend from just over 2 m to approximately 4.5 m. 8 Stop down / depth-of-field 8 A visual depth-of-field preview can be made by depressing the STOP DOWN button (when at the default setting) while viewing the image on the viewfinder screen. 9 Infrared focus settings 9 As infrared rays form an image at a different plane to that formed by visible light, the normal focus settings do not apply. Proceed as follows in manual focus mode: 1. Focus the lens in the conventional manner until satisfied. 2. Note the distance setting against the central lens index. 3. Re-align this distance setting against the infrared mark (coloured red) instead of the central lens index. Alternatively if you have already calculated the required distance, you can make a manual distance setting by using the distance scales together with the infrared mark instead of the central lens index. Focus in general There are three focus modes: Automatic, Manual and True Focus, all set on the camera grip. It is possible to combine some of these modes to suit your preferred way of working. Please see the H4D camera manual for a full explanation. Focus assist 10, 11, 12 As well as the conventional view on the focusing screen to ensure a sharp image, H cameras also feature LED focus assist capability appearing as two arrowheads to the right of the viewfinder display (except for lenses with a maximum aperture of f/6.7 or smaller). The arrowheads provide confirmation of a precision focus setting and are a useful aid when making a setting with eyesight alone. 10 Lens focus setting too far beyond the distance of the subject framed by the central section in the viewfinder 11 Focus setting too close for the distance of the subject framed by the central section in the viewfinder 12 Focus setting correct 13 Manual focus setting When the left arrowhead alone appears it means the focus setting is too far beyond the chosen distance (the area framed within the central zone in the viewfinder) and when the right arrowhead alone appears it means the focus setting is too close. Focus is correct when both arrowheads appear together. If the focus cannot be established, then both arrowheads flash. Automatic focus setting Focus is correct when both arrowheads are visible together. Focus is incorrect if only one arrowhead is visible. If the focus cannot be established, then both arrowheads flash. True Focus 13 All H4D camera models include the True Focus feature that helps in improving focus accuracy in certain situations; fashion photography in particular. Please see the H4D User Manual for full explanation and description. Photo: Mark Holthusen © / Hasselblad Master Technical Specifications Lists most of the user-level technical specifications for all models. Please note that there is additional information for: · HC 4/120 · HC 3.5/300 · HC 3.5-4.5/50-110 Zoom · HC 4.0-5.6/35-90 Aspherical Zoom As the Hasselblad lens range undergoes continual development, please occasionally check the Hasselblad website−www.hasselblad.com−for updates and downloads of technical information. K – v1 HASSELBLAD HCD 4/28 Product number: 3023028 the HCD 28mm lens has been designed to be compact and to deliver optimal performance when used with the 48x36mm sensor of the Hasselblad H3D. Image quality from the Hasselblad H3D is refined with integral use of Digital APo Correction which perfects the raw image by digitally removing any color aberration and distortion. the resulting raw images have perfect pixel definition optimal for image rendering. GENERAL LENS DAtA Focal length 28.9 mm Aperture range 4 - 32 Angle of view diag/hor/vert 95°/83°/66° Length/diameter 102 mm/100 mm Weight (incl. covers and lens shade) 850 g Filter diameter 95 mm CLoSE FoCUS RANGE DAtA Minimum distance object to film 0.35 m Maximum image scale 1:7.3 Corresponding area of coverage 36 x 27 cm Corresponding exposure reduction 0 f-stop CoMPAtIBILItY • • the HCD 4/28 mm is designed for exclusive use on the Hasselblad H3D camera. the HCD 4/28 mm lens is designed solely for digital use. this means that the lens is designed for a format of 37x49 mm and does not cover the film format (41.5x56mm). The thereforedisabled disabledwhen whenusing usinga afilm filmmagazine. magazine. the function is therefor • the HCD 4/28 mm lens is not compatible with the converter 1.7x. LENS DESIGN 12 elements in 9 groups FoCUS tYPE Rear focusing ENtRANCE PUPIL PoSItIoN 134 mm in front of the sensor plane (at infinite focus setting) the entrance pupil position is the correct position of the axis of rotation when making a panorama image by combining individual images of a scene. www.hasselblad.com HASSELBLAD HCD 4/28 MtF f/4 Modulation transfer as a f/8 100 100 80 80 60 60 Sagittal slit orientation drawn with continuous line and tangential with dashed. White MTF (%) infinite focus setting. MTF (%) function of image height at 40 20 40 20 light. Spatial frequencies 10, 20 and 40 lp/mm 0 0 10 20 0 30 0 10 Image height (mm) 20 30 Image height (mm) RELAtIVE ILLUMINAtIoN 1.0 Relative illumination Infinity setting 0.8 0.6 0.4 0.2 0 f/8 f/4 0 10 20 30 Image height (mm) DIStoRtIoN Infinity setting Distortion (%) 2 0 -2 -4 0 10 20 Image height (mm) 30 HASSELBLAD HC 3.5/35 Product number: 3023035 GENERAL LENS DATA: Focal length 35.8 mm Aperture range 3.5 - 32 Angle of view diag/hor/vert 89°/78°/63° Length/diameter 124 mm/100 mm Weight 975 g Filter diameter 95 mm CLOSE FOCUS RANGE DATA: Minimum distance object to film 0.50 m Maximum image scale 1:9.6 Corresponding area of coverage 54 x 40 cm Corresponding exposure reduction 0 f-stop COMPATIBILITY The HC3,5/35 mm lens is not compatible with the converter 1.7x. LENS DESIGN 11 elements in 10 groups FOCUS TYPE Rear focusing ENTRANCE PUPIL POSITION 152 mm in front of the film plane (at infinite focus setting) The entrance pupil position is the correct position of the axis of rotation when making a panorama image by combining individual images of a scene. MTF Modulation Transfer as a func- f/3.5 f/8 tion of image height at infinite focus setting. Sagittal slit orientation drawn with continuous line and tangential with dashed. White light. Spatial frequencies 10, 20 and 40 lp/mm 1/2 HASSELBLAD HC 3.5/35 RELATIVE ILLUMINATION Infinity setting DISTORTION Infinity setting 2/2 HASSELBLAD HC 3.5/50 Product number: 3023050 GENERAL LENS DATA: Focal length 50.3 mm Aperture range 3.5 - 32 Angle of view diag/hor/vert 70°/59°/46° Length/diameter 116 mm/85 mm Weight 975 g Filter diameter 77 mm CLOSE FOCUS RANGE DATA: Minimum distance object to film 0.6 m Maximum image scale 1:8.9 Corresponding area of coverage 50 x 37 cm Corresponding exposure reduction 0 f-stop LENS DESIGN 10 elements in 9 groups FOCUS TYPE Rear focusing ENTRANCE PUPIL POSITION 137 mm in front of the film plane (at infinite focus setting) The entrance pupil position is the correct position of the axis of rotation when making a panorama image by combining individual images of a scene. MTF Modulation Transfer as a function of image height at infinite focus setting. Sagittal slit orientation drawn with continuous line and tangential with dashed. White light. Spatial frequencies 10, 20 and 40 lp/mm 1/2 HASSELBLAD HC 3.5/50 RELATIVE ILLUMINATION Infinity setting DISTORTION Infinity setting 2/2 HASSELBLAD HC 2.8/80 Product number: 3023080 GENERAL LENS DATA: Focal length 82.3 mm Aperture range 2.8 - 32 Angle of view diag/hor/vert 46°/38°/29° Length/diameter 70 mm/84 mm Weight 475 g Filter diameter 67 mm CLOSE FOCUS RANGE DATA: Minimum distance object to film 0.70 m Maximum image scale 1:6.5 Corresponding area of coverage 36 x 27 cm Corresponding exposure reduction 0.3 f-stop LENS DESIGN 6 elements in 6 groups FOCUS TYPE Full focusing ENTRANCE PUPIL POSITION 79 mm in front of the film plane (at infinite focus setting) The entrance pupil position is the correct position of the axis of rotation when making a panorama image by combining individual images of a scene. MTF Modulation Transfer as a func- f/2.8 f/5.6 tion of image height at infinite focus setting. Sagittal slit orientation drawn with continuous line and tangential with dashed. White light. Spatial frequencies 10, 20 and 40 lp/mm 1/2 HASSELBLAD HC 2.8/80 RELATIVE ILLUMINATION Infinity setting DISTORTION Infinity setting HASSELBLAD HC 2.2/100 Product number: 3023100 GENERAL LENS DATA: Focal length 100.0 mm Aperture range 2.2 - 32 Angle of view diag/hor/vert 38°/31°/24° Length/diameter 80.5 mm/87.5 mm Weight 780 g Filter diameter 77 mm CLOSE FOCUS RANGE DATA: Minimum distance object to film 0.90 m Maximum image scale 1:7.2 Corresponding area of coverage 39 x 29 cm Corresponding exposure reduction 0.4 f-stop LENS DESIGN 6 elements in 5 groups FOCUS TYPE Full focusing ENTRANCE PUPIL POSITION 68 mm in front of the film plane (at infinite focus setting) The entrance pupil position is the correct position of the axis of rotation when making a panorama image by combining individual images of a scene. MTF Modulation Transfer as a function of image height at infinite focus setting. Sagittal slit orientation drawn with continuous line and tangential with dashed. White light. Spatial frequencies 10, 20 and 40 lp/mm 1/2 HASSELBLAD HC 2.2/100 RELATIVE ILLUMINATION Infinity setting DISTORTION Infinity setting 2/2 HASSELBLAD HC Macro 4/120 Product number: 3023120 GENERAL LENS DATA: Focal length 118.7 mm Aperture range 4 - 45 Angle of view diag/hor/vert 33°/26°/21° Length/diameter 166 mm/96 mm Weight 1410 g Filter diameter 67 mm CLOSE FOCUS RANGE DATA: Minimum distance object to film 0.39 m Maximum image scale 1:1 Corresponding area of coverage 56 x 41.5 mm Corresponding exposure reduction 1.3 f-stop LENS DESIGN 9 elements in 9 groups FOCUS TYPE Front focusing ENTRANCE PUPIL POSITION 148 mm in front of the film plane (at infinite focus setting) The entrance pupil position is the correct position of the axis of rotation when making a panorama image by combining individual images of a scene. MTF @ infinity setting Modulation Transfer as a function of image height at infinite focus setting. Sagittal slit orientation drawn with continuous line and tangential with dashed. White light. Spatial frequencies 10, 20 and 40 lp/mm 1/2 HASSELBLAD HC Macro 4/120 MTF @ image scale 1:2 Modulation Transfer as a function of image height at infinite focus setting. Sagittal slit orientation drawn with continuous line and tangential with dashed. White light. Spatial frequencies 10, 20 and 40 lp/mm RELATIVE ILLUMINATION 1:2 Infinity setting 1:2 Infinity setting DISTORTION 1/2 HASSELBLAD HC Macro 4/120 COMPATIBILITY When the H 1.7x Converter is used together with the HC Macro 120 mm the autofocus function of the camera is disabled. In addition to the metres/feet scale, the 120 mm lens A also displays magnification ratio scale (A). In the illustration, the scale shows a focusing distance of 1.27 feet / 0.39 metres which in turn produces a 1:1 (lifesize) magnification. With the 120mm lens mounted on the camera, addition screens will appear on the grip LCD when autofocus is chosen to signify a focus limit setting. Three are available – Full scan, Infinity scan and Near scan – accessed FuLL SCAN = 0.39 m – ∞ by the rear control wheel. This time-saving function is a form of presetting that restricts the scanning range of the lens to prevent it searching across the whole focus scale. Simply make a rough assesment of the approximate INF. SCAN = 0.9 m – ∞ focusing distance and then choose the most suitable of the three ranges. The lens will then be able to find the critical focus much faster. NEAr SCAN = 0.39 m – 1m www.hasselblad.com HASSELBLAD HC 3.2/150 Product number: 3023150 GENERAL LENS DATA: Focal length 150.0 mm Aperture range 3.2 - 45 Angle of view diag/hor/vert 26°/21°/16° Length/diameter 124 mm/86 mm Weight 970 g Filter diameter 77 mm CLOSE FOCUS RANGE DATA: Minimum distance object to film 1.30 m Maximum image scale 1:6.8 Corresponding area of coverage 38 x 28 cm Corresponding exposure reduction 0 f-stop LENS DESIGN 9 elements in 8 groups FOCUS TYPE Internal focusing ENTRANCE PUPIL POSITION 68 mm in front of the film plane (at infinite focus setting) The entrance pupil position is the correct position of the axis of rotation when making a panorama image by combining individual images of a scene. MTF Modulation Transfer as a func- f/3.2 f/8 tion of image height at infinite focus setting. Sagittal slit orientation drawn with continuous line and tangential with dashed. White light. Spatial frequencies 10, 20 and 40 lp/mm 1/2 HASSELBLAD HC 3.2/150 RELATIVE ILLUMINATION Infinity setting DISTORTION 2 meters and infinity setting 2/2 HASSELBLAD HC 4/210 Product number: 3023210 GENERAL LENS DATA: Focal length 211.1 mm Aperture range 4 - 45 Angle of view diag/hor/vert 19°/15°/11° Length/diameter 165 mm/85 mm Weight 1320 g Filter diameter 77 mm CLOSE FOCUS RANGE DATA: Minimum distance object to film 1.8 m Maximum image scale 1:7.0 Corresponding area of coverage 39 x 29 cm Corresponding exposure reduction 0 f-stop LENS DESIGN 10 elements in 6 groups FOCUS TYPE Internal focusing ENTRANCE PUPIL POSITION 70 mm in front of the film plane (at infinite focus setting) The entrance pupil position is the correct position of the axis of rotation when making a panorama image by combining individual images of a scene. MTF Modulation Transfer as a func- f/4 f/8 tion of image height at infinite focus setting. Sagittal slit orientation drawn with continuous line and tangential with dashed. White light. Spatial frequencies 10, 20 and 40 lp/mm 1/2 HASSELBLAD HC 4/210 RELATIVE ILLUMINATION Infinity setting DISTORTION Infinity setting 2/2 HASSELBLAD HC 4.5/300 Product number: 3023300 GENERAL LENS DATA: Focal length Aperture range Angle of view diag/hor/vert Length/diameter w. tripod mount Weight Filter diameter 292.0 mm 4.5 - 45 13°/11°/8° 198 mm/100 mm 198 mm/139 mm 2120 g 95 mm CLOSE FOCUS RANGE DATA: Minimum distance object to film Maximum image scale Corresponding area of coverage Corresponding exposure reduction 2.45 m 1:7.5 41 x 31 cm 0 f-stop COMPATIBILITY When the HC300 is used together with the H1,7X converter, the autofocus function of the camera is disabled. LENS DESIGN 9 elements in 7 groups FOCUS TYPE Internal focusing ENTRANCE PUPIL POSITION 13 mm in front of the film plane (at infinite focus setting) The entrance pupil position is the correct position of the axis of rotation when making a panorama image by combining individual images of a scene. MTF Modulation Transfer as a function of image height at infinite focus setting. Sagittal slit orientation drawn with continuous line and tangential with dashed. White light. Spatial frequencies 10, 20 and 40 lp/mm 1/2 www.hasselblad.com HASSELBLAD HC 4.5/300 RELATIVE ILLUMINATION Infinity setting DISTORTION Infinity setting 1/2 HASSELBLAD HC 4.5/300 When using a tripod with a 300mm you should use the A (removable) tripod mounting bracket to provide optimum balance. This is attached via a sleeve so that the camera body can be rotated for landscape/portrait formats without altering the tripod head position. The rotation is secured by a locking screw (A). Correct 90° orientation can be ensured by aligning white index markers (B) for both landscape and portrait orientations. LANDSCAPE orIENTATIoN B PorTrAIT orIENTATIoN www.hasselblad.com HASSELBLAD HC 3.5-4.5/50-110 Product number: 3023511 GENERAL LENS DATA: Focal length 51.5 (108.3) mm Aperture range 3.5 (4.5) - 32 Angle of view diag/hor/vert 69°/58°/46° (35°/29°/22°) Length/diameter 152 mm/103 mm Weight 1650 g Filter diameter 95 mm CLOSE FOCUS RANGE DATA: Minimum distance object to film 0.70 m Maximum image scale 1:10.8 (1:5.2) Corresponding area of coverage 60 x 45 (29 x 21) cm Corresponding exposure reduction 0 f-stop COMPATIBILITY The HC3,5-4,5/50-110 mm lens is not compatible with the converter 1.7x. LENS DESIGN 14 elements in 9 groups FOCUS TYPE Front focusing ENTRANCE PUPIL POSITION 50 mm 50 mm setting: 164 mm 80 mm setting: 161 mm 110 mm setting: 173 mm In front of the film plane (at infinite focus setting) 80 mm The entrance pupil position is the correct position of the axis of rotation when making a panorama image by combining individual images of a scene. 110 mm 1/3 HASSELBLAD HC 3.5-4.5/50-110 MTF Modulation Transfer as a function of image height at infinite focus setting. Sagittal slit orientation drawn with continuous line and tangential with dashed. White light. Spatial frequencies 10, 20 and 40 lp/mm 50 mm 80 mm 110 mm 2/3 HASSELBLAD HC 3.5-4.5/50-110 RELATIVE ILLUMINATION Infinity setting 50 mm 80 mm 110 mm f/4.5 DISTORTION Infinity setting 50 mm 80 mm 110 mm 3/3 HASSELBLAD Zoom lenses - Please Note! Zoom lenses are ruggedly constructed professional level lenses made to very strict Hasselblad specifications. However, by the nature of the necessary complex con- A struction and weight, they can be subject to damage if OK OK handled in an unsuitable manner. When using the lens shade, it becomes natural to place the lens/camera combination down on a surface in the correct manner, that is, in a horizontal orientation. Similarly, the lens on its own can placed vertically but still in a safe orientation as in illustration (A). This virtually avoids all risk of damage. However, placing the lens or lens/camera combination down in a vertical orientation on a surface as in illustration (B) − that is, resting on the front of the lens − should be avoided at all times. B ✕✕ www.hasselblad.com HASSELBLAD HCD 4,0-5,6/35-90 Aspherical Product number: 3023590 GENERAL LENS DAtA: Focal length 36,3 (87) mm Aperture range 4,0 (5,6) - 32 Angle of view diag/hor/vert 83°/70°/55° (39°/31°/24°) Length/diameter 167 mm/102,5 mm Weight 1410 g Filter diameter 95 mm Equivalent lens in 35 mm format 27-64 mm CLoSE FoCuS RANGE DAtA: Minimum distance object to image plane 0.65 m Maximum image scale 1:13 (1:5,4) Corresponding area of coverage 64 x 48 (26 x 20) cm Corresponding exposure reduction 0 f-stop CoMPAtIBILItY the HCD 4,0-5,6/35-90 mm lens is not compatible with the converter H1.7x and the HtS 1.5 tilt/Shift adapter. It can be used on the H3DII-60 but in the 35 mm setting, a marginal automatic crop will be introduced. LENS DESIGN 13 elements in 11 groups 1 Aspherical surface FoCuS tYPE Internal focusing ENtRANCE PuPIL PoSItIoN 35 mm setting: 50 mm setting: 90 mm setting: 35 mm 187 mm 178 mm 193 mm In front of the image plane (at infinite focus setting) 50 mm the entrance pupil position is the correct position of the axis of rotation when making a panorama image by combining individual images of a scene. 90 mm www.hasselblad.com HASSELBLAD HCD 4,0-5,6/35- 90 Aspherical MtF f/4 tion of image height at infinite Sagittal slit orientation drawn with continuous line and tan- MTF (%) focus setting. f/8 100 100 80 80 60 60 MTF (%) Modulation transfer as a func- 40 40 gential with dashed. White 20 light. Spatial frequencies 10, 20 and 40 lp/mm 0 20 0 10 20 0 30 0 10 Image height (mm) 35 mm 80 80 60 60 40 20 40 20 0 10 20 0 30 0 10 Image height (mm) 55 mm 100 80 80 60 60 MTF (%) MTF (%) 30 f/8 100 40 20 0 20 Image height (mm) f/5.6 90 mm 30 f/8 100 MTF (%) MTF (%) f/5 100 0 20 Image height (mm) 40 20 0 10 20 Image height (mm) 30 0 0 10 20 Image height (mm) 30 HASSELBLAD HCD 4,0-5,6/35- 90 Aspherical RELAtIVE ILLuMINAtIoN Infinity setting Relative illumination 35 mm 90 mm 50 mm 1.0 1.0 1.0 0.8 0.8 0.8 0.6 0.6 0.6 0.4 0.4 0.4 0.2 0 0.2 f/8 f/4 0 10 20 0 30 0.2 f/8 f/4.5 0 10 Image height (mm) 20 0 30 f/8 f/5.6 0 10 Image height (mm) 20 30 Image height (mm) DIStoRtIoN Infinity setting Distortion (%) 35 mm 90 mm 50 mm 2 2 2 0 0 0 -2 -2 2 -4 0 10 20 Image height (mm) 30 -4 0 10 20 Image height (mm) 30 -4 0 10 20 Image height (mm) 30 Photo: Joao Carlos © / Hasselblad Master Related Accessories HASSELBLAD COMPATIBILITY H 1.7X Converter Product number: 3023717 The converter 1.7x can be combined with all HC lenses except for the following: GENERAL LENS DATA: • HC 3,5/35 mm Focal length conversion factor • HC 3,5-4,5/50-110 mm Aperture reduction 1.7x -1.5 stops Length/diameter 56the mm/85 mm When the H1,7X converter is used together with HC300 mm lens, the autofocus Weight 465 g function of the camera is disabled. COMPATIBILITY LENS DESIGN The converter 1.7x can be combined with all HC lenses except for the following: 6 lenses in 4 groups • HC 3,5/35 mm • HC 3,5-4,5/50-110 mm When the H1,7X converter is used together with the HC300 mm lens, the autofocus function of the camera is disabled. LENS DESIGN COMPATIBILITY 6 lenses in 4 groups The H1.7x Converter is compatible with all H-system lenses except the following: • • • • HCD 4/28mm (3023028) HC 3.5/35mm (3023035) HC 4–5.5 / 35–90mm Zoom (3023590) HC 3.5–4.5 / 50–110mm Zoom (3023511) Please also note that the AF function of the HC Macro 120mm and the HC 300mm is disabled when used in conjunction with this item. ATTACHING AND REMOVING THE CONVERTER 1/1 The converter is attached and removed in the same manner as a lens. It can be attached either to the lens first or directly to the camera, whichever is preferred. It can also be used in combination with extension tubes, though it should www.hasselblad.com be mounted between the camera body and extension tube or combination of tubes. FOCUSING The H1.7x Converter does not change the readings from the distance scale on the lens, so the near and far limits of the focusing scale still apply. However, the depth-of-field scale no longer applies and should be disregarded. Depth-offield should be checked on the focusing screen using the depth-of-field button. LIGHT METERING Since the H1.7x Converter increases the focal length it also, according to the geometrical laws of optics, decreases the aperture of the total optical lens/converter system. The TTL metering system takes this into account automatically general purposes. However, for critical applications alternative exposure settings should be made. 1/1 HAsseLbLAD H sYsteM H 13mm H 26mm H 52mm Product number: 3053513 Product number: 3053526 Product number: 3053552 Hasselblad H extension tubes (3053513, 3053526, 3053542) are designed to enable H lenses to focus at closer distances. The greater the extension, the these fully-automatic extension greater the magnification of the image. The tubes can tubes provide a practical and be used individually, in combination with each other or economical solution for close-up in combination with other accessories according to the application or desired H extension tubes can requirements. can be effect. used together only be used together with Hasselblad H cameras and in any combination and together H lenses. with a converter. GENERAL data for all lens /extencomplete Tubestube cancombinations be attached either to the lens first or directly sion regarding to the camera, whichever is preferred. There are no remagnification, exposure reduction, strictions about the combination or order in which tubes area of coverage etc, available. are mounted. They can be used together with any H lens though conventional practice regarding the unsuitability of certain lenses for close-up work still applies. Extension tubes can also be used in combination with a Converter H 1.7x, though in this case they should be mounted between the converter and the lens. Autofocus extension tubes remains operable until & a message is displayed on the LCDconVerter stating that autofocus is no longer possible with that specific combination and setting. Please note that extensive close-up tables, both metric and imperial, concerning various combinations of lens/ extension tube/focus settings are available as free downloads from www.hasselblad.com. When theAND extension tubes are ATTACHING REMOVING EXTENSION TUBES Extension tubes are attached and removed in the same used together with a converter, manner as a lens. they should be mounted between the converter and LIGHT METERING for optimum Thethe TTLlens metering systemperformautomatically takes into account ance.exposure adjustment requirements for general purposes. However, for critical applications alternative exposure settings should be made. PHYsicAL DAtA: H 13mm H 26mm H 52mm extension 13 mm 26 mm 52 mm Weight (including covers) 125 g 150 g 195 g external dimensions 84 x 34 mm 84 x 47 mm 84 x 73 mm (including covers) 1/1 HASSELBLAD H SYStEM CF Lens Adapter Product number: 3043500 the Hasselblad H System CF Lens Adapter allows the use of all C-type lenses from the V-system on H cameras. Integral processors for data conversion bridge the two systems to access a number of the H-display and lens-control functions. the adapter allows: • light metering at full aperture. • electronic focus confirmation on viewfinder display. • exploitation of databus connection with CFE lenses. • access to shutter speeds (manually set on lens) from 1s–1/500s including B and t mode. restrictions regarding autofocus, continuous drive, light metering and aperture/shutter controls, as well as certain lenses or combinations of lenses/converters apply. A comprehensive user manual is available as a free download from www.hasselblad.com. pHYSICAL DAtA: Dimensions approx. 86 x 112 x 20 mm Weight (including covers) 135 g 1/9 Product number: 3043400 The revolutionary hTs 1.5 is a tilt and shift adapter that can provide a pivotal step-up for many hasselblad photographers. designed for the hCd28mm, hC35mm, hC50mm, hC80mm and the hC100mm lenses it, in effect, adds five different “tilt and shift lenses” to the range. With the extension tubes, h13, h26 or h52, the hTs 1.5 can also be used for close-up work. This simple device solves not only technical challenges, but also provides exciting opportunities for creative solutions as well. The combination of well-known optical principles combined with the latest in digital image control, provides a powerful package that will expand photographic expression to new levels. hasselblad holds a patent pending on the hTs 1.5. A comprehensive user manual is available as a free download from www.hasselblad.com. “shift” is the moving of a lens, up and down or to the sides, from for example, being one of them. The dilemma that arose forced its central position while retaining its perpendicular orientation to photographers to find a compromise, between the “illness” and the the film plane. simply put, the adapter expands the diameter of the “cure”. hasselblad has now eradicated this dilemma. projected image circle at the film plane. This allows for much greater With the introduction of automatic chromatic aberration correc- freedom in “placing” the image area within the now much broader tion computation (daC), significant improvements strike the viewer circle before vignetting takes effect. and most importantly, all this immediately. all calculations and adjustments take place in the happens without moving the orientation of the camera in relation to background monitored and governed by sensors in the adapter. The the subject. so if verticals, for example, are acceptable in the view- sharpness at the edge of the frame, despite the fact that the lens finder, they will remain so whatever the amount of shift to include is pushed to its limits, remains stunning. the “hidden” parts of the image. simple but ingenious. On the creative front, it has long been standard practice for “Tilt” differs from shift in that the normal perpendicular orienta- photographers to break the rules in order to produce images that tion of the lens to the film plane is changed resulting in a change show something just a little different. Large-format users were in the plane of focus. This means that at any given aperture/focus well-acquainted with the imaginative possibilities that arose from setting, the depth of field in the subject will not remain as simply making the “wrong” camera or lens movements. and now hassel- the space between two measured points from the camera as is blad users can enjoy this stimulating freedom as well. fascinating normally the case, but increased or decreased. This amount is user and captivating images are easily conjured up and controlled with controlled. Once again, simple but ingenious. just a few slight movements. The combination of large sensors and By combining these two laws of physics, the doors of creative razor sharp lenses – and now tilt and shift possibilities – hassel- solutions are thrown wide open. The list of situations that could blad has brought some of the creative aspect of former large-format advantageously exploit tilt and shift is probably longer than it might world to the digital medium format. first appear to be. for some professional photographers it could rapidly become an essential item for all work. Take a look at this revolutionary accessory at your nearest hasselblad dealer. Try it yourself out to see how this new product But the story doesn’t end there. Large-format users have been could rapidly become an essential part of your photography toolkit. using tilt and shift for many years, partly because they could, but The powerful combination of tilt, shift and daC can bring new per- partly because they had to. some photographic solutions unfor- spectives to your photographic vision and provide a marked change tunately, have also created problems, lens edge performance, in both the technical and creative aspects of your work. www.hasselblad.com Front view Rear view www.hasselblad.com GeneraL Lens daTa: focal length conversion factor aperture reduction Width/height/depth Weight 1.5x -1.3 stops 140 mm / 146 mm / 77 mm 750 g Lens desIGn 6 elements in 5 groups enTranCe pUpIL pOsITIOn W. hCd 28mm: 175 mm W. hC 35mm: 192 mm W. hC 50 mm: 177 mm W. hC 80mm: 119 mm W. hC 100mm: 109 mm hCd28 In front of the image plane (at infinity focus setting) The entrance pupil position is the correct position of the axis of rotation when making a panorama image by combining individual images of a scene. hC 35 hC 50 hC 80 hC 100 www.hasselblad.com CLOse fOCUs ranGe daTa Lens Minimum distance Maximum image scale Coverage exp.reduction hCd 4/28 mm 0.39 m 1:4.7 23 cm × 17 cm 0 eV hC 3,5/35 mm 0.54 m 1:6.2 30 cm × 23 cm 0 eV hC 3,5/50 mm 0.64 m 1:5.7 28 cm × 21 cm 0 eV hC 2,8/80 mm 0.74 m 1:4.2 21 cm × 15 cm 0.3 eV hC 2,2/100 mm 0.94 m 1:4.6 22 cm × 17 cm 0.5 eV COMpaTIBILITY The hTs 1.5 adapter is compatible with all h system cameras. support for digital image corrections only with hasselblad Cf card based digital capture products. The hTs 1.5 adapter is optimally designed for the following lenses: Lens equivalent lens with the hTs 1.5 angle of view diag/hor/vert hCd 4/28 mm 6,3/45 mm 71°/59°/45° hC 3,5/35 mm 5,6/55 mm 59°/49°/37° hC 3,5/50 mm 5,6/75 mm 44°/35°/27° hC 2,8/80 mm 4,5/128 mm 27°/22°/16° hC 2,2/100 mm 3,5/155 mm 23°/18°/14° The hC150, hC210 and the hC300 will fit onto the adapter but handling and performance can be compromized. The hTs 1.5 is not compatible with: The h1,7X converter The Cf lens adapter hC 50-110 mm hCd 35-90 mm hC 120 mm autofocus / focus confirmation (disabled) COMpaTIBLe Lenses and eXTensIOn TUBes hCd28, hC35, hC50, hC80 and hC100 extension tube 13mm, 26mm and 52mm HC35 + HTS 1.5 at f/16, 5 degrees tilt www.hasselblad.com MTf perfOrManCe 10, 20 and 40 lp/mm 80 80 60 60 MTF (%) MTF (%) f/11 100 40 20 hCd 28mm 0 @ infinity 40 20 0 10 20 30 Image position (mm) 0 40 0 10 100 80 80 60 60 40 20 hC 35mm 0 40 0 10 20 30 Image position (mm) 0 40 0 10 80 80 60 60 40 20 @ infinity 20 0 10 20 30 Image position (mm) 0 40 0 10 80 80 60 60 MTF (%) MTF (%) 100 40 40 0 10 20 30 Image position (mm) 0 40 0 10 f/5.6 80 80 60 60 MTF (%) 100 40 @ 2m 0 20 30 Image position (mm) 40 f/11 100 20 hC 100mm 40 20 20 @ 2m 20 30 Image position (mm) f/11 100 0 40 40 f/4.5 hC 80mm 20 30 Image position (mm) f/11 100 MTF (%) MTF (%) f/5.6 100 0 40 20 @ infinity hC 50mm 20 30 Image position (mm) f/11 100 MTF (%) MTF (%) f/5.6 MTF (%) The diagram shows lens perfomance over the full enlarged image circle. Vertical dashed line show the basic sensor format (36×.48 mm). dashed lines in the diagrams shows the tangetial performance. f/6.3 100 40 20 0 10 20 30 Image position (mm) 40 0 0 10 20 30 40 Image position (mm) www.hasselblad.com MOVeMenTs The lens can be shifted 18 mm, either upwards or downwards, and it can be tilted 10 degrees up or down. Tilt and shift can be combined according to the diagram. hTs settings are presented on camera grip LCd and are also embedded in the image file. 10 Landscape mode Portrait mode Max tilt angle (degrees) MaXIMUM TILT The graph shows the maximum amount of tilt that can be used without vignetting as a function of the amount of shift used. format 36×48mm. 8 6 4 2 0 0 5 10 15 Shift (mm) www.hasselblad.com MOVeMenTs - rOTaTIOn The hTs 1.5 adapter can be rotated 90 degrees to the left or right to enable free placement of sharpness plane and shift direction. www.hasselblad.com HC80 + HTS 1.5 at f/11, 10 degrees tilt Use Of shIfT for perfect parallel vertical lines in the image, the camera needs to be parallel to the subject. Tilting the whole camera would produce converging parallel lines. But by shifting the lens parallel to the image plane, you can raise or lower the view without tilting the camera. If the subject is a building as in this example, the camera should be placed level. Camera positioned level. The roof of the building is outside the area projected onto the sensor (HC28 + HTS). The complete camera tilted upwards to include the top of the building results in converging vertical lines in the image. The camera positioned level again with an upward lens shift of 9 mm applied results in parallel verticals. www.hasselblad.com Use Of TILT By tilting the lens in relation to the image plane, you can effectively tilt the plane of sharpness in the subject. depending on your idea of the final image you can either use tilt to enlarge the apparent depth of field or reduce it. The full image HCD28 + HTS 1.5 at f/11 No lens tilt produces some lack of sharpness in the foreground and background, partly due to insufficient depth of field. Lens tilted a few degrees to the right produces an image with perfect sharpness from the foreground to the background. Lens tilted a few degrees to the left produces an image with an apparent shallow depth of field. sTITChInG The hTs 1.5 lends itself extremely well to automatic stitching to create a panoramic image in super high quality. With most subjects it will be impossible to detect any dividing line between the separate images. The main reasons for this are: • Thelensisshiftedsidewaysandthereforedoesnotproduce any distortion of the subject • TheDAClenscorrectionfordistortionandvignettingensures perfect images that can easily be stitched together The resulting image can be created in any high-end stitching software, e.g. the “photomerge” function in adobe photoshop Cs3 or later. In the case of adobe photoshop Cs3, use the following procedure: • openthethreeimages • Gotomenu:“File-Automate-Photomerge” • Clickon“addopenfiles”andcheck“interactivelayout” • ClickOK • In the preview that appears you can choose to modify the layout, but in most cases there will be no need for any manual interaction. • Finally click OK and the final stiched image will be processed. If the stitch is not perfect, you can modify the layer masks for each layer. 0.08 - UK v6 specification subject to change without notice. prOCedUre place the camera on a tripod and aim it at a subject. Then set the hTs 1.5 in the normal position with no tilt or shift. rotate the hTs 1.5 with the controls facing up to allow for sideways shift. Make the first exposure in the mid position. shift to both end positions and make an exposure in each position. develop the three images with daC turned on. Import the images into the stitching software and follow the instructions. HCD28 and HTS 1.5 – The three images above have been merged into one image using Adobe Photoshop CS3 “Photomerge”. Even at 100% it is almost impossible to see any stitch lines. www.hasselblad.com HASSELBLAd H SYStEM proshade V/H 60-90 Product number: 3040740 the proshade V/H 60-95 is an adjustable bellows lens shade that provides highly efficient protection against stray light. Its compact, flat folding design saves space in the equipment case. By using the proshade adapters, this shade can be fitted to all Hasselblad H-system lenses as well as all V-system lenses except the distagon CFi 30 mm and tele-Superachromat FE 300 mm. the shade features a filter holder for glass, gelatin, or plastic filters. the bellows folds down for easy access to the filter holder or for viewing without filter. the Hasselblad proshade V/H 60 – 95 is supplied with a proshade mask 6093/250 (3040312). Optional masks and adapters also available (please see website for details). UV-sky filters Absorbs UV radiation and reduces blue haze without affecting colors. protects the front lens surface. UV-sky 67 mm (Product number: 3053470) UV-sky 77 mm (Product number: 3053474) UV-sky 95 mm (Product number: 3053478) polarizing filters reduces reflection and increases color saturation in e.g. green foliage or a blue sky. C-pola 67 mm (Product number: 3053482) C-pola 77 mm (Product number: 3053486) C-pola 95 mm (Product number: 3053490) Disposal of Waste Equipment by Users in Private Households in the European Union This symbol on the product or on its packaging indicates that this product must not be disposed of with your other household waste. Instead, it is your responsibility to dispose of your waste equipment by handing it over to a designated collection point for the recycling of waste electrical and electronic equipment. The separate collection andlecycling of your waste equipment at the time of disposal will help to conserve natural resources and ensure that it is recycled in a manner that protects human health and the environment. For more information about where you can drop off your waste equipment for recycling, please contact your local city office, your household waste disposal service or the dealer where you purchased the product. Smaltimento delle apparecchiature da parte di privati nel territorio dell’Unione Europea Questo simbolo presente sul prodotto o sulla sua confezione indica che il prodotto non può essere smaltito insieme ai rifiuti domestci. Èresponsabilità dell’utente smaltire le apparecchiature consegnandole presso un punta di raccolta designato al riciclo e allo smaltimento di apparecchiature elettriche ed elettroniche. La raccolta differenziata e il corretto riciclo delle apparecchiature da smaltire permette di proteggere la salute degli individui e l’ecosistema. Per ulteriori informazioni relative ai punti di raccolta delle apparecchiature, contattare l’ente locale per lo smaltimento dei rifiuti, oppure il negozio presso il quale è stato acquistato il prodotto. Entsorgung von Altgeraten aus privaten Haushalten in der EU Eliminación de residuos de equipos eléctricos y electrónicos por parte de usuarios particulares en la Unión Europa Das Symbol auf dem Produkt oder seiner Verpackung weist darauf hin, dass das Produkt nicht über den normalen Hausmüll entsorgt werden darf. Benutzer sind verpflichtet, die Altgerate an einer Rücknahmestelle für Elektro- und Elektronik-Altgerate abzugeben. Die getrennte Sammlung und ordnungsgemalße Entsorgung Ihrer Altgerate tragt zur Erhaltung der natürlichen Ressourcen bei und garantiert eine Wiederverwertung, die die Gesundheit des Menschen und die Umwelt schützt. Informationen dazu, wo Sie Rücknahmestellen für Ihre Altgerate finden, erhalten Sie bei Ihrer Stadtverwaltung, den örtlichen Müllentsorgungsbetrieben oder im Geschaft, in dem Sie das Gerat erworben haben. Este símbolo en el productoo en su envase indica que no debe eliminarse junto con los desperdicios generales de la casa. Es responsabilidad del usuario eliminar los residuos de este tipo depositándolos en un “punto limpio” para el reciclado de residuos eléctricos y electrónicos. La recogida y el reciclado selectivos de los residuos de aparatos eléctricos en el momento de su eliminación contribuirá a conservar los recursos naturales y a garantizar el reciclado de estos residuos de forma que se proteja el media ambiente y la salud. Para obtener más información sobre los puntos de recogida de residuos eléctricos y electrónicos para reciclado, póngase en contacto con su ayuntamiento, con el servicio de eliminación de residuos domésticos o con el establecimiento en el que adquirió el producto. Verwijdering van afgedankte apparatuur door privegebruikers in de Europese Unie Destruiçâo, por Utilizadores na Uniâo Europeia, de Equipamento Usado no lixo Doméstico Dit symbool op het product of de verpakking geeft aan dat dit product niet mag worden gedeponeerd bij het normale huishoudelijke afval. U bent zelf verantwoordelijk voor het inleveren van uw afgedankte apparatuur bij een inzamelingspunt voor het recyclen van oude elektrische en elektronische apparatuur. Door uw oude apparatuur apart aan te bieden en te recyclen, kunnen natuurlijke bronnen worden behouden en kan het materiaal worden hergebruikt op een manier waarmee de volksgezondheid en het milieu worden beschermd. Neem contact op met uw gemeente, het afvalinzamelingsbedrijf of de winkel waar u het product hebt gekocht voor meer informatie over inzamelingspunten waar u oude apparatuur kunt aanbieden voor recycling. Este símbolo, no produto ou na respectiva embalagem, indica que este material não deve ser destruîdo com outro lixo doméstico. É da sua responsabilidade destruir o equipamento usado levando-o para um local de recolha apropriado, destinado à reciclagem de produtos eléctricos e electrónicos usados. A recolha e reciclagem sepaiada do seu equipamento doméstico quando da destruição, ajudará a preserver os recursos naturais e a assegurar que ele é reciclado através de um processo que protege a saúde humana e 0 ambiente. Para obter mais informações sobre onde pode colocar o seu equipamento usado para reciclagem, contacte aentidade responsável local, o serviço de destruição do lixo doméstico, ou a loja onde adquiriu o produto. Elimination des appareils mis au rebut par les ménages dans l’Union européenne Le symbole apposé sur ce produit ou sur son emballage indique que ce produit ne doit pas être jeté avec les déchets ménagers ordinaires. Il est de votre responsabilité de mettre au rebut vos appareils en les déposant dans les centres de collecte publique désignés pour le recyclage des équipements électriques et électroniques. La collecte et le recyclage de vos appareils mis au rebut indépendamment du reste des déchets contribue à la préservation des ressources naturelles et garantit que ces appareils seront recyclés dans le respect de la santé humaine et de l’environnement. Pour obtenir plus d’informations sur les centres de collecte et de recyclage des appareils mis au rebut, veuillez contacter les autorités locales de votre région, les services de collecte des ordures ménagères ou le magasin dans lequel vous avez acheté ce produit. Bortskaffande av avfallsprodukter från användare i privathushåll inom Europeiska Unionen Om den här symbolen visas pa produkten eller forpackningen betyder det att produkten inte far slängas på samma stalle som hushallssopor. I stallet ar det ditt ansvar att bortskaffa avfallet genom att overlamna det till ett uppsamlingsställe avsett for återvinning av avfall från elektriska och elektroniska produkter. Separat insamling och återvinning av avfallet hjälper till att spara på våra naturresurser och gör att avfallet återvinns på ett sätt som skyddar människors hälsa och miljön. Kontakta ditt lokala kommunkontor, din närmsta återvinningsstation for hushållsavfall eller affären där du kopte produkten för att få mer information om var du kan lämna ditt avfall for återvinning. Please occasionally check the Hasselblad website−www.hasselblad.com−for updates and downloads of technical information. This information is subject to change without notice. Victor Hasselblad AB & Hasselblad A/S shall not be liable for technical or editorial errors or omissions contained in this information. © Copyright 2011 3023028 3023035 3023050 3023080 3023100 3023120 3023150 3023210 3023300 3023511 3023590 3023717 3043400 3043500 3053513 3053526 3053552 3043500 3040740 3053470 3053474 3053478 3053482 3053486 3053490 Hasselblad A/S Hejrevej 30, DK - 2400 Copenhagen, Denmark 5013051 . INF/UM . V4. ENG . 2011 – Copyright © 2011 Victor Hasselblad AB & Hasselblad A/S For the following products: Victor Hasselblad AB Box 220, SE - 401 23 Göteborg, Sweden