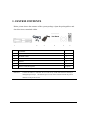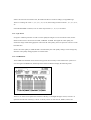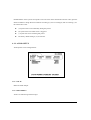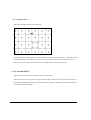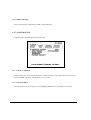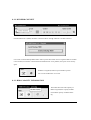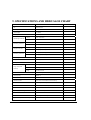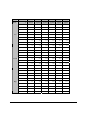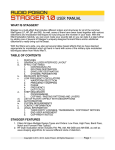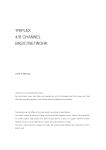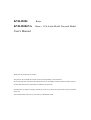
1
KVR-B004
Basic
KVR-B004NA
Basic + 1Ch Audio Model Network Model
User's Manual
Thank you for purchasing our product.
The pictures may be different from the actual system depending on specifications.
We recommend users who install and operate this unit to thoroughly read this manual and other reference
manuals indicated in this manual before installation and operation.
Specifications are subject to changes without prior notice to incorporate improvements in the performance
of the unit.
This manual and the software are protected by COPYRIGHT LAW.
GENERAL SAFETY AND PRECAUTIONS
This model is manufactured to international safety standards. Review the following safety
precaution to avoid injury and prevent damage to the DVR or any products connected to
it.
1. Use a proper power source.
Do not operate this product from a power source that applies more than the specified voltage (90~260
VAC).
2. Never insert metallic material into the DVR case.
This can cause electric shock.
3. Do not operate in wet & dusty conditions. Keep product surfaces clean and dry.
Avoid placing the DVR in areas like a damp basement or a dusty hallway.
4. Do not expose this product to rain or use near water.
If the product gets wet, unplug it immediately and contact an authorized dealer.
5. To clean the outside case of the DVR, use a lightly dampened cloth (no solvents).
6. The DVR generates heat during operation. Place the DVR in a well ventilated area. The DVR has a
built in fan to properly ventilate the system. Do not block air bent holes (bottom, upper, sides and back) of
the DVR case.
7 Do not operate with suspected failures. If there are any unusual sounds or odors coming from the DVR,
unplug it immediately and contact an authorized dealer or service center.
8. Do not attempt to remove the top cover.
Warning: Removing the cover of DVR can cause severe electrical shock.
9. Use standard lithium cell battery.
NOTE: Battery is installed in the system.
The standard lithium cell 3V battery located on the mother board should be replaced if the time clock
does not hold its time after the power is turned off.
2/42
Warning: Unplug the DVR before replacing battery or you may be subjected to severe electrical shock. Properly dispose of old batteries.
Caution: Risk of explosion if battery is replaced by an incorrect type. Do not discard lithium
batteries into the trash can or into fire. Dispose in accordance with local waste regulations.
10. Some DVR models use a DC adapter because the power supply is outside the DVR cabinet.
Use only the DC adapter provided.
FCC COMPLIANCE STATEMENT
Caution: Any changes or modifications in construction of this device which are not expressly approved by the party responsible for compliance could void the user's authority
to operate the equipment.
NOTE: THIS EQUIPMENT HAS BEEN TESTED AND FOUND TO COMPLY WITH FOR A CLASS A DIGITAL DEVICE,
PURSUANT TO PART 15 OF THE FCC RULES. THESE LIMITS ARE DESIGNED TO PROVIDE REASONABLE PROTECTION AGAINST HARMFUL INTERFERENCE WHEN THE EQUIPMENT IS OPERATED IN A COMMERCIAL ENVIRONMENT. THIS EQUIPMENT GENERATES, USES, AND CAN RADIATE RADIO FREQUENCY ENERGY AND, IF NOT INSTALLED AND USED IN ACCORDANCE WITH THE INSTRUCTION MANUAL, MAY CAUSE HARMFUL INTERFERENCE
TO RADIO COMMUNICATIONS, OPERATION OF THIS EQUIPMENT IN A RESIDENTIAL AREA IS LIKELY TO CAUSE
HARMFUL INTERFERENCE IN WITCH CASE THE USER WILL BE REQUIRED TO CORRECT THE INTERFERENCE AT
THIS OWN EXPENSE.
3/42
CONTENTS
1. SYSTEM CONTENTS .....................................................................................................................................................................6
2. BUTTON FUNCTIONS ...................................................................................................................................................................7
2.1. FRONT PANEL.............................................................................................................................................................................7
2.2. BACK PANEL...............................................................................................................................................................................8
3. SYSTEM FUNCTION......................................................................................................................................................................9
3.1. SYSTEM START ..........................................................................................................................................................................9
3.2. HDD DETECTION .......................................................................................................................................................................9
3.3. MONITORING MODE ...............................................................................................................................................................10
4. SETUP MENU................................................................................................................................................................................12
4.1. SETUP MENU STRUCTURE AND INITIAL VALUE.............................................................................................................12
4.2. SETUP .........................................................................................................................................................................................13
4.2.1. RECORD SETUP ................................................................................................................................................................14
4.2.2. AUDIO SETUP....................................................................................................................................................................16
4.2.3. SENSOR SETUP..................................................................................................................................................................17
4.2.4. MOTION SENSOR SETUP .................................................................................................................................................18
4.2.5. ALARM SETUP ...................................................................................................................................................................19
4.2.6. HDD SETUP........................................................................................................................................................................21
4.2.7. SYSTEM SETUP ..................................................................................................................................................................22
4.2.8. NETWORK SETUP (Static IP Network model, Dynamic IP Network model) ...................................................................24
5. RECORD FUNCTION ...................................................................................................................................................................26
6. SEARCH AND PLAYBACK FUNCTION ...................................................................................................................................28
6.1. SEARCH FUNCTION ................................................................................................................................................................28
6.1.1. EVENT SEARCH .................................................................................................................................................................28
6.1.2. TIME SEARCH ....................................................................................................................................................................29
6.2. PLAYBACK FUNCTION...........................................................................................................................................................29
7. PTZ CONTROL (OPTION) ...........................................................................................................................................................31
8. SEARCH PROGRAM ....................................................................................................................................................................33
4/42
8.1. PURPOSE ....................................................................................................................................................................................35
8.2. DETAIL FUNCTION..................................................................................................................................................................34
8.2.1. BASIC SCREEN...................................................................................................................................................................34
8.2.2. DVR HDD CONNECT ........................................................................................................................................................35
8.2.3. HDD CAPACITY INFORMATION .....................................................................................................................................35
8.2.4. EVENT LIST ........................................................................................................................................................................36
8.2.5. SEARCH ..............................................................................................................................................................................37
8.2.6. CONTROL ...........................................................................................................................................................................37
8.2.7. ZOOM CHANNEL...............................................................................................................................................................38
8.2.8. SAVE TO JPEG FILE..........................................................................................................................................................39
8.2.9. RECORD .............................................................................................................................................................................39
9. SPECIFICATIONS .........................................................................................................................................................................40
10. WARRANTY AND DISCLAIMER ............................................................................................................................................42
5/42
1. SYSTEM CONTENTS
Below picture shows the contents of the system package. Open the packaged box and
check the items contained within.
1
2
3
4
5
6
Contents
Volume
1
System
1
2
POWER CORD
1
3
AC-DC ADAPTER
1
4
Manual
1
5
Software CD
1
6
Remote Controller(Option)
NO
Reference
(Option)
Contact the seller or a customer service center if any of the items listed are missing or
damaged upon receipt. The manual, power cord, remote control and CD may not be
identical to the picture shown.
6/42
2. BUTTON FUNCTIONS
2.1. FRONT PANEL
Each button on the system’s front panel is used to operate the system's basic functions such as recording,
playback, fast-forward, reverse, etc.
NAME
FUNCTION
1
POWER LED
Indicates the power’s ON/OFF status.
2
REC
Indicates the system’s is recording state.
3
EVENT
Event search.
4
TIME
Time search.
5
ONE_FRAME
Plays back one frame when playback is slow.
6
MENU
Displays the on-screen menu.
7
CH4(LEFT)
Displays Channel 4 individually in full screen mode or left button.
8
CH1(UP)
Displays Channel 1 individually in full screen mode or up button.
9
CH2(RIGHT)
Displays Channel 2 individually in full screen mode or right button.
10
CH3(DOWN)
Displays Channel 3 individually in full screen mode or down button.
11
ALL(ENTER)
Display images of all 4 channels in quad screen mode or enter button.
12
SLOW
Plays back image slowly.
13
FF
Fast Forward.
14
PLAY/PAUSE
Play/Pauses playback.
15
REW
Rewind.
16
STOP
Stops playback or record.
17
REC LED/REMOCON
Record status LED/Remote receiver LED
NO.
7/42
2.2. BACK PANEL
Below picture shows the back panel of the system.
No.
NAME
Description
1
VIDEO OUT
Video Output Port
2
VIDEO IN
Video Input Port
3
AUDIO OUT
Audio Output Port
4
AUDIO IN
Audio Input Port
5
POWER IN
Port for connecting DC ADAPTER (+12V).
6
POWER SWITCH
Turns the system on.
7
LAN
Port for connecting LAN cable(RJ45).
8
ALARM/SENSOR
Port for connecting outside input sensor and a single alarm device.
8/42
3. SYSTEM FUNCTION
3.1. SYSTEM START
The system will go into a self test once it is powered on. The contents of test are HDD1 and HDD2, LAN,
AUDIO FUNCTION, etc. Even if an unexpected situation such as power loss happens during recording, the
system will return to record mode automatically once power is restored.
3.2. HDD DETECTION
Duration of the HDD Test depends on the HDD Specification. If test time takes longer than 2 minutes contact a service center. This system accepts two HDDs maximum. After system recognizes a HDD, system
displays an "OK" sign to indicate that the HDD is available to the system. If the system does not recognize
a HDD, then the message "NOT installed" is shown.
After system recognizes a new HDD, the HDD must be formatted. A HDD formatted on this system will no
longer be recognized by a PC.
Reference
If the model of the HDD is not shown on the HDD test screen, no images will be saved.
Check to make sure that the HDD Rack is Locked.
After finishing the HDD test, "LAN check OK" will be shown on the screen. The system can now be connected to an Ethernet. “AUDIO OK” will be displayed next. Audio can now be recorded.
If the RTC Battery fails, the user must set the system back to factory default. Factory values are listed in the
set up section.
RTC (REAL TIME CLOCK) CHIP saves the system information.
Reference
If the system experiences an unexpected power failure, the system will return to the previous recording state automatically once power is restored.
9/42
3.3. MONITORING MODE
After finishing HDD, LAN and the AUDIO tests, the system will display a quad monitoring screen.
The basic system information is indicated on the lower part of the monitor. USED 30% indicates the percent of used HDD capacity. [M] or [S] indicates the HDD I use. [M] is the master HDD and [S] is the slave
HDD. In case of no HDD, system will show NO HDD. "2005/11/03 12:04:09" indicates time set of the system. "*" mark indicates the overwrite function of HDD. CH1, 2, 3, 4 indicates channel information.
When the system does not detect any input signal, system shows a blue back screen. If system shows a blue
back screen even when cameras are connected, please check connections between the system and cameras
once more.
When a channel select button is pressed, the system will display the channel selected in full screen as
shown below.
10/42
In order to see the quad mode screen, press the ALL button. In order to set automatically scan monitoring
screens, press the channel button that is already selected in full screen mode. This function shows each
channel for a set duration until stopped.
In order to stop automatic scanning, press any key on the front panel.
The duration of each screen can be set at MENU->SYSTEM->DISPLAY PERIOD. The default duration is
2 seconds.
11/42
4. SETUP MENU
4.1. SETUP MENU STRUCTURE AND INITIAL VALUE
The setup menu and its factory default values of this system are listed in the table below.
SETUP
FACTORY DEFAULT
CHANNEL1~4
YES
MODE
EACH
FRAMERATE
30
QUALITY
NORMAL
HDD SEQUENCE
-
SCHEDULE
TIME RECORD[T]
MUTE
NO
RECORDING
NO
CHANNEL
CH1
CH1~4 TYPE
NONE
RECORDING TIME
10SEC
CHANNEL1~4
NO
SENSITIVITY
05
CHANNEL1~4
NO
DURATION
5SEC
HDD OVERITE ENABLE
YES
MASTER HDD FORMAT
-
SLAVE HDD FORMAT
-
DISPLAY PERIOD
02
DATE FORMAT
YYYY/MM/DD
TIME SETUP
-
PASSWORD
111111
FACTORY DEFAULT
-
CLIENT ACCESS ENABLE
YES
DNS
192.168.1.1
RECORD
AUDIO
SENSOR
MOTION
ALARM
HDD
SYSTEM
NETWORK
12/42
IP
192.168.1.90
GATEWAY
192.168.1.1
SUBNET MASK
255.255.255.0
MAC ADDRESS
00:11:3D:XX:XX:XX
4.2. SETUP
When user presses the "MENU" button in the monitoring screen, the system will ask for the password as
shown below. Once the password is entered, the setup menu will be displayed.
In the setup menu, press the RIGHT or LEFT button to toggle between the MAIN MENUS. The MAIN
MENUS are RECORD, AUDIO, SENSOR, MOTION, ALARM, HDD, SYSTEM, and NETWORK setup.
Press the UP or DOWN button to select each SUB MENU that is belonging to the corresponding main
menu each. Press the MENU button once again to exit the setup menu.
13/42
4.2.1. RECORD SETUP
RECORD SETUP is used to set values related to recording.
4.2.1.1. CHANNEL 1~4
Select [YES] to record the specific channel. System will not record the given channel if [NO] is selected.
4.2.1.2. MODE
To select the recording mode, navigate to [MODE].
Press the Select button to choose either [EACH] or [QUAD] Mode. In EACH MODE, system records images of each of the 4 cameras to a separate screen so that the recorded images can be played back using the
1, 2, 3 and 4 BUTTONS to display each screen at full screen or all four in a Quad View. In QUAD MODE,
system records images of all 4 cameras to one full screen so that user can not view specific channels separately.
The factory default setting is EACH MODE.
4.2.1.3. FRAME RATE
Use the SELECT BUTTON to choose the desired frame rate for recording. The factory default is 30(NTSC)
or 25(PAL), frame per second. The higher the record frame rate, the more natural the motion of playback
14/42
will be. The lower the record frame rate, the smaller the file size of the recordings, saving HDD usage.
There are 9 settings for NTSC: 1, 2, 3, 4, 5, 7, 10, 15, 30, and 8 settings for PAL-8 kinds: 1, 2, 3, 5, 6, 8, 12,
25.
If AUDIO RECORD is selected, User can select only between 5, 7, 10, 15, or 30 frames.
4.2.1.4. QUALITY
Navigate to VIDEO QUALITY in order to set the quality the images are to be recorded at. Then, use the
SELECT BUTTON to choose between LOW, NORMAL or HIGH. The higher the video quality, the
cleaner the image will be during playback. The lower the video quality, the more space user will save on the
hard disk drive.
NOTE: The video quality in VIEW MODE is not affected by the video quality settings. These settings only
affect the video quality during playback of recorded video.
4.2.1.5. SCHEDULE
The SCHEDULE Sub Menu can be used to setup specific times and days of the week for the system to record. Navigate to SCHEDULE, and then press the SELECT Button to display the following menu.
The first "T" on the left is equal to the first hour of the day (12 midnight through 1:00 am). The next "T"
equals the second hour of the day (1:00 am - 2:00 am), and so on. Press the UP, DOWN, LEFT, and
15/42
RIGHT Buttons on the system's front panel to move the cursor to the desired time selection. Then, press the
SELECT Button to change between continuous recording (T), sensor recording (S) and no recording (-) for
the selected time a slot.
z
(T) System will record continuously during this period.
z
(S) System will record when sensor is triggered.
z
(-) System will not record during this period.
z
The factory default setting is (T) for all hours.
4.2.2. AUDIO SETUP
Audio Options can be configured here.
4.2.2.1. MUTE
Mutes the Audio Output.
4.2.2.2. RECODRING
Audio is recorded along with the images.
16/42
4.2.2.3. CHANNEL
Select the input channel for audio.
4.2.3. SENSOR SETUP
The SENSOR Menu is used to setup recording that is triggered by an input sensor.
The Type of sensor and recording times can be specified.
4.2.3.1. SENSOR TYPE 1, 2, 3, 4
There are 3 different modes for sensor activated recording:
z
NOT INSTALLED: no sensors are connected to the system.
z
TYPE: NORMAL-OPEN
z
TYPE: NORMAL-CLOSE
In order to set the mode for sensor activated recording, navigate to each channel and press the SELECT
Button, then choose either NOT INSTALLED, TYPE: NORMAL-OPEN, or TYPE: NORMAL-CLOSE. In
NORMAL-CLOSE mode, sensor recording starts if an intruder cuts the cable line that connects the sensor
to the system. In NORMAL-OPEN mode, sensor recording starts when the circuit is closed.
See RECORD SCHEDULE for reference.
17/42
4.2.3.2. RECORDING TIME
RECORDING TIME is used to set the duration to record after the sensor’s last detection of movement. Default value is 10 Seconds.
4.2.4. MOTION, SENSOR SETUP
Use the MOTION Menu to setup Motion Recording. Motion Recording works the same way the Sensor
Recording does. When the system detects motion, it will send a signal to the Input Sensor. Setup each channel separately.
The factory default setting is -,-,-,-.
4.2.4.1. MOTION SENSOR CHANNEL1~4
Setup each channel for Motion Recording
4.2.4.2. SENSITIVITY
Decides the sensitivity of motion detection. The higher the value, the more sensitive detection will be.
4.2.4.3. RECORDING TIME
The Duration to record in the event motion is detected.
18/42
4.2.4.4. SELECT AREA
Select the Area where motion is to be detected.
Each channel must be setup separately. Switch between channels using the SLOW Key. UP, DOWN, LEFT,
and the RIGHT keys, will change the location of the cursor. Press the ALL Key to mark or clear the selected area. Motion will be detected from all areas marked M. Clear areas will be ignored.
4.2.5. ALARM SETUP
Alarm output needs to be set according to sensor or motion setup.
If alarm duration is set to any value except 0, the alarm output is based on sensor input. After the alarm duration passes, the alarm output will stop. Alarm output also depends on motion input. When motion input is
perceived, the alarm will output.
19/42
4.2.5.1. ALARM CHANNEL 1~4
It sets up sensor channels related with the alarm. When channels set to [YES] then, alarm will output.
See SETUP MENU-> SENSOR and MOTION for sensor setup. When alarm is set, then monitoring or recording screen shows ALARM[1U--] in upper left side as below picture. "U" means that Channels are not
set.
The previous picture shows the state of alarm setup. Only the second channel is not set. The first channel
detects motion or other source and outputs alarm.
20/42
4.2.5.2. DURATION
It indicates how long the alarm lasts after it sets off.
4.2.6. HDD SETUP
It shows basic information of HDD and sets up the initialization and overwrites of HDD.
4.2.6.1. HDD OVERWRITE ENABLE
If user chooses YES (default setting), recording continues and overwrites previous recording when HDD
space is full. In this case, old data is erased first. If user chooses No, the recording session stops when all
HDD is full.
4.2.6.2. MASTER, SLAVE HDD FORMAT
When system recognizes HDD, it shows [EXIST]. If not, it shows [NO HDD].
In case of [EXIST], User can format HDD but be aware that all data in the HDD is erased.
21/42
4.2.6.3. HDD SUMMARY
It shows the information of HDD used. 1MB is 1048576BYTES.
4.2.7. SYSTEM SETUP
It initializes time, channel display period and system.
4.2.7.1. DISPLAY PERIOD
Channel rotation time is set on monitoring mode. Channel rotation is only possible when the system is set
by EACH MODE. The factory default setting is two seconds.
4.2.7.2. DATE FORMAT
It changes the date format. It supports YYYY/MM/DD, MM/DD/YYYY, DD/MM/YYYY formats.
22/42
4.2.7.3. TIME SETUP
It changes the time of system. The change of time is possible between 2005 year and 2099 year.
4.2.7.4. PASSWORD
It changes system password. A password is used for system security. The factory default password is
"111111". CH1, 2, 3 and 4 are used to enter password.
23/42
4.2.8. NETWORK SETUP (Static IP Network model, Dynamic IP Network model)
It sets up network part. This DVR supports dynamic network IP with DIPS server. The DIPS is Dynamic
network IP Service. When you use a dynamic IP such as ADSL or VDSL and so on, customer can not access the DVR with the client program easily, because the DVR IP is changed automatically. To solve this
problem, DIPS server records the DVR IP and DVR sends the own IP to the DIPS server. Therefore, you
can access the DVR via DIPS server. Detailed information is shown as below.
4.2.8.1. CLIENT ACCESS ENABLE (Static IP Network model, Dynamic IP Network model)
It controls access of the CLIENT PROGRAM. If yes, the DVR system is allowed to connect to a client program via network.
4.2.8.2. DHCP ON (Static IP Network model, Dynamic IP Network model)
DHCP function is that the DVR system gets the value of IP, SUBNET mask and gateway from the DHCP
server automatically. Therefore, if DHCP server does not exist on your network, You MUST set DHCP to
NO.
4.2.8.3. GET DNS AUTOMATICALLY (Dynamic IP Network model only)
DVR gets the DNS IP from DHCP server automatically. If DHCP server does not exist, You MUST set this
configuration to NO and then user sets up the value of DNS IP manually. DNS is Dynamic Naming Service.
24/42
4.2.8.4. GET DIPS FROM DNS (Dynamic IP Network model only)
When “GET DIPS FROM DNS” is YES, DVR gets DIPS IP from DNS server automatically. If the value of
DNS IP is not correct, DVR is not able to connect to DIPS server. In this case, you MUST set this configuration to NO and then YOU set up the value of DIPS IP manually. Currently DIPS IP is 222.231.024.028.
The DIPS server stores a DVR’s IP. When the DVR connects DIPS server via network, the DVR sends it’s
own IP to the DIPS server. As soon as client program is executed, the client program gets the DVR IP
automatically. Refer to the client manual for more detail information.
4.2.8.5. INFORMATION RELATED NETWORK CHANGE
It changes DNS, DIPS, IP, GATEWAY, SUBNET MASK and MAC ADDRESS setup.
If DHCP ON is YES, Users can not change the value of the IP, gateway, subnet mask manually. If DHCP
ON is NO, the DVR cannot get the values of IP, subnet mask, gateway and DNS from DHCP server automatically. Therefore “GET DNS AUTOMATICALLY” item is valid when DHCP ON is YES.
The value of DNS, DIPS, IP, GATEWAY, SUBNET MASK and MAC ADDRESS can be changed manually. Move the keys using UP and DOWN and then press the ENTER KEY. A network submenu is shown
as below picture and then you change the value.
25/42
5. RECORD FUNCTION
To start recording, press the "REC" button on the front panel.
The above picture shows the information of recording status.
z
E-REC: Each Record.
z
Q-REC: Quad Record.
z
[M]: Master HDD.
z
[S]: Slave HDD.
z
30%: 30% of HDD is used.
z
[T]: Continuous Record.
z
[S]: Sensor Record.
To stop recording, press the "STOP" button on the front panel and input the PASSWORD.
26/42
There are two recording modes, CONTINUOUS RECORDING MODE (T) and SENSOR RECORDING
MODE. See SETUP->RECORD->SCHEDULE for further reference.
To schedule recording at a specified times throughout the day, navigate to SCHEDULE. Then, press the
SELECT BUTTON to display the following menu.
The numbers below indicate the hours of the day based on a 24-hour clock. The first "T" on the left is equal
to the first hour of the day (12 midnight through 1:00 am). The next "T" equals the second hour of the day
(1:00 am – 2:00 am), and so on. Press the UP or DOWN BUTTON on the system’s front panel to move the
ARROW "V" to the desired time selection. Then, press the SELECT BUTTON to change between continuous recording (T), sensor recording (S) and no recording (--) for the selected time a slot.
z
(T) System will record continuously during this period.
z
(S) System will record when sensor is triggered.
z
(-) System will not record during this period.
z
The factory default setting is (T).
If POWER shuts off during recording, the system will automatically recover all system data and resume recording when POWER is restored.
Reference
Even through unexpected situations such as power loss, during recording, the system
will return to recording automatically upon restoration of power without damage.
27/42
6. SEARCH AND PLAYBACK FUNCTION
6.1. SEARCH FUNCTION
When the playback button is pressed at the monitoring screen, the most recent image is
played back. The Search function has two modes, event search and time search.
6.1.1. EVENT SEARCH
When the “EVENT SEARCH” button is pressed, the event search screen is displayed as shown above. Use
the UP and DOWN buttons to find the event to view. Press the PLAY or ENTER button to start playback of
the event chosen. The total number of events is 64.
28/42
6.1.2. TIME SEARCH
When user presses the “TIME SEARCH” button, time search screen is showed as shown below.
The screen above shows the beginning and the end of the recorded time on the HDD. Use the LEFT or
RIGHT BUTTON to view a specific time, then playback the image.
6.2. PLAYBACK FUNCTION
Playback function has several modes as below.
BUTTON NAME
FUNCTION
PLAY
Normal playback or Stop Playback momentarily.
FF
Fast playback. This has 5 modes (4, 16, 32, 64 and128). Press FF to change the
normal speed of playback.
REW
Fast Playback backward with 5 modes. (4, 16, 32, 64 and 128).
STOP
Stop Playback and returns to monitoring screen.
SLOW
Playback slow with 3 modes ( 1/2, 1/4, and 1/8).
ONE FRAME
Playback image frame by frame when playback image is set at slow.
The optional playback mode is normal playback, fast playback, fast playback backward, slow playback and
one frame playback. The image recorded by EACH MODE can be displayed with QUAD or FULL
screen. The image recorded by QUAD MODE can be displayed with QUAD screen only.
29/42
User playback images recorded by EACH MODE, uses CHANNEL 1,2,3,4 and ALL button to change
screen. The basic information of image recorded is showed in lower part of the screen. It shows time, HDD
information, record mode and playback speed of image recorded.
30/42
7. PTZ CONTROL (OPTION)
Audio and Network models support PTZ function with PELCO-D protocol via RS485 serial interface. Push
the “SLOW” button on recording or monitoring mode to enter PTZ control mode. PTZ control buttons are
described in the table below.
BUTTON
Description
SLOW (PTZ)
Enter PTZ Control mode or exit.
CH1 (UP)
“UP” command. The camera moves left.
CH2 (RIGHT)
“RIGHT” command. The camera moves right.
CH3 (DOWN)
“DOWN” command. The camera moves down
CH4 (LEFT)
“LEFT” command. The camera moves left.
ONE FRAME (ZOOM IN)
“ZOOM IN” command.
MENU (ZOOM OUT)
“ZOOM OUT” command.
ENTER (Select PTZ camera)
Select the camera ID to control PTZ camera.
Push the “SLOW” button to enter PTZ control mode.
Press the “ENTER” button to select the PTZ camera as below.
31/42
If the PTZ camera is connected to CH1, select CH1 using “ENTER” button and then press command button
such as “UP, DOWN, LEFT, RIGHT ZOOM IN and ZOOM OUT” buttons. After cameras are positioned
correctly, press the SLOW button to EXIT.
32/42
8. SEARCH PROGRAM
8.1. PURPOSE
This manual is for the "4CH DVR". User can see the images recorded in HDD through computer.
33/42
8.2. DETAIL FUNCTION
8.2.1. BASIC SCREEN
z
View - This shows image.
z
Scrollbar - The total length of Scrollbar is proportional to the capacity of the HDD. If user moves
scrollbar, the image moves to the specified time.
z
HDD - This shows the connection between the HDD, Viewer and the capacity of HDD.
z
Event - This shows the list of events recorded in HDD. User uses this function to search event desired and playbacks image on time (Year, Month, day, Hour, Minute and Second).
z
34/42
Control - This controls the functions of Record, Stop, RW, Play, Pause, and FF.
8.2.2. DVR HDD CONNECT
First Hard Disk Drive (HDD) should be connected with PC through USB Drive or IDE Connector.
User clicks "Connect Backup HDD" button. Above picture shows that viewer recognizes HDD. If a button
is not activated, user checks connection between HDD and PC. If no problem, user opens viewer and try
again.
If HDD is recognized, a button is pressed like a picture.
User can use all functions of a viewer.
8.2.3. HDD CAPACITY INFORMATION
This button shows the total capacity of
HDD recognized, the capacity of HDD
used and the capacity of HDD remaining.
35/42
8.2.4. EVENT LIST
4CH DVR records starting time as event when image is recorded
every time. This function shows event recorded for user to search
image desired.
36/42
User selects "Event" Icon for moving, then select event desired on "Event List" Dialog. After this, user selects "OK" Button and playback is started from desired point.
8.2.5. SEARCH
User can move starting point directly and playback image
using Search function.
The condition of search is Year, Month, Day, Hour, Minute and Second. "Start Date" and
"End Date" in
"Information" indicates the range of the search. This range indicates the starting point and the finishing
point of the recording session. Search can be possible within this range. User selects date and "Search Button" to see the image at that point of time.
8.2.6. CONTROL
Control buttons are for image control.
z
37/42
PLAY – Playback
z
STOP – Stop
z
PAUSE – Pause
z
Fast Forward, Fast Playback. Playback speed increases by one. Maximum
speed is 128X. To return to normal speed, press Play button.
z
Rewind - Reverse Playback. To return to normal speed, press Play button.
z
Record - Record Button. The File Format of image is AVI. The name of the codec is MPEG4.
8.2.7. ZOOM CHANNEL
38/42
In order to scale up image during playback, Move the mouse pointer to the desired channel and left Click.
The desired channel will scale up. In this case, record type should be Quad type.
8.2.8. SAVE TO JPEG FILE
During playback, user can right click the mouse anywhere on the screen, then "DVR-image-001.jpg" will
be recorded in folder which includes HDDViewer.exe. The name of next image is "DVR-image-002.jpg,"
"DVR-image-003.jpg" and so on.
8.2.9. RECORD
During playback, User presses
button, below dialog-box is shown and record is started.
In order to stop recording, user presses
button and a confirmation window
will display and record will stop. Image file (*.avi) recorded can be played by MediaPlayer10.
39/42
9. SPECIFICATIONS AND HDD USAGE CHART
Item
Basic +1 Audio. Network
OS
Real-time OS
Video Input
4 Channel
Video Output
2 Channel
Video Input Standard
NTSC / PAL
NTSC
640 * 480 Pixels
PAL
640 * 576 Pixels
NTSC
640 * 224 Pixels
PAL
640 * 272 Pixels
NTSC
120 fps(Quad) / 30 fps(Each)
PAL
100 fps(Quad) / 25 fps(Each)
NTSC
30 fps(Quad) / 7.5 fps(Each)
PAL
25 fps(Quad) / 6.25 fps(Each)
Remark
Monitoring resolution
Recording resolution
Display Frame rate
Recording Frame rate
Recording Mode
Continuous /motion, sensor
Display Mode
FULL/QUAD
Compression Format
Motion JPEG
Low
12 Kbytes/frame
Normal
15 Kbytes/frame
High
20 Kbytes/frame
Image Size (Each
Channel)
POWER
AC/DC Adaptor (12V, 5A)
HDD Capacity
HDD * 2
HARD RACK
One HDD is installed in the HARD RACK.
Motion detection
ON / OFF, and selectable motion sensitivity
Audio
4 CH Input / 1CH Output
PTZ Control
PELCO-D, RS485 (2400bps)
Software
Multi viewer software
Operating Systems Supported
WIN_2000, WIN_XP
Camera Power(12V)
+DC 12V
Sensor/Alarm
4 CH Input / 1 CH Output
Operation Temperature/Humidity
5~40℃ /20~80% RH
40/42
(8~20Kb/frame)
Quality
Mode
Low
Normal
High
41/42
Frames/Sec
1 Frame
1 Hour
1 Day
10 Days
20 Days
30 Days
f/s
kilobyte
megabyte
gigabyte
gigabyte
gigabyte
gigabyte
30
12
1300
31.2
312
624
936
15
12
648
15.5
155
310
467
10
12
432
10.1
103.7
207.4
311
7
12
302
7.26
72.58
145.15
219.74
5
12
216
5.18
51.8
103.6
155.4
4
12
173
4.15
41.5
83
124.5
3
12
130
3.12
31.2
62.4
93.6
2
12
86
2.06
20.6
41.2
61.8
1
12
43
1.03
10.3
20.6
30.9
30
15
1620
38.88
388.8
777.6
1166
15
15
810
19.44
194.4
388.8
583.2
10
15
540
12.96
129.6
259.2
388.8
7
15
378
9.07
90.7
181.4
272.1
5
15
270
6.48
64.8
129.6
194.4
4
15
216
5.18
51.8
103.6
155.4
3
15
162
3.89
38.9
77.8
116.7
2
15
108
2.59
25.9
51.8
77.7
1
15
54
1.3
13
26
39
30
20
2160
51.84
518.4
1370
1555
15
20
1080
25.92
259.2
518.4
777.6
10
20
720
17.28
182.8
345.6
518.4
7
20
504
12.01
120.1
240.2
360.3
5
20
360
8.64
86.4
172.8
259.2
4
20
288
6.91
69.1
138.2
207.3
3
20
216
5.18
51.8
103.6
155.4
2
20
144
3.46
34.6
69.2
103.8
1
20
72
1.73
17.3
34.6
51.9
10. WARRANTY AND DISCLAIMER
The manufacturer does not assume any responsibilities related to the sales of the unit and does not endorse
any third party to represent the manufacturer in any way. The warranty does not apply to malfunctions of
the unit or its parts resulting from any accident, negligence, misuse, or misapplication. Also, the warranty
does not include accessories or components that the manufacturer does not supply.
The warranty is valid for one year from the date of purchase. However, the malfunctions listed below are
not covered by the warranty even during the warranty period. Repair services for the malfunctions below
will be available, but with applicable charges.
If malfunctions occur due to carelessness of the user;
If a user disassembles or replaces any parts of the unit without permission;
If power other than the recommended power is connected to the unit;
If malfunctions occur due to natural disaster (fire, flood, tidal wave, etc.); or,
If consumable parts/items are to be replaced;
The warranty specified herein is only for the units delivered.
Consumers will be charged for examination and repairs after the expiration of the warranty period (one
year).
A fee will be assessed for repairs or examinations, except within the scope of the warranty specified herein
even during the warranty period.
For out-of-warranty services, please contact your local vendor or service center.
Any work by unauthorized personnel will not be covered by warranty
SURETY CERTIFICATE
PRODUCT OR MODEL NAME
Network/Basic +1 Audio
PURCHASE PLACE
PURCHASE DATE
WARRANTY PERIOD
CUSTOMER
NAME/TEL
ADDRESS
42/42
1 YEAR FROM PURCHASE DATE
/