1
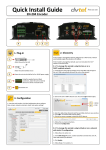
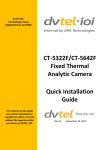
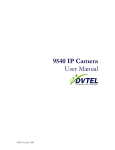
Quick Install Guide
CF-5212/CF-5222 HD Analytic Fixed Camera
Network (Ethernet) and POE connection
Properly rated power supply (when not using PoE)
1. Unpack the CD from the product package and load it in the CD drive.
1. From the navigation bar, select the Camera tab.
2. Click the DNA icon
and run the DNA utility (DNA.exe). DNA discovers all
devices on the network and assigns an IP address to the device. DNA version
2.0.4.1 and above supports CF-5212/CF-5222.
2. From the TV System dropdown list, select the required video
format (PAL/NTSC). The default video format is PAL.
3. Do one of the following:
•
If there are authenticated devices, right-click the unit(s) in DNA’s Discover
List and select Login or click the Login icon
on the toolbar.
•
If there are un authenticated devices or devices located on a separate VLAN,
enter the IP address manually by clicking
on the toolbar.
3. Click the check mark to save settings. The unit resets and the
new setting is configured. Note: changing the video format
restores the unit to factory defaults and deletes any analytic
configuration that was set previously.
4. Click the Login icon and enter login credentials for the devices.
5. Enter the unit’s IP address in your browser (Internet Explorer 8 and above).
6. When the Login window opens, enter the unit’s default user name and
password (“admin” and “admin”).
NOTE: Refer the DNA 2.0 User’s Manual for details how to use DNA.
You can also select the video format in DNA from the context
menu by clicking Change Video Format, or from the Device
Properties screen of the Properties tab.
1. From the navigation bar, select the Analytics > Depth tab. Follow
the instructions displayed on-screen for the Solo Setup procedure.
2. On the Solo Setup control keypad, click the Start Recording icon
and select a folder where to store the clip.
3. Press Stop Recording.
4. Click Browse on the keypad to load and view the clip. Navigate the
clip and add human markers.
5. Press the round Play button on the control panel located to the
left of the monitor to exit Clip mode and return to Live mode.
6. Expand the Step 1: Ground & Height tab. Place ground and height
markers and guidelines in the clip.
7. Continue setting depth by clicking the tabs for Steps 2-4. Follow
the instructions. Expand the Help section included with each step for
detailed information. Verify that the settings provide an accurate
representation of the sizes and distances in the scene. When
finished, click Apply to save settings.
NOTE: Refer to the HTML Edition Units User’s Guide for instructions
how to use the Solo Setup function.
From the navigation bar, select Analytic > Rules.
A rule for detecting humans or vehicles entering the
scene (blue masked area) is defined by default.
You can activate rules, modify settings, delete, or
add a new rule.
To create a new rule:
1. Click New.
2. Select the rule type.
3. Draw on the video scene where you want the
detection to take place.
4. Define the attributes for detection.
5. When finished, click Apply to save the settings.
NOTE: Refer to the HTML Edition Units User’s Guide for information
on the use of rules.
1. From the navigation bar, select Home.
Notice: Failure in part or in whole of the installer, owner, or user in any way to follow the prescribed procedures or to heed warnings and cautions
provided in the installation and user manual shall absolve DVTEL and its agents from any resulting liability.
Warning: THIS EXAMPLE IS FOR DEMONSTRATION PURPOSES ONLY. For deployment in live applications, such as security, safety and loss prevention
programs, installers, owners and users should read and follow the installation and user manual prescribed procedures provided. Installation should
follow safety, standards, electrical codes and security best practices as well as the laws that apply where the units are being installed.
CF-5212-5222_QIG_Jan21_2015
DVTEL, Inc.
Tel: 201-368-9700
65 Challenger Road
Ridgefield Park, NJ 07660
Fax: 201-386-2615
Order Fax: 201.712.0343
[email protected]
www.dvtel.com
P/N MA0605-20-60
2. Select Arm. The camera is ready to use.