1
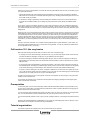
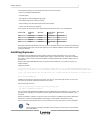
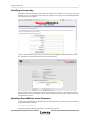
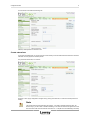
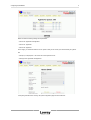
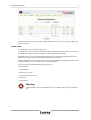
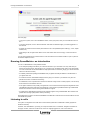
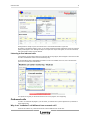
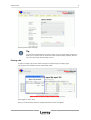
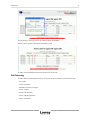
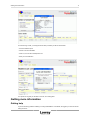
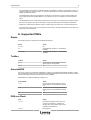
Running a small call-center
with QueueMetrics Espresso
Loway
Revision $Revision: 1.10 $ - covers
QueueMetrics 12.05 / Espresso 0.11
Revision History
$Date: 2012/06/01 09:52:17 $
L
Table of Contents
Introducing QueueMetrics Espresso ........................................................................................ 1
Turning your PBX into a call-center solution ...................................................................... 1
Call centers 101: the very basics ................................................................................... 2
Prerequisites ........................................................................................................... 2
Tutorial organization .................................................................................................. 2
Installing Espresso ............................................................................................................ 3
Installing a license key ............................................................................................... 4
Updating QueueMetrics under Espresso .......................................................................... 4
Testing your new call center ................................................................................................ 5
Configure the PBX .................................................................................................... 5
Configuring QueueMetrics ........................................................................................... 7
Running QueueMetrics: an introduction .......................................................................... 12
Listening to calls ..................................................................................................... 12
Outbound calls ....................................................................................................... 13
Call listening ......................................................................................................... 16
Getting more information ................................................................................................... 17
Getting help .......................................................................................................... 17
A. Supported PBXs ......................................................................................................... 18
Elastix ................................................................................................................. 18
TrixBox ................................................................................................................ 18
AsteriskNOW ......................................................................................................... 18
PBX-in-a-Flash ....................................................................................................... 18
FreePBX .............................................................................................................. 19
Thirdlane .............................................................................................................. 19
What if my PBX is not on the list? ................................................................................ 19
Appendix II: Common problems and solutions .......................................................................... 19
Avoiding queue_log file rotation ................................................................................... 19
Stopping and starting QueueMetrics .............................................................................. 19
Setting QueueMetrics memory limits ............................................................................. 19
Installing the SSH Java client in Trixbox ......................................................................... 20
Installing QueueMetrics on a different server .................................................................... 20
Introducing QueueMetrics Espresso
QueueMetrics Espresso is a way to install a fully configured QueueMetrics automatically on the most common Asterisk PBXs that use FreePBX (or a derivative) as their Asterisk configuration GUI.
QueueMetrics Espresso natively works on the following PBXs:
• Elastix
• TrixBox
• AsteriskNOW
• PBX-in-a-Flash
• FreePBX
You obtain a completely configured system that supports inbound and outbound calling, linking to call recordings,
call barging, the Agent’s GUI with logins/logoffs/pauses, call completion statuses and many other fetures.
Turning your PBX into a call-center solution
You probably already know that using one of the above-mentioned Asterisk distributions you can install a fully featured Asterisk-based PBX in a matter of minutes. This PBX is very good for most users as it is preconfigured to
handle the most common scenarios one can find in a personal environment or in a small to medium sized office.
Call centers 101: the very basics
2
However, the common usage patterns of a small call center are quite different from the ones you are likely to find
in a typical PBX, because:
• Agents spend almost their whole working day being available to answer the phone (as opposed to standard
PBX users who use the phone occasionally while doing other work); handling and answering calls for them has
to be made as easy as possible.
• A call center is usually a high-density commercial enterprise; therefore it has to be run and monitored using
tools that offer immediate visibility on how things are going and that can quickly identify and address bottlenecks.
In our opinion, running a successful call center is more a state of mind than a given set of telephone equipment.
What makes a difference is not the number of extensions, queues or agents you may have: it is a mindset where
you consider that the customers calling in are very important and you do your best to serve them well within given
budget limits.
Maybe you just run a small computer-repair shop and have a couple of lines coming in. What is the cost of having
people waiting or calling various times because they cannot talk to anybody within a reasonable time? What will
your clients think about you? On the contrary, what will your clients think of your Customer Service Department
if it always answers after the very first ring? And how do you know if your technicians actually answer the phone
when the calls come in or wait five minutes, because they are doing other things? These are the questions you
should ask. If you follow the guidelines in this document, you’ll find an easy way to start answering questions like
these.
Running a call-center, therefore, is not a matter of having multiple PRIs or special hardware. In most cases, you
will not even need a separate box from your main PBX running Asterisk. You will only need some software and a
bit of configuration to set it up correctly.
Call centers 101: the very basics
Before we start building a small call center, we have to focus a bit on the terminology:
• A campaign is a set of calls that belong to the same scope, e.g. your technical support versus commercial support lines are different campaigns, though they may be staffed by the same agents.
• An inbound campaign is devoted to answering people calling in, while an outbound campaign is made up by
agents dialing out. Call centers often mix inbound and outbound activities in order to optimize the use of available personnel.
• A queue is the physical implementation of an inbound campaign. The queue receives calls and routes them to
the available agents, according to a predefined logic (usually, FIFO for the calls and round-robin for the agents).
In call center terminology, this functionality is often referred to as the ACD (Automated Call Distribution).
• An agent is a person working at a call center. The agent is different from a casual user as an agent logs in and
out, in order to tell the system when he is available or not. In this way, the ACD searching logic minimizes agent
searching time, as it hardly ever has to ring up an unavailable agent.
An agent can be working on one or more queues: whenever he is available, all calls coming in to any queue he’s
working on will be routed to him.
In this tutorial, we will learn how to create both inbound queues and outgoing campaigns and the proper agent
setup to handle them successfully.
Prerequisites
To follow this guide, you will need a reasonably modern Asterisk-based PBX installed, running FreePBX. It may
be your home or office PBX. This tutorial has been produced for TrixBox 2.8 and its derivatives, but applying it to
different versions should be rather trivial.
You can follow this guide completely while having your PBX running, so there is no need for any prolonged downtime. You will need at least a couple of telephones to test your setup, and a land line you can use.
You should be basically familiar on how to use your PBX: creating extensions, connecting to external lines and so
on.
Espresso will install QueueMetrics and Qloaderd on your system by downloading them from the network, so your
PBX needs to be connected to the Internet during the installation.
Tutorial organization
This tutorial is split into two separate parts; one for inbound and one for outbound.
Installing Espresso
3
For each queue/campaign, for both inbound and outbound, we will show how to:
• Define it in FreePBX and QueueMetrics
• Associate agents
• Have agents use their QueueMetrics' agent page
• Run statistical reports and real-time monitoring
• Keep recordings of all calls made and play them back as needed
• Listen to live calls as they are happening
In our scenario, we have a fictious set of queues and agents that work on them. They are defined as:
Queue code
Campaign
name
Direction
Agents working on it
Extensions
300
Support EN
Inbound
200 and 201
400 and 401
301
Support ES
Inbound
200
400
302
Helpdesk
Inbound
201
401
350
Callback
Outbound
200, 201 and
202
400, 401, 402
Each agent is defined by his/her agent code; as you can see, extension codes are now separate and linked to the
physical extension being used. You can have agents log on from different extensions and still be able to accurately track their activities.
Installing Espresso
QueueMetrics is a fully-fledged call center monitoring solution (see http://queuemetrics.com) . It is an industry-standard, commercial product that is available free of charge to smaller call centers, home users and SOHOs
and is used in a large number of call centers worldwide, including installations with hundreds of agents online at
the same time.
Espresso will download QueueMetrics and its components and will install them on your PBX by using the yum
package manager.
Logging into the PBX
If you have an SSH client or can access the system console (i.e. the attached keyboard and monitor,
if any), log in as user 'root' with password 'password' (you entered the password during system ins
If not, you should install the Java SSH client (see 'Common problems and solutions' at the end of t
Installing using Espresso
Installation using Espresso is really quick and simple. First, log on to your PBX through its shell; you must use a
root account as you will be installing new software on the system.
Issue the following commands:
wget -P /etc/yum.repos.d http://yum.loway.ch/loway.repo
yum install queuemetrics-espresso
The yum command will download QueueMetrics and all of its dependencies and install them on your system. This
may take a while, depending on your internet connection speed. When asked to confirm the installation, type "y"
to proceed.
When the installation is complete, you will have to point your browser to the address http://myserver:8080/queuemetrics and you should see the QueueMetrics home page (you will be asked to accept the EULA first).
Log in as demoadmin with password demo; if you don’t see any errors, then your system is correctly configured.
Tip
Check in Appendix I for specific information about your PBX (e.g. how to log on, or special issues
you should address).
Installing a license key
4
Installing a license key
QueueMetrics ships with a default free license that allows usage of up to 2 agents at once; this may or may not be
enough for you to run a complete test of the product. We suggest you ask Loway for a free unlimited-agents demo
key, by filling in the form located at:
Once you receive the license key by email, you can install it simply by logging on to QueueMetrics as "demoadmin", selecting the License page and clicking on "Install new license key".
Copy the activation code you received by email into the license box and press "Run". The system will restart in a
few seconds (you may see a blank page - if you do, just try to reload). Log off an on again. On the License page
you should see the new key.
Updating QueueMetrics under Espresso
If a new version of QueueMetrics is released and you want to upgrade to it, you can do so from the command line
by issuing the following command:
yum update queuemetrics
Note that we update the package queuemetrics, not queuemetrics-espresso!
Testing your new call center
5
The license keys, configuration files and everything else are automatically retained. On the first run, you may be
asked to let QueueMetrics update its database; the process will be done automatically through a web-based wizard.
When you update from one version to a newer one, QueueMetrics takes a few moments to optimize the database
so that queries can run faster on it. If your database is very large, this may take a while to run.
Testing your new call center
Configure the PBX
Point your browser to your PBX server; you should see a welcome screen.
When using TrixBox:
• Click on User mode [ switch ]
• Enter user maint and password password as credentials
• Click on PBX, PBX settings
You should see the FreePBX welcome screen.
When using AsteriskNOW:
• Select FreePBX Administration
• Enter admin and admin as credentials
You should see the FreePBX system status screen.
Create inbound queues
Click on Queues and create a new one with the following parameters:
• Queue number: 300
• Queue name: Support EN
• Ring strategy: rrmemory
• Call recording: wav49
Leave all other settings blank.
Click on "Apply configuration changes", "Continue with reload".
Configure the PBX
6
You should see a result like the following one:
Likewise, create queues 301 and 302 in turn.
Create extensions
If you have not already done so, for the purpouse of this tutorial you should create three SIP extensions and associate them to three physical or software phones.
They should be named 400, 401 and 402.
Once this is done, apply configuration changes and try placing some test calls, to make sure that all phones are
working.
Note
The picture above reports extensions 200 and 201. You need to generate extensions 200, 201
and 202 only if you don’t want to enable hotdesking. In this case we assume that agents with code
200 will answer calls from the extension 200 and so on. To explain how the hotdesking funcionality
Configuring QueueMetrics
7
could be implemented you need to define the extensions 400, 401 and 402 instead of the 200 and
201.
Configuring QueueMetrics
We now have to configure QueueMetrics to use the newly-defined queues and agents.
Go to http://10.10.3.123:8080/queuemetrics and login as demoadmin with password demo.
Import queue definitions
From the home page, click on Edit QueueMetrics settings, Setup wizard.
Note
The Setup wizard is present only if you’re logged with a user holding the CONFIG key. If you are
migrating from a QueueMetrics version older than 1.5.2 you need to add this key to your account.
Follow the wizard until complete.
At this point, queues 300, 301 and 302 have been created.
Create agents
We now have to tell QueueMetrics on which queues our agents will be working.
Edit QueueMetrics settings, Edit agents.
Configuring QueueMetrics
Create a new agent, setting the following parameters:
• Asterisk agent code: Agent/200
• Agent description: My Agent 200
• Current terminal: --Leave all other parameters blank. Note that the agent code must be Agent/extension number, without spaces or
other characters.
At the end, the agent configuration screen should look like the following one:
Now you should edit the queue-agent association, that is, select which agents can work on which queues.
Just click on Cfg Queues, choose queue 300, Agents
8
Configuring QueueMetrics
Make sure that the following settings are implemented:
• Queue 300: Agent/200 and Agent/201
• Queue 301: Agent/200
• Queue 302: Agent/201
At this stage, you should also edit the "00 All" queue so that you can see all your inbound activity at a glance.
Set:
• Queue(s) to "300|301|302" - this means all of those queues at once
• Main agents as Agent/200 and Agent/201
If everything has been done correctly, the queue configuration page should look like this:
9
Configuring QueueMetrics
10
Notice that Agents column shows the number of agents defined as "2-0-0", that is to say 2 agents as Main Level,
0 as Wrap, 0 as Spill.
Create users
The configuration so far is enough for running reports.
This gets to be a problem if the number of queues and agents is higher than it is in this example - you can never
tell if all agents are logged on to their correct queues, and your agents often cannot either.
QueueMetrics helps you in this by offering the so-called Agent’s page, which is a specialized page from which
agents can log on, log off, pause, see calls processed and also do other activities.
In order to enable this, you have to create a logon for each agent that perfectly matches the agent code you used
in the agent definition, so e.g. for extension 200 you would use Agent/200.
Go to Home page, Edit QueueMetrics settings, Administer users.
Create a new user:
• Login: Agent/200
• Password: (You choose)
• Real name: (The person’s name)
• Enabled: Yes
• Class: AGENTS
Warning
Make sure that the class is set to AGENTS and not e.g. ADMIN, or they will logon as administrators!
Configuring QueueMetrics
11
Create entries for extensions 201 and 202 as well. At the end, the user list should look like the following picture:
Tip
While you are in the user configuration screen, take a second to change the password for user demoadmin and the other default users; using default passwords in a production environment is unwise.
To check if your changes have been successful, try logging off and logging in again with the credentials for
Agent/200; you should see a screen that looks like the following:
Running QueueMetrics: an introduction
12
From this page:
• To log in to a queue, click on the "Add Member" button, select your queue, enter your local extension and confirm.
• To log off of all queues, click on "Remove Member" and select "All selected" again; you will be logged off in a
few seconds.
• An agent can pause and record his/her pause status as one of the predefined pause codes (e.g. Lunch, Optional break, etc.)
• When taking a call, the agent will be able to mark a "Call status code" for that call (e.g. to mark the call as a
Sale)
You can also associate the four bottom buttons to a set of functions that can either be URLs to open or pieces of
the Asterisk dialplan to launch.
Running QueueMetrics: an introduction
You can run QueueMetrics in many different modes:
• As an analytical package, that allows you to see who did what in your call center: how many calls were processed, the response times, agent sessions, etc. It produces over 150 different stats, and it’s fully documented
in its user manual that can be downloaded from http://queuemetrics.com/manual_list.jsp (you can also browse it
online from the same location)
• As a Quality Assessment package, QueueMetrics lets you gather and analyze statistics on the behaviour of
your agents over time.
• As a real-time monitor, QueueMetrics displays what is going on in real-time - just select an entry from the
queues list and click on "Real-time monitoring"
• As a wallboard, it runs a special screen meant to be used with a large screen or video projector; it can be set up
sto be used from a stand-alone Linux box.
• As an Agent’s interface, it will provide your agents with a set of functions that will help them integrate with external CRM apps and perform their tasks more efficiently. It also includes a specialized Firefox app called AGAW
that acts as a real-time overview of the general situation for agents.
• As a data source, QueueMetrics will interact with external programs using a standard XML-RPC interface and
provide them with high-quality data for further processing.
We suggest that you have a look at the QueueMetrics User Manual to make the most out of the wealth of information that QM can provide.
Listening to calls
The system is configured to record all calls in WAV49 format (a derivative of GSM that is natively playable on
Windows machines).
Therefore, from QueueMetrics, you simply run a report and then click on "Answered", navigate to the bottom of
the page, "All calls", see list of all calls found, click on the magnifying glass icon, click on the audio file.
Outbound calls
13
Although there is usually only one, there can be zero or more audio files linked to a given call.
By listening to the audio recording of a call, you can easily implement a Quality Assessment process to review the
quality of each agent’s work. Although this topic is not a part of the scope of this guide, it is not to be overlooked,
and is discussed in detail in the User Manual.
Listening to live inbound calls
It is sometimes nice to be able to listen to live inbound calls as they happen, while the agent is still on the line with
the caller. QueueMetrics makes such a task extremely easy.
Go to the Realtime page in QueueMetrics and wait for a call to be available; when it is, click on the small telephone icon and enter your local extension.
Your phone will ring and you will be able to listen to the call in progress, as it’s happening.
Outbound calls
In order to run outbound campaigns in your call center, you need to set it up so that agents have a procedure to
place outgoing calls.
Why is an "outbound" call different from a normal call?
There are two reasons why "outbound call-center" calls are different from normal calls:
Outbound calls
14
• They are made as a part of one or more ongoing campaigns, and not on a one-by-one basis
• You want to be able to distinguish them from "casual" calls made for different purpouses
QueueMetrics offers a web interface that easily allows the implementation of this model: you just select the campaign from a drop-down list and enter the number to be dialled.
How do I keep track of outbound agents?
As agents that make outbound calls are not, technically speaking, members of a queue (as there is no such thing
in Asterisk as an outbound queue), we have a problem trying to understand if they are available or not in the real-time reporting.
As a solution, we suggest to create special queues in Asterisk for outbound presence; these are normal, inbound
queues that never get any call, but agents can log-on and log-off from them. This will cause no problem with Asterisk but will make your life easier when monitoring the call-center.
How is outbound activity tracked?
Outbound activity is tracked just like inbound:
• The wait time for a call will be the call set-up time
• The talk time will be the conversation time
• The caller-id will be the called number
• The calling person will be shown in the Agent field
For lost outbound calls, the "agent" field will be displayed.
Can I track inbound and outbound activity at once?
Yes, QueueMetrics lets you track both inbound and outbound activity at once, on a queue-by-queue basis. This is
very useful e.g. in the realtime monitoring, so that on a single page you see all of your agents and their current activities, or in the reports to see the total talk time or number of calls related to an agent.
This can be misleading when running reports, because the "wait times" and "lost call ratio" of a mixed inbound/outbound queue are meaningless; this is because you do control wait times when receiving inbound calls,
but you cannot do the same when calling outside (callees will answer if and when they please). So be careful
when doing this.
Changes to the QueueMetrics configuration
Log in to QueueMetrics and go to Edit queues.
Create a new queue with the following parameters:
• Queue alias: OUT-Callback
• Queue(s): 350
• Call flow: Outbound calls
• Main agents: Agent/200, Agent/201, Agent/202
Leave other fields blank.
Outbound calls
15
Save and go back to the main page.
Tip
You may want to add this queue to the "00 All" entries, so you can see all activity at a glance; or
(better) you can create a new "00 All Inbound" to track all inbound activity separately. See also
Can I track inbound and outbound activity at once?.
Placing calls
In order for an agent to place a call, he/she must logon as an agent and go to the Agent’s page.
Log onto queue "OUT-Callback" using the "Add member" button.
When logged on, click on "Dial".
Enter your current extension, select the campaign and enter the number to be dialled.
Call listening
16
The phone will ring; when you pick it up, the outbound number will be dialled.
While the call is in progress, call progress is displayed, as usual:
As always, the Pause and Status keys can be used as for an inbound call.
Call listening
In order to listen to recorded outbound calls, you simply use the same procedure you used for inbound calls:
• Run a report
• Click on "Answered"
• Navigate to the bottom of the page
• Click on "All calls"
• See list of all calls found
• Click on magnifying glass icon
• Click on the audio file.
Getting more information
17
For live listening, as well, you simply follow the same procedure you did for inbound calls:
• Go to the Realtime report
• Wait for a call to be available
• When it is, click on the small telephone icon
• Enter your local extension.
Your phone will ring and you will listen to the call, as it’s taking place.
Getting more information
Getting help
If you are still having problems installing or running QueueMetrics on FreePBX, we suggest you check out the following resources:
Supported PBXs
18
• The QueueMetrics User Manual is the definitive guide to QueueMetrics. It explains all the features, graphs, reports and configuration options at length. You can read a browsable version at http://queuemetrics.com/manuals/QM_UserManual-chunked/
• The QueueMetrics FAQ at http://queuemetrics.com/faq.jsp are a collection of common solved problems that
many people experienced with QueueMetrics. If you are struck by an error message, this is the first place to
look at.
• The QueueMetrics forums at http://forum.queuemetrics.com will help you in pinpointing your problems and getting community support. They will also be helpful in seeing what other people are doing with QueueMetrics.
• AstRecipes is a wiki collecting Asterisk "recipes", aimed mostly at call-center users - see http://astrecipes.net
• You may want to contact Loway if your problems are still unsolved - see http://queuemetrics.com/contact.jsp for
all relevant contact information.
A. Supported PBXs
Elastix
The following versions of Elastix have been tested with Espresso:
Elastix
Status
2.0.4 b4
OK
2.2
OK (Hotdesking, Asterisk 1.8, automated installation)
2.3.0 beta2
OK (Hotdesking, Asterisk 1.8, automated installation)
TrixBox
TrixBox
Status
2.6.x.x
OK (Transfer and Call Hangup from the realtime page are not supported)
2.8.x.x
OK
AsteriskNOW
The queue_log file is not automatically rotated daily or weekly by the standard AsteriskNOW distribution. Please
note that the queue module has to be installed before installing QueueMetrics with espresso otherwise the qloaderd should be restarted manually after the queue module installation.
(AsteriskNOW is a registered trademark of Digium Inc.)
AsteriskNOW
Status
1.7.0
OK (Transfer and Call Hangup from the realtime page are not supported with Asterisk
1.4)
1.7.1
OK (Transfer and Call Hangup from the realtime page are not supported with Asterisk
1.4)
2.0
OK
PBX-in-a-Flash
PIAF
Status
1.7.5.7.1
OK (Please note that Tomcat is very slow
to start-up and shutdown; Transfer and
Hangup call from the realtime page are not
supported with Asterisk 1.4)
2.0.6.2.1
Not supported
FreePBX
19
FreePBX
FreePBX
Status
2.10
OK
Thirdlane
Thirdlane is a bit different from FreePBX-based systems. It still can be configured through Espresso but a few
things are different. The first is that Thirdlane has the concept of TENANTS - that is everything you do is linked to
a tenant. For example, if you create SIP extension 200, it will actually be called SIP/200-t1, where "t1" is your tenant code. A single-tenant instance of Thirdlane will use a defaut tenant called "thirdlane".
So, in order to make QM work, you need to follow the rules below:
• Tenant codes should be all lowercase. Uppercase ones might not work.
• When you log in an agent through an extension, the extension should be entered as "200-t1", not just "200".
• All queues are called "queuename-tenant". So queues "sales-t1" and "sales-t3" are two distinct queues used by
two distinct tenants.
• In order to enable inbound and outbound chanspy from the real-time page, you should define a tenant code for
each agent; you will enter this in the "CURRENT TERMINAL" field for the agent. So if Agent/101 works for tenant "t3", you should enter "t3" in the Current Terminal field for Agent/101.
Thirdlane
Status
2.2 ST
OK
2.2 MTE
OK (Transfer from the realtime page is not
supported)
What if my PBX is not on the list?
If your version of the PBX is not listed on the tables above, and installation fails, you should contact Loway so that
we can make a new release that addresses your issues.
Once the new version is released, you can re-apply it on your system by issuing the command:
yum update queuemetrics-espresso
And wait for its completion.
Appendix II: Common problems and solutions
Avoiding queue_log file rotation
On most Asterisk PBXs, the queue_log file is rotated daily or weekly along with the other Asterisk logs found in /
var/log/asterisk. The queue_log file contains essential information on how the call center is working. It is used by
QueueMetrics to report on the status and the actual work being performed in your call center, and you surely want
to keep that data in a safe place for cross-period analysis.
Although QueueMetrics keeps its own copy of that data set in its own database and will automatically detect file
rotations, if the call center process is critical to you, we advise to keep a backup of those files, just in case.
Stopping and starting QueueMetrics
You can stop and restart the QueueMetrics application by issuing the commands
/etc/init.d/queuemetrics stop
/etc/init.d/queuemetrics start
/etc/init.d/queuemetrics restart
You can also stop and start Qloaderd using the same syntax:
/etc/init.d/qloaderd stop
/etc/init.d/qloaderd start
/etc/init.d/qloaderd restart
Setting QueueMetrics memory limits
QueueMetrics is a complex application and it is designed to be used by multiple parallel users. This means that if
you have a large data set and many users running queries on it, it is possible that you start getting "Out of memory" errors.
Installing the SSH Java client in Trixbox
20
To fine-tune the amount of memory used by your system, you can edit the file /etc/init.d/queuemetrics and modify
the option:
JAVA_OPTS="-Xms128M -Xmx128M"
The Xms parameter is the amount of memory that Java uses on startup for its object heap; and the Xmx is its
maximum allowed size. For best speed, keep both to the same value unless you have experience in tuning Java
memory requirements.
Installing the SSH Java client in Trixbox
If you do not have an SSH client available, you can install one in TrixBox by following this procedure:
• Use a web browser and go to http://myservr/maint - if asked for login and password, use user maint password
password
• From the PBX drop-down menu, select PBX settings, Module Admin (on the left-hand menu), Check for updates online.
• Under System Administration, click on Java SSH and select Download and Install, then click the Process button
at the bottom of the page.
• The system will ask you for confirmation: go ahead and install the module.
• If FreePBX shows an orange label stating that changes must be applied, click on it and apply them.
• From the left-hand menu, select Tools
• You should now find Java SSH and click on it
A terminal window will open (it may take a while, waiting for the Java client to load).
Installing QueueMetrics on a different server
Installing on a different server can be a good idea if your call center has more than 20 or 30 agents and you don’t
want to slow down the main Asterisk box when running statistics.
It’s very easy to do:
• Install QueueMetrics on the new server and install a local copy of the database
• Create a rule on the new QueueMetrics database that allows for connection to MySQL from a client that is located on the Asterisk server.
• Tell the qloaderd on the PBX to send data to the new server.
Go to the TrixBox server and edit the file /etc/sysconfig/qloaderd.
It should look like the following:
PARTITION=P001
QUEUELOG=/var/log/asterisk/queue_log
LOGFILE=/var/log/asterisk/qloaderd.log
LOCKFILE=/var/lock/subsys/qloaderd
PIDFILE=/var/run/qloaderd.pid
MYSQLHOST=localhost
MYSQLDB=queuemetrics
MYSQLUSER=queuemetrics
MYSQLPASS=javadude
Edit the variables MYSQLHOST, MYSQLDB, MYSQLUSER, MYSQLPASS to point to the new QueueMetrics
server.
Then isssue the command:
/etc/init.d/qloaderd restart
Check the log file to make sure that there are no errors and data is being uploaded correctly to the QM server.
You should also change the callfile.dir property in order to point to the Asterisk server and, on the Asterisk server
itself, allow Asterisk Manager (AMI) access from the QueueMetrics server.
As a last warning, you should make sure that the Asterisk server and the QueueMetrics server have clocks
aligned to a sub-second difference; otherwise the real-time page may show strange information, e.g. by displaying
negative wait times. In order to avoid this, you should install ntpd on both servers.