1
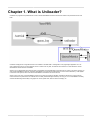
The QueueMetrics Uniloader User Manual
Loway
The QueueMetrics Uniloader User Manual
Loway
Table of Contents
1. What is Uniloader? .......................................................................................................................................
2. Installation .................................................................................................................................................
2.1. Running in production .........................................................................................................................
3. Concepts ..................................................................................................................................................
3.1. Back-ends .......................................................................................................................................
4. Usage ......................................................................................................................................................
4.1. Uploading data .................................................................................................................................
4.2. Feedback actions: proxying AMI .............................................................................................................
4.3. Splitting a single queue_log file into multiple back-ends .................................................................................
5. Scenarios ..................................................................................................................................................
5.1. One Asterisk instance, one local QueueMetrics instance ................................................................................
5.2. One Asterisk instance, one hosted QueueMetrics Live instance ........................................................................
5.3. Multiple Asterisk instances, one QueueMetrics instance .................................................................................
5.4. One Asterisk instance, multiple QueueMetrics instances .................................................................................
5.5. Multiple Asterisk instance, multipe QueueMetrics instances .............................................................................
6. PBX Custom settings ....................................................................................................................................
6.1. Yeastar MyPBX ................................................................................................................................
iii
1
2
2
3
3
5
5
5
5
8
8
8
8
8
8
9
9
Chapter 1. What is Uniloader?
Uniloader is a program that uploads data to a local or remote QueueMetrics instance and receives actions to be performed on the local
PBX.
Uniloader is deployed as a single file that has to be installed on the PBX itself. It is designed as a very lightweight application so it can
work unobtrusively even on low-end hardware; and it is meant to be very safe, so data will not be lost even in cases where the remote
QueueMetrics server becomes unavailable.
When it runs, it uploads data using either HTTP/S or the MySQL protocol (depending on the back-end you specify). HTTP/S is meant to run
with remote QueueMetrics instances, especially QueueMetrics Live (see http://queuemetrics-live.com for more information) , while MySQL
is meant for local systems; either case works if QueueMetrics is hosted on the same machine.
When running over HTTP, if the QueueMetrics server has no direct connection to the PBX, Uniloader is able to act as a proxy and will
receive actions to be performed on the Asterisk server via AMI (Asterisk Manager Interface). This way you can run QueueMetrics remotely
and still take advantage of the ability to log agents on and off, pause them, listen to calls via ChanSpy, etc.
1
Chapter 2. Installation
The Uniloader can be downloaded from http://queuemetrics-live.com/uniloader.jsp
The package contains:
• Uniloader binaries for all supported architectures (i386, amd64, arm7),
• A sample extensions_queuemetrics file,
• A sample splitter file.
Just copy the file "uniloader_xxx" for your architecture (Intel 32 / 64 bit, ARM 7) into your computer and make it executable:
cp ./bin/uniloader_arm7 ./uniloader
chmod a+x ./uniloader
To test it, run:
./uniloader -?
It should output a result like:
NAME:
uniloader - uploads a file to QueueMetrics or QueueMetrics Live.
USAGE:
uniloader [global options] command [command options] [arguments...]
VERSION:
0.2.0 - build: 20151112.1258 - OS: darwin/amd64
COMMANDS:
upload, u
help, h
Uploads a source file to a QueueMetrics instance
Shows a list of commands or help for one command
GLOBAL OPTIONS:
--src, -s "/var/log/asterisk/queue_log"
--cacert
--verbose-back-end
--help, -h
--version, -v
The source queue_log file to be uploaded
An optional CA Cert file, in .pem format
Enables verbose back-end logging
show help
print the version
If it does, it is working.
2.1. Running in production
Uniloader produces a verbose log on STDOUT that should be redirected to a file and periodically rotated.
You should also make sure that Uniloader is started when the PBX boots and that in case it should crash it is automatically restarted.
We advise running Uniloader using nice so that it has reduced access to scarce CPU resources in case of high load / contention with the
PBX - while the PBX voice quality quickly degrades on a resource-starved system, Uniloader doe not really care about small delays in data
uploading.
2
Chapter 3. Concepts
3.1. Back-ends
Uniloader supports three different back-ends: HTTP/HTTPS, MYSQL and FILE.
Each back end is functionally similar and can be thought of as a black box; it can be selected simpy by entering a proper URI for the server.
3.1.1. HTTP/HTTPS back-end
If your URI looks like:
http://myserver/queuemetrics
Then you are using HTTP. In this case, the value of the "token" parameter is either a server in a cluster, or you can leave it blank to denote
the default server, and user/password are for a valid QueueMetrics HTTP user.
The HTTP back-end also supports HTTPS URLs and will, by default, retrieve actions to be performed on the PBX.
Please note that some appliances do not support HTTPS, so running HTTP might be mandatory.
HTTPS CA certificate issues
On some systems (especially appliances) it is possible that when running HTTPS requests, they all fail with an error like:
x509: failed to load system roots and no roots provided
In this case, you have to manually tell the Uniloader where to find the correct CA .pem files for your system, by using the "--cacert"
parameter.
E.g.
./uniloader --cacert=/etc/certs/default.pem upload ....
Will force Uniloader to use the supplied root certificates. In case they are totally missing, we suggest copying a recent certificate file from a
working Linux distribution and point to that.
3.1.2. MySQL back-end
If your URI looks like:
mysql:127.0.0.1/queuemetrics
the loader will connect to a MySQL database called "queuemetrics" on "127.0.0.1", using the supplied login and password; the token in this
case is the partition that we want to upload data to.
If your MySQL is running on a remote system, it might be advisable to use a MySQL URI of the format:
mysql:tcp(1.2.3.4:3306)/uniloader?allowOldPasswords=1
This will connect to a database called "uniloader" on 1.2.3.4 and will set the parameter "allowOldPasswords" to 1, as it is sometimes
needed to use old versions of MySQL.
A complete reference of all allowed DSN (Data Source Name) formats and connection parameters is available at https://
github.com/go-sql-driver/mysql
3.1.3. File back-end
If your URI looks like:
file:/my/file/path
The loader will try and append to a local file. This module is meant for quick testing of splitting rules and does not currently check the state
of the local file before writing to it.
It can also be used as a quick way to "throw away" a log file, by using file:/dev/null on Unix systems.
3
Concepts
This back-end is only meant for testing and experimentation; the file is rebuilt on every run, so no guarantee about data
integrity is implied.
4
Chapter 4. Usage
4.1. Uploading data
To upload data, you need the upload command in Uniloader:
NAME:
upload - uploads a source file to a QueueMetrics instance
USAGE:
command upload [command options] [arguments...]
OPTIONS:
--uri, -u
--login, -l "webqloader"
--pass, -p "qloader"
--token, -t
--splitter, -x
--noActions
The connection URI. Valid URIs start with file:, mysql:,
The login for your connection
The password for your connection
In MySQL mode, the partition. In HTTP/S mode, usually bla
A JSON file describing how to split the source into multi
Actions from QM will NOT be sent to the PBX via AMI. Requ
So you usually launch it like:
./uniloader --src /var/log/asterisk/queue_log upload \
--uri mysql:/queuemetrics --login qm --pass 1234 --token P001
You can avoid passing parameters which value matches the defaults, so if your token is blank, or your user is "webqloader" (as it is the
case with default QueueMetrics Live instances), you do not need to pass them explicitly.
Uniloader reads the source file specified in "src" and automatically detects if the file is rotated/rewritten.
When data is being uploaded, Uniloader makes sure that data is not uploaded twice and retries on errors. You can safely restart it at any
time and it will automatically synchronize with the current state of the selected back-end.
You can NEVER have multiple Uniloader / Qloader / Wqloader instances point to the same instance at the same time. If you
do, you will get hard-to-debug data corruption.
4.2. Feedback actions: proxying AMI
It is possible for Uniloader to act as a kind of AMI (Asterisk Manager Interface) proxy for a remote QueueMetrics instance. This happens by
default if you use a HTTP back-end. If you do not want this feature, you need to start Uniloader with the "--noActions" option.
For example:
./uniloader --src /var/log/asterisk/queue_log upload \
--uri http://my.queuemetrics-live.com/test1234 --pass 1234
All access information to the Asterisk PBX is to be configured on the QueueMetrics instance; for example, if the PBX server is accessible
on the address 127.0.0.1 (so the same host Uniloader is running on) and you log-in as "admin" password "amp123", you should edit the
configuration properties and make sure that it says:
callfile.dir=tcp:admin:[email protected]
default.webloaderpbx=true
At the PBX level, make sure you include the default QueueMetrics dial-plan in extensions.conf:
#include extensions_queuemetrics.conf
And reload it.
4.3. Splitting a single queue_log file into multiple back-ends
If you run a single Asterisk instance on which multiple clients are hosted, chances are that you configure your Asterisk system with a
common naming convention, so that all extensions for your client Foo Company are named "foo-123", all queues are named "foo-q1" and
so on.
5
Usage
If you do, it is actually possible to split the queue_log file that Asterisk generates into multiple virtual queue_log files. To do this, Uniloader
looks for references of the client name in queues and agents, and can optionally rewrite them so that a reference for queue "foo-q1" is sent
to a specific QueueMetrics Live instance set up just for Foo Company; and it is rewritten as simply "q1".
To split a single queue_log file you need to create a split file that details what you want done, and then you can launch:
./uniloader --src queue_log.txt upload --splitter splitter.json
Please note that you do not need to specify a "main" rule on the command line. If you do, a copy of the source file will be also uploaded to
the main driver, without applying any transformation.
These are sample contents for a splitter.json file:
[
{
"uri": "http://my.queuemetrics-live.com/foocompany",
"login": "webqloader",
"pass": "verysecure",
"token": "",
"matcher": ["foo-"],
"match": "any",
"removematch": true,
"disabled": false,
"noactions": false,
"clientname": "foo"
},
{
"uri": "mysql:127.0.0.1/queuemetrics",
"login": "queuemetrics",
"pass": "itsasecret",
"token": "P001",
"matcher": ["bar-"],
"match": "any",
"removematch": false
}
]
The following items must be specified for each instance.
• uri: the URI to upload data to. You can mix and match different backends as you see fit
• login, pass and token: the information required by your back-end
• matcher: an array of strings that will be searched in the agent and queue fields.
• match: at the moment, it must be "any" - meaning that if a string is found, it is considered a match
• removematch: if true, the matching string is removed from the queue and agent fields
• disabled: set to true to manually turn off a rule
• noactions: set to true to turn off AMI actions for this instance, as you would do for the main instance by using the "--noActions" flag.
• clientname: the name of the instance, that will be injected in the AMI responses using the dialplan variable UNILOADER_CLIENT before
they are passed to Asterisk.
If you avoid setting some item, it is assumed to be a blank string or the "false" boolean value. Defaults you set with the command lines are
ignored, so all relevant information must be specified in the JSON file.
Split data is sent only to instances matching the specific split rule; so the main instance you specify on the command line
will be fed all data in any case. As you usually do not want this, you can simply avoid entering any "--uri" parameter on the
command line.
4.3.1. Splitting FAQs
What happens if one back-end is or becomes unavailable?
Each back end runs in parallel; but if one should lag behind or should not be available, data for it is delayed until the system is fully
operational; at that point it will catch up automatically.
6
Usage
You can also safely restart Uniloader even if not all data is currently uploaded to all instances; the only thing you have to consider is that, in
case your queue_log is rotated, then only data present in the current queue_log file is uploaded.
This works correctly only for the MySQL and HTTP drivers; in case you specify a file back end, it will be truncated and
rebuilt on each invocation.
Can I use different back-ends?
Yes, of course. Mix and match them as you best see fit.
Can I use feedback actions?
Yes - provided that all back-ends are HTTP.
What happens to the default back-end?
The default back-end - the one that is specified on the command line - is sent the raw queue_log data. If you don’t need this, you can use a
file back-end and point it to /dev/null, or you can simply omit it.
Do I have to have a splitting rule for all my virtual clients?
No. Only the rules you specify will be applied, so if you do not include a rule for a specific client, the relevant logs will simply be ignored.
This means that you may host on the same Asterisk instance clients who use QueueMetrics and clients that don’t.
How do I modify the configuration on a live system?
You can simply create a new JSON file and restart the Uniloader. In a few seconds it will sync again and start tailing the files. The file will
be read in parallel by all the different back-ends, so it will not require a proportional amount of disk IOPS.
Why do I need the clientname field?
If you have a scenario where multiple QM instances are fed by the main QueueMetrics instance, it will be handy to have rewriting enabled,
so that e.g. the queue called "foo-q1" appears at the QueueMetrics level as simply "q1".
This works fine when uploading data to QueueMetrics, but when actions are performed by that QueueMetrics instance, they will appear as
happening on queue "q1" and not on the actual Asterisk queue "foo-q1".
By injecting the variable UNILOADER_CLIENT is therefore possible to edit the actions dialplan and rebuild the correct pyisical name to be
used when performing actions at the Asterisk level.
7
Chapter 5. Scenarios
5.1. One Asterisk instance, one local QueueMetrics instance
You want to use Uniloader for your local QueueMetrics instance.
In this case you should use the MySQL back-end. You would not usually use the AMI feedback as QueueMetrics is able to connect directly
to the PBX.
You may also use the HTTP back-end, but there are currently no advantages in doing so.
5.2. One Asterisk instance, one hosted QueueMetrics Live
instance
You want to use Uniloader for a QueueMetrics-Live instance.
In this case you should use the HTTP or HTTPS backend, and turn on AMI feedback, as the QueueMetrics Live instance has no way to
connect directly to your PBX.
In order to make your life easier, QueueMetrics Live actions are pre-configured to send actions back via HTTP; you just need to make sure
that the AMI credentials specified in the property callfile.dir in configuration.properties match the ones used on your PBX.
5.3. Multiple Asterisk instances, one QueueMetrics instance
You have multiple Asterisk boxes and want to consolidate all their activity into a single QueueMetrics instance.
In this case, you need a cluster-enabled QueueMetrics instance, and each Uniloader instance should upload data to a different partition.
Each cluster member should be defined in the QueueMetrics instance (if you use the MySQL back-end, you set the token to the name of
the partition; if you use HTTP you should set it to the name of the cluster member).
The names for cluster members are the ones you use in the property cluster.servers of your QueueMetrics
configuration.properties file.
Each cluster member in QueueMetrics defines its own AMI credentials; so you can safely use the AMI feedback mode with no further
configuration.
5.4. One Asterisk instance, multiple QueueMetrics instances
You run multiple different clients on one Asterisk instance, and you want to send each of them to their own QueueMetrics Live instance.
In this case, you need to set up splitting rules so that data for each client is uploaded to the right QueueMetrics Live instance.
In order to make sure that Asterisk performs the correct actions at the AMI level, you must specify a "clientname" for each client and use
that string in the Asterisk diaplan in order to build the actual queue / agent / channel name to be used by Asterisk.
5.5. Multiple Asterisk instance, multipe QueueMetrics instances
If you have multiple Asterisk instances on which calls are processed, and calls for any client can be processed on each cluster member,
you need to set up rewriting rules and create a cluster member (and related partition) on each destination QueueMetrics instance.
Make sure you use the "clientname" variable to have Asterisk perform the correct AMI calls.
8
Chapter 6. PBX Custom settings
Uniloader can run on several asterisk based PBXs, on custom hardware, or in specific distributions. Here are reported some configuration
hints for specific systems.
6.1. Yeastar MyPBX
6.1.1. MyPBX related setup
For this system you need to select the uniloader compiled for ARMv7. By referring to the integration document [http://yeastar.com/
download/The_Integration_of_MyPBX_and_QueueMetrics_en.pdf] issued by Yeastar, to run the uniloader into MyPBX devices please
follow the below steps:
• Connect to a MyPBX via SSH connection
• Change the working folder to /persistent
• Download the uniloader from http://queuemetrics-live.com/uniloader.jsp
• Uncompress the uniloader-0.2.0.tar.gz file on a local folder.
• Rename che /persistent/uniloader-0.2.0/bin/uniloader_arm7 to /persistent/uniloader-0.2.0/bin/uniloader
• Create the /persistent/uniloader folder and copy /persistent/bin/uniloader file on it
• Make it as executable (chmod 755 /persistent/uniloader/uniloader)
• Generate the file add.sh as specified in the integration document [http://yeastar.com/download/
The_Integration_of_MyPBX_and_QueueMetrics_en.pdf] issued by Yeastar
In the previous lines is supposed to have an uniloader 0.2.0 release version. The uniloader-X.X.X will change accordingly with the
downloaded version.
In order to integrate the dialplan, needed by QueueMetrics to properly operate, please follow the below steps:
• Move to /persistent/uniloader-0.2.0/extensions
• Rename the extensions_queuemetrics.conf.yeastar file to extensions_queuemetrics.conf
• Copy the extensions_queuemetrics.conf to /etc/asterisk
• Follow the steps specified in the integration document [http://yeastar.com/download/
The_Integration_of_MyPBX_and_QueueMetrics_en.pdf] issued by Yeastar when generating the extensions_custom.conf file
If the call center wants to have outbound calls tracked, QueueMetrics needs an internal extension to be defined in the MyPBX GUI thus
providing a safe and easy way to manage outbound rules for all calls generated by QueueMetrics.
The dialplan provided in the uniloader package is already set for the extension 9000. If you define this extension from the SIP available
extensions in the MyPBX GUI there is nothing to do more. If you need to change the default extension to something different from 9000,
instead, you need to properly update the /etc/extensions_queuemetrics.conf file in order to track this change. To do that:
• Open /etc/asterisk/queuemetrics_extensions.conf with a text editor (vi is available in the MyPBX)
• Locate the line: exten # 28,n,Set(MYPBX_QM_EXT=9000) and modify the 9000 accordingly
• Save and reload/reboot the pbx
6.1.2. QueueMetrics Live related setup
Integrating MyPBX with QueueMetrics Live requires some modifications on the QueueMetrics Live settings. This can be easily performed
through a web page tool reachable from the QueueMetrics Live home page by following the below steps:
• Log on QueueMetrics Live with administrative rights
• Click on the "Edit system parameters" under the "Administrative tools" subset
• Look at the configuration key callfile.monitoring.channel=Local/$EM@from-internal and change as callfile.monitoring.channel=SIP/$EM
• Repeat the same for the configuration keys callfile.outmonitoring.channel and callfile.customdial.channel
• Save, then log-off from QueueMetrics Live
9