1
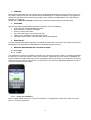
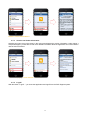
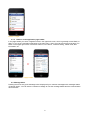
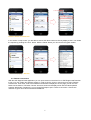
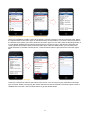
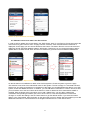
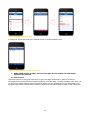
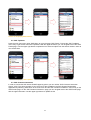
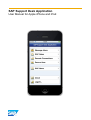
SAP Support Desk Application
User Manual for Apple iPhone and iPod
Contents
1.
Purpose .......................................................................................................................................... 3
2.
Features .......................................................................................................................................... 3
3.
Availability ...................................................................................................................................... 3
4.
Message processing with the application ..................................................................................... 3
4.1
First steps ........................................................................................................................................ 3
4.1.1
Logon ........................................................................................................................................... 3
Picture 1: Logon screen ............................................................................................................................ 3
4.1.2
Terms and Conditions................................................................................................................... 3
Picture 2: Terms and Conditions .............................................................................................................. 4
4.1.3
Version and further information ..................................................................................................... 4
4.1.4
Logoff ........................................................................................................................................... 4
4.2
Message Inbox ................................................................................................................................. 5
4.2.1
Add information to a customer message ....................................................................................... 6
4.3
SAP Notes ....................................................................................................................................... 6
4.4
Remote connections......................................................................................................................... 7
4.5
Maintain user access data in the Secure Area .................................................................................. 9
5.
News from Active Global Support and get in touch with the Customer Interaction Center.......10
5.1
SAP HotNews .................................................................................................................................10
5.2
SAP TopNotes ................................................................................................................................11
5.3
SAP Customer Interaction ...............................................................................................................11
Images
Picture 1: Logon screen ............................................................................................................................... 3
Picture 2: Terms and Conditions .................................................................................................................. 4
Picture 3: Displaying version and further information .................................................................................... 4
Picture 4: Logoff........................................................................................................................................... 5
Picture 5: Buttons on the page header ......................................................................................................... 5
Picture 6: Accessing customer messages .................................................................................................... 6
Picture 7: Writing a memo in customer messages ........................................................................................ 6
Picture 8: Search for a SAP Note ................................................................................................................. 7
Picture 9: Displaying a SAP Note ................................................................................................................. 7
Picture 10: Navigation steps to open the remote connection ......................................................................... 8
Picture 11: Book connection type ................................................................................................................. 8
Picture 12: Open the remote connection....................................................................................................... 9
Picture 13: Navigation stetps to maintain the Secure Area ............................................................................ 9
Picture 14: Maintian the Secure Area ..........................................................................................................10
Picture 15: User credentials saved in SecureArea .......................................................................................10
Picture 16: Displaying SAP HotNotes ..........................................................................................................11
Picture 17: Displaying SAP TopNotes .........................................................................................................11
Picture 18: Navigation steps to CIC informations .........................................................................................12
Picture 19: Displaying CIC Information ........................................................................................................12
2
1. PURPOSE
SAP Support Desk Application is an application for the Apple handheld devices iPhone and iPod, which can
be used by customers to work with the SAP Active Global Support on customer messages. The application
features are limited and don’t meet all functionalities of the SAP Service Marketplace or the SAP Solution
Manager (cf. chapter 2).
Please refer to SAP Note 1609198 to obtain further information about limitations and restrictions.
2. FEATURES
With the SAP Support Desk Mobile Application customers can do the following:
access the SAP Incident Management inbox
add information to customer messages
search or display SAP Notes
open and close support connections with SAP
maintain user credentials in the SAP Secure Area
read latest news and be in touch with SAP Active Global Support
3. AVAILABILITY
The SAP Support Desk Mobile Application is available for free at the iTunes Store and needs a SAP Service
Marketplace user associated to a MaxAttention or Enterprise Support contract.
4. MESSAGE PROCESSING WITH THE APPLICATION
4.1 First steps
4.1.1
Logon
The mobile device must be connected to a WLAN or to a 3G service provider. When you start the application
the first time you have to accept the ‘Terms and Conditions’. Afterwards the Logon Screen is displayed. All
further initialization will show the logon screen straightaway without requesting you to accept the ‘Terms and
Conditions’ anymore. On the logon screen you enter the S-user ID and the appropriate password in order to
connect to the SAP Support system.
Picture 1: Logon screen
4.1.2
Terms and Conditions
Later it is still possible to read the ‘Terms and Conditions’ in the application via the main menu entry point
About > Terms and Conditions.
3
Picture 2: Terms and Conditions
4.1.3
Version and further information
Selecting the menu entry point ‘About’ in the main menu displays the version information. Under ‘About’ >
‘Help and Support’ you are able to find more related information about the application and contact data in
case of technical issues.
Picture 3: Displaying version and further information
4.1.4
Logoff
With the button “Logoff…” you close the application and logoff from the SAP Support system.
4
Picture 4: Logoff
4.1.5
Buttons in the application page header
In the page header you see a navigation button in the upper left corner, which is generally named ‘Back’ or
‘Menu’ if you are one navigation step below of the main menu. Use it to go back to the previous page. The
button in the upper right corner is an action button to, for instance, confirm a setting, refresh a list, add
information, etc.
Picture 5: Buttons on the page header
4.2 Message Inbox
Pressing the menu entry point ‘Message Inbox’ displays all your customer messages with messages status
‘Customer Action’. You can select a customer message to view the message details and the communication
done with SAP.
5
Picture 6: Accessing customer messages
4.2.1
Add information to a customer message
In an opened customer message press the Add Memo button in the upper right corner in order to add a
memo to the customer message. You can write up to 140 characters. Press the ‘Add’ button to save and add
your memo to the customer message. This memo can be read by a SAP Support Consultant but it
doesn’t send the message back to SAP. The message stays in your Inbox. You can return the
message to SAP only by using the SAP Solution Manager or Service Marketplace.
Picture 7: Writing a memo in customer messages
4.3 SAP Notes
Press on menu entry point ‘SAP Notes’ in order to search for SAP Notes directly from the device or open a
SAP Note by typing its number. In the “Search note” section you can enter any search term. With the ‘Reset’
button you can remove the typed search term. In order to trigger the search press the ‘Search’ button. The
result will be a list of all SAP Notes found. In case your search didn’t find a document you will get a blank
page. Select an object in the search results in order to view a SAP Note.
6
Picture 8: Search for a SAP Note
In the section “Jump to note” you are able to enter a SAP Note number to directly display a Note. You initiate
the request by pressing the ‘Go to’ button. With the ‘Reset’ button you can remove the typed number.
Picture 9: Displaying a SAP Note
4.4 Remote connections
With the SAP Support Desk Application you can open remote connections for an SAP Support staff member
to log on to your system and perform support. In order to do this, click on main menu entry point ‘Remote
Connections’. As a result, a list of all maintained Customers is displayed. On this page you can see two
buttons at the bottom. The button ‘Recent’ acts as a shortcut and displays a list with the latest updated
systems. With button ‘Customers’ you run through all steps to open a service connection. Choose one
customer to get a list of all its maintained installations.
7
Picture 10: Navigation steps to open the remote connection
Select one installation to obtain a list of all its systems. Choose a system to see all connection types. Select
the required service connection type. On the bottom there are two buttons. If you open a service connection
the first time for a system you have to book the connection type once. For that, press the ‘Bookings’ button if
it is not already selected and choose the required service connection type. In the following step enter the
contact person and book the service with the button ‘Book’. With the ‘Reset’ button you can remove the
typed characters in the field “Contact person”. Press the ‘Back’ button to get back to the connection types
list.
Picture 11: Book connection type
Press the ‘Connections’ button at the bottom of the screen. You can now see your just booked connection
type on the list. Select it and specify the contact data and connection timeframe. Press the ‘Open’ button to
establish the connection. Use the ‘Reset’ button to get the default values.
8
Picture 12: Open the remote connection
4.5 Maintain user access data in the Secure Area
In order to add or update user access data in the “SAP Secure Area” for your Service Connections select the
main menu entry point ‘Secure Area’. On page ‘Choose customer’ a list of all maintained Customers is
displayed. On this page you can see two buttons at the bottom. The button ‘Recent’ acts as a shortcut and
displays a list with the latest updated systems. With button ‘Customers’ you run through all steps to add or
update data in the SAP Secure Area. Choose one customer to get a list of all its maintained installations.
Picture 13: Navigation stetps to maintain the Secure Area
On this list select one installation to obtain a list of all its systems. Choose a system to get to the page
‘SecureArea’ to see a list of the maintained users for this system. The list is empty if no user data has been
entered yet. According to the buttons on the bottom of this page you can add/update user data for your SAP
system, router and additional servers. In addition, you can add further information in a memo. Hence, at first
you must select one of the four buttons at the bottom in order to determine which data shall be added or
modified. With the button at the right upper corner ‘Add / Update User’ you can add or update user
credentials. After pressing this button you have to enter a client, a user and a password. Press button
‘Change’ to confirm the settings. Use the ‘Reset’ button to get the default values. If you select the button
‘Memo’ in the ‘SecureArea’ page the button on the right upper corner is named ‘Add’ and enables you to add
additional information of 140 characters for the Support consultants in the “SAP Secure Area”.
9
Picture 14: Maintian the Secure Area
In Picture 14 you see the result of the maintained user in the SecureArea screen.
Picture 15: User credentials saved in SecureArea
5. NEWS FROM ACTIVE GLOBAL SUPPORT AND GET IN TOUCH WITH THE CUSTOMER
INTERACTION CENTER
5.1 SAP HotNews
Select the main menu entry point ‘SAP News’ to get to the page ‘RSS Feeds’ in order to access the
information that provides SAP Active Global Support for your daily work. Via ‘SAP HotNews’ menu entry you
get the list of the SAP HotNews. With the upper left button you can navigate back to the ‘RSS Feeds’. Use
the upper right button to update the list. Select an object from the search results in order to view a SAP Note.
10
Picture 16: Displaying SAP HotNotes
5.2 SAP TopNotes
Press the main menu entry point ‘SAP News’ to get to the page ‘RSS Feeds’. Choose the ‘SAP TopNotes’
menu entry to get the list of the SAP TopNotes. With the upper left button you can navigate back to the ‘RSS
Feeds’ page. Use the upper right button to update the list. Select an object from the search results in order to
view a SAP Note.
Picture 17: Displaying SAP TopNotes
5.3 SAP Customer Interaction
In order to contact the SAP Active Global Support by phone you can call the “SAP Customer Interaction
Center” (CIC). The phone number of your local CIC is also available in the SAP Support Desk Mobile
Application by selecting ‘SAP News’ in the main menu and the SAP ‘Customer Interaction’ menu entry on the
‘RSS Feeds’ page. On the ‘SAP Customer Interaction’ page you can navigate back to the ‘RSS Feeds’ page
with the upper left button. Use the upper right button to update the list.
11
Picture 18: Navigation steps to CIC informations
Choose your country. As a result the phone and fax number of your local CIC is displayed.
Picture 19: Displaying CIC Information
12