1
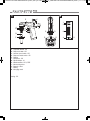
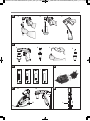
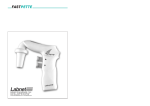
FASTPETTE PRO INSTRUKCJA (474P.) Nr rys. 015.9001.00.07_FASTPETTE PRO INSTRUKCJA (474P.) 11-11-30 16:58
31 Mayfield Avenue, Edison - NJ 08837 - USA
Phone: +1-732-417-0700
email: [email protected]
www.labnetinternational.com
FASTPETTE PRO INSTRUKCJA (474P.) Nr rys. 015.9001.00.07_FASTPETTE PRO INSTRUKCJA (474P.) 11-11-30 16:58
1
E
2
K
1
2
J
H
A
B
G
F
ABCDE F GHJ KL M-
Aspiration button - PP
Dispense button - PP
Suction speed switch - PP
Dispense mode switch - PP
Display
Nosepiece - PP
Pipette holder - SI
Membranefilter - PP / PTFE
Connector gasket
Batteries cover
Battery
Charging stand
Casing - PP
L
C
C
D
D
3
4
5
FASTPETTE PRO INSTRUKCJA (474P.) Nr rys. 015.9001.00.07_FASTPETTE PRO INSTRUKCJA (474P.) 11-11-30 16:58
3
B
A
C
4
A
B
C
5
6
1
7
D
2
3
7A
4
7B
M
8
L
FASTPETTE PRO INSTRUKCJA (474P.) Nr rys. 015.9001.00.07_FASTPETTE PRO INSTRUKCJA (474P.) 11-11-30 16:58
TABLE OF CONTENTS
1 - INTRODUCTION .............................................................................................................. 2
2 - WORK SAFETY INSTRUCTIONS ..................................................................................... 2
3 - LIMITATIONS OF USE ..................................................................................................... 3
4 - TO SWITCH ON THE FASTPETTE PRO .......................................................................... 3
5 - ASPIRATING AND DISPENSING LIQUIDS ...................................................................... 3
6 - TROUBLESHOOTING ...................................................................................................... 4
7 - REPLACING THE FILTER ................................................................................................. 6
8 - CHARGING THE BATTERIES .......................................................................................... 6
9 - MAINTENANCE ................................................................................................................ 7
10 - COMPONENTS ................................................................................................................ 7
11 - ORDERING INFORMATION ............................................................................................. 8
12 - SPARE PARTS .................................................................................................................. 8
13 - PRODUCT DISPOSAL ......................................................................................................8
1
FASTPETTE PRO INSTRUKCJA (474P.) Nr rys. 015.9001.00.07_FASTPETTE PRO INSTRUKCJA (474P.) 11-11-30 16:58
1 - INTRODUCTION
The FASTPETTE PRO pipette controller is a device intended for pipetting liquids with the
use of measuring pipettes. It can work with all types of glass or plastic pipettes in the volume
range from 0.5 ml to 100 ml.
The FASTPETTE PRO pipette controller is a medical device intended for professional use,
in vitro diagnostics, and testing samples collected from the human body.
Two dispense modes permit selection of dispensing intensity depending on the user's
needs. The selected setting of the pipette controller mode is shown on the display (fig. 1E)
Fig. 1 shows the external parts of the pipette controller with a description of the materials used.
Display indicators are shown in fig. 2.
2 - WORK SAFETY INSTRUCTIONS
WARNING! Risk of injury
CAUTION: Risk of damage to the device or errors in pipetting of liquids
Before starting the work with the FASTPETTE PRO every user should read these operating
instructions carefully.
CAUTION:
• Using the device inconsistently with the operating instructions may result in damaging
the device.
• The device should be maintained only at an authorised service centre, otherwise the manufacturer will be relieved from any liability under the warranty.
• Only original spare parts and accessories, recommended by the manufacturer, shall be used.
• Only the original charger, supplied by the manufacturer, shall be used for charging
the batteries.
• In case of incorrect functioning of the pipette controller, work shall be stopped. The device
shall be cleaned in accordance with the operating instructions and/or sent for repair to an
authorised service centre.
• In the case of mechanical damage to the casing, the device shall be immediately sent
for repair to an authorised service centre.
• The use of excessive force during work shall be avoided.
WARNING!
• During the work with the FASTPETTE PRO general safety regulations regarding risks related
with laboratory work should be observed. Protective clothing, goggles and gloves should
be worn.
• The FASTPETTE PRO shall be used only for measuring liquids in conditions specified
by the manufacturer, which are limited due to the chemical and mechanical resistance
of the device, as well as the user safety.
• The pipette controller should not be used in an environment where explosion risk is present.
• The information and instructions provided by the manufacturers of the reagents must
be observed.
2
FASTPETTE PRO INSTRUKCJA (474P.) Nr rys. 015.9001.00.07_FASTPETTE PRO INSTRUKCJA (474P.) 11-11-30 16:58
3 - LIMITATIONS OF USE
• The FASTPETTE PRO may not be used for measuring substances, the vapours of which
damage the following plastics: PP, SI, EPDM, POM.
• The pipette controller may not be used in an environment where explosion risk is present.
• Flammable liquids shall not be measured - in particular substances with flash-point below
0 °C (ether, acetone).
• The pipette controller shall not be used for drawing acids with a concentration above 1 mol.
• The pipette controller shall not be used for drawing solutions with a temperature above 50 °C.
• The pipette controller may work in temperature range from +10 °C to +35 °C.
4 - TO SWITCH ON THE FASTPETTE PRO
The FASTPETTE PRO pipette controller is switched on by pressing the aspiration button
(fig. 1A) or the dispense button (fig. 1B). The display will show the selected aspiration mode,
dispense mode and the batteries level indicator. Examples of the display indications are
shown in (fig. 5.1). The batteries are discharged and requires charging if the indicator does
not display "bars" (fig. 5.4). When the batteries are fully charged, the indicator displays three
„bars” (fig. 5.1).
The FASTPETTE PRO switches off automatically if not used for 5 minutes.
The FASTPETTE PRO may be charged only with the original charger.
The mains voltage shall conform with the specification on the charger.
Charging shall be done in accordance with section 8 of the instruction manual.
5 - ASPIRATING AND DISPENSING LIQUIDS
Attaching a pipette
CAUTION: Before attaching a pipette check whether the pipette is not damaged, has no
dents or sharp edges in the gripping part. Check whether the gripping part is dry.
The pipette shall be gripped as close to the upper end as possible and carefully inserted
into the pipette holder until resistance is noticed (fig. 3A).
WARNING!
Do not apply excessive force so as not to damage thin pipettes and to avoid injury risk.
A pipette that has been correctly attached and sealed in the holder should not tilt to the sides.
After attaching a pipette hold the device in such a way as to keep the pipettor in vertical
position. After finished work it is recommended not to leave the device with an attached
pipette for a longer period, for example overnight or over a weekend.
CAUTION: Do not put aside the pipette controller if there is liquid in the pipette.
3
FASTPETTE PRO INSTRUKCJA (474P.) Nr rys. 015.9001.00.07_FASTPETTE PRO INSTRUKCJA (474P.) 11-11-30 16:58
Filling the pipette
Before aspirating is started, set the speed by successive pressing the SPEED switch (fig. 1C)
until the display shows the right speed (fig. 1E).
• HIGH speed - fast aspirating (fig. 2.1)
• LOW speed - slow aspirating (fig. 2.2)
It is recommended to choose the LOW position for pipettes with a volume up to 5 ml, and
the HIGH position for pipettes with a volume greater than 5 ml. Holding the pipette controller in such a way that the pipette is in vertical position immerse the pipette end in the liquid to be drawn up (fig. 3B), and press the aspiration button gently. The pipette filling speed
depends on how deep the aspirating button has been pressed. The deeper the button
is pressed the faster the liquid is aspirated into the pipette.
It is recommended to draw a slightly greater liquid volume than required (due to meniscus
above the required volume mark), adjusting the aspiration speed, particularly in the final filling
stage, so as not to overfill the pipette.
Setting the volume
After aspirating the liquid to the pipette, in order to remove the solution rests from the outside surface of the pipette, its end shall be dried with absorbent paper that does not leave
impurities. Then set the required liquid volume precisely. Pressing the dispense button gently
(fig. 3C), dispense the excessive liquid from the pipette until the meniscus of the liquid
aligns exactly with the required volume mark on the pipette.
Emptying the pipette
Holding the vessel in inclined position, place the pipette end in contact with the vessel wall
and press the dispense button gently (fig. 3C). The dispensing intensity may be adjusted
depending on how deep the dispense button has been pressed. The deeper the button
is pressed the faster the outflow of liquid from the pipette.
The FASTPETTE PRO has two dispense modes. The dispense mode is selected by successive pressing the MODE switch (fig. 1D) until the display shows the right mode (fig. 1E).
• dispense in gravity mode marked with the „drop” icon on the display (fig. 2.4) - the dispense is effected in gravity mode, which means that the liquid flows out of the pipette by
its own weight. The outflow speed is adjusted depending on how deep the dispense button has been pressed.
• forced dispense with a blow marked with the „arrow” icon on the display (fig. 2.5) – the dispense is effected in gravity mode, however, when the dispense button is pressed to the
middle position, the pump is started and fast emptying of the pipette with a blow is effected.
CAUTION:
During gravimetrical dispensing the pipette is not completely emptied due to the characteristics of pipettes used with the pipette controller.
4
FASTPETTE PRO INSTRUKCJA (474P.) Nr rys. 015.9001.00.07_FASTPETTE PRO INSTRUKCJA (474P.) 11-11-30 16:58
6 - TROUBLESHOOTING
If during your work the functioning of the pipette controller is incorrect, check the cause
and remove the fault.
Problem
Possible cause
The pipette falls out (the
The pipette holder is dirty
holding force of the pipette or wet (fig. 1G).
is to small), or tilts to the
side too much.
Action
Take out the pipette holder, clean,
wash and dry.
The pipette holder is dam- Replace the holder with a new
aged.
one.
The pump is working, but
the pipette controller aid
does not draw liquid or
draws liquid very slowly.
Liquid leaks from the
pipette (the aspiration
and the dispense buttons
are not pressed)
The filter is dirty (fig. 1H).
Take out the pipette holder, take
out the filter, if it is dirty, replace it
with a new one.
The pipette holder
and/or the connector gasket is damaged (fig. 1J).
Replace the mechanically damaged elements with new ones.
The pipette is damaged.
Check the pipette for damage
- cracks, dents - if present, replace the pipette with a new one.
The pipette is inserted
incorrectly.
Check whether the pipette has
been correctly inserted in the
holder.
The pipette holder, the filter, Check whether all parts are present and correctly installed.
or the connector gasket
is installed incorrectly.
The pipette holder and/or
the connector gasket is
damaged (fig.1G, fig. 1J).
Replace the mechanically damaged elements with new ones.
If the problem cannot be remedied using the above guide, contact Labnet International to
obtain service.
Before returning the FASTPETTE PRO for service, it should be cleaned and decontaminated.
A decontamination form and RA number must be obtained from Labnet before sending for
service.
5
FASTPETTE PRO INSTRUKCJA (474P.) Nr rys. 015.9001.00.07_FASTPETTE PRO INSTRUKCJA (474P.) 11-11-30 16:58
7 - REPLACING THE FILTER
CAUTION:
The work safety instructions given in section 2 shall be observed when disassembling the
pipette controller.
The filter replacement is necessary, if drawing efficiency deterioration is observed.
The direct reason may be dirty filter after a long period of use.
The procedure is shown in (fig. 4).
• Remove the pipette.
• Unscrew the nosepiece (fig. 4A).
• Remove the membrane filter (fig. 4A) and the pipette holder (fig. 4B).
• Rinse the holder using a wash bottle (fig. 4C).
• Blow liquid out of the holder and leave it until it is completely dry.
• Install new membrane filter (fig. 4D) and assemble the device in reverse order.
8 - CHARGING THE BATTERIES
CAUTION:
The FASTPETTE PRO may be charged only with the original charger. The mains voltage
must conform with the specification on the charger.
Using other chargers than the original one may damage the battery of the pipette controller.
Charging the batteries in the FASTPETTE PRO pipette controller is controlled by a microprocessor
chip which controls the entire process. When the batteries have been charged, the charging circuit
disconnects automatically.
Charging:
1. Charging temperature: 10 °C to 35 °C.
2. Charging the battery is carried out through a charger (power supply) by direct connection
to the mains, or indirectly by means of a charging stand (fig. 1M). Batteries charging is indicated by successive lighting of “bars” in the display order 4-3-2-1-4-3-2-1 (fig. 5).
3. Full charging time: 7-8 hours.
4. The batteries are charged when all 3 “bars” blink (fig. 5.1).
The pipette controller has 3 NiMH type AAA batteries with a capacity of 900 mAh.
You have access to the batteries (fig. 1L) and can replace them with new ones after taking off
the battery cover (fig. 1K). The manner in which the batteries are arranged is shown in fig. 8.
The service life of the batteries: approx. 1000 charging cycles, if used correctly.
It is not possible to overcharge the batteries if all instructions of the manufacturer are followed.
CAUTION:
It is not recommended to interrupt the charging process. If the charging process is interrupted, the next charging may take place after the batteries have been completely discharged. If the pipette controller is stored on a charging stand (fig. 7A or fig. 7B), the charging stand should be disconnected from the power supply.
6
FASTPETTE PRO INSTRUKCJA (474P.) Nr rys. 015.9001.00.07_FASTPETTE PRO INSTRUKCJA (474P.) 11-11-30 16:58
WARNING!
If disposable batteries are used, it is unacceptable to connect the device to the charger.
In order to prolong the life span of the rechargeable batteries, the following rules should be
followed:
1. Before the pipette controller is activated for the first time, the batteries should be
charged.
2. FASTPETTE PRO should not be left uncharged for a longer period of time.
3. In the case of a planned longer break in the work of the pipette controller, it is recommended
to take the batteries out of the pipette controller.
9 - MAINTENANCE
Cleaning
The FASTPETTE PRO does not require any maintenance. The external parts of the pipetting
aid may be cleaned with a swab moistened with isopropyl alcohol.
The nosepiece and the pipette holder may be autoclaved at 121 °C for 20 minutes. After autoclaving, dry the pipette holder. The filter included in the set may be sterilised by autoclaving
at 121°C for not more than 15 minutes.
Storage
The FASTPETTE PRO shall be stored in a dry place. The allowable storage temperature: -20 °C
to +50 °C.
During breaks in the work the pipette controller shall be placed on a charging stand in horizontal position (fig. 7A) or in vertical position (fig. 7B). The charging stand may be fitted on
a wall (fig. 7B) with a fixing set included with the pipette controller.
CAUTION:
Do not store the pipetting aid with a pipette contoller.
10 - COMPONENTS
The FASTPETTE PRO set is supplied with the following components:
• Pipette controller
• Charger
• Charging stand
• Membranefilter 0.2 μm
• Battery – 3 pcs.
• Instruction manual
7
FASTPETTE PRO INSTRUKCJA (474P.) Nr rys. 015.9001.00.07_FASTPETTE PRO INSTRUKCJA (474P.) 11-11-30 16:58
11 - ORDERING INFORMATION
The FASTPETTE PRO comes with a universal charger and a set of adapters in different versions:
EU, US, UK and Australia. Choose your country used adapter and connect to the housing.
To mount the adapter, it should be inserted into the slots of the housing in the direction of the
arrow (1), until you hear a click engagement.
To remove or change the adapter, simply press the “PUSH” button in the direction of the
arrow (2), then holding the button down, remove the adapter in the direction of the arrow (3).
Catalogue no. P2002
12 - SPARE PARTS
Item
in fig. 1
Part name
Catalogue no.
Number of
pieces in pack
F
Nosepiece
P29052
1
G
Pipette holder
P29054
1
H
Membranefilter 0.2 μm
P9023
1
Membranefilter 0.45 μm
P2024
1
J
Connector gasket
P9025
1
L
Charger 9V: EU, US, UK, AU Plug
P9010
1
M
Charging stand
P29055
1
13 - PRODUCT DISPOSAL
According to Directive 2002/96/EC of the European Parliament and of the Council of
27 January 2003 on waste electrical and electronic equipment as amended, pipette controller FASTPETTE PRO is marked with the crossed-out wheeled bin
and must not be disposed of with domestic waste.
In accordance with the requirements of Directive 2006/66/EC of
6 September 2006 on batteries and accumulators and waste batteries
and accumulators, batteries must be disposed of in accordance with
national regulations.
The crossed out wheeled bin symbol is printed in the product instruction manual and on the
packaging. In order to recycle the used product, send it to the nearest service centre or to
the manufacturer. For contact details please go to www.labnetlink.com
All rights reserved. Product described in this manual is subject to availability and technical modification. Errors excepted.
LABNET reserves the right to improve, enhance or otherwise modify its products without prior notification.
© 2011 LABNET
FPPR/11/2011
8
FASTPETTE PRO INSTRUKCJA (474P.) Nr rys. 015.9001.00.07_FASTPETTE PRO INSTRUKCJA (474P.) 11-11-30 16:58