1
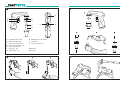
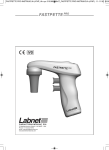
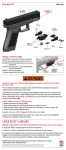
FAST PETTE
Labnet International, Inc.
FAST PETTE
1
E
A
K
B
H
J
C
D
G
F
A
B
C
D
E
F
G
-
Aspiration button - ABS
Dispense button - ABS
Suction speed switch - PP
Dispense mode switch - PP
Low battery indicator
Nosepiece - PP
Pipette holder - SI
H - Membrane filter - PP / PTFE
J - Safety valve
K - Connector gasket - SI
NiMH battery
Casing - PP
4
FAST PETTE
TABLE OF CONTENTS
1 - INTRODUCTION .............................................................................................................. 2
2 - WORK SAFETY INSTRUCTIONS ..................................................................................... 2
3 - LIMITATIONS OF USE ..................................................................................................... 2
1 - INTRODUCTION
The FASTPETTE pipette controller is designed for pipetting liquids with serological pipettes.
The device works with all types of glass and plastic serological pipettes in the range of 1 ml
to 100 ml.
The FASTPETTE is equipped with replaceable membrane filters that protect against cross
contamination. The filters also prevent contamination of the mechanism by reagent vapors.
4 - GETTING STARTED ......................................................................................................... 3
The FASTPETTE features a two speed control system which enables very fast dispensing
of large volumes and precise measuring of small volumes.
5 - ASPIRATING AND DISPENSING LIQUIDS ...................................................................... 3
Fig. 1 shows the external parts of the pipette controller and a description of the materials
used in the construction.
6 - TROUBLESHOOTING ...................................................................................................... 4
7 - REPLACING THE FILTER AND CLEANING THE VALVES ............................................... 5
8 - CHARGING THE BATTERY .............................................................................................. 6
9 - MAINTENANCE ................................................................................................................ 6
2 - WORK SAFETY INSTRUCTIONS
Before operating the FASTPETTE, all users should read these instructions carefully.
Using the pipette controller a manner inconsistent with the operating instructions may result
in damage to the device.
10 - COMPONENTS ................................................................................................................ 7
Any required repairs to the FASTPETTE should be performed at an authorized service center.
Repair elsewhere may void the warranty.
11 - ORDERING INFORMATION ............................................................................................. 7
• While using the FASTPETTE, follow general laboratory safety guidelines. Protective clothing,
goggles and gloves should be worn.
• The FASTPETTE shall be used for measuring liquids only in the manner specified in this
manual. Liquids to be measured are limited by the chemical and mechanical resistance
of the device, as well as user safety.
• The pipette controller should not be used in environments where there is a risk of explosion.
• Information and instructions provided by the reagent manufacturer must be observed.
• Use only original spare parts and accessories.
• Only the original charger, supplied by the manufacturer, should be used for charging the
battery and powering the device.
• If the pipette controller malfunctions, discontinue use immediately. Clean the device in
accordance with the operating instructions and contact the manufacturer for repair.
• Avoid excessive force while using the pipette controller.
12 - SPARE PARTS .................................................................................................................. 7
3 - LIMITATIONS OF USE
• Substances that damage PP, SI, ABS, EPDM and POM should not be measured with the
FASTPETTE.
• The pipette controller shall not be used in environments where a risk of explosion is present.
• Flammable liquids shall not be measured – in particular substances with a flash-point
below 0 °C (ie ether, acetone).
• The pipette controller shall not be used for drawing acids with a concentration above 1 mol.
• The pipette controller shall not be used with substances with a temperature above 50°C.
• The ambient operating range of the pipette controller is +10 °C to +35 °C.
1
2
FAST PETTE
4 - GETTING STARTED
Before operation be sure that the pipette controller battery is charged. To check the battery
charge, press the aspiration button (fig. 1A) and check the low battery indicator light. If the
indicator does not light, the pipette controller is ready for use.
Emptying the pipette
If the low battery indicator is lit, the pipette controller must be charged before use.
Alternatively, the charger can be connected and the FASTPETTE can be used while charging.
Only the original charger should be used.
The FASTPETTE has two dispensing modes. The modes are selected with the GRAV/BLOW
switch (fig. 1D).
The line voltage must conform to the specification on the charger.
Follow the instructions in section 8 of this manual for charging the FASTPETTE.
5 - ASPIRATING AND DISPENSING LIQUIDS
Tilt the receiving vessel and place the pipette tip in contact with the vessel wall. Gently press
the dispense button (fig. 2C). The speed of dispensing is adjusted by varying the pressure
on the dispensing button. The greater the pressure applied, the faster the liquid flow.
• GRAV position – When the GRAV mode is selected, the liquid in the pipette is dispensed
by gravity flow only. Flow rate is adjusted by the pressure applied to the dispense button.
Attention:
During gravimetrical dispensing the pipette is not completely emptied due to the
characteristics of pipettes used with the pipetting controller.
Before attaching a pipette, check for damage. The pipette should be free of dents,
chips and sharp edges on the section that is held by the pipette controller. Be sure
that this section is dry.
• BLOW position - the liquid in the pipette is dispensed in constrained mode - the liquid is
forced out of the pipette. The dispensing speed is regulated by the depth of pressing
applied to the dispense button. When the button is pressed to the end position the rapid
emptying with the blow out is executed.
Hold the pipette close to the end that is to be inserted in the pipette controller and push it
into the pipette holder until resistance is felt (fig. 2A). Do not apply excessive force as this
may cause the pipette to break and injure the user. A pipette that is correctly seated in the
holder will not tilt to the side.
Attention:
Due to the characteristics of graduated pipettes, in order to diminish the splashing
of the liquid in the last stage of emptying the pipette, the speed of the dispensing
should be reduced.
After seating the pipette, hold the pipette controller so that the pipette is in a vertical position,
pointing downward. It is possible to lay the pipette controller on the bench stand with
a pipette attached. It is not recommended to leave a pipette attached to the device for an
extended period of time (ie overnight).
6 - TROUBLESHOOTING
If the pipette controller fails to function properly, refer to the troubleshooting table below to
isolate and remedy the problem.
Attaching a pipette
Do not lay the pipette controller on its side while there is liquid in the pipette.
Filling the pipette
Before aspiration is started, set the suction speed using the HIGH/LOW switch (fig. 1C).
• HIGH position – fast aspiration
• LOW position – slow aspiration
It is recommended to choose the LOW position for pipettes with a volume of up to 5 ml, and
the HIGH position for pipettes with a volume greater than 5 ml. Holding the pipette controller so that the pipette is in a vertical position, immerse the pipette end in the liquid to be
drawn up (fig. 2B) and pres the aspiration button gently. The filling speed depends on how
much pressure is applied to the aspirating button. The more pressure applied, the faster the
liquid is drawn up.
It is recommended to draw a slightly greater volume of liquid than is required. Adjust the
aspiration speed while filling as to not overfill the pipette.
Setting the volume
Problem
Possible cause
The pipette holder is dirty
The pipette falls out (the
holding force of the pipette or wet (fig. 1G).
is to small), or tilts to the
side too much.
Action
Take the pipette out of the holder.
Disassemble the pipette holder
and check for mechanical
damage.
Clean, wash and dry the pipette
holder.
The pipette holder is dam- If the holder is damaged, replace
aged.
it with a new one.
The pump is working, but The filter is dirty (fig. 1H).
the pipetting aid does not
draw liquid or draws liquid
very slowly.
Take the pipette out of the holder.
Disassemble the pipette holder.
Take out the filter - check it for
impurities - if it is dirty, replace it
with a new one.
After filling the pipette, wipe the tip with absorbent paper to remove any liquid from the outside
surface of the pipette. The volume can then be precisely adjusted. Gently press the dispensing
button (fig. 2C) until the meniscus of the liquid in the pipette aligns exactly with the required
volume mark. The speed of aspiration can be adjusted by varying the pressure applied.
3
4
FAST PETTE
The check valve is blocked Check the valve for flooding.
(fig. 1J).
If it is wet - rinse it and dry.
Check the valve for blockage
or displacement due to excessive
force during pipette installation
- if it is blocked or displaced try
to set it in the right position.
Liquid leaks from the
pipette (the aspiration
and the dispense buttons
are not pressed)
The pipette holder
and/or the connector gasket is damaged (fig. 1K).
Check the pipette holder and the
connector gasket for mechanical
damage - if there is damage,
replace the damaged part with
a new one.
The pipette is damaged.
Check the pipette for damage
- cracks, dents - if present, replace the pipette with a new one.
• Rinse the holder with the safety valve using a wash bottle (fig. 3C).
• Blow any remaining liquid out of the holder and allow it to dry completely before reassembling.
• Install new membrane filter (fig. 3D) and assemble the device in reverse order.
8 - CHARGING THE BATTERY
The FASTPETTE has a low battery indicator. When the battery requires charging, the indicator
will light when the aspiration button is depressed.
Note:
The FASTPETTE should be charged only with the original charger. The line voltage must
conform to the specification on the charger. Use of a charger other than that supplied
may damage the battery of the pipette controller.
A time circuit controls battery charging. When the battery is completely charged, the charging
circuit disconnects automatically. When charging is complete, the control lamp (fig. 1E) will
shine continuously.
Charging:
The pipette is inserted
incorrectly.
Check whether the pipette has
been correctly inserted in the
holder.
The pipette holder, the filter, Check whether all parts are present and correctly installed.
or the connector gasket
is installed incorrectly.
The pipette holder and/or
the connector gasket is
damaged (fig.1G, fig. 1K).
Check the pipette holder and the
connector gasket for mechanical
damage - if there is damage,
replace the damaged part with
a new one.
If the problem cannot be remedied using the above guide, contact Labnet International
to obtain service.
Before returning the FASTPETTE for service, it should be cleaned and decontaminated.
A decontamination form and RA number must be obtained from Labnet before sending
for service.
1. Ambient charging temperature 10° to 30°C.
2. Charging is accomplished with the charger included with the FASTPETTE. During charging,
the lamp indicator will flash.
3. A full charge is accomplished in 11 – 14 hours.
4. When charging is complete, the indicator lamp will glow steadily.
The pipette controller has a NiMH battery with a capacity of 1700 mAh.
The service life of the battery is approximately 1000 charging cycles. For optimum battery
life, the battery should be completely discharged before recharging. The time circuit of the
charger prevents overcharging of the battery.
Note:
Allow the battery to charge fully and do not interrupt the charging cycle. If the cycle
is interrupted, the battery should not be recharged until it is completely discharged.
9 - MAINTENANCE
The FASTPETTE requires no routine maintenance. The external parts of the pipette controller
may be cleaned by wiping down with isopropyl alcohol.
The nosepiece and pipette holder with check valve may be autoclaved at 121 °C for 20 minutes. The filters included in the set may be sterilized by autoclaving at 121 °C for no more
than 15 minutes.
7 - REPLACING THE FILTER AND CLEANING THE VALVES
Follow the safety instructions in section 2 when disassembling the device.
Attention: After autoclaving, allow the silicone pipette holder to cool and then bend and
squeeze it several times in the area of the safety valve.
If, over time, the drawing efficiency of the pipette controller deteriorates, the cause may be
a dirty filter. If this is the case, the filter must be replaced following the directions below and
illustrated in figure 3.
Storage
• Remove the pipette.
• Unscrew the nosepiece (fig. 3A).
When not in use, the pipette controller should be placed in the bench stand included with
the unit or stored using the optional wall hanger.
• Remove the membrane filter (fig. 3A) and the pipette holder (fig. 3B).
Note: Do not store the FASTPETTE with a pipette attached.
5
Store the FASTPETTE in a dry place. The storage temperature should be between -20 °C
and +50 °C.
6
FAST PETTE
10 - COMPONENTS
The FASTPETTE pipette controller is supplied with the following components:
• Charger
• Bench stand
• Membrane filter 0.2 µm – 2 pieces
• Instruction manual
Then bench stand has 2 positions for storing the FASTPETTE (fig. 4).
11 - ORDERING INFORMATION
The following versions differ with the types of included charger. The appropriate version
should be ordered depending upon the line voltage of the facility:
Versions
Voltage
Catalog number
USA
120 V / 60 Hz
P2000
EURO
220 V / 50 Hz
P2000-220EU
UK/Ireland
230 V / 50 Hz
P2000-230UK
Australia
240 V / 50 Hz
P2000-240AU
12 - SPARE PARTS
Item
in fig.1
Description
Catalog no.
F
Nosepiece
P2022
G
Pipette holder
P2021
H
Membrane filter 0.2 µm
P2023
Membrane filter 0.45 µm
P2024
K
Connector gasket
P2025
L
USA 120V/60/Hz
P2017
Power
EURO 220V/50Hz
P2015
supply:
UK/Ireland 230 V / 50 Hz
P2016
Australia 240 V / 50 Hz
P2018
M
Bench stand
P2029
N
Wall hanger
P2028
FP/02/2005
7
8
FAST PETTE