1
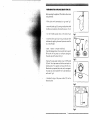
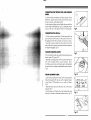
GENERAL INFORMATION Attention: • We will not assume any responsibility for any damages in the event of: • Use which is improper or which does not conform to that which is intended; • Repairs that are not carried out at an authorized service centre; • Tampering with the power cable; • Tampering with any component of the machine; The use of spare parts and accessories which are not original. In these cases, the guarantee shall be null and void. Keep these operating instructions in a safe place and attach them to the steam vacuum cleaner whenever another person needs to use it. For additional information in the event of problems that are not completely or only partially with in instructions, contact the specialists responsible TECHNICAL FEATURES STANDARD ACCESSORIES Nominal voltage 120 V - 60Hz 2 extansion hoses Size (in mml L 460 x W. 320 x H 340 1 large multipurpose brush + Max Steam pressure 58 psi 1 hose Protective thermostat 210°C textiles tool w/ bristled support Maximum power 1700 Watt 1 window-wiper 3 sizes Motor: double turbine 1 nozzle with end piece with small and soft Stainless steel tank 1 fill bottle Power cable: 5.2 metres 2 small brushes for nozzle Hose: 2.3 metres Spare O-ring set Required air volume: 45 litres/second 1 atomiser (steam - injection extraction 1 Motor regulation: 5 levels Blower Steam volume regulation: 3 levels Depression brush Low voltage controls on the handle Water drain plug in boiler for decalcification 1 Small brass and 1 steel Multipurpose swivel brush with frame + rubber Tank volume 1,5 htres lips and bristled element Water/detergent tank volume 1,5 litres (stearn- injection - extraction model c@us LISTED STEAM CLEANER 32GB SAFETY ELEMENTS Safety valve for overpressure Protective thermostat KEY TO SYMBOLS ~~ Do not aim the steom jet yourself and/or people, animals or appliances that have electrical components fitted (e,g,: inside of ovens) ~ In the event that water or steam escapes beware of the danger of burnsl Construction and execution due to technological progress are subject to change without notice, CEJ attempting to operate the ampliance, make sure you and understand these instruction for use it. 2002/95/CE (RoHS) 2002/96/CE (RAEE) SAFETY INSTRUCTIONS Never allow the parts supplied with electricity to come in contact with water: there is the of a short circuit! The hot steam and hot water can cause scalding! The steam vacuum cleaner is designed only for use by an operator and for domestic use only, Technical modifications or any illegitimate use are prohibited because of the risks they entail, steam vacuum cleaner may only be used by adults in a healthy physical and psychological state. The steam vacuum cleaner must only connected to a suitable electrical Always be certain that the electrical outlet is provided with a ground line and that it is of a voltage corresponding to that indicated on the machine's data Never use the steam vacuum cleaner if the power Have defective cords or plugs replaced immediately and Do not allow the power cord to pass around corners, over sharp edges, or over very and keep it away from oil. Do not carry or pull the steam vacuum cleaner by the power cord, Do not pull the plug out of the electrical socket by pulling on the power cord, and do not touch the plug with wet or moist hands, Be certain that children do not have any possibility to play with the machine; therefore, do not leave steam vacuum within their reach, use, or custody. Children are not aware of the dangers associated Do not aim the steam jet toward yourself or other people, animals, or ml"lh"rink to high temperatures and/or to humidity. Never unscrew the drain plug from the tank while the machine is in operation, Before unscrewing the drain plug, be certain that the steam pressure tank is no longer under rressure, In the event that boiling water or steam escapes, beware of the danger a burnsl Under unfavourable power supply conditions, the appliance can cause temporary voltage 2 WHERE TO KEEP OR USE THE APPLIANCE Place the steam vacuum cleaner in a safe place where nobody can knock it over and where nobody can be harmed by it. Do not use the steam vacuum cleaner in the open air; never leave it in areas where temperatures are lower or equivalent to aoc, especially when the cleaner has waler in it. Do not place the steam vacuum cleaner on hot surfaces or close to open flames, as this will bring damage to the appliance. CLEANING THE APPLIANCE Before cleaning the appliance, you must sWitch off the main sWitch and then pull the plua out of the electrical socket and allow the machine to cool down. Never plunge the steam vacuum cleaner in water! is forbidden to dry any part of the steam vacuum cleaner in conventional and/or microwave ovens. It is absolutely forbidden to service the inner parts of the machine. OPERATION In this section, we would like to prOVide you with a few hints on how to use the appliance properly: • While in operation, the machine should be carried on uniform surfaces; • Choose an adequately lit environment, where the electrical socket is easily accessible; • Never place the steam vacuum cleaner under the water tap to fill the boiler tank; • Never leave the machine running unattended; • Do not overfill the boiler with water and do not mix water with chemicals; • The steam vacuum cleaner should only be used in its horizontal position; • Do not vacuum acids and/or solvents as these will damage the machine; • Do not pick up explosive powders and/or liquids; • Do not vacuum any blazing and/or very hot objects, i.e. embers, ashes or other materials under combustion. APPLIANCE CARE each use, turn all switches off, pull the plug out of the electrical socket and empty the waste water container. Keep the machine in a dry place, away from children's reach. Keep the machine away from dust and dirt. A discaler action against calcium is to be foreseen before leaving the apparel unused tor a quite long time. REPAIR/MAINTENANCE In the event of malfunction, defects, or suspected defects after a fall. pull the out of the socket. Never start a detective machine. Only authorised service centres are allowed to service or repair the appliance. The manufacturer disclaims any responsibility for any damage and/or may result in the event of service that is carried out in breach of the applicable safety or is executed unauthorised personnel. 3 DESCRIPTION 15 78 911 12 13 14 3 10 1. Waste water container cover 2. Main switch 15. Power cable plug 16. Float assembly 17. "Venturi assembly" 18. Waste water container 19. Filter cover 3.Control panel 4. Water or detergent tonk door 5. Hose/air filter (option), iron adaptor connection 6. Boiler cop 7. Vacuum 20. boiler 8. Boiler ~ 9. Red control lamp (water low) 10. Green control lamp (ready for operation) 11. Injection/extraction function button for water or detergent (steam injection - extraction model only) 12. Vacuum power button (increases the vacuum power) 13. Steam volume button for reaulatina the steam 14. Vacuum power 4 STANDARD ACCISSORIES a) 2 extension hoses b) large multipurpose brush with clear cover c) bristled frame and rubber lips d) nozzle with small brush and sofl brush e) hose f) steam ani off button on hose g) vacuum onloff button on hose h) end piece for nozzle i) 2 small nylon brushes for nozzle I) blower m) atomiser n) fill bottle 0) textiles tool wlbristled support p) window-wiper 3 sizes g) d~pression brush rl orlng sel s) small brass and steel brushes t) multipurpose swivel brush with bristled frame wilh rubber lip and attachments e -~ d ~~tI iii) Ii) ~ ~ ~ sQQ C(@ r 5 PACKAGING Remove the appliance the accessories from the packaging and put them in an The original packaging has been designed to protect the appliance during shipment. We suggest you the packaging for any future use. Packaging materials should be kept out of children's reach as they may pose a hazard. WARNINGS fabriCS, follow the instructions given on the fabrics label; if no - For the cleaning of materials contact the fabric manufacturer to obtain more information. cleaning instruction is only be used on materials with characteristics that make them - This steam vacuum cleaner suitable for steam vacuum cleaning - We do not recommend the use of adaptor plugs, split wires and/or extension leads. - Do not touch the appliance with wet or moist hands and/or feet. - Do not expose the appliance to atmospheric agents (rain, sun, frost, etc.) -If the protective thermostat comes into operation, the appliance will stop automatically. Before restarting, have the appliance inspected by an authorised service centre. The machining process may have left some residues in the appliance ducts, so when the steam function is used for the first time, be certain to apply the steam jet to a scrap piece of cloth before proceeding to clean your textiles/upholstery; this will eliminate any existing residues. During the preparation of the steam vacuum cleaner, the plug must disconnected from the socket. )t - IMPORTANT INFORMATION FOR CORRECT DISPOSAL OF THE PRODUCT IN ACCORDANCE WITH EC DIRECTIVE 2002/96/EC. At the end of its working life, the product must nol be disposed of as urban wosle. It must be token to a speciallacal authority differentiated wosie collection cenln! or to a dealer providing this service. Disposing of a household appliance separately avoids possible negative consequences for the environment and health deriving from inappropriate disposal and enables the constituent materials 10 be recovered to obtain signifi cant savings in energy and resources. As a reminder of the need to dispose of household appliances separately, the product is marked with a crossed-oUI wheeled dustbin. 6 PREPARING THE APPLIANCE READY FOR USE Before operating the appliance, fill to be generated: - fill the to allow steam demineralised or tap water 1; - unscrew the boiler cap by turning it anticlockwise while simultaneously applying downward pressure; Fia 2. the fill bottle down on the boiler Fig 2. - screw the boiler cap (6) by turning it clockwise while simultaneously applying downward pressure; ensure the cap is securely tight. - steam - injection - extraction model . Open the detergent door (4), remove the block cap and fill the tank with tap water or non-foamy detergents. Close the cap and the door (4); Fia 3. - Remove the waste water container cover ( 1), fill the tank (18) with 1 litre of tap water and lock the cover back into locked position. This operation will ensure that the air is and any impurities (dust, mites, etc.) are For proper use, do not exceed the "min" water level shown on the tank. 4. Fig. 1 ~C:)U'- 6-[) ~ ~ ~~ Fig. 2 6 6 - Introduce the plug of the power cable (15) into electrical socket. Fig. 3 Wmin Fig. 4 7 CONNECTING THE ACCESSORIES The accessories can the & Failure to secure the (]ccessories using the clasp provided c(]n F" 5 a hazard; the necessaries can suddenly come off while Ig. mnchine is in operntion. All the following functions can be used with (]ny one of the accessories provided: - steam function; - vncuuming function; - simultaneous vncuuming and steam functions; TO REMOVE THE ACCESSORIES: on the handle of the work hose on the handle of the button to remove the accessories. Fia. 5. CONNECTING THE BRISnED FRAMES TO THE BRUSH A cnn be attached to the large multifunction brush 10 clean and care for all surfaces: - bristled with rubber lip attachments, suitable for hard best stenm collection. To connect frame simply slide the frames in or out in the direction shown in the illustration. Fia. 6. CONNECTING THE NOZZLE AND SMALL BRUSHES Fig. 6 For removing very stubborn dirt, use the nozzle with the smnll brush. Switch on the ste(]m while simultaneously working with the small brush to loosen the dirt.l hen slop the stenm nnd use the vacuum function to vacuum up the dirt. fa remove the smnll brush from the nozzle, Ily The nozzle is -Window Rndinlors Sinks and wnsh basins of shower Fig. 7 8 -" CONNECTING THE TEXTILES TOOL AND WINDOW WIPER To clean armchairs, mattresses, and fabric surfaces, use the textile tool, using the steam function and then the vacuum function to vacuum up the steam and dirt. For the cleaning of gloss and small hard surfaces, attach the window wiper to the textiles tool, Fig. 8, by sliding the window wiper on the tool in the direction shown in the illustration, CONNECTING THE HOSE (e) Fig- 8 5 - Flick the accessory socket door (5) wide open quick connection of the hose (e) to the socket on the front of the appliance. Press the connection in as far as it will go. Close the accessory socket door (5) so that is rests on the body of the quick connection and check that the two elements are properly engaged. (Fig. 9) VACUUM CLEANING ALONE 5ch on the machine at the main switch (2) and push the vacuum function button (7). Figures 10-11, the vacuuming power via the vacuum power buttons 14) (increase/reduce vacuum pawed Fig 11. vacuum function control button (g) on the handle of the work hose (e) to activate or deactivate the vacuum function. Fig 12. Fig- 9 '~ ~~) ~ Fig- 10 STEAM CLEANING ALONE - Switch on the machine at the main switch (2) and push the boiler heating button (8). As soon as the' operation ready' control lamp (10) illuminates, you can work with steam. Fig. 11. - Adjust the steam volume via the button (13) on the control panel (3). Fig 11 Push the steam on/off button (f) on the handle of the work hose (eL to activate or deactivate the steam function. Fia 12. 3 Fig. 11 Fig_ 12 9 SIMULTANEOUS VACUUMING AND STEAM FUNCTIONS Proceed as described above and activate the desired functions sim PLEASE NOTE: With the such as parquet, both straightened anew and cleaned. out of the depths and then vacuumed up. or waxed SUI faces) absolutely must be tested lor heat resistance WATER OR DETERGENT INJECTION/EXTRACTION FUNCTION (STEAM - INJECTION - EXTRACTION MODEL ONLY) - Pour water or into the tank (4) as described in - Mix the cleaning with water to the concentration ",--,r,_"",m\l cleaning on the macnlne vacuum button Fig. 11 Push the steam on/off button and the vacuum to activate or deactivate water/detergent the vacuuming power via the vacuum power the on and the 11. attach the atomiser to this brush the between the extension hose (a) and frame with rubber lips. depending m INJECTION/EXTRACTION + STEAM FUNCTION for use'. deter;::]ent into the tank as described in button (8). soon as the green control (10) is with steam. Push the injection/extraction button (11 ) and the vacuum button (7) . the steam volume via the button (I the vacuuming power via the vacuum power buttons (12) (14) (increase/reduce vacuum Fig 11 - Push the steam button (f) and the vacuum on/off button on the handle of the work hose and steam functions. Fig.12. [his to activate or the water/detergent . combination of functions is specia well suited to the removal of perSistent 10 - - - - - - - - - - - - MULTIFUNCTION SWIVEL BRUSH This is a large brush, equipped with a swivel jOint. It can be used for the cleaning of large surfaces and can easily reach areas that are very low down. The swivel brush comes with a bristled frame with rubber lips and bristled frame with stiff attachments for rugs and carpeted floors. HOW TO USE: o see: how to use the multipurpose brush. --... F' 16 ,--'g_'_______________--. Fit the rubber blades with the knurled sides facing outwards You can fit the rubber blades, bristle attachment ~ )1(JI\ brush to clean all kinds of surfaces. ~- (. \ or stiff blades onto the professional swivel / \\ • ~./' ~~~~, ci6f -'~ . Remove both side covers from the --0 0 0 0 - 0 0 , , 0 iii_~ Turn the brush upside down and position the desired attachment to the attachment groove: Fig- 16 A Rubber blades are suitable for cleaning hard surfaces and allow for effective steam collection. They should be installed with the knurled sides facina outwards. Fig.16 A . Bristled frames are suitable for cleaning loose g'::::=;;!::D * 6 J't:~~ HC_-=-===-_, Fig, 16 B and fitted carpets, etc. They should be installed \ to the brush Fia .16 B ........ The stiff blade is used in combination with ! ! i the vacuum function. It should be installed to the front groove on the brush Fig.17 Fig. 17 NOTE Prior to cleaning fitted carpets, release any leftover condensate by pressing the button (el ...... on the handle of the work hose. Position the side covers back to their respective seats on the brush (L to L side, R to R side, as on the brush and covers). Fia.17 A Fig, 17 A 11 ROTATING DEPRESSION BRUSH FIG. 18 This brush combines the cleaning action of steam with the effect of vacuum generated by the motor and enables the operator to remove hairs, dust, and debris from all textile surfaces (loose and fitted carpets, sofas, car seats, etc.). HOW TO USE: o Install the brush to the female end of the extension hose to teh handle until the click. o of the work hose and press the Fig. 18 Proceed as per the vacuum and steam function BLOWING FUNCTION With the blowing function, air is blown out allowing you to perform such tasks as collecting fallen leaves in the garden and removing dust from areas where the accessories cannot reach. How to use: o remove the dirty eater container and cover (1 +18) from their respective seats on the appliance. 19. Remove the blowing function cap (c). Fig. 19 Fig. 20 Fig. 20. o Introduce the blower into the push it in as far as it will go until snug, as shown in the illustration. Fig. 21. ~ o Switch on the machine al the main switch (2) and the vacuum function button o Adiust the vacuum power via the vacuum power buttons 14) (increase/reduce vacuum button (g) on the handle of the to activate or deactivate the blowing function. o For the the use of the hose with nozzle Fig. 21 is recommended. SMALL BRASS OR STEEL BRUSH When attached to the nozzle in place of the small efficient scrubbing action on persistent soiling. How to use: brush out of the nozzle o pull the small brass or steel brush to the nozzle o install the these small brushes a more and push it in until you hear a click. 12------------------------ • HINTS ON THE USE OF YOUR APPLIANCE FOR THE DEEP CLEANING OF YOUR HOME, WE RECOMMEND CLEANING WITH STEAM AT LEAST ONCE A WEEK. VERY DIRTY FLOORS: Begin first with the steam cleaning (use the large multifunction brush (b) with the rubber lip attachment! (c)). For the cleaning of very dirty floors, first switch on the steam to loosen the dirt. Then stop the steam and vacuum the floor NORMALLY DIRTY FLOORS: With normally dirty floors, work simultaneously with the steam and vacuum functions (use the large multipurpose brush (b) with the rubber lip attachment (cll To do so, switch on the steam and vacuum functions. Move the vacuum hose constantly in one direction (either toward the body or away from the body). After finishing the cleaning work, switch off the steam at the on/off button (f) but leave the vacuum function sWitched on (g) for another moment so that the remaining dirty water can be transported into the dirty water tank. PLEASE NOTE: If the steam function is to be used on flooring that requires a cleaning product, such as marble or PVC, we recommend the use of a terry cloth towel over the floor tool. Adjust the steam volume to the surface which is to be treated (steam level - button 13). RUGS AND CARPETED FLOORS: "( The machine can deeply clean dust away from all types of rugs and carpeted floors. To do so, use the large multipurpose brush (b). First switch on the vacuum function and vacuum your rug or carpeted floor as usual to remove dust. Then sWitch on the steam and vacuum functions in order to carry out a deep cleaning, This type of cleaning brightens up the colour and gives your carpet back its original volume. Impurities are removed from the very roots of the fibres. In the case of encrusted areas or special stains, we recommend treating these first with the nozzle with end. To do so, set the steam level (button 12) and vacuuming power (button 13) to the maximum. WINDOWS Work simultaneously with the steam and vacuum functions (Window wiper 3 sizes for window surfaces/mirrors/wall tiles). Switch on the steam and vacuum functions. In order to be able to achieve the best possible cleaning results, always work from top to bottom. very dirty windows, you should clean these first only with the steam function (Without the vacuum function) and then only with the vacuum function (without the steam function). Begin the cleaning while you have placed the special tool with the rubber lips directly against the glass surface. Then gUide the rubber lips slowly downward. When the vacuum function is sWitched on, the steam and the condensed water will be vacuumed up again. PLEASE NOTE: In the winter, the glass surfaces should be pre-warmed from a distance of 5 to 10 cm. (2 to 4 in.) ------------------------- 13 UPHOLSTERY AND MAnRESSES For cleaning upholstery and mattresses, you can simultaneously use both the steam and vacuum functions or else only the vacuum function (textil tool). This tool is equally suitable for the cleaning of automobile upholstery, For the procedure to clean the aforementioned materials, see: "Rugs and Carpeted Floors". PLEASE NOTE: Please do not clean sensitive materials (velvet, velour, leather, etc.) with the steam function. Please test a concealed area of the materials to be cleaned beforehand for color fastness and resistance to heat HOUSEPLANTS Switch on the steam function (nozzle). Begin the cleaning from a safe distance. Please note: You absolutely must maintain a safe distance in order to lower the steam temperature. MAINTENANCE OF THE MACHINE AND ACCESSORIES 17 WHEN PERFORMING ANY MAINTENANCE ON THE APPLIANCE, THE PLUG MUST BE DISCONNECTED FROM THE ELECRICAL SOCKET. 16 The GAIA SOOO is a very tough machine and requires only very little maintenance. However, in order to avoid dirt buildup in the tubes (a), hoses (e), accessory components, and dirty water tank ( lS+ 1) it is important to clean the machine after use. To do so, switch on the vacuum function and simply vacuum up clear tap water through the parts that have been used. Please then empty the drawn-in water out of the dirty water tank ( lS) and rinse out the tank with clean water. The dirty water tank (lS), float assembly (16) and the "Venturi effect" assembly (17), are located inside the dirty water tank (lS). They can be removed from their seats in order to be cleaned, as shown in illustration no. 22. You should clean the 0 Fig. 22 rings on the accessories at regular intervals. Fig. 23 Clean the vacuum filter (20) at regular intervals. To do so, disengage the filter cover (19), Fig. 23. Shake the filter and wash it with clean water if necessary. Reposition the filter in its seat and refit the filter cover (19). In the event that the machine is not used for a long period of time, we recommend completely emptying out the machine and the boiler by unscrewing the drain screw (21) (this is located on the bottom of the machine). Fig. 24 Fig. 24 14------------------------- DECALCIFYING THE STAINLESS STEEL TANK The decalcification of the stainless steel tank at regular intervals is recommended, depending upon the hardness of the water and the number of hours of operation. The minimum is once a year A specific product, which can be ordered from our authorised service centres, should be used for decalcification. To decalcify the tonk, corry out the procedure below. Never heat up the machine during the decalcification phase!. o Disconnect the power coble (15) from the electrical socket. o Unscrew the boiler cop (6). o Mix the decaldier with water to the concentration specified on the packaging. Pour the mixture into the tank and allow it to rest for not less than 10 minutes with the machine off. o Before removing the drain screw 121 L place a receptacle under the appliance. o Now, loosen the drain screw (21). Fig. 15. o Let the mixture of water + decalcifier flow out of the boiler. o Tighten the drain screw (21); be certain the screw is securely tightened. o Fill the boiler with water only to rinse, as described above, then empty the boiler. o Repeat the above step 2/3 times before resuming normal operation of the appliance. LEGAL NOTICE These instructions contain essential information for proper operation and accurate maintenance of the appliance as weI! as information on machine functions. • Understanding such information and adhering to the instructions given in this booklet is for hazardless, safe operation and maintenance of the appliance. • Please contact your local retailer or the manufacturer if you require further information or if you encounter problems that you feel have not been adequately covered or explained clearly in these instructions for use. • Please note that the contents of this instructions manual ore not part of any earlier or existing arrangement, legal agreement or contract and that no future arrangement, agreement or contract will alter the substance of the contents in this manual. • All of the manufacturer's obligations are contained in the appliance sale agreement, which also contains the full and exclusive terms and conditions of guarantee. • All the terms of guarantee contained in the sale agreement are neither restricted nor extended by way of these explanations. • These instructions for use contain information protected by copyright. • These instructions for use may not be photocopied or translated into another language without the prior written permiSSion of the Manufacturer. DISPOSAL OF THE APPLIANCE • Appliances no longer in use should be made inoperative. • Disconnect the plug from the socket and cut the electrical cable. • Appliances no longer in use should be sent to on appropriate waste collection centre. 15 - - - - - - - - - - -


![Rii Mini-[2.4GHz] User`s Manual Ver:2.0](http://vs1.manualzilla.com/store/data/005760596_1-38a2c6f0785d9724a30239cfe3cd13aa-150x150.png)