1
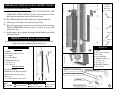
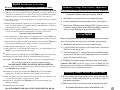
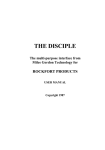
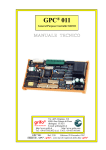
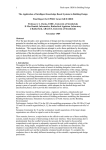
Gaplock GDO
...the automated lock for automated garage doors
Operation and Installation Manual
Automated sectional roll-up garage door lock that, automatically locks
the door every time it’s closed and automatically unlocks it when it’s
opened.
IMPORTANT SAFETY INFORMATION
A Garage Door (Door) is a large, heavy object that moves with the
help of springs under high tension and an electric motor. Since moving
objects, springs under tension and electric motors can cause injuries,
your safety and the safety of others depends on you reading and
following the information in this manual. If you have questions or do
not understand the information presented, email: [email protected].
WARNING: To Prevent Serious Injury or Death
1.
2.
3.
4.
5.
Compatible only with a residential garage door opener (GDO)
equipped with an A/C-motor (not compatible with D/C-motor
equipped GDOs).
Operates using existing GDO remote controls, wall switch/console
and wireless keypad.
Mounts on garage door track inside garage, on either side of a
sectional roll-up garage door. (Requires 2” of clearance between
door track and first obstruction such as a wall/cabinet.)
Gaplock Operating Instructions
Activating the GDO with its remote control, wall switch/console or
wireless keypad simultaneously activates Gaplock to unlock.
Important Emergency Release Instructions
In the event of an emergency there are two (2) procedures required
before each automated garage door equipped with Gaplock can be
manually opened:
1. Release garage door from garage door opener using the
opener’s red emergency release handle/cord.
2. Unlock Gaplock (mounted on garage door track) by shifting red
manual release handle atop of Gaplock away from garage door
track.
Emergency Release Test
Gaplock’s lock bar retracts out of the track during the entire garage
door open/close cycle, then automatically releases back into the track
just above the roller wheel to lock the garage door when closed.
Gaplock
Manual Release Instructions
Locate red manual release lever on top of Gaplock and shift it away
from garage door track to manually unlock garage door.
Mount automated lock on either track, above third wheel of Door.
Keep people clear of opening while Door is moving.
DO NOT allow children to play with the Door operator controls.
DO NOT operate a Door that jams or one that has a broken spring.
DO NOT try to remove, repair or adjust springs or anything to which
Door spring parts are fastened, such as wood blocks, steel brackets,
cables or other like items.
Perform this test (of above procedures) at least once a month.
Caution: DO NOT perform this test while the garage door is
open, as weak or broken springs may allow the door to fall
rapidly, causing injury or death.
1.
2.
3.
4.
5.
Close garage door.
Release garage door from garage door opener.
Release Gaplock mounted on garage door track.
Manually open and close garage door.
Re-engage (reset) both release mechanisms.
2
Drill Hole
Template
Illustration
(not to scale)
IMPORTANT INSTALLATION INSTRUCTIONS
To reduce the risk of injury or death:
1. READ AND FOLLOW ALL SAFETY, INSTALLATION AND
OPERATION INSTRUCTIONS. If you have any questions or do not
understand any instruction, email: [email protected].
Hole 1
2. Have Gaplock installed by a professional in the garage door industry.
3. All wiring is to be employed as required by local codes.
4. Disconnect garage door opener from source of power before installing
Gaplock and DO NOT reconnect opener to source of power until
instructed to do so.
H
5. Install manual release signage label supplied with Gaplock next to GDO
wall button/console.
Gaplock
Hole 2
Manual Release Instructions
Hole 3
Locate red manual release lever atop of Gaplock and shift it away from the
garage door track to manually unlock garage door.
Parts List
Parts List
Parts Shown
A: Gaplock
A: Gaplock
B: Red Manual Release lever
C: Lock Bar
D: Lock Bar Hinge
E: Gaplock GDO Wires (30’)
F: 1/4” Bolts (x2)
G: 1/4” Nuts (x2)
B:
C:
D:
E:
F:
G:
H:
Z:
Parts Not Shown
Gaplock GDO Control Module
Drill Hole Template
Gaplock GDO Control Module (GCM)
Manual Release Signage Label
Staples (x6)
Cover Plate Replacement Screw
Door Sensor Spring
Lock Bar
Lock Bar Hinge
Gaplock PRO Wires (8”)
1/4” Bolt (x2)
1/4” Nut (x2)
Drill Hole Template
Door Track
Wall/Ceiling Outlet
Cover Plate Replacement Screw
GDO Plug
Tools Required For Installation
Drill
1/4” Drill Bit
1 1/4” Hole Saw
Small Round File
7/16” Wrench
Phillips Screwdriver
Wire Cutters
Hammer
Gaplock Wires
4
Gaplock Installation Instructions
Be sure to follow and complete all seventeen (17) steps below
1. UNPLUG GARAGE DOOR OPENER (GDO) FROM WALL/CEILING OUTLET.
2. With garage door closed completely, align supplied drill hole template on the inside of
door track (Z) on either side of door, so that hole (1) is on top and the dark horizontal line
within dotted circle is positioned right above third wheel of door (up from floor).
3. Place a mark on inside of door track through hole (2) of template, then remove template
and open garage door.
4. Realign template inside track so that hole (1) is on top and the mark previously placed on
track is visible through hole (2) in template, then place additional marks onto inside of
track through holes (1 & 3) of template.
5. Drill 1/4" holes at the marks placed through template holes (1 & 3) using a 1/4” drill bit and
a 1 1/4” hole at the mark placed through template hole (2) using a 1 1/4" hole saw.
Deburr holes using a small round file.
6. Insert supplied 1/4” bolt (F) through hole (3) in track and slot at bottom of Gaplock (A),
loosely secure with supplied 1/4” (G) nut so that Gaplock is aligned vertically along track.
7. Insert shorter end of supplied lock bar (C) through hole (2) in track and into Gaplock and
interlock lock bar with lock arm, by sliding slotted end of lock bar up lock arm.
8. Align supplied lock bar hinge (D) onto top of lock bar.
9. Insert supplied 1/4” bolt (F) through lock bar hinge, hole (1) in track and upper slot in
Gaplock , loosely secure with supplied 1/4” nut (G).
Mandatory Garage Door Opener Adjustment
DO NOT proceed without performing this mandatory adjustment.
Failure to complete this adjustment may cause damage to the
garage door and/or garage door opener (GDO).
1. Shift Gaplock ’s red manual release lever to unlocked position.
2. Locate the GDO instruction manual and up-force sensor adjuster.
3. Following the GDO instructions adjust the GDO’s up-force sensor to
a (minimal) setting that shuts off the GDO in the unlikely event a jam
occurs, to avoid damaging the garage door and/or GDO.
Testing Gaplock
Before testing Gaplock make sure mandatory GDO adjustment described
above was completed and garage door is in the fully opened position.
1. Shift Gaplock ’s red manual release lever to locked position.
2. Using the GDO remote control or wall switch/console, activate the
GDO to close the garage door.
11. Tighten the 1/4” nuts and bolts with a 7/16” wrench and flatblade screwdriver.
3. Verify that during step (2) lock arm (B) retracts into Gaplock until the
garage door is fully closed, then automatically releases out into the
garage door track to lock the door.
12. Carefully route Gaplock GDO wires (E) to GDO. Secure in place using supplied staples.
4. If Gaplock did not function properly during test, check system wiring.
10. Check lock bar movement through track and align Gaplock to ensure smooth operation.
Use care not to pinch or cut wires when securing.
DO NOT ROUTE WIRES IN PATH OF MOVING OBJECTS.
13. Remove and discard the center mounting screw securing the wall/ceiling outlet cover
plate (DO NOT remove cover plate).
14. Hold the cover plate in place and plug in the Gaplock GDO control module (GCM),
aligning the top mounting hole with the center mounting hole in cover plate.
15. Insert the supplied cover plate replacement screw through the top mounting hole and
cover plate hole and tighten to secure the control module.
16. Strip back 1/2” of insulation from Gaplock GDO wire ends and connect them to the
terminals on the GCM.
Caution: DO NOT open the garage door if Gaplock did not
function properly during this test without first shifting Gaplock ’s red
manual release lever to unlocked position.
Mounting Manual Release Signage Label
1. Remove backing from supplied manual release signage label and stick
to wall next to GDO wall button/console (use tacks or staples to
permanently mount label).
2. Make certain all users read and understand all information on label.
17. Plug GDO power cord into GCM.
DO NOT OPERATE THE GDO UNTIL INSTRUCTED TO DO SO.
For further information, email: [email protected]
6
Warranty
Limitation of Liability:
The maximum liability of Automated Security Technologies, Inc. (AST) to
Buyer or any person or entity, based on, arising out of or in connection
with the delivery, non-delivery, sale, installation, use or other employment
of Gaplock GDO, whether for personal injury, wrongful death, property
damage, or otherwise, shall in no case exceed the actual cost of
Gaplock GDO . AST SHALL NOT BE LIABLE FOR ANY SPECIAL,
INCIDENTAL, INDIRECT OR CONSEQUENTIAL DAMAGES OR FOR
LOSS OF REVENUE EVEN IF THE DAMAGE, INJURY OR LOSS IS CAUSED
BY THE NEGLIGENCE OR FAULT OF AST.
Limited Warranty:
AST warrants that Gaplock GDO will be free from defects in materials and
workmanship for a period of one (1) year from the date of sale. The
warranty shall not apply to any Gaplock GDO which has been repaired,
altered or modified, or which has been subject to misuse, abuse, neglect,
shipping or environmental damage, vandalism, or acts of God. THE
WARRANTIES CONTAINED HEREIN ARE EXPRESSLY MADE IN LIEU
OF ANY AND ALL OTHER WARRANTIES, EXPRESS OR IMPLIED, AND
THE WARRANTIES OF MERCHANTABILITY AND FITNESS OR A
PARTICULAR PURPOSE ARE EXPRESSLY DISCLAIMED. AST’s
obligations under this warranty shall be limited to, at AST’s option, repair
or replacement of Gaplock GDO, or payment of the cost of having Gaplock GDO
repaired or replaced by AST. Buyer shall pay the cost of returning
Gaplock GDO to AST; AST shall pay the cost of returning the repaired or
replaced Gaplock GDO to Buyer.
Jurisdiction, Governing Law:
Buyer agrees that the exclusive jurisdiction and venue of any action with
respect to Gaplock GDO shall be in the Superior Court of California for the
County of Ventura and Buyer hereby submits to the exclusive jurisdiction and
venue of such court for the purpose of any such action. Buyer agrees that the
action shall be governed by California law.
Gaplock GDO
Automated Security Technologies, Inc
2470 Stearn St. #249, Simi Valley, CA 93063
astlocks.com
7