1
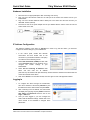
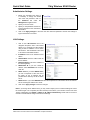
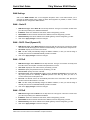
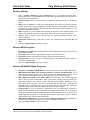
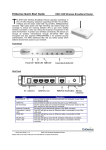
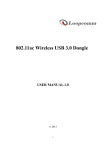
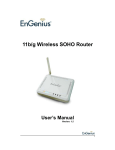
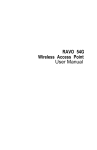
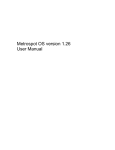
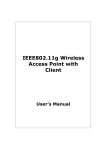
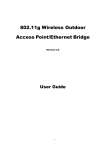
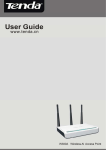
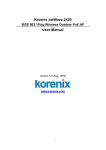
Quick Start Guide
11b/g Wireless SOHO Router
T
he 11b/g Wireless SOHO Router operates seamlessly in
the 2.4 GHz frequency spectrum supporting the 802.11b
(2.4GHz, 11Mbps) and the newer, faster 802.11g
(2.4GHz, 54Mbpswireless standard. High output power and
high sensitivity can extend range and coverage to reduce the
roaming between APs to get more stability wireless connection.
It also can reduce the expense of equipment in the same
environment. To protect your wireless connectivity, this device
can encrypt all wireless transmissions through 64/128-bit WEP
data encryption and also supports WPA2/WPA/802.1x for
powerful security authentication. The MAC addresses filter lets
you select exactly which stations should have access to your
network.
Label
LAN Ports (1 – 4)
WAN Port
DC Connector
Antenna Connector
Connection / Activity
LED
WAN LED
WLAN LED
Power LED
Quick Start Guide v.1.1
Description
Use an Ethernet cable to connect each port to a computer on your Local
Area Network (LAN).
Use an Ethernet cable to connect this port to your WAN router.
Use the power cable and connect the adapter to the power socket on the
wall, and the DC inlet into the DC connector.
Connect the omni-directional antenna to the SMA connector.
This LED will light up once an Ethernet cable is connected to one of the
LAN ports.
This LED will light up once an Ethernet cable is connected to WAN
(Internet) port.
This LED will light up once the RF (wireless LAN) feature is enabled
This LED will light up once the power cable is connected to the DC
connector.
11b/g Wireless SOHO Router
Please refer to the User’s Manual in the CD-ROM for complete instructions.
1
Quick Start Guide
11b/g Wireless SOHO Router
Hardware Installation
1.
2.
3.
4.
Place the unit in an appropriate place after conducting a site survey.
Plug one end of the Ethernet cable into the LAN port of the device and another end into your
PC/Notebook.
Plug one end of another Ethernet cable to WAN port of the device and the other end into you
cable/DSL modem (Internet)
Insert the DC-inlet of the power adapter into the port labeled “DC-IN” and the other end into the
power socket on the wall.
IP Address Configuration
The default IP address of the device is 192.168.1.1 In order to log into this device, you must first
configure the TCP/IP settings of your PC/Notebook.
1.
2.
3.
4.
In the control panel, double click Network
Connections and then double click on the
connection of your Network Interface Card (NIC).
You will then see the following screen.
Select Internet Protocol (TCP/IP) and then click
on the Properties button. This will allow you to
configure the TCP/IP settings of your
PC/Notebook.
Select Use the following IP Address radio
button and then enter the IP address
(192.168.1.21) and subnet mask (255.255.255.0). Ensure that the IP address and subnet mask are
on the same subnet as the device.
Click on the OK button to close this window, and once again to close LAN properties window.
Logging In
1.
2.
3.
To configure the device through the web-browser,
enter the IP address of the device (192.168.1.1) into
the address bar of the web-browser and press Enter.
After connecting to the IP address, the web-browser
will display the login page. Specify admin for both the
User Name and Password and then click on the
Login or OK button.
Once you have logged in, you man configure the
WAN, LAN and Wireless settings. Please refer to the
user’s manual in the CD-ROM to configure these
parameters.
Quick Start Guide v.1.1
11b/g Wireless SOHO Router
Please refer to the User’s Manual in the CD-ROM for complete instructions.
2
Quick Start Guide
11b/g Wireless SOHO Router
Administrator Settings
1.
2.
3.
4.
Before you commission the device it
is necessary to change the default
user name and password. Click on
the Password link under the
Management navigation menu.
Specify a new user name.
Specify a new password and then retype the password in the next field for
confirmation.
Click on the Apply Changes to save the new user name and password. Use the new settings to
log into the device in the future.
LAN Settings
1.
2.
3.
4.
5.
6.
7.
8.
Click on the LAN Interface link on the
navigation drop-down menu. This feature
allows you to configure the LAN interface
using a static IP address or as a DHCP
server/client. This IP address is also used
to access the web-based interface.
IP Address: Enter an IP address for this
device.
Subnet Mask: Enter the subnet mask for
this IP address.
Default Gateway: Enter the IP address of
the default gateway.
DHCP-Static IP: If you use a Static IP
address, select Disabled from the dropdown list.
DHCP Client: If you select DHCP Client,
you are not required to enter the rest of
the fields, as the IP address will be
provided to the device by the AP or DHCP
server
DHCP Server: If you select DHCP Server from the drop-down list. This device will act as a DHCP
server and assign IP address to it clients.
Click on the Apply Changes to save the changes.
Note: If you change the IP address here, you may need to adjust your PC’s network settings to access
the network again. The computers (and other devices) connected to your LAN also need to have their
TCP/IP configuration set to DHCP or Obtain an IP address automatically. Please refer to the user’s
manual in the CD-ROM to configure the advanced settings.
Quick Start Guide v.1.1
11b/g Wireless SOHO Router
Please refer to the User’s Manual in the CD-ROM for complete instructions.
3
Quick Start Guide
11b/g Wireless SOHO Router
WAN Settings
Click on the WAN Interface link on the navigation drop-down menu. This feature allows you to
configure the WAN interface using a static IP, DHCP Client (dynamic IP), PPPoE, or PPTP. Follow
the steps below to configure the WAN interface.
WAN – Static IP
1.
2.
3.
4.
5.
WAN Access Type: Select Static IP from the drop-down list. This type of connection is used when
your ISP has provided you a dedicated IP address.
IP Address: Enter an IP address for this device, which is assigned by your ISP.
Subnet Mask: Enter the subnet mask for this IP address, which is assigned by your ISP.
Default Gateway: Enter the IP address of the default gateway, which is assigned by your ISP.
Click on the Apply Changes to save the changes.
WAN – DHCP Client (Dynamic IP)
1.
2.
3.
4.
WAN Access Type: Select DHCP Client from the drop-down list. This type of connection is usually
used when the ISP will supply the IP address and DNS settings. This is also known as Dynamic IP.
Host Name: Specify a host name for this device.
DNS: The ISP usually automatically assigns the DNS IP address, in case you need to assign it
manually then click on the Set DNS Manually and fill in the fields.
Click on the Apply Changes to save the changes.
WAN – PPPoE
1.
2.
3.
4.
5.
6.
7.
8.
WAN Access Type: Select PPPoE from the drop-down list. This type of connection is usually used
for a DSL service and requires a username and password to connect.
User Name: Specify the user name which is provided by your ISP.
Password: Specify the password which is provided by your ISP.
Service Name: Specify the name of the ISP.
Connection Type: Select Continuous (always online), Connect on Demand (connect to the ISP
only when you click on a website), or Manual (connect to the ISP only when you click on a
‘Connect’ button) from the drop-down list.
Idle Time: The PPPoE service can automatically disconnect if the connection is idle. Specify the
number of minutes after between 1 and 100.
DNS: The ISP usually automatically assigns the DNS IP address, in case you need to assign it
manually then click on the Set DNS Manually and fill in the fields.
Click on the Apply Changes to save the changes.
WAN – PPPoE
1.
2.
3.
4.
5.
WAN Access Type: Select PPTP from the drop-down list. This type of connection is used when
your ISP has provided you a dedicated IP address.
IP Address: Enter an IP address for this device, which is assigned by your ISP.
Subnet Mask: Enter the subnet mask for this IP address, which is assigned by your ISP.
Default Gateway: Enter the IP address of the default gateway, which is assigned by your ISP.
Click on the Apply Changes to save the changes.
Quick Start Guide v.1.1
11b/g Wireless SOHO Router
Please refer to the User’s Manual in the CD-ROM for complete instructions.
4
Quick Start Guide
11b/g Wireless SOHO Router
Wireless Settings
1.
2.
3.
4.
5.
6.
7.
Click on the Basic Settings link under the Wireless menu on the navigation drop-down menu.
These options allow you to enable/disable the wireless interface, switch between the 11b/g and 11b
radio band and channel frequency
Wireless Interface: Place a check in this box to disable the wireless interface, it is enabled by
default.
Band: Select the IEEE 802.11 mode from the drop-down list. For example, if you are sure that the
wireless network will be using only IEEE 802.11g clients, then it is recommended to select 802.11g
only instead of 2.4 GHz B+G which will reduce the performance of the wireless network. You may
also select 2.4GHz B or 2.4GHz G
SSID: The SSID is a unique named shared amongst all the points of the wireless network. The
SSID must be identical on all points of the wireless network and cannot exceed 32 characters.
Channel: Select a channel from the drop-down list. The channels available are based on the
country’s regulation.
Show Active Clients: Click on this button to view a list of clients that are associated with this
device.
Click on the Apply Changes to save the changes.
Wireless WEP Encryption
1.
2.
3.
4.
5.
Encryption: Select WEP from the drop-down list in order to enable WEP security and then click on
the Set WEP key button.
Key Length: Select a 64-bit or 128-bit WEP key length from the drop-down list.
Key Format: Select a key format such as HEX or ASCII from the drop-down list.
Encryption Key: You may use up to four different keys for four different networks. Select the
current key that will be used.
Click on the Apply Changes to save the changes.
Wireless WPA/WPA2-Mixed Encryption
1.
2.
3.
4.
5.
6.
Encryption: Select WPA or WPA2-Mixed from the drop-down list in order to enable WPA security.
WPA Authentication Mode: Select Enterprise (Radius) or Personal (Pre-Shared Key). If you
select Enterprise (radius) then the pass key is located on the RADIUS server, however, if you
select Personal (Pre-Shared Key) then you may assign a key on this configuration page.
WPA / WPA2 Cipher Suite: Select TKIP or AES as the cipher suite. The encryption algorithm
used to secure the data communication. TKIP (Temporal Key Integrity Protocol) provides perpacket key generation and is based on WEP. AES (Advanced Encryption Standard) is a very
secure block based encryption. Note that, if the bridge uses the AES option, the bridge can
associate with the access point only if the access point is also set to use only AES. The device
negotiates the cipher type with the access point, and uses AES when available.
Pre-Shared Key: The key is entered as a pass-phrase of up to 63 alphanumeric characters in
ASCII (American Standard Code for Information Interchange) format at both ends of the wireless
connection. It cannot be shorter than eight characters, although for proper security it needs to be of
ample length and should not be a commonly known phrase. This phrase is used to generate
session keys that are unique for each wireless client.
Authentication Radius Sever: If you have selected Enterprise (Radius) as the authentication
type then you must specify the RADIUS port number, IP address, and password.
Click on the Apply Changes to save the changes.
Quick Start Guide v.1.1
11b/g Wireless SOHO Router
Please refer to the User’s Manual in the CD-ROM for complete instructions.
5