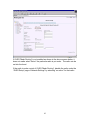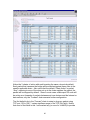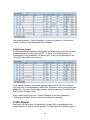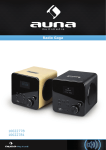
1
Metrospot OS version 1.26
User Manual
Table Of Contents
Login ……………………………………….……………….4
Web Server Login Setup ………………………………….…….5
Main Setup Page…………………….…..……………….….7
Main Menu …..…………….……………………….…………..7
Quick Config …………………..………………………………..10
Unit Setup ………………..………….……………….……...15
General ………………..……………….……………………...15
Motherboard Index ………..……….…………………………...17
Network Settings
……………………………….………...20
Network Interface Configuration …………………….…...…….…20
Bridge Setup …………………………………………………..22
Bridge Parameters ….……………………………………………….24
Spanning Tree Protocol Parameters …..………………………………....25
IGMP ……...…………………………………………………....26
Kernel Routing Table …………………………………..……….28
OLSR Setup ……………...………………………….………...30
Wireless Settings …….……………..…………….………..33
General Settings ………..……………………………………..33
Advance Settings ….……..………………………...……...…..37
Signal Tuning ……………..………….…………………….…39
Bonding …………………………….……………………….40
Setup ………………………………….……………………….40
Mode ……..…………………………….……………………….44
ARCD Setup …………………………….………………….49
General Settings …..……………………….…………………..49
Homing Beacon Setup ..………………………….……………..51
Security …..…………………………….…………………….53
WPA ……………………..…….………………………….…..53
2
…...…………………..….………………………………54
Bridge Layer Security …….…………………….………………56
WEP
Traffic Control …….……………………….………………58
Basic Bridge Layer Filter …….……………………….…………58
Advance Bridge Layer Filter …….……………………….………59
Multicast Stream Control …….……………………….…………62
VLAN Packet Control …….………………………..……………64
Traffic Shaper …….…………………………….……………...64
Service Definitions …….……………….……….……………...65
Service Level Agreements …….………………………………...68
Port SLA Binding …….……………...………….………………71
SNMP Agent …………………….……….………………....73
Monitor
…………………………….……………………….77
General …………………………...………….……………….77
Radios …………………………….……..…………..……….77
Topology .…………………………….……………..………….78
FAQ …….……………………………….…….………………81
3
Login
A Metrospot OS node can be accessed via HTTPS, an encrypted Secure Socket
Layer HTTP to provide reasonable protection against eavesdroppers. The
default IP address of the Metrospot OS node is 192.168.11.1 for single board
units and 192.168.11.1 and 192.168.11.2 for dual board units. To access the
node, first power it up and connect a PC to it either through the node’s ethernet
port or one of it’s 802.11 radios with default SSID “Metrospot” followed by a
number. Then bring up a web browser on the PC. Internet Explorer version 6 or
higher, Mozilla, or any browser that correctly supports Javascript and dynamic
HTML tables may be used. Make sure the PC’s IP address is in the
192.168.11.0 subnet and enter “https://192.168.11.1” (or alternatively
“https://192.168.11.2” to reach the other motherboard for HE series unit) in the
web browser’s URL text box to login to the node. The following login page will
appear upon successful connection to the node:
4
Use the default user name “admin” and password “xrftech” for the login. Upon a
successful login, the “Main” web page will present some details about the
Metrospot OS node.
Web Server Login Setup
The default web server user “admin” login ID and password should be changed
upon successful login to secure the node under configuration. Notice the
expandable configuration menu tree on the left of the page. Expand the
configuration tree by clicking the Board ID icon to reveal the other configuration
web pages:
The above screen capture also presents some other alternatives for login setup.
By default a “guess” user profile have been created but no access permission
has been granted so the “guess” user will not be able to access the Metrospot
OS web interface. To edit the permissions of the “guess” user, click the “guess”
user link. Alternatively, a new user can be created by selecting the “Add new
user” link.
Change the default “admin” password and/or user ID by selecting the “admin”
link.
5
Reconfigure the user ID and password fields. The above screen capture also
allows the “admin” user to change the Metrospot OS web server access rights.
For the “admin” user, it is best to leave all the fields checked (especially the
“Login Management” box) and simply change the username and password.
Hitting the “Save Changes” button will activate the change immediately so keep
note of the newly configured username and password.
6
Main Setup Page
The “Main” Page presents general information about the Metrospot OS node and
also some setup options for the node under configuration. It is the first page
presented upon a successful login. It can also be accessed by selecting the
“Main” tab in the menu tree on the left-hand side of the web interface.
Main Menu Tab
The above screen capture is a sample “Main” page taken from an Xrftech HE
series unit. The “Model” field shows “HE Series” to indicate this particular detail.
For M4, M2 or other single board Xrftech M Series unit, the “Model” field will
show “M Series”. The second field “Number of Radios” shows the number of
operational radios on the motherboard. In the above screen, 5 radios are shown
to be operational on the motherboard. If the “Number of Radios” shown on the
“Main” page is less than the number of radios present on the particular
motherboard, one or more radios are not working correctly on the board. The
two most likely reasons are that the radios are not slotted properly on the pci
slots or the radios cards themselves are not working. Contact your local vendor
for a resolution. The “Metrospot OS Version” field shows the version of the
Metrospot OS running on this board, in this case version 1.26. The “Linux Kernel
7
Version” shows the Linux Kernel and the Board ID shows the ID name of this
node, which can be configured on the “Unit” page detailed below.
Also notice the buttons on the “Main Page”.
Activate All Changes
“Activate All Changes” is used to activate all configurations that have been
committed or saved in persistent storage on the board. When changes are
committed via the “Commit” button present on various Metrospot OS
configuration web pages, the changes made are saved into the persistent
storage but they are not activated yet to prevent any potential network changes
from disrupting the web configuration session before all necessary configurations
are completed. Push the “Activate All Changes” button on the “Main” page to
execute all the configurations made the board. Please keep in mind that these
include all network settings so the system will timeout for about 1 mintue when
this button is pushed as the system resets all the settings.
Upon pushing the “Activate All Changes” button, a 10-minute countdown display
will also appear (if not displayed already) on top of the left hand corner to signify
that the administrator has a limited time to confirm all the changes just activated
before the system reverts to a previously saved up configuration or the factory
default settings if there is no previous backup. The countdown reversion is
instituted to prevent any errant configuration from rendering the node locally and
remotely inaccessible.
8
If the IP address of the board has been changed, please make sure to reset the
PC’s IP address to the same subnet as that of the Metrospot OS node so the PC
can continue accessing the node after all the changes on the node kicks it.
Please log back into the “Main” page and push the “Confirm Changes” button to
stop the countdown clock.
Again, if for some reason the changes just activated cause the system to
loose connection or break networking and the “Confirm Changes” button
cannot be pushed in time, the system will revert to the last backed up
configurations. If no backup settings were made, the system will revert to
system default factory settings (IP address 192.168.11.1).
Reboot System
The “Reboot System” button cause the system to do a software reboot.
Restore Factory Settings
The “Restore Factory Settings” button resets all configuration to factory defaults.
Use this “button” to reset to factory defaults. Please keep in mind that this
means that IP address will revert back to 192.168.11.1 so make sure that subnet
is accessible from the PC for further configuration.
9
Backup Current Settings
The “Backup Current Settings” button backs up all configured settings into a
persistent backup storage, overwriting any previous backup. The rule of thumb
is to make a backup for the settings that have been well tested to work so they
can be restored via “Restore Backup Settings” button or countdown reversion if
any new changes were to break the network or system settings..
Restore Backup Settings
The “Restore Backup Settings” button restores any previously backed up
configuration. This button will only appear on the page if there is a previously
saved set of configurations to restore.
Browse and Update Firmware File
Metrospot OS firmware can be updated via the web interface. To update the
Metrospot OS firmware, first download the latest version of the firmware from the
local vendor into a directory on the PC. Since different firmwares are available
for different CPUs and different boards, please make sure the firmware
downloaded matches the CPU and board by checking the “Main” page before
proceeding further.
Then push the “Browse” button on the web interface to select the firmware from a
directory on the PC and then “Update Firmware File” to upload the firmware into
the board. A message should appear on the “Main” web page showing the
outcome of the update. If the upload is successful, wait for about 30 seconds
and then push the “Reboot” button to reboot the system. Even though most
services are restarted on a successful firmware upload, “Rebooting” the system
ensures that certain updated kernel drivers and kernel itself (which cannot be
reloaded without a reboot ) are restarted.
Quick Config
The “Quick Config” page allows for quick and easy configuration of the boards IP
address and subnet mask, the board ID name, the type of traffic protocol to and
also the number of radios on the board to use as Access Points to serve end
user machines such as laptops and other WIFI enables devices.
The “Quick Config” page should be used as a starting point for complex
configurations since changes made on this page will effect radio and
network settings that may have already been configured beforehand.
10
Board ID
The Metropspot OS can be configured with an optional board ID to make
identification on the web page easier. The “Board ID” if configured and
committed will appear on top of each web page. Since a Metrospot OS unit can
be made up of more than 1 board, select a name that is fitting. In this case, the
name “tower 1-left slot” will be chosen for this particular board on the HE series
unit to signify that this board under configuration fits into the left hand slot of
tower 1 HE unit. For an M Series unit, since there is typically only 1 board in the
unit, the “Board ID” can be just a general label say “tower 1”.
IP Address
The “IP Address” and “Subnet Mask” fields allows for the IP address and subnet
mask of the board to be set in one easy step, an alternatively to the setup
presented in the “Network Settings” page.
Traffic Protocol
The “Traffic Protocol” field allows for the selection of either “Client Bridging” or
“Mesh Routing” as the traffic protocol of choice to run on the network.
11
Client Bridging
Bridging creates a network where each node is layer-2 bridged together,
meaning all nodes unless filtered will hear broadcast traffic. When a bridge
receives a broadcast from one interface, it will forward the frame to all interfaces
except the one from which it came. Client Bridging refers to a layer 2 network
consisting of Master-Managed mode radio pairs, along with Ethernet ports
forming the bridge. Unlike a lot of vendors, Metrospot OS does not use a layer 2
NAT or proxy ARP to bridge traffic originating from or destined for devices behind
radios running in Managed mode, which traditionally uses 3-address header
frame. Instead, Metrospot OS uses 802.11 4-address headers on Managed
mode radios for devices behind these radios to ensure that the original source
MAC address of the layer 2 packets are preserved across multiple hops so that
customer access control and load balancing applications can be set to run on
layer 2 MAC address if needed. Metrospot OS Master mode radios however
accepts and transmit using both 3 and 4 address 802.11 frames to ensure that
standard WIFI enabled laptops and other customer devices work with all
Metrospot OS Master mode radios.
It is recommended that administrators wishing to setup radios running in Ad-hoc
mode avoid bridging since bridging in general does not handle multi-radio-tomulti-radio associations well. Use “Mesh Routing” instead if complex Ad-hoc
multi-radio-to-multi-radio associations are needed.
Mesh Routing
Metrospot OS also allows for a routed network to be used instead of a bridged
one. In “Mesh Routing”, dynamic routes are set up between multiple nodes to
ensure that data packets will get from one device to another until it reaches a
given destination. The radios can either run in Ad-hoc mode to form multi-radioto-multi-radio associations or Master-Managed mode to form radio-to-radio or
radio-to-multi-radio associations. If a previously established path were to break,
the dynamic routes can quickly reroute traffic provided a link exist for the reroute.
Aside from dynamic routes, Metrospot OS’s “Mesh Routing” also by default
automatically creates IP tunnels between gateway and non-gateway nodes so
that different nodes and devices bearing the same subnet can be transparently
routed across multiple hops and subnets as if traffic were bridged. This allows
for end-user WIFI enabled devices such as laptops to roam between radios set
up as Access Points on different Metrospot OS nodes without having to install
special applications or change out the devices IP address and default gateway
while roaming. See the “Board Operation Mode” section below for in depth
explanation of gateway and non-gateway modes.
Number of Access Points
The “Number of Access Points” allows for quick configuration of the number of
radios to use as Access Point to serve end user WIFI enabled devices. This
number dictates how many radios on board will serve as Access Points with the
12
count starting from last radio to first radio. For example, if the number of radios
present on board is 5 and “2 radios” is selected in the “Number of Access Points”
selection box, then the last 2 radios (in this case ath4 and ath3) on the board will
be set up to run Master mode with SSID of “Metrospot” by default. The first 3
radios (ath0, ath1 and ath2) will run as backhaul radios to ferry user traffic
between nodes to and the Access Point radios.
All these default configuration can of course be changed or fine tuned in
“Network Settings” and “Wireless Settings” web pages.
Board Operation Mode
A board can operate in one of 3 modes: Gateway, Repeater, or End Unit.
Setting Gateway mode instructs Metrospot OS that the board itself has a physical
link to the routers or other “Gateway” devices that provide the connection to the
Internet and other data services. The link is typically the 10/100M or Gigabit
Ethernet port on the board. Setting “Gateway” mode also resets all backhaul
(non Access Point) radios on the board to run in Master mode if “Client Bridging”
Traffic Protocol is selected or Ad-hoc modes if “Mesh Routing” is selected.
Setting “Repeater” mode instructs Metrospot OS that the board is to act as a
repeater between “Gateway” and “End User” mode. The Ethernet ports of the
nodes acting as “Repeaters” are typically not connected to gateway routers.
They however can be used to provide a connection to gateway routers for a
Local Area Network to access the Internet and other data services. Setting
“Repeater” mode with “Client Bridging” Traffic mode also toggles non-Access
Point backhaul radio operating mode. The first backhaul radio will run in
Managed mode, the second backhaul radio in Master mode, the third backhaul
radio in Managed mode, and so forth for “Client Bridging” Traffic protocol. If
“Mesh Routing” Traffic protocol is selected, then all backhaul (non Access Points)
radios will run in Ad-hoc mode.
Setting “End Unit” mode instructs Metrospot OS that the board is to act as a last
hop node serving end user WIFI enabled devices. Like in “Repeater” mode, the
Ethernet ports of these nodes are typically not connected to gateway routers but
can be used to provide a connection to gateway routers for a Local Area Network
to access the Internet and other data services. Setting “End Unit” mode with
“Client Bridging” Traffic sets up all non-Access Point backhaul radios to run in
Managed mode. If “Mesh Routing” Traffic protocol is selected, then all backhaul
radios will run in Ad-hoc mode.
All these default configuration can of course be changed or fine tuned in
“Network Settings” and “Wireless Settings” web pages.
Push the “Commit Changes” button to save the changes made on this page to
persistent storage.
13
Notice the message in red appearing after the changes have been committed to
prompt for the administrator to “Activate All Changes” or “Reboot System” on the
“Main” page in order to activate the changes. If there are other configurations to
be set, this action can be postponed until all changes are finished.
Also Notice on subsequent web page refresh, the “Board ID” if configured will
appear on the header label of each web page. In the example, the board ID is
“first tower”.
14
Unit Setup
A Metrospot OS unit may consist of 1 or more individual motherboards housed in
a single encasement. For the M Series model, each unit will contain 1
motherboard. For the HE Series model, each unit typically contains 2
motherboards. Information pertaining to each unit such as GPS coordinates and
number of motherboards per unit, as well as “Unit Name” and a brief description
of the unit can be entered in the “Unit Settings” page. All the configurations on
the unit page are optional and not required for wireless radios to work properly.
The GPS coordinates however can be used to draw topology maps to show
linkage between Metrospot OS nodes running in “Mesh Routing” mode to
facilitate management of individual Metrospot OS nodes. To configure the unit
page, click the “Unit Settings” page icon on the left-hand menu tree.
General
Notice the “Number of Motherboards” text box and the “Motherboard Index”
menu tab in the above picture. The text box and menu tab will show up on the
“Unit Settings” page for HE series units and not for M Series units (since M
Series units will only have 1 motherboard per unit). If the HE Series unit consists
of more than 1 motherboard, the unit page should have been pre-configured to
the correct number of motherboards and each motherboard pre-configured with
15
the different IP address starting with 192.168.11.1 for the first motherboard,
192.168.11.2 for the second, and so forth. If the “Number of Motherboards” is
not correct, follow the instructions below to configure the unit correctly.
Unit Name
The “Unit Name” text box allows for a name to be configured for a unit. In this
particular example, “tower 1” will be used as the name of the unit.
Notes
The “Notes” text box allows for a brief description of the particular unit or board in
the unit to be configured.
Coordinates Input Method
These 2 radio boxes allow for the selection of longitude and latitude coordinates
input method for the unit. Selecting “GPS Serial Port Receiver” instructs
Metrospot OS to read the coordinates off a GPS receiver connected via a serial
port. Metrospot OS currently only reads NMEA 0183 format so please make
sure the format output is correct. With this selection, the “GPS Receiver Serial
Baud Rate” will also have to be configured. Selecting “Manual Entry” instructs
Metrospot OS to use the Latitude and Longitude textbox settings as the
coordinates. Since most of the nodes will most likely be stationary, selecting
“Manual Entry” eliminates the need for a GPS receiver to report the coordinates.
Fixed coordinates can be used. This entry is optional and can be left as is
GPS Receiver Serial Baud Rate
This text box works in conjunction with the “GPS Serial Port Receiver”. Typically
serial port rate for GPS receivers are 4800 but check the receiver datasheet.
The box will be disabled on selection of “Manual Entry” as the input method.
This entry is optional and can be left as is.
Longitude and Latitude
These text boxes allow for coordinates to be entered with “Manual Entry”.
Coordinates can be entered either as a decimal number or in degrees, minutes,
seconds, hemisphere (N,S,E,W) separated by commas. Notice the toggle
button. Pushing the toggle converts between decimal coordinates and degrees,
minutes, seconds, hemisphere. If “GPS Serial Port Receiver” input method is
selected, these two text boxes will be disabled but the coordinates read from the
GPS receiver will be displayed in them. These entries are optional and can be
left blank.
Number of Motherboards
This textbox will only appear on the unit page for HE series units. Enter the
number of motherboards that is housed in the unit under configuration. This
entry is optional and can be left as is.
16
Push the “Commit Changes” button the save the changes on this page to
persistent storage.
Notice the message in red appearing after the changes have been committed to
prompt for the administrator to “Reboot System” on the “Main” page in order to
activate the changes. If there are other configurations to be set, this action can
be postponed until all changes are finished.
Click the “Motherboard Index” tab to finish the configuration for the HE unit.
Motherboard Index
The “Motherboard Index” page should only appear on HE series units. It allows
for the simplification the web-based unit management by allowing for multiple
motherboards in the unit to be controlled through a single web interface.
17
Below is an example of a “Motherboard Index” setup page.
Notice the 2 rows in the table above. Each row corresponds to a motherboard
and the number of rows corresponds to the “Number of Motherboards”
configured in the General tab of the unit page. Each motherboard row can be
mapped to an IP address and a Board ID in the expandable Unit and Board ID
tree on the left hand side of the web page. To continue with this example HE
configuration, the motherboard with index 0 will correspond to the “left slot” of the
unit and will retain the IP address of 192.168.11.1. The keyword “self” is used
instead of 192.168.11.1 on motherboard index 0 to avoid any hard coding of IP
address incase the IP address of this motherboard under configuration is set to
change. For the motherboard index 1, “right slot” is set as the “Board ID” and it
maps to the IP address of 192.168.11.2. Setting the IP address on the
motherboard index page does not change the IP address of the individual
motherboards, it just maps the expandable left hand tree of the Metrospot OS
web interface to the a specific motherboard in the unit if there are multiple
motherboards in a unit to facilitate the display.
18
After “Commit Changes” is pushed and web page refreshed, another expandable
“Board ID” tree will appear the new motherboard. Now if the second
motherboard still bears the default IP of 192.168.11.1, that motherboard’s IP
address will also have to be reconfigured to whatever IP has been selected for it
on the “Motherboard Index” page. See the “Quick Config” section above for
instructions to change IP address.
19
Network Settings
By default, each system is pre-configured to run as a bridge and all network
interfaces (both radios and Ethernet ports) on the system are attached to the
bridge br0, making all network interfaces function like Ethernet ports on a layer 2
Ethernet switch. Click on the “Network Settings” menu tab on the left hand
expandable tree to verify.
Network Interface Configuration
Notice the interface name on the menu tabs along with “Bridge Setup”, “Kernel
Routing Table”, “OLSR Setup” tabs on top of the “Network Settings” page. Each
radio and Ethernet port is identified with a unique name. Radios using Atheros
chipset will typically begin with “ath” followed by a unique slot number to indicate
a specific Atheros radio card on the motherboard. Radios using Conexant
chipset will begin with “cnx” followed by the slot number and radios using Prism
chipsets will begin with “wlan” followed by a slot number. Interface names
beginning with “eth” or “ixp” correspond to Ethernet ports on the unit. The M4 (4
radio M Series model) has 2 Ethernet ports “ixp0” and “ixp1”.
If this node is running “Client Bridging” Traffic Protocol either by default or
design (see the “Quick Config” section for more details about Traffic Protocol)
20
each network interface will be enabled and attached to bridge br0, as illustrated
in the above screen capture. The other settings on the “Network Settings” page
of the radio do not have to be set and can be left blank if the network device is
participating in a bridge. If there are multiple bridges configured on the board,
please select the desired bridge for attachment in the “Attach to Bridge” option
box.
However, if a particular network device is to be routed instead, detached the
network interface from the bridge via the “Attach to Bridge” option box and
configure the “IP Address” and “Netmask” for that device if not already
configured. The “Broadcast” IP address and the “Network IP” address can be left
blank since typically they can be calculated from the IP address and subnet
mask. If “Mesh Routing” has been selected in the “Quick Config” Main Page,
each network interface will be automatically assigned a unique class A private IP
address with a subnet mask of 255.255.255.255 and detached from the bridge,
as shown in the screen capture below.
If the default IP addressing scheming for a routed network is not desirable,
changed them but make sure it is routable by either checking or configuring the
“Kernel Routing Table” and “OLSR Setup” page if dynamic OLSR calculated
routes are to be used.
21
Also, if a particular device is to be routed, the onboard DHCP server can
configured to server IP address out that interface. To enable DHCP server on
that device, select “Yes” and configure the “Routers” textbox with one or more
default gateway IP addresses, Domain Name Servers and Domain name to
assign out that interface. Also configure the range of IP addresses to be
assigned out that interface.
As a rule of thumb, Metrospot OS will enable OLSR routing on backhaul radios if
“Mesh Routing” is selected in the “Quick Config” page and attach Access Point
radios and Ethernet ports to bridge br0 to simplify last hop configuration for end
user WIFI enabled device or Wide/Local Area Network connected via the
Ethernet port of the unit.
Push the “Commit Changes” button to save the changes made on this page to
persistent storage. Notice the message in red appearing after the changes have
been committed to prompt for the administrator to “Activate All Changes” or
“Reboot System” on the “Main” page in order to activate the changes. If there
are other configurations to be set, this action can be postponed until all changes
are finished.
Bridge Setup
The default IP for the unit is 192.168.11.1 and that IP is configured on the bridge
interface of the board. Use the menu top on top of the “Network Settings” page
to access the “Saved Bridge Interface” table. Each row on the table corresponds
to a bridge already configured on the board. Notice the hardware address of the
bridge displayed in the table. The bridge hardware address is formed from the
lowest MAC address of all network interfaces attached to the bridge so if the
bridge hardware address is to used for access control by a third party application,
make sure all “Network Settings” configuration are set before using this hardware
address.
Also keep in mind that as network interfaces are removed or added into the
bridge, the bridge hardware address will most likely change also.
22
To change the IP address of the system while still keeping the default bridge br0
operational, click the “edit” link for the on Bridge Setup page. Keep in mind that
the default IP should be changed if there is more than 1 node operating in the
network to avoid IP conflict with multiple units.
The first section of the “Bridge Setup” page is as follows:
23
IP Address, Netmask and Broadcast Address
To change the IP address of the unit, fill in the “IP Address”, “Netmask” and
“Broadcast Address” (optional) textboxes.
There are various bridge and bridge spanning tree parameters that can be set as
well. They can be left as is to use the default values.
Bridge Parameters
Bridge Ageing Time
Bridge Ageing Time controls the expiration time (in seconds) of an Ethernet MAC
addresses in the bridge Forwarding Database. If an incoming Ethernet frame
bearing the source MAC address has not been “seen” in this amount of time, the
entry will be deleted in the database. This field can be left blank to use the
default of 300 seconds or 5 minutes. Setting it to 0 makes all entries permanent,
which is probably not a good idea unless all nodes, path, and customer PCs are
fixed in location.
Bridge Garbage Collection
Bridge Garbage Collection Interval dictates how often the entire bridge
Forwarding Database is checked for timed-out entries. The default is 4 seconds
and this field can usually be left blank.
24
Spanning Tree Protocol Parameters
If they are multiple redundant paths or loops in the bridge network, be sure to
enable spanning tree protocol also by selecting “Yes” for “Spanning Tree
Protocol” to avoid network loop congestion.
Bridge Priority
The Bridge Priority number is a spanning tree parameter that allows for a certain
node to be designated as the root bridge in a network of many bridged nodes.
The bridge with the lowest priority number will become the root bridge. The
default value is typically 8000 and allowable values range from 0 to 65535(16
bit). For nodes serving as “Gateway” units in a bridged network that provide
many other nodes the link to the Internet or data servers, it is better to have this
unit serve as the root bridge (by setting priority to say 2000) so all radios and
Ethernet ports that are attached to the bridge on that node are put in forwarding
state. This field can be left blank for non-root bridges. If all nodes have equal
priority and they are correctly network together, then the node typically with the
lowest bridge MAC address will become the root bridge.
Bridge Forward Delay
The Bridge Forward Delay is the time in seconds spent by spanning tree protocol
for each learning and listening state a bridge enters before the forwarding state.
The default is 15 seconds and this field can usually be left blank.
Bridge Hello Time
The Bridge Hello Time is another spanning tree protocol parameter that controls
how often Hello message packets are sent out from the root bridge and
designated bridge to communicate topology changes in the bridge network. The
default is 2 seconds and this field should usually be left blank or set to 2.
Bridge Max Age
The Bridge Max Age is a spanning tree protocol parameter to determine how
soon a Hello message is missed before current system’s bridge start the root
bridge takeover procedure. Default is 20 seconds.
The second section of the bridge setup covers IGMP version 2 parameters for
layer 2 multicast streaming control.
25
IGMP Parameters
IGMP Snooping
IGMP Snooping at layer 2 prevents unwanted multicast streams from being
transmitted on Ethernet ports or WIFI radios that are attached to the bridge,
thereby helping to free up bandwidth.
IGMP Querier
In cases where an IGMP router is not present on the network to keep track of
group membership and generate IGMP queries, the bridge can be configured to
send out Group Specific Queries to host ports upon receiving an IGMP leave
message from those ports and intermittent General Queries to each port
participating in multicasting if IGMP Snooping is enabled. Check the "IGMP
Queury" box to activate this feature.
Force IGMP Querier
In cases where multiple nodes are bridge together in the network without any
IGMP router present, the node can be forced to generate its own IGMP queries
for handling its own host ports instead of offloading query generation to the
neighboring mini-dslam with the lowest IP address. Check the "Force IGMP
Query" box below to force the query generation.
Robustness Value
The robustness variable indicates how susceptible the network is to lost packets.
IGMP can recover from robustness variable minus 1 lost IGMP packets. The
robustness variable should be set to a value of 2 or greater. The default
robustness variable value is 2.
26
Query Interval
As for the other fields, the “Query Interval” is the interval between General
Queries sent by the Querier, which may be the current board under configuration
if a) there are no other IGMP routers in the bridge network or b) the node has the
lowest IP address (on its bridge gateway) of all IGMP routers in the LAN or c) the
query function on the mini-dslam if forced.
Query Response Interval
The “Query Response Interval” is the Max Response Time inserted into the
periodic General Queries. It set the upper bound in tenth-second measurements
for a node to respond to a General Queries.
Startup Query Interval
The “Startup Query Interval” is the interval between General Queries sent by a
Querier on startup.
Startup Query Count
The “Startup Query Count” is the number of Queries sent out on startup,
separated by the Startup Query Interval.
Last Member Query Interval
The “Last Member Query Interval” is the Max Response Time inserted into
Group-Specific Queries sent in response to Leave Group messages, and is also
the amount of time between Group-Specific Query messages.
Last Member Query Count
The “Last Member Query Count” is the number of Group-Specific Queries sent
before the router assumes there are no local members.
Please refer to RFC 2234 for the specific details on IGMP v2 multicasting. For
applications where quick responses are vital such as video multicasts, the “Query
Response Interval”, “Last Member Query Interval” and “Last Member Query
Count” should be set low
This last section allows for the configuration of a DHCP server for the bridge. The
onboard DHCP server can configured to server IP address out to all interfaces
connected to the bridge. To enable DHCP server on the bridge, select “Yes” and
configure the “Routers” textbox with one or more default gateway IP addresses,
Domain Name Servers and Domain name to assign out that interface. Also
configure the range of IP addresses to assign out that interface.
Push the “Commit Changes” button the save the changes on this page to
persistent storage. Notice the message after the changes have been committed
to prompt for the administrator to “Activate All Changes” or “Reboot System” on
27
the “Main” page in order to activate the changes. If there are other configurations
to be set, this action can be postponed until all changes are completed.
Kernel Routing Table
The routing table of the board can be manually configured on the “Kernel Routing
Table” page of “Network Settings”. Even if the network is running as a bridge,
sometimes it is necessary for the system to be managed across different subnets
from the Internet. If “Mesh Routing” is used as the Traffic protocol, dynamic
routes will be automatically added and displayed in the routing table. But a
default route to the Internet on “Gateway” nodes running “Mesh Routing” may still
be needed to route traffic out the gateway router.
The kernel routing table can be setup with a default gateway for the unit. To
setup a route, select the “Kernel Routing Table” tab in “Network Settings”.
Then click “add a new route” to reveal the following page:
28
Target
“Target” IP address is the destination IPv4 network address. For a default
gateway configuration, use 0.0.0.0.
Netmask
The “Netmask” signify the IPv4 subnet mask of the destination. For a default
gateway configuration, use 0.0.0.0.
Gateway
The “Gateway” is the IPv4 address of the gateway to use to reach the “Target”.
Device
The “Device” to route packets to the “Target” network can be left as “Determine
by Gateway” to be determined by the kernel routing code or configured manually
to a specific network interface.
Push the “Commit Changes” button the save the changes on this page to
persistent storage. Notice the message appearing after the changes have been
committed to prompt for the administrator to “Activate All Changes” or “Reboot
System” on the “Main” page in order to activate the changes. If there are other
configurations to be set, this action can be postponed until all changes are
completed.
29
OLSR Setup
If routing is preferred instead of a big bridge network, Optimized Link State
Routing(OLSR) can be used to set up dynamic routes to link each node in the
network. OLSR is a proactive routing protocol that exchanges topology
information between its nodes regularly by using multipoint relay (MPR) nodes to
facilitate efficient flooding of control messages in the network, thus allowing for
self-healing and redundancy in the network when there are multiple paths
available for use.
Metrospot OS expands on OLSR functionality by allowing for the automatic
creation of tunnels to bridge 2 or more nodes that maybe be multiple hops or
subnets away. Backhaul radios controlled by OLSR will use the “best” route to
ferry traffic back and forth between gateway nodes and repeater/end user nodes
while Access Point radios serving WIFI enabled devices or Ethernet port serving
a LAN on repeater/end user nodes will be transparently tunneled through the
OLSR mesh backhaul network. By using an automatic tunneling scheme, end
user devices do not have to run the OLSR routing protocol or have special
software installed on their PCs for connection to the Internet or data services.
The factory default traffic protocol use is bridging. To enable OLSR in Metrospot
OS, use the “Quick Config” menu item found on the Main Page to select “Mesh
Routing”. Also select the “Board Operation Mode” as either “Gateway”,
”Repeater” or “End User” and the number of Access Point for the board. Then
push “Commit Changes” on the “Quick Config” page and “Activate All Changes”
or “Reboot System” to activate OLSR if no other changes are needed.
To fine tune OLSR, click on the “OLSR” tab in the “Network Settings” page.
30
Enable OLSRD
“Enable OLSRD” turns on or off the OLSR routing protocol. Unless a bridge
network of nodes is desired, “Yes” should be selected. If “Client Bridging” is
selected as the Traffic Protocol in the “Quick Config” page, OLSR will be
disabled.
Enable Automatic Tunnel Creation
“Enable Automatic Tunnel Creation” turns on or off automatic tunnel creation. If
manual IPv4 subnetting of the network served by an Access Point radio is
desired instead of tunneling, select “No” for “Enable Automatic Tunnel Creation”,
then create a “Network Address” and “Netmask” entry for the subnet to be served
by the Access Point radio under “OLSR HNA4 Routes” table by selecting “Add
Route” under “Action” column. Also make sure the Access Point radio is set with
“No action” in the Network Devices table. The DHCP server can also be
configured on the device specific “Network Settings” page to serve IP addresses
out the device.
Enable GPS Coordinates Messaging
“Enable GPS Coordinates Messaging” allows for longitude and latitude
coordinates to be transmitted to other OLSR nodes that also have this feature
enabled. A topology map can be drawn for these messages to show the location
31
and linkage for these nodes. (See the Topology Map section for more
information)
Network Devices
The “Network Devices” table enable all network interfaces (both radios and
Ethernet) to be put under control of OLSR. The rule of thump is put only
backhaul radios under OLSR and keep Access Point radio out of “Mesh Routing”.
If the “Number of Access Points” selected on the “Quick Config” page is greater
than 0, then changes applied on that page will be reflected in this “OLSR Setup”
page as well so no further configuration is needed.
OLSR HNA4 routes
OLSR HNA4 routes are IPv4 routes that are advertised by a node to other nodes
to inform them that the path to that route goes through this node. If manual IPv4
subnetting of the network served by an Access Point radio is desired instead of
tunneling, add the subnet’s Network address and netmask as an entry in the
table. Multiple entries can be added for each Access Points.
32
Wireless Settings
The “Wireless Settings” tab on the main menu tree contains settings for each
radio on the board. Each radio will have a “General” settings page where
general configuration for the radio can be set, an “Advance” settings page where
radio vendor specific parameters can be fine tuned, and a “Signal” page where
signals for specific radios can be monitored. Selecting the “Wireless Settings”
tab will present the settings page for the first radio “ath0” on board. There will
typically be 4 or 5 radios named “ath0”,”ath1”,”ath2”,”ath3”, “ath4” for each
motherboard in the HE unit with “ath0” as the radio slotted closest to the
motherboard CPU and “ath4” slotted farthest.
For M series with single motherboards, the number of radios ranges from 1 to 4
and have names also starting with the characters “ath” followed by a number.
Each radio present on the board will correspond to a menu tap on the Wireless
Settings page.
General
The tab menu on top of the page will reveal all the radios available of
configuration on the board. Push the tab menu for the specific radio to configure
it. The General page is presented by default for the selected radio.
33
Frequency Mode
The frequency mode for different radios vary depending on whether the radios
support 802.11a, 802.11b, 802.11g or a combination of these modes. The
“Frequency Mode” drop down box will only list the operating modes supported by
the radio under configuration. If the desired frequency for operation for the radio
falls within the 5 GHz range, select 802.11a as the operating mode. If the radio
is to operate on 2.4 GHz range, select either 802.11b or 802.11g as the
operating mode. Please make sure the “Frequency Mode” matches the antenna
to which the radio is connected.
SSID
SSID is the network name that identifies a particular WIFI network for connection.
Operating Mode
There are 3 possible operating modes available for the radio: Master, Managed,
Ad-hoc.
Master mode (also called AP or infrastructure mode) radio operates as an
Access Point radio and manages communications between client radios(running
in Managed Mode) that use the same SSID as the Master mode radio. Master
mode radio authenticates wireless clients, handles channel contention and
packet bridging between it clients. A radio operating in Master mode can have
many clients associated to it but a radio operating in Managed mode can only
associate to 1 Master. As an added precaution, Metrospot OS prevents radios
running managed mode from associating with master radios on the same unit to
prevent short circuit links.
Unlike Infrastructure mode, Ad-hoc allows all wireless devices with the same
SSID and frequency within range of each other to discover and communicate in
peer-to-peer fashion without relying on central access points as a go-between.
Channel
Different radios can operated in different frequency ranges. The “Channel”
dropdown box presents a list of channels available for selection under the
“Frequency Mode” in operation.
Below is an example of list of frequencies for a radio operating in 802.11g
frequency mode. (802.11b will have the same list of frequency for the same
radio)
34
Below is an example of a list of frequencies for a radio operating in 802.11a
frequency mode.
Channel listing might vary from the above example depending on the regulatory
domains and radios supplied in the unit. If the channel listing does not reflect the
“Frequency Mode” selected, push the “Commit and Activate” button on the
bottom of the page to refresh the list. Keep in mind that communication through
the web interface may break if the radio under configuration is also the radio
used for the communication.
Access Point
The “Access Point” field can be left blank in most cases. If the radio is operating
as a Master mode, then the “Access Point” setting will show the BSSID (a 6-byte
address number with each byte separated by a colon) which is typically the
hardware address of the radio itself.
If the radio is to operate in “Managed” mode, then the “Access Point” field will
either show the Access Point BSSID to which this radio is connected or “Not
Associated” if there is no connection to a “Master” radio. The “Access Point”
textbox for a client radio can be configured with the desired BSSID of the specific
Access Point if there are multiple Access Point radios using the same ESSID
within the vicinity.
35
For a radio operating in “Ad-hoc” mode, the Access Point field will reflect the
BSSID of the master ad-hoc node and should not have to be configured.
Bit Rate
The “Bit Rate” field can usually be left as “auto”. But in some cases where the bit
rate negotiated between the master and client radio is either too high, too low, or
widely fluctuating (“Bit Rate”current reading changes each time the web page is
refreshed) this field can be configured to a specific bit rate to force the radio to
transmit non-multicast packets at the desired rate.
Transmit Power
The “Transmit Power” set the transmit power in dBm that the radio will use. It
usually can be left unconfigured but should be configured in some
circumstances. In cases where the 2 radios communicating with each other are
particularly close in distance and the radios used on board are high-powered ,
the transmit power for each radio should be lowered to cut down signal reflection
in order to minimize interference. Lowering the “Transmit Power” on a highpowered radio will often times increase the radio sensitivity (which can be check
by reading the “Noise” field described below).
RTS Threshold
802.11 standard includes the RTS/CTS (Request to Send/Clear to Send) function
to minimize collisions among hidden stations. A client radio will refrain from
sending a data frame until it completes a RTS/CTS handshake with the master
radio. The client radio initiates the process by sending a RTS frame. The access
point receives the RTS and responds with a CTS frame. The client must receive
a CTS frame before sending the data frame. The CTS also contains a time value
that alerts other clients to hold off from accessing the medium while the client
initiating the RTS transmits its data. The RTS/CTS handshaking provides positive
control over the use of the shared medium. Most vendors recommend using a
threshold of around 500. The use of 2347 bytes effectively disables RTS/CTS for
the access point.
The RTS Threshold sets the minimum packet size in bytes for which the radio will
send an RTS using the RTS/CTS handshake. If it is set to “off” of the maximum
packet size, RTS/CTS handshake will be disabled. RTS/CTS handshake is off
by default.
Rule of thump is to enable it on client stations if they are far apart or “hidden”
from each other and only use it if a marked improvement is seen.
Fragment Threshold
The Fragment Threshold sets the maximum fragment size in bytes for all packets
on the radio. Setting the keyword “off” disables fragmentation. Packets are not
fragmented by default.
36
Link Quality, Signal, Noise
The “Signal” reading is a measure of the receive signal read from the radio in
dBm. The “Noise” is a measure of the noise floor signal read from in the radio in
dBm. Typically, a higher “Noise” floor reading will be reported if more “TX
Power” is used on the radio. The Link Quality is a measure of the signal quality
with respect to the noise floor. It is computed as the difference between the
“Signal” reading and the “Noise” floor reading over the “Noise” floor. For a
stable link, the received “Signal” should be at least 25dBm above the noise floor.
Advance Wireless Settings
Next select the “Advance” tab to configure some more settings for the radio. The
“Advance” page may look different depending on which radios are used since
different radios may have different feature sets. The following page is an
example from an Atheros radio supporting Turbo mode.
Client Bridging
In the Metrospot OS implementation, “Client Bridging” allows for a radio
operating in Managed Mode to use 4-address 802.11 frames to bridge traffic
37
originating from another WIFI enabled device but passing through this radio on
the way to the Master radio. For packets originating from the same node under
configuration, 3-address 802.11 frames are used like standard radios running
Managed mode. The setting is enabled by default and only applies to radios
operating in Managed mode. Enabling or disabling it on radios operating in
Master or Ad-hoc mode has no effect.
AP Bridging
“AP Bridging” allows for a radio operating in “Master” mode to reflect incoming
signal from a client to another client connected the to “Master” radio, thus
allowing client-to-client communication indirectly with the “Master” as a repeater
since client cannot directly communicated with each other in Infrastructure
“Operating Mode”.
While the “Master” radio reflects back incoming packets from 1 client that is
destined for another client to enable client-to-client communication, it also
reflects broadcast and multicast packets to facilitate this communication. This
means any constant broadcast or multicast stream origination from client radios
to the master will create interference on both the master and client sending the
packets. Disable this feature on the master radio if it is to receive moderate to
high amount of broadcast and multicast traffic. Enabling or disabling it on radios
operating in Managed or Ad-hoc mode has not effect.
Turbo mode
For radios using Atheros chipset, 2 adjacent frequencies can be bonded to give
twice the bandwidth. To enable turbo mode, select “enabled” in the Saved
Settings “Turbo Mode” text box. Then go back to the wireless settings “General
Page” for the radio and select the desired Turbo mode channel if the radio is
running in master mode. This option will only present itself for Atheros radios
that support Turbo mode.
Rx/Tx Antenna and Diversity
In most cases, since each radio on board will only use 1 antenna, diversity
should be disabled to get the best signal lock. If diversity is used where only 1
antenna is connected, some radios will not lock signal properly. Also in most
cases, the antenna is connected to antenna A during board assembly so pick
antenna A for Rx and Tx antenna if the setting is not configured already. The
default setting for TX/RX antenna is A so these fields should not have to be
configured.
Link Distance
For long distance transmission, various radio parameters such as ACK timeout,
CTS timeout and slot time have to be fine tuned in order to allow for a stable link
to be established. Setting the “Link Distance” automatically adjusts these fields
for the radio. Rule of thumb is if the distance between the link to be established
38
is greater than 150 meters, fill in this field for the radios at both ends of the link
and set the distance to twice the actual distance to account for round trip delays.
Signal
Besides redisplaying the “Signal” and “Link Quality” readings found in the
“General” page, the “Signal” page also prints out the “Bit Rate” settings and
number of received, transmitted and errored packets for the radio. This page
automatically refreshes every 6 seconds and the “Signal” reading can be used to
align the antenna. After the antenna is properly aligned to read the strongest
“Signal”, the signal quality can be further gauged by observing the number of
errored packets on each refresh if the remote radio is pumping out traffic. If the
received or “RX” frame errors jumps significantly (more than 5 per second so say
by 30 or more), then some further adjustment in transmit signal strength or
frequency used may be in order.
It is recommended that the administrator access the system through the
Ethernet port when aligning the antenna and fine tuning the signal in order
to maintain the stable connection to the web interface.
39
Bonding
In cases where more than 1 radio’s worth of bandwidth is needed to connect 2
different nodes, 2 or more radios can be “bonded” together on each node and the
traffic between the 2 nodes load shared between the bonded radios. Typically,
bonding is used in a point-to-point scenario where a bigger pipe is needed or
desired to connected two nodes but bonding can also be used in a point-tomultipoint scenario provided each node downstream has an equal number of
radios bonded as the upstream node and all radios to be bonded on each
downstream node have decent signal quality for connection.
Also multiple bonds can be set up within a single unit. For example, in cases
where there are 4 or more radios on a unit, 2 bonds with 2 radios in each bond
can be set up to backhaul the traffic if the unit is acting as a repeater.
Step 1
To setup bonding, first make sure that each radio to be used in the bond is
connected to a different radio on the remote end of the bond in the “Wireless
Settings” page. One way this can be done is by provisioning a different SSID for
each radio in the bond in order to maintain a unique radio pair link on either end.
The alternative if a single SSID is required for more that 1 radio pair is to
manually configure “Access Point” BSSID on each client radio to lock a specific
master radio upstream.
The bottom line to make radio bonding work is not to have more than 1
radio on 1 node associate with the same radio on the remote node.
Defer the “Activate All Changes” until the sequence of steps to set up the bond is
completed.
40
Step 2
Second, make sure the radios to be bonded are not attached to the bridge if
bridging is used, routed manually if manual routing is used, or under the control
of OLSR is “Mesh Routing” is used. To detach the radio from the bridge, go the
“Network Settings” page for the radio and select “Not Attached” in the “Attach To
Bridge Port” setting for each radio to be added into the bond. To disable manual
routing, blank out the “IP address”, “Netmask”, “Broadcast”, “Network Address”
and “MTU” fields for all the radios to be added into the bond. It is OK for
“0.0.0.0” to be displayed on the “IP Address” field.
Defer the “Activate All Changes” until the sequence of steps to set up the bond is
completed. The following page shows a radio “ath0” not attached to the bridge
and not manually routed (with IP address of 0.0.0.0).
41
If OLSR “Mesh Routing” is not enabled as shown in the above screen below, it
does not matter what “Action” the particular radio is put under. The radio can be
set into the bond.
If the radio is under control of OLSR “Mesh Routing”, disable the radio under the
“OLSR Setup” page of Network Settings” by selecting “no action” for that radio.
42
Step 3
Third, create the bond by opening the “Bonding” web page and selecting create
under “Action” column.
43
There are various modes of boding that are supported:
Balance MAC XOR
This mode uses the source and destination MAC address for each Ethernet
packet (from either the Ethernet or WIFI port) and performs a XOR modulo the
number of radios to determine which network interface to transmit a particular
packet. If the particular network interface calculated is an unassociated radio,
the algorithm chooses the next radio that is associated.
Balance IP XOR
“Balance IP XOR”, unlike traditional MAC XOR algorithm uses IP source and
destination address XOR to determine which radio to output a particular packet.
The algorithm attempts to load balance traffic across all the associated radios in
the bond.
Diffserv Multicast
This particularly algorithm can be used in cases where the focus is delivering
multiple multicast streams. The algorithm transmits different multicast streams on
the first n -1 radios where n is the number of radios and puts non-multicast
stream on the nth radio. Different multicast streams are sent out on different
multicasting radio. Another better alternative is to use “Traffic Control” page to
assign specific multicast streams is be transmitted out specific radios.
44
Active Backup
In Active Backup, 1 and only 1 radio in the bond is used to traffic transmission. If
the radio becomes unassociated, then the next associated radio in the bond will
be used.
Unordered Round-Robin
This bond simply round-robins packets out all radios in the bond. The downside
of this mode is packets tend to arrive out or order at the receiver end and it is left
up the TCP(on end-user machines) to handle the out-of-order packets. TCP
however does not handle the out-of-order packets well in a high-speed high
latency radio link. This mode should be used with long distance links where the
bit rate is generally low and TCP can offset the out-of-order packets to yield a
higher rate for 2 or more radios bonded this way
Ordered Round-Robin
This bond mode also round-robins packets out all radios in the bond. But unlike
the unordered version, it tries to order at the receiver end by putting received
packets in a buffer and try to order the packets in the buffer. This mode gives
better performance for UDP traffic streams like high bandwidth multicast movies
that need ordered packets. But since packets are held in a buffer for a period of
time, it does not help TCP in the long run because it adds latency so only use it
in long distance link for lower rate TCP traffic.
Link Monitoring Frequency
Select the appropriate bonding mode and set the “Link Monitoring Frequency”,
typically 100 (milliseconds). The “Link Monitoring Frequency” is the amount of
time measured in milliseconds that each radio in the bond will be polled. If the
radio reports back that its link is broken, the bonding code will redirect packet
that was destined to transmit out that radio to the next actively linked radio.
After configuring the bond mode and “Link Monitoring Frequency”, push the
“Commit and Confirm Changes” button to create the bond device. A confirmation
prompt will also be issued upon pushing “Commit and Confirm Changes” to
ensure the system network operations still function. Go to the “Main” page and
push the “Confirm Changes” before the countdown clock expires to prevent
Metrospot OS from reverting to a previously saved configuration or factory
default settings if there is no previously saved one.
Next add the radios into the bond by selecting the bond interface menu tab that
should appear after pushing the “Commit Changes” or “Commit and Activate
Changes” button.
45
A similar page should appear.
46
Notice the radios that can be added to the bond interface selected have the
option “Add to bond “ interface name presented under the “Action” column.
Radios that are part of the bridge or part of another bond, will show up as “device
is busy” under the “Action” column. Select the radios to be added in the bond. If
there’s only 1 radio available for bonding, there is really no need to add it to a
bond. After the changes are set in this page, either “Commit Changes” button
to save the settings in this page to persistent storage.
As an aside, interfaces previously added into an existing bond interface can be
deleted by selecting the “delete from bond” interface name option and reattach
back to the bridge or reset with the correct kernel route if the interface is not
longer needed for the bond.
After adding all the radios in the bond, the last step is to go back to the “Network
Settings” page and either attach the bond to the bridge if bridging is to be used or
configure the network settings and kernel route for the bond if routing is to be
used.
47
Repeat the previous steps for setting up more bonding interfaces.
48
ARCD(Automatic Radio Connection Daemon)
In cases where there are many Access Point master radios in the vicinity or
where there are master radios bearing the same SSID, it can be confusing and
tedious for the administrator to manually configure the associations between
master and managed mode radios especially for nodes having multiple radios
operating in managed mode. The Automatic Radio Connection Daemon or
ARCD for short can be used on these nodes to help with the task. ARCD can be
enabled to automatically associate one or more radios operating in managed
(client) mode to master radios on remote nodes that are one or more hops away
from the data content and/or Internet gateway node.
The administrator can pick specific radios running in managed mode to put under
control of ARCD. When a radio configured to run managed mode is put under
ARCDs control, ARCD first runs a site survey for that radio to find out which
remote Access Point master radio is in the vicinity of that radio. It then picks the
remote Access Point master that bearing a SSID that matches a certain criteria
(either a sub-string SSID match or an complete SSID match from an SSID list). If
multiple remote Access Point masters matches, ARCD then selects the master
transmitting the strongest signal and have the radio under its control associate
with it. After association is established between the 2 near and far end radio,
ARCD then listens for homing beacons from that remote master. (Homing
beacons are typically sent from gateway units that have a dedicated link or
physical line such as an Ethernet connection to the data servers or the Internet.
And since Homing Beacons are packaged as broadcast Ethernet packets, they
can traverse multiple hops to reach remote units. Homing Beacon configuration
on the unit will be covered below.) If no Homing Beacon is heard for a set period
of time, ARCD then picks the next stronger remote matching Access Point
master and starts listening again. The process is repeated down the list of
matching Access Point masters until a remote master is found that can transmit
the Homing Beacon the unit. If the list is exhausted, the process starts again
with association to remote matching master with the strongest signal.
If multiple managed mode radios are put under control of ARCD, ARCD applies
the same process as it would for 1 radio for all radios simultaneously, and stops
the process until the unit as a whole is able to receive Homing beacons, either
through one or more radios or Ethernet ports. ARCD however prevents multiple
managed mode radios under its control on a single unit from associating with the
same master radio on a remote unit for more effective and efficient radio usage
Even though ARCD tries to find the strongest remote Access Point master radios
for connection, ARCD should not be used as a substitute for proper antenna
selection and alignment aiming or unit placement. And while it is fairly useful in
a bridge network comprised of Master-Managed mode backhaul associations, its
49
use should be carefully considered in situations where link signals are very weak
or where associations break easily since these events disrupt homing beacon
transmission and reception which cause ARCD to cycle associations
unnecessarily. In an Ad-hoc network doing “Mesh Routing”, there is no need for
ARCD and it should be disabled.
General Settings
To enable ARCD, click the “ARCD Setup” tab on the left hand column of the web
page to bring up the ARCD setup page.
Enable ARCD by selecting the “Yes” radio button.
Next choose the radios to put under ARCDs control in the table.
The “Client Radios Reaction Time” dictates the number of seconds ARCD will
wait after the last homing beacon was heard before it starts the re-association
process again.
Then choose the method ACRD will use to pick eligible remote Master radios for
association with one or more of its client/Managed mode radios. If “Use SSID
Substring Matching On Client Radios” is chosen, ARCD will use the “SSID”
configured for the radio in the “Wireless Settings” page as a sub-string for
50
matching the list of SSIDs obtained from a site survey on that radio. For
example, if the string to match is “Metrospot” and site survey reveals “Metrospot”,
“Metrospot1”, “Metrospot2”, “hyperMetrospot”, “Metro spot” and “someone”,
ARCD will try to associate with sites bearing SSID of “Metrospot”, “Metrospot1”,
“Metrospot2” and “hyperMetrospot”, starting with the site giving the strongest
signal out of the 4 and then working its way to the weakest one until a Home
Beacon frame can be received upon association with one of these sites.
If “Use an SSID From The SSID On Client Radios” is selected, ARCD uses the
list configured in the “SSID List To Use For Client Radios” table. To add an SSID
into the list, select the add action and enter the SSID in the textbox next to the
action. (An SSID previously added can always be deleted by selecting the delete
action.)
Push the “Commit Changes” button to store the changes on this page into
persistent storage. Then select the “Homing Beacon Setup” tab to set up this
node under configuration to either receive or transmit a homing beacon.
Homing Beacon Setup
Homing beacons allow for a unit either directly or indirectly home in on gateway
nodes from which the beacons are sent. Select the “Homing Beacon Setup” tab
to set up the system to either send or receive homing beacons.
51
If the unit is physically connected via it’s Ethernet port to gateways or switches
that connects to the Internet or data servers, select “send” for Homing Beacon if
ARCD is to be used. If the unit does not have a direct cabling to the data or
Internet traffic path but is to act as a last hop unit or repeater unit, select
“Receive” for Homing Beacon. Selecting “Disable” for Homing Beacon will stop
the unit from either receiving or sending Homing Beacons on any of it’s network
interfaces including radios and Ethernet ports. Homing Beacon transmission and
reception is disabled by default.
Next configure the “Homing Beacon Transmit Interval” which is the interval in
number of seconds the node will transmit a homing beacon. This field is only
applicable if “Homing Beacon” is set to “Send”.
Then select the radios to transmit the Homing beacons in the “Radios Available
for Transmitting Homing Beacons” table. This field is only applicable if “Homing
Beacon” is set to “Send”.
Push the “Commit Changes” button to store the changes on this page into
persistent storage. To activate all changes made, push the “Activate All
Changes” button found in the “Main” page but this can be deferred if there are
further configurations still needed.
52
Security
Since the workhorses of each Metrospot OS node are the radios, either serving
as Access Points or Backhaul linkages, security issues of transmitting data
packets over the airwaves should be carefully looked at by the administrator of
the network. To prevent hackers from easily deciphering the data contained in
its radio transmissions, Metrospot OS offers WPA authentication and encryption
scheme for its Access Point radios as well as a 128-bit AES encryption scheme
that can be used on both radios and Ethernet interfaces alike. WEP is also
offered as an alternative to WPA for its radios but its use should be carefully
weighed because of the weak protection. A Metrospot OS radio can be
configured to use either WPA or WEP security but not both at the same time.
Choose the “Security” tab on the left-hand menu tree to reveal a list of option
tabs for security settings configuration.
WPA
The default “Wireless” “WPA” security page is for the first radio “ath0” found on
the node is open by default. This page allows for configuration of the WPA
authentication and encryption schemes for a radio serving as an Access Point to
WIFI enabled devices such as laptops, PDAs, etc that support WPA security.
53
To enable WPA on the selected radio, check the “On” radio box for WPA. Then
choose the Authentication Protocol. Metrospot OS currently supports WPA for
radios operating in Master mode only.
Authentication Protocol
For networks with Remote Authentication Dial-In User Service(RADIUS) support,
the EAP(Extensible Authentication Protocol) option can be selected to off load
authenticaton to a RADIUS server. Otherwise, select the PSK(preshared key)
option for authentication to be performed by the radio under configuration. If the
“PSK and EAP” option is selected, then the decision for deciding which
authentication to use is left up to the authentication device (ie the laptops), not
the Access Point radio.
Encryption Protocol
Metrospot OS currently supports both encryption schemes used in WPA: TKIP
and CCMP. TKIP(Temporal Key Integrity Protocol) replaces WEP with a new
encryption algorithm that is stronger that the WEP but still not as strong as the
CCMP(Counter mode CBC MAC Protocol) security protocol which uses 128-bit
AES block cipher. Because Metrospot OS currently performs all radio
encryption in software, maximum radio throughput may not be reached if WPA
encryption is enabled on boards with slower CPUs. Radio hardware encryption
support is planned for future Metrospot OS release.
PSK Passphrase
If the PSK authentication is selected, enter a passphrase 8 to 63 characters long
in the “PSK Passphrase” text box.
Authentication Server Configuration
The EAP authentication is selected, configure one or more RADIUS server
entries in this table by pushing the “Append” button and then filling in the “Server
IP address”, “Server Secret” and “Server TCP Port” of the RADIUS server.
After all the changes have been set on this page, push the “Commit Changes”
button to set them into persistent storage. If no further configuration is needed,
go to the “Main” page and push the “Activate All Changes” button to activate all
settings for the board.
WEP
Metrospot OS also offers WEP security for its radios. Use of WEP is
discouraged since the protection is easily compromised with tools easily obtained
from the Internet. To enable WEP for a radio, select the “Wireless” menu tab on
the “Security” page, then radio to be configured and the “WEP” menu tab for that
radio.
54
Unlike WPA, Metrospot OS WEP can be used on radios operating in Master,
Managed or Ad-hoc mode.
WEP Security
To enable WEP, select “Turn On” to the “WEP Security” radio box. If WPA has
been previously configured on the radio, please disable it first before enabling
WEP.
WEP Key
Even though WEP only uses 1 fix key for authentication, up to 4 separate keys
can be configured to allow for the administrator to switch keys is needed.
Metrospot OS currently supports 40-bit (also known as 64-bit WEP or WEP40)
and 104-bit (also known as 128-bit WEP or WEP104) key sizes for WEP.
Various formats are accepted for WEP keys. A 40-bit key can be entered as 10
hex characters (such as “0123abcdef”) or a 5-ascii character string (such as
“s:hello”) with prefix “s:” to indicate ascii string input. A 104-bit key can be
entered as 26 hex characters (such as “0123456789abcdef0123456789”) or a
13-ascii character string(such as “s:Any13Characte”) again with prefix “s:” to
indicate ascii string input.
55
Active Key
Use the “Active Key” index to choose the desired key from the 4 possible keys for
WEP authentication.
Push the “Commit Changes” button to save the changes made on this page to
persistent storage. Notice the message in red appearing after the changes have
been committed to prompt for the administrator to “Activate All Changes” or
“Reboot System” on the “Main” page in order to activate the changes. If there
are other configurations to be set, this action can be postponed until all changes
are finished.
Bridge Security
Currently, WPA security is only supported for radios operating in “Master” mode
intended for serving as Access Points for WIFI enabled devices. For the
backhaul radios operating in “Managed” or “Ad-hoc” mode needing strong
security, another option is available. Metrospot OS provide 128-bit AES
encryption for all its network interfaces that are participating in bridging at Layer
2. This includes all radios as well as Ethernet ports and tunnels that may be
attached to the bridge.
Packets that were encrypted at one node have to be decrypted at another node
in order to maintain the original packet integrity for the final destination.
However the encryption-decryption process can take place between nodes that
are several hops apart since the packet headers are not touched in the
encryption/decryption process.
To deploy the “Bridge” encryption scheme, select the “Security” tab on the lefthand tree and then the “Bridge” menu tab. Since in most case there will only be
1 bridge on a given node, the “br0” bridge device will be default and sole page
displayed.
56
Crypt Key
Use a 16 Hex character string as the cryptographic key for the bridge layer
encryption and decryption. This key must be the same for all nodes in the bridge
in order for encryption-decryption process to work.
Encryption on Bridge Tunnels
If “Mesh Routing” is used as the Traffic Protocol and automatic tunneling is also
enabled for the Mesh, the bridge tunnels that are created automatically can be
configured to use encryption/decryption. To enable this feature, check the
“Enable Encryption On All Dynamically Created Bridged Tunnels” checkbox.
Port Encryption Table
Specific network interface that are attached to the bridge can be selected to
perform the bridge layer encryption and decryption. If a particular radio is acting
as an Access Points for various WIFI enabled devices, do no choose that radio
for bridge layer encryption since the WIFI enabled devices at the other end will
not know how to decrypt packets that are transmitted from the radio. Notice that
network interface that are not attached to the bridge are not listed in the above
screen capture.
Push the “Commit Changes” button to save the changes made on this page to
persistent storage. Notice the message in red appearing after the changes have
been committed to prompt for the administrator to “Activate All Changes” or
“Reboot System” on the “Main” page in order to activate the changes. If there
are other configurations to be set, this action can be postponed until all changes
are finished.
57
Traffic Control
Metrospot OS provides 2 basic means for traffic control for packets that flow in
and out of a Metrospot OS enabled node: filtering and traffic shaping. Filtering
allows for unwanted packets flowing into a network device to be dropped while
traffic shaping allows for packets flowing out of a network device to be limited to
a specific bit rate.
If a layer 2 bridge is used as the underlying infrastructure for the backhaul
network, Metrospot OS provides extensive support for traffic filtering at the bridge
layer to prevent unwanted packets originating from end user WIFI enabled
devices from flowing past the Access Point radios.
By default, each network interface on a Metrospot OS enabled unit filters out
NetBIOS, IPX, NetBEUI, Appletalk and AARP packets since these types of
packets are not needed for traffic flow to and from the gateway nodes connecting
the Internet or data servers and thereby contribute to bandwidth waste on the
backhaul. Moreover, some of these protocols use TCP/UDP ports that have
been exploited by hackers for attacks on PCs so disabling these protocols (by
filtering out the TCP/UDP port they use) is a good practice. The filters for these
protocols however can be disabled if there is a need to these types of packets to
be transmitted on the node.
Basic Bridge Layer Filter
The easiest way to disable one or more of these filters is through the “Basic”
Bridge Layer Filter page. Select the “Traffic Control” tab on the left-hand tree
menu, then “Bridge Layer Filter” menu tab and finally the “Basic” menu tab to
reach this page.
58
Choose the protocol to disable or enable by selected the corresponding radio
boxes.
Notice the 2 buttons “Commit Changes” and “Commit and Confirm Changes” on
the bottom of the page. “Commit Changes” button allows for changes made in
this page to be saved in to persistent storage while deferring activation of the
changes until the “Activate All Changes” button is pushed on the “Main” page.
“Commit and Confirm Changes” will save the changes made in this page into
persistent storage and activate them as well while putting up a countdown clock
prompting for a confirmation on the “Main” page. If the “Confirm” button is not
pushed within 10 minutes after the countdown starts, the backup configuration
(or factory default if no backup is available) will be restored to safeguard for any
filters that might break communication to the system.
Advance Bridge Filter
For finer control of how specific packets are handled on a network device
participating in the bridge, Metrospot OS offers complete management of the
rules set employed by the bridge. First, it allows packets to be filtered at 1 of 3
locations or chains of action on the bridge: the INPUT chain (for packets destined
for the bridge itself, on the level of the MAC destination address), OUTPUT chain
(for locally-generated packets) and FORWARD chain (for packets being
forwarded by the bridge which constitutes the majority of the traffic). Second,
Metrospot OS “Advance” bridge filter allows for packets to be filtered based on
input network device, output network device, source MAC address, destination
MAC address, VLAN ID, Ethernet ether type, source IP address/subnet,
destination IP address/subnet, TCP port, UDP port, or a combination of 1 or
more of the above. If a filter rules matches the packet, the filter rule can further
be set up to either drop the packet right away, accept the packet right away or
“continue” on to the next rule. By correctly setting up these filter rules, complex
tasks can be performed. One particularly noteworthy example would be the
control of allowing only specific multicast stream to flow out specific network
interfaces in the bridge instead flooding all interfaces. Another example would be
the control of allowing only specific VLAN tagged Ethernet packets to flow out
specific network interfaces.
To configure the bridge filter rules, select the “Traffic Control” tab on the left-hand
menu tree, then the “Bridge Layer Filer” menu tab and then the “Advance” menu
tab. A similar page should appear with some default rules already set up. These
default rules correspond to the ones set up to filter out unit filters out NetBIOS,
IPX, NetBEUI, Appletalk and AARP packets.
59
Notice the 3 chains of action with each boasting the same rule sets by default.
Each packet that traverses the bridge will be matched against these rules in the
specific applicable chain. Also notice that the default “Chain Action” is packet
“drop”, meaning is none of the rules set up in the chain matches the packet, the
packet will be dropped by default. Since in most cases a Metrospot OS node will
be acting as a forwarder of packets between end user devices and the Internet or
data servers, only the “Forward” chain warrants further configuration.
The first default rule in the “Forward” chain is setup to drop any packet using
TCP port 135 to 139(“:” syntax signifies a range in the TCP Port field). Notice
that most of the fields in rule 1 are marked any (or none for VLANID) to provide
60
as wide as possible match for TCP port field. If a packet does not match the first
rule, it is then matched against the next rule, rule2 .
A note of caution: In order to match parameters found in IP layer or
TCP/UDP layer header, the IPv4 ether type has to be specified in the rule.
As an aside, the reason port 135 to 139 are disabled by default on Metrospot OS
is that these ports are well known ports for DOS(Denial of Service) and other
attacks and are not used in normal traffic destined for Internet or data servers.
Rule 2 simply matches on UDP port 135 to 139.
Rule 3 and 4 match on TCP/UDP port 445 which is used for resource sharing
between Windows-based PCs. Not only is it not useful in a wireless network
infrastructure, allowing the packets to flow into the bridge contributes to network
clutter.
Rule 5 specifies that any IP version 4 packet will be accepted. So for IP version
4 packets that do not match the first 4 rules, they will be accepted on the
“Forward” chain and forwarded to the output network device for transmission.
Any packets that are not IP version 4 will be further matches against the next
rule(s).
Rule 6 specifies that any Ethernet packet with ether type 0xbfff will be accepted.
Ether type 0xbfff corresponds to ARCD homing beacons so if ARCD is not
enabled, this rule may be deleted.
Rule 7 specifies that any Ethernet packet with ether type 0x888e will be
accepted. Ether type 0x888e corresponds to WPA authentication packets so be
careful not to delete this rule or else WPA authentication will not work.
Rule 8 specifies that any Ethernet packet bearing the destination MAC address
01:80:c2:00:00:00 will be accepted. 01:80:c2:00:00:00 is a 802.11D MAC
address typically used for spanning tree protocol bpdus. Notice the mask
“/ff:ff:ff:ff:ff:ff” used in the setting to show that destination (and source) MAC can
be mask to include a range of addresses and not just 1 address per rule. For
rule 8, then mask could have been omitted since it narrows the range down to 1
address.
Rule 9 specifies that any Ethernet packet with ether type “ARP” will be accepted.
Instead of a hex ether type, strings such as “ARP” (ethertype 0x806) or IPv4
(ethertype 0x800).
If after traversing all 9 default rules and no match was found for the packet, then
the default action is taken which in this case is to drop the packet. So for
61
NetBIOS, IPX, NetBEUI, Appletalk and AARP packets, this is then end of the
line.
For those familiar either Linux networking, these rules syntax and chain names
may look familiar. The reason is “Advance” Bridge layer filter page is simply an
interface into Linux Ebtables and the default filtering chains on the bridge
The following 2 sections offer a quick tutorial on setting up port specific multicast
stream and VLAN packet control. Use these 2 sections as a guide for
multicasting and VLAN port control setup on the bridge or as a starting point for
more complex control for other types of traffic.
Multicast Stream Control
The standard behavior of most bridges when it comes to multicast packets is to
flood the packets out all network interfaces attached to the bridge except for the
interface from which the packets came. While Metrospot OS does support IGMP
Snooping on the bridge to prevent flooding of multicast packets out network
interfaces to end user devices that do not want them, there might be occasions
where specific multicast streams need to be forwarded out specific ports
regardless of whether end user device downstream respond with IGMP request
or not. In these cases, IGMP Snooping and Querier function can be turned off
on the bridge and multicast stream control rules can be set up on the “Forward”
chain to handle the multicast streams.
For this example, let’s assume there are 4 multicast streams with destination IPs
239.2.12.40, 239.2.12.41, 239.2.12.42 and 239.2.12.43 coming in from the
Ethernet port eth0. Streams 239.2.12.40 and 239.2.12.41 has to flow out radio
ath0. Streams 239.2.12.42 and 239.2.12.43 has to flow out radio ath1.
First make sure both radios ath0 and ath1 are attached to the bridge not
participating in “Mesh Routing” in the “Network Settings” page. Then turn off
IGMP Snooping and the IGMP Querier function for the bridge in the “Network
Settings” page also. (See the “Network Settings” section for details regarding the
above steps.)
Push the “Append” button in the “Forward” chain table to append a new rule.
Since there are 4 streams to manage, one option is to create 4 new rules, 1 for
each stream. Then append another rule to act as a sink to drop all multicast
stream 239.2.12.0/24 to prevent unwanted flooding out these or other ports.
62
Note that some of the fields such as Destination MAC, Source MAC, VLAN ID,
Source IP, etc are not filled in. Fields not filled in will take on wildcard value
“any” (or “none” for VLAN ID) to provide as wide of a match as possible. A note
of caution: In order to match parameters found in IP layer or TCP/UDP layer
header, the IPv4 ether type has to be specified in the rule.
The next step would be to place the 5 rules just appended above the fifth rule
accepting all IPv4 packets. If the move is not made, these 5 rules will not be
examined since the fifth rule will evaluated to true first and multicast streams will
be forwarded on all ports as in the default case. To place the 5 rules above the
fifth rule, check the fifth to ninth rule and click the “Last” button to drop them
below the 5 newly created rules.
A more efficient alternative to the above rules set is to use subnet mask of “/254”
on the Destination IP address field to shorten the table. The smaller number of
rules a packets have to be matched against, the more CPU resource is available
for other uses.
63
Now either push the “Commit Changes” to save the changes or “Commit and
Confirm” button to save and activate the changes.
VLAN Packet Control
VLAN tagged Ethernet packets are dropped by default since there are not rules
accepting packets of ether type 0x8100. To allow for VLAN packets for an
incoming port to be forwarded to a specific port, a rule can be appended in the
“Forward” chain table to do just that:
In the above “Forward” chain table, packets bearing the VLAN ID 4 coming in
from port eth0 to be forwarded to ath0 will be “Accepted” and not dropped by the
bridge filter. All other VLAN tagged packets will be dropped by the default sink
action of the “Forward” chain.
Again, make sure to push the “Commit Changes” to save the changes or
“Commit and Confirm” button to save and activate the changes.
Traffic Shaper
Metrospot OS also allows for bridged and routed traffic to be shaped so that
certain qualities of service can be granted. For Metrospot OS, different types of
64
traffic to be transmitted on a network interface can be classified and put into
queues of varying priorities and bandwidth guarantees. Specifically, each
network interface can employ up to 4 “Service Level Agreements” (SLA) to
prioritize and traffic shape all the traffic to be transmitted on the interface. Traffic
grouped into a particular SLA can be further prioritized and traffic shaped to fine
tune the bandwidth guarantee for specific traffic types. For cases where traffic
control is needed to limit the amount of end-user bandwidth or to prioritize certain
types of traffic, it is recommended that traffic shaping be enabled on interfaces
such as Access Point radio that directly serve the end user. Enabling traffic
shaping on the nodes or interfaces serving the edge of the network cuts down
the amount of processing each packets has to go through on its way from end
user to data servers and vice versa.
Traffic shaping on all network interfaces is disabled by default in Metrospot OS.
To enable traffic shaping on a particular interface, 3 configuration setups need to
be performed.
Service Definition
A Service Definition gives a label to a single type of traffic that may flow in or our
of a particular network interface. By creating multiple “Service Definitions”,
various types of traffic now have labels and these labels can be used to group
the traffic types into 1 or more SLAs for traffic shaping. The first configuration
setup is then to define the types of traffic to be traffic shaped or “Service
Definitions”. Select the “Traffic Control” page on the left-hand tree, then the
“Traffic Shaper” menu tab and the “Service Definition” menu tab. By default,
there are no “Service Definitions” defined.
65
Push the “Create Default Services” button to automatically create some “Service
Definitions” for common traffic types.
66
If other types of traffic are needed, push the “Append” button to create a “Service
Definition” for each of the other types needed.
The “Service Name” is essential a label for classification rule used to define a
particular type of traffic. In the above screen capture, “http” is the label used to
associate with packets bearing TCP port 80. The “Mask” value is left blank to
indicate that an exact port number match is to be used. (The “Mask” actually
defaults to 0xffff when no mask is used.)
As an aside, if there are various traffic types that are to be grouped into a single
SLA priority and a single “Mask” can be computed for them, that will cut down the
number of “Service Definitions” needed and in term cut down the number of
traffic shaping rules needed for each SLA. For example, if traffic with “TCP/UDP”
ports 40 and 41 are to be grouped into the same SLA can be grouped into a
single label by using value of 40 and mask of 0x3e.
Besides “TCP/UDP Port, “IP Protocol” and “IP TOS” can also be used ” as
classifier for a traffic type. The “IP Protocol” classifier allows for the 8-bit protocol
field in the IP version 4 header to be used for marking the packet type. If IGMP
control messages need to be traffic shaped, use “2” for the value of the “IP
Protocol”. The “IP TOS” field allows for the 8-bit Type of Service field in the IP
version 4 header to be used for the marking.
67
After creating all the needed “Service Definitions”, push the “Commit Changes”
button to save them into persistent storage.
Service Level Agreements
After all the “Service Definitions” have been created, proceed to the “Service
Level Agreement” page to configure 1 or more SLA for use on the network
interface(s) to be traffic shaped. Metrospot OS offers a simple grouping
approach to provisioning SLA for the end users. Instead of provisioning
individual SLA for each individual end user, Metrospot OS allows administrators
to allocated a fix bandwidth or portion of the bandwidth (of a particular network
interface) to an SLA and then assign end users to that SLA. This alleviates the
need to process massive tables of per-user SLAs on a node.
After all the end users have been added to a particular SLA, the “Service
Definitions” can then be added and prioritized in the SLA to define the
guarantees for the different types of traffic and services provided for the end
users in that SLA.
Metrospot OS offers 4 SLAs: Platinum, Gold, Silver and Bronze. The Platinum
SLA has the highest priority of the 4 SLAs, followed by Gold, Silver then Bronze.
To set up an SLA, select the “Service Level Agreements” menu tab then the SLA
of choice.
68
In the above screen shot, Platinum SLA was selected. First start by configuring
the bandwidth considerations for the particular SLA. The bandwidth for the SLA
can be entered either as an absolute number in Kilobits per second or as a
percentage of the overall bandwidth set for the network interface to which the
SLA is tied. Since each SLA can be tied to multiple network interfaces (meaning
each radio or Ethernet port can support multiple SLAs), using a percentagebased calculation instead of an absolute number helps to prevent problems
caused by over and under provisioning in cases where the maximum bandwidth
of each interface varies widely.
To complete the “Service Bandwidth Configuration” table, set the per-port
“Minimum” and “Maximum” rate allowed for packet transmission for this SLA.
The “Minimum Rate” setting should not exceed the “Maximum Rate Setting”.
Since most a single network interface will have to support multiple SLAs, make
sure that the sum of all “Minimum Rates” in the “Service Bandwidth
Configuration” table for all SLAs to be supported by a particular network interface
(radio or Ethernet port) does not exceed the real and configured speed of the
interface. If the sum of the “Minimum Rates” for all SLAs to be supported by say
a standard 802.11 radio exceeds 40Mbps when the maximum bandwidth of the
radio is around 25Mbps, traffic shaping will not work correctly. In the same
token, traffic shaping will not work correctly if the sum exceeds 100 percent if a
percentage-based allocation is used.
Next push the “Add” button SLA “Service Users” table to add the IP addresses of
end user to be provisioned in this SLA.
The screen shot above illustrates the various formats of IP address that can be
accepted. In the first and second entry, a slash netmask format is used to
specific whole subnets instead of individual IP addresses. The first entry allows
for any IP address in the 192.168.50.0 and 192.168.51.0 subnet to be classified
into the SLA. The second entry allows for 62.54.12.0 subnet packets to also be
classified into the SLA. The third entry, without the “/”, signifies that an individual
IP address is to be used. To keep the number of entries and therefore perpacket processing down, use of individual IP entries should be kept to a
minimum. As for the big picture, the SLA “Service Users” table groups many
69
users together in an SLA to allow for traffic shaping to evenly distribute the
bandwidth allocated to this SLA among all these users. If there are few users
online at a particular time, then these users will get more share of the SLA
bandwidth pie. If there are many users, then each will get less share.
After all the “Service Users” have been added, proceed to prioritize and set the
bandwidth limitations for each type of traffic to be transmitted to these users.
Use the “Add” button to add the “Service Definition” for each priority table and the
“Last” button to further reorder the “Service Definitions” in each priority table with
the first entry in each priority bears the highest priority traffic with a single priority
table. Up to 5 priorities tables of “Service Definitions” can be configured per SLA.
Each priority table can be assigned a “Minimum Rate” and “Maximum Rate” limit.
These rates assignment are either made in percentage of Kilobits per second
depending on how the “Service Bandwidth Configuration” is set up. When
assigning these rates, make sure the “Min Rate” is not greater than the “Max
Rate” per priority table, and the sum of the “Min Rates” for all the priority tables in
the SLA does not exceed 100 percent if percentage based allocation is used or
the minimum “Kilobits Per Second” bandwidth of the SLA set in the SLA “Service
Bandwidth Configuration” table.
In the above screen shot, 3 “Service Definitions” have been added to the highest
priority table. HTTP, HTTPS and FTP packets have been assigned to the highest
priority table. Notice also the highest priority table has been set up to attempt to
guarantee 50 percent of total SLA bandwidth for HTTP, HTTPS and FTP packets
bound for users within the SLA. If the SLA “Service Bandwidth Configuration”
table’s “Minimum Rate” is say 50 percent of the overall port bandwidth, then
HTTP, HTTPS and FTP packets will be provisioned with 50 percent of that 50
percent so 25 percent of the overall port bandwidth.
The “Max” Rate is set to 100 percent which translates to the full bandwidth of the
SLA, meaning if free bandwidth is available, HTTP, HTTPS and FTP will be
granted 100 percent of 50 percent so 50 percent of the overall port bandwidth.
The next “High Priority” table shows that telnet traffic is assigned in the table,
getting 10 percent of the bandwidth slotted for this SLA but may get up to 50
percent of the SLA bandwidth if there is bandwidth available. The next table
70
shows that POP3 and SMTP are given less priority in this SLA, only getting 10
percent of the bandwidth allocated to this SLA even if there is extra bandwidth
available.
The above settings provide an example of how to set up the priority tables. More
“Service Definitions” can be assigned to one of the 5 priority tables.
Remember to push the “Commit Changes” button after all the setting up this
page to save all the configurations in this page to persistent storage.
Port SLA Bindings
The final step to setting up traffic control is to bind the SLA(s) configured to the
network interface. If no SLA is bound to an interface, then traffic shaping is not
activated in Metrospot OS even if they have been configured. To set up the
binding, select the “Port SLA Bindings” menu tab in the “Traffic Shaper” menu in
“Traffic Control”.
The above screen capture illustrates a few points.
First, multiple network interfaces or ports can be tied to a particular SLA,
“Platinum” in this case. If an SLA has been setup to serve a group of end users,
71
the SLA should be tied to any network interface acting as Access Point that may
be serving these users. In the above example, “ath3” and “ath4” are used as
Access Points” and therefore bound to various SLAs.
Second, a single network interface can be bound to more that 1 SLA. For
network interfaces acting as Access Points serving various groups of people,
there may be a added to group these groups into different SLAs in order to
provide better quality of service for one group over another.
Third, “Bounded Bandwidth” bitrates are set for network interfaces bound to
SLAs. The “Bounded Bandwidth” field is used to specify the upper bound
bandwidth the network interface can support. For a WIFI radio interface, a
reasonable limit to use is 23000 kbps since most WIFI radios support around 20
to 25 Mbps. The port bit rate set here allows for the SLA allotted bandwidth to
be calculated if a percentage-based setting is used in SLA “Service Bandwidth
Configuration” page.
Remember to push the “Commit Changes” button after all the setting up this
page to save all the configurations in this page to persistent storage. Then
“Activate All Changes” on the “Main” page for the SLAs to take effect on the
bounded network interfaces.
72
SNMP Agent
SNMP is a widely used network monitoring and control protocol. The basic
framework of the protocol revolves around SNMP agent software on network
devices reporting activity and statuses back to the SNMP manager software on
workstations and the manager software sending configuration messages to the
SNMP agent software.
The SNMP data structure that defines each piece of information obtainable or
configurable from the network device is called a MIB (Management Information
Base). Each MIB data structure is identified by a unique OID (Object Identifier)
comprising of a series of numbers that allows for all MIBs to be easily
categorized and correctly processed.
Metropost OS provides an SNMP agent supporting SNMP version 2c and version
3. SNMP version 2c is the de facto version 2 SNMP widely supported by many
network devices. Like its version 1 predecessor, SNMP v2c utilizes clear text
community name for access control which is always a security risk especially in a
wireless network. SNMP v3 attempts to resolve this security risk by
implementing better authentication coupled with message encryption. Metrospot
OS currently supports either MD5 or SHA hashing for authentication and either
DES or AES cipher via the USM (User-Based Security Model) model of SNMP
v3. Unlike the SNMP v3 VACM (View-based Access Control) model which uses
group base access control, USM handles security on a per user basis.
Metrospot OS currently supports various MIB-2 branch classes such as system,
interfaces, at, ip, icmp, tcp and udp to name a few.
To configure the SNMP version to use or manager access control for the SNMP
agent on board, select the “SNMP Agent” tab on the left-hand menu tree. The
default “General” page should appear.
73
User Access Control table
The “User Access Control” table allows for configuration of 1 or more user
access control profiles for accessing the node under configuration.
Action
The “Action” check box allows for creation of new profiles and modification or
deletion of existing profiles.
Community or User Name
The “Community” or “User” indicates either the SNMPv2c or SNMPv3 string
handle for a particular access entry.
Type
The “Type” selection box sets which SNMP version to use for the entry under
configuration. If SNMPv2c is selected, then proceed to choose the “Access”
rights and if needed, fill in the “OID” and “v1/v2c Host” parameter. If SNMPv3 is
chosen, proceed to fill in the “v3 Auth Protocol” and “v3 Auth Passphrase” fields if
authentication is needed. If encryption is also needed, fill in the “v3 Priv
Protocol” and “v3 Priv Passphrase” fields along with the above authentication
parameters. If neither authentication nor encryption is needed, leave the 4 fields
blank.
74
Access
“Access” controls the access rights of the community or user name. There are 2
levels of access: read and read-write.
OID
“OID” controls how much of the MIB tree is allowed for individual community or
user to manage.
SNMP v1/v2c Hosts
“v1/v2c Hosts” signifies the IP address of the manager workstation. If left blank
for an SNMPv2c entry, any manager workstation can access the agent via the
corresponding community string. This parameter is only needed for an SNMPv2c
community entry and can be left blank for SNMPv3 entry.
SNMPv3 Authentication Protocol
“v3 Auth Protocol” specifies the authentication hash protocol to be used with an
SNMPv3 user entry. MD5 or SHA may be used, or the field may be left blank for
an SNMPv3 entry if not authentication and encryption is needed. It can be also
left blank for an SNMPv2c entry.
SNMPv3 Authentication Passphrase
The “v3 Auth Passphrase” specifices the authentication password phrase to use
for the authentication hash chosen for an SNMPv3 entry. The minimum
password phrase length is 8 characters.
SNMPv3 Privacy Protocol
The “v3 Priv Protocol” specifies the encryption protocol to be used for the
SNMPv3 user entry. Either AES or DES encryption may be selected. If no
encryption is needed, select “None”.
SNMPv3 Privacy Passphrase
The “v3 Priv Passphrase” specifies the privacy password phrase to use for the
chosen cipher for an SNMPv3 entry. The minimum password length is 8
characters.
By default, SNMPv3 is enabled on each Metrospot OS node. The default “User”
name, authentication and privacy (encryption passphrase) for both access
control and trap configuration have been blanked out in the above screen capture
but will be visible in the “General” SNMP Agent Setup page on the node.
Trap Configuration Table
The second “Trap Configuration” tables allows for SNMP TRAP version type and
destination to be set up. An SNMP TRAP is a message sent from the agent to
manager workstation signifying the occurrence a particular event (such as a
system reboot) worthwhile of notification. The parameters available for
75
configuration are similar to the “User Access Configuration” table fields except for
the “destination” which sets the IP address of the workstation for notification.
Remember to push the “Commit Changes” button after all the setting up this
page to save all the configurations in this page to persistent storage. Then
“Activate All Changes” on the “Main” page to restart the SNMP agent with the
changes. The other alternative is to use the “Commit and Activate Changes”
button to saved the changes and also activate them after the change.
76
Monitor
The Metrospot OS allows for various system level statistics, per radio
associations and node coordinates to be monitored via the web interface.
System Statistics
Aside from the radio “Signal” monitor in the “Wireless Settings” page, system
level statistics like uptime and cpu load can be viewed to ascertain the health of
any node in the network. To check system level statistics, click the “Monitor” tab
in the left-hand menu tree.
The “System” level page will automatically refresh every 20 seconds and each
refresh will take at least 3 seconds since these statistics have to be calculated
over a period of time for accurate reporting.
Radio Associations
The next menu tab “Radios” allows for radio association to also be reported.
77
The above screen capture shows only 1 client backhaul radio associated to radio
“ath0” operating in master mode. There typically will be more than 1 client radio
associated to a master radio, especially in cases where the radio is serving as an
Access Point. For radios operating in managed mode, there will be only 1
master node listed. For radios serving as ad-hoc mode backhaul, there will most
likely be at least one other ad-hoc radio associated. Select the appropriate radio
in the radio menu tab for the radio to be configured.
Topology
If a Metrospot OS node is configured with a set of latitude and longitude
coordinates(in the “Unit Settings” page), this coordinate can be overlaid on top of
a 2-D map show the location of the unit with respect to the map. To setup the
map overlay, first select “the Monitor” menu tab on the left-hand tree and then the
“Topology” menu tab on the “Monitor” page.
78
Use the “Browse Button” to select the map to be used for upload into the
Metrospot OS node. Take care not to use a map greater than a few hundred
kilobytes in size since the bigger the map, the more persistent storage is need
and the longer the loading time for the “Topology Map” page. Currently only
JPEG files are accepted so please convert the map to JPEG format if the map to
be used is in some other format.
The “Alternative Dimensions” page allows for the map to be display in a
dimension other than the original dimension. For big maps that span more than
the screen resolution of the browser, the display on the page can be shrank by
altering the pixel width and height of the map. Leave these fields blank if the
native map dimensions are to be used. Metrospot OS will calculate the native
dimension and display the map accordingly.
The last set of textboxes allows for the JPEG picture to be precisely mapped to
longitudinal and latitudinal coordinates. “North” specifies the north most latitude
of the map boundary, “South” the southern most boundary latitude, “East” the
eastern most map longitude, and “West” the west most map longitude.
Push the “Commit and Activate” button to upload the map (if one has been
selected via the “Browse Button” and/or set the dimensions and boundaries.
79
If “Mesh Routing” is used with “GPS Coordinates Messaging” option enabled
(which is the default action), coordinates of all nodes in the mesh will be
exchanged and link associations also drawn on top of the map.
Notice that 4 red squares are displayed in the above screen capture. Each red
square represents a node in the “Mesh Routing” network. Association lines are
drawn to show how each node is linked to its neighbors. Aside from showing
topology of the nodes, this page also provides a convenient way to manage all
the nodes in the “Mesh Routing” network. Hovering the mouse cursor over a red
square will prompt for the IP address of the node to be displayed. Clicking on the
IP address dialog box brings up the web interface of that specific node.
80
FAQ
How come I get bad picture quality on my multicast video streams?
In WIFI 802.11 protocol, multicast streams lack error correction and are therefore
very prone to packet lost in environment with a lot of interference. In cases
where there are a considerable number of radios within the vicinity, it is best to
use a radio frequency that is non-overlapping to minimize the interference. Also,
if it can be avoided, do not use channels in the 2.4 GHz unlicensed band since
aside from consumer WIFI Access Points and laptops, other wireless devices
such as cordless phones and Bluetooth headsets also use the 2.4 GHz band
making it less suitable for high speed multicast video streaming. Also try to
minimize the number of hops between the video server and player.
If multiple hops between radios are used for multicast video stream, select the
frequency used on each successive hops carefully. Do not use the same
frequency on adjacent hops and try not to repeat the same channel usage on
nearby hops since amplified signals will propagate a long distance. Even if these
signals are not strong enough to carry significant bit rates, they create noise for
the local radios.
In cases where the frequency band is reasonably clear, then make sure to
optimize the configurations for multicasting. If client-bridging is used to bridge
the multicast stream between a pair of radios, one operating in master and the
other in managed mode, then make sure the video server is located at the
master radio end and the video player is located at the managed radio end.
Also disable the AP bridging setting (via the “Advance” menu in the “Wireless
Settings” page). The reason for these 2 steps is since a master radio by default
retransmits out broadcast and multicast traffic coming from the client radios in
order to bridge multiple client radios together, a signal reflection is created which
leads to interference for multicast video streams.
How come I am seeing a lot of errors in the “Wireless Settings Signal”
page?
A lot of frame errors usually signify that there is an interference problem. Some
tips to help reduce interference and minimize frame errors include using radio
frequencies that are as far apart as possible for all radios in the system. For
example, in the 2.4 GHz range, even though channels 1, 6 and 11 are not
suppose to overlap, the signal skirts might be high enough for high powered or
amplified cards to cause some interference with adjacent non-overlapping
channels such as 1 and 6 or 6 and 11. On a similar note, antennas for radios
within a unit should also be spaced as far apart as possible to reduce cross
interference.
81
Another tip to help reduce interference and errors is to lower the transmit power
of the radios at both the local and remote sites if the radios are very close to
each other (a few meters apart).
82