1
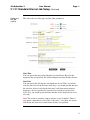
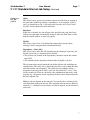
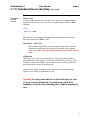
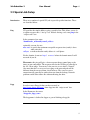
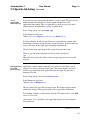
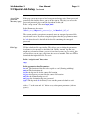
Job Scheduler 2 User Documentation Version 1 July 2009 Job Scheduler 2 User Manual Page 1 Table of Contents 1. Overview................................................................................................................................. 2 1.1 Introduction........................................................................................................................... 2 2. Setting up a Job....................................................................................................................... 3 2.1 Standard Internet Job Setup .................................................................................................. 3 2.2 Special Job Setup .................................................................................................................. 9 3.1 About Job Start Parameters and Logic................................................................................ 13 1 Job Scheduler 2 User Manual Page 2 1. Overview 1.1 Introduction About JS2 Job Scheduler 2 is a system that can run pre-defined tasks on a scheduled basis. Many schedulers are primarily designed to run tasks within the same PC / server / complex in which they are resident. JS2 is designed primarily to run tasks that are on other servers on the internet. There are a few special tasks that are provided with JS2 and these are described in this document. 2 Job Scheduler 2 User Manual Page 3 2. Setting up a Job 2.1 Standard Internet Job Setup Introduction A standard job for JS2 is an internet address (url) that it can access. On the scheduled date and time, the system will access this address for you in the same way as if you were accessing it through a browser. Whatever processing is normally performed by that page when it is accessed ‘live’ from a browser will be performed in response to being accessed by JS2. Accessing the page to modify, delete or add jobs From the menu on the initial JS2 page select “Add/Modify Scheduled Jobs”. This will take you to a screen such as the one shown below. It lists all of your jobs and allows you to modify or delete existing jobs or add new ones. As you will see in further examples, the jobs are color coded to provide you with additional information at a glance. Continued on next page 3 Job Scheduler 2 User Manual Page 4 2.1 2.1 Standard Internet Job Setup Setup, Continued Setting up a new job When you click on the Add a New Job link, you are presented with a screen like the one below. This allows you to specify all of the parameters for the job. Script to run This is the full URL for the page that you wish to run. This gives you the ability to run a single page (only). When you browse the internet, you can click on links to get to the page you want. In JS2 you must specify the specific page that you need to run. Parameters If the program/page requires parameters these can be entered in this box. The parameter string must be formatted in the same way as it would appear on the command line (in the form ?xxxx=yyyy&aaa=bbb). It must start with a “?” and it must have a “&” between parameters. Parameter strings cannot contain any blanks. Job name This can be any name you choose. We suggest that you only use letters, numbers, underscores, dashes or blanks (between words). Each of your job names must be different. Run this script (Frequency) You can currently specify that your script should run on an hourly, daily or weekly basis. You must choose one of the values for the interval between executions. If the job is to run every day, then the frequency would be Daily 1. You could specify a different interval (e.g. every 12 hours) based on your needs. 4 Job Scheduler 2 User Manual Page 5 Continued on next page 5 Job Scheduler 2 User Manual Page 6 2.1 2.1 Standard Internet Job Setup, Continued Setting up a new job (cont’d) This shows the rest of the page (and the other parameters). Start Time You can specify the time of day when this job should start. Based on the frequency that you specified, this will be changed each time that the job runs. Start Date You can specify the date that the job should next be run. Thus, if you don’t want the job to run for the first time until Aug 1, you would put that date into the start date. After it is run for the first time, it will then run on whatever frequency you have specified. If you wanted it to run the day before New Year’s day, you would specify that date and then set the frequency for every 52 weeks. Note: The system is currently setup to run once every 15 minutes. Thus, if you specify a time that isn’t one of the 4 “fire times” every hour, the system will run the job at the closest time before the time you specified. Continued on next page 6 Job Scheduler 2 User Manual Page 7 2.1 2.1 Standard Internet Job Setup, Continued Setting up a new job (cont’d) Order This allows you to specify an execution sequence for jobs that are starting at the same time (without specifying a dependency). As an example, if jobs 2 and 3 are dependent on job 1, you can provide an order of 2 for job 2 and 3 for job 3 to force them to be run in that order. Run Once If this box is checked, the job will run at the specified time (and date) but it will not run again until you manually change it. Once the Start Time is older than the current window, it won’t run (again). Disable This allows you to leave a job defined but temporarily prevent it from running. It won’t run again until you uncheck the box. Dependency – Start After This allows you to make this job dependent on the running of a previous job. For this job to run, two criteria must be satisfied: • The previous job (named in the dependency) must have run in this current run of JS2. • The schedule for the dependent job must make it eligible to be run. The job name must exactly match the one defined for the job (including any capitalization). The safest way to define the two jobs is to give them the same start time and the same frequency. You could also (for example) define a frequency for the first job of daily 1 (once per day) and daily 7 (every 7 days for the second job). There are obviously some combinations that won’t work properly (e.g. a frequency for the dependent job that is more frequent than for the job it depends on). Multiple jobs can depend on the same job. You can also have a chain of jobs, each dependent on the previous one. The dependent job can run in a different location (i.e. a different server) from the one that it depends on (the location is irrelevant). Continued on next page 7 Job Scheduler 2 User Manual Page 8 2.1 2.1 Standard Internet Job Setup, Continued Setting up a new job (cont’d) Return Code A job can return a return code and this can be checked as a requirement for dependent jobs. This has to be issued in a specific format as follows (PHP example): <?PHP … echo "js2_rc=0003"; ?> This must be in the output stream and must be in the format shown above. The return code can be 0000 to 9999. Dependency – Start Next This is similar to the Start After dependency except that it starts the dependent job when this job completes (optionally with a specific return code). This does not currently function (but it will be added soon). Notification This allows you to specify an email address of the person who should be notified when the job completes (and be provided with the job output). This should be a valid email address for yourself or someone who has provided permission for the receipt of such an email. At present, the output is not intended for the limited cell phone message length so such addresses should not be used. Warning: It is not permissible to use this facility for any sort of spam or unsolicited email. Any such usage will lead to immediate removal of the offending job(s) and the banning the user. 8 Job Scheduler 2 User Manual Page 9 2.2 Special Job Setup Introduction There are a number of special JS2 jobs to provide specific functions. These are described below. Ping JS2 provides the simple ability to ping a specified site. This allows you to do a regular response time / “site up” test. Instead of using a url, enter ping in the “script to run” box. In the parameters box enter: ?domain=the_url¬ify=email_address optionally you can also use: max =nn to specify the maximum acceptable response time (notify is done when exceeded) cell=yes to indicate that the notify address is a cell phone For the domain, do not use http://. or www. before the domain name. It will not work if you do. Please note: this ping will give a faster response than a normal ping so the times are not comparable. The response time for the JS2 Ping is generally in the 10 – 30 ms range. You can try it for your site to see what is “normal”. Also note that this is a server-to-server ping so the network path will be different from the one used from a local browser. The server-to-server connection will generally be quicker than one from the desktop. Network problems could affect either one without affecting the other. Dapp In order to run a Dapp job that you have created (at http://www.dapper.net/open/ ) enter dapp into the “script to run” box. In the Parameters box enter: ?dapp=the_dapp_name The dapp name is defined in dapper as part of defining a dapp job. Continued on next page 9 Job Scheduler 2 User Manual Page 10 2.2 Special Job Setup, Continued Access Application Protected Page If you need to access an application that has it’s own signin, JS2 provides two utility functions that allow you to do the signin and then access the application successfully. This isn’t guaranteed to work in every case and it will not work if the application is using a captcha check. In the “script-to-run” box enter login_app In the Parameters box enter: ?id=id_label,user_id&pw=pw_label,user_pw&url=full_url In order to find the id and password boxes on a page that may contain other information, you must specify the labels for the two boxes spelled exactly the same as the ones on the signin page (including capitalization). The url points to the login page for the system that you want to run. The user_pw can be the actual password or it can be specified as *url Where the url provides the address of the encrypted password stored on the user site. Run application Application security routines normally use sessions to verify that a user is passwordlogged in for accesses after the initial login. That means that the session id protected page needs to be passed back to the application after the login. JS2 provides a function to do this. In the “script-to-run” box enter restricted_access In the Parameters box enter: ?url=the_full_url&display=yes The url points to the page that you want to run. The display option controls whether the display of the page should be sent as part of the notification. If everything seemed to work correctly, then the JS2 return code is set to 0000 else it is set to 9999. At this point, it isn’t possible to run a page that requires its own commandline parameters. Continued on next page 10 Job Scheduler 2 User Manual Page 11 2.2 Special Job Setup, Continued Access Unix protected directory / page If the page you want to access has been protected using unix / linux password protection, this facility allows you to do the sign-in. The job(s) to access the password-protected page would be dependent on this job. In the “script-to-run” box enter login_unix In the Parameters box enter: ?id=the_user_id&pw=the_password_or_*url&url=the_full_url The system provides an option to remotely store an encrypted password file on your own server. If you are using that option, then the pw parameter must be *url where the url is the full url for the file containing the encrypted password. File Copy JS2 has a built-in file copy facility. This allows you to define the parameters in advance so it can run as a scheduled job. Unlike “normal” ftp that you might use to download from a server to your local system (or visa versa), this version allows you to copy a file from one server to another. This uses FTP to download then upload the file. To use it: In the “script-to-run” box, enter: copy In the parameters box Parameters: in= url The location of the file to be copied as a url (Starting with http) out=url The destination url in_id= the ftp user id for the source file location in_pw= the ftp user password for the source file location out_id= the destination ftp user id out_pw= the destination ftp user password type= The ftp mode: b for binary. leave out this parm to default to ascii. with a “?” at the start and “&” before every subsequent parameter (with no spaces). Continued on next page 11 Job Scheduler 2 User Manual Page 12 2.2 Special Job Setup, Continued File Copy (cont’d) Considerations A maximum size limitation will be implemented for file copies. Using FTP requires an ID and Password at both ends of the process. If either one or both of the servers is set up for anonymous ftp, then the id can be defined as “anonymous” with whatever password is required by the server (it is often optional to enter one). If you control one or both of the servers, then you could implement a (unix) password on the directory to provide some control rather than using the FTP id and password as the control. Restart should be used automatically so the system should normally overcome any interruptions to the download/upload. 12 Job Scheduler 2 User Manual Page 13 3.1 About Job Start Parameters and Logic Start Time for Jobs The start time that you specify for a job will be used to determine when to start the job in conjunction with the Time Frame Window. The Time Frame Window is a standard system value. The current value is displayed at the end of the Job Details panel for each job. If the start time specified for the job is greater than the start of the “time window” then the job will start. The start of the time window is the current time minus the Time Frame Window value. Thus, if the job is scheduled to start at 1400 and if the Time Frame Window value is 1800 seconds (30 minutes) then the job will start anytime after 1330. This is constrained by the daily start and end time as explained below. Daily Start and Daily End These values provide a hard limit on when the job will be run. Thus, whichever time is later, the Start Time or the Daily Start will be used. The Time Frame Window does not apply to the Daily Start time. If the Daily Start is 1000, the job won’t start before 10:00 AM period. If the Start Time were then specified as 1030, the Time Frame Window would apply to that. With a Time Frame Window of 30 minutes, the job could start anytime between 10:00 and 10:30. The Daily End works in the same way as the Daily Start. It is a hard time and the Time Frame Window does not affect it. Thus, if the Daily End time is 22:00, then the job will not run after that time. What if a job hasn’t run for a while A job might not run because of a dependency that wasn’t satisfied (or you may have disabled it for a while). Once you enable it or the dependency is satisfied, it will run again. The Start Date / Start Time in the system will then be updated to the appropriate date and time based on the frequency that was scheduled for that job. 13