1
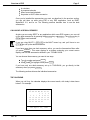
DSM-00176-00 June 1992 OVERVIEW OF ESP The Executive Screen Processor (ESP) is a collection of programming tools which make it easier for you to create attractive, consistent, easy to use screens and reports for your application programs. ESP lets you design your screens and reports without writing any lines of code—you just tell ESP where to put each field, what to call it, and what kind of information it contains. But, ESP is more than a screen design program. It also helps you manage every aspect of screen input and output: accepting user input; making sure it’s valid; interpreting special entries, such as function keys; placing defaults in fields (ESP can calculate defaults based on values in other fields, according to formulas you enter); and much more. On reports, ESP performs category breaks, calculates up to three levels of subtotals and totals, and controls pagination. In short, ESP exists to make your life easier, freeing you from the drudgery of writing program code to display each screen and menu in your application. ESP not only makes application development more efficient, it also improves the overall quality of your programs. Since ESP handles all screen display and input, your screens are more consistent and easier for your customers to use. WHAT ESP CONSISTS OF The ESP product consists of three main parts: The SEDIT screen editor, which uses a "what you see is what you get" interface to let you design your screens simply by moving the cursor to where you want each field and using SEDIT’s powerful field editor to set such characteristics as the field prompt, the default (either constant or calculated based on other values), the types of acceptable information, entry length, whether the field is display only, security level needed for display and update, and more. The ESP toolbox. This is a collection of assembly language subroutines and AlphaBASIC XCALLs designed to handle every aspect of screen input and output. You can use the calls in the toolbox to display your screens, accept, verify, and edit input, manage user memory areas, output data to reports, and more. The desk accessories. These include a perpetual calendar, a calculator, a macro record, store, and playback feature, and an ASCII value conversion utility. In addition, when you receive ESP, you get two already developed ESP applications: Rev. 00 Page 2 Overview of ESP The SIGNIN security system. With SIGNIN, you control which accounts and applications each user can access, and your users never need to go to the AMOS prompt to switch applications or accounts. The GLUE menu generation package. GLUE lets you define a menu or series of menus for individual accounts and/or projects, or a master set of menus for your whole computer. WHERE TO FROM HERE? This document is your introduction to ESP’s capabilities. It also explains: The ESP installation file, TOOLBX.INI. How to use ESP’s desk accessories. How to use screens created with ESP. For more information on how you can put ESP to work for you, refer to these other documents in the ESP Documentation Library: The Release Notes for your version of ESP. They describe changes and new features in this version of the software. They also include instructions for updating from an earlier version of ESP. If you haven’t installed ESP yet, see the ESP Installation Instructions. The SEDIT User’s Guide. This document tells you how to use SEDIT, the ESP screen generation program. SEDIT is the key to ESP—it lets you design menus, input screens and report formats without having to write a line of program code. The ESP Programmer’s Manual. This manual tells you how to use ESP screens and reports from your application programs. It describes the assembly language subroutines and AlphabASIC XCALLs that make up the ESP toolbox. These routines let you display data on ESP screens, accept and verify screen input, manipulate ISAM data base files, and more. These manuals tell you everything you need to know to use ESP to improve your application development. The ESP Documentation Library also includes these documents, describing the applications included with ESP: The SIGNIN Security System Implementation Guide The GLUE User’s Manual THE ESP INITIALIZATION FILE The ESP initialization file is called TOOLBX.INI, and is located in the DMSESP: account. As with the initialization files for other Alpha Micro products, this file contains statements controlling certain aspects of ESP’s operation. TOOLBX.INI can contain statements affecting: Rev. 00 Overview of ESP Page 3 The number of ESP users allowed on your computer. This determines the size of the TOOLBX.SYS file in system memory. The size of the toolbox memory pool. The desk accessories available to you. If you have the DART data base manager installed on your computer, TOOLBX.INI also contains the DART Product Installation Code (PIC). The following sections describe each of these statements. You must reboot your computer after making changes to TOOLBX.INI. Your changes do not take effect until you do. THE USERS STATEMENT As described in the ESP Installation Instructions, ESP must have the file DMSESP:TOOLBX.SYS in system memory. When it is loaded, this file reserves approximately 11KB of memory per toolbox user for user-specific information such as printer definitions, graphics device definitions, job characteristics, and so on. Obviously, on a system with many users, the toolbox can take up a very large chunk of system memory. The USERS statement lets you tell ESP how many people may be using ESP at any one time. The format of the USERS statement is: USERS=xx xx is the number of users you want. This number should be equal to the maximum number of jobs using the ESP toolbox on your system, including: Any jobs which use SEDIT. Any jobs which may use an ESP application, such as SIGNIN, DART, AlphaCALC 2.0 or later, and so on. Any spawned jobs, such as MULTI windows, which may use ESP or an ESP application. If you don’t have a USERS statement in TOOLBX.INI, TOOLBX.SYS takes the number of jobs allocated by the JOBS statement in your system initialization file as the maximum number of ESP users. Since this will always be more than the actual maximum number of users, you can save system memory with a USERS statement. Rev. 00 Page 4 Overview of ESP THE TOOLBOX MEMORY POOL In addition to the 11KB per user discussed above, the toolbox may occasionally need a little more memory during periods of heavy use. This memory is allocated by a MEMORY=xxK statement in TOOLBX.INI. If you have the memory available, we suggest you set the size of this memory pool (which is shared by all toolbox users) to 32K. If your memory pool setting is too small, you may receive the message: Insufficient Toolbox Memory while using ESP or an ESP application. If this happens, try increasing the memory pool size. Conversely, if you never encounter this message, and you need the memory for other uses, you can try decreasing the memory pool allocation. DEFINING THE DESK ACCESSORIES ESP’s desk accessories, which are described in detail later in this document, include a calculator, a calendar, a macro record and playback feature, and ASCII value conversion. To use any of these accessories, you must define them in the TOOLBX.INI file. You define the desk accessories with the ACCESSORY command. Its format is: ACCESSORY=DMSESP:filename filename is the name of the program file for the desk accessory you want. It does not include an extension. The accessory file names are: Calculator Calendar Macros ASCII Values DACCLC DACCAL DACMAC DACKVL Add an ACCESSORY command for each desk accessory you want to use. You will then be able to use the accessories from ESP or any ESP application, as described below. While the desk accessories supplied with ESP are in the DMSESP: account, you can tell ESP to look elsewhere for them by specifying a different account in the ACCESSORY statement. For example, ACCESSORY=ALC:DACMAC looks for the macro accessory file in the ALC: ersatz account. THE DESK ACCESSORIES ESP’s desk accessories perform the same function for your computer work that the tools on your desk perform for your non-computer activities—they make it easier for you to do the tasks you need to do. Four desk accessories are part of the standard ESP software: Rev. 00 Overview of ESP Page 5 A calculator A perpetual calendar Macro record and playback Keystroke to ASCII value conversion Once you’ve installed the accessories you want, as described in the previous section, you can call them up while using ESP or any ESP application, such as DART, AlphaCALC 2.X, and so on. The following sections describe how to use the desk accessories. CALLING UP A DESK ACCESSORY Anytime you are using SEDIT or any application which uses ESP screens, you can call up the desk accessories by pressing the ACCESSORY key or ESCAPE @ . The ACCESSORY key is SHIFT / F13 on most terminals. If you are using MULTI, SHIFT / F13 is the MULTI menu key, and you’ll have to use ESCAPE @ to call up the desk accessories. If you have more than one desk accessory active, you see the Accessories Menu after you press ACCESSORY . This menu displays in a window overlaying your current screen display, and lists the accessories defined in your TOOLBX.INI file. You can choose the accessory you want in two ways: Type its number and press EXECUTE . Use ↑ and ↓ to highlight it and press EXECUTE . If you have only one desk accessory set up in TOOLBX.INI, you go directly to that accessory when you press ACCESSORY . The following sections discuss the individual accessories. THE CALENDAR When you call it up, the calendar displays the current month, with today’s date shown below it. For example: April Su Mo Tu We 1 5 6 7 8 12 13 14 15 19 20 21 22 26 27 28 29 Th 2 9 16 23 30 1992 Fr Sa 3 4 10 11 17 18 24 25 Thu April 23, 1992 Rev. 00 Page 6 Overview of ESP You can look at other months using these keys: ↑ to see the previous month. to see the next month. PREV SCREEN to go back one year. NEXT SCREEN to go forward one year. ↓ To leave the calendar display, press MENU . THE CALCULATOR ESP’s calculator is a simple four function calculator with memory. Its display looks like this: Calculator 0 Sto Rcl Off * / = Clr 7 8 9 - 4 5 6 CE 1 2 3 + 0 . The top of the calculator display shows the last four values and operations. The layout at the bottom of the display corresponds to the keys on the ten-key pad of AM-62 and AM-72 terminals. For example, the NEXT WORD key on these terminals multiplies. For terminals with different keyboards, some functions may not be available on the ten-key pad. For example, there is no Clear Entry key on the AM-65 ten-key pad. The following keys work on all terminals: Rev. 00 Overview of ESP Page 7 FUNCTION Addition Subtraction Multiplication Division Equals Clear All Clear Entry Memory Store Memory Recall Turn Off KEY TO USE RETURN , , or + ENTER * / T or = C DEL , RUBOUT , or , (comma) S R MENU or ESCAPE ESCAPE When you’re done with the calculator, press MENU . MACRO RECORD AND PLAYBACK The macro record/playback accessory lets you record a series of keystrokes, which you can then play back any time you’re using ESP or an ESP application. Macros can greatly reduce time spent doing repetitive tasks, such as setting up standardized screen fields. You can leave the macro screen before beginning recording or playback by pressing MENU . Recording a Macro 1. Be sure to have the cursor where you want it to be when you start the procedure you’re going to record. This can be anywhere in ESP or an ESP application. 2. Press ACCESSORY , then choose Macro Record/Playback from the menu. 3. Choose the Record option. 4. Type the name of the file you want to store the macro in. If you enter just a six character file name, the macro file goes in the current account, with the extension .TIP (Terminal InPut). You can enter a full file specification, but the file must be in an account you can legally write to. Each macro goes in its own file; if you enter an existing file name, the file is overwritten by the new macro. You are not warned when this happens. 5. When you press EXECUTE after typing the name, you return to where you were when you called up macros. Now, perform the procedures you want to record. Every keystroke you make is recorded in the macro file. While you are recording, an R displays near the right of the bottom status line. Rev. 00 Page 8 Overview of ESP 6. When you’re finished recording, press This ends the recording. ESCAPE , followed by CTRL / _ (underline). Don’t forget to end the macro. If you don’t press ESCAPE CTRL / _ , ESP continues to record your keystrokes, which can take up a large amount of disk space. The macro accessory can record keystrokes from ESP based applications only. If you use a program with a non-ESP interface, keystrokes are not recorded. Playing Back a Macro 1. Be sure to have the cursor where you want it to be when the macro playback begins. It’s a good idea to save your work before running a macro. If you request the wrong macro name, or start the macro at the wrong point, it could do a great deal of damage. Once you press EXECUTE to begin playing back the macro, there is no way to stop it. Also, if you leave ESP or an ESP application during playback, the macro will stop. However, when you re-enter ESP, playback will resume, possibly at a completely different point than you intend. 2. Press ACCESSORY , then choose Macro Record/Playback from the menu. 3. Select the Playback option. 4. Type the name of the macro you want to use. As when recording, you can enter a full file specification. The default extension is .TIP. If you don’t include an account, ESP follows a specific search path looking for the macro file. This path is described below. 5. If you want to perform the actions recorded in the macro more than once, set the iteration field to the number you want. 6. Press EXECUTE . You return to where you were when you called up macros, and ESP performs all the keystrokes recorded in the macro file. During playback, P displays on the bottom status line. The search path ESP follows when looking for the file to play back is: The current account. The [,0] account for this project. The root account for your user name (as entered in MUSER). The DMSESP: account. You can use this search path to your advantage by placing standard macros in accounts where they can be accessed by anyone who needs to use them. Rev. 00 Overview of ESP Page 9 ASCII VALUE CONVERSION This accessory is for programmers who want a quick way to find the ASCII value for a particular keystroke. When you choose this accessory, you see this display: ASCII Character Value Key: Hex Value: Octal Value: Decimal Value: [ Press MENU key when done ] Just press the key (or combination of keys) you want to know the ASCII value for. ESP displays the hexadecimal, octal, and decimal values of the key; if it is a printable character, the character also displays. Press when you want to leave the ASCII Character Value screen. MENU USING SCREENS CREATED WITH ESP One of the benefits of creating your screens through ESP is that you don’t have to worry about designing a user interface for screen handling—ESP has already done that for you. All screens created using SEDIT, ESP’s screen editor, function essentially the same way when a user calls them up through your application. If for some reason you need to modify these characteristics for one of your screens, or for certain fields on a screen, you can tell ESP to let your software perform screen handling as needed. For information on choosing any of the options or setting any of the flags discussed below, see the SEDIT User’s Guide. Screens created with ESP follow these rules: CURSOR MOVEMENT You can move the cursor either backward or forward from field to field. You define the field order when you create the screen. To move the cursor, you can use: TAB , ↓ BACK TAB , or , RETURN SHIFT / TAB to go to the next field. , or ↑ to go to the previous field. If a field has the automatic carriage return flag set, you also move to the next field when your entry in this one reaches the maximum length. ESP screens "wrap around." You can go directly from the first field on the screen to the last field, and vice-versa. Rev. 00 Page 10 Overview of ESP Within a field, you can use: → to move to the right without erasing. to move to the right, erasing characters. ← to move to the left without erasing. RUBOUT to move to the left, erasing characters. SHIFT / → to go to the end of an entry. SHIFT / ← to go to the beginning of the field. NEXT WORD to go to the beginning of the next word. PREV WORD to go to the beginning of the previous word. SPACE When you reach the end of a screen field, ESP will not accept any more characters; if you continue typing, your terminal beeps and the characters are not accepted. CHANGING ENTRIES To change an existing entry in any field, you can retype it, or use the following editing keys: CHAR DEL , or CTRL / D to delete a character. or CTRL / F to insert a space. WORD DEL or CTRL / V to delete a word. CTRL / V to delete to the end of the field. CTRL / Y to enter or leave automatic character insert mode. RUBOUT , CHAR INS POP-UP MENUS In a field where you have defined a pop-up menu, you can use NEXT WORD or → to cycle forward through the choices, and PREV WORD or ← to cycle backward through them. You can also type the first letter of a choice to select it. VIEWING HELP For any field which has a help file defined, you can see the help information by pressing HELP or ESCAPE ? . If the help file is more than one screen long, pressing NEXT SCREEN goes to the next screen, and pressing PREV SCREEN goes back to the previous screen. Pressing MENU clears the help display and returns you to the original screen. Rev. 00 Overview of ESP Page 11 LEAVING A SCREEN While someone is using an ESP screen, ESP returns to the calling application program under these conditions: When the cursor enters a field with the pre-edit interrupt flag set. When the cursor leaves a field with the post-edit interrupt flag set; if the changed value post-edit interrupt flag is set, ESP returns to the calling program only if he field is changed. If the user presses a function key or other undefined CTRL character. Generally, a return to the application caused by a pre- or post-edit interrupt is temporary, so the application can perform some check or calculation based on the field. The application then returns to ESP to continue screen input. Returning to the application based on a function key or control character, however, often signals the end of input for this screen. For example, your application may exit from a screen whenever the user presses MENU . How to handle these keys is up to you when you write your application. See the sections on the GTSCR XCALL and special key handling in the ESP Programmer’s Manual for more information on when ESP returns control to the application and what information it returns. Rev. 00