1
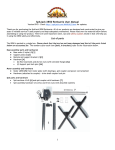
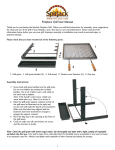
SpitJack XB50 Rotisserie User Manual Version 5/07/12 - Check http://spitjack.com/MANUALS.html for updates. Thank you for purchasing the SpitJack XB50 Rotisserie. All of our products are designed and constructed to give you years of reliable service if used properly and kept adequately maintained. Please read over the material below before assembling or using the product. There are some important notes, tips and safety cautions mixed in that will help you in using the XB50 safely and effectively. List of parts Base assembly parts and hardware Motor assembly and hardware Spit parts and hardware Accessories and other components Rotisserie Assembly Spit assembly procedure Motor and motor mount assembly procedure Base and spit supports assembly procedure Final assembly procedure (requires assistance) Attaching the Manual Operation Crank Operating the Rotisserie Prepping the meat Stuffing Rigging Attaching the meat to the spit Trussing and binding Setting up the fire pit The indirect cooking method Maintenance Cleaning Rust protection Motor Hardware specifications Supporting Documents Safety precautions Warranty, Replacement & Liability 1 List of parts The XB50 is packed in a single box. Please check that the box has not been damaged and that all the parts listed below are accounted for. The numbers after each item [bold, in brackets] refer to the illustration below. Base assembly parts and hardware] ● Base units (X-style) (2)[1] ● Support posts (2)[2] ● Remote spit support bracket (1)[3] ● Hardware [4] (6) hex head bolts and (6) hex nuts (with serrated flange) [4a] (2) support post lock pins [4b] Motor assembly and hardware ● Motor [5] (with housing, switch, front motor plate, spit coupler and power cord attached) ● Hardware (attached to coupler) - drive shaft coupler pin and fastener Spit parts and hardware Spit sections A & B [6] Spit assembly hardware (2 screws and 2 hex nuts) Spit coupler screw and nut - 1 screw and 1 hex lock nut with nylon collar (make sure not to confuse this part with the hex bolts for the spit connector assembly) 2 Accessories and other components The XB50 comes with a trussing hardware & accessory package included. Below is a list and illustration of the current accessory package. Please check to make sure you received all items. ● ● ● ● ● ● ● ● Small clamps (2) [A] 14” needle, 6” needle [B] Cleaning brush [C] Dual thermometer (1) [D] Pulling gloves (one set) [E] Small ball of twine [F] U-bolt [G] Spit forks (2) [H] Optional Accessories In addition, there are accessories and other products that you can order separately for your XB50. If you have ordered them with the XB50, they may be included in the box (but not pictured above) or come in a separate package. Rotisserie Assembly The XB50 requires some minor assembly before its first use. Before you begin the assembly procedure, check to make sure you have all the parts, tools, and necessary hardware at hand. Tools needed: 2 adjustable wrenches, flat head screwdriver, Phillips head screwdriver. Spit assembly procedure 1. Remove the hardware from spit section A. 2. Slide spit section A into spit section B and replace the hardware. Wrench-tighten both sets of hardware. 3 Note: Depending on what you are cooking, it may make more sense to attach the spit inside the animal (if you are cooking a pig or lamb. It is sometimes easier to bring in a section from each “end” and attach it in the middle than to try to drive the fully assembled spit through from one end. 3. Set the spit assembly aside while the rest of the rotisserie is assembled. Motor and motor mount assembly procedure The motor comes fully assembled with spit coupler and spit support sleeve attached. Base and spit supports assembly procedure 1. Place one of the base units [1] on the ground so that the spit support bracket is facing up. 2. Place one of the support posts [2] into the bracket so that the 3 bolt holes line up with the holes in the base bracket. 3. Place 3 bolts [4a] through the holes so that the bolt head is on the outside. 4. Fasten the bolts with serrated flange hex nuts and wrench-tighten all 3. 5. Repeat this procedure with the other base and spit support set. 4 6. Place the remote spit support bracket [3] on one of the base/support post assemblies. 7. Secure it at the third hole from the top of the post with one of the support post lock pins [4b]. This is an arbitrary selection. You may adjust the height to your specific needs although we caution against using the highest setting if you are cooking a large unbalanced load. Note: you will have to set the remote support bracket one hole LOWER on the post than the motor to create a level spit. Final assembly procedure (requires assistance) Attach the motor assembly [C] to the remaining base/support post assembly and attach the bracket [A] using the same procedure as step 6 and 7 above, making sure that it is set at the same height. Note: you will have to set the remote support bracket one hole LOWER on the post than the motor to create a level spit. 1. You should now have: a base/support post assembly with a remote spit support bracket [3], a base/support post assembly with the motor assembly [5] attached, and the assembled spit (or unassembled if that is what you have chosen for your rigging). Note: The next step is rigging the meat to the spit. Please refer to the related documents for instructions on how to do this. Once the meat is securely fastened to the spit, you can proceed with the final assembly. We suggest using the support assemblies to help in the rigging procedure. It’s much easier to work with when the meat is off the ground and supported. Once the meat is secured on the spit, we can proceed with the assembly. It is recommended you assemble and test the XB50 at least once before your first cooking event. 2. While having someone hold up the other end of the spit, carefully insert the end of spit section B into the spit coupler. Note: it is important to use the correct end of the spit (B) for this step. Although they may look similar, one hole at end of the spit is a little different and provides a better connection with the couple. 3. Plug the motor [5] to a 110V power source (or inverter) and turn it on to spin the coupler until the holes for the spit and coupler align (if necessary). 4. Place the spit coupler bolt through the holes and wrench-tighten with the white spit coupler nut (with the nylon collar). 5. The rotisserie is now fully assembled and ready to use. Check to make sure all connections are tight and secure before proceeding! 5 Operating the Rotisserie 1. Once the rotisserie has been fully assembled, all the screws and bolts are checked for tightness and proper adjustment, the loaded spit has been attached as instructed above, the fire pit has been constructed and the fire is underway, simply connect a properly rated and sized extension cord (we suggest a surge protector as well) to the power cord of the motor. 2. When ready to turn it on, flip the switch on the back of the motor.. 3. Check to see that the spit is turning smoothly and the motor is running without any unusual noises. 4. To shut off the motor, flip the switch to off and disconnect the power source. Prepping the meat It’s a good idea to hose (or even scrub) the meat thoroughly and dry it before you begin. Then give it a good rubbing inside and out with salt. If you have to store it for any longer than a few hours, ice it as best you can and store in a cool, safe place until ready to cook (this can be done after the rigging). As far as any culinary preparations, there are of course endless options. Some of the most common methods include injecting with a flavor solution or marinade. Brining the meat will not pick up a lot of ambient flavor such as smoke or surface seasoning applied. Since it’s not easy to brine a large animal, flavor injection is more popular. You can inject up to 12 hours before cooking. Stuffing We don’t recommend stuffing a whole animal especially if you are attempting to cook one for the first time. Many things can go wrong with stuffing and it can ruin the whole event. Rigging Attaching the meat to the spit Note: this process can take up to two hours. Try to have someone helping you and plan the timing accordingly. Remember it will take one hour to cook each 10 lbs. so you may want to consider rigging the night before if you plan an all-day cook. Just as there is no standard way to cook a whole animal, there is no standard way to rig the meat for cooking, and there are probably as many variations as there are cooks. For use with this machine we recommend a specific method of securing the meat to the spit that will keep the meat from loosening during cooking. Instead of using forks at each end (this technique is more practical for solid pieces of meat such as a roast) we recommend “lashing” the backbone of the meat directly to the spit by stitching it with butcher’s twine and a special trussing needle. Trussing and binding Keep the animal intact until the end of cooking is crucial to a successful event. Because of the size of the animal (the larger the meat, the bigger this problem), the prolonged cooking times, and the condition of the meat when fully cooked, some parts of the meat may come loose toward the end of cooking. As the meat softens, some shrinkage occurs, connective tissue is broken down, and the meat loses it’s structural integrity. Unless properly held together, parts of the animal can become dislodged and fall off. To address this, some people wrap the meat in chicken wire to form a crude cage, tightening the apparatus as needed during cooking. This can be cumbersome and even unhealthy as most chicken wire is treated with a poisonous zinc compound. SpitJack suggests both trussing the whole length of the meat at intervals with butcher’s twine and using oversized worm gear hose clamps (available at http://spitjack.com) on the fore and hindquarters as a backup. It’s also a good idea to sew up the belly, even if it’s empty, to make the cooking easier. For a detailed illustrated tutorial on rigging your meat, see the related documents Securing a Whole Animal to the SpitJack XB50 Spit and 6 Setting up the fire pit There are many different ways to configure a pit for use with this rotisserie. The method below is one that we have tested successfully and which addresses most issues that come when cooking a whole animal in this way. This machine is designed to be used directly on the ground or floor surface. Make sure you have a level, hard, non-flammable surface at least 10’ x 4’ to use for the operation. If there is anything you want to protect in this space (such as patio tiles or a lawn) we suggest laying down sheet metal and a layer of pavers or bricks as a protective base (see the related document Fire pit Layout for SpitJack XB50 Rotisserie System). The indirect cooking method Although it may seem illogical, it is best not to cook the meat directly over the fire. The main reason for this is that when fat starts rendering and dripping onto a hot coal, it may cause a flare up. It is also possible for fat to heat up to a high temperature without dripping out and a flare up can cause the whole meat to ignite. Either way, unwanted flare-ups are to be avoided if possible. The best way to accomplish this is by not cooking directly over the heat source. On the other hand, you want to get as close as possible to the heat or else the meat will take too long to cook. We recommend a drip pan directly under the animal to catch drippings (of fat and juices) and a fire of charcoal or hot hardwood embers as close as possible to the turning meat. This will be different with every pit configuration, but the principal is the same: 1. 2. 3. 4. Consider the drippings and the danger of flare-ups Have a drip pan (or sand pile) directly underneath the meat to catch the drippings Have the fire as close to meat as possible while still considering the above. Have the meat as close to the heat as possible by adjusting the height of the spit. Using these guidelines, we have cooked a meat in 40 degree (F) ambient temperature on a windy day to 195 degrees in normal cooking time. Maintenance Care of the SpitJack XB50 is simple and inexpensive but should be done regularly to insure maximizing the product life. Cleaning Before the first use and after extended storage: 1. Clean the entire spit assembly (inside and out) with warm soapy water, rinse and dry thoroughly. Coat the spit bearing rings and spit connector pipe lightly using mineral oil (included). 2. Wipe off any excess oil, dirt or residual packaging from the rest of the parts. After each use and before extended storage: 1. Clean the entire spit assembly (inside and out) with warm soapy water, rinse and dry thoroughly. 2. Wipe down or wash other parts as needed. Dry and touch up with heat safe paint if needed. Store all parts in a dry place until the next use. Cover the motor assembly if possible to prevent dust and dirt accumulation. Rust protection Most of the parts on the XB50 are either stainless steel or powder paint coated. The stainless steel might show small rust spots (this is the nature of the metal) that can easily buffed out with some light steel wool. The powder coated paint finish might either chip, scratch, or get burned off during normal use. This can be easily touched up using spray paint. Try to match the paint you use with the finish (satin, gloss, etc.) of the part you are painting. For the bases and support posts, we recommend Rustoleum Ultra High Heat. This is the only high heat paint we know of that gives a semi-gloss finish. 7 Keeping certain parts (exposed motor parts) lubricated (lightly coated with oil or other anti-corrosive material) will prevent premature rust and corrosion. Motor The XB50 motor is a well-built, rugged component that will last years if properly used and maintained. 1. Reduce exposure to dust or dirt while in use. 2. Keep it as dry as possible. 3. Occasionally oil the drive shaft with some 10W-40. Hardware specifications If you need to order hardware for your XB50 either ask for the following at your local parts dealer or online at McMaster-Carr.com or BoltDepot.com. Call us if you have trouble finding parts. Motor specifications: Voltage: 110V Motor type: 60W RPM:6 Phase:1 Operating temperature range:40-175F Overall Dimensions: Base units – 14” 1/2 x 20” Length fully assembled (base to base) - 74”, end of spit (or manual wheel) to end of motor – 68” Spit height - adjustable from 11” to 19” (from middle of spit to ground) Spit length – 60” total, 54” usable (between base legs) Supporting Documents These documents have been created to make your rotisserie experience easier, more effective, safer and more enjoyable. Please check our website for updates and recent additions: http:spitjack.com/MANUALS.html How to secure a whole animal onto a SpitJack spit using a needle and twine 8 Safety precautions The SpitJack XB50 is a powerful machine with electrical components that will be used outdoors in conjunction with live fire and high heat and safety awareness and proper safety procedures should be followed at all times while in use. 1. 2. 3. 4. 5. Electrical hazard: Make sure any extension cord you use is properly grounded, rated for this use, and in sound condition. Keep all electric cordage (whether the cord or plug from the XB50 motor or any extension that is connected) away from the direct heat source (fire, hot coals, or any part that has gotten very hot. Keep all electric cordage (whether the cord or plug from the XB50 motor or any extension that is connected) away from water. Make sure any extension cords are not in any collected water. Do not operate the XB50 in rain or snow unless all parts and connections are kept dry. Do not attempt to modify or repair the motor while it is running. Disconnect the power immediately if any unusual sound or odors or smoke are coming from the motor. Fire, heat and burn hazard: Since you will need a large heat source to use the XB50, special precautions must be taken to prevent harm to yourself, other people, the environment, property, and the equipment. 1. Make sure you have properly prepared your “pit” area where the fuel will be burned. There should be not be any easily combustible material either directly under the burning area or in nearby proximity. Keep all combustible material a safe distance from the fire at all times. 2. Use only appropriate fuel sources (wood logs, natural or other charcoal products) for your heat source. Use only approved starter fluid (or other methods) to start the fire only. Do not add starter fluid, gasoline or any other highly flammable material to the fire once it has started. 3. Tend the fire continuously and carefully. Never leave sight of the live fire. Do not add more fuel than needed. 4. Be aware of fat dripping from the cooking meat. Hot fat can easily ignite if it comes in contact with a live flame. If you have a fat collection device or system, make sure collected or excess fat is removed periodically and not let to sit hot by the heat. 5. Do not wear very loose fitted clothing such as a long dress or robe while tending the fire. 6. Keep a properly rated and sized fire extinguisher handy for emergency use. 7. Take care when handling any part of the XB50 or anything that has been close to the heat source. Mechanical hazard: The XB50 is a very powerful machine and can cause bodily harm or injury unless used safely and according to instructions. 1. Make sure the power is disconnected before assembly, disassembly, or maintenance. 2. Some of the components of the XB50 are heavy. Use proper lifting and transport procedure while handling. 3. Do not overload the motor. This machine is rated and tested at no more than 100 lbs. on the spit. Any additional weight may case excess wear on the motor or motor malfunction. 9 Warranty, Replacement, Liability LIMITED WARRANTY. Rasa Incorporated, d/b/a/ SpitJack (the “Company”) warrants that (a) its SpitJack XB50 (the “Product”) will perform substantially in accordance with the accompanying written materials for a period of one year from the date of receipt and (b) that the components of the Product is contained will be free from defects in materials and workmanship under normal use and service for a period of one (1) year. In the event applicable law imposes any implied warranties, the implied warranty period is limited to one year (365 days) from the date of receipt. Some jurisdictions do not allow such limitations on duration of an implied warranty, so the above limitation may not apply to you. . This warranty is valid only for Product (s) purchased directly from SpitJack or from one of its authorized dealers. CUSTOMER REMEDIES. The Company’s and its suppliers’ entire liability and your exclusive remedy shall be, at the Company’s option, either (a) return of the price paid for the Product, or (b) repair or replacement of the Product that does not meet this Limited Warranty and which is returned to the Company with a copy of your receipt. This Limited Warranty is void if failure of the Product has resulted from accident, abuse, or misapplication. Any replacement Product will be warranted for the remainder of the original warranty period or thirty (30) days, whichever is longer. NO OTHER WARRANTIES. TO THE MAXIMUM EXTENT PERMITTED BY APPLICABLE LAW, THE COMPANY AND ITS SUPPLIERS DISCLAIM ALL OTHER WARRANTIES, EITHER EXPRESS OR IMPLIED, INCLUDING, BUT NOT LIMITED TO IMPLIED WARRANTIES OF MERCHANTABILITY AND FITNESS FOR A PARTICULAR PURPOSE, WITH REGARD TO THE PRODUCT AND ANY RELATED OR ACCOMPANYING WRITTEN MATERIALS. THIS LIMITED WARRANTY GIVES YOU SPECIFIC LEGAL RIGHTS. YOU MAY HAVE OTHER RIGHTS WHICH VARY FROM JURISDICTION TO JURISDICTION. NO LIABILITY FOR DAMAGES. TO THE MAXIMUM EXTENT PERMITTED BY APPLICABLE LAW, IN NO EVENT SHALL THE COMPANY OR ITS SUPPLIERS BE LIABLE FOR ANY DAMAGES WHATSOEVER (INCLUDING WITHOUT LIMITATION, SPECIAL, INCIDENTAL, CONSEQUENTIAL, OR INDIRECT DAMAGES FOR PERSONAL INJURY, LOSS OF BUSINESS PROFITS, BUSINESS INTERRUPTION, LOSS OF BUSINESS INFORMATION, OR ANY OTHER PECUNIARY LOSS) ARISING OUT OF THE USE OF OR INABILITY TO USE THIS PRODUCT, EVEN IF THE COMPANY HAS BEEN ADVISED OF THE POSSIBILITY OF SUCH DAMAGES. IN ANY CASE, THE COMPANY’S AND ITS SUPPLIERS’ ENTIRE LIABILITY UNDER ANY PROVISION OF THIS AGREEMENT SHALL BE LIMITED TO THE AMOUNT ACTUALLY PAID BY YOU FOR THE PRODUCT. BECAUSE SOME JURISDICTIONS DO NOT ALLOW THE EXCLUSION OR LIMITATION OF LIABILITY FOR CONSEQUENTIAL OR INCIDENTAL DAMAGES, THE ABOVE LIMITATION MAY NOT APPLY TO YOU. © SpitJack 2012. All rights reserved 10