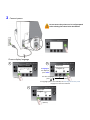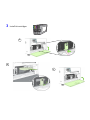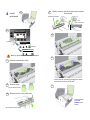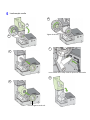
1
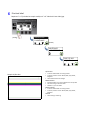
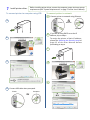
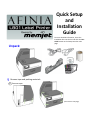
Quick Setup
and
Installation
Guide
For more detailed information, insert the
Installation Disc into the PC and click the User
Guide button on the Setup Launcher main
page.
Unpack:
1
Remove tape and packing materials
a
Remove tapes.
(continued on next page)
b
Remove tapes and foam.
foam
c
Remove cardboard.
Save the packing foam and cardboard!
Squeeze latches to open clamshell
Lift tabs
cardboard
2
Connect power
Do not connect the printer to a PC until prompted
to do so during the Printer Driver Installation!
Choose display language
a
b
Missing Printhead
If Language is
not displayed,
press Select
For other languages,
press
,
(Config)
LANGUAGE
1. English
(Select)
If Language option is not available, see Selecting the Security Level
on page 12 of the User’s Manual.
c
LANGUAGE
1. English
(Return)
3
Install ink cartridges
a
b
c
4
a
Install
printhead
f
Slowly remove tape from electrical contacts
and nozzles
electrical contacts
No less than 45°
b
nozzles
Missing Printhead
g
(Config)
CONFIGURATION
3. PRINTHEAD
(Select)
PRINTHEAD
2. REPLACE
Wait for printhead latch to be released.
c
h
Open printhead latch fully.
c
d
d
Remove caps.
Check that ink is flowing through the tubes
on both sides of the printhead.
i
Do not discard caps!
e
Remove cover from printhead
Control Panel
will read
Online when
ready
Do not discard the cover!
5
Load sample media
e
a
Tighten knob fully.
b
f
c
Insert media until it stops. Wait for printer to load media.
g
d
Flat side against media roll.
6
Print test label
Requires 6” x 4” (included as sample media) or 4” x 6” labels with inter-label gap.
Printer Online
(Config)
CONFIGURATION
2. MAINTENANCE
(Select)
MAINTENANCE
1. PRINT TEST PAGE
PRINT TEST PAGE
2. PQ PLOT 6x4
Top Section:
Sample PQ Plot 6x4
•
•
•
Lines are defined with no missing nozzles
Lines are printed in order: Yellow, Black, Cyan, Black,
Magenta
Vertical dashed lines are straight
Middle Section:
•
•
•
All yellow, black, cyan, black, magenta lines are printed
No color mixing on the color bars
Numbers 1, 3, 5 are visible
Bottom Section:
•
•
Lines are defined with no missing nozzles
Lines are printed in order: Yellow, Black, Cyan, Black,
Magenta
Overall:
•
No streaking or smearing
7
Install printer driver
Before installing printer driver, ensure the computer meets minimum system
requirements (see “System Requirements” on page 72 of the User’s Manual).
To connect printer to computer using USB
To connect printer to network
a
Connect printer to network using Ethernet
a
Printer
Network
Network
b
b
c
c
d
e
d
Connect USB cable when prompted.
Printer
Computer
USB
If you will be using DHCP to set the IP
Address, skip to step c.
To assign the printer a Static IP address,
please see Selecting the Security Level on
pa g e 1 2 o f t h e Us e r M a n u a l b e fo r e
proceeding to step c.