1
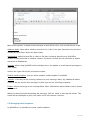
User guide
(last update: Oct 2015)
SpinOffice CRM is unique in the way it manages your relationships. A central
location is created for your mail, all your business and personal contacts, your
calendar, projects, all documents & files but also call notes, tasks and memos.
It is the ideal relationship management solution for small and medium-sized
enterprises and will really help you achieve great things!
In this manual we will explain most of the functionalities, the chapters are divided by
feature. We recommend to start with SpinOffice step by step and advise you to go through
all chapters.
If you have any questions or comments, please write me an email or call us (+1-360-209-5609 for English or +31-70-311-5400 for Dutch or +39-386-776-085 for Italian)
Have fun exploring SpinOffice CRM!
Hugo van der Horst
Rudolf Philipse
Luca Malin
- Support Worldwide
- Support Worldwide
- Support Italy
or Skype us.
1. Starting SpinOffice CRM
5
1.1 Registration ....................................................................................................................5
1.2 Start the tour or Get started ...........................................................................................5
2. General information
6
2.1 The difference between Limited and Pro edition ............................................................6
2.2 A contact card for every contact .....................................................................................6
2.3 Toolbar icons ..................................................................................................................7
2.4 System menu and tabs - for Mac users .........................................................................8
2.5 Mac shortcuts ...............................................................................................................10
2.6 Right mouse click function ...........................................................................................10
2.7 Enabling right mouse click on a Mac trackpad .............................................................10
3. The contacts section
11
3.1 Screen layout ................................................................................................................11
3.2 Explanation of labels & fields on the contact card ........................................................12
3.3 Adding new contacts ....................................................................................................14
3.3.1. Importing multiple existing contacts
14
3.3.2. Adding individual new contact
14
3.4 Editing name and address information .........................................................................15
3.5 Adding, editing and deleting contact information ..........................................................15
3.6 Searching contacts .......................................................................................................17
3.7 Filtering contacts ..........................................................................................................17
3.8 Sending mass mailings based on filters .......................................................................18
3.9 Managing the card format via Contact types ................................................................18
3.10 Tab items at the bottom of the contact card ...............................................................19
4. The archive section
22
4.1 Screen layout ...............................................................................................................22
4.2 Archive menu items under right-click ...........................................................................23
4.3 Drag and drop archive items to a folder .......................................................................24
5. Integrating your email
25
2 / 52
5.1 Configuring your email .................................................................................................25
5.2 Screen layout sending a new email message ..............................................................26
5.3 Managing email templates ...........................................................................................27
5.4 Fill in your personal information for email signature .....................................................28
5.5 Action types ..................................................................................................................28
6. The inbox
29
6.1 Screen layout ...............................................................................................................29
6.2 Linking emails to contacts ............................................................................................30
6.3 Linking emails to a folder .............................................................................................31
6.4 Linking emails to colleagues ........................................................................................31
6.5 Converting emails to a task ..........................................................................................32
6.6 Archiving / finishing emails ...........................................................................................32
7. The agenda
33
7.1 Adding an appointment ................................................................................................33
7.2 Linking appointments to contacts, folders or other users .............................................34
7.3 Showing birthdays ........................................................................................................34
7.4 Printing the agenda ......................................................................................................34
7.5 Synchronizing agenda with smartphone and tablet .....................................................34
8. Files, folders and the folder list
35
8.1 Adding files to a contact ...............................................................................................35
8.2 The file list ....................................................................................................................35
8.3 Creating folders and subfolders ...................................................................................35
8.4 Adding items to a folder or subfolder ............................................................................37
8.5 The folder list ................................................................................................................38
9. Task management
40
9.1 Creating tasks ..............................................................................................................40
9.2 The task list ..................................................................................................................40
9.3 Reminders ...................................................................................................................41
9.4 Finishing / checking tasks ............................................................................................42
3 / 52
10. Call reports and memos
43
10.1 Inbound and outbound calls ......................................................................................43
10.2 Memos .......................................................................................................................44
11. MailChimp integration
45
11.1 What can you do with it? ............................................................................................45
11.2 How does it work? ......................................................................................................45
11.3 Available for all users ..................................................................................................45
12. Menu items in Administration section
46
13. The benefits of the Pro edition
49
13.1 Annual fee ..................................................................................................................49
14. Synchronize with mobile devices
50
14.1 Contact sync ..............................................................................................................50
14.2 Calendar sync (launch date: Nov-2015) .....................................................................50
14.3 Email sync ..................................................................................................................50
14.4 Microsoft Exchange sync available ............................................................................50
15. Training & support
51
15.1 User support & tickets ................................................................................................51
15.2 Online training ............................................................................................................51
Helpful resources
52
4 / 52
1. Starting SpinOffice CRM
1.1 Registration
After you have downloaded the application from our website or the App Store, the
following icon will be stored on your PC or Mac Launchpad. If you click on the icon
our registration page opens.
Fill in your first name, last name, company name & email address to create your free
account. Your personal user name and password will be sent to your email address directly
on registration. You will be taken direct to your personal encrypted database. Subsequently,
each time you open SpinOffice CRM your user name (email address) will be displayed
immediately, and you will only have to fill in your personal password.
Signing up with LinkedIn will provide fast access to your SpinOffice account without a new
password.
Your SpinOffice database is accessible from any desktop or laptop, Mac (OS X 10.7 and
later) or Windows PC and iPad (via SpinOffice iPad app), as long as you have an internet
connection and SpinOffice installed.
1.2 Start the tour or Get started
The first time you log in we give you the option to start a tour (approx. 9 slides) in which
we show you the basic features of SpinOffice, or the possibility of getting started right
away. There are a few these steps that help you to set up your account. By completing them
you will be well on track with getting your account configured. The steps for getting started
are:
1. Import your email: go to your inbox and import your existing email into SpinOffice
by entering the POP/IMAP settings of your email account. (See paragraph 5.1
Configuring your email for more details)
2. Import existing contacts: fill your database with contacts from a relationship excel
file or from Apple Address Book Contacts. (See paragraph 3.3 Adding contacts for
more information about the import process.)
3. Update your personal profile: go to Administration; My Personal profile and fill in
all the fields, so SpinOffice can use this information for generating a personalized
email footer. Add your company logo in order to set this as the email header in the
default email template.
4. Invite other database users: in order to collaborate with your colleagues you may
invite them into your database, via menu item New; Invite Colleague. Each invited
user will receive her/his own login credentials. Rights and roles per user can be
divided in the Pro edition.
5 / 52
2. General information
SpinOffice will help you to manage your relationships; in the long run it will really save you
time. You will stay connected with your friends and business contacts and save time by
getting organized. All your customers, prospects, email, calendar, tasks and memos,
documents, projects and archive will be in one central database and will be accessible for
you and your colleagues. Any file or message is stored in the cloud, encrypted and only you
will receive the key.
When working with multiple users, you will all share the same data but in the security
settings the administrator can manage the permission level of each user.
2.1 The difference between Limited and Pro edition
You may work with the Limited obligation-free edition until you have reached 50 items.
What is an item? Each manually added contact, each email sent, and all documents and
attachments added to your database count as items. Mass importation of contacts and
incoming emails do not count as items.
Use SpinOffice Limited edition for as long as you want to see if it fits your needs. Set up
your email, import existing contacts, create and manage email templates, archive call notes
and memos, create filters and use SpinOffice to send out mailings to your friends or
business contacts.
Upgrade to Pro for $299.99 (€ 299.99) per year to receive:
✓ Unlimited encrypted storage
✓ Daily data backup
✓ Phone & email support
✓ The ability to sync with your mobile devices
✓ Many extra features (including Microsoft Office integration, time registration,
document templates and mail merge, multi-user capabilities, sending birthday
& scheduled SMS)
2.2 A contact card for every contact
SpinOffice is actually a digital rolodex; every contact has its own contact card with relevant
contact information. Besides the contact card, each contact has its own personal archive
where all former communication is stored. All incoming and outgoing emails, outbound
and incoming calls, tasks, appointments, attachments and all types of files can be found
here.
6 / 52
2.3 Toolbar icons
The toolbar in SpinOffice shows many important actions you can perform:
Back: Using the back button you can navigate to the contacts you most recently used. The list
will automatically update as you go along using SpinOffice. Fifteen contacts are
remembered.
Favorites:
It is nice to be able to group contacts together and use them for mailings or other group
functions. By default, each user will get a ‘My list’ group allowing you to make a favorite
group of your most used contacts. Use ‘Organize favorites’ to create and remove groups.
You can add or remove group members by selecting the group and by selecting ‘Organize
group members’.
!
SpinOffice allows you to make personal groups and groups that are shared with your
colleagues.
!
Import file:
Any file can be imported into SpinOffice. Use the import feature to select and import your
file(s) you have stored in your local machine. The uploaded files will appear in the
contacts’ archives.
!
Email:
Create a new email or select an email template using the arrow besides the 'Email' button
in the toolbar. Any email will be linked automatically to the contact card from where the
email is created. To create additional templates or change existing templates, go to the
menu item Administration; Email templates.
!
Memos, inbound & outbound call notes:
Create a small memo that will end up in the contact’s archive. When working with multiple
users, you are able to send a memo internally to your colleagues. In that case, the memo
will also end up in your colleague’s inbox.
Make notes of incoming and outgoing phone calls with the related contact. These
messages are internal messages and can also be forwarded to team members.
!
All memos and call notes are stored in the contact’s personal archive, which can be found
under the ‘Archive’ tab, and is therefore visible to any user of the database. So these items
are stored as individual items and they have a data stamp and user linked to them.
!
!
Task:
Creating tasks related to a contact person allows you to create a task list and jump from
the task list to the related contact. Reminders can be set, colleagues can be linked and
priority can be given.
A cool thing with a task is that you can link attachments to it, so for example a proposal
that you sent to a contact can be linked to the task of following it up. When the time
comes for getting in contact with the prospect, you instantly have the proposal at hand.
7 / 52
The task list can be filtered by activity codes, status or date in the task list which is found
via menu item Go to; Tasks & Timesheet. The activity codes can be managed via
Administration; Activity codes.
!
SMS (short text messages):
Short text messages that you send from SpinOffice are sent via the sms gateway that we
use, and thus not via your own mobile phone. You do need to fill in your mobile number in
the Administration; My Personal profile. Any reply to a short text message will be received
on your mobile phone.
A smart Pro feature is that it allows you to schedule SMS messages to be sent at a later
point in time. So you can set up an sms message for someone’s birthday in advance, and
SpinOffice will automatically send the message right on time.
!
Scanning:
Please Inform us if you would like to use this feature; we will have to connect your scanner
with SpinOffice. Once that has been done, this is a really great feature! All scanned
documents will be linked to the particular contact; they can be sent out as attachments
and they can be added to a folder.
!
Facebook:
If you have imported your contacts via the (disabled) Facebook import feature, this
Facebook button appears in the toolbar. It allows you to send private Facebook messages
directly to your Facebook friends. Any message which is sent from SpinOffice will be
stored automatically in the correct archive.
!
Refresh:
Allows you to refresh the content of SpinOffice CRM. After certain actions you need to click
on the refresh button to see the changes you have made. For instance, after adding a
contact.
2.4 System menu and tabs - for Mac users
There are three layers at the top of the application window. In the illustration you can see
what we mean and below the illustration we will explain you what you can do with all three
of them:
8 / 52
The first layer is the system menu which you as a Mac user are used to. All menu items can
be found there. Go through them the first time you enter SpinOffice so you know what can
be found where. Many things in SpinOffice can be customized; go to the menu item
Administration for that. In chapter 13 we explain all the elements of that feature.
(So for Mac users the menu is on top as system menu; for our Windows users the menu is to be found in the
right top corner of the application window)
The second layer is the screen tabs. There are two important points to mention here:
1. You are able to manage which important screens should always be open when you
open and work within SpinOffice. This can be managed via the menu Administration;
CRM preferences; Default tabs. See below:
Check and uncheck the screens you want to have active. Inactive screens will open in
a separate tab once you open them via the menu. For example, when Agenda is not
active and you go to your agenda via the menu, it will automatically open in a new
tab. Do you want to have your Inbox or Agenda open on a second screen? No
problem, just drag it out of the application!
2. All memos, new emails, call reports etc. which you create will appear in a new tab.
When you click on ‘Send’ this tab will automatically close and you can continue where
you were.
The third layer is the contact/archive tab: here you can toggle between the contact
information and the contact’s archive section.
9 / 52
2.5 Mac shortcuts
Several Mac shortcuts can be used within SpinOffice. Below you will find a list of all
shortcuts:
Ctrl-I
Go to Inbox
ˆ⌘Space
Special Characters
Ctrl-T
Go to Tasks
⌘’
Select next tab
Ctrl-A
Go to Agenda
⇧⌘←
Select next window
⌘C
Copy content
⌘R
Refresh SpinOffice
⌘V
Paste content
⌘H
Hide SpinOffice
⌘A
Select all
⌘M
Minimize SpinOffice
⌘X
Cut
⌘Q
Quit SpinOffice
2.6 Right mouse click function
In SpinOffice, there are many menus hidden under the right mouse click. For Windows users
this is nothing new, but for Mac users this is something to get used to. Apple calls the right
mouse click the 'secondary click’.
Default action on Mac is to click or tap with two fingers on your trackpad. In many Mac
software applications, menus are also hidden under the secondary click. Some important
locations where SpinOffice has menu options under secondary click are: in the archive,
agenda, the inbox, the folder list and file list.
2.7 Enabling right mouse click on a Mac trackpad
Follow the steps below to enable
secondary click on your Mac, if this is
disabled (for instance for MacBook Pro
users with a mouse trackpad):
1.Go to System preferences;
2.Select 'Trackpad’;
3.Enable second option ’Secondary click’.
10 / 52
3. The contacts section
The main application screen is the contact card with all contact related information. As we
mentioned before, you can compare this screen to an old-fashioned rolodex card index.
Only this one is interactive, smart and always up-to-date!
The contact card contains contact information and many other characteristics. A contact is
always classified in a certain category, we call this a contact type. Examples are for instance
a customer, prospect, vendor, supplier, company or private contact. The fields and labels
on a card are arranged on the basis of this contact type.
In the following paragraphs we will discuss all the smart features that are to be found on
the main contact screen. But first we will start with an explanation of the main components.
3.1 Screen layout
SpinOffice’s main screen, the contact card, is divided into three parts.
1
3
2
Part 1: All contact information
Here you find all contact related information. Any field can be edited and used as a filter.
The labels and format of the contact card can be modified via menu item Administration;
Contact type. In the following paragraphs we will explain the features that are related to
this part of the contact card.
11 / 52
Part 2: Extra information tab items
Additional information is placed here, for instance keywords to filter on, interrelations,
extra memo space and extra contact information that is less important and does not need
to be seen instantly upon opening. We will also explain the meaning of these tabs later in
this chapter.
Part 3: The contact list
On the left of the screen you will find a complete overview of all the contacts in your
database. At the top you see the search box. Contacts are arranged alphabetically but can
be found using first name, last name, company name or email address.
Your search results will be shown directly and can be selected. Click on the ‘x’ icon to undo
your search.
3.2 Explanation of labels & fields on the contact card
All text labels and fields can be personalized for each contact type created. So a prospect’s
contact card may be different from a supplier or prospect. Because you probably would like
to store different kinds of information for each contact type.
Adjust contact type card labels and fields via menu item Administration; Contact type.
Select the contact type to see the layout of the fields and labels.
We will briefly discuss the fields that require some comments:
- Company name: commonly used as Company name field. (This is the 'Line1’ field in
Administration; Contact type)
- Address line2: can be used as Attn. as accompanying text.
- Address line3: is an extra address line, but isn’t visible for relatively small resolution
screens. Via menu item Administration; CRM preferences this field can be managed by
checking/unchecking ‘Add Company line3 field’.
- Street/number: speaks for itself. Via menu item Administration; CRM preferences the
street number can be added to the street field. (Uncheck 'Add Street number field’).
- City/State/Zip code: default 'US State’ field is shown, disable this field via
Administration; CRM preferences and uncheck 'Add US State field’.
- Job title: default we have set job title here, but the label can be adjusted. Go to
Administration; Contact type and select the contact type for which this label should
have another name. Field 'Info1' represents the job title field.
12 / 52
- Extra info field: is an extra line and is not visible for relatively low resolution screens.
Go to Administration; Contact type and select the contact type for which this label
should be changed. Field 'Info2' represents the extra info field. If you adjust the label
here, it will directly change on main screen.
- Last name: consists of two fields, the second field is meant for prefix.
- First name: consists of two fields, the second field is meant for initials.
- Date of birth: consists of two fields, in the second field the current age is displayed.
- Salutation: default we have set three options, one informal (Hi) and two formal (Dear Mr
and Dear Ms) options. This determines the salutation of an email to this person. If you
select 'Hi' as salutation, the email salutation for this person will be 'Hi [first name],’. If
you choose 'Dear Mr’ or 'Dear Ms’ the person’s last name will be used as their email
salutation. Manage the salutation via the menu item Administration; Salutation.
- Debtor number: is an extra info field. Go to Administration; Contact type and select the
contact type for which this label should be changed. Field 'Number1' represents this
field. If you adjust the label here, it will change directly on the main screen.
- Creditor number: is also an extra info field. Go to Administration; Contact type and
select the contact type for which this label should be changed. Field 'Number2'
represents this field.
- Contact type: this field indicates the type of relationship and as a result also the layout
and color of the card.
- Account Manager: your name will be shown here. When using SpinOffice with multiple
users you can allocate contacts to fellow users.
- Customer since: is an extra date field. Go to Administration; Contact type and select the
contact type for which this label should be changed. Field 'Customer since' represents
this field.
- Search value: is an extra info field. Go to Administration; Contact type and select the
contact type of which this label should be changed. Field 'Search value' represents this
field.
- Code: this field can be used for filtering.
- Active checkbox: when unchecked the contact won’t appear in search results in
SpinOffice. Only checked contacts will be synced with the synchronization module.
- Profile picture: upload a profile picture here. Max size: 300M.
On the right, all contact information like telephone numbers, fax numbers, websites and
email addresses are stored. Websites and email addresses are clickable. If you click on an
13 / 52
email address, a new blank email message will open. On click on a website URL, you will be
taken to the website in your default web browser.
3.3 Adding new contacts
In SpinOffice you can add your relationships in several ways (imported or manually added)
in different quantities (multiple or individual) and at different locations. SpinOffice offers
the following.
3.3.1. Importing multiple existing contacts
Go to menu item Extra; Import; Contacts. A popup appears where you have the possibility
to add contacts from:
- Existing contact data file via .CSV / .XLS / .XLSX file. It is important that your Excel file
does not contain formulas. After uploading your file SpinOffice will help you to match
the Excel columns and SpinOffice's fields.
- Mac Contacts (if Mac user): SpinOffice will connect to your Contacts and will import all
of them in one go.
Watch this tutorial in which we show how both import options works.
For both imports SpinOffice will create a new contact type. Default for Excel import will be
‘Import’, but during the import match you can define another contact type if required.
3.3.2. Adding
individual new
contact
1. Via the ‘+’
icon at the
top of the
contact list
on the left.
The
following
window
appears:
Pay attention to the first field ‘Contact type’. If you change this field, other fields and
labels can change. This is because, as previously stated, contact cards differ per contact
type. At least a company name or last name is a required field when adding contacts.
14 / 52
2. Via your Inbox: if you receive an email from an unknown sender that you would like to
add to SpinOffice, just click on the question mark icon. The same popup as referred to
above will be displayed.
3. Via the menu: go to 'New; Contact’ and the same popup appears.
When finished, all added contacts will have their own contact card and archive. Sometimes
it is necessary to click on the ‘Refresh’ icon.
3.4 Editing name and address information
By default, all fields on a contact card are locked. To unlock
and edit a contact’s card, click on any field and select ‘Edit’ in
the menu that will appear. All fields are now editable.
When you have finished editing just continue working with
SpinOffice. All the modifications you made are automatically
saved.
3.5 Adding, editing and deleting contact information
On the right, under first tab item CONTACT INFO, all contact information like telephone
numbers, fax numbers, websites and email addresses are stored.
How to add contact information
1. Click on the '+' icon to add contact information.
15 / 52
2. Add the phone number, fax number, website URL, email address etc. in the first
field.
3. SpinOffice will recognize most common input and will autofill the second field
'Description'.
4. If you uncheck 'Default’, this new item will be stored under OTHER NUMBERS.
5. If you check ‘Private’ this new entry will be hidden from any other database users. If
the new item is an email address, all emails from this address will be hidden from
other users.
6. Click on Save to finish.
How to edit contact information
1. Click once on the contact info item which you would like to adjust.
2. Click on the 'gear wheel' icon to edit the contact information item.
3. When done, click on 'Save' button to finish.
How to delete contact information
1. Click once on the contact info item which you would like to delete.
2. Click on the '-' icon to delete the contact information item.
3. Confirmation is requested.
4. If you check ‘And unlink this email address from this contact’ all communication in
the contact’s archive will disappear as well. Otherwise it will be saved in the
background.
5. Click on 'Yes’ to confirm the removal.
Websites and email addresses are clickable. If you click on an email address, a new blank
email message will open. If you click on a website address, you will be taken to the website
in your default web browser.
16 / 52
3.6 Searching contacts
Use the search box on the left side to search any contact. All matching results are displayed
directly when typing. Contacts are arranged alphabetically but can be found on first name
and last name, company name or email address.
If you check the last item 'Enable Search when left-click on field (right-click remains Edit/
filter)’ in Administration; CRM preferences you will also find a search box under left-click.
3.7 Filtering contacts
Filters allow you to obtain an overview of contacts that meet a certain search criteria. For
example, do you want an overview of all your prospects, or of all customers that are located
in the same country? Or do you want to send a mailing to all your former customers? You
can filter on almost every field and you can also filter on filter. How do you do that? We will
show you.
Let’s give an example! We would like to get an overview of all our clients, for instance to
send a mailing:
1.Go to a contact who which is a
client;
2.Click once on the contact type
field ‘Client’ and choose ‘Filter on
selected’.
3. In the left column, instead of the contact list, all
contacts are shown which match the filtered criteria
contact type = Client. All matching contacts, 28 in
this example, are arranged alphabetically.
4. Via the x you can remove individual contacts from
this particular filter.
5. Once you have made your filter you can send all of
them a mailing or (via the 'Options' button) add them
to a favorite group or check/uncheck a keyword for
all.
Choose ‘Filter exclude selected’ to achieve the opposite result. Or select ‘Filter on’ and
enter an entry you want to filter on. You are able to filter on almost any field on the card.
Filters can also work on keywords that are listed under tab item 'Keywords’.
17 / 52
Filters are a superbly powerful function in SpinOffice and they allow you to select contacts
for personalized mailings or other mailings based on document templates.
Watch this tutorial in which we explain how to make selections and send group mailings.
3.8 Sending mass mailings based on filters
To send a group mailing, these are the steps:
1. Create an email template via Administration; Email templates.
2. Make your filter as described above. When all matching contacts are displayed in the
left column you can create your mass email.
3. Click on the arrow next to ‘Email’ in the toolbar menu.
4. Select the created mail template.
5. A popup ‘Create mass Emails’ appears and the process of creating drafts starts
automatically.
6. When the process is finished, go to the ‘Draft’ folder in your inbox.
7. Use the right-click and select ‘Send all’ and your mass mailing will be send directly!
3.9 Managing the card format via Contact types
As we mentioned before in this chapter, contact cards can differ per contact type. Our
philosophy is that you presumably want to store different kinds of information for the
various types of relationship.
Where can you manage and adjust the fields, labels and color of the contact card? Via menu
item Administration; Contact type you can manage the different types:
18 / 52
To edit a current contact type, click on the item you wish to change. In the following
example you see the card format of contact type 'Company’.
Contact card fields and layout can now be adjusted. When finished, click on ‘Save’. The
format of the card will be changed for all contacts of that specific contact type!!
Would you like to create a new contact type? Click on the yellow ‘+’ button in the previous
main window. A new empty card will be shown and can be filled and built from scratch. One
frequently used way to create a new contact type is to copy an existing contact type. This
can be done by selecting one in the drop-down menu in the left corner of this window when
you have a new empty contact type open.
3.10 Tab items at the bottom of the contact card
On the lower part of screen 1 SpinOffice provides more space for more background
information about the contact. There are four tab items. Below we give more explanation.
CONTACTS:
Related contacts
(interrelations)
will be shown
here. This can be
colleagues of this
contact, or other
contacts in your
SpinOffice
19 / 52
database or unlinked contacts that do not have their own contact card.
To add a related contact, use the ‘+’ icon at the bottom and choose one of following
options:
- Add an employee: the ‘Add contact’ window will appear and a new contact can be
added.
- Add a link to an existing contact in SpinOffice: a window appears where you can select a
contact to link with and then indicate the type of relationship between those two.
- Add an unlinked contact: this option gives you the opportunity to establish a
relationship between a SpinOffice contact and a person who does not have their own
contact card, for instance family members, electrician, gardener etc. To edit a related contact, use the ‘-’ and to remove use the ‘gear wheel’ icon. Only related
employees and contacts are clickable, unlinked contacts are not.
MEMO:
You can store additional information in this blank text box. Click once, choose ‘Edit’ and
text can be added. The data is saved automatically when you leave the contact card, or if
you use the right mouse click and choose ‘Lock edit’.
EXTRA INFO:
The fields described here are for filter purpose. If any of the fields ‘Info 3’ up to ‘Info 10’
are filled in the administration section Administration; Contact type, these labels and fields
are shown on this ‘Extra info’ tab.
20 / 52
This way you have more space to enter relevant contact information which does not
necessarily need to be displayed on the main screen, the contact card. Examples of
common used fields are ‘IBAN’, ‘VAT no.’ and ‘BIC/SWIFT’.
KEYWORDS:
Use the keyword feature to classify your contacts for filter purpose. On this tab item, there
is space for forty keywords which can be defined via menu item Administration; Keywords.
After adding several keywords, you can check and uncheck the checkboxes. Use the
keyword feature to classify and filter your contacts. You will appreciate the benefits of this
smart feature as soon as you use it!
To check and uncheck keywords for a contact, go to the KEYWORDS tab, click once on one
checkbox and choose 'Edit’. All checkboxes will become adjustable.
The data is automatically saved when you leave the contact card or if you use the right
mouse click and choose ‘Lock edit’.
21 / 52
4. The archive section
The archive gives an overview of all correspondence with a contact. All emails, tenders,
attachments, tasks, files and (telephone) notes are clearly displayed on this screen in a
recognizable Outlook-style. All communication in the archive can be linked to folders. More
about this later in the next paragraph.
4.1 Screen layout
The archive is divided into 4 parts. Below we explain what information can be found where.
3
4
1
2
Part 1: Correspondence overview
In this overview all communication with this contact is shown, in chronological order. So, all
sent and received messages, attachments, documents, outstanding and finished tasks,
agenda items, call reports, notes etc. related to this contact will automatically be stored
here. If you right-click on an individual archive item a menu appears with a number of
options. We’ll discuss these in paragraph 4.2.
Part 2: Preview of selected correspondence
Beneath the overview you see the preview presented the way you are used to in any email
application. The first part of the email content is shown, with a scroll to see all.
22 / 52
Part 3: The list bar
The list bar in the top left corner consists of two elements:
- Folder overview: all existing folders for the present contact are shown. Create folders
via the ‘+’ icon and drag and drop archive items to folders. More information about
creating folders and their uses will be discussed in chapter 8.
- Communication overview by item type: all archive items will be assigned a type. This
makes it easy to see all items of the same type.
Via menu item Administration; CRM preferences you can determine which of the two should
initially be shown unfolded in the archive.
Part 4: Contact information
In the left bottom left corner you will see a small summary of the contact’s information.
This way you can always check if you are in the correct archive.
4.2 Archive menu items under right-click
As mentioned at the beginning of this chapter, a lot of smart tools are available in your
archive, many of them under the right-click. Each archive item can be:
• linked to a folder, another contact (or to another user when using
SpinOffice with multiple users)
• marked as unread
• highlighted in yellow
• printed or deleted
• converted to task
• marked as private
• notes can be added
• versions can be seen
• all documents in the archive can be converted to PDF
All archive items can be dragged and dropped into folders in the left ‘Folder’ section.
Linked items are displayed with a yellow folder icon.
23 / 52
4.3 Drag and drop archive items to a folder
All previously created folders (linked to this particular contact) are listed in this section on
the left. To add an archive item to an existing folder, drag the item by its subject and drop
it into any folder you want. Use double click on the folder to view the complete content.
In the inbox the same folders are shown. In chapter 8 we discuss the benefits of using
folders.
24 / 52
5. Integrating your email
In order to import your previous communication and to build up your database it is
essential that you have configured your email. Go to the inbox and provide SpinOffice the
correct POP/IMAP settings of your email account. Multiple accounts can be added, please
add them via menu item Administration; Email settings (POP/IMAP).
Within SpinOffice, sending an email is possible via the 'Compose' button in the inbox. But
besides that, it is very easy to send mails from the contact card:
1. Find the person you would like to send a message to, via the search box in the top left
corner. This ensures that the email will be created including the correct contact
information (email address and salutation) and that the email will end-up in the
archive of this contact.
2. Double click on the email address stated in the CONTACT INFO section on the left or
click on ‘Email' in the toolbar.
3. An existing email template can also be selected by clicking on the small arrow next to
the email icon in the toolbar. In the drop-down menu which will appear you can select
your template.
4. A new message window will appear. In paragraph 5.2 we will explain the screen
layout.
5. After composing an email, click on ‘Send’ and the message will be stored in the
contact’s archive.
5.1 Configuring your email
To import your existing email, SpinOffice needs the incoming mail server settings (POP/
IMAP) from the mail account(s). Until your email has been configured correctly SpinOffice
will continue to show you the Configure mail popup every time you open your inbox:
25 / 52
Enter your email address and password and click on ‘Connect’, SpinOffice will try to find the
proper server settings. If the settings are not found, please click on ‘Configure manually’.
We will help you to try to find the proper mail server settings:
Select your account type and click on the 'Test access’ button to try to connect. At the
bottom of this screen a message will appear with the test result. Keep testing until the
above shown green check (see above) is shown and SpInOffice has a successful connection.
Click on 'Save' to finish.
Once you have clicked on ‘Save' we will keep you informed of the status in the inbox and by
email if it takes a long time to import your email messages, for instance if there are 2500
messages in your received and sent box.
As soon as SpinOffice is connected, all messages will be imported into your inbox. Sending
emails is not a problem at all, all outgoing messages go though our mail server.
If account information is incorrect, an ‘Invalid email settings’ notification will remain in your
inbox. Do not hesitate to contact us if you need any help with this.
If you don’t know your POP/IMAP settings or you don’t succeed, please do save any
(incorrect) settings so we have some information to use in order to try to help you!
5.2 Screen layout sending a new email message
When you have selected a contact to send a message to, according to the steps we
described at the beginning of this chapter, the following window appears.
26 / 52
Most of the options in above email message screen will be clear, but we will discuss a few:
Address book: select other contacts to add as Cc or Bcc, from your favorites lists you have
created or from filters that have been made.
Attachment: upload a local file or select a file that is already stored in any SpinOffice
archive of this particular or another contact. If present, choose the file you want to attach
and move it downwards.
Internal: when using SpinOffice with multiple users, the option to send internal messages is
also visible.
And on the right side of this recipients section:
Default email template: you can select another email template if available.
Contact: a fast way to link existing contacts to your message. Note, any additional added
contacts do not receive this message! So here you are not selecting recipients.
Folder: link the message to an existing folder. More information about folders can be found
in chapter 8.
When you have finished composing the message, click on ‘Send’ in the top left corner. The
email will be displayed in your sent items and in the contact‘s archive.
5.3 Managing email templates
In SpinOffice it is possible to create email templates.
27 / 52
- Go to menu item Administration; Email templates or click on the arrow next to ‘Email’ in
the toolbar on the contact card screen and select ‘Manage email templates’.
- Now you have the ability to create new templates via ‘New’. Fill in a new template with
default fields e.g. «My Email», «My first name», «My last name». Your job title is in
default «My Info1».
- Choose ‘Edit’ to set the subject, any preferences and to add attachments.
- And determine the template tab that the template should be saved under
- Click on ‘Save’ when finished and close this template builder section. The template can
be used after you have refreshed SpinOffice.
5.4 Fill in your personal information for email signature
Go to menu item Administration; My Personal Profile to complete your own information.
Most of the information you enter there can be used as mail-merge field in the email
template builder Administration; Email templates. So make sure you completely fill in your
profile.
If you upload your company logo, it will be automatically added to the default email
template.
5.5 Action types
Last menu item in the Email templates screen is ‘Action types’. In this section you define
the template to use for each action. What should be the template for sending an email, for
forwarding an email and for replying? And which template to use for incoming and
outgoing call reports.
28 / 52
6. The inbox
All email messages will be displayed in your inbox. Incoming messages that are recognized
will automatically be linked to a corresponding contact. If the recipient is unknown you can
add the contact to your database as ‘new’ or link it to an existing contact. In the following
paragraphs we will explain more about the tools that the inbox contains.
6.1 Screen layout
The inbox screen is divided into five parts and is similar to the archive layout. Below we
explain what information can be found where.
3
1
4
2
5
Part 1: Received message overview
This section speaks for itself; all received messages are displayed. They can be arranged by
name, subject or date. Important points of attention:
- double-click on the sender: you will be taken to the corresponding contact card.
- double-click on the message subject: the message will open.
29 / 52
- right-click provides a menu with a number of smart tools. This is the same menu that
can be called up in your archive (chapter 4).
- Individual messages can be dragged and dropped to folders (only if folders are created).
Part 2: Preview of selected correspondence
Beneath the message overview you see the preview presented the way you are used to in
your email application. The first part of the content of a message is shown.
Part 3: The folder list
The top left corner shows all folders that have been created for this contact. You can create
a folder by using your right-click ‘Create folder’. This way you can organize and classify
messages from one contact. (Examples of commonly used folders are; Service, Support,
Sales, Tenders, Projects, Visits, Invoices)
All existing folders are listed in this left section. To add a received message, drag it to a
folder. Use double click on the folder to view the complete contents. In chapter 8 we
discuss the benefits of using folders.
Part 4: Inbox menu items
Under the folders you will find the menu structure you are used to in your mail program.
Only ‘Finished’ is different from what you are used to. This will be discussed in paragraph
6.6. Part 5: Contact information
In the bottom left corner you will see a small resume of the contact’s information if the
email address is known to SpinOffice.
6.2 Linking emails to contacts
Any message, from familiar and unknown
senders, can be linked to any contact. Why
would you link a mail to a contact? To
make sure that emails end up in the proper
archive. Unknown senders are marked with
the question mark icon.
Add them as new by clicking on the icon or link to an existing contact via right-click menu.
30 / 52
You can link emails to several types of contacts in your inbox:
Connect unknown sender to existing contact: use the right-click, choose ‘Contact link’ and
search for the right contact in your SpinOffice to link to, in the search box which will
appear. After linking the correct contact, the current message and subsequent messages
will be stored in the corresponding archive, and the contact and email address are paired.
Add unknown sender as new contact: use the right-click, choose ‘Add contact’ and fill in all
relevant information. After saving, contact will be added and the current message and
subsequent messages will be stored in the corresponding archive.
Connect familiar sender to existing contact: use the right-click, choose ‘Contact link’ in
menu and search for the right contact to link to, in the search box which will appear. After
linking the correct contact, the current message and subsequent messages will be stored in
the corresponding archive.
An email can be linked to more contacts.
6.3 Linking emails to a folder
An email can be linked to a folder. With folders you can organize and classify messages
from a contact. Examples of commonly used folders are; service, support, sales, tenders,
projects, visits, invoices. A link can be made in two ways:
- right-click when on the message and select ‘Folder link’. All existing folders are listed
and can be linked using the blue arrow and unlinked using the red arrow.
- drag and drop the message by its subject directly into a folder into a folder in the list
on the left.
Linking to a folder is only possible once folders have been created. Note that if a new folder
is created, it is always linked to the contact that is visible/active on your screen!
To see the complete content of the folder, double click on the folder in the folder list on the
left.
6.4 Linking emails to colleagues
This option is only available with multiple users. They can link messages to each other. The
message will automatically be visible in the colleague’s inbox.
31 / 52
6.5 Converting emails to a task
Is there a follow-up action required to a message? Convert the email to a task also via rightclick on the message and choose ‘Convert to task’. You can schedule and prioritize it for
yourself. A reminder can be set and also this action can be linked to a folder.
6.6 Archiving / finishing emails
To prevent the inbox from becoming over full, messages should be archived when read and
finished with. In SpinOffice we call this 'Finish’. Click on the 'Finish’ icon to remove the
message from your inbox; the message itself remains stored in the archive.
So the ‘Finish’ function is a way of cleaning up your inbox. All finished items are to found in
the ‘Finished’ folder in the inbox on the left. (see inbox screen layout image in paragraph
6.1; part 4)
32 / 52
7. The agenda
The agenda in SpinOffice does not differ very much from the one you are used to, but this
agenda has some tools which make this a useful feature. We will discuss them in this
chapter.
When using SpinOffice with multiple users, all agendas are merged into one central office
agenda. In order to keep the agenda orderly, every employee/user has a different color. You
can immediately see whether a colleague is available for a meeting and appointments can
be created and adjusted. The main agenda is fully integrated and accessible for every user.
Shielding appointments from others is also possible.
7.1 Adding an appointment
1. Open your agenda.
2. Click on the ‘+' icon on top in the gray bar.
3. A popup appears where you can set all details of the appointment, like specific date
and time, a reminder (cool when in sync with mobile devices), recurrence, for
colleagues and more.
4. Click on ‘Save' to confirm.
33 / 52
5. Created appointments are clickable and visible. Via the right-click they can be
removed, printed and linked to other contacts and colleagues.
7.2 Linking appointments to contacts, folders or other users
At the point of creating the ‘Add appointment’ screen is shown, and this screen gives you
the possibility of linking an appointment to a company or a contact. The advantage of this
is that the appointment will also be stored in the contact’s archive. When an appointment
has taken place, it will be listed under communication type ‘Appointments’ in the
‘Communication’ list on the left of the archive.
Besides linking to a contact, a folder can be selected. This makes a folder more complete
than just a collection of files. For instance if you are working on a project with multiple
contacts, it is easy to retrieve info on when you had an appointment and with whom.
How to link an appointment to multiple users, contacts or folders? First, make and save a
new appointment, and when visible in the agenda you can add other users, contacts or
folders via right-click.
7.3 Showing birthdays
Activate ‘Show birthdays’ via Preference option on top of the agenda screen. The date of
birth field on the contact card will be picked for all active contacts in the database and will
be shown in the agenda.
7.4 Printing the agenda
The agenda can be printed or exported as a PDF file via the ‘Print’ option in the top right
corner.
7.5 Synchronizing agenda with smartphone and tablet
With an MS Exchange box, which is additionally available with Pro, the agenda will
synchronize with your iPhone, iPad and Mac. At the end of 2015 a free sync will be
available. More information about this can be found in chapter 14 of this manual.
34 / 52
8. Files, folders and the folder list
In order to make SpinOffice your daily working environment, you need to import all your
contact related files into your database. Create folders in order to have your files structured
and organized. Almost any file can be imported into the application.
8.1 Adding files to a contact
Via the toolbar menu item 'Import file’ it is possible to add files directly from your local disc
to a contact. All uploaded files will be visible in the contact’s archive. This simplifies the
transition from previously used CRM applications or other relationship tools to SpinOffice.
8.2 The file list
A complete overview of all files added/uploaded and of files received via email is available
via menu item Go To; File list. A window opens with a complete list of all files in your
SpinOffice. At the top of the window there is the ability to search files based on description,
company or contact.
Use right click on file item for many more options. For instance to see file properties, to
send as an attachment, to export, to print, to see properties or to convert to PDF.
It is not possible to add new files to SpinOffice via the file list. This is only possible via the
contact card, the archive, or when in a folder.
8.3 Creating folders and subfolders
In this paragraph we explain how to create folders and what the main benefits are of using
folders. Folders can be created from a contact’s archive or within the inbox.
To create a new folder, you can go to the archive
of the contact for whom you are planning to
create a folder. It is also possible in the inbox
when you receive a message from a contact, if
you want to store the message in a folder. Click
on the ‘+’ icon in the folder list on the left.
35 / 52
The following ‘Create new folder’ window appears:
The ‘Folder name’ field is
required. ‘Folder type’ is a way
to make easy filters in the folder
list based on a folder type. Only
select one of the folders in the
list in the second ‘Is subfolder
of’ line if applicable, otherwise
leave empty if it isn’t a
subfolder. Click on the save
button when finished.
The newly created folder will automatically open and will be directly visible in the archive’s
folder list on the left.
It will also be added to your complete folder list. This overview is accessible via menu item
Go to; Folder list. To open a folder, click on the folder in the folder list.
As mentioned above, the folder will automatically open in a new window. On the next page
we will show you an example of a folder and important tools and icons.
All types of files can be added to any folder; email messages, memos, short text messages,
tasks, appointments, call reports, etc. Any contact in your database or a colleague can be
linked to a folder. It is even possible to send emails from a folder. The message will
automatically be stored in this folder.
36 / 52
Important icons that have an important role in this part of SpinOffice:
Link folder: Manage the contacts that are linked to the folder. A newly added contact will also be
displayed on the left part of the window. (In our example, right under ‘Green, Justin’).
Folder properties:
All folder details can be seen and adjusted here.
!
!
Time registration:
Use the right-click to write time. Give date, description, minutes and fee.
!
Import files:
Import files that are already stored in the archive of the contact or click on the icon with
the green arrow in this window to add files from your local disks.
Creating a subfolder works exactly the same way as
creating a folder, except that the field ‘Is subfolder
of’ should be completed.
After your subfolders has been made, it will be
shown like this. All folders and subfolders are
visible. Main folders can be folded and unfolded via
the small unfold icon.
Use the right-click on a folder or subfolder to access a
small menu where several actions can be taken.
8.4 Adding items to a folder or subfolder
First you have to create folders and subfolders in order to be abble to store archive items
into these folders. Once you have done so the rest is pretty easy:
37 / 52
In the inbox or in the archive, drag the selected archive item, whether it is an email, a file, a
task, a note or something else by its description and drop it into the destination folder or
subfolder.
After you have dropped the item into the folder, the item will show a folder icon to make
clear this item is linked to a folder. And there will be a link mark shown in the folder list on
the left to indicate that the item is linked to this particular folder. In the contact’s archive
you will have the same for the item and the linked folder.
Manage the folders for an archive item via right-click menu item ‘Link to folder’.
8.5 The folder list
The folder list gives an overview of all existing folders. At the top you have the ability to
search folders by description or by contact/company (click on the button to toggle).
38 / 52
Use the right-click on a folder for more options. Click once on the folder to go to the
content. The image above this paragraph shows what this looks like and gives you more
information.
The folder type list on the left can be adjusted via administration menu Administration;
Folder types. This is assigned by you as user when the folder is created, but it is still
adjustable via the folder properties. 39 / 52
9. Task management
For many of our prospects, a proper task management component is essential. SpinOffice
provides a simple and clear way of creating and managing tasks.
9.1 Creating tasks
When on a contact card, click on the ‘Task’ icon in the toolbar menu or via the menu item
New; Task. The following window will appear:
Many fields can be filled in besides scheduling, prioritizing and adding a note to the task.
Thus, it is possible to link the task to a folder and/or an activity (support, service,
declarable etc.). You can even add attachments.
When a task has been saved, it will appear in your ‘Task list’ and also in the contact’s
archive. In this archive, finished tasks are shown with a green checkmark. High priority
tasks are shown in red.
9.2 The task list
As we just said, tasks can be viewed per individual contact, via everyone’s archive. But
SpinOffice also provides an overview of all outstanding tasks. We call this the ‘Task list’.
All tasks are sorted by expiration date. The longest outstanding task appears at the top.
The task status is displayed in red when it has a past date. The task itself is displayed in red
when it is labeled as high priority, blue when medium priority and green when low priority.
In the example below you will see the task we made in the previous paragraph.
40 / 52
Click on the name of the contact and you will be taken to the contact card. Click on the task
itself to see the actual task and the ability to check and finish the task. The task list can be
printed via the print icon in the top right corner.
When using SpinOffice with multiple users, use the filter option at the top of the window to
view team members tasks.
9.3 Reminders
If the reminder checkbox has been checked when creating a task, you will receive a
reminder at expiration time. Here is an example:
Check and finish the task or snooze and move action forward. All past actions will be
logged. So, if action is snoozed, the next time the task is opened the number of snoozes is
visible.
41 / 52
9.4 Finishing / checking tasks
Outstanding tasks can be opened from the contact's archive and from the task list. To
finish a task, open and click on ‘Finish'. The task will be removed from the task list and will
remain, checked, in the contact’s archive.
All tasks, finished and outstanding, will remain visible at individual archive level. They
are all stored in the contact’s archive. Click on the 'Task’ item in the list bar on the left to
open an overview of all tasks that have been carried out, or that are still outstanding.
Click on an individual task to see more information. It is also possible to finish tasks from
here.
42 / 52
10. Call reports and memos
Both call reports and memos are smart tools for archiving communication with relations, for
internal use or in order to retrieve information.
Call reports and memos are stored in the contact's archive. When working with multiple
users, these messages can be linked to other team members. The message will then be
forwarded and will be placed in team member’s inbox.
10.1 Inbound and outbound calls
Nowadays a lot of communication takes place by phone. It is therefore very important to
make call reports of your incoming and outgoing phone calls. In SpinOffice, this is very
easy. We even created a template for you, already filled with relevant information about
your contact.
An example of a completed incoming call report:
To create a call report, go to the contact card of the relevant contact and click on the
‘Inbound call’ or ‘Outbound call’ icon in the toolbar menu. Relevant contact information is
displayed and there is enough space to add text.
Attachments from local a file or one already in SpinOffice can be added, priority level can be
given and a folder can be linked to the report. Create your own customized call report
templates via the menu item Administration; Email templates.
43 / 52
10.2 Memos
Create a memo, also via the toolbar menu, to add relevant information that can be useful in
the future. Examples of memos are passwords and login details. Attachments can be added
to a memo, priority level can be given and folders can be linked.
All call reports and memos will be stored in the contact's archive. 44 / 52
11. MailChimp integration
More than 5 million people use MailChimp to design, send, and track email marketing
campaigns. Keep your MailChimp and SpinOffice data updated with this new integration
from MailChimp. Manage subscribers, bounces, and more.
SpinOffice’s integration with MailChimp allows for two-way interaction between your
customer database and your email list(s). Build highly specific filters in SpinOffice and share
them with MailChimp.
11.1 What can you do with it?
- Import MailChimp contacts to SpinOffice based on list(s).
- Export SpinOffice contacts to MailChimp mailing list(s) based on filters.
- Add hard bounces to SpinOffice contacts’ profiles.
Manage email contacts and campaigns with SpinOffice’s MailChimp integration. Use this
integration to segment your lists based on profiles of contacts in SpinOffice CRM.
11.2 How does it work?
It’s easy! Open the module in SpinOffice, enter your MailChimp API Key, connect and select
one of the above options.
11.3 Available for all users
This integration module is available for all our users. Importing MailChimp contacts to
SpinOffice is free of charge, but for each new exported SpinOffice contact to MailChimp you
pay one credit. Let’s give a worked example of a monthly export.
You would like to send out a monthly mailing to all your customers via MailChimp. The
first time you will have to export all your 200 customers from SpinOffice to a MailChimp
mailing list. We charge you for one credit per exported contact, so this initial action will
cost you 200 credits ($10). Next month, with 5 new happy customers who need to be
added to your mailing list in MailChimp, you export the same filtered group to
MailChimp again. This action will only cost you 5 credits ($0.25), so you only pay for the
new exported contacts.
As you can see, in general it will mean that the first target group export will cost you
several credits. For recurrent exports only new contacts will be paid for via credits.
Watch this tutorial in which we show details about the MailChimp integration.
45 / 52
12. Menu items in Administration section
Many settings can be adjusted via menu item Administration. We will explain each menu
item. Do not hesitate to contact me ([email protected]) when you have any questions
about any of these settings.
CRM preferences
Check and uncheck general preferences that will add to the ease of using SpinOffice. For
instance the option to adjust date format, the ability to show an extra company name line,
street numbers and US states.
When using SpinOffice with multiple users this can be seen as the company preference part.
All settings here count for every user of the database.
Sync settings
Both the Limited and the Pro version support synchronization of all contacts in SpinOffice
with your Apple Address Book on your iPhone, iPad and Mac via a CardDAV sync account.
Enable the option and an email with details will be send to you. (Paragraph 14.1 Contact
sync)
Email templates
Via this menu item you are able to manage your mail templates. By default there is an
incoming and outgoing call report template and an email template. New templates can be
46 / 52
added, edited and saved. This menu item is also accessible via the arrow next to 'Email' in
the toolbar menu. (Paragraph 5.3 Managing email templates)
Manage template tabs
Email templates can be categorized into tab items here. New tab items can be made by
entering text in the last row. Next to ‘Default templates’, the following are created in your
account; ‘General templates’, ‘Internal templates’ and ‘Tender templates’.
As soon as you add a new email template to one of these (via previous menu item), the tab
will appear in the menu under the arrow next to 'Email' in the toolbar. Email settings (POP/IMAP)
Your POP/IMAP email properties are saved here. If you have configured your email in the
during first login, the information you have set will be displayed in this admin section.
Multiple new mail accounts can be added here by entering POP/IMAP information of any
domain in the last empty row. (Chapter 5 Integrating your email)
My personal profile
Add personal information about yourself so that an email template is filled with your
information via mail-merge fields. (Paragraph 1.2 Start the tour or Get started)
Contact type
In this section you are able to manage the different contact types. The meaning of contact
types is explained in chapter 3. The section gives an overview of all contact types created.
Click on them to see and edit the format of the contact type. Add a contact type via the
yellow “+” icon. Deleting contact types is only possible if there are no contact matching that
type. (Paragraph 3.9 Managing the card format via Contact types)
Salutation
Manage the drop-down items of the ‘Salutation’ field on the contact card in this admin
menu item. But this feature is smart; you can indicate if salutation is formal or informal and
if it should be followed by the first name or last name. This way you are able to create email
salutations like 'Dear Mr. Smith' or 'Hi John’. (Paragraph 3.2 Explanation of labels & fields
on the contact card)
Keywords
The keywords that are listed at the bottom of the contact card screen, can be arranged and
adjusted via this menu item. There is space for 40 keywords and these are often used for
filtering purposes. (Paragraph 3.10 Tab items at the bottom of the contact card)
47 / 52
Action types
In this section, mail templates can be linked to all possible actions. You can determine
which template should be used when you send, respond to or forward a message and when
you write a memo or fill in a call report. (Paragraph 5.5 Action types)
Folder types
Define default folders based on the types of files that can be added to it. In the folder list
via menu item Go To; Folder list you will find all previously created folders with the default
types on the left. Every folder you create requires a folder type. (Chapter 8.5 The folder list)
Activity codes
Tasks, appointments and folders can be allocated to an activity. In the task list and folder
list you are able to filter on activity. Manage info fields
Info fields are extra information fields on
the contact card. They are only visible
when labeled in the administration
section via the menu Administration;
Contact type. As default, ‘Info field1’ is
‘Job title’ for every contact type and is
stated as such on the contact cards.
For this active info field ‘Job title’, you are
able to add the job titles that will be
shown at this contact card fields’ dropdown list.
Change password
You have the ability to change your password here. We recommend doing this frequently.
Credits
Credits are used for exporting contacts to MailChimp and for sending SMS text messages.
This menu option gives a status of the amount of credits left, where credits were spend on
and it gives the ability to purchase extra credits. (100 credits cost $5.99)
Extra SMS options
A Pro feature: this allows you to send birthday & scheduled short text messages to your
contacts. Plus there is an option to create text message templates.
48 / 52
13. The benefits of the Pro edition
Use our free SpinOffice Limited edition for as long as you want to see if it fits your needs.
Set up your mail, import existing contacts from various sources, create and manage email
templates, archive call notes and memos, create filters and use SpinOffice to sent out
mailings to your friends or business contacts.
You can try SpinOffice Limited obligation-free until you reach 50 items. Each manually
added contact, sent email, uploaded document and attachment in your database counts as
an item.
What does the unlimited Pro version offer?
✓ Unlimited encrypted storage for all database users
✓ Daily data backup
✓ Phone & email support
✓ The ability to sync with your mobile devices
✓ Many extra features (including Microsoft Office integration, time registration,
document templates and mail merge, multi-user capabilities, sending birthday
& scheduled SMS)
13.1 Annual fee
We only offer an annual price since we believe this will help you the best with making a
good start.
The annual fee for Pro is $299.99 (€ 299,99) per year per user. There are two options to
upgrade your account and to make the payment:
1. Click on Upgrade to Pro in the right corner on top to purchase your license with your
Apple ID in the Mac App Store and PayPal for Windows users.
2. Go to your online Dashboard to purchase Pro licenses for all the available users via
PayPal, iDEAL or bank transfer.
49 / 52
14. Synchronize with mobile devices
Synchronization of data is crucial these days. SpinOffice
offers sync of contacts, calendar and email and the
SpinOffice iPad app contains all your data.
There are some great developments related to the sync at
this moment, so hereby the latest status of what we offer.
14.1 Contact sync
Both the Limited free and the Pro version support synchronization of all contacts in
SpinOffice with your Apple Address Book on your iPhone, iPad and Mac via a CardDAV sync
account. This sync can be enabled via menu item Administration; Sync settings.
14.2 Calendar sync (launch date: Nov-2015)
The ability to synchronize the calendar in SpinOffice across iPhone, iPad and Mac iCal via an
CalendarDAV account will be available in November for Limited and Pro users. At this
moment, Oct-2015, we’re doing the latest tests before launching.
14.3 Email sync
Email in SpinOffice is in sync when IMAP is set as incoming email server for the configured
email account. Many email clients like Gmail, Hotmail/Outlook, AOL mail, Mail.com,
Office365.com, Yahoo, Strato etc. do support IMAP. Both the incoming and send items are
synced with SpinOffice and the primary client.
14.4 Microsoft Exchange sync available
We also offer a MS Exchange box which allow you to sync the contacts, email and calendar
with your iPhone, iPad, Mac Mail and Apple Address Book, Android and Windows devices
and MS Outlook.
With an Exchange box, every contact, appointment or email will automatically be available
on any other device you have on which a SpinOffice exchange box is installed. For example,
you can add new appointments from your SpinOffice account or Mac iCal and then see them
on the road using your iPhone, iPad or Android device. Your agenda, contacts and emails
are saved online and synced automatically so that you’ll have access everywhere.
Annual costs are $40 (€ 40) per year per Exchange box. It is required that we create the box
for you, SpinOffice can’t connect to any existing Exchange account.
50 / 52
15. Training & support
15.1 User support & tickets
For Limited free version users we provide initial free support to help you setting up the
account. If you have questions in the first few weeks, please write us an email or call us:
For English, please call +1-360-209-5609
For Dutch, please call +31-70-311-5400
For Italian, please call +39-386-776-085
Skype (English) is also possible.
After initial support, email and phone support will cost $45 per support item. Once you
have upgraded to Pro, you will be entitled to email and phone support with a maximum of 4
support tickets per month. Each subsequent support ticket will also cost $45 per support
item.
15.2 Online training
The most essential key to a successful CRM project is ensuring that users know how to use
the software. Without that knowledge, new software is a stumbling block that can actually
decrease productivity and cause frustration among you and your colleagues. Our
professional training will teach you how to get things done efficiently, and how to use the
system effectively in the context of your business.
Training for you and your users will pay for itself many times over and will help ensure the
success of your project. Our experience is that customers who were trained report
significantly higher user adoption rates.
- We can train users anywhere in the world
- We use TeamViewer remote support
- We hold interactive classes so you can ask questions
- Online training sessions are typically two hour
Sign up here for our online training ($180)
51 / 52
Helpful resources
On our website you will find an online support center which can answers most of the
common questions that our customers ask us. And you’ll find help with getting started via
some useful tutorials. Please visit our:
- Support center: www.spinoffice-crm.com/support/
- Edition comparison: www.spinoffice-crm.com/edition-comparison/
- FAQ: www.spinoffice-crm.com/faq/
- Contact information: www.spinoffice-crm.com/about-us/contact/
- Online training sign up: www.spinoffice-crm.com/about-us/online-training/
52 / 52