1
iOS User Guide
© 2012 AirWatch, LLC. All Rights Reserved.
This document, as well as the software described in it, is furnished under license. The information in this manual may only be used in accordance
with the terms of the license. This document should not be reproduced, stored or transmitted in any form, except as permitted by the license or by
the express permission of AirWatch, LLC.
Other product and company names referenced in this document are trademarks and/or registered trademarks of their respective companies.
iOS User Guide| v.2012.03 | March 2012
Copyright © 2012 AirWatch, LLC. All rights reserved. Proprietary & Confidential.
Contents
Executive Summary.....................................................................................................................3
Getting Started ...........................................................................................................................4
General Requirements ............................................................................................................................................ 4
Device Requirements .............................................................................................................................................. 4
Prerequisites ........................................................................................................................................................... 4
Enrollment ..................................................................................................................................5
Agent-Less Enrollment ............................................................................................................................................ 6
Agent-Based Enrollment ......................................................................................................................................... 7
Agent ....................................................................................................................................................................... 8
APNs for MDM ........................................................................................................................................................ 9
Dashboard Visibility ....................................................................................................................9
Profiles ......................................................................................................................................12
Profile Types (Payloads) ........................................................................................................................................ 13
Unmanaged Profiles .............................................................................................................................................. 16
Compliance ...............................................................................................................................17
Applications ..............................................................................................................................19
Creating the Web-Based AirWatch App Catalog Web clip .................................................................................... 19
Recommending Public Apps ................................................................................................................................. 21
Distributing Corporate Apps ................................................................................................................................. 24
Advanced – APNs for Applications ........................................................................................................................ 25
App Store Volume Purchase Program (VPP) ..............................................................................28
Download a volume purchased app ..................................................................................................................... 28
Upload a new volume purchased app .................................................................................................................. 29
iOS 5 Features ...........................................................................................................................31
Application Management ..................................................................................................................................... 31
Profile Management ............................................................................................................................................. 32
Managed Settings ................................................................................................................................................. 34
Device Check-Out .................................................................................................................................................. 34
Software Development Kit (SDK) ...............................................................................................35
Passcode configurations........................................................................................................................................ 35
User name and password configurations ............................................................................................................. 35
Access Control Tab ................................................................................................................................................ 36
Compliance Tab ..................................................................................................................................................... 37
Secure Browser .........................................................................................................................38
Secure Content Locker ..............................................................................................................40
Content Organization ............................................................................................................................................ 40
Content Control..................................................................................................................................................... 41
Content Access ...................................................................................................................................................... 41
Content Management & Visibility......................................................................................................................... 42
iOS User Guide | v.2012.03 | March 2012
Copyright © 2012 AirWatch, LLC. All rights reserved. Proprietary & Confidential.
Page 1
General Exception Management ...............................................................................................45
User Manual Un-enrollment ................................................................................................................................. 45
iOS User Guide | v.2012.03 | March 2012
Copyright © 2012 AirWatch, LLC. All rights reserved. Proprietary & Confidential.
Page 2
Executive Summary
This information guide is designed for end users of iOS devices and console users of the AirWatch solution. The
documentation below will enable users to understand how Mobile Device Management (MDM) is controlled from the console
and how to navigate and leverage the resources within it. Following the review of this guide, end users will be able to enroll an
iOS device, navigate the console, and understand the various profiles and applications that can be installed on a device.
Furthermore, there are additional features in the AirWatch solution such as web clips, an internal app store, a volume
purchase program, a Software Development Kit (SDK), along with many other tools which will be explained below. Also, there
is a section outlining the iOS 5 features and new system settings that are available, as well.
The material included will give the user a brief overview and general requirements necessary for enrollment and how each
organization is set up for their devices to communicate across Apple’s network and the AirWatch solution. It will describe in
detail the overview of enrolling a device and the necessary steps required by the end user. More importantly is the description
and the drill-down into the functionality of the console. This document will outline the navigation and functionality of how the
console manages various location groups and how applications and profiles are created and managed.
There are many components, functionality and ways to manage and set up applications. All of this will be outlined and
explained below. It also includes how an Internal App Store is created and how internal applications can be uploaded and
accessed by end users. Furthermore, AirWatch provides a Software Development Kit that can be used to build secure
applications for internal use. This, along with a Secure Browser, is explained in more detail below.
Lastly, there are many tools and resources that are mentioned in this guide to help out any user who is already familiar with
the AirWatch solution or anyone who is utilizing it for the first time.
iOS User Guide | v.2012.03 | March 2012
Copyright © 2012 AirWatch, LLC. All rights reserved. Proprietary & Confidential.
Page 3
Getting Started
The following sections describe the basic requirements for the AirWatch MDM solution.
General Requirements
Before AirWatch can be set up to manage devices, a few things will be needed:
An AirWatch environment that has been set up for the organization.
Network administrative information such as email server and EAS gateway, if one exists.
Devices to enroll.
Device Requirements
To manage devices with AirWatch, you must meet the following device requirements:
An Apple Push Notification Service Certificate (APNs Cert) for your corporation.
For optional enrollment using the AirWatch agent (for added functionality such as GPS tracking), each device must
have access to the App Store, and an Apple ID to download apps.
APNs Notes: It is required that your organization have an APNs certificate to manage iOS devices. The APNs is used to allow AirWatch to
securely communicate to your devices over-the-air (OTA).
Each organization needs their own APNs certificate to ensure a secure mechanism for their devices to communicate across
Apple’s push notification network. Acquiring an APNs certificate is a partnership directly between your organization and Apple.
AirWatch cannot provide or issue an APNs certificate to your organization.
AirWatch uses your APNs certificate to send notifications to your devices when the Administrator requests information or
during a defined monitoring schedule. No data is sent through the APNs server, only the notification.
Prerequisites
Before any user begins to enroll a device, they need to make sure the device can connect to the App Store, which requires an
Apple account to be setup on the device.
The following information will be needed to begin:
The URL of the enrollment page - This URL is specific to your organization’s environment, and is set during the initial
environment install (e.g. awmdmsever.com).
An activation code (aka Group ID) - This code will be set in the console (under Locations & Groups > Add Child
Location Group), and input on the device at the enrollment page. It is possible to set separate activation codes for
specific sets of device profiles.
User Credentials - These can be the same as the network directory services credentials, or they can be explicitly
defined in the console.
Note: The iPhone Configuration Utility (iPCU) is also a useful tool to have, which can be downloaded from the Apple website – It lets the
user easily create, maintain, encrypt, and install configuration profiles, track and install provisioning profiles and authorized applications,
and capture device information including console logs.
iOS User Guide | v.2012.03 | March 2012
Copyright © 2012 AirWatch, LLC. All rights reserved. Proprietary & Confidential.
Page 4
Enrollment
Enrollment of iOS devices in the AirWatch system is a simple and streamlined process. Enrollment can either use the AirWatch
MDM Agent from the iTunes, AppStore, or use a completely clientless approach using only the devices web browser to enroll.
Upon enrollment, pre-set profiles begin downloading immediately on the device which will also be visible in the management
console.
Either of these processes will result in the following flow of events:
The device is directed to a portal site
User authentication takes place
Device authentication takes place
Management profiles and settings begin to download to the device
iOS User Guide | v.2012.03 | March 2012
Copyright © 2012 AirWatch, LLC. All rights reserved. Proprietary & Confidential.
Page 5
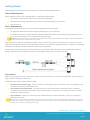
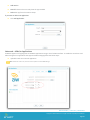
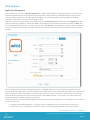
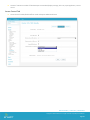
Agent-Less Enrollment
Open Safari on the device, enter the enrollment URL in the address bar or click on an address in an enrollment
email or a SMS message. You are prompted to enter an activation code (Group ID) as shown.
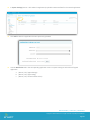
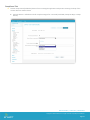
After entering the access code, you are prompted for user enrollment credentials. The enrollment configuration
that has been specified in the console determines the credentials.
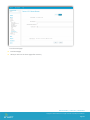
After the credentials are validated, you are prompted to install the AirWatch Enrollment Profile. Clicking “Install”
brings up the Install Profile confirmation dialog box. Click Install Now.
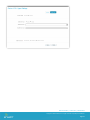
You are prompted by the device one final time to accept the remote device management module. The device is
now enrolled in the console and should begin receiving the profiles that have been assigned to it in the
management console.
iOS User Guide | v.2012.03 | March 2012
Copyright © 2012 AirWatch, LLC. All rights reserved. Proprietary & Confidential.
Page 6
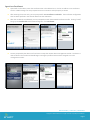
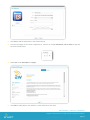
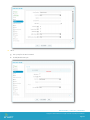
Agent-Based Enrollment
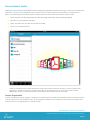
To enroll an iOS device, open Apple’s App Store and search for the AirWatch MDM Agent. Install the Agent. An
AirWatch icon shows up as displayed below.
Tap the AW icon. The enrollment page opens where you are asked for the server URL and the Activation Code
(Group ID). Click Save My Information. You are directed to a Device Info page, move on with the enrollment
process by clicking on the ‘Key’ icon. The following page prompts for user enrollment credentials.
The following steps are the same as those mentioned in enrollment using the web browser. After the credentials are
validated, you are prompted to install the AirWatch Enrollment Profile. Clicking “Install” brings up the Install Profile
confirmation dialog box. Click Install Now. You are prompted by the device one final time to accept the remote
device management module. The device is now enrolled in the console and should begin receiving the profiles that
have been assigned to it in the management console.
iOS User Guide | v.2012.03 | March 2012
Copyright © 2012 AirWatch, LLC. All rights reserved. Proprietary & Confidential.
Page 7
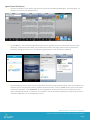
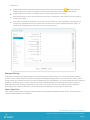
Agent
Using the AirWatch Console, the Admin has the ability to set Passcodes and enable GPS through the agent. From System
Settings Device iOS Agent Settings:
From here, the Admin can enter a password which will allow access to the AirWatch Agent on the device.
Ability to enable GPS setting.
Modify heartbeat, data sample, and data transmit intervals.
iOS User Guide | v.2012.03 | March 2012
Copyright © 2012 AirWatch, LLC. All rights reserved. Proprietary & Confidential.
Page 8
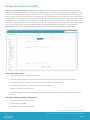
APNs for MDM
A slightly different look on the screen below; however, the information has not changed:
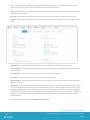
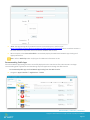
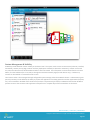
Dashboard Visibility
From the Dashboard, IT Administrators can access the following information and request information from a device. Click on
the friendly name of the device from the main dashboard and the information below will be displayed. If the command is
grayed out on the dashboard it means that it is not available for that specific device/platform.
Security - Displays the current status of the Security of the device - if it’s compromised, if the device is currently
enrolled, Passcode, Encryption and Certificate information, and overall information on the applications and
profiles on the device. Each subsequent tab will go into further detail about this information.
Note: For the console to acknowledge if the device is compromised or not, the user needs to enroll using the
agent, not over the air (OTA).
Profiles - This tab lists the profiles that are associated with the device. The status indicates if the profile is
installed, is pending installment or removed from the device. The actions include deleting and installing profiles
from here.
Apps – Similar to profiles, this tab indicates the status of the Application, Type (public or internal), Name, Version
and Size.
Certificates – This information includes which Certificates are loaded on the device, first and last seen (time &
date) and when the Certificates are valid from.
iOS User Guide | v.2012.03 | March 2012
Copyright © 2012 AirWatch, LLC. All rights reserved. Proprietary & Confidential.
Page 9
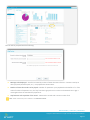
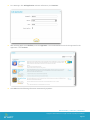
User – The User Information displays a snapshot of the User’s name, status, email address, location group,
security type, contact number and a list of devices that the user is enrolled in.
GPS – Powered by Bing, this tab will give location information where the device is located; both Road View and
Bird’s Eye view are available.
Event Log – The event log lists the time and event of communication between the device and the console.
Content – Feature for iPads to display documents accessed from the Secure Content Locker (described in detail
below).
Device Query – Command requesting information from the device to be sent back to the console.
Clear Passcode – Gives the IT Admin the ability to clear the passcode on a device allowing the end user to reset
their passcode.
Send Message – Feature to send a message via Email, Push Notification or SMS.
Lock Device – Feature that can remotely lock a device from the console.
Enterprise Wipe – Remotely un-enrolls a device from the console; resets the device back to the settings before
MDM was installed.
Find Device – A recent enhancement is the functionality to send a remote command to a device to play a sound
for a customized duration and number of time the sound will play for. Custom AirWatch Sound is built into the
AW Agent to distinguish from iOS defaults; also, sound can be played repeatedly and gaps between repetitions
can be defined. This feature can be integrated into an SDK based app, as well as, on the AW Agent. Furthermore,
end users can access functionality from the Self Service Portal and provide an end user the ability to locate a
misplaced device.
From the Dashboard, click on the Friendly Name > Find Device:
iOS User Guide | v.2012.03 | March 2012
Copyright © 2012 AirWatch, LLC. All rights reserved. Proprietary & Confidential.
Page 10
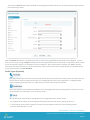
The user will be prompted with the following:
Message to be displayed – Text field is limited by number of APNs characters allowed – characters used up in
other payloads (sound file path, etc.). Pre-populated as shown above.
Number of times the sound is to be played – Number of repetitions is pre-populated to the default of 1. If the
value of number of repetitions is 1, the “Gap” text box is grayed out so no value can be entered since a gap is
meaningless when the sound will be played once.
Gap between each repetition of the sound - Measured in seconds and a minimum value of 10
Note: Similar functionality is also available in the Self Service Portal.
iOS User Guide | v.2012.03 | March 2012
Copyright © 2012 AirWatch, LLC. All rights reserved. Proprietary & Confidential.
Page 11
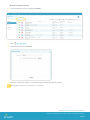
Profiles
AirWatch enables IT administrators to create and deploy configuration profiles that define enterprise settings, policies, and
restrictions for smart devices without user interaction. AirWatch delivers signed, encrypted, and locked configuration profiles
over-the-air to ensure they are not altered, shared, or removed. This section discusses the types of profiles that can be
deployed through AirWatch and the process to deploy them.
From the AirWatch console, select Apps and Profiles > Profiles.
Click Add to create a new Profile.
Select Platform.
iOS User Guide | v.2012.03 | March 2012
Copyright © 2012 AirWatch, LLC. All rights reserved. Proprietary & Confidential.
Page 12
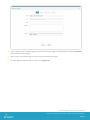
The first tab is General that needs to be filled out including required information such as Location Group and the Name of
the Profile being created.
After the General Information is completed, the user can click on any payload below that needs to be configured. For each
section, first start by clicking ‘configure’ and then fill out the required information for each field. A new profile can be created
for just one specific category or a combination of many categories. After all information is entered, click Save to save the
information that was just entered. If the IT Administrator wants to push out the newly created Profile to all enrolled devices
in the Location Group, click Save & Publish.
Profile Types (Payloads)
Passcode profiles require end-users to protect their devices with a passcode each time they return from idle state. This
ensures that all sensitive corporate information on managed devices remain in the right hands. If multiple profiles
enforce separate passcode policies on a single device, the most restrictive will be enforced.
Restrictions profiles limit the features available to users of managed devices by restricting specific content such as the
use of YouTube, the iTunes Store, or the on-device camera.
Wi-Fi profiles push corporate Wi-Fi settings directly to managed devices for instant access.
To configure Wi-Fi profiles, select the appropriate wireless protocols and security settings in this area.
If an Enterprise security type is selected, you will then be prompted to select one of the following options:
Protocols, Authentication, or Trust
iOS User Guide | v.2012.03 | March 2012
Copyright © 2012 AirWatch, LLC. All rights reserved. Proprietary & Confidential.
Page 13
“Protocols” allow the user to then select your EAP type to configure the EAP-FAST Protected Access Credential
settings
“Authentication” prompts you for a username. The username field accepts Lookup Values, and the value can be
loaded by clicking on the question mark (?) to the right of the text box
“Trust” allows you to specify which certificates should be trusted for the purpose of validating the authentication
server for the Wi-Fi connection
VPN profiles push corporate virtual private network settings to corporate devices so that users can securely access
corporate infrastructure from remote locations.
Email profiles send email configurations directly to devices so that end-users automatically receive email.
If the username, password, or alternate SMTP servers are omitted, then the user is prompted for them when they
access the account
Multiple accounts can be added by clicking the plus (+) button
Exchange ActiveSync profiles allow end-users to access corporate push-based email infrastructure.
The user can create a profile for a specific user by specifying the domain name, user name, and email address,
and password, or they can leave the password field blank and the users will be prompted for their password – If
they choose this configuration they must use a lookup value for the username field.
If the user chooses to use certificates to validate the ActiveSync connection and wish to include them in the
profile, select one of the two options listed under Certificate Type.
Uploaded Certificate –This will allow the user to upload a certificate and include a pass-phrase that the user must
enter before receiving the certificate.
Certificate Authority – This will allow the user to specify the Certificate Authority in existence on the local
network as the source of the certificate.
You can configure multiple Exchange accounts by clicking the Add (+) button.
This section can be configured with LDAPv3 directory information. The fields in this section support lookup values.
Click on the tool tip for keys and definitions.
This section can be configured with information to allow the users to sync wirelessly with the company’s CalDAV server.
The fields in this section support lookup values. Click on the tool tip for definitions.
This area allows for configuration of Subscribed Calendars. The fields in this section support lookup values. Click on the
tool tip for definitions.
iOS User Guide | v.2012.03 | March 2012
Copyright © 2012 AirWatch, LLC. All rights reserved. Proprietary & Confidential.
Page 14
This section allows for specific configuration of CardDAV services. The fields in this section support lookup values. Click
on the tool tip for definitions.
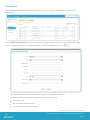
Web Clip profiles send down clickable hyperlinks in the form of an icon onto devices for quick access to common web
resources. For example, to add the online version of the iPhone User Guide to the Home screen, specify the web clip
URL: http://help.apple.com/iphone/. Multiple Web Clips can be added per profile by clicking on the plus (+) sign in the
top right corner of the window.
The label is the name that appears on the screen.
The URL is the address that the user will be redirected to on the device. This can be internal or external.
Removable - It will specify whether or not the user has the ability to remove the Web Clip from their device.
Icon - To add a custom icon, select a graphic file in gif, jpeg, or png format. For best results provide a square
image no larger than 400 pixels on each side and less than 1 MB in size when uncompressed. The graphic will be
automatically scaled and cropped to fit, if necessary, and converted to png format. Web clip icons are 104 x 104
pixels for devices with a retina display of 57 x 57 pixels for all other devices.
Precomposed Icon - Specifying this will stop the device from adding a shine to the icon.
Full Screen - indicates that the address will be loaded full screen on the device without the Safari address bar and
borders.
Credentials profiles deploy corporate certificates to managed devices. If the user’s network supports it, ad-hoc
certificate requests can be configured as well. Multiple credential configurations can be added per profile by clicking
on the plus (+) sign in the top right corner of the window.
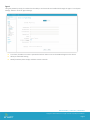
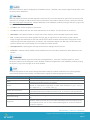
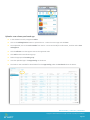
The SCEP payload lets the user specify settings that allow the device to obtain certificates from a CA using Simple
Certificate Enrollment Protocol (SCEP). The table below is a guide for determining appropriate values.
Setting
Description
URL
This is the address of the SCEP server.
This can be any string that will be understood by the certificate authority. It can be used
to distinguish between instances, for example.
The representation of a X.500 name represented as an array of OID and value. For
example, /C=US/O=Apple Inc./CN=foo/1.2.5.3=bar, which translates to: * * *“C”, “US”+ +, *
*“O”, “Apple Inc.”+ +, ..., * * “1.2.5.3”, “bar” + + +
Specify the type and value of an alternative name for the SCEP server. Valid values are an
e-mail address (RFC-822), the DNS name of the server, or the server's fully-qualified URL.
A pre-shared secret the SCEP server can use to identify the request or user.
Select a key size, and—using the checkboxes below this field—the acceptable uses of the
key.
If your Certificate Authority uses HTTP, use this field to provide the fingerprint of the CA’s
certificate, which the device will use to confirm authenticity of the CA’s response during
the enrollment process. You can enter a SHA1 or MD5 fingerprint, or select a certificate
to import its signature.
Name
Subject
Subject Alternative Name
Challenge
Key Size and Usage
Fingerprint
iOS User Guide | v.2012.03 | March 2012
Copyright © 2012 AirWatch, LLC. All rights reserved. Proprietary & Confidential.
Page 15
Advanced profiles allows for advanced access point configuration.
Custom Setting profiles allow for custom XML profiles to be included in the profile payload. The code to be inserted in
the text box should begin with and include the second appearance the <dict> tag in the exported .mobileConfig file.
Unmanaged Profiles
Unmanaged profiles do not require the device to be managed. They can be installed on a device during the enrollment process
or after the device has been enrolled. And when MDM is broken they remain on the device. An unmanaged profile can be
password protected. Once on the device they cannot be removed by the user without proper credentials. The end user is
prompted at the end of enrollment to install all assigned profiles. After a device is enrolled, the end user is prompted to install
new unmanaged profiles via an APNs message (requires the AirWatch MDM Agent). Unlike managed profiles that are sent
directly to the device without the user’s acknowledgement, unmanaged profiles do require the end user to be prompted to
install the profile.
iOS User Guide | v.2012.03 | March 2012
Copyright © 2012 AirWatch, LLC. All rights reserved. Proprietary & Confidential.
Page 16
Compliance
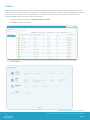
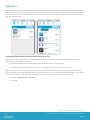
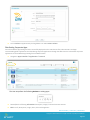
From the Compliance tab, users can Blacklist certain apps, as well as, set specific Blacklist Rules if a device is ever
compromised.
From the Application Compliance tab, users can select from existing compliance rules for the applications listed. Under
Actions, the application rule can be modified or deleted. To add a new compliance rule, click
The Application Name is the same as “Identifier” in iPhone Configuration Utility (iPCU)
The following actions can be taken if the application is found on the device:
Send SMS to User
Wipe the Device to factory settings
Un-enroll the Device (Enterprise Wipe)
:
iOS User Guide | v.2012.03 | March 2012
Copyright © 2012 AirWatch, LLC. All rights reserved. Proprietary & Confidential.
Page 17
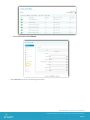
From the Device Compliance tab, IT Administrators also have the ability to take similar actions if a device is compromised:
iOS User Guide | v.2012.03 | March 2012
Copyright © 2012 AirWatch, LLC. All rights reserved. Proprietary & Confidential.
Page 18
Applications
AirWatch enables enterprises to build secure business apps, which can be deployed, managed and secured alongside public
apps via a custom enterprise app catalog. For end-users, this enterprise app catalog can be deployed as a web-based solution
or native app solution so that recommended public applications and internally deployed applications can be selected from a
single centralized location.
Creating the Web-Based AirWatch App Catalog Web clip
The first step to deploying applications using the AirWatch solution is deploying the AirWatch App Catalog to managed
devices. There are two ways of doing this:
By sending the Web-Based AirWatch App Catalog to devices in the form of a Web Clip.
By installing the Native AirWatch App Catalog on all managed devices using advanced processes.
Whereas the first method is a simple process that can be easily deployed through commonly used AirWatch management
profile capabilities, the second method involves either a two step process, or advanced deployment techniques. The following
section explains how to complete the first method, creating the Web-Based AirWatch App Catalog Web Clip:
Navigate to Apps & Profiles Profiles
Select Add
iOS User Guide | v.2012.03 | March 2012
Copyright © 2012 AirWatch, LLC. All rights reserved. Proprietary & Confidential.
Page 19
Fill out information under General:
Select Web Clips and fill out the following information:
iOS User Guide | v.2012.03 | March 2012
Copyright © 2012 AirWatch, LLC. All rights reserved. Proprietary & Confidential.
Page 20
Note: The App Catalog URL for AirWatch versions 5.14 and above is in the format of
https://<YourEnvironment>/devicemanagement/AppCatalog?uid={DeviceUid} where <YourEnvironment> is
the main URL that a corporation uses to access the AirWatch web console
When complete, select Save and Publish to immediately deploy the Web-Based AirWatch App Catalog to all
appropriate devices
Note: Refer to Web Clips under Profile Types for additional information on this.
Recommending Public Apps
Once the AirWatch App Catalog has been successfully deployed to the smart device fleet, administrators can begin
recommending public applications and distributing corporate applications through the Web Console.
To recommend public apps to the AirWatch App Catalog from the Web Console:
Navigate to Apps & Profiles Applications Public
iOS User Guide | v.2012.03 | March 2012
Copyright © 2012 AirWatch, LLC. All rights reserved. Proprietary & Confidential.
Page 21
For a New app: Click Add Application and enter information; click Continue.
After selecting Apple as the Platform, enter the App Name. The console defaults to search the app store for the
application. Click Continue.
Click Select and the following information automatically populates:
iOS User Guide | v.2012.03 | March 2012
Copyright © 2012 AirWatch, LLC. All rights reserved. Proprietary & Confidential.
Page 22
Click Save to add this application to the Location Group.
From the main page on the console > Applications, the user can review information, edit or delete an app that
has been already saved.
Select Info to edit Description or Images:
Click Edit to modify Name, URL, Platform or other information seen here:
iOS User Guide | v.2012.03 | March 2012
Copyright © 2012 AirWatch, LLC. All rights reserved. Proprietary & Confidential.
Page 23
You can Delete an application by clicking delete icon under Actions column.
Distributing Corporate Apps
Once the AirWatch App Catalog has been successfully deployed to the smart device fleet, administrators can begin
recommending public applications and distributing corporate applications through the Web Console. To distribute corporate
applications to the AirWatch App Catalog from the Web Console:
Navigate to Apps & Profiles Applications Internal
The User can perform the following Actions on existing apps:
Review/Edit the following Information: Description, Images, EULA and Previous Versions
Edit the Info, Description, Images, EULA, Files and Assignment
iOS User Guide | v.2012.03 | March 2012
Copyright © 2012 AirWatch, LLC. All rights reserved. Proprietary & Confidential.
Page 24
Add Version
Search for devices that currently have the app installed
Delete the app from the Location Group
If you want to add a new application:
Click Add Application:
Advanced – APNs for Applications
AirWatch supports self signing internal AirWatch applications using a client’s APNs certificate. To enable the console to send
APN messages to an application that supports APNs messaging follow the below steps:
Upload the APP as an internal application
Note: Under the “Files” tab, the user has the option to select APN settings:
iOS User Guide | v.2012.03 | March 2012
Copyright © 2012 AirWatch, LLC. All rights reserved. Proprietary & Confidential.
Page 25
In System Settings (Device > iOS > APNs For Applications) upload the APN certificate for the internal application:
Click Add to select the Application that was previously uploaded:
Visit the Notification tab in the corresponding application screen in system settings to select the self signed
application
a. (Device / iOS / Agent Settings)
b. (Device / iOS / App Catalog)
c. (Device / iOS / Secure Content Locker)
iOS User Guide | v.2012.03 | March 2012
Copyright © 2012 AirWatch, LLC. All rights reserved. Proprietary & Confidential.
Page 26
iOS User Guide | v.2012.03 | March 2012
Copyright © 2012 AirWatch, LLC. All rights reserved. Proprietary & Confidential.
Page 27
App Store Volume Purchase Program (VPP)
The App Store Volume Purchase Program enables customers to purchase iOS applications in volume and distribute them to
their end users; this is only available in the HTML App Catalog. By leveraging the AirWatch Console and iOS App Catalog,
AirWatch is able to provide order management and tracking of volume purchases, distribution of application redemption
codes/licenses, general compliance monitoring, and application installation. The process works as follows:
iOS applications are purchased/ordered through the Apple Volume Purchase portal (outside of AirWatch). A
volume purchase is associated to one order for an application, and the order includes redemption codes to be
used by individual users to download these pre-purchased applications from the App Store.
Apple sends the Orders information via .xls format; customers then need to convert the orders to a .csv format to
upload into the AirWatch console (App & Profiles/Orders). Upon upload, the orders are created in a ‘new’ status.
Admin users must approve each order before the application can be downloaded by individual users. Admin
users also have the option of deleting orders or placing orders on hold for general exception processing.
Upon order approval, the associated licenses need to be allocated to users. This can be accomplished by selecting
all or select users within the assigned Location Groups. Either way, Admin users can choose to partially allocate
an order. Upon license allocation, the application is available to be downloaded by individual users on a first
come first serve basis. Licenses can be reserved or unassigned as required. At this point, an optional message can
be sent by the admin user to notify the end users of the available license for the application.
End users leverage the app catalog (‘Purchases’ tab) to redeem the license code and download the application.
Purchased applications are displayed where active redemption/license codes are still available. Once
downloaded, the license code is marked as ‘Redeemed’.
When the first license code is redeemed and the application is downloaded to a device the order status changes
to ‘In Process’. Once all license codes are redeemed, the order status is updated to a ‘Complete’ status.
Download a volume purchased app
Open the App Catalog on the device.
Navigate to the purchased tab to see company VPP apps available.
Click Install, and AirWatch will dynamically assign an available redemption code.
Select Done when the process is complete.
Navigate to the app catalog to Public Apps.
Find the newly downloaded app and click Install.
iOS User Guide | v.2012.03 | March 2012
Copyright © 2012 AirWatch, LLC. All rights reserved. Proprietary & Confidential.
Page 28
Upload a new volume purchased app
In the AirWatch console, navigate to Orders.
Click on the Add Application button to upload the csv – select the correct app and click Save.
Once uploaded, click on the order number from the list - review and modify the information, and then select Save
and Approve.
Click the Allocate icon that appears next to the approved order.
Click Add to add a new allocation group.
Select the appropriate location group.
View the uploaded app in the App Catalog on the device.
The Order is now available for downloaded from the App Catalog under the Purchased tab on the device.
iOS User Guide | v.2012.03 | March 2012
Copyright © 2012 AirWatch, LLC. All rights reserved. Proprietary & Confidential.
Page 29
Actions
Delete – Ability to completely delete the Order.
Notify – Feature allows IT Admin to communicate users of the available app.
Allocate – Needed to fully process the Order(s) to Location Group(s) (see above).
iOS User Guide | v.2012.03 | March 2012
Copyright © 2012 AirWatch, LLC. All rights reserved. Proprietary & Confidential.
Page 30
iOS 5 Features
Application Management
iOS 5 introduces the concept of ‘Managed Applications’. AirWatch MDM supports managed applications and can push and
install new/updated applications during the enrollment process or upon publishing. Managed applications apply to both
internal and public applications, and also support management of purchased applications by using MDM to distribute
redemption codes from the Volume Purchase Program (VPP).
Automatic installation of applications is controlled through a new ‘assignment type’ setting within the Assignment tab when
creating or editing an application. When set to ‘Auto,’ the applications are automatically installed on the device (Note: The
user is prompted on the device prior to install) and when set to ‘On Demand,’ the applications can be individually installed by
the end user from the App Catalog. Automatic install of purchased applications assumes that redemption codes have been
allocated.
iOS 5 also supports the removal of managed applications. Managed applications can be removed on-demand from the
console (using either Applications tab in the dashboard or the View Devices page in Application Management) or automatically
(with an enterprise wipe or when MDM is manually broken by the end user from the device). Administrators can optionally
choose to allow an application to remain installed on devices after MDM is broken – this control is also defined within the
Assignment tab when creating or editing an application.
To improve general visibility the following application status/reasons have been introduced. This information is also written to
the device’s event log:
Pending Install/Needs Redemption – a VPP app requires a redemption/license code to install it on the device.
These codes may not be available if the there are none or not enough codes allocated to the Location Group.
iOS User Guide | v.2012.03 | March 2012
Copyright © 2012 AirWatch, LLC. All rights reserved. Proprietary & Confidential.
Page 31
Pending Install/Redeeming – The license is in the process of being redeemed against Apple’s VPP.
Pending Install/Prompting – The end user is prompted to install or not install the application.
Pending Install/Installing – The applications is being installed. This status will only be visible for larger
applications.
Installed/Confirmed – The application has been installed.
Installed/User Installed – The application was manually installed by the user.
Pending Removal/MDM Removal – The application is configured to be removed during an enterprise wipe,
removed on a manual break of MDM, or was removed by an admin user from the dashboard or view devices page
and is in the process of being removed. This status will only be visible for larger applications.
Removed/MDM Removed – The application was removed (see above).
Removed/User Removed – The application was removed manually by the user.
Removed/Install Rejected – The user did not install the auto-pushed application.
Removed/Install Failed – The installation failed.
Unknown/Unknown –unknown status of the application.
New application management features are only available to managed applications. To determine which features are available,
applications are now classified as managed or unmanaged applications.
Managed Applications:
Applications that have been installed through AirWatch MDM 5.17 or greater where the device is currently
running iOS 5 at the time of enrollment.
Managed apps include internal applications, purchased applications (tied to VPP) and free public or
recommended applications (from Apple’s App Store).
Unmanaged Applications:
Applications installed on an iOS 4 device enrolled under any AirWatch MDM release.
Applications installed on an iOS 5 device enrolled under AirWatch MDM release 5.15 or less.
Applications installed on an iOS 4 devices in AirWatch MDM release 5.17 or greater in which the devices has been
upgraded to iOS 5 but not re-enrolled.
Applications manually installed on an iOS 4 or iOS 5 device external to AirWatch MDM (i.e. via iTunes, iPCU, etc.)
Profile Management
Profile Management includes enhancements to support the following new payload configurations supported by iOS 5
Email and EAS Payloads:
Enable/disable S/MIME (Secure/Multipurpose Internet Mail Extensions) along with the ability to define an
S/MIME certificate or encryption certificate.
Prevent users from moving mail from one account to another. This prevents users from using another email
account as the ‘From’ user.
Enable/disable use of mail account in 3rd party applications. For example, if you wanted to forward and
email/article from CNN, this would prevent you from selecting your mail account currently under MDM.
iOS User Guide | v.2012.03 | March 2012
Copyright © 2012 AirWatch, LLC. All rights reserved. Proprietary & Confidential.
Page 32
Wi-Fi:
Set a proxy for the Wi-Fi network
Enable/disable auto-join
iOS User Guide | v.2012.03 | March 2012
Copyright © 2012 AirWatch, LLC. All rights reserved. Proprietary & Confidential.
Page 33
Restrictions:
Enable/disable Cloud backup and Cloud document and key value synchronization (
Note: Key value sync
enables applications to store small amounts of data like the application state or setting in the iCloud).
Enable/disable Photo Stream. If enabled, photos can be synchronized across devices.
Automatically allow or reject non trusted HTTPs certificates. If enabled, this will prevent users from going to
unsafe external URLs.
Force iTunes to prompt for password entry for each iTunes transaction. Currently Apple prompts the user to
re-enter their password when there’s greater than 15 minutes of in-activity between application installs. If
enabled, this configuration prompts the user for each new transaction.
Managed Settings
AirWatch has introduced managed settings for Voice Roaming and/or Data Roaming. Each can be individually enabled or
disabled at the Location Group level (System Settings/Device/Managed Settings) which control all devices for that Location
Group and also set at the device level via a new command/action from the dashboard. It is recommended that the roaming be
disabled for all devices at the Location Group level and then enabled/disabled at the individual device level as required.
Regardless of the level, enabling or disabling roaming sends a command to the device to enable or disable capabilities.
Roaming and other network information can be viewed within the Network view of the device details page.
Device Check-Out
iOS 5 capabilities also include the ability to detect when users manually break MDM from their device. This information is
accurately reflected within the Dashboard.
iOS User Guide | v.2012.03 | March 2012
Copyright © 2012 AirWatch, LLC. All rights reserved. Proprietary & Confidential.
Page 34
Software Development Kit (SDK)
AirWatch’s Software Development Kit (SDK) enables customers to leverage standardized MDM related security policies,
validations, and functionality within their own internal .ipa/application. The SDK is enabled through two components. The
first is the SDK library which is complied into the customer’s .ipa/application. The library includes functionality to support
beacon, logging, certificate trust evaluation, command processor, authentication, secure content locker, etc. Once in the .ipa,
customers can call these capabilities in line within their code. The second is the SDK profile that is sent down to devices which
is configurable at the Location Group level within System Settings > Device > iOS > SDK Security. Similar to the library, the
customers can call these capabilities in line within their code. To leverage AirWatch’s SDK capabilities, internal applications
must have the ‘Application uses AirWatch SDK’ enabled. The following capabilities are managed in System Settings:
Authentication Tab (when opening the application): Can be set to None, Passcode OR User Name and Password
Passcode configurations
Passcode complexity – simple or alphanumeric.
Minimum passcode length, minimum number of complex characters and maximum passcode age in days.
Auto-Lock in minutes, Passcode history and grace period for device lock in minutes.
Allow single sign on (SSO) and allow the same passcode for all apps.
Maximum number of failed attempts.
Actions if maximum number of failed attempts is exceeded (display message, lock user, wipe application, restrict
access.
User name and password configurations
Grace period for device lock in minutes.
Allow single sign on (SSO).
Maximum number of failed attempts.
iOS User Guide | v.2012.03 | March 2012
Copyright © 2012 AirWatch, LLC. All rights reserved. Proprietary & Confidential.
Page 35
Actions if maximum number of failed attempts is exceeded (display message, lock user, wipe application, restrict
access.
Access Control Tab
Access Control: Enable/disable offline mode and require MDM enrollment.
iOS User Guide | v.2012.03 | March 2012
Copyright © 2012 AirWatch, LLC. All rights reserved. Proprietary & Confidential.
Page 36
Compliance Tab
Prevent compromised (Jailbroken) devices from accessing the application and prevent restoring a backup of the
current device to another device
Assumes device is Jailbroken and call compliance engine for command (send SMS, Enterprise Wipe, or Wipe
Device).
iOS User Guide | v.2012.03 | March 2012
Copyright © 2012 AirWatch, LLC. All rights reserved. Proprietary & Confidential.
Page 37
Secure Browser
The AirWatch Secure Browser application provides an alternative to Safari internet browsing. Browser security is managed
within System Setting at the Location Group level. Copy/paste or printing capabilities can be enabled or disabled, pops-up
blocked or enabled along with cookie configuration control (always allow, never allow or from visited sites). The home page
can be defined and users can be configurably returned to this home page based on configured inactivity time (in minutes).
System Settings > Device > iOS >Secure Browser
Features include the ability to turn ON/OFF:
Copy/Paste
Printing
Pop-ups
Accepting Cookies
iOS User Guide | v.2012.03 | March 2012
Copyright © 2012 AirWatch, LLC. All rights reserved. Proprietary & Confidential.
Page 38
From the Kiosk page:
Kiosk Homepage
Ability to return to the home page after inactivity
iOS User Guide | v.2012.03 | March 2012
Copyright © 2012 AirWatch, LLC. All rights reserved. Proprietary & Confidential.
Page 39
Secure Content Locker
AirWatch provides Enterprise level Mobile Content Management (MCM) for iPad devices through a new native Content Locker
application. Content can be configured to be accessed in online or offline modes and content data is encrypted on the
device. The following document level content is supported for the initial release of the Secure Content Locker:
iWork: Keynote (including Keynote09), Numbers (including Numbers09), Pages (including Pages09)
MS Office: Excel, PowerPoint and Word
Other: PDF, XML, Text, Rich Text Format (RTF) and HTML
Pictures: JPG and PNG formats
Content is managed at the Location Group level using a new Content menu/user interface. Similar to profiles and
applications, content is created at a Location Group but can be assigned to one or many child Location Groups.
Additionally, content can be made available to devices/end users based on device ownership.
Content Organization
Content is deployed to Pads by category. Categories are configured to be created in the AirWatch solution and used to classify
or group content into a user friendly manner. These categories or folders can be created in a flat structure or through a tree
structure similar to creating folders on a desktop or Mac.
iOS User Guide | v.2012.03 | March 2012
Copyright © 2012 AirWatch, LLC. All rights reserved. Proprietary & Confidential.
Page 40
Content Control
Content can be uploaded to AirWatch individually or through a bulk import process. Similar to other bulk import processes
(User and Admin accounts) in the system, batch status can be monitored and reviewed through an integrated user interface.
When performing a bulk import, an individual file path needs to be specified for content being uploaded. Regardless of the
upload method content information such as version, description, author, notes keywords, etc. can be captured. The document
content is also associated to a category.
Deployment and use is configurable for each type of content. The following capabilities are currently supported:
Content Access Control: Can be set to enable offline viewing or online viewing only
Transfer Method: Can be set to any (cellular) or Wi-Fi Only (no cellular)
Download Type (used for offline viewing only): Can be set to On Demand - controlled by the user OR content can
be pushed automatically upon by download date. Automatic documents (mandatory documents) cannot be
deleted by users
Download Priority (used for offline viewing only): Can be set as high, medium or low for queuing purposes
Content can also be managed using effective and expiration date functionality. This information is tagged on the document
and compared to the device’s current time settings. In addition, it’s also refreshed from AirWatch while the content locker is in
active use, upon application start up or every 5 minutes during inactivity. Content that has expired but has not been
downloaded is no longer available upon expiration. Downloaded content that has expired will be removed from the device
upon expiration. Lastly, the AirWatch solution also provides visibility around previous versions of the same content.
Content Access
To access/download content the user’s iPad must be enrolled in MDM and the native Content Locker application must be
installed from iTunes. To access content, the user is prompted for their Group ID (formerly Activation Code) and User ID and
password. The content locker supports basic, LDAP and Proxy authentication. Once logged in, content is organized and
presented in the order in which it was categorized. If content was set to on demand, then users must find and select the
content to be downloaded. For larger content, the users will be able to monitor the download in real-time. Once the
document has been downloaded it can be selected for viewing within the application or opened using 3rd party application
such as Dropbox (
Note: This is controlled via a system setting that can be accessed and/or changed by navigating to
System Settings Device iOS Secure Content Locker). Additional information such as version and description can be
viewed for the content and users can also flag content as a favorite. Visibility into content is clear and concise. Content can be
filtered by installed/not installed within a category or folder. It can be searched, filtered by favorites or viewed by most recent
documents (~within the last two weeks). The ability for users to delete content is also supported with the exception of
automatic or mandatory documents. Delete is accomplished by selecting/sliding your finger across the document. The
Content Locker also leverages APNs messaging for application badging. The badging value is determined based on the number
of updates and mandatory documents for each device. This can be used to notify users of documentation updates prior to
accessing/opening the application.
iOS User Guide | v.2012.03 | March 2012
Copyright © 2012 AirWatch, LLC. All rights reserved. Proprietary & Confidential.
Page 41
Content Management & Visibility
AirWatch provides detailed content visibility at the device level. The system tracks current content status (unknown, installed,
uninstalled), content priority (high, medium and low), deployment method (on demand or automatic), content version and
size, when the document was downloaded and when it was last viewed. This information can be accessed from the Content
Menu, from the Dashboard (as a new tab) or through the new Device Details page (for iPad devices only). Furthermore,
content can be installed or removed from this screen.
The Content Locker is also managed through configurable system settings within the AirWatch solution. Authentication grace
period (in minutes) can be defined, the ability to prevent the application from being opened in another applications (Dropbox,
etc.) can be enabled or disabled and if the device is/has been compromised (jail broken) or MDM has been broken AirWatch
prevents access to the Content Locker application and performs a complete wipe of the content data on the device.
iOS User Guide | v.2012.03 | March 2012
Copyright © 2012 AirWatch, LLC. All rights reserved. Proprietary & Confidential.
Page 42
Administer Enterprise Content
From the AirWatch console, navigate to Content.
Click
Upload the file and click Continue.
The User will have the ability to complete/modify the following information below:
.
Note: Multiple categories can be selected for one document.
iOS User Guide | v.2012.03 | March 2012
Copyright © 2012 AirWatch, LLC. All rights reserved. Proprietary & Confidential.
Page 43
A new category can be created by going back to the main Content page of the Dashboard and selecting Categories
under Settings Add Category.
Also, from the main Content page, users can sort all documents by Category.
To assign different/multiple Location Groups, click Assignment.
iOS User Guide | v.2012.03 | March 2012
Copyright © 2012 AirWatch, LLC. All rights reserved. Proprietary & Confidential.
Page 44
General Exception Management
User Manual Un-enrollment
The following steps will remove MDM, or any associated profile, from the device. Removing the Global MDM Profile will
cause all other profiles that have been added through MDM to automatically remove themselves.
From the home screen on the device select Settings.
In the settings screen select General, and then scroll down and select Profiles.
The Global MDM Profile should be at the top of the list.
Select this profile, click the Remove button, and confirm the selection on the following screen.
The profile page will now display “No profiles are currently installed.”
iOS User Guide | v.2012.03 | March 2012
Copyright © 2012 AirWatch, LLC. All rights reserved. Proprietary & Confidential.
Page 45
© 2012 AirWatch, LLC. All Rights Reserved.
This document, as well as the software described in it, is furnished under license. The information in this manual may only be used in accordance
with the terms of the license. This document should not be reproduced, stored or transmitted in any form, except as permitted by the license or by
the express permission of AirWatch, LLC.
Other product and company names referenced in this document are trademarks and/or registered trademarks of their respective companies.
iOS User Guide| v.2012.03 | March 2012
Copyright © 2012 AirWatch, LLC. All rights reserved. Proprietary & Confidential.