1
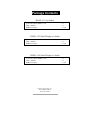
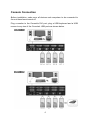
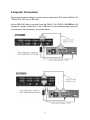
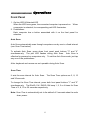
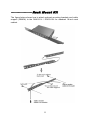
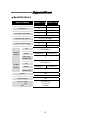
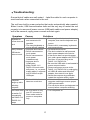
Package Contents DAAG-114 (w/ Audio) 4-Port AcroGear (DAAG-114) User’s manual Rubber foot pad x1 x1 x 1 set DADG-122 (Dual Display w/ Audio) 2-Port AcroGear (DADG-122) User’s manual Rubber foot pad x1 x1 x 1 set DADG-124 (Dual Display w/ Audio) 4-Port AcroGear (DADG-124) User’s manual Rubber foot pad Rextron Technology, Inc. PP5-ZG5800-000-JK Printed in Taiwan x1 x1 x 1 set Table of Content Introduction……………………………………………..1 Overview .............................................……………….1 Features ..............................................……………….1 System Requirements…………………………………2 Console side .......................................……………….2 Computer side.....................................……………….2 Installations……………………………………………..3 PC BIOS Notice ..................................……………….3 Console Connection............................……………….4 Computers Connection ..................... ………………...5 Operations………………………………………………6 Front Panel........................................ ………………..6 Hotkey commands………………………………………8 Rack Mount Kit ................................ ………………11 Appendices……………………………………………12 Specifications ………………………………………….12 Troubleshooting ……………………………………13 Please read this manual thoroughly and follow the Installation procedures to prevent any damage to the KVM switch or any connecting device. * The final specifications are the actual product based. * Features and functions may be added or changed since the manual was written. Please visit our website to download the latest version of manual for reference. RoHS ------------------------ Introduction Overview The AcroGear series, fully compatible with USB specification, are the combination of USB KVM (keyboard/Video/mouse) switch and USB peripherals sharing device. You can easily operate up to 4 PCs, G3/G4 Macs, or Mac Pros respectively from 1 USB keyboard, 1 USB mouse, and 1 DVI monitor saving you space, time, equipment and money. Its peripheral sharing function enables you to share more USB peripherals among all computers. The “FUNC” button for selecting the audio and adjusting the video signal strength. Yet, the AcroGear series support the audio function (Speaker + MIC) as well. Users can switch among four media sources and enjoy the output on one single display and one set of speakers. Installation is as easy as connecting USB A-B cables to computers and to the AcroGear series. Computer selecting is as easy as front panel button pressing. The built-in USB hub ensures smooth switching from one computer to the other. The AcroGear series provide the easiest way to manage multiple computers with USB interface and share USB peripherals among computers. No more tangled cables and messy working environment; let the AcroGear series do the computer switching for you. Features ■ Support DVI Single Link with the resolution up to 1920 x 1200 @ 60Hz ■ 2/4 computers share up to 4 different USB peripherals ■ Front panel push buttons for easy computer selection ■ Front panel FUNC button fore easily adjusting the video signal strength ■ Front panel FUNC button for easily selecting the audio ■ No drivers needed for keyboard and mouse operation ■ Support keyboard and mouse plug-n-play ■ Buzzer sound for computer switching confirmation ■ Activate Auto Scan by front buttons pressing ■ Selectable Scan Time interval ■ Support the DVI monitor ■ Saves time, space, equipment and power ■ USB self-power operation ■ No software required ■ Hotkey functions allow easily computer access ■ Support Windows and Mac host systems ■ Support dual DVI displays (for DADG-122 / DADG-124 only) 1 ------------------------ System Requirements Console side One / Two DVI monitor (Two for dual display type) One USB Keyboard One USB mouse Computer side Each USB-enabled computer must be connected to the DAAG-114 / DADG-124 by One DVI cable for monitor, as shown below One USB A-B cable with Type-A and Type-B plug for USB devices, as shown below 2 ------------------------ Installation PC BIOS Notice The following BIOS setup changes are necessary for PC users and not necessary for Mac users: 1. In STANDARD CMOS, set HALT ON ERROR to ALL BUT KEYBOARD. 2. In PNP AND PCI SETUP, set PNP OS INSTALLED to YES and set USB IRQ to ENABLED. Note: The AcroGear series are applicable for USB keyboard and mouse switching from one computer to the other. If you plan to share other peripherals such as a CCD camera, printer or scanner, it is required to shut down the driver of the computer before switching to another computer. Because port switching is equivalent to unplugging the USB cable from one computer and plugging it to another one, some USB drivers check attached USB peripherals all the time and do not accept plug-n-play function. 3 Console Connection Before installation, make sure all devices and computers to be connected to the unit have been turned off. Plug a monitor to the Console's DVI port; plug a USB keyboard and a USB mouse to any two of the Console's USB ports as shown below. 4 Computer Connection Use a male-to-male cable to connect from a computer's DVI port to DAAG-114 / DADG-124 DVI port of PC side. Use a USB A-B Cable to connect from the DAAG-114 / DADG-124 USB port (B connector, square connector) to the USB port on the corresponding computer (A connector, flat connector), as shown below. 5 ------------------------ Operations Front Panel 1. On-line LED & Selected LED When the LED turns green, the connected computer is powered-on. When a computer is selected, its corresponding red LED illuminates. 2. Pushbuttons Each computer has a button associated with it on the front panel for selection. Auto Scan Auto Scan automatically scan through computers one by one in a fixed interval (see Scan Time below). To activate Auto Scan, press down front panel push buttons "3" and "4" simultaneously. The port LED flashes during Auto Scan. Auto Scan is effective for powered-on computers only. To exit the Auto Scan mode, just tap any one of the pushbuttons. Note: keyboard and mouse are not operable during Auto Scan. Scan Time It sets the scan interval for Auto Scan. The Scan Time options are 3, 8, 15 and 30 seconds. To change the Scan Time interval, press both front panel buttons "1" and "2" simultaneously. The DAAG-114 / DADG-124 beep 1, 2, 3 or 4 times for Scan Time of 3, 8, 15 or 30 seconds respectively. Note: Scan Time is automatically set to the default of 3 seconds when the units loses power. 6 Adjust the Video Signal To adjust the optimal video signal strength corresponding to the length or quality of DVI cable, the user can press “FUNC” button combining with the other pushbuttons. Step 1. Press “FUNC” button three times, the LED of “FUNC” will flash one time per second. Step 2. Press pushbutton “1” one or two times for adjusting the equalization of selected port input video strength with one beep (normal) or two beeps (enhance) respectively. or Press pushbutton “3” one or two times for adjusting the output current of selected port with one beep (normal) or two beeps (enhance) respectively. or Press pushbutton “4” one, two, three, or four times for adjusting the output emphasis of selected port with one beep (no pre-emphasis), two beeps (low pre-emphasis), three beeps (medium pre-emphasis), or four beeps (high pre-emphasis). Step 3. Once the setting is finished, press “FUNC” button one time to exit the setting. Select the Audio Signal To select the audio signal from any port of 4 connected computers, the user can press “FUNC” button combining with the other pushbuttons. Step 1. Press and hold “FUNC” button. Either all of 4 green LEDs light up or just one green LED lights up. All of 4 green LEDs light up means the audio port and the selected computer port are the same; we call it as “tracking mode”. On the other hand, just one green LED lights up (the selected audio port) means the audio port is different from the selected computer port; we call it as “non-tracking mode”. Step 2. While the “FUNC” button is holding, press pushbutton “1” for selecting audio port 1. or 7 While the “FUNC” button is holding, press pushbutton “2” for selecting audio port 2. or While the “FUNC” button is holding, press pushbutton “3” for selecting audio port 3. or While the “FUNC” button is holding, press pushbutton “4” for selecting audio port 4. or While the “FUNC” button is holding, press pushbutton “1” AND “2” for entering the tracking mode. Step 3. Once the setting is finished, release “FUNC” button to exit the setting. Hotkey Commands The Hot-key command is a short keyboard sequence to select a computer, to activate computer scan, etc. KVM Switch interprets keystrokes for hot-keys all the time. A hot-key sequence starts with two left Ctrl keystrokes ( in 0.2 seconds ) followed by one or two more keystrokes. A built-in buzzer generates a high-pitch beep for correct hot-key command; otherwise, one low-pitch beep for error and the bad key sequence will not be forwarded to the selected computer. NOTE: By pressing left Shift + Num Lock + Num Lock + left Ctrl users can enable/ disable the hotkey commands. To select a computer: Left Ctrl + Left Ctrl + Selects the computer at port 1. Left Ctrl + Left Ctrl + Selects the computer at port 2 1 2 Do not use the keypad at the right of the keyboard. To start Auto Scan, automatically scan power- on computers one by one at a fixed interval: 8 Left Ctrl + Left Ctrl + F1 To abort the Auto Scan mode, press the left Ctrl key twice. When Auto Scan detects any keyboard or mouse activity, it suspends the scanning till the activity stops; it then resumes with the next computer in sequence. The length of the Auto Scan interval (Scan Rate) is adjustable, see below. Manual Scan enables you to manually switch back and forth between power-on computers. Left Ctrl + Left Ctrl + F2 Press Ï or Ð to select the previous or the next computer in sequence. And, press any other key to abort the Manual Scan. To adjust Scan Rate, this sets the duration before switching to the next computer in Auto Scan: Left Ctrl + Left Ctrl + F3 The KVM Switch generates 1 to 4 beeps indicating scan interval of 3, 8, 15 and 30 seconds respectively. Audio Stick An optional multimedia module can be LINKed to the back of each KVM switch for selecting microphone and stereo speaker signals. There are two options for Audio Stick: ON and OFF. When set to 'ON', audio selection follows computer selection. When set to 'OFF', audio selection stops to follow computer selection. It is useful if you want to listen to a particular computer's audio signal while operating other computers. Left Ctrl + left Ctrl + F5 The KVM switch beeps once or twice corresponding to ON and OFF respectively. Enforce the audio followed with the selected computer by pressing the following hotkey Left Ctrl + left Ctrl + A USB-Port Rule There are two options for USB-Port Rule: ON and OFF. When set to 'ON', USB-Port selection follows computer selection. When set to 'OFF', USB-Port selection stops to follow computer selection. 1. USB 1: pressing the hotkey below to turn ON/OFF the USB-Port Rule Left Ctrl + left Ctrl + F7 9 Enforce the USB followed with the selected computer by pressing the following hotkey Left Ctrl + left Ctrl + U 2. USB 2: pressing the hotkey below to ON/OFF the USB-Port Rule Left Ctrl + left Ctrl + F8 ON: USB-Port selection followed with computer selection OFF: USB-Port selection followed with USB 1 NOTE: Please make sure that USB device linking procedure has accomplished before switching to the next computer. Alternative Hotkey Commands Users may Press Scroll Lock twice instead. For example, To select a computer: Scroll Lock + Scroll Lock + 1 Selects the computer at port 1. Scroll Lock + Scroll Lock + 2 Selects the computer at port 2 For those keyboards didn’t have or support Scroll Lock, please press and HOLD the left Shift and then press Num Lock twice instead. For example, To select a computer: Left Shift + Num Lock + Num Lock + 1 Selects the computer at port 1. Left Shift + Num Lock + Num Lock + 2 Selects the computer at port 2 NOTE: Shift means press and hold Shift key 10 ------------------------ Rack Mount Kit The figure below shows how to attach optional mounting brackets and cable support (RMK04) to the DAAG-114 / DADG-124 for standard 19-inch rack cabinet. 11 ------------------------ Appendices ․Specifications Specification DAAG-114 DADG-124 Console Port 1 1 Computer Port 4 4 Front panel push button 4 4 Front panel FUNC button 1 1 Hot plug-and-play Yes Automatic scan interval 3, 8, 15, 30 seconds Cable Length (Max) 3M(10ft) for USB Computer ON-LINE LED 4 4 Computer Selected LED 4 4 KB MS Computer Interface Monitor USB Type B x 4 DVI female x 4 Audio Jack 4 (Speaker+MIC) KB MS Console Interface Monitor Audio Jack (Speaker+MIC) DVI female x 8 USB Type A x 4 DVI female x 1 DVI female x 2 1 Hot Key Yes Resolution 1920 x 1200 DDC2B Support Yes H x W x D (mm) 44 x 220 x 130 (in.) 1.7 x 8.7 x 5.1 size Compact 12 ․Troubleshooting: Ensure that all cables are well seated. Label the cable for each computer to avoid confusion when connected to the unit. The unit have built-in power protection that works automatically when needed. When it works, USB communication halts and the only way to restart the unit properly is to remove all power sources (USB patch cables and power adapter), wait a few seconds, apply power sources and start again. Symptom Causes Solutions In Auto Scan, keyboard and mouse are not mouse does not operable. work Too many keyboards or mouse drivers installed. Newly installed Improper device driver. Device consumes too USB device much power. does not work. Device consumes too much power instantaneously. Improper device initialization. When DAAG-114 / DADG-124 work under self-power, i.e., no power supply added, it supports max of 100mA as per USB spec. Keyboard or Computer hangs up while Device initialization takes too much time. switching computer. Auto Scan does All PCs are off or only one PC is turned on. not switch PC Scan mode works for automatically power-on computers and DAAG-114 only. / DADG-124 Press any front button to select a computer, then use the keyboard and mouse. Remove ALL unnecessary keyboards and mouse drivers. Re-install device driver. The device should be self-powered, add a power adapter to the device. If the device does not provide power jack, add a power adapter with DC5V of less than 1A current rating to the DAAG-114 / DADG-124. Be sure the USB cable is well seated to ensure communication. Remove all power sources to the DAAG-114 / DADG-124 by unplugging all USB A-B cables and the power adapter; then start all over again. Select the computer by pushbutton, restart the computer and try again. Wait at least 5 seconds before computer switching to ensure proper USB communication. Turn off device driver (not keyboard nor mouse) before computer switching. Turn computers on. beeps 13 The resolution Improper video settings of is not good. DAAG-114 / DADG-124 To adjust the optimal video signal strength corresponding to the length or quality or DVI cable, the user can press “FUNC” button combing with the other pushbuttons. Limited Warranty IN NO EVENT SHALL THE DIRECT VENDOR'S LIABILITY FOR DIRECT OR INDIRECT, SPECIAL, INCIDENTIAL OR CONSEQUENTIAL DAMAGES, LOSS OF PROFIT, LOSS OF BUSINESS, OR FINANCIAL LOSS WHICH MAY BE CAUSED BY THE USE OF THE PRODUCT EXCEEDS THE PRICE PAID FOR THE PRODUCT. The direct vendor makes no warranty or representation, expressed or implied with respect to the contents or use of this documentation, and especially disclaims its quality, performance, merchantability, or fitness for any particular purpose. The direct vendor also reserves the right to revise or update the product or documentation without obligation to notify any user or organization of such revisions or updates. For further information, please contact your direct vendor. All the brand names and registered trademarks are the property of their respective owners. 14