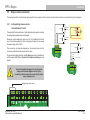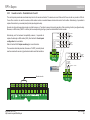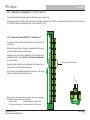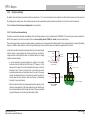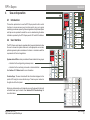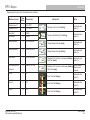
1
RP1r-Supra / VSN-RP1r+ / ESS-RP1r-Supra
Extinguishing Control Panel
User Manual
HLSI-MN-103I v.05
March 2015
RP1r-Supra
Note
Nota:
This manual is valid for the following control panel models:
• RP1r-Supra
• VSN-RP1r+ (no touch screen)
• ESS-RP1r-Supra
To make comprehension easier, when these control panels are mentioned, only the RP1r-Supra model name is used,
however, the information is valid for any of the models indicated above.
HLSI-MN-103-I v.05
http://www.honeywelllifesafety.es
User Manual
2
RP1r-Supra
Index
3.4.6
3.4.7
Contents
1 Introduction
1.1
1.2
1.3
1.4
CE Marking
System Design and Planning
Personnel
General
2 Installation Guide
2.1
2.2
2.3
2.4
Introduction
Pre-installation Check List
Transient Protection
Installation Procedure
2.4.1
2.4.2
2.4.3
2.4.4
Mounting Plate Installation
Panel Enclosure Installation
Installing the Batteries
Enclosure cover
3 Installation
3.1 Cabling Instructions
3.1.1
3.1.2
Cable Terminations
Cable Quality and Installation
3.2 EMC Considerations
3.2.1
3.2.2
Screen Termination
Ferrite Sleeves (Optional)
3.3 Base PCB Wiring Connections
3.4 Input circuits connection
3.4.1
3.4.2
3.4.3
3.4.4
Gas release - Terminal Blocks: A and B
Hold device - Terminal Block: C
Emergency abort device - Terminal block: D
Zone connection - Terminal blocks: E, F and G
3.4.4.1
3.4.4.2
3.4.5
Call points in zone circuits
Gas release call point in zone 3
Technical alarm inputs - terminal blocks: H, I and J
3.4.5.1
3.4.5.2
3.4.5.3
Low pressure signal (LOW PRESS) - Terminal block: H
Flow signal (FLOW PRESS) - Terminal block: I
Door open signal - Terminal block: J
HLSI-MN-103-I v.05
http://www.honeywelllifesafety.es
5
5
5
5
6
7
7
7
7
8
8
9
10
10
11
11
12
12
13
13
13
14
15
15
16
17
18
19
19
20
20
20
20
Digital input - Terminal block: K
Input Monitoring
3.4.7.1
3.4.7.2
21
22
Monitoring with an EOL capacitor
Monitoring with EOL resistor
22
23
3.5 Output circuits connexion
3.5.1
3.5.2
3.5.3
3.5.4
3.5.4.1
3.5.4.2
3.5.4.3
3.5.5
24
Extinguishing release circuits Terminal blocks 1 and 2
Auxiliary 24Vdc Output Circuit - Terminal blocks 3 and 4
Sounder circuits - Terminal blocks: 5 and 6
Status relays - Terminal blocks: 7, 8, 9, 10, 11, 12 and 13
General fault contact (GEN.FAULT) - Terminal block: 7
Status contacts - Terminal blocks: 8, 9 and 10
Operating mode contacts: - Terminal blocks: 11, 12 and 13
Output monitoring
3.5.5.1
3.5.5.2
End of line diode monitoring
End of line resistor monitoring
24
24
25
26
27
27
28
28
29
29
30
4 Use and operation
31
4.1 Introduction
4.2 User Interface
31
31
4.2.1
LED Status Indicators
4.2.1.1
4.2.1.2
4.2.2
Front panel: detection process
Front panel: Release process
Function keys
4.3 Access levels
4.4 Operating modes
4.5 Control Panel Status
4.5.1
4.5.2
4.5.3
4.5.4
4.5.5
Normal Status
Preactivatedstatus(singlezonefirecondition)
Activated status (Double zone alarm condition)
Extinguishing release status
End of extinguishing release
4.6 Auxiliary call points
4.6.1
4.6.2
4.6.3
GAS release manual call point
Hold device
Emergency Abort device
4.7 External signals
4.7.1
LOW PRESSURE signal
32
32
33
34
35
35
36
36
37
38
40
41
42
42
42
43
44
44
User Manual
3
RP1r-Supra
4.7.2
4.7.3
4.7.4
Flow signal (FLOW PRESS)
Door open signal
Digital input
4.8 Disablements
4.8.1
4.8.2
4.8.3
4.8.4
4.8.5
4.8.6
Disable zones
Disable the extinguishing process
Disable the sounders
Silence sounders
Mute Buzzer
Disable external device (only for Belgium)
4.9 Faults
4.9.1
4.9.2
4.9.3
Auxiliary power supply fault
Monitored circuits faults
Sounders Fault / Disabled indicator led
4.10 Other functions
4.10.1 Control panel reset
4.10.2 Evacuation
4.10.3 Leds test
5 Configuration
5.1 Overview
5.2 Configurationmodenavigation
5.3 Available options
5.3.1
5.3.3
5.3.4
5.3.5
Extinguishing options
Sounders options
Line options
Additional options
5.4 Special features (UNE-EN54 non-compliant)
5.4.1 Overview
5.4.2 Specialfunctionsconfiguration
5.5 Restore default values
5.6 Monitoring functions
5.6.1
5.6.2
5.6.3
Overview
Access to monitoring functions
Monitored parameters
Index
45
45
47
48
48
49
49
49
50
50
Appendix A General Wiring Diagram
Appendix B Specifications
Appendix C Accessories
68
69
72
51
51
51
53
54
54
54
54
55
55
55
56
56
60
61
63
64
64
64
65
66
66
66
67
The material and instructions covered in this manual have been carefully checked for accuracy and are presumed to be correct. However, the manufacturer assumes no
responsibility for inaccuracies and reserves the right to modify and revise this document without notice.
HLSI-MN-103-I v.05
http://www.honeywelllifesafety.es
User Manual
4
RP1r-Supra
1
Introduction
Introduction
The purpose of this manual is to provide the user with all recommended procedure descriptions and full technical details for the successful installation and
commissioning of the extinguishing control panel which is referred to.
Procedures described in this manual include appropriate warnings and cautions to guide the user towards adopting safe and methodical work practices during the
installation and commissioning phases.
1.1 CE Marking
This panel is CE Marked to show that it conforms to the requirements of the following European Community Directives:
•
Electromagnetic Compatibility Directive 89/336/EEC (and the amendment of the Directives 92/31/EEC, 93/68/EEC).
•
Low Voltage Directive 73/23/EEC (and the amendment of the Directive 93/68/EEC).
•
The Constructive Products Directive by the application of the following standards:
•
•
•
UNE-EN54-2:Firedetectionandfirealarmsystems-Controlandindicatingequipment.
UNE-EN54-4/A2:2006:Firedetectionandfirealarmsystems-Powersupplyequipment..
UNE-EN12094-1:2004:Fixedfirefightingsystems-Componentsforgasextinguishingsystems-Part1.
1.2 System Design and Planning
Itisassumedthatthesystem,ofwhichtheExtinguishingcontrolequipmentisapart,hasbeendesignedbyacompetentfirealarmsystemdesignerin
accordance with the requirements of EN54 Part 14 (UNE 23007/14) and other applicable local standards.
Thedesigndrawingsshouldclearlyshowthepositionsofallthecontrolpanelandfielddevices.
Extinguishing control panels are manufactured in compliance with national and local standards and meet the requirements of UNE-EN 12094-1:2004, UNEEN 54-2 and UNE-EN 54-4/A2:2006.
However,someinstallationandconfigurationpracticesmaynotmeetthestandards.Contacttheproperauthoritiestoconfirmtherequirements.
1.3 Personnel
Installationofthisproductmustbecarriedoutonlybysuitably-qualifiedelectricalengineers.
Readcarefullythecommissioningandconfigurationproceduresofthismanual.Itisrecommendedbythemanufacturertocheckthewiringlinesbefore
makinganyconnectiontothepanelorequipment.Donotcarryoutanyconfigurationfunctionswithoutfullyunderstandingoftheiroperation.
HLSI-MN-103-I v.05
http://www.honeywelllifesafety.es
User Manual
5
RP1r-Supra
Introduction
1.4 General
This release control panel RP1r-Supra has been designed to manage correctly and according to UNEEN12094-1:2004, UNE-EN 54-2 and UNE-EN 54-4/A2:2006 the automatic release sequence of most
of the extinguishing systems.
Pre-Activated
Activated
Manual
Release
Active
Pressure
Flow
Pressure
Moreover, RP1r-Supra meets the following EN12094:1 Options with requirements:
•
•
•
•
•
•
•
•
•
Delay of extinguishing signal (Section 4.17)
Signalrepresentingtheflowofextinguishingagent(Section4.18)
Monitoring of the status of components - Low pressure (Section 4.19)
Emergency hold device - Sequence b (Section 4.20)
Controloffloodingtime(Section4.21)
Manual only mode (Section 4.23)
Triggering of equipment outside the system (Section 4.26)
Emergency abort device (Section 4.27)
Activation of alarm devices with different signals (Section 4.30)
Low
Z1
Z2
Z3
Power
Released
Monitored
Cct.
Abort
General
Fault
Keypad Access
Lamp test (3 sec.)
System
Disabled
Monitored
Cct.
Hold
Earth
Fault
Silence
Resound
Automatic
Monitored
Cct.
Sounder
Fault
Disabled
Release
Fault
Power
Supply
Fault
Delay
On/Off
Release
Circuit
Fault
Auxiliary
Mute
Buzzer
Manual
Release
Only
System
Fault
Open door
Manual
Only
OFF
Alarm
Disablement
Test
Power Supply
Fault
Evacuate
(3 sec.)
ON
Reset
TheRP1r-Supradesignisbasedonamodularbuildconceptwhichofferstheusercompletelyflexiblesystemsolutions.Eachcontrolpaneliscomprised
ofanumberofseparatebuildmodulestosimplifytheinstallationprocess.Theelectroniccomponentsarecontainedinaneasy-to-fitenclosurespecifically
designed to simplify panel installation. To this end the electronics need not be installed until system commissioning is to be undertaken, thereby reducing
concept).
the incidence of damage or contamination resulting from other ‘trade’ activities. (
RP1r-Supra is a compact control panel which includes a 65W switched power supply with battery charger circuit and it has space provision for two sealed,
lead-acid batteries has (2 x 7 Ah) for backup in case of mains loss.
In accordance with UNE-EN 54-4:A2:2006, compulsory standard from August 2009, it is necessary to supervise the internal battery resistance to guarantee
the battery correct operation in the event of a power supply fault. The control panel carries regular readings of internal battery resistance to check the resistive
value. If this value exceeds 700 mΩ, the control panel will show a power supply fault, indicating that the battery status is not correct.
The control panel has 3 input zones for direct connection of 2-wire conventional detectors or external release call points, 2 release monitored circuits and
2 sounder outputs with different frequencies in order to identify each release state.
The control panel also includes different auxiliary inputs and outputs to manage and signal the operating status and different series communication interfaces
for optional integration with remote monitoring systems (e.g: TG or Fire.IMT).
According to Section 4.17 of UNE-EN 12094-1:2004, it is possible to specify a delay known as a pre-discharge-warning time which shall be adjustable from
00 and 60 seconds, in 5-second intervals. The front panel provides an informative 2-digit display which indicates the time remaining to start the extinguishing
release.
HLSI-MN-103-I v.05
http://www.honeywelllifesafety.es
User Manual
6
RP1r-Supra
2
Installation
Installation Guide
2.1 Introduction
This section is intended to provide you with simple guidelines on how to install the extinguishing control panel quickly and safely.
2.2 Pre-installation Check List
Beforeinstallingtheextinguishingcontrolpanel,youmustfirstensurethatthefollowingcriteriahavebeenmet.Failuretodothismaynotonlyresultin
damage to the equipment, but may also cause problems when commissioning the equipment or adversely affect its performance.
Before selecting a location for the control panel and devices, DO make sure that:
•
The operating room temperature is in the recommended range: -5ºC to +40ºC
•
The relative humidity is between: 5% and 95%
•
Thepaneliswallmountedinapositionwhichallowsclearvisibilityofdisplaysandeasyaccesstooperatingcontrols.Theheightabovefloorlevel
should be chosen such that the LCD is just above normal eye level (approximately 1.5 metres).
•
DO NOT locate the panel where it is exposed to high levels of moisture.
•
DO NOT locate the panel where there are high levels of vibration or shock.
•
DO NOT site the panel where there would be restricted access to the internal equipment and cabling/wiring connections.
2.3 Transient Protection
This equipment contains transient-protection devices. Although no system is completely immune from lightning transients and interference, for these devices
to function correctly, and to reduce susceptibility, this equipment must be earthed correctly.
As with all solid state devices, this system may operate erratically or can be damaged if subjected to lightning-induced transients.
The use of overhead or outside aerial wiring is not recommended due to the increased susceptibility to nearby lightning strikes.
HLSI-MN-103-I v.05
http://www.honeywelllifesafety.es
User Manual
7
RP1r-Supra
Installation
2.4 Installation Procedure
Installation of the RP1r-Supra control panel, in line with
concept, is comprised of two stages: mounting plate installation and panel
enclosure installation Details of each stage are provided in the following
sections.
2.4.1
Mounting Plate Installation
To prevent distortion, the RP1r-Supra mounting bracket MUST be installed
on the wall as flat as possible, i.e. with a maximum flatness deviation
between any two points of 3mm. Where the wall is out of tolerance, use
appropriate packing pieces to meet these requirements.
Step 1:
•
Hold the mounting plate in the required position on the wall and mark
thepositionofthe3fixingholes.Usealeveltoensurethesearelevel.
•
Remove the mounting plate from the wall and drill the 3 holes.
•
Use rawlplugs or equivalent (Ø 6mm) to the 3 holes.
Step 2:
Screwthemountingplatetothewall,usingthetopfixingholeonlyat
this stage and appropriately-sized screws.
•
Step 3:
•
Line the 2 holes in the lower area of the mounting plate with the two
holes in the wall drilled earlier. Use suitably-sized screws to secure
the mounting plate to the wall.
Step 4:
•
Remove all blanks from the 20mm cable-entry apertures required for
all cable access.
HLSI-MN-103-I v.05
http://www.honeywelllifesafety.es
User Manual
8
RP1r-Supra
2.4.2
Installation
Panel Enclosure Installation
The control panel enclosure is very simple to install providing the mounting
plate has been installed correctly as described in Section 2.4.1 Mounting
Plate Installation.
This procedure assumes that all field cables have been
secured on the mounting bracket with fire industryapproved cable glands, using the appropriate cable
apertures (knockouts) and appropriately labelled by
function in readiness for termination within the panel.
Step 1:
•
With the mounting plate installed on the wall in the desired location,
offer the two rebates located at the top of the panel enclosure to engage
the enclosure to the mounting plate.
•
While performing this procedure, you will need to guide each of the
fieldcablesthroughtheaperturelocatedatthebackoftheenclosure
until they are within the enclosure.
Step 2:
•
Once the enclosure is aligned correctly with the mounting base, use
the4suitably-sizedscrewstofixit.
HLSI-MN-103-I v.05
http://www.honeywelllifesafety.es
User Manual
9
RP1r-Supra
Installation
CAUTION - ENERGY HAZARD!
NEVER short the battery terminals.
CAUTION - RISK OF EXPLOSION!
If battery is replaced with an incorrect type.
2.4.3
Installing the Batteries
The batteries must be located in the dedicated space in the lower part of
the RP1r-Supra enclosure which has space provision for two 7Ah,12V
sealed lead batteries.
•
Orientate the batteries so that the wiring connection terminals of each
unit are adjacent to each other (as shown opposite) then offer each
in turn to the enclosure.
•
Locate the batteries in their right position inside the enclosure.
2.4.4
Enclosure cover
The control panel has a cover (door) to close the enclosure at the end of
the installation.
Use4screwstofixthecoverontheenclosure.
HLSI-MN-103-I v.05
http://www.honeywelllifesafety.es
User Manual
10
RP1r-Supra
3
Installation
Installation
3.1 Cabling Instructions
All wiring should comply with current wiring regulations or the applicable local wiring regulations. Note also the requirements of EN54-14 (UNE 23007/14)
forcablingandinterconnectionofafiredetectionandalarmsystem.
For information on wiring inputs and outputs and wiring instructions to identify terminals, refer to Section 3.3 External Wiring.
Use the following rules when installing cables::
1.
Cables should be brought into the enclosure using the 20mm cable entry points provided on the top face and back of the enclosure. Ensure that all
openings in the enclosure are closed before connecting power to the panel to prevent inadvertent access to hazardous voltages and protect against
foreign bodies which may cause short circuits.
2.
Tailsshouldbeofsufficientlengthtoconnecttotheappropriateterminationpointsatthecommissioningstage.
3.
Cable conductor size should be a minimum of 0.5mm2. Terminals accept one 0.5 to 2.5mm2 stranded or solid conductor.
4.
Cables should be screened or metal coated and the screens terminated into the earthing points provided within the enclosure to meet EMC requirements
definedbyEuropeanDirectivesandtopreservetheintegrityofthescreenconnection.
5.
Use insulation sleeving on the tails between the cable entry position and the earth post. Run the tails close to the rear wall of the back box.
6.
The supply to the panel must be provided with a suitable and readily-accessible, double-pole, mains-disconnect device. The mains supply must be
suitablyfusedandratedaccordingtothespecifications.
7.
The cable entry points on the extreme left-hand side of the enclosure should be used for mains cable entry. DO NOT route mains cables using any
other cable entry points and ensure that the mains wiring is always separated from the low voltage wiring.
8.
All low voltage cables should have a minimum 300Vac rating.
HLSI-MN-103-I v.05
http://www.honeywelllifesafety.es
User Manual
11
RP1r-Supra
3.1.1
Installation
Cable Terminations
This section provides guidance on where to bring cables into the enclosure
for ease of termination. Ensure the following requirements are met:
1.
The mains supply should be brought into the control panel such that
the cable path to the PSU is kept as short as possible.
2.
All loop and ancillary cable terminations should be brought into the
panel enclosure using cable entry points close to their termination
points to ensure tails are kept as short as possible
3.
Zones
Leave blank
Main power
supply
Some cable entry points, e.g the nearest to mains entry , should be
left unused, where possible, to provide adequate mains supply input/
signal cable segregation.
3.1.2
Cable Quality and Installation
It is vitally important that good quality cable is used, and that correct
installation techniques are followed. In general, the following cable
installation requirements must be met:
1.
All cable sections must be circular to allow effective cable clamping
using the cable glands.
2.
The cable must be screened (sheathed) to provide protection against
Radio Frequency Interference (RFI) and the screen must be connected
to earth at the control panel.
3.
The screen must be continuous throughout the loop.
4.
Cable recommended for use is MICC with a LSF PVC overcovering, a
fireresilientcabletoBS7629orPVC/SWA/PVCtoBS6387.
Recommended Cables::
HLSI-MN-103-I v.05
http://www.honeywelllifesafety.es
Manufacturer
Product Name
Part Number
Type
Honeywell
2 x 1.5 LHR
2 x 1.5LHR
Fire resistant and halogen free
Honeywell
2 x 2.5 LHR
2 x 2.5 LHR
Fire resistant and halogen free
User Manual
12
RP1r-Supra
Installation
3.2 EMC Considerations
FollowingtheaboveinstructionsandbyusingsuitablecablesEMCproblemswillbeavoided.InparticularlydifficultEMCenvironments,orwherenonpreferredcablingisused,itispossibletofitadditionalferritesuppressors(sleeves)tocablesenteringthecontrolpanel.
3.2.1
Screen Termination
Cables should be screened or metal coated and the screens must be
earthed within the enclosure.
Multiple earthing of cable screens must be avoided. Six earthing points
are provided for this purpose, next to the cable entry points, at the rear
part of the housing.
Use insulation sleeving on the tails between the cable entry position and
the earth post. Run the tails close to the rear part of the back box.
3.2.2
Ferrite Sleeves (Optional)
In difficult EMC environments, or where non-preferred cablesareused,
optionalferritesleevesshouldbefittedtoallthewiringentries.
Theferritesleeves(A)aretobefittedovertheconductor(s)ofeachcable
and as close as possible to the entry point of the cable.
The sleeve should be held in place using a cable tie (not supplied).
If more ferrite sleeves are required, please contact your supplier.
HLSI-MN-103-I v.05
http://www.honeywelllifesafety.es
User Manual
13
RP1r-Supra
Installation
3.3 Base PCB Wiring Connections
The base PCB of the extinguishing control panel provides the external
cable/wiring connectors for the following functions.
To recognize the function of connectors easily, the input connections have
been identified with alphabetical characters and the output connexions
with numbers:
9
Status relay. Preactivation
10
Status relay. Extinguishing release in progress
11
Status relay. Extinguishing release cancelled
12
Status relay. Manual mode
13
Status relay. Automatic mode
1
2
3
4
5
6
A
B
C
D
E
F
G
Inputs
A
Monitored input for gas release (optional manual call point on front panel).
B
Monitored input for gas release (circuit 2)
C
Monitored input for hold device (NO)
D
Monitored input for extinguishing abort device (NO)
E
Monitored input for detectors/call points connexion (Zone 1)
F
Monitored input for detectors/call points connexion (Zone 2)
G
Monitored input for detectors/call points connexion (Zone 3) or manual call
point for gas release.
H
Pre-Activated
Activated
Manual
Release
Active
Pressure
I
Alarm
Z1
Disablement
J
Z2
Test
Flow
H
I
Monitored input for low pressure signal (NO)
Pressure
Monitoredinputforflowdetection(NO)
J
Monitored input for open door detection (NO)
K
Digital input for programmable external contact (voltage free)
Low
Outputs
1
Monitored output (max. 1A) for release devices solenoid activation (circuit 1)
2
Monitored output (max. 1A) for release devices solenoid activation (circuit 2)
3
24Vdc output (250mA). For release devices supply (Resettable)
4
24Vdc output (250mA). For auxiliary devices supply (Fix)
5
Monitored output (max. 250mA) for sounders activation (circuit 1)
6
Monitored output (max. 250mA) for sounders activation (circuit 2)
7
Status relay. General Fault (*)
8
Status relay. Extinguishing release activated
HLSI-MN-103-I v.05
http://www.honeywelllifesafety.es
Z3
7
Released
Monitored
Cct.
Abort
General
Fault
Keypad Access
Lamp test (3 sec.)
System
Disabled
Monitored
Cct.
Hold
Earth
Fault
Silence
Resound
Automatic
Monitored
Cct.
Sounder
Fault
Disabled
Release
Fault
Power
Supply
Fault
Delay
On/Off
10
Release
Circuit
Fault
Auxiliary
Mute
Buzzer
11
Manual
Release
Only
System
Fault
Reset
12
Open door
Manual
Only
OFF
K
Power
Power Supply
Fault
Evacuate
8
9
(3 sec.)
ON
13
(*) In standby mode (de-energized relays or without power supply) all the status relays
have a short circuit between its terminals (C and NO), except the general fault relay (7)
which has 3 terminals (C, NO, NC) and allows two status (open circuit: C-NO / closed
circuit : C-NC)
User Manual
14
RP1r-Supra
Installation
3.4 Input circuits connection
This section describes the criteria and requirements for the connection of different circuits and devices whose signals will be used as inputs of the control panel.
3.4.1
Gas release - Terminal Blocks: A and B
If an auxiliary call point (optional) is connected to terminal block “A”, the manual gas release can be activated when the control panel is in Automatic or
Manual mode.
When the control panel is in System Disabled mode, the manual call point activation will only activate the sounders circuit (Preactivated condition).
A second auxiliary call point can be connected to terminal block “B” in order to activate the release in circuit 2. For this, this function must have been previously
activatedatthecontrolpanelconfiguration(SeeSection5. Control Panel Configuration for more details).
To ensure the monitoring, it is necessary to install a serial 2K2 resistor with
the call point and a 47μF (≥ 35V) capacitor as an End Of Line element (EOL).
NO Call point
Alternatively, and for compatibility reasons with previous installations, it is
possible to replace the capacitor by an EOL resistor (6K8). (See Section
5. Control Panel Configuration for more details).
Resistor
2K2
+
-
Call point 2
Aux. call point
Refer to Section 3.4.7 Input monitoring for more information.
+
NO Call point
Resistor
2K2
EOL
capacitor
47µF
EOL
capacitor
47µF
NO Call point
EOL
capacitor
47µF
Aux. call point
Resistor
2K2
Manual gas release
+
A
HLSI-MN-103-I v.05
http://www.honeywelllifesafety.es
-
EOL
capacitor
47µF
Call point 2 - not used
+ -
B
User Manual
15
RP1r-Supra
3.4.2
Installation
Hold device - Terminal Block: C
The extinguishing control panel has an input for Hold device to comply with the requirements of UNE-EN 12094-1:2004, section 4.20b (Emergency detection
devices).
The optional connection of a Hold device to Terminal block “C” allows you to manually stop the automatic extinguishing sequence. While the push button
input is active, the countdown timer remains held up and awaiting.
The HOLD input is self-resettable. By releasing the push button, the input is no longer active and the countdown restarts.
To ensure the monitoring, it is necessary to install a serial 2K2 resistor with the call point and a 47μF (≥ 35V) capacitor as an End Of Line element (EOL).
Hold call point
Alternatively, and for compatibility reasons with previous installations, it is possible to replace the capacitor by an EOL resistor (6K8). (See Section 5. Control
Panel Configuration for more details).
Refer to Section 3.4.7 Input monitoring for more information.
+
NO Call point
Resistor
2K2
EOL
capacitor
47µF
-
EOL
capacitor
47µF
Hold call point - not used
Hold manual release
+ -
C
HLSI-MN-103-I v.05
http://www.honeywelllifesafety.es
User Manual
16
RP1r-Supra
3.4.3
Installation
Emergency abort device - Terminal block: D
The extinguishing control panel has an Abort input to comply with the requirements of UNE-EN 12094-1:2004, section 4.27 (Devices for emergency abort).
The optional connection of an Abort device to Terminal block “D” allows you to manually stop the automatic extinguishing sequence. The Abort input is
latched, so, once activated, it will require a manual reset of the control panel to enable again the extinguishing process.
To ensure the monitoring, it is necessary to install a serial 2K2 resistor with the call point and a 47μF (≥ 35V) capacitor as an End Of Line element (EOL).
Alternatively, and for compatibility reasons with previous installations, it is possible to replace the capacitor by an EOL resistor (6K8). (See Section 5. Control
Panel Configuration for more details).
Abort switch
Refer to Section 3.4.7 Input monitoring for more information.
+
NO switch
Resistor
2K2
EOL
capacitor
47µF
-
EOL
capacitor
47µF
Abort switch - not used
Emergency abort
+ -
D
HLSI-MN-103-I v.05
http://www.honeywelllifesafety.es
User Manual
17
RP1r-Supra
3.4.4
Installation
Zone connection - Terminal blocks: E, F and G
The connection terminals for detection zones provide 24Vdc nominal voltage, which is used to supply power to conventional detectors and call points.
WhenusingNotifierseries800orMorleyECO1000detectors,upto32detectorsperzonecanbeinstalled.
Detection zone circuits must be wired as a single circuit with no spurs or T junctions to enable the monitoring circuit to work correctly. Moreover, a 47μF (≥
35V) capacitor is required as an End Of Line element.
Alternatively, and for compatibility reasons with previous installations, it is possible to replace the capacitor by an EOL resistor (6K8). (See Section 5. Control
Panel Configuration for more details).
Refer to Section 3.4.7 Input monitoring for more information.
+
-
+
-
Zone 3
Zone 2
Zone 1
-
+
-
+
-
+
-
+
-
Detector
Detector
+
+
+
+
-
-
+
-
-
Detector
Detector
+
+
+
+
-
Detector
-
+
-
Detector
EOL
capacitor
47µF
+
-
Detector
-
EOL
capacitor
47µF
+
-
Detector
-
+
+
EOL
capacitor
47µF
+
-
-
Detector
+
-
E
HLSI-MN-103-I v.05
http://www.honeywelllifesafety.es
F
-
Zone 2
Zone 1
+
+
-
-
+
-
+
-
+
-
+
-
Detector
Detector
Detector
+
+
+
-
Detection zones
+
+
-
Detector
EOL
capacitor
47µF
-
+
-
Detector
-
+
-
EOL
capacitor
47µF
EOL
capacitor
47µF
Detector
Zone 3 - not used
+ -
G
User Manual
18
RP1r-Supra
Installation
3.4.4.1 Call points in zone circuits
Call points can be included, optionally, in zones 1 and 2.
Zener diode
5,1V
When it is necessary to distinguish between the indication of a detector
alarm and a call point alarm in the same zone, a 5.1V Zener must be
installed in series connection with each of the call points.
+
Detector
+
-
-
Zener diode
5,1V
+
Detector
NO Call point
-
+
-
EOL
capacitor
47µF
Zone
Alternatively, it is possible to use a resistor 80Ω > R > 150Ω in series
connection with call points.
NO Call point
+
+
Thedetectoralarmwillbeindicatedbythezoneledinflashingmodeand
the call point alarm will be indicated by the zone led in steady mode.
Resistor
EOL
capacitor
47µF
(min. 80Ω; max. 150Ω)
NO Call point
-
3.4.4.2 Gas release call point in zone 3
Alternative connection for
call point
If Zone 3 is set as Manual Release zone, it is not necessary to install a
5.1V Zener to indicate call point alarms.
Refer to Section 5. Control panel configuration for more information.
Resistor
EOL
capacitor
47µF
+
Zone 3
(min. 80Ω; max. 150Ω)
Release
call point
Connection example:
Manual release call point
on Zone 3
Voltage (%)
0
Status
Measured resistance
14
Shortcircuit
0
27,5
Call point alarm
60Ω 80Ω
87
Detector alarm
150Ω 200Ω
94
Normal
(6K8)
100
Open
circuit
2K8 3K2 6K9 >7K8
Zone status thresholds (approximate values)
HLSI-MN-103-I v.05
http://www.honeywelllifesafety.es
User Manual
19
RP1r-Supra
3.4.5
Installation
Technical alarm inputs - terminal blocks: H, I and J
Using the monitored inputs for external signals available in the control panel, it is possible to detect and signal events from external devices.
To ensure the monitoring, it is necessary to install a serial 2K2 resistor with the corresponding sensor output contact and a 47μF (≥ 35V) capacitor is required
as an End Of Line element or, alternatively, an EOL resistor (6K8). (See Section 5. Control Panel Configuration for more details).
Refer to Section 3.4.7 Input monitoring for more information.
3.4.5.1 Low pressure signal (LOW PRESS) - Terminal block: H
The low pressure input allows the control panel to signal the status of loss of
extinguishing agent in the bottles sent by the sensors installed in the bottles.
H
I
External signals
3.4.5.2 Flow signal (FLOW PRESS) - Terminal block: I
J
The control panel has an input that allows the connection of the
corresponding flow sensor, which will be monitored, to comply with the
requirements of UNE-EN 12094-1:2004, section 4.18 (Signal flow of
extinguishing agent).
NO contact
3.4.5.3 Door open signal - Terminal block: J
Alarm signal
This is a self-resettable input.
+
EOL
capacitor
47µF
Resistor
2K2
-
This monitored input indicates the status of the door of the building where
the extinguishing system is installed.
The indication is purely informative, however, if the control panel is
configuredproperly,itispossibletoconditiontheautomaticextinguishing
process, by blocking it when the door is open (see Section 5. Control panel
configurationformoredetails).
HLSI-MN-103-I v.05
http://www.honeywelllifesafety.es
EOL
capacitor
47µF
+ -
Alarm signal
input - not used
User Manual
20
RP1r-Supra
3.4.6
Installation
Digital input - Terminal block: K
The extinguishing control panel has a programmable digital input to connect an external contact in order to control the extinguishing control panel from a
higher level and external system.
Dependingonthecontrolpanelconfiguration,theexternalcontactcanbeNO(NormallyOpen)orNC(NormallyClosed).Botharevoltagefreecontacts.
There are different functions which can be associated with the activation
ofthiscontact,dependingonthecontrolpanelconfiguration(seeSection
5. Control panel configuration, for more information):
•
•
•
•
Reset
Evacuate
Mute sounders and buzzer
Delay on / off
K
Digital input
Digital input
To avoid irreparable damage to the control panel, do not
use contacts or cables with voltage in the digital input.
+
HLSI-MN-103-I v.05
http://www.honeywelllifesafety.es
NO dry
contact
-
User Manual
21
RP1r-Supra
3.4.7
Installation
Input Monitoring
By default, all monitored inputs are NO (Normally Open) contacts and they become activated when the circuit is closed with a serial 2K2 resistor.
Monitored outputs may also be used with NC (Normally Closed) contacts which will be activated when the circuit is open. In normal status (standby), the
NC contact must be connected in series with a 2K2 resistor.
The control panel provides two different ways to implement the monitoring circuit by means of an EOL element: with a capacitor (default) or with a resistor.
Refer to Section 5. Control panel configuration, for more information).
3.4.7.1 Monitoring with an EOL capacitor
In order to increase the robustness and stability of the monitoring procedure
and in compliance with UNE-EN54-13, the control panel uses, by default,
an End Of Line capacitor to monitor the input circuits.
To do so, it is necessary to install at the end of each line, a 47μF (≥ 35V)
capacitor.
Moreover, this monitoring procedure reduces the system power consumption
and, consequently, the batteries useful life is extended without increasing
the battery capacity.
+
+
Call point (NO)
-
Call point (NC)
EOL
capacitor
47µF
Resistor
2K2
Monitoring topology for NO circuit
(capacitive monitoring mode)
-
Monitoring topology for NC circuit
(capacitive monitoring mode)
NO Call point
Input line
Resistor
2K2
In case of using a capacitive end of line mode, the capacitor
used as an end of line element in zones will be 47μF (≥ 35V).
+
-
EOL
capacitor
47µF
Resistor
2K2
EOL
capacitor
47µF
EOL
capacitor
47µF
Input line - not used
+ -
The EOL capacitors supplied with the control panel are
bipolar type elements, so the polarity of the connection
makes no difference.
Using other than the supplied electrolytic capacitors, you
must take into account the type of capacitor used and, if
necessary, respect the polarity of the connection.
HLSI-MN-103-I v.05
http://www.honeywelllifesafety.es
Connection example
User Manual
22
RP1r-Supra
Installation
3.4.7.2 Monitoring with EOL resistor
Alternatively, it is possible to use a 6K8 resistor as an End Of Line element
for input circuits so that the system is backward compatible with existing
installations which use the traditional monitoring EOL resistor.
+
Thismonitoringmodeisenabledfromthecontrolpanelconfiguration.Refer
to Section 5. Control panel configuration for more details.
-
Call point (NC)
EOL resistor
6K8
Resistor
2K2
Monitoring topology for NO circuit
(resistive monitoring mode)
The criteria for monitoring and discrimination of the different states by using
an EOL resistor (6K8) is as follows:
•
EOL resistor
6K8
Resistor
2K2
-
Monitoring topology for NC circuit
(resistive monitoring mode)
For call points with NO contacts (default): when the R=2K2 line is
closed, the input becomes ACTIVE, regardless of whether the EOL
resistor (6K8) is present or not. In the latter case (ACTIVE input without
EOL resistor), the control panel will also indicate a fault.
NO Call point
EOL resistor
6K8
Resistor
2K2
For call points with NC contacts, when the R=2K2 line is open, the
input becomes ACTIVE, regardless of whether the EOL resistor (6K8)
is present or not. In the latter case (ACTIVE input without EOL resistor),
the control panel will also indicate a fault.
Input line
•
+
Call point (NO)
+
-
EOL resistor
6K8
Input line - not used
+ -
Connection example
Relative value (%)
0
17,5
28
40
Range for NOC
Shortcircuit
Active
(2K2 || 6K8)
Active w/o EOL
Range for NCC
Shortcircuit
Normal
w/o EOL
Measured resistance
0
(2K2 || 6K8)
370Ω 390Ω
80
(only 2K2)
(only 2K2)
1K8 1K9
3K2 3K3
Open circuit
Active
Open circuit or
Active w/o EOL
(only 6K8)
6K8
100
Normal status
23K
>24K
Resistive EOL inputs’ threshold for state identification (approximate values)
HLSI-MN-103-I v.05
http://www.honeywelllifesafety.es
User Manual
23
RP1r-Supra
Installation
3.5 Output circuits connexion
Extinguishing release circuits Terminal blocks 1 and 2
The outputs of the terminal blocks 1 and 2 will produce the signal to activate
the extinguishing release devices solenoids.
Maximum current supplied by each circuit is 1 A (provided that the total
sum of intensities supplied by all the control panel outputs do not exceed
the power supply limit of 2.4A).
+
-
+
Extintion circuit 2
Solenoid
Extintion circuit 1
3.5.1
EOL diode
(1N4007)
+
Solenoid
Diode
Solenoid
Diode
EOL
resistor
6K8
-
EOL diode
(1N4007)
Connection in case of resistive EOL
EOL diode
(1N4007)
Solenoid
Extintion circuit 1
The connection of solenoids depends on the solenoid type and the
monitoringmethodused(seefiguresontheright).
To ensure the monitoring function, an EOL diode is required or, alternatively,
an EOL resistor (6K8). Refer to Section 3.5.5 Output monitoring for more
details.
Extinction circuit
This section describes the criteria and requirements for the connection of the external circuits and devices which are monitored by the control panel.
+
-
EOL
diode
Circuit 2 - not used
+ -
To avoid irreparable damage to the control panel,
always use the diode diagram on the right in
connections which involve the use of coils (holders,
relays, dampers, etc.).
Extinguishing release circuit
1
2
HLSI-MN-103-I v.05
http://www.honeywelllifesafety.es
User Manual
24
RP1r-Supra
3.5.2
Installation
Auxiliary 24Vdc Output Circuit - Terminal blocks 3 and 4
The Base PCB provides two 24Vdc outputs, supplied by the control panel power supply, which can be used to drive ancillary equipment indicators.
Maximum current supplied by each output is 250mA. Both outputs have an over-current protection fuse.
Aux 24V output (terminal block 4) provides constant 24Vdc with Imax = 250 mA (max. current) to supply ancillary devices.
On the contrary, 24V RES output (terminal block 3), which is also 24 Vdc and Imax = 250 mA, provides resettable supply. Thus, when the control panel
is reset, the output voltage goes down to 0V for 5 seconds approximately. This type of output is used to drive external ancillary devices which require a
momentarily power cut-off in order to be reset.
Before connecting auxiliary devices to the control panel, please consider the following:
•
Ensure that the external wiring is not short circuited.
•
Observe correct polarity.
•
Before connecting any external circuit to the control panel, check their maximum consumption. To comply with the standards, batteries must be able to
keepthesysteminstandbyandalarmstatusfortherequiredperiodsoftime.Ensurethatthecontrolpanelpowersupplyandbatteriesprovidesufficient
capacity. Otherwise, auxiliary devices must not be supplied by the control panel but by suitable external power supplies.
Auxiliary modules with optional connection to the control panel, such
as UCIP, VSN-232, VSN-4REL, etc., get their power from non-resettable
auxiliary output (block 4), therefore the availability of current Imax in this
output will be reduced proportionally according to the number and
specific consumption of the connected devices.
+
resettable
-
-+
24Vdc supply output
+
24Vdc supply output
+
Auxiliary 24Vdc outputs
3
24 Vdc
(Imax: 250 mA)
steady
-
24 Vdc
(Imax: 250 mA)
-
4
HLSI-MN-103-I v.05
http://www.honeywelllifesafety.es
User Manual
25
RP1r-Supra
3.5.3
Installation
Sounder circuits - Terminal blocks: 5 and 6
The control panel provides two monitored output circuits for sounder activation. The maximum current that each of these circuits can provide is 250 mA.
If one of the circuits is not used for sounders, a 68k resistor must be connected between terminals to avoid a fault condition. Alternatively, it is possible to
replace this resistor by a reversed polarity diode (see diagram below).
SoundercircuitsmustbewiredasasinglecircuitwithnospursorTjunctionstoensurethecorrectoperationofthemonitoringfunction(seefiguresbelow).
Moreover,anEOLdiode(1N4007orsimilar)withreversedpolarity(seefigure)mustbeinstalledafterthelastsounder.
Diode
Alternatively, and for backward compatibility reasons, it is possible to
replace the diode by an EOL resistor (6K8). See Section 5. Control panel
configuration for more details.
+
-
Sounders 2
Sounders 1
Refer to Section 3.5.5 Output monitoring for more information.
The sounders should be polarized, otherwise a 1N4007 (or similar) diode
must be connected to sounder (+) positive terminals to avoid fault conditions.
EOL diode
1N4007
(reverse pol.)
Sounder
+
Diode
EOL diode
1N4007
(reverse pol.)
Sounder
-
Diode
Diodes needed
ONLY in case of
non polarized sounders
Sounders 1
Sounder
+
-
EOL diode
1N4007
(reverse pol.)
EOL diode
1N4007
(reverse pol.)
Sounders 2 - not used
+ -
Sounder circuits
5
HLSI-MN-103-I v.05
http://www.honeywelllifesafety.es
6
User Manual
26
RP1r-Supra
3.5.4
Installation
Status relays - Terminal blocks: 7, 8, 9, 10, 11, 12 and 13
The control panel status and operating mode is indicated by means of output relays.
In de-energized mode, all the status relays have a short circuit between its terminals (C and NO), except the general fault relay (7) which has 3 terminals
(C, NO, NC) and allows two status (open circuit: C-NO / closed circuit : C-NC)
3.5.4.1 General fault contact (GEN.FAULT) - Terminal block: 7
The general fault relay indicates the existence of a fault condition in the
control panel.
In the panel’s quiescent status, the relay is energised and when the panel
is in a fault condition, the relay is non-energized.
Depending on the control panel configuration, the fault signals can be
resettables or latched (refer to Section 5. Control panel configuration
for more information.
Faults are latched by default and the control panel has to be reset for the
relay to return to its normal condition (energized).
7
Relay for general fault indication
NO
NC
Common
On the contrary, the resettable faults make the relay return to its normal
condition automatically, when the fault is cleared.
Note:thefigureontherightshowsthefaultcondition.Therelayisnon-energized.
In the panel’s quiescent status, the relay is energised.
• Quiescent status:
Continuity between C and NO contacts
• Fault or without power supply: Continuity between C and NC contacts
HLSI-MN-103-I v.05
http://www.honeywelllifesafety.es
User Manual
27
RP1r-Supra
Installation
3.5.4.2 Status contacts - Terminal blocks: 8, 9 and 10
Preactivated (terminal block: 9 - PREACT.)
•
Release in progress (terminal block 10 - RELEASED)
In standby mode (de-energized), the 3 relays have an open circuit between
their terminals (C and NO), as shown in the illustration.
NO
•
Common
Activated (terminal block: 8 - ACTIV.)
NO
•
Common
The control panel provides 3 output relays to indicate the status of the extinguishing release process:
To indicate the control panel status or phase, the corresponding relay is
activated. In that situation, the affected relay(s) will show continuity between
the terminals C and NO.
3.5.4.3 Operating mode contacts: - Terminal blocks: 11, 12 and 13
The control panel provides 3 output contacts which indicate the control
panel status:
•
Disabled (terminal block 11)
•
Manual (terminal block 11)
•
Automatic mode (AUTO) (terminal block 13)
In standby mode (de-energized), the 3 relays have an open circuit between
their terminals (C and NO), as shown in the illustration.
To indicate the control panel status, the corresponding relay is activated.
In that situation, the affected relay will show a closed contact between the
terminals C and NO.
8
9
Relays for release process
indication
10
11
12
Relays for operating status
indication
13
HLSI-MN-103-I v.05
http://www.honeywelllifesafety.es
User Manual
28
RP1r-Supra
3.5.5
Installation
Output monitoring
By default, the control panel’s monitored output (terminal blocks: 1, 2, 5 and 6) work based on the detection of a 6k8 resistive load as end of line element.
Byconfiguringthecontrolpanel,themonitoredoutputscanalsooperatewithapolarizeddiode(seeSection3.4.5.2)asanendoflineelement.
Refer to Section 5. Control panel configuration for more details.
3.5.5.1 End of line diode monitoring
In order to increase the robustness and stability of the monitoring procedure and in compliance with UNE-EN54-13, the control panel uses, by default, an
End Of Line capacitor to monitor the output circuits. A reverse polarity diode (1N4007 or similar)isrequired(seefigure).
This monitoring procedure reduces the system power consumption and, consequently, the batteries useful life is extended without increasing the battery
capacity. In addition, diode allows to monitor wiring, determining if this has resistive minimum conditions to guarantee their function.
•
•
In normal operation (quiescent status), the voltage in the output
terminals must be limited by the EOL diode (0.7V approx.). In the
absence of this diode, the control panel detects an open circuit and
indicates a fault. If there is a short-circuit in the output line or the
connected elements are not polarized correctly or even if the wiring
resistor was altered and the circuit could not meet its function, the
control panel will also indicate a fault (see Section 5.6 Monitoring
functions for more information).
When an output is active, the injected signal has direct polarity. In this
case,thereversepolarityofthediodemakethecurrentflowthrough
the connected elements (not through the diode) if they are polarized
correctly. Otherwise, the control panel will indicate a fault.
HLSI-MN-103-I v.05
http://www.honeywelllifesafety.es
+
Diode
Current flow
Sounder
Diode
EOL diode
(reverse pol.)
Sounder
EOL diode
(reverse pol.)
Output state: standby
(reverse polarity)
Output 1
In this case, and with the outputs in standby status, the control panel injects
into the outputs a pulsing signal with inverse polarity and monitors the
voltage variation in the output terminals. In activation status, the voltage
injection has direct polarity.
+
-
EOL diode
(reverse pol.)
Output 2 - not used
+ -
+
Diode
Current flow
Sounder
EOL diode
(reverse pol.)
Connection example
Output state: active
(direct polarity)
User Manual
29
RP1r-Supra
Installation
3.5.5.2 End of line resistor monitoring
Thismonitoringmodeisenabledfromthecontrolpanelconfiguration.Refer
to Section 5. Control panel configuration for more details.
+
Diode
Current flow
Sounder
-
•
In standby operation (quiescent status), the control panel injects into
the outputs a reverse polarised signal and monitors the voltage drop
causedbythecurrentflowintheEOLresistor(6k8).Intheabsence
ofthisresistor,therewillbenocurrentflowandthecontrolpanelwill
indicate a fault. If there is a short-circuit, the connected elements are
not polarized correctly or the resistor value is not the appropriate, the
control panel will also indicate a fault.
Sounder
Output state: standby
(reverse polarity)
The criteria for output monitoring by means of an EOL resistor (6K8) is
as follows:
•
Diode
EOL
resistor
6K8
Output 1
Alternatively, it is possible to use a 6K8 resistor as an End Of Line element
for output circuits so that the system is backward compatible with existing
installations which use the traditional monitoring EOL resistor.
+
-
EOL
resistor
6K8
EOL
resistor
6K8
Output 2 - not used
+ -
+
Diode
Current flow
Sounder
-
EOL
resistor
6K8
Connection example
Output state: active
(direct polarity)
When an output is active, the injected signal has direct polarity. In this
case, the correct polarity of the connected elements makes the current
flowthroughtheseelementsnotthroughtheEOLresistor.Otherwise,
the control panel will indicate a fault.
HLSI-MN-103-I v.05
http://www.honeywelllifesafety.es
User Manual
30
RP1r-Supra
4
Operation
Use and operation
Pre-Activated
Alarm
Activated
Z1
Manual
Release
Active
4.1 Introduction
Disablement
Z2
Pressure
Test
Flow
Z3
Pressure
This section explains how to use the RP1r-Supra panel’s built-in control
functions to access various menu functions and/or carry out regular
mandatory procedures required by the local regulations. Helpful descriptions
and tips are also provided to assist the user in understanding the status
information provided by the RP1r-Supra panel’s LCD and LED indicators.
Power
Low
Released
Monitored
Cct.
Abort
General
Fault
Keypad Access
Lamp test (3 sec.)
System
Disabled
Monitored
Cct.
Hold
Earth
Fault
Silence
Resound
Automatic
Monitored
Cct.
Sounder
Fault
Disabled
Open door
Manual
Only
4.2 User Interface
Evacuate
(3 sec.)
Release
Fault
Power
Supply
Fault
Delay
On/Off
Release
Circuit
Fault
Auxiliary
Mute
Buzzer
OFF
Power Supply
Fault
ON
The RP1r-Supra control panel is provided with all required indicators to allow
the user to review the system status and, with appropriate user access,
perform approved system maintenance functions in accordance with the
requirements of the local regulations.
Manual
Release
Only
System
Fault
FIRE
Reset
Pre-Activated
Activated
Alarm
Manual
Release
Active
Disablement
Z1
Z2
Pressure
Flow
System status LEDs are also provided and these divided into two groups
•
Low
Indicators for the extinguishing release process.
•
Indicators for the monitoring and events or alarms detection.
Z3
See Section 4.2.1 Status leds for more information.
OFF
ON
Power
Released
Monitored
Cct.
Abort
General
Fault
Keypad Access
Lamp test (3 sec.)
System
Disabled
Monitored
Cct.
Hold
Earth
Fault
Silence
Resound
Automatic
Monitored
Cct.
Sounder
Fault
Disabled
Manual
Only
Release
Fault
Power
Supply
Fault
Delay
On/Off
Auxiliary
Mute
Buzzer
Open door
Function Keys. The user interacts with the information displayed on the
panel’s LCD using the various function keys. These keys are located on
the right side of the front panel.
Test
Pressure
Release
Circuit
Fault
Manual
Release
Only
Power Supply
Fault
FIRE
System
Fault
Evacuate
(3 sec.)
Reset
Pre-Activated
Activated
Manual
Release
Active
Pressure
Flow
Pressure
Low
Entering a valid access Level 2 passcode or using the keyswitch (optional)
will make these keys functional. See Section 4.2.2 Function keys for
more information.
Monitored
Released
Cct.
System
Disabled
Cct.
Abort
Automatic
Manual
Only
OFF
Monitored
Hold
Alarm
Z1
Disablement
Z2
Test
Z3
Power
General
Fault
Keypad Access
Earth
Fault
Silence
Resound
Lamp test (3 sec.)
Monitored.
Cct.
Open door
Sounder
Fault
Disabled
Release
Fault
Power
Supply
Fault
Delay
On/Off
Auxiliary
Mute
Buzzer
Release
Circuit
Fault
Power Supply
Fault
Evacuate
(3 sec.)
ON
Manual
Release
Only
HLSI-MN-103-I v.05
http://www.honeywelllifesafety.es
FIRE
System
Fault
Reset
User Manual
31
RP1r-Supra
Operation
Internal Buzzer. This audible device activates to alert the user to take
immediate action whenever the system detects any condition such as a
fireorfaultevent.Dependingonthetypeofevent,thebuzzeractivates
(sounds) using a different tone pattern.
Normal
Alarm/Fault
Mute
Buzzer
Release
is used to silence (mute)
The MUTE BUZZER control key
the internal buzzer in the event of these conditions occurring.
4.2.1
LED Status Indicators
The front panel leds are used to know the system status. All the information,
according to the standard requirements, is clearly visualized by means of
these leds.
1
4.2.1.1 Front panel: detection process
The group of leds located on the right side of the front panel are the
indicators and keys used for the control panel detection process.
1
Zone status leds
2
System alarm led
3
Disablement led (disabled zone)
4
Test led (zone test)
5
Power led
6
General Fault led
7
Earth Fault led
8
Sounders Fault/Disabled led
9
Power Supply Fault led
10
Auxiliary Power Supply Fault led
11
System Fault led
12
Keypad Access led (Access Level 2)
13
Silence / Resound led
14
Evacuate led
15
Delay On/Off led
16
Mute Buzzer led
Alarm
Manual
Release 3
Active
Disablement
Z1
Z2
Pressure
4
Flow
Test
Z3
Pressure
5
Low
Monitored
6
Cct.
Abort
General
Fault
Keypad Access
Lamp test (3 sec.)
12
System
Disabled
Monitored
7
Cct.
Hold
Earth
Fault
Silence
Resound
13
Automatic
Monitored
8
Cct.
Sounder
Fault
Disabled
Evacuate
14
Release 9
Fault
Power
Supply
Fault
Delay
On/Off
15
Release
Circuit 10
Fault
Auxiliary
Mute
Buzzer
16
Manual
Only
ON
Power
Released
Open door
OFF
HLSI-MN-103-I v.05
http://www.honeywelllifesafety.es
Pre-Activated
2
Activated
Manual
Release11
Only
Power Supply
Fault
FIRE
System
Fault
(3 sec.)
Reset
User Manual
32
RP1r-Supra
Operation
4.2.1.2 Front panel: Release process
The group of leds located on the left side of the front panel are the indicators
and keys used for the control panel release process.
1
Released led (release has started)
2
Countdowntimerforreleaseactivation/displayforcontrolpanelconfiguration
3
Releasedled(Releaseisfinished)
4
Operating Mode leds
5
Reserved leds for future use
6
Pre-activated / Activated led (Release status indicator)
7
Manual Release led
8
PressureFlowled(Extinguishingagentflowindicator)
9
Pressure Low led (Indicator of low pressure due to loss of extinguishing agent)
10
Monitored Circuit Abort and Hold leds
11
Monitored Circuit - Open Door led
12
Release Fault led
13
Release Circuit Fault led
14
Manual Release Only led
Pre-Activated
Activated
Z1
1
Manual
Release
Active
Pressure
Flow
7
Disablement
Z2
8
Test
Z3
2
Pressure
Low
3
9
Power
Released
Monitored
Cct.
Abort
System
Disabled
Monitored
Cct.
Hold
Earth
Fault
Automatic
Monitored
Cct.
11
Fault
Release
Fault
12
Supply
Release
Circuit
Fault
Power Supply
13
General
Fault
Keypad Access
Lamp test (3 sec.)
10
4
Sounder
Open door
Manual
Only
OFF
5
ON
Manual
Release
Only
HLSI-MN-103-I v.05
http://www.honeywelllifesafety.es
6Alarm
Disabled
Power
Fault
Auxiliary
Fault
FIRE
System
Fault
14
Silence
Resound
Evacuate
(3 sec.)
Delay
On/Off
Mute
Buzzer
Reset
User Manual
33
RP1r-Supra
4.2.2
Operation
Function keys
Panel operation, at access Levels 1 and 2, is controlled by the various
function keys located on the front fascia.
Pre-Activated
Function control keys are single-function activation keys and, apart from
the MUTE BUZZER, require the panel to be at user access Level 2 before
they can be selected.
1
Z1 key to disable/test Zone 1 (access level 2)
2
Z2 key to disable/test Zone 2 (access level 2)
3
Z3 key to disable/test Zone 3 (access level 2)
4
Introduction of programming sequences and led test (access level 2)*
5
Disable/Activate sounders (access level 2)
6
Manual Activation of Evacuate signal (access level 2)
7
Activate/Disable the delay before sounders activation (access level 2)
8
Mute Buzzer (access level 1 - always available)
9
Control panel Reset (access level 2)
10
Operating Mode selection (access level 2)**
11
Key to disable / enable access to keypad (access level 2)
Manual
Release
Active
Pressure
Cct.
Abort
Monitored
System
Disabled
Cct.
Hold
Monitored.
Automatic
Cct.
Open door
Release
Fault
Manual
Only
Release
Circuit
Fault
ON
Fault
FIRE
(*) The “Led Test” function of the key (4) is also accessible
from level 1.
For security reasons, it is not possible to modify the
operating mode if the alternative method for level 2
access (without key, as described in section 4.3.) was
used.
10
Automatic
Manual
Only
OFF
11
General
Fault
Pre-Activated
Activated Earth
Fault
Manual
Release
ActiveSounder
Fault
Disabled
Pressure
Power
Flow
Supply
Fault
Pressure
LowAuxiliary
Power Supply
Released
Manual
Release
Only
System
Disabled
Monitored
Cct.
AbortSystem
Fault
Monitored
Cct.
Hold
2
Z3
3
Keypad Access
4
Lamp test (3 sec.)
Alarm
Silence
Resound
5
Z1
Disablement
Evacuate
6
Z2
(3 sec.)
Test
Delay
On/Off
7
Z3
Power
Mute
Buzzer
General
Fault
Reset
Earth
Fault
8
Keypad Access
Lamp test (3 sec.)
Sounder
Fault
Disabled
Release
Fault
Power
Supply
Fault
Delay
On/Off
Release
Circuit
Fault
Auxiliary
Power Supply
Mute
Buzzer
Fault
9
Silence
Resound
Cct.
Open door
Monitored.
Evacuate
(3 sec.)
ON
Manual
Release
Only
HLSI-MN-103-I v.05
http://www.honeywelllifesafety.es
Z2
Power
Low
Released
1
Test
Flow
Monitored
Z1
Disablement
Pressure
OFF
** The button for selecting the mode of operation (10) is
only enabled from level 2 if the access to this level is
gained through the user key (11).
Alarm
Activated
FIRE
System
Fault
Reset
User Manual
34
RP1r-Supra
Operation
4.3 Access levels
The control panel will enable or disable access to system functions depending on the operating access level.
Level 1
•
Always available with the control panel ON.
This level do not require activation.
• The user is only allowed to mute the internal buzzer and the led test.
• Ifanyotherpushbuttonispressed,thecontrolpanelwillbrieflyactivatethe
internal buzzer and its led
•
Keypad acc.
Lamp Test
Level 2
Pre-Activated
(3 sec.)
•
Available by turning the key clockwise in order to unlock the keypad.
Most of the functions are available (function and zone keys).
• Keypad access led ON indicates that level 2 is available
• Access level 2 (with restrictions) is also gained by means of the following
sequence of keys:
Flow
Low
Lamp Test
Keypad acc.
•
Level 3
•
While keeping pressed the
Lamp Test
(3 sec.)
(3 sec.)
Released
Monitored
Cct.
Abort
General
Fault
Keypad Access
Lamp test (3 sec.)
System
Disabled
Monitored
Cct.
Hold
Earth
Fault
Silence
Resound
Automatic
Monitored
Cct.
Sounder
Fault
Disabled
Manual
Only
Release
Fault
Power
Supply
Fault
Delay
On/Off
Release
Circuit
Fault
Auxiliary
Mute
Buzzer
Manual
Release
Only
System
Fault
Open door
key.
key, press the following keys in this order: Z1, Z2, Z2, Z1
Available by closing the “PROG” jumper located inside the control panel.
This access level is used to programme and change the control panel
configuration.
•
Power
(3 sec.)
Keypad acc.
Press and keep pressed the
Test
Pressure
Keypad acc.
•
Alarm
Disablement
Pressure
•
Lamp Test
Activated
Manual
Release
Active
OFF
Power Supply
Fault
Evacuate
(3 sec.)
ON
-BAT+ BATTERY FUSE +PSIN- EARTH
Reset
RS-232 RS-232 AUX-MOD
PROG
4.4 Operating modes
System Disabled
The control panel has three operating modes which can be selected with the “mode selector”
. The corresponding led is ON when a mode is selected.
Automatic
Manual Only
The selection of the operating mode can only be carried out from level 2 and only by gaining access by means of the user key
Automatic
Manual only
•
System
Disabled
•
•
The control panel manages any alarm from zones or from the gas release call point on the
front panel and carries out the release process automatically following the conditions and
delaysalreadyconfigured.
The control panel manages any alarm from zones, activating the corresponding conditions
and sounders. However, the release can only be activated from the GAS release call point
locatedonthefrontpanelorfromtheZone3(ifitisconfiguredasManualRelease).
The same as the above condition but it does NOT allow the release outputs to be activated,
even manually.
HLSI-MN-103-I v.05
http://www.honeywelllifesafety.es
System Disabled
Automatic
Manual Only
User Manual
35
ic
For a description of the different status, the control panel is operating
in “Automatic” mode. In this situation, the led on the front panel is
lit in amber, and the corresponding output contact (AUTO) keeps
activated. For any other operating modes, the leds and activated
contacts will be those corresponding to the selected mode.
Pre-Activated
System Disabled
Automatic
Manual Only
Alarm
Activated
Z1
Manual
Release
Active
4.5.1
Pressure
When the panel
is at user access Level 1 and also in the quiescent status, i.e. the panel status is normal, the following indications are present:
Test
Flow
DisablementStatus
Normal
Z2
Z3
Pressure
POWER LED (green). This is lit continuously when the panel is powered.
Power
Low
Normal
General
Fault
Keypad Access
Lamp test (3 sec.)
Monitored
Cct.
Hold
Earth
Fault
Silence
Resound
NA
Monitored
Cct.
Abort
NC
d
Operation
4.5 Control Panel Status
Común
d
RP1r-Supra
The Alarma/Avería
internal Buzzer is silent.
Monitored
Cct.
Sounder
Fault
Disabled
Release
Fault
Power
Supply
Fault
Delay
On/Off
Release
Circuit
Fault
Auxiliary
Power Supply
Mute
Buzzer
Open door
Manual
Release
Only
Fault
FIRE
System
Fault
Evacuate
Disparo
GENERAL FAULT relay (GEN.FAULT) energized≡standby(continuitybetweenCandNO)
(3 sec.)
Reset
HLSI-MN-103-I v.05
http://www.honeywelllifesafety.es
User Manual
36
Pre-Activated
Alarm
RP1r-Supra
Activated
4.5.2
Pressure
If there is anTest
alarm in one of the zones, the control panel goes into preactivated release mode and the following indications are present:
Flow
Disablement
Preactivatedstatus(singlezonefirecondition)
Z2
Z3
Pressure
Monitored Normal
Cct.
Abort
Keypad Access
General
Lamp test (3 sec.)
Fault Alarma/Avería
Monitored
Cct.
Hold
Earth
Fault
NA
NC
Monitored
Cct.
ic
The internal buzzer operates (pulsing tone, 1 Hz)
Común
d
Activated
Release
Circuit
Fault
Activated Manual
Alarm
Release
ated
Manual
Active
Release
ual
Only
Disablement
ase
Pressure
Power Supply
Active
ored
d
Abort
ored
d
Hold
Pressure
pen door
ic
Earth
Monitored
Fault
Cct.
Hold
Silence
Earth
Manual
Resound
Sounder
Fault
Disabled
Monitored
Cct.
Supply
Fault
FIRE
The ALARM led (red) flashes.
Z1
Z2
Zone status leds indicate “Alarm” in the corresponding zone.
Flashing
Z3in case of a detector alarm/ Steady in case of a call point alarm
Z3
Pre-Activated
Keypad
Access
Lamp test (3 sec.)
Fault
General
Activated
Release
Fault
Active
Keypad Access
Lamp test (3 Statusleds→
sec.) Alarm
Silence
Resound
Evacuate
(3 sec.)
Sounder
Pressure
Fault
Delay
Disabled
Flow
Evacuate
(3 sec.)
“Preactivated”:ON
“Activated”: OFF
Z1
Disablement
Statuscontacts→
PREACT:ON
Z2
ACTIV: OFF
RELEASED: OFF
Test
Power
Pressure
Supply
Fault
Low
Delay
On/Off
When
parameter= 0 (default
value), sounder outputs 1 and 2 (SND1 and SND2) will operate with slow pulsing tone (1 Hz).
Z3
isfinished,sounderscanbesilentbypressing“Silence/Resound”
Whenthedelayconfiguredinparameter
Power
key.Ifaspecificdelayhasbeenconfigured,sounderswillbesilentuntilthedelayisfinished.Thedelaycanbecancelledat
Auxiliary
Cct. Fault
Abort
Mute
Buzzer
Access
General
any
time byKeypad
pressing
the “Delay ON/OFF” key
Manual
System
Monitored
Release System
Cct. Fault
Disabled
Only
Hold
HLSI-MN-103-I
v.05
Reset
Release
Fault
ase
it
Mute
Buzzer
Z2
Monitored
General
Cct.
AbortFault
Open doorPower
ase
Power
Low Power
GENERAL FAULT relay (GEN.FAULT) energized≡standby(continuitybetweenCandNO)
Delay
On/Off
Test
ored
ual
ase
Test
Flow
Low
Evacuate
(3 sec.)
Fault
Disablement
System
Z1 Reset
Fault
FIRE
sure
Resound
Power
Supply
Fault
Alarm
Auxiliary
Release
Fault
Pre-Activated
Flow
Disparo Silence
Sounder
Fault
Disabled
Open door
sure
POWER LED (green). This is lit continuously when the panel is powered.
Power
Low
d
Operation
Z1
Manual
Release
Active
Auxiliary
Power Supply
Fault
System
Release
Circuit
Released
Fault
Fault
On/Off
Mute
Buzzer
Monitored
Reset
Power Supply
FIRE
Silence
Resound
Fault
Earth
Fault
http://www.honeywelllifesafety.es
Sounder
Monitored
Automatic
Cct.
Open door
Fault
Disabled
Lamp test (3 sec.)
Silence
Resound
Evacuate
(3 sec.)
Delay
On/Off
and the sounders will operate immediately.
User Manual
37
RP1r-Supra
Alarm
Pre-Activated
Activated
4.5.3
Manual
Release
Active
Disablement
By default, the control panel starts Z2
the release process when there is an alarm coincidence in zone 1 and zone 2 or when the gas release call point has
been activated
(only
automatic
or
manual
operating modes). In these circumstances, the following indications are present:
Test
Pressure
Flow
Z3
Pressure
Monitored Normal
Cct.
Abort
Keypad Access
General
Lamp test (3 sec.)
Fault Alarma/Avería
Monitored
Cct.
Hold
Earth
Fault
NA
NC
Monitored
Cct.
ic
The internal buzzer operates (pulsing tone, 1 Hz)
Común
d
Open door
Activated
Release
Circuit
Fault
Activated Manual
Alarm
Release
ated
Manual
Active
Release
ual
Only
Disablement
ase
Pressure
ored
d
Abort
ored
d
Hold
pen door
ic
Pressure
Monitored
General
Cct.
AbortFault
Earth
Monitored
Fault
Cct.
Hold
Sounder
Fault
Disabled
Monitored
Cct.
Supply
Fault
Release
Fault
ase
it
FIRE
Power
Low Power
Open doorPower
ase
Evacuate
(3 sec.)
Auxiliary
Power Supply
Fault
System
Release
Circuit
Released
Fault
Fault
GENERALFAULTrelay(GEN.FAULT)energized≡standby(continuitybetweenCandNO)
Delay
On/Off
Z2
The ALARM led (red) flashes.
Z1
Z2
Zone status leds indicate “Alarm” in the corresponding zone.
Flashing
Z3in case of a detector alarm/ Steady in case of a call point alarm
Test
ored
ual
ase
Test
Flow
Low
Sounder
Fault
Disabled
Mute
Buzzer
Fault
Disablement
System
Z1 Reset
Fault
Active
sure
Resound
Power Supply
FIRE
Flow
Disparo Silence
Power
Supply
Fault
Alarm
Auxiliary
Release
Fault
Pre-Activated
sure
POWER LED (green). This is lit continuously when the panel is powered.
Power
Low
d
Operation
Z1 zone alarm condition)
Activated status (Double
Z3
General
Pre-Activated
Keypad
Access
Lamp test (3 sec.)
Fault
Activated
Silence
Earth
Manual
Resound
Release
Fault
Active
Keypad Access
Lamp test (3 Statusleds→
sec.) Alarm
Silence
Resound
Evacuate
(3 sec.)
Sounder
Pressure
Fault
Delay
Disabled
Flow
Evacuate
(3 sec.)
Disablement
Statuscontacts→
Power
Pressure
Supply
Fault
Low
Delay
On/Off
Auxiliary
Cct. Fault
Abort
Mute
Buzzer
Monitored
Reset
Power Supply
ACTIV: ON
RELEASED: OFF
Z3
Power
Sounder
outputs (SND1 and SND2) will operate with quick pulsing tone (2 Hz)
General
Fault
FIRE
Monitored
Cct.
PREACT:ON
Z2
Test
On/Off
Mute
Buzzer
“Activated”: ON
Z1
Manual
System
Monitored
v.05
Earth
System
Reset
Release HLSI-MN-103-I
Cct. Fault
Disabled
Only
Fault
Hold
http://www.honeywelllifesafety.es
Automatic
“Preactivated”:ON
Sounder
Fault
Keypad Access
Lamp test (3 sec.)
Silence
Resound
Evacuate
User Manual
38
RP1r-Supra
Operation
Additionally, the release sequence starts.
According to Section 4.17 of UNE-EN 12094-1:2004, it is possible to specify a delay known as a pre-discharge-warning time which shall be adjustable from
00and60seconds.Theconfigurationofthisdelaytimeisrestrictedtotheaccesslevel3(seeSection 5. Control panel configuration for more details)
The GAS sign flashes.
The countdown begins. By default, the timer shows 60 seconds*.
During the delay time, the sounders cannot be
silent.
* When release has been caused by the action of the
manual call point, the sequence of extinction begins
immediately, without applying the delay set in the
parameter
.
It is possible to change this behaviour by default,
through the modification of the parameter
(refer to section 5. Control Panel Configuration for
more details).
HLSI-MN-103-I v.05
http://www.honeywelllifesafety.es
User Manual
39
Pre-Activated
Alarm
RP1r-Supra
Activated
4.5.4
Pressure
When the delay
time is over, the control panel activates the extinguishing release and the following indications are present:
Test
Disablement
Extinguishing
release status
Z2
Flow
Z3
Pressure
Monitored Normal
Cct.
Abort
Keypad Access
General
Lamp test (3 sec.)
Fault Alarma/Avería
Monitored
Cct.
Hold
Earth
Fault
NA
NC
Monitored
Cct.
ic
The internal buzzer operates (steady tone)
Común
d
Activated
Release
Circuit
Fault
Activated Manual
Alarm
Release
ated
Manual
Active
Release
ual
Only
Disablement
ase
Pressure
Power Supply
Active
ored
d
Abort
ored
d
Hold
Pressure
pen door
ic
Earth
Monitored
Fault
Cct.
Hold
Silence
Earth
Manual
Resound
Sounder
Fault
Disabled
Monitored
Cct.
Supply
Fault
FIRE
The ALARM led (red) lights in steady mode.
Z1
Z2
Zone status leds indicate “Alarm” in the corresponding zone.
Flashing
Z3in case of a detector alarm/ Steady in case of a call point alarm
Z3
Pre-Activated
Keypad
Access
Lamp test (3 sec.)
Fault
General
Activated
Release
Fault
Active
Keypad Access
Lamp test (3 Statusleds→
sec.) Alarm
Silence
Resound
Evacuate
(3 sec.)
Sounder
Pressure
Fault
Delay
Disabled
Flow
Evacuate
(3 sec.)
“Preactivated”:ON
Z1
Statuscontacts→
Mute
Buzzer
General
Fault
Keypad Access
Lamp test (3 sec.)
Manual
System
Monitored
Release System
Cct. Fault
Disabled
Only
Hold
HLSI-MN-103-I
v.05
Reset
Earth
Fault
Silence
Resound
Fault
System
Release
Circuit
Released
Fault
Fault
Mute
Buzzer
Monitored
Reset
Power Supply
FIRE
Cct.
Open door
RELEASED: ON
Power
Sounder
outputs (SND1 and SND2) will operate in steady tone.
http://www.honeywelllifesafety.es
Sounder
Monitored
Automatic
ACTIV: ON
Z3
On/Off
Auxiliary
Cct. Fault
Abort
Power Supply
PREACT:ON
Z2
Test
Delay
On/Off
Auxiliary
“Activated”: ON
Disablement
Power
Pressure
Supply
Fault
Low
Release
Fault
ase
it
Mute
Buzzer
Z2
Monitored
General
Cct.
AbortFault
Open doorPower
ase
Power
Low Power
GENERALFAULTrelay(GEN.FAULT)energized≡standby(continuitybetweenCandNO)
Delay
On/Off
Test
ored
ual
ase
Test
Flow
Low
Evacuate
(3 sec.)
Fault
Disablement
System
Z1 Reset
Fault
FIRE
sure
Resound
Power
Supply
Fault
Alarm
Auxiliary
Release
Fault
Pre-Activated
Flow
Disparo Silence
Sounder
Fault
Disabled
Open door
sure
POWER LED (green). This is lit continuously when the panel is powered.
Power
Low
d
Operation
Z1
Manual
Release
Active
Fault
Disabled
Evacuate
(3 sec.)
User Manual
40
RP1r-Supra
Operation
Pre-Activated
Alarm
Activated
The GAS sign lights in steady mode. Z1
Manual
Release
Active
Disablement
Z2
Pressure
Test
The timer keeps the value 00 seconds Z3
in flashing mode.
Flow
Pressure
Power
Low
Released
Monitored
Cct. The “Released”
Abort
System
Disabled
Automatic
Manual
Only
4.5.5
OFF
led
flashes.
Lamp test (3 sec.)
Fault
General
Keypad Access
Monitored
Cct.
Hold
Release
Earth
Silence
Cct.
Fault
Disabled
Resound
Circuits:Fault
the output
relays for solenoid activation of release devices are activated during the period of time already
,
295
configured(parameter
Sounder
Monitored
Evacuate sec., default value)
Open door
Power
Supply
Fault
Alarm
Auxiliary
Release
Fault
Pre-Activated
End of extinguishing
release
Activated
Release
When the release
ON
Circuit
Fault
Manual
period Release
of time indicated
Active
Manual
Release
Only
Pressure
(3 sec.)
Delay
On/Off
Mute
Buzzer
Fault
parameter
Disablement
System
Reset
Fault
Test
Z1
Power Supply
in
FIRE
Flow
is over, the following indications are present:
Z2
The timer keeps the value 00 seconds Z3
in steady mode.
Pressure
Low
Power
Released
Monitored
Cct. The “Released”
Abort
System
Disabled
Monitored
Cct.
Hold
Automatic
Monitored
Cct.
Sounder
Fault
Disabled
Release
Fault
Power
Supply
Fault
Delay
On/Off
Release
Circuit
Fault
Auxiliary
Mute
Buzzer
General
Keypad Access
Earth
Fault
Silence
Resound
led
lights Lamp
in steady
mode.
test (3 sec.)
Fault
Release Circuits: the output relays for solenoid activation of release devices are disabled.
Open door
Manual
Only
OFF
Power Supply
Fault
Evacuate
(3 sec.)
ON
Manual
Release
HLSI-MN-103-I v.05
Only
http://www.honeywelllifesafety.es
FIRE
System
Fault
Reset
User Manual
41
RP1r-Supra
Operation
4.6 Auxiliary call points
As described in Section 3.4. Input Circuits Connection, it is possible to connect a number of auxiliary call points to the control panel to make the remote
control easier.
4.6.1
GAS release manual call point
Following the instructions of Section 3.4.1 Gas release, it is possible to connect an auxiliary call point (optional) for manual release (only in Automatic or
Manual operating modes). The call point activation in this condition will make the control panel go into ACTIVATED status.
According to Section 4.17 of UNE-EN 12094-1:2004, it is possible to specify a delay known as a pre-discharge-warning time which shall be adjustable from
00and60seconds.Theconfigurationofthisdelaytimeisrestrictedtotheaccesslevel3,duringthecontrolpanelconfigurationprocessandbymeansof
(see Section 5. Control panel configuration for more details). The value of this parameter will establish the delay time between the
the parameter
gas release manual call point and the beginning of the release process.
By default, in case of manual call point release, the control panel starts the extinction process immediately, regardless of the value stored in parameter
Ifthedelayisneeded,thisoptionmustbeactivatedthroughthemodificationoftheparameter
(refer to section 5. Control panel configuration
for more details).
When the control panel is in Disabled mode, the call point activation will only cause the sounder circuit activation (Preactivated status).
To enable the use of a second auxiliary manual call point, connected to the MANUAL REL.2 input (block B, see section 3.4.1 for more details), it is necessary to
previously activate this feature using the parameter
by accessing control panel configuration mode. In this case, the activation of this second manual call
point does not make the control panel enter in Activate status and it only activates extinction circuit 2 (block 2, see section 3.5.1 for more details). The text
is displayed.
The control panel automatically leaves this status when the condition of manual call point 2 activated disappears.
4.6.2
Hold device
Following the instructions of Section 3.4.2 Hold device, and according to the requirements of UNE-EN 12094-1:2004, Section 4.20b (Emergency detection
devices), the control panel supports (optional) the connection of a hold device which will stop, manually, the automatic release sequence.
If the hold device is activated when the control panel has already started the countdown (Activated mode), the control panel sounders will change from rapid
frequency mode to low frequency mode, the countdown stops and the output contact corresponding to “Disabled” mode will activate.
If the Activation has been started from a manual call point, the countdown will only be cancelled if the delay option is activated. This option, which is disabled
intheconfigurationmode(seeSection 5. Configuration for more details).
by default, can be enabled by modifying the parameter
The sequence of actions that are implemented by the control panel once the HOLD call point has been activated is the following:
HLSI-MN-103-I v.05
http://www.honeywelllifesafety.es
User Manual
42
RP1r-Supra
Operation
NA
Común
NA
Común
While the push button input is active, the countdown timer remains held up and awaiting.
Contact DISABLED: ON
Sounder outputs (SND1 and SND2) operate in slow pulsing mode (1 Hz)
The HOLD input is self-resettable. By releasing the push button, the input is no longer active and the countdown restarts.
According to UNE-EN 12094-1:2004, section 4.20.4, if there is a fault in the hold device monitoring circuit, the control panel must indicate the fault
condition and avoid the activation of the release circuit.
ItispossibletoconfigureiftheGasreleasepushbuttoninput(auxiliaryorZone3callpoint)orhaspriorityovertheHolddevicebychangingtheparameter
,duringthecontrolpanelconfiguration(refertoSection5. Control panel configuration, for more details)
4.6.3
Emergency Abort device
NA
Común
NA
Común
Following the instructions of Section 3.4.3 Emergency Abort device, and according to the requirements of UNE-EN 12094-1:2004, Section 4.27 (Devices
for emergency abort), the control panel supports the connection (optional) of an emergency ABORT device to manually stop the automatic release sequence.
DISABLED Contact: ON
Sounder outputs (SND1 and SND2) disabled (silent)
HLSI-MN-103-I v.05
http://www.honeywelllifesafety.es
User Manual
43
d
d
ic
RP1r-Supra
Operation
The Abort input is latched, so, once activated, it will require a manual reset of the control panel to enable the extinguishing process again.
(see Section 5. Configuration for more details), it is possible to change the default operation of
As an alternative, and by modifying the parameter
the control panel in front of the activation of the ABORT input, allowing the control panel to keep the abort condition only while the ABORT input is activated.
ThecountdownwillberestoredautomaticallyonceABORTactivatedconditiondissapears.(Note:ThemodificationofthisoptioncontravenestheUNE-EN
12094-1:2004 standard).
4.7 External signals
Following the description of Section 3.4.5. Technical alarm inputs, the control panel provides a number of monitored input circuits for external signals to
detect and signal events from external devices.
4.7.1
LOW PRESSURE signal
The LOW PRESSURE input (LOW PRESS) allows the control panel to signal the status of loss of extinguishing agent in the bottles sent by the sensors
installed in the extinguishing agent bottles.
Refer to Section 3.4.5.1 Low Pressure Signal to see the connection of this external signal.
Pre-Activated
Activated
When the control panel receives a low pressure signal, this is considered as a fault. This input is self-resettable.
Alarm
Normal
Disparo
Z2
NA
Test
Pre-Activated
NC
Flow
The internal buzzer operates (pulsing tone)
Disablement
Común
Pressure
Z1
Alarma/Avería
Manual
Release
Active
Alarm
Z3
GENERALFAULTrelay(GEN.FAULT)non-energized≡fault(continuitybetweenCandNC)
Activated
Z1
Pressure
Power
Manual
Release
Active
Monitored
General
Cct.
Pressure
Fault
Abort
Flow
Monitored
Earth
Cct.
Pressure
Fault
Hold
Low
Sounder
Monitored
Fault
Cct.
Monitored
Open door
Released
Cct. Disabled
Abort
Power
Release
Supply
Monitored
System
Fault
Cct. Fault
Disabled
Hold
Auxiliary
Release
Power Supply
Circuit
Monitored
HLSI-MN-103-I
v.05
Fault
Automatic
Cct. Fault
Low
Disablement
Keypad Access
The
Lamp test (3 sec.)
Silence
Resound
Evacuate
(3 sec.)
Delay
On/Off
Mute
Buzzer
Z3
Power
“Low
Pressure” led lights in steady mode
General
Fault
Keypad Access
Lamp test (3 sec.)
Earth
Fault
Silence
Resound
Sounder
Fault
http://www.honeywelllifesafety.es Disabled
Manual
System
Reset
Release Manual
Power
Release
Fault
Only
Supply
Only
Fault
Open door
Z2
ALARM led (red) lights in flashing mode.
Test
Evacuate
(3 sec.)
FIRE
Delay
On/Off
User Manual
44
RP1r-Supra
4.7.2
Operation
Flow signal (FLOW PRESS)
AccordingtoUNE-EN12094-1:2004,section4.18(Signalflowofextinguishingagent),thecontrolpanelprovidesaninputwhichallowstheconnectionof
thecorrespondingflowsensorinordertomonitoritsstatus.
Refer to Section 3.4.5.2 Flow signal (Flow Press) to see the connection of this external signal.
When this input is active, the control panel will treat this condition as an alarm and the following indications will be shown:
Normal
Alarma/Avería
The internal buzzer operates (steady tone)
Disparo
Pre-Activated
Activated
Manual
Release
Active
Released
System
Disabled
ON
Disablement
Statuscontacts→
Pre-Activated
Pre-Activated
Flow
Activated
Activated
Pressure
Manual
Release
Power
Sounder
Active
Manual Low
Release
Active
Monitored
Cct.
Pressure
Abort
Flow
Monitored
Cct.
Pressure
Hold
“Activated”: ON
Z1
Pressure
PREACT:ON
Z2
ACTIV: ON
RELEASED: ON
Alarm
Test
Alarm
Z3
Z1
Z1 SND2) operate in steady mode
outputs Disablement
(SND1 and
Z2
Disablement
Pressure
Z2
Keypad Access
General
Test
Flow
Lamp test (3 sec.)
Fault
Test
“Pressure
Flow” led lights
Pressure
Z3
in steady mode
Silence Power
Earth
Low
Resound
Fault
Power
Monitored
Keypad Access
General
led lights in steady
mode
Cct. “Released”
Sounder
Lamp test (3 sec.)
Evacuate Fault
Abort
Fault
(3 sec.)
Keypad Access
General
Disabled
Monitored
Silence
Lamp test (3Earth
sec.)
Fault
Cct. Power
condition
a control
manual reset
Resound
Fault panel
Delay
Holdimplies
Supply
On/Off
Silence
Earth
Fault
Z3
Low
Released
Monitored
Cct.
Monitored
Open door
Released
Cct.
System
Abortof this
The
activation
Release Disabled
Manual
Only
Fault
Monitored
System
Sounder
Monitored
Evacuate
4.7.3 Cct.
DoorHold
open signal
Disabled
Automatic
Resound Fault
Cct. Fault
(3 sec.)
Open
door
Auxiliary
Release
Disabled
Mute
Power Supply
Circuit
Buzzer
Sounder
Monitored
Fault
This monitored
input provides
the status
indication
the door of the building where the extinguishing system is installed.
Fault
Power of Delay
Evacuate
Release
Manual
Automatic
Fault
Cct.
Supply
(3 sec.)
Only
Open door
Fault Disabled
On/Off
Fault
Refer to Manual
Section 3.4.5.3 Door System
open signal
to see the connection of this external signal.
Reset
Release
OFF
Fault
Power
Release
Delay Auxiliary
Release
Manual
Only
Mute
Power Supply
Supply
Circuit
Thisindicationisjusttoprovideinformation,however,thecontrolpanelcanbeconfiguredsothattheautomaticreleaseisblockedwhenthedoorisopen
Only
Fault
Buzzer
On/Off Fault
Fault Fault
Automatic
OFF
Alarm
Statusleds→
“Preactivated”:ON
FIRE
(parameter
OFF
ON
). Refer to Section 5. Control panel configuration for more details).
Release
Circuit
HLSI-MN-103-I
Fault v.05
ON
ManualAuxiliary
Release
Power Supply
Only Fault
FIRE
http://www.honeywelllifesafety.es
Manual
System
Release
Only
FIRE
Fault
System
Mute
Buzzer Fault
Reset
Reset
User Manual
45
Pressure
d
ic
OFF
OFF
Monitored
Cct.
RP1r-Supra
Abort
Released
System
Disabled
Fault
Hold
ON
•
Release
Power
Supply
Delay
Auxiliary
Mute
Buzzer
Release
Circuit
Fault
Pre-Activated
Manual
Activated
Release
Only
Manual Alarm
Release
Active
Power Supply
Fault
If the countdown is activated (release in process) and the door is open, the release process goes into Hold mode. When the
closed,
Reset the countdown starts again from the beginning.
Alarm
System
door
is
Fault
Pressure
Flow
Pressure
Low
Released
Monitored
Cct. System
Abort
Disabled
Monitored
Cct.
Hold
Automatic
Released
Monitored
Cct. Manual
Open door
Only
System
Disabled
Release
Fault
Automatic
ON
Release
Circuit
Fault
Manual
Only
Manual
Release
Only
FIRE
Disablement
Alarma/Avería
PressureDisablement
Disparo
Pre-Activated
Flow
Z1
Z1
Z2 (pulsing tone)
The internal buzzer operates
Test
Alarm
Z2
Z3
Z1
Activated
PressureTest
Power
Manual Low
Disablement
Release
GENERAL FAULT relay (GEN.FAULT) non-energized≡fault(continuitybetweenCandNC)
Active
MonitoredPower
Keypad Access
General
Cct.
Pressure
Lamp test (3 sec.)
Fault
Abort
Test
Flow
Keypad Access
General
The
ALARM
Monitored
Silenceled (red) lights in flashing mode.
Earth
Lamp test (3
sec.)
Fault
Cct.
Pressure
Resound
Fault
Hold
Power
Low
Silence
Earth
Sounder
Monitored
Evacuate
ResoundFault
Fault
Cct.
“Door open”
lights in steady mode
Monitored
(3 sec.) led
Keypad
Access
General
Open door
Disabled
Cct.
Lamp
test (3 sec.)
Fault
Sounder
Abort
Evacuate
Power
Delay
Release Fault
(3 sec.)
Supply
MonitoredDisabled
Silence
Earth
Fault
On/Off
Fault
“Hold”
lights
in steady mode
Cct.
Resound
Power
Hold
Delay Fault
Auxiliary
Release Supply
Mute
On/Off Power Supply
Circuit Fault
Sounder
Monitored
Buzzer
Evacuate
Fault
Fault
Fault
Cct.
(3 sec.)
OpenAuxiliary
door
Disabled
Mute
Manual Power Supply
Buzzer System
Reset
ReleaseFault
Power
Delay
Release
Fault
Only
Supply
Fault
On/Off
If
the
option
4.26
from
EN12094:1/2003 is enabled (see Section 5.4. Special Functions for more information),
Fault
System
Reset
Faultbe used to indicate if the fan output is disabled (led ON) or enabled (led OFF).
Auxiliary
Release
Mute
Power Supply
Circuit
Buzzer
Fault
Fault
NA
Manual
Release
Active
NC
Normal
Evacuate
open”
(3 sec.) led lights in steady mode
Fault
On/Off
Fault release
To
block the extinguishing
process while the door is open. In this situation, the following indications are present:
Común
Activated
Operation
Resound
Sounder
Fault
“Door
Disabled
FIRE
Pre-Activated
Keypad Access
Lamp test (3 sec.)
Monitored
Cct.
Open door
Manual
Only
General
Fault
Monitored
To
provide informationEarth
(default):Silence
Cct.
•
Automatic
OFF
d
Power
Low
Z3
Z2
Z3
FIRE
then the Open Door led will
ON
Manual
Release
Only
FIRE
System
Fault
HLSI-MN-103-I v.05
http://www.honeywelllifesafety.es
Reset
User Manual
46
RP1r-Supra
4.7.4
Operation
Digital input
Following the description of Section 3.4.6. Digital input, the control panel provides a programmable digital input for a free voltage external contact in order
to control the panel from any other external system. Refer to Section 3.4.6. for more details.
There are a number of operations which can be carried out when this contact is activated. These operations are determined by the indications of parameter
, (Refer to Section 5. Control panel configuration for more details).
HLSI-MN-103-I v.05
http://www.honeywelllifesafety.es
User Manual
47
RP1r-Supra
Operation
4.8 Disablements
4.8.1
Z1
Disable zones
Press the required zone key to disable the supervision of one of the 3
detection zones.
Z2
This action is only available in Access Level 2.
When a zone is disabled, the following indications are present:
Activated
Alarm
ated
Z1
ual
ase
Active
Disablement
Z2
sure
Pre-Activated
Flow
sureActivated
Manual
ored
Release
Active
Abort
ored
Hold
Pressure
pen door
Disabled zone indicator, lights (yellow).
Test
Z3
Alarm
Z1
Power
Low
ored
Z3
General
Fault
Keypad Access
Lamp test (3 sec.)
Earth
Fault
Silence
Resound
Power
Supply
Fault
Delay
On/Off
Auxiliary
Mute
Buzzer
Disablement
“Disablement” led lights
Z2
Under these Test
circumstances, the alarms and faults of the disabled zone(s) are not supervised and, in consequence, they will not be indicated at the control
Evacuate
Flow Sounder
Fault
panel.
(3 sec.)
Disabled
Z3
asePressure
Low
ase
it
Power Supply
Monitored
ual Cct.
ase
Abort
Fault
Power
General
Fault
Keypad Access
Lamp test (3 sec.)
Monitored
Cct.
Hold
Earth
Fault
Silence
Resound
Monitored
Cct.
Sounder
Fault
Disabled
Release
Fault
Power
Supply
Fault
FIRE
Open door
Release
Circuit
Fault
System
Fault
Reset
Evacuate
(3 sec.)
Delay
On/Off
HLSI-MN-103-I v.05
Auxiliary
Mute
http://www.honeywelllifesafety.es
Power Supply
Fault
Buzzer
User Manual
48
RP1r-Supra
4.8.2
Operation
Disable the extinguishing process
System Disabled
To disable the extinguishing process, the control panel has to be set in “Disabled” operating mode by pressing repeatedly the “mode selector”
until the
required operating mode led is lit (see Section 4.4. Operating modes). In this operating mode, the extinguishing process cannot be started, manually or
automatically.
Automatic
Manual Only
This function is only available in Access Level 2.
The following indications are present:
System Disabled
Automatic
“Disabled” led lights
Manual Only
DISABLED relay: ON
4.8.3
Disable the sounders
According to UNE-EN 12094-1:2004, section 4.15, “DisablingofthetransmissionpathtothealarmdevicesofafloodingzoneshallbepossibleONLYwith
thedisablingofthetransmissionpathtotheactuatorsofthatfloodingzone”.
Thus, sounders can only be disabled when the control panel is in “Disabled” operating mode.
To disable sounders, press the “Silence / Resound” key
Silence
Resound
from Access Level 2.
System Disabled
.
Automatic
Manual Only
When the control panel returns to “Manual” or “Automatic” operating mode, the sounders circuits are automatically restored.
4.8.4
Silence sounders
Unlike the section above (4.8.3 Disable sounders), the active sounders can be silent (not disabled), temporarily, by pressing “Silence / Resound” key
always from Access Level 2.
Silence
Resound
By pressing the “Silence / Resound”
HLSI-MN-103-I v.05
http://www.honeywelllifesafety.es
Silence
Resound
key twice, the sounders sound again.
User Manual
49
RP1r-Supra
4.8.5
Operation
Mute Buzzer
According to Section 4.3. Access Levels, the internal buzzer can be silent from any Access level, even Access level 1, by pressing “Mute buzzer”
key.
4.8.6
Mute
Buzzer
Disable external device (only for Belgium)
If the option described in UNE-EN 12094-1:2004, section 4.26, is enabled (see Section 5.4. Special Functions for more information), the external device
key for 3 seconds.
linked to the control panel will be disabled or enabled by pressing the “Delay On/Off”
Delay
On/Off
HLSI-MN-103-I v.05
http://www.honeywelllifesafety.es
User Manual
50
RP1r-Supra
Operation
4.9 Faults
4.9.1
Auxiliary power supply fault
According to UNE-EN 54-4:A2:2006, compulsory from August 2009, it is necessary to monitor the batteries internal resistance in order to ensure a correct
and safe operation in case of a mains failure. The control panel makes periodic measurements of the battery internal resistance to check the resistive value.
If this value is higher than 700 mΩ, an Auxiliary power supply fault will be generated to indicate that the state of batteries is not correct.
4.9.2
Monitored circuits faults
All monitored inputs and outputs require an End Of Line element (EOL) to ensure the monitoring function of the wiring lines (See Section 3. Installation
for more details).
If there is a short circuit or the control panel does not detect the EOL resistor, a fault will be generated and the indicator led, on the front panel, will be lit in
flashing mode. Additionally, the General Fault led and contact will also be activated.
Pre-Activated
Activated
By using the default monitoring mode (capacitive EOL in inputs and diodes in outputs), the control panel also monitors the wiring, determining if it has
the resistive minimum conditions to guarantee its function. Otherwise, a fault will be indicated. This additional feature is not present if you are using the
monitoring mode by means of a resistive EOL.
Alarm
Normal
Pressure
Low
The internal buzzer operates (pulsing tone)
Disablement
Disparo
NA
NC
Común
Pressure
Flow
Z1
Alarma/Avería
Manual
Release
Active
Z2
Test
Z3 FAULT relay (GEN.FAULT) non-energized≡fault(continuitybetweenCandNC)
GENERAL
Power
Monitored
Cct.
Abort
General
Fault
Keypad Access
The
Lamp test (3 sec.)
Monitored
Cct.
Hold
Earth
Fault
Silence
Resound
Monitored
Cct.
Sounder
Fault
Disabled
Release
Fault
Power
Supply
Fault
Delay
On/Off
Release
Circuit
Fault
Auxiliary
Mute
Open door
Manual
Release
Only
Power Supply
FIRE
Evacuate
(3 sec.)
Faultv.05 Buzzer
HLSI-MN-103-I
http://www.honeywelllifesafety.es
System
Fault
General Fault led lights in flashing mode. (This led ON indicates the presence of any kind of failure in the system)
Reset
User Manual
51
Released
Manual
Release
Active
System
Pressure
Disabled
RP1r-Supra
Flow
Depending on the type of fault, the indications are as follows:
Automatic
Pressure
Monitored circuit
Release circuit 1
Release circuit 2
Sounders 1
Term.
Block
Low
Description Manual
Monitored
Only
Released
Cct.
Abort
Monitored
Cct.
Abort
Disablement
General
Fault
Keypad Access
Z1
Monitored
Cct.
Hold
Test
Earth
Fault
Silence
Z2
Monitored
Cct.
Open door
Power
Sounder
Fault
Disabled
Z3
Evacuate
Release
Fault General
Fault
1
CCT OFF
EXT 1
Release
Pre-Activated
Circuit Earth
Monitored
System
Fault
2
CCT EXTCct.
2
Activated
Disabled
ON
Fault
Hold
Manual
Manual
5
SND 1 Monitored
ReleaseSounder
Release
Only Active
Automatic
Fault
Cct.
Pre-Activated
Open door
6
SND 2
Disabled
Activated
Pressure
Power
Release
Manual
Pre-Activated
A
AUX. MAN.REL.
Supply
ManualFlow
Only
Fault
Fault
Release
Pre-Activated
Activated
Active
Pressure
OFF
Auxiliary
Release
Activated
Manual Low
Power Supply
Circuit
Pressure
Release
Fault
B
MANUALFault
REL.2
Manual
Active
ON
Flow
Release
Monitored
ManualReleased
Active
System
Cct.
Pressure
Release
Abort
Pressure
Fault
Only
Pressure
Flow
C
HOLD MAN.REL.
MonitoredLow
System
Flow
Cct.
Pressure
Disabled
Hold
Monitored
Released
Cct. Low
Pressure
Abort
Monitored
Low
D
ABORT SWITCH
Automatic
Cct.
Monitored
Open door
Monitored
Released
System
Cct.
Cct. Abort
Monitored
Disabled
Hold
Released
Cct.
Release
Manual
Abort
Monitored
Only
Pre-Activated
System
Fault
Monitored
Alarm
E Activated
Z1
Cct.
Disabled
Automatic
Pre-Activated
Cct.
Monitored
Hold
System
Alarm
Open door
OFF
Z1
Release
Cct.
Pre-Activated
Activated
Disabled
Alarm
Manual
Circuit HoldZ1
Monitored
Activated
Disablement
Release
Fault
Release
Manual
Manual
Automatic
Active
Cct.
Z1
ON
Disablement
Release
Monitored
Open door
Only
Z2
Fault
Manual
F Pressure
Z2
Active
Automatic
Manual
Cct.
Disablement
Release
Z2
Open door
Release
Test
Active
Pressure
Release
Manual
Flow OFF
Only
Release Z2
Test
Only
Z3
Pressure
Circuit
Fault
Flow
Release
Manual
Test
Fault
Z3
G Pressure
Z3
Flow
Power
Only
Fault
ON
Pressure
Low OFF
Release
Z3
Power
Manual
Pressure
Circuit
Low OFF
Release
Monitored
Power
Release
KeypadFault
Access
General
Released
Low
Only
Cct.
Circuit
ON
Lamp
test
(3 sec.)
Fault
Monitored
Abort
Keypad
Access
General
Released
Fault
Cct.
Manual
Lamp test
(3 sec.)
Fault
Monitored
Keypad
Access
General
Abort
ON
Released
Release
Monitored
Silence
Cct.
Earth
System
Lamp test
(3 sec.)
Fault
Manual
Abort
Cct.
Only
Disabled
Resound
Fault
Monitored
Hold
Silence
Earth
System
Release
Cct.
Disabled
Only
MonitoredHold
Resound
Fault
Silence
Earth
System
FIRE
Sounders 2
Manual release
Manual release 2
FIRE
Hold device
Extinguishing abort
call point
Zone 1
Zone 2
FIRE
Zone 3
FIRE
FIRE
FIRE
Disabled
Automatic
Automatic
Automatic
Manual
Only
Manual
HLSI-MN-103-I v.05
Only
http://www.honeywelllifesafety.es
Manual
OFF
Only
OFF
OFF
ON
Monitored
Cct.
Hold
Cct.
Monitored
Open door
Cct.
Monitored
Open door
Release
Cct.
Open door
Fault
Release
Fault
Release
Release
Fault
Circuit
Release
Fault
Circuit
Release
Sounder
Fault
Fault
Sounder
Disabled
Fault
Sounder
Disabled
Power
Fault
Supply
Disabled
Power
Fault
Supply
Power
Fault
Auxiliary
Supply
Power
FaultSupply
Auxiliary
Fault
Power Supply
Auxiliary
Lamp test (3 sec.)
Operation
Resound
(3 sec.)
PowerIndicator
Delay
Supply
On/Off
led
Notes
Keypad Access
Fault
Lamp test (3 sec.)
Auxiliary
Mute
Power Supply
“Release
fault”
Alarm circuit
Silence
Buzzer
Fault
Resound
System
Reset
Fault
EvacuateDisablement
led: flashing
Z1
“Sounders fault/disabled” led: flashing
(3 sec.)
Z2
Z1
steady
Z3
Z1
Z2
Z1
flashing
Z2
Z3
Lamp test
Reset Fault
Z2
Test
Power
Test
Silence
Earth
“Monitored
Cct”
led (fault in Z3
hold mode): flashing
Resound
Fault
“Hold”
led: steady
Z3
Keypad Access
General
Power
Alarm
Delay
On/Off
Test
Alarm
Disablement
“Manual
release” fault led:
Alarm
Power
Mute
Buzzer Disablement
Test
Disablement
“Manual
release”
Keypadfault
Accessled:
General
(3 sec.)
Lamp test (3 sec.)
Fault
Power
Sounder
Evacuate
Fault
(3
sec.)
Keypad
General
“Monitored
Cct”
ledAccess
(fault in
Disabled
Silence
Earth
Lamp
testAccess
(3 sec.)
Fault
Keypad
General
“Abort”
led:
steady
Resound
Fault
Power
Delay
Lamp test (3 sec.)
Fault
Supply
Earth
On/Off
Sounder Silence
Fault
Evacuate
Fault
Resound
Fault
Silence
Earth
(3
sec.)
Disabled
ZoneAuxiliary
1 fault led:
flashing
Mute
Resound
FaultSupply
Power
Sounder
Buzzer
Fault
Evacuate
Power
Delay
Fault
(3 sec.)
Supply
Sounder
Disabled
Evacuate
On/Off
Fault
Fault
System
(3 sec.)
ZonePower
2 fault led:
flashing
Reset
Disabled
Delay
Fault
Auxiliary
Mute
Supply
Power
Supply
On/Off
Power
Delay
Fault
Buzzer
Fault
Supply
On/Off
Fault
ZoneAuxiliary
3
fault
led:
Muteflashing
System
Power
Supply
Reset
Buzzer
Auxiliary
Fault
Mute
Fault
Power Supply
Buzzer
Fault
System
Reset
Fault
System
Fault
Automatic reset
option(*)
abort mode): flashing
Automatic reset
option(*)
Automatic reset
option(*)
Automatic reset
option(*)
Automatic reset
option(*)
Aborts release.
Manual reset
required.
Automatic reset
option(*)
Automatic reset
option(*)
Automatic reset
option(*)
Reset
Evacuate
Resound
(3 sec.)
Evacuate
(3 sec.)
Evacuate
Delay
(3 sec.)
On/Off
Delay
On/Off
Delay
Mute
On/Off
Buzzer
Mute
Buzzer
User Manual
52
Release
Manual
Active
Release
Active
Pressure
RP1r-Supra
Pressure
Flow
Pre-Activated
Flow
Pressure
Activated
Low Pressure
H
LOW PRESS
Pressure
Low
Manual
SWITCH
Low
Release
Monitored
Released
Cct. Active
Monitored
Abort
Flow Signal
I
FLOW PRESSReleased
Cct.
Pressure
Abort
Monitored
SWITCH
System
Cct. Flow
Disabled
Monitored
Hold
System
Cct.
Pressure
Hold
Open door
J
DOOR OPEN Disabled
Monitored
Low
Automatic
Cct.
SWITCH
Open door
Monitored
Automatic
Cct.
Monitored
Open door
Released
Cct.
Release
Manual
Abort
(*)
Only
Fault
By default, all faults are latched and require
the
control
Release
Manual
Monitored
System
Only
panel to be reset in order to
be restored.
Fault
OFF
Cct.
Release
Disabled
Circuit Hold
OFF
Release
Except for the abort circuit
fault, for the restFault
of the
Circuit
ON
Monitored
circuits, it is possible to modify this
operation
and
Fault
Automatic
Manual
Cct.
ON
Open door
Release
perform an automatic restore when
the fault condition
Manual
Only
Release
disappears (see Section 5.4 Special functions
for
more
Release
Manual
Only
Only
information).
Fault
FIRE
FIRE
OFF
4.9.3
Sounders Fault / Disabled indicator led
Disablement
General
Fault
General
Keypad Access
(3 sec.)
Lamp
test
Keypad
Access
Z2
Fault
Test
“FlowEarth
pressureSilence
fault” led: flashing
Lamp test (3 sec.)
Resound
Fault
Silence
Earth
Resound
Fault
Power
Sounder
Evacuate
Fault Cct(3-sec.)
Monitored
open door
Sounder
Disabled
Evacuate
Fault
Keypad
General
(3 sec.) Access
Disabled
Power
Delaytest (3 sec.)
Lamp
Fault
Supply
On/Off
Power
Fault
Delay
Supply
Silence
Earth
On/Off
Fault
Auxiliary
Mute
Resound
Fault
Power Supply
Buzzer
Auxiliary
Fault
Mute
Power Supply
Sounder
Buzzer
Evacuate
Fault
Fault
System
(3 sec.)
Disabled
Reset
Fault
System
Reset
Power
Delay
Fault
Supply
On/Off
Fault
Power Supply
Fault
Z3
led: flashing
Operation
Automatic reset
option(*)
Automatic reset
option(*)
Automatic reset
option(*)
Mute
Buzzer
ON
Manual
FIRE
•
Disablement
Auxiliary
Release
Circuit
Fault
Release
There are two possible reasons for the Sounders fault/disabled led
Only to be lit:
•
Z1
Z2
Z2
Test
Test
Z3
Alarm
Z3
Power
Z1
“Low Power
pressure fault” led: flashing
Disablement
System
Fault
Reset
If the EOL element has not been installed in any of the 2 sounder circuits (according to Section 3.5.3. Sounder circuits, a fault condition will be
generated in the monitored circuit. In this case, the “Sounders fault/disabled” led will be lit in quick flashing mode (2 Hz). Additionally, the “General
fault” led and contact will be also activated.
AccordingtoUNE-EN54standard,whenthereisadelayconfiguredforsoundersactivation,thismustbeindicatedbyactivatingthe“Disabled”condition.
The “disablement” led lights and the “Sounders fault/disabled” led is also lit, but in this case, in slow flashing mode (1 Hz).
When sounders are not still activated, because there
is a delay on (through parameter
), the led of the
key will light.
“Delay ON/OFF”
Delay
On/Off
HLSI-MN-103-I v.05
http://www.honeywelllifesafety.es
User Manual
53
d
c
RP1r-Supra
Operation
4.10 Other functions
4.10.1 Control panel reset
To perform a reset action, enter a valid user access level 2 passcode and then press the RESET key
. (Refer to Section 4.3. Access levels) for
more information). This action is used to clear all event indications on the control panel and return it to its normal operation.
Reset
On the other hand, according to UNE-EN 12094-1:2004, Section 4.12.2, it is possible to inhibit the reset function temporarily, once the control is ACTIVATED.
toconfiguretheinhibitionperiodoftimefromthecontrolpanelprogrammingmode(Seesection5. Control panel configuration,
Use the parameter
for more details).
4.10.2 Evacuation
To generate an evacuation signal, the control panel must be in quiescent status.
From Access level 2, press and keep pressed the “Silence / Resound” key
circuits and generate an evacuation signal.
Silence
Resound
for 3 seconds to activate sounders without activating the release
The following indications are present:
Pre-Activated
Alarm
Activated
Z1
Manual
Release
Active
Disablement
Sounders
Z2outputs (SND1 and SND2), pulsing signal
Pressure
Test
Flow
Pressure
Low
“Alarm led” lights in steady mode
Z3
4.10.3 Leds
test
Power
To perform a led test in order to check that all of them work properly, keep pressed the “Keypad access” key
Keypad Access
General
Section
4.3. Access
levels for more information).
Lamp test (3 sec.)
Monitored
(See
Cct.
Abort
Monitored
Cct.
Hold
Earth
Fault
Release
Fault
Power
Supply
Fault
Silence
Resound
Evacuate
(3 sec.)
Delay
On/Off
Release HLSI-MN-103-IAuxiliary
v.05
Mute
Power Supply
Circuit
Buzzer
Fault
http://www.honeywelllifesafety.es
Fault
FIRE
for 3 seconds, from any Access level
Fault
Sounder
Fault
Disabled
Manual
Release
(3 sec.)
The control panel’s LEDs are then lit individually and the internal buzzer sounds.
Monitored
Cct.
Open door
Keypad acc.
Lamp Test
System
Reset
User Manual
54
Configuration
RP1r-Supra
5
Configuration
5.1 Overview
Thispanelhasdifferentoptionsthatallowthemodificationofitsfunctionalitiesinordertofitdifferentneedsandrequirementsforeachparticularapplication.
Theseconfigurationoptionsareonlyavailablefromaccess level 3 (see section 4.3. Access level, for additional information).
5.2 Configuration mode navigation
Different parameters and options are displayed on the front user panel
7-segment LCD.
Pre-Activated
Activated
Once access level 3 has been enabled, some of the user keys change their
normalfunctionandallownavigationthroughdifferentconfigurationoptions.
Enabledkeysforthispurposearehighlightedtobeidentified.
Manual
Release
Active
Pressure
►
Keypad acc.
Lamp Test
(3 sec.)
Flow
Press this key to select the next parameter
Pressure
Low
Alarm
Z1
Disablement
Z2
Test
Z3
Power
◄
Press this key to select the previous
parameter
Released
Monitored
Cct.
Abort
General
Fault
Keypad Access
Lamp test (3 sec.)
Delay
On/Off
▲
Use this key to increase a value
System
Disabled
Monitored
Cct.
Hold
Earth
Fault
Silence
Resound
▼
Automatic
Mute
Buzzer
Monitored
Cct.
Use this key to decrease a value
Sounder
Fault
Disabled
Release
Fault
Power
Supply
Fault
Delay
On/Off
▲
Release
Circuit
Fault
Auxiliary
Power Supply
Mute
Buzzer
▼
Silence
Resound
SEL/OK
System Disabled
Automatic
SEL/OK
Pressthiskeytoconfirmtheselectionor
modifiedvalue
Manual Only
Note: When moving from one parameter to another, the latest change is saved
without pressing SEL/OK.
HLSI-MN-103-I v.05
http://www.honeywelllifesafety.es
Open door
OFF
Manual
Only
Fault
►
◄
Evacuate
(3 sec.)
ON
Manual
Release
Only
FIRE
System
Fault
Reset
User Manual
55
Configuration
RP1r-Supra
5.3 Available options
5.3.1
Extinguishing options
In order to differentiate if digits displayed on LCD stand for a parameter or a value (Access level 3), a flashing dot between both
digits is used in case of a parameter.
Extinguishing release delay
UNE-EN 12094-1:2004 regulation, section 4.17, describes a delay time before
floodingorextinguishingprocedureactivationcalledpre-alertorpre-soaktime.
Thistimecanbemodifiedfrom00to60sec.,with5sec.steps.
Delay “t” for extinguishing (default value: 60 sec.)
Selectable value from 00 to 60 sec.
Soak time for extinguishing circuit 1
On value introduction mode, dot
position is used to calculate total
time:
= 15 sec.
= +100 (115 sec.)
Selectable value from
05 to 295 sec.
--
= +200 (215 sec.)
Time delay in case of manual release
HLSI-MN-103-I v.05
http://www.honeywelllifesafety.es
According to UNE-EN 12094-1:2004 regulation, section 4.21, there’s a soak or
floodingtimedefinitionforlowpressureextinguishingsystems.
Time while extinguishing circuit remains
active (soak time). (With 5 sec. steps)
Circuit remains active until control panel is
reset (default option).
In case extinguishing is released by manual call point, it’s possible to set the
delay time before extinguishing.
00
Immediate release (default value).
01
Same delay than activated by detection,
definedby
parameter.
User Manual
56
Configuration
RP1r-Supra
Release for extinguishing circuit 2
Extinguishing repetition
Enable/disable release for extinguishing circuit 2.
00
Disabled (default value)
01
Enabled
Enable/disable supervision for FLOW PRESS input to decide if release signal
should be repeated.
Ifenabled,andflowpresssignalremainsnotactiveafterrelease,releasesignal
willberepeatedupto3times.Incaseof3repetitions,theflowpresssignal
remains disabled, control panel will show a fault on extinguishing circuit.
Hold device priority
Extinguishingnotification
HLSI-MN-103-I v.05
http://www.honeywelllifesafety.es
00
Disabled (default value)
01
Enabled
Definesifholddevice(HOLDinput)isprioritizedoverreleasedevice.
00
Release device priority (default value)
01
Hold device priority
Definesthe“extinguishingreleased”statusindicationbymeansoftheLEDon
the front panel.
00
Active LED after
01
Active LED just when LOW PRESS input
active
delay (default value)
User Manual
57
Configuration
RP1r-Supra
5.3.2
Zone options
Zone coincidence condition
DefinesthealarmcombinationtomakethecontrolpanelchangeintoACTIVE
status and start extinguishing sequence.
00
Alarm on Z1 & Z2, or Z3 (default value)
01
Alarm on any zone (Z1 or Z2 or Z3), with
extinguishing to one zone
02
Any of the following combinations, with
extinguishing to two zones:
(Z1 & Z2) or (Z1 & Z3) or (Z2 & Z3)
03
Mode for Zone 3
Zoneverification
HLSI-MN-103-I v.05
http://www.honeywelllifesafety.es
Alarm on ALL zones (Z1 & Z2 & Z3)
Definesoperatingmodeforzone3:
00
Z3 as a call point (default value)
01
Z3 as a detector
Thesystemprovidesaperiodoftimeforzonealarmconfirmationinordertoverify
if it’s real. Enabling this parameter and, in case there is an alarm on any of the
three zones, control panel automatically resets the affected zone and waits up
to 10 minutestoconfirmthisalarm.Ifalarmisrepeatedonthesamezone,this
willbenotifiedimmediately.Otherwisethetimerwillberesetafter10minutes.
00
Withoutalarmconfirmation(defaultvalue)
01
Withalarmconfirmation
User Manual
58
Configuration
RP1r-Supra
Resettable ABORT input
(*)
UNE-EN 12094-1:2004 non-compliant
Open door behaviour
Operating mode for digital input
HLSI-MN-103-I v.05
http://www.honeywelllifesafety.es
According to UNE-EN 12094-1:2004 regulation, section 4.27, in case that an
emergency abort signal is activated (from an external device connected to
ABORT input), the extinguishing signal will be inhibited and a manual reset will
be required to enable it again.
00
ABORT input not resettable (default value)
01
ABORT input self-resettable(*)
Defineshowcontrolpanelreactsincaseitsdoorisopened.
00
Just notify “Open door” (default value)
01
Extinguishing procedure locked until door
is closed.
Associates a function to DIGITAL IN input:
00
Remote reset (default value)
01
Evacuate
02
Mute sounders
03
Delay ON/OFF
04
Mute buzzer
User Manual
59
Configuration
RP1r-Supra
5.3.3
Sounders options
Sounders activation mode
Operating mode for sounders 2
Disabledsoundersnotification
Defineswhensoundersareactivated:
00
Sounders are activated when PREACTIVE
status (default value)
01
Sounders are activated when ACTIVE status
Sounderscircuit2operates,bydefault,likesounderscircuit1(flashingmode),
and its frequency depends on panel status.
00
Sounders 2flashing modelikeSounders 1
(default value)
01
Sounders 2 always activated on steady mode
Defines“Disabledsounders”LEDstatusduringsoundersdelay:
According to UNE-EN 54-2 regulation, section 9.4.2c, the sounders delay should
be indicated as a disconnection.
HLSI-MN-103-I v.05
http://www.honeywelllifesafety.es
00
LED ON during sounders delay (default
value)
01
LED OFF during sounders delay
User Manual
60
Configuration
RP1r-Supra
5.3.4
Line options
Short-circuit mode
(*)
UNE-EN 154-2 non-compliant
Monitoring mode for inputs
Input mode for HOLD and ABORT
signals
Input mode for LOW PRESS signal
Input mode for FLOW PRESS signal
HLSI-MN-103-I v.05
http://www.honeywelllifesafety.es
Defineshowashort-circuitconditionforzonesshouldbeindicated:
00
Short-circuitnotifiedasafault
(default value)
01
Short-circuitnotifiedasanalarm(*)
It allows choosing End-Of-Line (EOL) device used for inputs monitoring:
00
EOL is a resistor
01
EOL is a capacitor (default value)
It allows choosing operating mode for external devices connected to HOLD
and ABORT inputs:
00
Normally open circuit -NO- (default value)
01
Normally closed circuit -NC-
It allows choosing operating mode for contact connected to LOW PRESS input:
00
Normally open circuit -NO- (default value)
01
Normally closed circuit -NC-
It allows choosing operating mode for contact connected to FLOW PRESS input:
00
Normally open circuit -NO- (default value)
01
Normally closed circuit -NC-
User Manual
61
Configuration
RP1r-Supra
Input mode for OPEN DOOR signal
Input mode for DIGITAL IN signal
It allows choosing operating mode for contact connected to OPEN DOOR input:
00
Normally open circuit -NO- (default value)
01
Normally closed circuit -NC-
It allows choosing operating mode for external contact connected to DIGITAL
IN input:
00
Normally closed circuit -NCInput is activated when the contact opens
01
Normally open circuit -NO- (default value)
Input is activated when the contact closes
HLSI-MN-103-I v.05
http://www.honeywelllifesafety.es
User Manual
62
Configuration
RP1r-Supra
5.3.5
Additional options
Sounders delay
Period of time (in minutes) that elapses between the control panel goes into
PREACTIVE status and the sounders are activated. If a single zone alarm is
activated, this period of time can be used to check the alarm and reset the
control panel before the sounders activation.
Time delay until sounders activation (default value 00 min.)
Selectable value from 00 to 10 minutes
Reset disabled after release
According to UNE-EN 12094-1:2004, section 4.12.2, there must be a
configurabletimegap,from0to30minutes,sinceACTIVEstatusisnotified
and reset is allowed.
--
Reset remains disabled until released
is finished or until the time configured in
ends (
→0seg.)
parameter
00
Allowed reset at any time (default value)
De 01 a 30
Earth fault level
Monitoring mode for outputs
HLSI-MN-103-I v.05
http://www.honeywelllifesafety.es
Reset remains disabled during configured
time (minutes)
Definesthethresholdleveltodetectanearthfault:
00
Low Sensitivity
01
Medium
02
High Sensitivity
It allows choosing End-Of-Line (EOL) device used for outputs monitoring:
00
EOL is a resistor
01
EOL is a diode (default value)
User Manual
63
Configuration
RP1r-Supra
5.4 Special features (UNE-EN54 non-compliant)
5.4.1
Overview
Pre-Activated
Alarm
Thiscontrolpanelallowsspecialconfigurationsforresettablefaults,single24VoperationfornavalsitesorpoweredfromUPS,orsingle220Vacoperationas
Activated
Z1
adependantsubsystem.TheseconfigurationsdonotmeetUNE-EN54-4/A2:2006orUNE-EN54-2requirementsandareonlyusedforspecialoperations.
Manual
5.4.2
Disablement
Release
Active
Z2
Specialfunctionsconfiguration
Pressure
Test
Flow
Keypad acc.
Z3 the following procedure
In order to modify
any of the special features,
Pressure
Power
should be followed:
Low
Monitored
General
Lamp Test
Released offCct.
Switch
theAbort
control panel
and batteries).
Lampsupply
test
Fault(main
•
Monitored
Silence
Earthlevel
System
Change
control
panel into
3 by closing jumper “PROG” (see
Cct.
Disabled
Resound
Fault
Hold
section 4.3 Access level, for additional information).
•
Open door
Disabled
Switch on the
panel again.
Silence
Resound
(3 sec.)
Automatic
Manual
•
OFF
Monitored
Cct.
Sounder
Fault
Release
Power
Supply
Fault
Evacuate
(3 sec.)
Delay
On/Off
Delay
Pre-Activated
Only
Fault seconds, almost all
On/Off
After
a few
LEDs will turn off and only LEDs
Activated
Auxiliary
associatedRelease
to
special
functions
will
remain
turned
on,
showing
the
Mute
Circuit
Buzzer
Fault
Manual
Fault
currentstatusforspecialconfiguration(seetable).The“Systemfault”
Release
Alarm
Power Supply
Manual
Release
FIRE
Only
LEDwillbeflashing
•
System
Fault
.
Active
Reset
Pressure
Flow
Pressthekey(s)associatedtospecialfeaturestobemodified(see
Pressure
table).TheLEDwillchangeitsstatusshowingthemodificationonthe
Low
associated function.
(*)
UNE-EN 12094-1:2004 non-compliant
Released
Monitored
Cct.
Abort
Special setup only for configurations where EN-12094Monitored
System
1:2014 is not applicable. If this setup is selected,
the
Cct. CE
Disabled
Hold
labeling related to this standard has to be removed from
Monitored
the equipment.
Automatic
Cct.
Open door
Release
Manual
(*) This kind of configurations are not compliant
with
Only
Fault
UNE-EN54-4/A2:2006 and UNE-EN 54-2 regulations.
They are only available for special cases and mustRelease
be
Circuit
used in agreement with the appropriate authority. Fault
OFF
Mute
Buzzer
Off
Resettable faults. Faults are self-resettables once the fault cause
has disappeared.
On
Main power supply faults are indicated (default)
Off
Main power supply faults are not indicated (*)
On
Battery faults are indicated (default)
Off
Battery faults are not indicated (*)
On
Z1 will re-activate after a new alarm (default)
Sounders
Off
Sounder
Z2 will not re-activate after a new alarm (*)
On
VSN4-REL
module installed
Z3
Off
No VSN4-REL module installed (default)
Disablement
Test
Z1
Power
Z1
Z2
Z1
Z2
Earth
Z3
Fault
Z2
Z3
Sounder
General
Fault
Keypad Access
Lamp test (3 sec.)
Reserved
ON
Latched faults. Faults need to be RESET by the control panel
(default)
(3 sec.)
Keypad Access
•
On
Silence
Resound
On
Evacuate
Fault
Disabled
(3 sec.)
Power
Supply
Fault
Delay Off
On/Off
Auxiliary
Mute
On
Buzzer
Z3
Power Supply
Fault
ON
Manual
Release
Only
If this setup is selected, the CE labeling related to this
standard has to be removed from the equipment.
HLSI-MN-103-I v.05
http://www.honeywelllifesafety.es
FIRE
System
Selection by
means ofReset
userFault
key
Off
Anumberofspecialconfigurationprofilescanbeselectedwith
specialfunctions(non-standard).Theselectedprofileisidentified
onthe7segmentdisplay(standardprofilebydefault).
Communication faults are indicated (for communication channel
monitoring with graphic software TG-RP1r).
Communication faults are not indicated (default)
Low battery sensitivity (*). Threshold for monitoring the battery
inner resistor. The threshold selection is done by modifying the
position of the user key to gain access to the keypad. Only one
change at a time.
High battery sensitivity (default)
User Manual
64
Configuration
RP1r-Supra
5.5 Restore default values
In order to restore the default values for configuration parameters, the
following procedure must be followed:
•
Change control panel into level 3 by closing jumper “PROG” (see
section 4.3 Access level, for additional information).
•
Press and hold, “Keypad access” key
Z1
Keypad acc.
Lamp Test
(3 sec.)
.
1
Keypad acc.
•
While keeping pressed “Keypad access” key
following sequence of keys: Z1 - Z2 - Z2 - Z1.
Lamp Test
4
(3 sec.)
Z2
, press the
3
2
Z3
Keycombinationtorestoreconfigurationdefaultvalues
This option is only available at access level 3.
This action only restores the default values
corresponding to the configurable options. Special
functions accessible from level 3 (see Section 5.4
Special Functions) do not recover the factory-defined
configuration and, if necessary, they must be restored
manually using the corresponding procedure.
HLSI-MN-103-I v.05
http://www.honeywelllifesafety.es
User Manual
65
Configuration
RP1r-Supra
5.6 Monitoring functions
5.6.1 Overview
The monitoring technique using a diode or capacitor as an end of line (EOL) element, as opposed to the traditional method of supervision through resistive
EOL, allows the control panel to monitor the wiring by determining if this has resistive minimum conditions to guarantee its function.
Thatis,ifoneofthewiringlines(e.g.extinguishingcircuit)hasanexcessiveresistancealongthelengthorqualityofthecable(e.g.4Ω),with1Aofcurrent,
this would mean a voltage drop of 4V, which could result in that the solenoid valve associated to that circuit could not be activated.
Classic monitoring method, using EOL resistive element, only determines the status of a line in relation to short circuits or open circuits, so the previous
case had not been detected. With the technique used in RP1r-Supra, using diodes and capacitors as end of line elements, it is possible to determine the
resistance of the line and to be aware of hypothetical faults in the wiring.
Values which emerge from the supervision of the different circuits can be monitored and visualized at the control panel.
These monitoring functions are only accessible from access level 3 (see Section 4.3. Access Levels, for more information).
5.6.2
Access to monitoring functions
Pre-Activated
Activated
The following procedure must be followed in order to access to
monitoring functions:
•
Manual
Release
Active
Gain Access Level 3 by closing jumper “PROG” (see Section 4.3.
Access Levels, for more information).
•
Press “Evacuation”
Evacuate
(3 sec.)
Pressure
Flow
key to enter Monitoring mode.
Pressure
Low
“Evacuation” led flashes and the corresponding keys light up to be
identified.
•
•
Parameters and associated values are displayed on the front panel.
•
Navigate through the different options by means of these keys:
Keypad acc.
“Keypad”
•
Lamp Test
(3 sec.)
and “Silence Resound”
Silence
Resound
Z2
Test
Z3
Power
►
Monitored
Cct.
Abort
General
Fault
Keypad Access
Lamp test (3 sec.)
System
Disabled
Monitored
Cct.
Hold
Earth
Fault
Silence
Resound
Automatic
Monitored
Cct.
Sounder
Fault
Disabled
Release
Fault
Power
Supply
Fault
Delay
On/Off
Release
Circuit
Fault
Auxiliary
Power Supply
Mute
Buzzer
.
Open door
Manual
Only
OFF
Z1
Disablement
Released
Press the “Evacuation” key again to leave the Monitoring mode.
HLSI-MN-103-I v.05
http://www.honeywelllifesafety.es
Alarm
Fault
◄
Evacuate
(3 sec.)
ON
Manual
Release
Only
FIRE
System
Fault
Reset
User Manual
66
Configuration
RP1r-Supra
5.6.3
Monitored Parameters
The following parameters are monitored by the control panel and accessible through Monitoring mode:
Earth leakage level
The display shows the monitored value of Earth leakage level. Leakage to
negative will reduce level, while leakage to positive will increase it. Typical
value: 99-100.
Sounders circuit 1
Resistive value of sounders circuit 1 (SND1).
Sounders circuit 2
Resistive value of sounders circuit 2 (SND2).
Extinguishing circuit 1
Resistive value of Extinguishing circuit 1 (CCT EXT 1).
Extinguishing circuit 2
Resistive value of Extinguishing circuit 2 (CCT EXT 2).
Battery resistor
The displays shows the monitored value(*) of the battery inner resistor.
Dependingonthevaluetobedisplayedthe7-segmentdisplaymaybeinsufficientand,forthisreason,thepositionofthedotisusedforthecalculationofthetotal
value:
=1.5Ω
(*)
= +100 (11.5Ω)
= +200 (21.5Ω)
(*) In the case of the parameter corresponding to the battery inner resistor, this value should be interpreted by applying a reduction factor of 10:1. I.e:
=0.15Ω
=1.15Ω
Note: The values shown in the monitoring mode are only useful if the control panel uses diodes and capacitors for monitorin mode.
HLSI-MN-103-I v.05
http://www.honeywelllifesafety.es
User Manual
67
RP1r-Supra
General Wiring Diagram
A
B
C
D
E
F
-
6
-
5
EOL
+
4
EOL
+
I2C auxiliary communication port
EOL
-
RS-232 communication port
8
EOL
+
Access level 3 jumper
7
EOL
-
Lithium battery location
6
EOL
-
USB port
5
EOL
-
Inhibition monitoring earth jumper
4
EOL
EOL
EOL
J
Power supply connector
3
EOL
I
2
EOL
Zones
H
Battery connection
External
call points
Sounders
+
EOL
1
Aux.
power supply
+
Extinction
circuits
+
Appendix A
Appendix
EOL
Pre-Activated
Alarm
Activated
Z1
Release
Active
Disablement
Z2
External
signals
Pressure
Digital
input
7
Z3
K
Test
Flow
Fault
relay
Pressure
Power
Low
General
Fault
Keypad Access
Lamp test (3 sec.)
System
Disabled
Monitored
Cct.
Hold
Earth
Fault
Silence
Resound
8
Automatic
Monitored
Cct.
Sounder
Fault
Disabled
Evacuate
9
Manual
Only
Release
Fault
Power
Supply
Fault
Delay
On/Off
Release
Circuit
Fault
Auxiliary
Mute
Buzzer
Manual
Release
Only
System
Fault
Open door
(3seg.)
sec.)
(3
Power Supply
Fault
ON
1
2
3
EARTH
-BAT+ BATTERY FUSE +PSIN-
HLSI-MN-103-I v.05
http://www.honeywelllifesafety.es
5
4
Reset
10 11 12
OFF
Released
Monitored
Cct.
Abort
State
relays
· Preactive
· Active
· Released
Mode
relays
· Disabled
· Manual
· Automatic
6
PROG
RS-232 RS-232 AUX-MOD
7
8
User Manual
68
RP1r-Supra
Appendix B
Appendix
Specifications
Mechanical
Construction:
Compact control panel with modular construction and composed of a metal mounting plate, an enclosure
which supports the electronic elements and a plastic front cover.
Dimensions (H x W x D):
353 x 381 x 123mm
Weight (no batteries / with batteries):
4 Kg / 9.3 Kg
Mounting holes:
3inmetalmountingplatetofixittothewall,4inenclosure
Cable entry points:
20mm apertures: 15 (top) and 8 (back)
Terminals:
Allfieldwiringterminationsaremadeusingplug-inscrewterminalscapableofacceptingconductorsizes
between 0.5mm2 and 2.5mm2.
Environmental
ClimaticClassification:
Class A
Operating Temperature:
-5ºC to +40ºC (indoor)
Humidity:
Max. 95% RH, non-condensing
Panel sealing:
IP30
Controls & Indications
Display:
a)7-segmentLEDDisplay(2digits)forconfigurationandcountdowntimer.
b) Indicator with the word “GAS” screen printed for indication of extinguishing release start.
Status indicators:
38 LEDs are provided for the following indications:
Alarm, faults, status of monitored inputs and outputs, operating modes, external signals, release sequence
status, silence sounders, mute buzzer.
Zone indicators:
6 zone LED indicators (2 leds per zone / 3 zones)
Controls:
10 push buttons are provided for the following functions:
Disable/test zones, test LEDs, disable/enable sounders, mute buzzer, manual evacuation, sounders delay,
reset, operating mode selection.
Access control:
Key to get access level 2 (keypad unlock) and internal jumper to get access level 3 (programming)
Buzzer:
Internal sounder with SPLmin= 60dBA at 1m
HLSI-MN-103-I v.05
http://www.honeywelllifesafety.es
User Manual
69
RP1r-Supra
Appendix
System capacity
Detection zones:
3 independent zones:
•
2 zones for conventional detectors
1configurablezonefordetectorormanualcallpoint
•
Sounder circuits:
2 monitored output circuits for sounders (2 x 250 mA)
Release circuits:
2 monitored output circuits for extinguishing release devices activation (2 x 1 A)
Auxiliary relay outputs:
7 output contacts for the following functions:
•
1 general fault relay
3 release status relays (Activated, Preactivated, In progress)
3 operating mode relays (Disabled, Manual, Automatic)
•
•
Auxiliary input contacts:
7 monitored input circuits for the following functions:
•
2 for Manual Release call points connection
1 for Hold device connection
1 for Abort emergency device connection
3 for technical alarm contacts (Low pressure, Flow and door open)
•
•
•
Digital input:
1digitalinputwhichcanbeconfiguredasNO/NC
Auxiliary 24Vdc supply:
Two 24Vdc outputs (resettable and non-resettable) to supply external devices (Imax = 2 x 250 mA)
Internal clock:
Internal clock RTC for event log with lithium battery (CR2016 / CR2025 or CR2032)
Event log:
Capacity: 1000 events. Accessible through software
Communication:
4 internal ports:
•
•
•
2serialportsRS-232(TTL,withRx,TxandGnd,nohardwareflowcontrol)
1 serial port I2C
1 USB port (type B connector)
Electrical supply
Classification:
Installation Class 1 (the control panel must be earth)
Mains supply:
110/230 Vac ±15%, 50/60 Hz
Max. Power:
65 W
Standby power consumption:
125 mA
HLSI-MN-103-I v.05
http://www.honeywelllifesafety.es
User Manual
70
RP1r-Supra
Appendix
Mains fuse rating:
T4AL-250V (4 A)
Backup batteries:
Emergency power supply by means of internal batteries (2 x 12V; 7Ah)
Max. Output voltage:
28Vdc ±100 mV
Max. Battery power:
2,4 A (65 W)
Battery load current:
300 mA
Battery resistor test (EN54):
700mΩ
Battery fuse rating:
F4AL 250V (4 A)
Battery charger output voltage:
Max. 1 A @ 30 Vdc
Approvals
In accordance with:
UNE-EN 12094-1:2004, UNE-EN 54-2 and UNE-EN 54-4/A2:2006
CPDcertification:
1134-CPD-045
Battery Disposal
As a minimum, replace the batteries every four years.
The battery units should always be disposed of in accordance with the battery manufacturer’s recommendations
and local regulations.
Batteries should be disposed of separately from household waste. Always dispose of batteries as per your
local regulations. Again, do not dispose of batteries with normal household waste. If you have any questions,
please contact the local authorities responsible for waste disposal
•
Batteries should not be taken apart, thrown in the fire or short circuited.
•
If a battery has leaked do not touch the battery fluid. Avoid skin contact (e.g. put on protective gloves) and clean the battery compartment
with a dry cloth.
•
Always replace all batteries at the same time and use batteries of the same type. Extreme care must be taken to avoid damage from
electricity. Use appropriate tools with insulated handles.
HLSI-MN-103-I v.05
http://www.honeywelllifesafety.es
User Manual
71
RP1r-Supra
Appendix C
Appendix
Accessories
RP1r-Supra
Extinguishing control panel
VSN-232
RS-232 communication module
TG-IP-1
IP communication module (VSN-232 required)
VSN-4REL
4-relay module
ITAC
Interface module for RP1r-Supra integration into an ID system
TG-RP1r
Graphic management software for RP1r-Supra control panel
OPC-RP1r
Software based on OPC server standard which meets the Data Access 1.0 and 2.0 protocol. The OPCRP1rsoftwareisdesignedfortheintegrationofNotifierExtinguishingcontrolpanels(RP1rseries)inany
managing system or SCADA with OPC requirements
UCIP
IP-GPRS communication module (VSN-232 is required)
HLSI-MN-103-I v.05
http://www.honeywelllifesafety.es
User Manual
72
Honeywell Life Safety Iberia
C/ Pau Vila, 15-19; 08911 Badalona (Barcelona)
T. 902 03 05 45 - F. 93 465 86 35
www.honeywelllifesafety.es