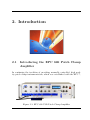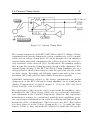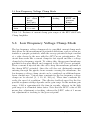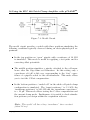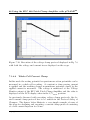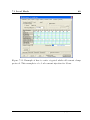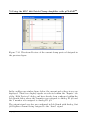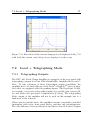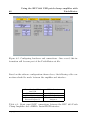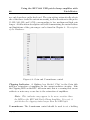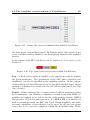
1
Manual 1.1.6 EPC 800 USB Patch Clamp Amplifier HEKA Elektronik Dr. Schulze GmbH Wiesenstrasse 71 D-67466 Lambrecht/Pfalz Germany Phone Fax Web Site Email +49 (0) 6325 / 95 53-0 +49 (0) 6325 / 95 53-50 www.heka.com [email protected] [email protected] HEKA Electronics Inc. 643 Highway #14 R.R. #2 Chester, NS B0J 1J0 Canada Phone Fax Web Site Email +1 902 624 0606 +1 902 624 0310 www.heka.com [email protected] [email protected] HEKA Instruments Inc. 2128 Bellmore Avenue Bellmore, New York 11710-5606 USA Phone Fax Web Site Email +1 516 882 1155 +1 516 467 3125 www.heka.com [email protected] [email protected] Front cover is a current clamp recording made with the EPC 800 USB of action potentials from an isolated guinea pig ventricular cardiomyocyte. Data was provided courtesy of Dr. Pavel Zhabyeyev and Dr. Terence F. McDonald, Dalhousie University, Nova Scotia. © 2004-2014 HEKA Elektronik Dr. Schulze GmbH COME80/4 Contents 1 Safety Guidelines 1 2 Introduction 3 2.1 Introducing the EPC 800 Patch Clamp Amplifier . . . . . . 3 2.2 Firmware Version . . . . . . . . . . . . . . . . . . . . . . . . 6 2.3 References . . . . . . . . . . . . . . . . . . . . . . . . . . . . 7 2.4 Naming Conventions . . . . . . . . . . . . . . . . . . . . . . 9 2.5 Support Hotline . . . . . . . . . . . . . . . . . . . . . . . . . 9 3 Unpacking and Installation 3.1 13 Unpacking and Connecting the EPC 800 Patch Clamp Amplifier . . . . . . . . . . . . . . . . . . . . . . . . . . . . . . 13 3.1.1 15 Static Electricity . . . . . . . . . . . . . . . . . . . . 4 Description of the Hardware 4.1 4.2 17 Probe . . . . . . . . . . . . . . . . . . . . . . . . . . . . . . 17 4.1.1 Probe Adapters . . . . . . . . . . . . . . . . . . . . . 18 Main Unit . . . . . . . . . . . . . . . . . . . . . . . . . . . . 19 4.2.1 Bottom Row of the EPC 800 USB Front Panel . . . 20 4.2.2 Gain, Mode and Filter Knobs . . . . . . . . . . . . . 21 4.2.3 Command Signal Processing . . . . . . . . . . . . . 24 4.2.4 Capacitance Compensation . . . . . . . . . . . . . . 26 4.2.5 Series Resistance Compensation 29 . . . . . . . . . . . ii CONTENTS 4.2.6 Seal Mode . . . . . . . . . . . . . . . . . . . . . . . . 30 4.2.7 Display, Noise and Remote . . . . . . . . . . . . . . 30 4.2.8 Knob-Sensitivity . . . . . . . . . . . . . . . . . . . . 31 4.2.9 Power Switch and Chassis Ground . . . . . . . . . . 31 4.2.10 Rear Panel Connectors . . . . . . . . . . . . . . . . . 32 5 Recording Modes of the EPC 800 Patch Clamp Amplifier 35 5.1 Voltage Clamp Mode . . . . . . . . . . . . . . . . . . . . . . 35 5.2 Current Clamp Mode . . . . . . . . . . . . . . . . . . . . . 36 5.3 Low Frequency Voltage Clamp Mode . . . . . . . . . . . . . 39 6 Theory of Compensation Procedures 41 6.1 Offset Compensation . . . . . . . . . . . . . . . . . . . . . . 41 6.2 Capacitance Compensation . . . . . . . . . . . . . . . . . . 44 6.3 Series Resistance Compensation . . . . . . . . . . . . . . . . 45 6.4 Bridge Compensation . . . . . . . . . . . . . . . . . . . . . 49 ® 7 Using the pCLAMP 7.1 EPC 800 Patch Clamp Amplifier with 51 Local Mode . . . . . . . . . . . . . . . . . . . . . . . . . . . 51 7.1.1 Software Installation . . . . . . . . . . . . . . . . . . 52 7.1.2 Hardware Connections . . . . . . . . . . . . . . . . . 52 7.1.2.1 Front Panel . . . . . . . . . . . . . . . . . . 52 Configuring Clampex Lab Bench . . . . . . . . . . . 53 7.1.3.1 Input Signals . . . . . . . . . . . . . . . . . 53 7.1.3.2 Output Signals . . . . . . . . . . . . . . . . 53 Membrane Test with Model Circuit . . . . . . . . . . 55 7.1.3 7.1.4 http://www.heka.com CONTENTS 7.2 7.3 iii 7.1.4.1 The Model Circuit . . . . . . . . . . . . . . 55 7.1.4.2 Open Pipette and V POF F SET . . . . . . . 57 7.1.4.3 Forming a Gigseal . . . . . . . . . . . . . . 59 7.1.4.4 Whole-Cell Configuration . . . . . . . . . . 61 7.1.4.5 Whole-Cell Voltage Clamp . . . . . . . . . 66 7.1.4.6 Whole-Cell Current Clamp . . . . . . . . . 68 Local + Telegraphing Mode . . . . . . . . . . . . . . . . . . 71 7.2.1 Telegraphing Outputs . . . . . . . . . . . . . . . . . 71 7.2.2 Configuring Telegraphs in Clampex . . . . . . . . . . 72 Remote Control through Soft-Panel . . . . . . . . . . . . . . 75 8 Using the EPC 800 USB patch clamp amplifier with PatchMaster 79 8.1 Software Installation . . . . . . . . . . . . . . . . . . . . . . 79 8.1.1 Dongle driver . . . . . . . . . . . . . . . . . . . . . . 80 8.2 Software Startup and Configuration . . . . . . . . . . . . . 80 8.3 Software Operation . . . . . . . . . . . . . . . . . . . . . . . 83 8.3.1 Local Mode . . . . . . . . . . . . . . . . . . . . . . . 83 8.3.2 Remote Mode . . . . . . . . . . . . . . . . . . . . . . 83 The Amplifier control window of PatchMaster . . . . . . . . 84 8.4.1 Main Controls . . . . . . . . . . . . . . . . . . . . . 85 8.4.2 “Show All” Controls . . . . . . . . . . . . . . . . . . 100 8.4.3 Current-Clamp Recording . . . . . . . . . . . . . . . 102 8.4 8.4.3.1 Bridge Compensation . . . . . . . . . . . . 104 8.4.3.2 Voltage Bandwidth in Current Clamp Recordings . . . . . . . . . . . . . . . . . . 105 http://www.heka.com iv CONTENTS 9 General Patch-Clamp Setup Practices 107 9.1 Mounting the Probe . . . . . . . . . . . . . . . . . . . . . . 107 9.2 Ground Wires . . . . . . . . . . . . . . . . . . . . . . . . . . 108 9.3 Grounding the Microscope . . . . . . . . . . . . . . . . . . . 108 9.4 External Shielding . . . . . . . . . . . . . . . . . . . . . . . 108 9.5 Pipette Holder and Electrode . . . . . . . . . . . . . . . . . 109 9.6 Bath Electrode . . . . . . . . . . . . . . . . . . . . . . . . . 110 10 Patch-Pipettes 111 10.1 Glass Capillaries . . . . . . . . . . . . . . . . . . . . . . . . 111 10.2 Pulling . . . . . . . . . . . . . . . . . . . . . . . . . . . . . . 112 10.3 Coating . . . . . . . . . . . . . . . . . . . . . . . . . . . . . 113 10.4 Heat Polishing . . . . . . . . . . . . . . . . . . . . . . . . . 113 10.5 Use of Pipettes . . . . . . . . . . . . . . . . . . . . . . . . . 114 11 Low-Noise Recording 115 11.1 Measuring the Noise of the Amplifier . . . . . . . . . . . . . 115 11.2 Noise of the Recording Set-Up 12 Appendix . . . . . . . . . . . . . . . . 115 121 12.1 Supported States . . . . . . . . . . . . . . . . . . . . . . . . 121 12.2 USB Descriptor . . . . . . . . . . . . . . . . . . . . . . . . . 121 12.3 List of EPC 800 USB Commands . . . . . . . . . . . . . . . 121 12.4 Telegraphing Translation . . . . . . . . . . . . . . . . . . . . 127 12.5 Technical Data . . . . . . . . . . . . . . . . . . . . . . . . . 129 http://www.heka.com CONTENTS v Index 135 List of Figures 137 List of Tables 140 http://www.heka.com 1. Safety Guidelines Please read the instruction manual of the EPC 800 Patch Clamp Amplifier, before putting the amplifier into operation to prevent any possible damage to life and equipment. In addition to the instruction manual of the EPC 800 Patch Clamp Amplifier, the regulations of prevention of accidents applicable to your country (VBG 4 in Germany) and the relevant rules for safety of the working environment are applicable. The instruction manual has been designed such that putting the EPC 800 patch clamp amplifier into operation is comprehensible, safe, economical, and helps to prevent dangerous misuse. A safe use of the amplifier, minimal service costs, and no delay in service can be guaranteed only if the instructions given in the operation manual are being followed. The instruction manual should always be in proximity to the amplifier. Misuse, neglected inspection of the instrument, or disregarding operating instructions may endanger the user and any third party, and may cause damage to technical equipment. The EPC 800 Patch Clamp Amplifier is manufactured according to currently applicable safety regulations. The amplifier is to be operated only if working properly. The amplifier should be sent immediately for repair if any technical problem occurs which may endanger the safety of any user. The EPC 800 Patch Clamp Amplifier is only to be used for its intended purpose as described in the instruction manual. “Intended purpose” includes regular inspection and service of the amplifier. It is possible to add technical equipment to the amplifier. This equipment is not defined as an “instrument” according to European Community (EC) rules. Thus, equipment can only be added if it is labeled with the CE-certification and has an accompanying statement certifying conformity with EC-rules. Only technical equipment approved by HEKA can be added to the amplifier. Information concerning this matter will be provided on request by our technical support team. Any further use of the EPC 800 Patch Clamp 2 Safety Guidelines Amplifier and added equipment, which does not fall within the “intended purpose” of the amplifier, is not in accordance with the liability regulations. HEKA does not accept liability for any damage caused by misuse of the EPC 800 Patch Clamp Amplifier. Manipulations of the instrument are not permissible and lead to loss of liability by the manufacturer. If you are uncertain regarding operating interactions, safety rules, or the instruction manual in general, please contact HEKA before putting the EPC 800 Patch Clamp Amplifier into operation. The EPC 800 Patch Clamp Amplifier instruction manual does not provide instructions for repair. Any necessary repair of the amplifier has to be performed by certified HEKA specialists. http://www.heka.com 2. Introduction 2.1 Introducing the EPC 800 Patch Clamp Amplifier In continuing the tradition of providing manually controlled, high quality patch clamp instrumentation, which was established with the EPC 7, Figure 2.1: EPC 800 USB Patch Clamp Amplifier 4 Introduction EPC 7 Plus and EPC 8 Patch Clamp Amplifiers, HEKA is pleased to introduce the EPC 800 Patch Clamp Amplifier. The EPC 800 Patch Clamp Amplifier is truly a unique hybrid patch clamp amplifier with its control logic and feature set primarily based upon its predecessor, the EPC 8. In comparison to the EPC 8, however, the EPC 800 Patch Clamp Amplifier offers many improvements and new features that increase its overall versatility. Some notable examples are highlighted by the three modes of operation of the EPC 800 Patch Clamp Amplifier. The EPC 800 Patch Clamp Amplifier can be operated in Local, Local + Telegraphing and Remote modes. The decision of which mode to use depends upon user preference of whether or not to have functionality to operate knobs and switches and upon what data acquisition software and AD/DA interface the amplifier is used with. The EPC 800 Patch Clamp Amplifier is the most flexible patch clamp amplifier ever produced in that it is a stand-alone amplifier which can be combined with any existing AD/DA interface and its compatible acquisition software. The functionality of the amplifier, of course, differs slightly depending upon what combination of hardware and software the amplifier is used with. In Local mode, the amplifier is a manually controlled patch clamp amplifier with all of the front panel knobs and switches active. Unlike other manual amplifiers, however, users do have the option of performing a Vp-Offset, CFast and C-Slow compensations automatically with the push of a button. In this respect, the amplifier offers features that previously were reserved for users of the computer-controlled EPC 9 or EPC 10 family of amplifiers. To operate in Local mode, the amplifier can be used with any AD/DA interface board. Compatible platforms comprise the complete HEKA / InstruTECH digitizer family, as well as Axon interfaces, including older models such as the Digidata® 1200 series. The Local + Telegraphing mode of the EPC 800 Patch Clamp Amplifier is possible by virtue of telegraphing outputs on the rear panel of the amplifier for Gain, Filter Bandwidth, Amplifier Mode and C-Slow values. As a result, these amplifier features can be fully utilized by use with any AD/DA interface having telegraphing inputs. For example, when used with the Axon Digidata® 1440A, Clampex software can easily be configured to receive the EPC 800 Patch Clamp Amplifier telegraphs and report the amplifier settings for gain, filter and whole-cell capacitance compensation. http://www.heka.com 2.1 Introducing the EPC 800 Patch Clamp Amplifier 5 The amplifier itself remains under manual control when operated in this mode and the ability to perform automatic adjustments of Vp-Offset, CFast and C-Slow compensations is still possible. The ability to operate the amplifier in this mode exemplifies the versatility of the EPC 800 Patch Clamp Amplifier. Not only do users now have the choice to operate the amplifier with non-HEKA acquisition software, but the amplifier can also be incorporated into experimental set-ups with third-party digital I/O boards having telegraphing inputs, as long as the interface is compatible with the chosen software. The EPC 800 Patch Clamp Amplifier can be operated in Remote mode, in which commands are sent and received to and from the amplifier through USB communication. A USB 2.0 connection is made between the rear panel of the amplifier and the host computer. When operated in this mode, the front panel knobs and switches of the amplifier are inactive. The EPC 800 amplifier commands are public (see chapter 12.3), and users are free to write their own interfacing to the instrument without the need of HEKA software or interface boards. HEKA also offers a dynamic link library (DLL) which gives direct access to the EPC 800 Patch Clamp Amplifier and HEKA data acquisition interfaces. The DLL can be used with most programming languages such as C, Pascal, Delphi and Visual Basic. The DLL provides functions for controlling amplifier settings and for stimulation and data acquisition. The EPC DLL package is delivered including a sample program and corresponding code written in Delphi and a C-header file as documentation. It is supported by Windows System 7 and all older operating systems. In addition, HEKA supports Mac OS X. For Mac platforms, HEKA supplies the EPC-framework, which is equivalent to a DLL on Windows systems. The amplifier can be used in remote mode in combination with any of the HEKA/InstruTECH series of acquisition interfaces and PatchMaster software. Within the PatchMaster program, there is a virtual front panel of the amplifier with a convenient graphics display, and mouse and/or keyboard operations provide versatility and ease of use. In addition to the controls for the amplifier, PatchMaster contains a powerful data acquisition system (sampling and storage in pulse, ramp and continuous modes), a fully programmable pulse generator, a digital oscilloscope, and all other features needed for patch clamp electrophysiology and many other applications. The complete PatchMaster acquisition system can also be http://www.heka.com 6 Introduction batch controlled from another application. The user can write their own application with a custom user interface while still benefitting from the advanced features of the HEKA system. HEKA provides a free software program called EPCMaster, which can be used to control the functionality of the amplifier in Remote mode. It is not an acquisition or analysis program but a ’software front panel’ control interface that provides a further level of integration with thirdparty hardware and software. In addition, EPCMaster Software is a useful tool to test amplifier functionality and the USB message stream. The versatility of the EPC 800 Patch Clamp Amplifier is reflected by the variety of experiments that it can be applied to. Besides being used for whole-cell voltage clamp experiments and recordings from artificial membranes or loose patches, it also excels in high-resolution recordings of single channels. Furthermore, the amplifier has true current clamp capabilities to enable fast action potential recordings. Technically, the EPC 800 Patch Clamp Amplifier retains the three noteworthy special features that are common to all HEKA patch-clamp amplifiers: the range-changing capability of the headstage, the extremely wide bandwidth available from the current monitor circuitry, and the integrated transient cancelation (automatically if desired) and series-resistance compensation functions. In Current Clamp mode, the EPC 800 Patch Clamp Amplifier acts as a ‘voltage follower’, similar to classical microelectrode amplifiers, which guarantees very fast and accurate membrane potential recordings. (Magistretti et al. 1996). Together, these features mean that a single headstage suffices for both single-channel and whole-cell recordings, and that both kinds of recordings can be made with high time resolution and low noise. 2.2 Firmware Version After the EPC 800 Patch Clamp Amplifier is started, the firmware is shown on the display. This manual describes capabilities of EPC800 firmware version 3x0x90. http://www.heka.com 2.3 References 2.3 7 References Further Reading This manual is designed to provide a general guide for setting up and using the EPC 800 Patch Clamp Amplifier. Specific examples for the various modes of operation are given and general information about the hardware and basic principles of the EPC 800 Patch Clamp Amplifier functions are provided. It is assumed that the reader has some familiarity with patch-clamp techniques. Should you be a newcomer to the field, perhaps the best place to start would be the paper by Hamill et al. (1981), where the basic gigaseal techniques are described, and the first three chapters of Single Channel Recording (B. Sakmann & E. Neher, eds., Plenum Press, New York, 1995). Certainly, it will be worthwhile to read this manual carefully. Many users will want to read some of the more advanced and complete discussions of individual topics which can be found in original articles and in the books Single Channel Recording (B. Sakmann & E. Neher, eds., Plenum Press, New York, 1995) and Methods in Enzymology, vol. 207 (Academic Press, New York, 1992). Original Articles Hamill, O. P., Marty, A., Neher, E., Sakmann, B. & Sigworth, F. J. (1981) Improved patch clamp techniques for high-resolution current recording from cells and cell-free membrane patches. Pflügers Arch. 391, 85-100. Magistretti, J., Mantegazza, M., Guatteo, E. & Wanke, E. (1996) Action potentials recorded with patch-clamp amplifiers: are they genuine? TINS 19, 530-534. Neher, E. (1981) Unit conductance studies in biological membranes. In: Techniques in Cellular Physiology (P. F. Baker, ed.) Elsevier/North Holland. Neher, E. & Sakmann, B. (1976) Single-channel currents recorded from membrane of denervated frog muscle fibres. Nature 260, 779-802. http://www.heka.com 8 Introduction Rae, J. & Levis, R. (1984) Patch clamp recordings from the epithelium of the lens obtained using glasses selected for low noise and improved sealing properties. Biophys. J. 45, 144-146. Barry, P. H. & Lynch, J. W. (1991) Liquid junction potentials and small cell effects in patch-clamp analysis. J. Memb. Biol. 121, 101-117. Peters, F., Gennerich, A., Czesnik, D. & Schild, D. (2000) Low frequency voltage clamp: recording of voltage transients at constant average command voltage. J. Neuroscience Meth. 99, 129-135. Book Chapters B. Sakmann & E. Neher, eds. (1995): Single Channel-Recording, Plenum Press, New York. Chapter 1: Penner, R.: A practical guide to patch clamping. Chapter 2: Marty, A. & Neher, E.: Tight-seal whole-cell recording. Chapter 3: Heinemann, S. H.: Guide to data acquisition and analysis. Chapter 4: Sigworth, F. J.: Electronic design of the patch clamp. Chapter 6: Neher, E.: Voltage offsets in patch-clamp experiments. Chapter 19: Colquhoun, D. & Sigworth, F. J.: Fitting and statistical analysis of single-channel records. Neher, E. (1992) Correction for liquid junction potentials in patch clamp experiments. In: Methods in Enzymology 207, 123-131, Academic Press, New York. http://www.heka.com 2.4 Naming Conventions 2.4 9 Naming Conventions ® versions Windows The EPC 800 Patch Clamp Amplifier is supported by 64- and 32-bit versions of Windows 8, Windows 7, Windows Vista, Windows XP, Windows 2000. An available USB 2.0 port is required (for Remote Mode only). Throughout the manual we will address all the above Windows versions as ”Windows”. We will explicitly mention the particular operating system versions, whenever it is required. Apple ® The EPC 800 Patch Clamp Amplifier is supported by Apple® computers running Mac OS X 10.4 or newer. An available USB 2.0 port is required (for Remote Mode only). Throughout the manual we will address all the above Mac OS X versions as ”Mac OS”. We will explicitly mention the particular operating system versions, whenever it is required. 2.5 Support Hotline If you have any questions, suggestions, or improvements, please contact HEKA’s support team. The best way is to send an e-mail to [email protected] specifying as much information as possible: Your contact information The program name: e.g., Patchmaster Software The program version number: e.g., v2.42 Your operating system and its version: e.g., Mac OS 10.4, Windows XP Pro 32-bit http://www.heka.com 10 Introduction Your type of computer: e.g., Mac G5, Core i5 @ 2.67 GHz with 3 GB of RAM Your acquisition hardware, if applicable: e.g., EPC 800 Patch Clamp Amplifier, ITC-18 Interface The serial number and version of your EPC 800 Patch Clamp Amplifier The questions, problems, or suggestions you have Under which conditions and how often the problem occurs Please contact the office located closest to you from the listing below. We will address the problem as soon as possible. Europe HEKA Elektronik GmbH Wiesenstrasse 71 D-67466 Lambrecht/Pfalz Germany phone: +49 (0) 6325 9553 0 fax: +49 (0) 6325 9553 50 e-mail: [email protected] web: http://www.heka.com Canada HEKA Electronics Incorporated 643 Highway #14 R.R. #2 Chester, NS B0J 1J0 Canada phone: +1 902-624-0606 fax: +1 902-624-0310 e-mail: [email protected] http://www.heka.com United States HEKA Instruments Inc. 2128 Bellmore Avenue Bellmore, NY 11710-5606 USA http://www.heka.com 2.5 Support Hotline 11 phone: +1 516-882-1155 fax: +1 516-467-3125 e-mail: [email protected] web: http://www.heka.com http://www.heka.com 12 http://www.heka.com Introduction 3. Unpacking and Installation This chapter provides instructions for unpacking and setting up the amplifier for use. 3.1 Unpacking and Connecting the EPC 800 Patch Clamp Amplifier Please follow these steps after receiving the EPC 800 Patch Clamp Amplifier to get to the point where the amplifier is connected and ready to be used. 1. When you receive the EPC 800 USB, please check the packing list to verify that you have all of required parts: The EPC 800 USB amplifier The headstage The model circuit (in the box with the headstage) The USB 2.0 cable The pipette holder Spare fuses and gold pin 2. The EPC 800 USB can be installed into a standard nineteen-inch instrument rack or used as a desktop unit. If installing on a rack, please do not use the EPC 800 USB as a shelf to support any other instrument. The EPC 800 USB case was not designed to do this and damage to the front panel will result. To minimize noise, it is advisable to mount the EPC 800 USB away from devices that emit high-frequency signals (i.e monitors, power supplies, etc). 14 Unpacking and Installation 3. To operate the amplifier in Remote mode and utilize the USB commands, the USB cable should be connected between the USB connector on the rear panel of the EPC 800 USB, labeled USB, to an available USB 2.0 port on the computer. As soon as the EPC 800 USB is detected by the host operating system the appropriate system files will be initialized and the EPC 800 USB will be ready for use. This provides ease of installation and flexibility for moving the EPC 800 Patch Clamp Amplifier from one computer system to another. 4. Appropriate BNC cable connections have to be made from the front panel Current and Voltage Monitors to their respective A/D Input channels on the AD/DA interface. The External Input CC and VC should be connected to a chosen D/A Output channel on the interface via a T-BNC connection. Whatever acquisition software is being used, it will have to be configured properly to correspond with the external hardware BNC connections between the amplifier and the interface. Examples of required BNC connections are provided in other sections of this manual (see chapters 7 - Using the EPC 800 Patch Clamp Amplifier with pCLAMP and 8 - Using the EPC 800 Patch Clamp Amplifier with PatchMaster ). ® 5. Connect the power cord to the EPC 800 USB. The internal power supply used in the EPC 800 USB is an auto switching multi-voltage supply that will operate from 90 Volts to 250 Volts. Make sure that the EPC 800 USB power cord is plugged into a properly grounded AC receptacle. Improper grounding of the EPC 800 USB could result in an electrical shock hazard. It is advisable to plug all equipment into a common outlet strip. This will minimize power line induced noise in the system. 6. Place the EPC 800 Patch Clamp Amplifier in its final place and connect the cable of the headstage to its “Probe” connector on the front panel of the EPC 800 Patch Clamp Amplifier main unit. It is suggested that the amplifier is switched off, before connecting the headstage. 7. The EPC 800 Patch Clamp Amplifier does not require the installation of any drivers. It may be that drivers are required by “other” http://www.heka.com 3.1 Unpacking and Connecting the EPC 800 Patch Clamp Amplifier 15 hardware but the scope of this manual does not cover installation requirements of second source options. 3.1.1 Static Electricity The input circuitry of the probe can be damaged by static electricity. To avoid this, please observe the following rules: 1. Avoid touching the input terminal unnecessarily. 2. When it is necessary to touch the input (e.g. while inserting a pipette into the holder), ground yourself first by touching a grounded metal surface. http://www.heka.com 16 http://www.heka.com Unpacking and Installation 4. Description of the Hardware The hardware components of the EPC 800 USB patch-clamp system consist of the head stage (or probe) and the amplifier main unit. Specific information about the hardware installation is given elsewhere (see chapter 3 - Unpacking and Installation starting on page 13). 4.1 Probe Figure 4.1: EPC 800 patch clamp amplifier probe The probe, or “headstage” of the EPC 800 Patch Clamp Amplifier is contained in a small enclosure designed to be mounted on a micromanipulator and directly attached to the recording micropipette. It contains the sensitive amplifier that constitutes the current-to-voltage converter, as well as components for injecting test signals into that amplifier. On the probe are the following connectors: Input Connector : This is a Teflon-insulated BNC connector. The standard pipette holder plugs directly into this connector; the center pin is the amplifier input, and the shield is driven with the command potential VP . Note: Avoid touching the probe’s input terminal, since the 18 Description of the Hardware input circuitry of the probe can be damaged by static electricity. When it is necessary to touch the input (e.g., while inserting a pipette into the holder), ground yourself first by touching a grounded metal surface. Gnd Connector : The black pin jack carries a high quality ground signal which is useful for grounding the bath electrode and nearby shields without potential errors that could arise from ground loops. This ground is connected directly to the signal ground on the controller through the probe’s cable. More details on grounding practices will be provided in chapter 9 - General Patch-Clamp Setup Practices which begins on page 107. Note: Since the headstage case is not grounded, it needs to be isolated from the micromanipulator; otherwise excessive noise will be introduced. Note: Calibration parameters are unique to each amplifier and head stage combination. Thus, if you exchange the head stage, be sure a new hardware calibration is performed by HEKA. 4.1.1 Probe Adapters The headstage of the EPC 800 USB patch clamp amplifier is shipped with two different mounting plates for mechanical connection of the preamplifier to various micromanipulator systems: Standard Mounting Plate: The headstage is mounted on a 38 mm x 90 mm x 4 mm plate which has 4 holes with 3 mm diameter. Since the plate is wider than the headstage, there is room for custom mounting holes on both sides of the headstage. Dovetail Mounting Plate: The dovetail adapter can be used to connect the headstage to a variety of micromanipulators that require a dovetail connection, e.g. to Sutter MP 285 or HEKA MIM 4 micromanipulator. The dimensions of the dovetail match the headstage housing. http://www.heka.com 4.2 Main Unit 19 Figure 4.2: Standard plate Figure 4.3: Dovetail plate 4.2 Main Unit Figure 4.4: EPC 800 patch clamp amplifier main unit http://www.heka.com 20 Description of the Hardware The main unit of the EPC 800 Patch Clamp Amplifier contains the power supply, the signal processing electronics and all of the controls. The bottom level of the front panel consists of the probe connector, BNC connections, grounding plug and clipping indicator. The potentiometers, knobs and buttons on the main unit front panel can be divided into six basic functional groups: (i) Gain, Mode and Filter, (ii) command signal processing, (iii) capacitance compensation, (iv) series-resistance compensation, (v) display, and (vi) power. 4.2.1 Bottom Row of the EPC 800 USB Front Panel Figure 4.5: Bottom Row of Amplifier PROBE: This input accepts the multi-pin connector of the head stage. SIGNAL GND: This banana jack is a high-quality signal ground connection that can be used to ground other parts of the experimental setup as necessary (see chapter 9 - General Patch-Clamp Setup Practices). External Input CC: Signals from an external stimulus source are applied here; they can be summed with the internal stimulus if desired. The Ext. Stim CC is ON or OFF depending on the position of the front panel Ext. Stim CC switch. External Input VC: Signals from an external stimulus source are applied here. They can be summed with the internal stimulus if desired. The combined stimulus signal is passed through a 2-pole filter to round off stepwise changes in voltage. This avoids nonlinearities (from slew-limiting amplifiers) in the command processing circuitry and also reduces the amplitude of the current transients from rapid charging of the pipette. Two degrees of filtering, specified as the rise times (time from 10% to 90% of the amplitude of a step change) are available in the front panel Ext. Stim VC switch on the front panel. 2 µs, which is the minimum required to avoid nonlinearities in the internal circuitry, and 20 µs, which is preferable for http://www.heka.com 4.2 Main Unit 21 all but the fastest measurements, to reduce the capacitive transients. Voltage Monitor: This output signal provides a monitor of the pipette potential. A BNC cable should be used from this connection to an assigned Analog Input channel of your AD/DA interface. It is scaled up by a factor of 10 relative to the potential applied to the pipette. The output impedance is 50 Ω. HEKA’s PatchMaster software will automatically convert any signal to correct scaling in the MKS system, provided that the proper configuration settings are set. Appropriate scaling factors will have to be manually set in other acquisition programs (ex., within Lab bench of pCLAMP® ). Current Monitor: A BNC cable should be used from this connection to an assigned Analog Input channel of your AD/DA interface. The EPC 800 USB has one current monitor output with the current signal filtered according to two internal filters. Filter 1 is a 5-pole, 10 to 100 kHz Bessel pre-filter and Filter 2 is a 4-pole, 20 kHz tunable Bessel filter. Additional information on the relationship between the internal filters and the setting of the filter knob on the front panel can be found in 4.2.2. The current monitor output signal can be viewed on the PatchMaster software oscilloscope screen, or within other acquisition programs, for monitoring the progress of the experiment. Positive voltages correspond to currents flowing out of the pipette. The specifics of the control of the filter ranges by the front panel switch will be discussed in the next subsection of this chapter. Clipping: This LED lights whenever the amplifier saturates in the current monitor pathway. The indicator is important in voltage clamp experiments where capacitive artifacts will be subtracted in the host computer; the subtraction will work well only as long as no saturation occurs, and this indicator serves as a simple monitor of this condition. It is particularly useful since it will indicate clipping by internal amplifiers even in cases where, because of filtering, the output voltage is not saturated. 4.2.2 Gain, Mode and Filter Knobs GAIN: Sets the scaling of the current monitor output. The range is 0.005 to 2000 mV/pA. The gain setting automatically selects one of the http://www.heka.com 22 Description of the Hardware Figure 4.6: Gain knob three available current-measuring feedback resistors in the probe (5 MΩ, 500 MΩ, and 50 GΩ), corresponding to low, medium and high gain ranges respectively. The table below summarizes the main features and limitations of the gain ranges. Feedback Resistor Gain [mv/pA] Imax VC Imax (out) CC Bandwidth Cslow Ranges Current Clamp RS-Compensation Low 5 MΩ 0.005-0.002 ±2 µA ±100 nA 100 KHz 30/100/1000 yes yes Medium 500 M Ω 0.05-20 ±20 nA ±1 nA 100 KHz 30/100/1000 yes yes High 50 GΩ 50-2000 ±200 pA 60 KHz 30/100 no no Table 4.1: Gain ranges of the EPC 800 Patch Clamp Amplifier The lowest gain range may be used for experiments (e.g. bilayers, loosepatch, or large cells) in which large currents need to be delivered (up to about 2 µA). Capacitance compensation of up to 1000 pF is available and RS -compensation can be used for RS values down to 10 Ω in this range. In the medium gain range, the background noise is larger than in the high gain, but the full 100 kHz bandwidth is available, and currents of up to about 20 nA can be recorded. This range is used mainly for wholecell recordings, and for this purpose the special features of the 1000 pF http://www.heka.com 4.2 Main Unit 23 transient cancelation range (see C-Slow Ranges), series resistance compensation, and the current-clamp modes are made available. The high gain range is intended for single-channel recording. It has a very low noise level, but this is obtained at the expense of a maximum current limit of about 200 pA. The maximum available bandwidth is about 60 kHz, and the special features mentioned above do not function in this range. Slow capacitance cancelation ranges (Cp , 30-100-1000 pF) can be set to any desired value. In voltage clamp mode and high gain range the 1000 pF C-Slow range is not supported. If inadvertently selected, the user will be alerted by an error message on the front panel LCD stating “Auto C-Slow Error” “Set lower range”. The current-clamp + bridge mode is only possible in the medium and low gain rangese. MODE switch: The operating modes of the EPC 800 patch clamp amplifier are described in detail in chapter 5 - Recording Modes of the EPC 800 Patch Clamp Amplifier on page 35. Figure 4.7: Mode knob Briefly, the VC (Voltage Clamp) mode is the usual mode for whole-cell, cell-attached, single channel, loose patch or bilayer recordings in which the pipette current is recorded while the pipette potential is controlled by command signals. The CC (current-clamp) + Bridge mode can be used to measure the resting potential or spontaneous action potentials in a whole-cell recording. The measured membrane potential will be shown on the V-mon display while http://www.heka.com 24 Description of the Hardware the current is held at a commanded value (I-Hold). The low frequency voltage clamp (LFVC) mode is a modified current clamp mode that allows for the measurement of potential deflections, such as action potentials or synaptic potentials, while the average potential is kept constant at a value chosen by the user (LFVC V-HOLD). FILTER: Figure 4.8: Filter knob The EPC 800 Patch Clamp Amplifier has a filter knob on the front panel that ranges from 0.1 to 100 kHz. This is an integrated filter comprised of two individual internal filters, filter 1 and filter 2. Filter 2 is a 4-pole tunable lowpass Bessel filter which can range, depending on the actual instrument, up to 20 kHz. Filter 1 is a 5-pole 10 to 100kHz lowpass Bessel pre-filter. Table 4.2 summarizes the various filter combinations of the current monitor. 4.2.3 Command Signal Processing These controls consist of the VHOLD , LF V CHOLD potentiometers. IHOLD , V POF F SET and VHOLD : The 10-turn VHOLD potentiometer is used to set the holding potential in Voltage Clamp mode. The range is +/- 500 mV. The value will be displayed on the LCD panel if I/VHOLD is selected. IHOLD : The 10-turn IHOLD potentiometer is used to set the holding current in Current Clamp + Bridge mode. The range of the potentiometer is dependent upon the current clamp range. In low current clamp range the http://www.heka.com 4.2 Main Unit 25 Front Panel Filter Knob 0.1 kHz 0.3 KHz 0.5 KHz 0.7 KHz 1 KHz 3 KHz 5 KHz 7 KHz 10 KHz 30 KHz 100 KHz Filter 1 10 kHz 10 kHz 10 kHz 10 kHz 10 kHz 10 kHz 10 KHz 10 KHz 30 KHz 30 KHz 100 KHz Filter 2 0.1 KHz 0.3 KHz 0.5 KHz 0.7 KHz 1 KHz 3 KHz 5 KHz 7 KHz 10 KHz bypassed bypassed Table 4.2: Filter settings of the current monitor Figure 4.9: Command potentiometers potentiometer limit is +/- 50 nA and in the high range is +/- 500 pA in local mode. While the instrument is remote controlled by PATCHMASTER the maximum range for IHOLD is +/- 100 nA and in the high range is +/- 1000 pA. The value will be displayed on the LCD panel if I/VHOLD is selected. VPOF F SET : The 10-turn V POF F SET potentiometer is used to set an offset voltage that is added to compensate for electrode offset potentials. It is typically used for zeroing of the pipette current after the pipette is inserted into the bath. The range is +/-200 mV, which is adequate for most stable electrodes. The value will be displayed on the LCD panel if http://www.heka.com 26 Description of the Hardware Vp/LFVC is selected. The offset can be performed manually, automatically or semi-automatically by pressing the black button next to the V POF F SET potentiometer. If an auto V POF F SET procedure is executed and the compensation exceeds the +/-200 mV range an error message will be displayed on the front panel LCD stating “Auto Vpoff error” “Range exceeded”. One shall reduce the gain and try again. After V POF F SET is adjusted one shall set the gain back to the intended value and perform auto V POF F SET again if required. The auto button calls a procedure for automatic zeroing of the pipette current. During execution, the green LED on the front panel will blink and is completed when the LED stops flashing and remains lit. If the display knob is set on V POF F SET a ’*’ will be shown before the digits to indicate an automatic optimization. After V POF F SET is set by the algorithm one can turn the potentiometer to do fine-adjustment. Changes on the potentiometer reading will be interpreted on a relative scale. The auto feature can be disengaged by pressing and holding the auto button until the green light goes out. It is very important to note that once the auto feature is turned off the value obtained during the auto procedure is lost and the value taking effect will be the potentiometer reading. Note that starting V POF F SET performes the compensation only once, the value is not dynamically adjusted over time. LFVCHOLD : When the amplifier is being used in the modified current clamp (LFVC) mode, the LFVC potential is specified by the 10-turn LF V CHOLD potentiometer. The range is +/- 200mV and it is displayed on the LCD panel if Vp/LFVC is selected. This value determines the average potential during which potential deflections are measured. More details of the LFVC mode are provided in the chapter 5 - Recording Modes of the EPC 800 Patch Clamp Amplifier. 4.2.4 Capacitance Compensation The capacitance compensation circuitry is used to cancel the large artificial currents that flow when the patch potential is suddenly changed, for example, as done in experiments on voltage-activated channels. The C-Fast circuitry is used to cancel the rapidly decaying currents that charge the pipette and other stray capacitance, while the C-Slow circuitry is mainly http://www.heka.com 4.2 Main Unit 27 used in whole-cell recordings to cancel the slower transients arising from the charging of the cell capacitance. The use of these controls is discussed below and in several other places throughout this manual (see chapters 7 Using the EPC 800 Patch Clamp Amplifier with pCLAMP and 8 - Using the EPC 800 Patch Clamp Amplifier with PatchMaster ). ® Figure 4.10: Compensation potentiometers C-Fast control: This potentiometer is used to cancel fast capacitive currents that charge the pipette and other stray capacitances (range: 0-15 pF). With nothing connected to the Probe input, cancelation is typically obtained at a setting of 1-1.5 pF due to the residual input capacitance of the current-measuring amplifier. C-Fast compensation using C-Fast and tau can either be performed manually by turning the 10-turn potentiometer, automatically or semiautomatically by pressing the black Auto button adjacent to the C-Fast potentiometer. Selection of this button performs an automatic compensation of C-Fast and τ -Fast. As long as the Auto button is still active, as shown by the solid green LED next to the black button, changes by moving the C-Fast potentiometer or τ -Fast knob will effect in relative scale as implemented for V POF F SET . Again the value shown at the display is marked with ’*’ showing an automatically obtained value. Deactivating Auto C-Fast the value of C-Fast and tau as determined by the Auto operation, is lost and the value of them are determined by the reading of the potentiometer. Note that starting Auto C-Fast compensation performes the compensation only once, the value is not dynamically adjusted over time. During the algorithm optimises C-Fast and tau the external stimulus input is deactivated. Nevertheless holding potential regardless of its constituents (whether applied by external stimulus input of by using the Vhold knob) http://www.heka.com 28 Description of the Hardware is measured and applied to the cell. Note: If the Auto C-Fast button is pushed while the amplifier is NOT in voltage clamp mode, an error message will be displayed on the display. τ -Fast control: This knob determines the time constant of C-Fast (up to 8µs). The value of τ -Fast may be adjusted manually by turning the knob or automatically or semi-automatically by performing an Auto CFast operation. C-Slow: This is used to cancel slow capacitive currents that charge the cell membrane in the whole-cell configuration. The 30, 100 and 1000 pF ranges actually allow capacitance values to be compensated in the ranges of 0.12-30 pF, 0.4-100 pF and 4-1000 pF, respectively. C-Slow can be compensated by first selecting the appropriate range (see below) and either manually adjusting the C-Slow potentiometer or automatically or semiautomatically by pressing the black Auto C-Slow button. Pressing the Auto button performs an automatic compensation of both C-Slow and RSeries. These settings are used by the RS compensation circuitry as the measure of series resistance. The automated setting follows the same rules as for V POF F SET and Auto C-Fast. Note that starting Auto C-Slow compensation performes the compensation only once, the value is not dynamically adjusted over time. During the algorithm optimises C-Fast and tau the external stimulus input is deactivated. Nevertheless holding potential regardless of its constituents (whether applied by external stimulus input of by using the Vhold knob) is measured and applied to the cell. C-Slow Range: Selects the range for slow capacitance compensation: Off - Turns cancelation off. 30 pF - Small cells. 100 pF - Small and medium-sized cells. 1000 pF - Large cells (low and medium gain range only). http://www.heka.com 4.2 Main Unit 29 Slow capacitance cancelation ranges (30-100-1000 pF) can be set to any desired value. However, in the high gain range (50 GΩ resistor) the 1000 pF range will not operate. If the gain is set to a value higher than 20 mV/pA, while the 1000 pF range is selected, the auto C-Slow cancelation will not be performed. An error message will temporarily be displayed on the display. Note: C-Slow compensation is only available in VC mode. R-Series: Adjusts the resistance in series with the slow capacitance (total range capability: 0.1 - 200 MΩ) to determine the time constant of the CSlow transient and also for RS compensation. The adjustment is limited by the selected C-Slow range and the actual value of C-Slow: a 30 pF C-Slow range enables an R-Series range of 3.5 - 1000 MΩ, 100 pF enables a range of 1.1 - 1000 MΩ and 1000 pF enables 1 - 1000 MΩ. The value can be set manually of by using Auto C-Slow compensation. The minimum values of R-Series depend on the actual device and might offer even lower values. The setting of this control is used by the RS compensation circuitry as the measure of the series resistance as well. 4.2.5 Series Resistance Compensation RS -Comp: The series resistance compensation corrects for membrane voltage errors under conditions of high access resistance between the pipette and cell interior (see Chapter 6 - Theory of Compensation Procedures starting on page 41). The amount of compensation can be changed manually by turning the %-Comp knob. The compensation is based on the value of R-series and will be effective only when RS -comp is turned ON and set to a particular speed value. The following settings determine the speed of feedback compensation: Off - Turns compensation off. 100 µs - Slow compensation. 10 µs - Fast compensation. http://www.heka.com 30 Description of the Hardware 2 µs - Very fast compensation. The choice of speed depends on the recording time constant and the degree of compensation desired, as described in Chapter 6 - Theory of Compensation Procedures. Fast RS compensation requires more critical adjustment of the controls but provides the maximum voltage-clamp speed. In Current Clamp mode, RS -comp acts as a bridge compensation. In this mode, only the 100 µs and 10 µs speeds are possible. 4.2.6 Seal Mode The device provides a seal mode which supports the user performing a seal at a cell. Pressing Auto CSlow and CFast simultaneously activates this mode. A test pulse is applied on top of the holding potential and the resistance of the cell is gathered. The resistance is mapped to a tone which is played if a headphone or speaker is attached to the device. The higher the resistance is the higher is the fundamental frequency of the signal that is played. During this mode knob settings will be taken into account with a certain delay up to .5 s. Changes of the holding potential created by the EPC 800 or by external stimulus input are taken into account. The mode can only be accessed in voltage clamp mode. To deactivate the mode hold Auto C-Slow and Auto C-Fast button for some seconds. 4.2.7 Display, Noise and Remote Display Selector and LCD Panel: An LCD panel can display the following parameter pairs: I/VMon, C-FAST/τ -FAST, C-Slow/R-Series, RS Range/Comp, Vp/LFVC, I/VHold and Noise. If the Auto display mode is activated, the LCD panel will automatically display, for 3 seconds, the value of any control as it is modified by the user. Noise: A detailed description of how to record the intrinsic noise of the amplifier can be found in in chapter 11 - Low-Noise Recording. When the display knob is in the “Noise” position, the LCD display will show the RMS noise current present in the current monitor signal. http://www.heka.com 4.2 Main Unit 31 Figure 4.11: Multi-parameter display REMOTE: This LED lights when the amplifier is controlled and operated through a series of USB commands. A USB 2.0 connection is made between the amplifier rear panel and the host computer. In REMOTE mode, all of the front panel knobs and switches of the amplifier are inactive with the exception of the LCD multi-position switch. 4.2.8 Knob-Sensitivity The knobs %-COMP, C-Slow, CFast, R-Series, V-Hold, I-Hold, VPOffset and LFVC-Hold need to be turned a certain degree before the changes read by the device are interpreted as intended and then change the settings. This prevents unintended changes that would happen using a amplifier with analog controls. If the display knob is set to Auto Display the sensitivity is significantly lower. Once a knob is turned and the EPC 800 Amplifier interprets the changes as intended the sensitivity is higher. After a number of seconds with no changes the sensitivity is decreased again. If one wants to make very fine change of e.g. VHold, one should switch the display knob to I/VHold. 4.2.9 Power Switch and Chassis Ground Power Switch: Power ON and OFF. http://www.heka.com 32 Description of the Hardware Note: Since the calibration settings of the amplifier have been determined for a warmed-up amplifier, switch on the amplifier at least 15 min before starting an experiment. This will ensure that the amplifier has warmed up to regular working temperature and calibration parameters are most accurate. Chassis GND (CHAS): The chassis is connected to the ground line of the power cord, as is typical of most instruments. The Signal Ground (Signal GND) is separated from the chassis by a 10 Ω resistor to avoid ground loops. 4.2.10 Rear Panel Connectors Telegraphing Outputs: Individual BNC telegraphing outputs for Gain, Filter Bandwidth, Amplifier Mode and C-Slow on the rear panel enable the amplifier to be used in local + telegraphing mode, provided that the AD/DA interface being used is equipped with telegraphing inputs. Thirdparty acquisition software programs, such as pCLAMP® will be able to read the status of these amplifier settings while recording data. The knobs and switches on the front panel remain under manual control. A more detailed example of how to use the telegraphing outputs of the EPC 800 Patch Clamp Amplifier are provided in the “Local + Telegraphing Mode” section of chapter 7 - Using the EPC 800 Patch Clamp Amplifier with pCLAMP and 12.4. ® Figure 4.12: Telegraphing outputs USB: This port is the connection to the USB 2.0 port in the host computer. It allows the computer to communicate with the EPC 800 USB in remote mode. http://www.heka.com 4.2 Main Unit 33 Sound: The EPC 800 USB has a sound generator built-in. A 3.5 mm output receptacle with a frequency range of 200 Hz to 4 kHz allows connection of an active speaker or a headset. If in manual mode the knobs are in a setting that is not supported, e.g. high gain and CC, a beep is output. http://www.heka.com 34 http://www.heka.com Description of the Hardware 5. Recording Modes of the EPC 800 Patch Clamp Amplifier The EPC 800 patch clamp amplifier is fundamentally an instrument for measuring small electrical currents. It uses a current-to-voltage (I-V) converter circuit to convert the currents to an analog voltage, which is then made available at the current monitor output for display and recording. At the same time that pipette currents are being recorded, the potential must be specified, and the various operating modes of the EPC 800 patch clamp amplifier correspond mainly to different ways of controlling that potential. 5.1 Voltage Clamp Mode This is the basic patch clamp mode in which the membrane voltage is controlled and the transmembrane current required to maintain the ‘clamped’ voltage is measured. The Voltage clamp mode is implemented by the circuitry shown in the figure below. The pipette potential is derived from the signal applied to External INPUT VC, with a variable offset added from the VHOLD control. The sum of these two sources is displayed and monitored as the VM ON signal. Before being applied to the pipette a further variable offset is added from the VP -OFFSET control to allow the user to cancel electrode offsets. 36 Recording Modes of the EPC 800 Patch Clamp Amplifier Figure 5.1: Voltage Clamp Mode 5.2 Current Clamp Mode The Current Clamp mode can be used to measure the resting potential or spontaneous action potentials in a whole-cell recording. In these experiments a known constant or time-varying current is applied and the resulting change in membrane potential caused by the applied current is measured. The measured membrane potential will be shown on the LCD panel as VM ON and the signal is available at the Voltage monitor output at the front panel of the EPC 800 Patch Clamp Amplifier. For stimulation, a command current can be injected while the pipette potential is measured. The command current is determined by the sum of the voltages from the ‘External Input CC’ and the IHOLD control. In Current Clamp mode, the input of the headstage acts as an highimpedance voltage follower circuit (see figure). The feedback resistor is used for stimulation in Current Clamp mode. This can be done by applying a defined voltage to the feedback resistor. http://www.heka.com 5.2 Current Clamp Mode 37 Figure 5.2: Current Clamp Mode The current clamp mode of the EPC 800 USB is called CC+Bridge. Bridge compensation in current clamp mode acts in a similar way as RS compensation does in voltage clamp mode. It can be thought of as an enhanced current clamp mode that compensates the voltage drop via the series (access) resistance of the electrode (RS ). In this mode, the stimulus artifact that is typically generated when injecting current is fully eliminated. The current clamp circuitry of the EPC 800 Patch Clamp Amplifier acts as a voltage-follower, thereby increasing not only the speed but also the stability of the circuit. Recording and following rapid events such as fast action potentials (AP) with patch or intracellular electrodes is possible. Additional information related to the bridge compensation in current clamp mode of the EPC 800 patch clamp amplifier can be found in the “Bridge Compensation” section of chapter 8 - Using the EPC 800 Patch Clamp Amplifier with PatchMaster. The capacitance of the electrode, and to some extent the amplifier, can be neutralized by the C-Fast setting, which acts as a capacitance neutralization adjustment in the Current Clamp mode. However, like capacitance neutralization settings on conventional microelectrode amplifiers, excessive capacitance neutralization can result in oscillation and potentially the destruction of the cell membrane. The best way to use the C-Fast control is to first adjust it in the Voltage Clamp mode, e.g., by using the Auto button; C-Fast is then automatically adjusted to neutralize all but the http://www.heka.com 38 Recording Modes of the EPC 800 Patch Clamp Amplifier amplifier input capacitance when you switch to current clamp mode. The EPC 800 Patch Clamp Amplifier has two possible current clamp OUTPUT gain ranges. When switching from voltage clamp to current clamp + bridge mode, which of the two current clamp OUTPUT gain ranges being used is dependent upon the voltage clamp gain range setting before switching. If, for example, the low gain range (0.005 to 0.2 mV/pA) is selected in voltage clamp, then upon switching to current clamp + Bridge mode, the current clamp stim scaling will be set to 10 pA/mV; corresponding to a maximum command current of +/-100 nA. The IHOLD potentiometer on the front panel can manually be set to +/-50 nA. This is a “medium” current clamp gain range, used in situations where medium current must be injected, including e.g. “loose seals”. It should be mentioned that the “medium” current clamp gain range has the side-effect that it cannot set zero current very precisely. This is a limitation when recording while not injecting current. For example, a jitter of 1 mV of the DA-output in the “medium” current clamp gain range would cause a jitter of 10 pA and injecting 10 pA is not the same as injecting zero current. Alternatively, if one switches to the current clamp + bridge mode from either the medium (0.5 to 20 mV/pA) or high (50 to 2000 mV/pA) gain ranges in voltage clamp then the current clamp stim scaling will be set to 0.1 pA/mV; corresponding to a maximum command current of +/-1 nA. The IHOLD potentiometer on the front panel can manually be set to +/500 pA. This “low” current clamp gain range is used in situation where smaller currents need to be injected. e.g for smaller cells. Note: Once in current clamp + bridge mode, the current clamp gain range cannot be changed. The “Gain” settings are internally restricted to the selected range, i.e. with a CC scaling of 10 pA/mV, only the low gain range (0.005-0.2 mV/pA) can be used in current clamp mode. The table below summarizes the main features of the two current clamp gain ranges. http://www.heka.com 5.3 Low Frequency Voltage Clamp Mode Low Gain Medium Gain Starting VC Gain Range (mV/pA) 0.005 ↔ 0.2 0.5 ↔ 20 or 50 ↔ 2000 IM AX ± 100 nA ± 1 nA 39 CC Stim Scaling 10 pA/mV 0.1 pA/mV IHOLD Knob Adjustment Range 50 nA 500 pA Table 5.1: Features of current clamp gain ranges of the EPC 800 Patch Clamp Amplifier 5.3 Low Frequency Voltage Clamp Mode The low frequency voltage clamp mode is a modified current clamp mode that allows for the measurement of potential deflections, such as action potentials or synaptic potentials, while the average potential is kept constant at a value chosen by the user with the LF V CHOLD potentiometer. The circuit thus works like a current clamp for fast signals and like a voltage clamp for low frequency signals. To achieve this, the measured membrane potential is low-pass filtered and compared to the LF V CHOLD potential. Then a current is injected into the cell to keep the membrane potential at the chosen LFVC potential. Since the cell does not distinguish currents entering through the pipette from currents crossing the membrane, the low frequency voltage clamp circuit can be considered an additional membrane conductance. Various time constants for the low frequency voltage clamp can be selected (1, 3, 10, 30, 100 µs). These time constants describe the speed of regulation. The effective feedback speed for the five possible response settings depends on the gain range. In the medium gain range, 1-100 is approximately the time in seconds, whereas in the high gain range it is a hundred times faster. Note that the LFVC value of 100 means slow adjustment or tracking, whereas the LFVC value of 1 means fast adjustment or tracking to the given set-point! http://www.heka.com 40 Recording Modes of the EPC 800 Patch Clamp Amplifier http://www.heka.com 6. Theory of Compensation Procedures 6.1 Offset Compensation In all patch clamp configurations a number of offsets have to be taken into account. These include amplifier offsets, electrode potentials, liquid junction potentials, and potentials of membrane(s) in series with the membrane under study. Some of these offsets are fixed during an experiment such as amplifier and electrode offsets while others are variable. It is standard practice to take care of the fixed offsets by performing a reference measurement at the beginning of an experiment. Thereby an adjustable amplifier offset is set for zero pipette current. Thereafter the command potential of the amplifier will be equal in magnitude to the membrane potential if no changes in offset potentials occur. The polarity of the command potential will be that of the membrane for whole-cell and outside-out configurations but will be inverted in the cell-attached and inside-out configurations. In cell-attached configuration an additional offset is present due to the resting potential of the cell under study. Liquidjunction potentials may appear or disappear during the measurement when solution changes are performed or in the case that the pipette solution is different from the bath solution (Barry & Lynch, 1991; Neher, 1992; Neher, 1995). These problems are handled by applying the appropriate corrections and sign inversions during off-line analysis. An analysis of the underlying offset problem and justification for the procedures can be found in Neher (1995). The rule for calculating the Offset Sum (LJ) is to form the sum of all changes in offsets which occur between the reference measurement and the test measurement. The polarity of a given offset voltage should be taken as viewed from the amplifier input (positive, if positive side of the voltage 42 Theory of Compensation Procedures source is closer to the input). A sign inversion has to be applied if the offset under consideration disappears. A procedure how to measure liquid junction potentials is described in Neher (1992). Ion mobilities for calculation of liquid junction potentials can be found in Barry & Lynch (1991). The EPC 800 Patch Clamp Amplifier enables automatic or manual adjustment of the offset potential in the range of +/- 200 mV. For users of the EPC 800 Patch Clamp Amplifier with HEKA’s PatchMaster software, additional information related to the setting of the liquid junction potential within Patchmaster can be found in chapter 8 - Using the EPC 800 Patch Clamp Amplifier with PatchMaster or within the PatchMaster user manual. The table below lists the LJ values for some typical solutions. Solution 145 K-glutamate, 8 NaCl, 1 M gCl2 , 0.5 ATP, 10 NaOHHEPES 145 KCl, 8 NaCl, 1 M gCl2 , 0.5 ATP, 10 NaOH-HEPES 60 Cs-citrate, 10 CsCl, 8 NaCl, 1 M gCl2 , 0.5 ATP, 20 CsOH-HEPES 32 NaCl, 108 Tris-Cl, 2.8 KCl, 2 M gCl2 , 1 CaCl2 , 10 NaOH-HEPES 70 N a2 SO4 , 70 sorbitol, 2.8 KCl, 2 M gCl2 , 1 CaCl2 , 10 NaOH-HEPES LJ 10 mV 3 mV 12 mV -3 mV 6 mV Table 6.1: Typical LJ values for different solutions In each case, a liquid junction potential between the given solution and physiological saline (main salt: 140 mM NaCl) is listed. Polarity is that of physiological saline with respect to the given solution (according to the convention of Barry & Lynch). Note: When applying the above rules for calculating the correction LJ, two sign inversions of the liquid junction potential are effective for the standard liquid junction potential correction. First, the liquid junction potential that was present during http://www.heka.com 6.1 Offset Compensation 43 the reference measurement disappears during the experiment (after seal formation). Second, according to Barry & Lynch, the potentials are defined with opposite polarity as those for patch clamp experiments (bath vs. electrode instead of electrode vs. bath). Thus, values in the table can be taken as they are and entered as such in the LJ control. If however, a liquid junction potential appears during a measurement (e.g., during solution changes), then only one sign inversion applies. In that case, the sign of the value in the table must be inverted before adding it to the “Correction Sum”. In the following, some specific examples together with explanations will be given. In all these cases it is assumed that the reference measurement is performed in standard saline. Example 1: An outside-out or whole-cell measurement with normal saline in the pipette. In this case, LJ should be set to zero. This is one of the few measurements which do not require any correction. It is quite unphysiological, however. Example 2: An outside-out or whole-cell measurement with KCl-based internal solution in the pipette. LJ should be set to 3 mV (see table) in order to correct for the disappearance of a liquid junction potential between the KCl containing pipette and the NaCl-based bath solution. Example 3: An episode with low-chloride bath solution during the experiment of example 2. It is assumed that the reference electrode in the bath includes a salt bridge such that the change in Cl− concentration is not “seen” by the Ag-AgCl-wire. Nevertheless, a liquid junction potential will develop at the bath/salt-bridge interface, unless a “bleeding” KClbridge is used (see Neher, 1992). Similarly, a liquid junction potential will develop during local microperfusion. Thus, the correction during the episode in low-chloride medium will be the sum of this liquid junction potential and the correction of Example 2 (3 mV). Taking the value for a low Cl− solution (e.g., sulfate Ringer; see table), we arrive at a value of LJ = 3 + (−6) = −3 mV , which should be set during that part of the experiment. Note: The sulfate Ringer in this case is -6 mV (the inverse of http://www.heka.com 44 Theory of Compensation Procedures the value in the table), because this potential “appears” during the measurement with inverted polarity to the convention of Barry & Lynch. Example 4: An outside-out or whole-cell measurement with Cs-citratebased internal solution. In this case, LJ should be set to 12 mV (see table above). Example 5: A cell-attached measurement with sulfate-Ringer in the pipette. Two corrections apply: 1. the correction for the liquid junction potential during the reference measurement (6 mV, see table above) and 2. the resting potential of the cell. We assume the latter to be -60 mV and therefore set LJ to -54 mV. In the cell-attached mode polarities of the amplifier readout are inverted, thus the amplifier will display the “physiological” patch potential. 6.2 Capacitance Compensation The EPC 800 Patch Clamp Amplifier offers users an automatic procedures for both fast and slow capacitance subtraction. The use and behavior of these automatic compensation routines, as they pertain to Remote and Local modes of operation, are discussed elsewhere in this manual in several places (see chapters 4 - Description of the Hardware, 7 - Using the EPC 800 Patch Clamp Amplifier with pCLAMP and 8 - Using the EPC 800 Patch Clamp Amplifier with PatchMaster ). ® When executing a C-Fast or C-Slow automatic compensation, the ongoing pulse protocols are suspended and short trains of square-wave pulses are applied during which time the green “Auto” LEDs on the EPC 800 Patch Clamp Amplifier front panel will be blinking and the pulses can be seen on an oscilloscope screen. The resulting capacitive transients are averaged and then used to calculate the required corrections. The algorithm iteratively tries to minimize the RMS amplitude of the current transient elicited by the application of the small square voltage pulse. In the case of C-Fast compensation, for example, the search is done over the whole range of CFast (0-15 pF) and τ -Fast (0-8µs) values. The values of C-Fast and τ -Fast that correspond to the RMS minimum amplitude are then stored as the http://www.heka.com 6.3 Series Resistance Compensation 45 new “Auto-C-Fast” and “Auto-τ -Fast” values. As the algorithm runs external stimulus input is deactivated. Holding potential applied to external input VC i acquired and then generated internally so that the potential for the cell does not change. 6.3 Series Resistance Compensation In whole-cell voltage clamp recording, the membrane potential of the cell is controlled by the potential applied to the pipette electrode. This control of potential is not complete, but depends on the size of the access resistance between the pipette and the cell interior, and on the size of the currents that must flow through this resistance. This access resistance is called the “series resistance” (Rs ) because it constitutes a resistance in series with the pipette electrode. Part of the series resistance arises from the pipette itself, but normally the major part arises from the residual resistance of the broken patch membrane, which provides the electrical access to the cell interior. In practice, we find that the series resistance usually cannot be reduced below a value about two times the resistance of the pipette alone. Series resistance has two detrimental effects in practical recording situations. First, it slows the charging of the cell membrane capacitance because it impedes the flow of the capacitive charging currents when a voltage step is applied to the pipette electrode. The time constant of charging is given by τu = Rs x Cm , where Cm is the membrane capacitance. For typical values of Rs = 5 MΩ and Cm = 20 pF, the time constant is 100 µs. This time constant is excessively long for studying rapid, voltage-activated currents such as Na+ currents in neurons, especially since several time constants are required for the membrane potential to settle at its new value after a step change. The second detrimental effect of series resistance is that it yields errors in membrane potential when large membrane currents flow. In the case of Rs = 5 MΩ, a current of 2 nA will give rise to a voltage error of 10 mV, which is a fairly large error; for studying voltage-activated currents, errors need to be kept to ∼2 mV at most. Electronic compensation for series resistance in voltage clamp systems has been in common use since the days of Hodgkin and Huxley. The princihttp://www.heka.com 46 Theory of Compensation Procedures ple of the compensation in the case of a patch clamp is that a fraction of the current monitor signal is scaled and added to the command potential (correction pathway, see Figure 6.1 below). When a large current flows in the pipette, the pipette potential is altered in a way that compensates for the potential drop in the series resistance. This arrangement constitutes positive feedback, and can become unstable when overcompensation occurs. The EPC 800 Patch Clamp Amplifier incorporates additional circuitry to allow capacitance transient cancelation to occur while RS -compensation is in use (see Sigworth, Chapter 4 in Single Channel Recording). This is shown as the prediction pathway in figure 6.1 below, and it accelerates the charging of the membrane capacitance by imposing large, transient voltages on the pipette when step changes are commanded (this is sometimes called “supercharging”). These voltages would occur due to the action of the correction pathway alone as the large capacitive charging currents elicit pipette voltage changes; however, when these currents are canceled by the transient cancelation, their effect must be predicted by the cancelation circuitry: hence the prediction pathway. Figure 6.1: Series Resistance Compensation Together, the two parts of the EPC 800 Patch Clamp Amplifier Rs compensation circuitry cancel the effects of a fraction α of the series resistance. This means that the charging of the membrane capacitance is accelerated, with a time constant under compensation of http://www.heka.com 6.3 Series Resistance Compensation 47 τc = (1 − α)τu where τu is the uncompensated time constant. Similarly, the voltage errors due to membrane currents are also reduced by the factor (1-α). The fractional compensation is determined by the setting of the %-COMP control on the EPC 800 USB front panel. For proper compensation, however, the circuitry needs to have an estimate of the total series resistance (for the correction pathway), and both the series resistance and membrane capacitance must be known for the capacitance transient cancelation (C-Slow) circuitry. In the EPC 800 USB, the estimation of series resistance has been combined with the transient cancelation, in that the Rs control has a dual effect. Its setting affects both the kinetics of the transient cancelation and the scaling of the correction feedback signal. This means that in practice the estimation of the series resistance consists of adjusting C-Slow and R-Series to cancel the transient currents due to the cell membrane capacitance. Once this has been done, the relative amount of Rs -compensation can then be selected with the %-COMP control. Theoretically, it is desirable to compensate as much of the series resistance as possible. In practice, however, a degree of compensation above 90% can involve considerable technical problems, and in some recording situations a value below 90% is preferable. To illustrate one technical problem, consider the case when a 100 mV potential change is commanded and 90% compensation is in use. This degree of compensation means that the cell membrane capacitance will be charged 10 times faster than normally. The rapid charging is accomplished in the compensation circuitry by forcing the pipette potential to (very transiently) reach a potential of 1 V. The resulting large current causes the membrane capacitance to charge quickly to its final value of 100 mV. In general, when a voltage step of size ∆V is commanded, the pipette potential actually receives an initial transient of size ∆V / (1-α) due to the compensation effect. The technical problem comes from the fact that the maximum pipette potential excursion in the EPC 800 USB is about +/-1.4 V, implying that 90% compensation can be used for steps only up to about 120 mV in amplitude. Overload of amplifiers (obvious in practical use due to the loss of proper transient cancelation) will occur if larger pulses are applied, unless the %-COMP setting is reduced. http://www.heka.com 48 Theory of Compensation Procedures The degree of Rs -compensation is also limited by stability considerations. Stable Rs -compensation requires that the C-Fast control is properly set to cancel the fast capacitance transients; when the series resistance is high, say above 10 MΩ, misadjusting of C-Fast can easily cause oscillation. In cases where Rs is this size or larger, it is often advisable to use the slower settings of the Rs switch which, in slowing down the speed of the compensation feedback, makes it less susceptible to high-frequency oscillations. In cases where Rs is relatively small, on the other hand, it is sometimes not possible to use full 90% compensation because of the limited speed of the compensation feedback, even in the fastest, 2 µs setting of the switch. This problem arises when the time constant τu is smaller than about 100 µs, and comes from the fact that compensated membrane time constant τC cannot be made smaller than a value that depends on the speed of the Rs -compensation feedback. If you turn up the %-COMP control to try to obtain a smaller τC , you will observe overshoot or ringing in the current monitor signal, due to an overshoot in the membrane potential. The minimum value for τC is given approximately by τc(min) = p τu − τf where τf , the effective time constant of the feedback loop is about 2 µs for the fast setting and 6 µs for the slow setting. The corresponding maximum a values are given by r αmax = 1 − τf τu Table 6.2 gives maximum α values (i.e., %-comp settings) and the resulting τC values in the 2 µs setting for some values of the uncompensated time constant τu . At the 10 µs setting, full 90% compensation may be used without overshoot for time constants τu greater than about 1 ms; the 100 µs setting is appropriate for τU values on the order of 10 ms or longer. In practice, you can estimate τU from the ratio of the settings of C-Slow and R-Series. For example, if C-Slow is 10 pF and Rs is 10 MΩ, the time constant is 10 pF × 10 M Ω = 100 µs http://www.heka.com (6.1) 6.4 Bridge Compensation τu (µs) 90 50 30 22 13 8 49 α 0.85 0.80 0.75 0.70 0.60 0.50 τc (µs) 13 10 8 7 5 4 Table 6.2: Relationship between Rs %-comp settings and membrane time constants The use of the Rs -compensation circuitry can be summarized as follows: When you set the capacitance transient cancelation (C-Slow, R-Series, CFast, τ -Fast) to minimize the size of the transients when voltage pulses are applied, you have also properly set them for series resistance compensation. Then you enable R-Series and turn up the %-COMP control to the desired value. Any misadjusting of the transient cancelation will be apparent and can be compensated. 6.4 Bridge Compensation Bridge compensation in current clamp mode acts in a very similar way to the Rs compensation in voltage clamp mode. It basically compensates the voltage drop via the series (access) resistance of the electrode (Rs). Further information with illustrations demonstrating the effects of the bridge compensation of the EPC 800 in current clamp mode are provided later in this manual in Chapter 8 - Using the EPC 800 USB with PatchMaster. http://www.heka.com 50 http://www.heka.com Theory of Compensation Procedures 7. Using the EPC 800 Patch Clamp Amplifier with pCLAMP ® This chapter will concentrate on the various ways in which the EPC 800 Patch Clamp Amplifier can be used in combination with Axon ’s pCLAMP® software and Digidata® interfaces. Three modes of operation are discussed; local mode, local + telegraphing mode and finally remote mode via control through HEKA’s virtual amplifier soft panel. Topics covered will be the required hardware connections and software configuration steps. This is followed by an example tutorial for using the system with a model circuit to simulate typical experimental conditions of a pipette entering the bath solution, canceling potential offsets, forming a seal, compensation of C-Fast, breaking the membrane to go to the wholecell configuration, compensation of C-Slow and finally executing whole-cell voltage clamp and current clamp protocols. Detailed information related to the installation and general programming of the Clampex software is not covered. It is assumed that users of the EPC 800 Patch Clamp Amplifier in combination with Axon hardware and software already possess a general familiarity with these products. The scope of this discussion is strictly related to getting the amplifier ready to use and cover some basic functioning of the amplifier in combination with third-party equipment. 7.1 Local Mode When operated in a local mode, the EPC 800 Patch Clamp Amplifier is a completely manually controlled amplifier. All of the amplifier settings are controlled directly by the user through the front panel knobs, switches and ® 52 Using the EPC 800 Patch Clamp Amplifier with pCLAMP potentiometers. The amplifier can be used with any of Axon ’s Digidata® interfaces and compatible version of Clampex. This is possible even with older Digidata® models such as the 1200. 7.1.1 Software Installation The software being used in the examples given in this chapter is Clampex 10.2. It is assumed at this point that this software and the protection dongle driver have been correctly installed on the acquisition computer. 7.1.2 Hardware Connections Information about setting up and connecting the EPC 800 Patch Clamp Amplifier have already been covered (see Chapter 3 - Unpacking and Installation). It is also assumed that the Digidata® model of choice is properly powered on, connected to the computer and correctly configured for use with the Clampex software. These instructions can be found in the pCLAMP® 10 user guide. 7.1.2.1 Front Panel There are four BNC cable connections that have to be made between the front panel of the EPC 800 patch clamp amplifier and the Digidata® interface. The connections below are example configurations; they can be changed as long as the proper configuration is set from within the software. EPC-800 USB Front Panel Current Monitor Voltage Monitor External Input CC External Input VC ® Digidata Front Panel Analog Input 0 Analog Input 1 T-BNC to Analog Output 0 T-BNC to Analog Output 0 Table 7.1: Front panel BNC connections between the EPC 800 Patch Clamp Amplifier and a Digidata® interface http://www.heka.com 7.1 Local Mode 7.1.3 53 Configuring Clampex Lab Bench Now as the correct hardware connections have been made, the input and output signals must be properly configured in the “Configure” → “Lab Bench” dialog. 7.1.3.1 Input Signals Lab Bench has separate tabs for input and output signals and virtually any type of signal can be configured for any of these channels. In our example, Analog IN #0 is physically connected to the “Current Monitor” of the amplifier and Analog IN #1 is physically connected to the “Voltage Monitor” of the amplifier. In the Lab Bench panel, Analog IN #0 is assigned the “I monitor” signal. The units should be pA and the scale factor is 0.001 V/pA. Analog IN #1 is assigned the “V monitor” signal. The units are mV and the scale factor is 0.01 V/mV. Figure 7.1: Configuring the input signals in Lab Bench for the Voltage and Current Monitor outputs of the EPC 800 Patch Clamp Amplifier 7.1.3.2 Output Signals Both the “External Input CC” and the “External Input VC” on the front panel of the EPC 800 Patch Clamp Amplifier are connected to “Analog http://www.heka.com ® 54 Using the EPC 800 Patch Clamp Amplifier with pCLAMP Output 0” on the front panel of the Digidata® through a T-BNC connector. Voltage Clamp Experiments: For the purpose of executing voltage clamp experiments, the “Analog OUT #0” is assigned the “V command” signal. The units are mV and the scale factor is 100 mV/V. Figure 7.2: Example of configuring the output signals for voltage clamp experiments. Analog Out #0 is assigned to the V command signal. Current Clamp Experiments: For the purpose of executing current clamp experiments, the “Analog Out #0” is assigned the “I cmd” signal. The units are nA and the scale factor is 0.1 nA/V http://www.heka.com 7.1 Local Mode 55 Figure 7.3: Example of configuring the output signals for current clamp experiments. Analog Out #0 is assigned to the Icmd signal. 7.1.4 Membrane Test with Model Circuit The following tutorial will guide you through most of the basic and some of the unique and more sophisticated features of the EPC 800 Patch Clamp Amplifier. It will enable the user to explore the use of the front panel controls while at the same time, it allows you to check whether the amplifier is functioning properly. In this example, the model circuit that was shipped with the amplifier is being used as a substitute for a real patch clamp recording. Some of the specifics related to the amplifier’s usage with Clampex are highlighted and the screenshots should provide Clampex users with a good frame of reference. 7.1.4.1 The Model Circuit The model circuit should be connected to the probe input via a BNC adapter and the plug goes to the black GND connector on the probe. http://www.heka.com ® 56 Using the EPC 800 Patch Clamp Amplifier with pCLAMP Figure 7.4: Model Circuit The model circuit provides a switch with three positions simulating the following conditions typically observed during an electrophysiological experiment: In the top position an “open” pipette with a resistance of 10 M Ω is simulated. This mode is useful for applying a test pulse and for correcting offset potentials. The middle position simulates a pipette attached to the cell membrane after the Giga-Ohm seal formation. In this setting only a capacitance of 6 pF is left over, corresponding to the “fast” capacitance of a pipette sealed to the cell membrane. This mode allows you to test the C-Fast compensation. In the bottom position a “model cell” in the whole cell patch clamp configuration is simulated. The “input resistance” is 5.1 M Ω, the “membrane resistance” is 500 M Ω and the “membrane capacitance” is ∼ 22 pF. This mode allows testing the C-Slow compensation and the current clamp mode. Furthermore it is useful to check stimulation patterns you design within the acquisition software. Note: This model cell has a long “membrane” time constant (about 10 ms). http://www.heka.com 7.1 Local Mode 7.1.4.2 57 Open Pipette and V POF F SET With the model circuit in the top position, the “10 M” setting simulates an open pipette with a resistance of 10 M Ω. This is useful for applying a test pulse and correcting for offset potentials. The “Membrane Test” dialog of Clampex should be opened with the “Bath” tab selected. The correct pipette resistance should be calculated and displayed in the “R:” field where you should read a value close to 10 M Ω. For observation of the current pulses, it is convenient to set the front panel Gain switch to a setting such that the current through the open pipette is reasonably sized, perhaps set the Gain to 5 mV/pA. Other recommended front panel settings are Filter set to 3 kHz, RS COMP is off and C-Slow range is off. The VHOLD , IHOLD , LF V CHOLD and V POF F SET potentiometers should all be set to read 0 on the LCD display. With a gain setting of 5 mV/pA you should see a rectangular current of about 500 pA in response to a 5 mV test pulse. This represents the ohmic resistor you are recording from: I= U 5 mV = = 500 pA R 10 M Ω (7.1) There will invariably be a small offset potential between the pipette and the bath electrodes. Pipette offsets up to +/- 200mV can be compensated manually by turning the V POF F SET potentiometer or automatically by pushing the black Auto VP button. The values will be displayed on the amplifier LCD display and the effects are observed in the Clampex oscilloscope window (see right side of figure below). http://www.heka.com ® 58 Using the EPC 800 Patch Clamp Amplifier with pCLAMP Figure 7.5: Automatic or manual V POF F SET . The left panel shows the test pulse before the offset correction and the right side illustrates the effects of an automatic V POF F SET correction. Note: Practical Tips Before the pipette is inserted into the bath, the current trace should be flat, except for very small capacitive pulses due to the stray capacitance of the pipette and holder. If there should be no change in the trace upon entering the bath, check for an open circuit, for example: 1. a bubble in the pipette; 2. faulty connection to the probe input; 3. bath electrode not connected. The surface of the solution is relatively “dirty”, even if (as we strongly recommend) you aspirate some solution from the surface to suck off dust and contaminants. For this reason it is important to apply a small amount of positive pressure to the pipette before you move its tip into the bath, and also to avoid going through the air-water interface more than once before forming a seal. When you do move the pipette tip into the bath, the current trace may go off-scale (check clipping); in that case, reduce the gain or adjust the V POF F SET potentiometer until the trace reappears. http://www.heka.com 7.1 Local Mode 7.1.4.3 59 Forming a Gigseal Moving the model circuit switch to the middle position will leave only a capacitance of about 6pF connected. This simulates a Gigaseal and the C-Fast controls can be used to cancel the capacitive spikes resulting from the stimulus test pulse. In order to see the small currents resulting from the high resistance of the model circuit, the amplifier gain can be set to 20 or 50 mV/pA. As illustrated in the figure below, two fast capacitive transients are coming from the 6 pF capacitor in the model circuit. CFast and τ -Fast compensations can be done manually by turning the front panel potentiometer and knob or automatically by pressing the black Auto C-Fast button. If performing manually, as you approach a value close to 6 pF you should see the spikes becoming smaller. As soon as you are overcompensating you will see the spikes going in the opposite direction. This indicates that you should decrease C-Fast (using the model circuit it is not very critical to misadjust τ -Fast). Continue adjusting C-Fast and τ -Fast until you see an almost flat line. Figure 7.6: Automatic or manual C-Fast compensation. The left panel shows the capacitive spikes resulting from the test pulse and the right side illustrates the effects of an automatic C-Fast compensation. The amplifier Gain was set to 20 mV/pA. Note: Practical Tips: When the pipette is pushed against a cell, the current http://www.heka.com ® 60 Using the EPC 800 Patch Clamp Amplifier with pCLAMP pulses will become slightly smaller to reflect the increasing seal resistance; when the positive pressure is released, the resistance usually increases further. Some cell types require more “push” from the pipette than others, but an increase in resistance of 1.5 (i.e., a reduction in the current pulses by this factor) is typical. Application of gentle suction should increase the resistance further, and result (sometimes gradually, over maybe 30 s; sometimes suddenly) in the formation of a gigaseal, which is characterized by the current trace becoming essentially flat again (hyperpolarizing the pipette to -40 to -60 mV often helps to speed the seal formation). To verify gigaseal formation, increase the GAIN to perhaps 50 mV/pA; the trace should still appear essentially flat except for capacitive spikes at the start and end of the voltage pulse. Transient cancelation will be essential if you will be giving voltage pulses in your experiment. If no voltage jumps are required, turn the stimulus off to avoid introducing artifacts. If voltage jumps are to be applied, switch the GAIN and FILTERS to the values you will be using and adjust C-Fast and τ -Fast to cancel the capacitive spikes mentioned above. Be sure to use Gain settings of 50 mV/pA or above for lower noise in single-channel recordings. Keep the Filter switch set at 10 kHz unless you actually will need the full 100 kHz bandwidth for some reason; otherwise you might drive the current monitor output or your recorder’s input amplifiers into saturation with the very large amount of high-frequency noise. Should you use the full bandwidth, you should avoid gain settings above 100 mV/pA for the same reason. If you are applying voltage pulses to the patch membrane, you probably will want to subtract control traces from the traces containing the channels of interest in order to remove the capacitive transients. Nevertheless, it is important to try to cancel the capacitive transients as well http://www.heka.com 7.1 Local Mode 61 as you can in order to avoid saturating any amplifiers, the recording medium or the AD converter. It is a good idea to set the C-Fast and τ -Fast controls while you observe the signal without any filtering beyond the internal 10 kHz filter. Then, during the recording, watch to see if the Clipping light blinks. When it does, it means that internal amplifiers in the EPC 800 Patch Clamp Amplifier are about to saturate, and/or that the Current Monitor output voltage is going above 13 V peak, on the peaks of the transients, and you should readjust the transient cancelation controls. Otherwise, it is likely that the recording will be non-linear and subtraction will not work correctly. The fast transient cancelation is not sufficient to cancel all of the capacitive transients in a patch recording. This is partly because the pipette capacitance is distributed along the length of the pipette; therefore, each element of capacitance has a different amount of resistance in series with it, so that a single value of τ -Fast will not provide perfect cancelation. The time course of the transients also reflects dielectric relaxation in the plastic of the pipette holder and in the pipette glass. These relaxations are not simple exponentials, but occur on time scales of about 1 ms. If you use pipette glass with low dielectric loss (e.g., aluminosilicate glass) or if you are careful to coat the pipette with a thick coating and near to the tip, the relaxations will be smaller. You can cancel part of these slow relaxations by using the C-Slow controls, with the C-Slow Range set to 30 pF. 7.1.4.4 Whole-Cell Configuration Breaking the Patch and C-Slow Compensation: If the fast capacitance cancelation was adjusted (as described above) before breaking the patch, then all of the additional capacitance transient will be due to the cell capacitance. Canceling this transient using the C-Slow and R-Series controls will then give estimates of the membrane capacitance http://www.heka.com ® 62 Using the EPC 800 Patch Clamp Amplifier with pCLAMP and the series resistance. For adjusting these controls it is a good idea to observe the transients at high time resolution, perhaps with 10 kHz filtering. This will allow you to observe the effect of the R-Series control, which sets the initial amplitude of the transient, as opposed to the C-Slow control, which sets the total area. After compensating C-Fast well, the model circuit can be switched to the 0.5 GΩ position. This will simulate a “model cell” cell 22 pF “membrane capacitance”, 500 M Ω “membrane resistance” and 5.1 M Ω “input resistance” in the whole-cell configuration. This position can be used to verify the C-Slow controls and the action of the series resistance compensation with C-Slow enabled. The figure below is of screenshots of the Membrane Test dialog before and after C-Slow and R-Series compensation. On the right is the capacitance transient due to the cell capacitance. The Cm and Rm values are indicative of the model circuit values. On the left is the compensated signal. The correct procedure for performing a C-Slow compensation is to first select the appropriate range: 30, 100 or 1000 pF. The compensation itself can be performed automatically by pressing the black Auto C-Slow button. Alternatively, it could be performed manually by turning the C-Slow and R-Series potentiometers. With some practice you will develop a good feeling for these parameters and how they affect the recording. With increasing quality of the compensation you should approach the real values of the model circuit and the transients should disappear. The compensated signal on the right is a good example of a well compensated whole-cell transient. http://www.heka.com 7.1 Local Mode 63 Figure 7.7: Automatic or manual C-Slow and R-Series compensation. The left panel displays the capacitance transient due to the cell capacitance and the right side illustrates the effects of an automatic C-Slow compensation. Important note: If either or all three of the automatic routines of the EPC 800 Patch Clamp Amplifier are performed through the front panel Auto buttons of V POf f set , C-Fast or C-Slow, it is suggested you keep them on. If you were to turn the Auto off (by pressing and holding the Auto button) the values obtained during the Auto procedures would be lost and the values from the settings of the front panel potentiometers would be in effect. If you wish to manually “fine-tune” an auto compensation procedure, it is best to make a note of the compensation values obtained during the auto procedure and then dial these manually and adjust slightly from this point. Note: Practical Tips: After a gigaseal is formed, the patch membrane can be broken by additional suction or, in some cells, by high voltage pulses (600-800 mV, so called Zap pulse). Electrical access to the cell’s interior is indicated by a sudden increase in the capacitive transients from the test pulse and, depending on the cell’s input resistance, a shift in the current level. Additional suction sometimes lowers the access resistance, causing the capacitive transients to http://www.heka.com ® 64 Using the EPC 800 Patch Clamp Amplifier with pCLAMP become larger in amplitude but shorter. Low values of the access (series) resistance are desirable and, when Rs compensation is in use, it is important that the resistance be stable as well. A high level of Ca2+ buffering capacity in the pipette solution (e.g., with 10 mM EGTA) helps prevent spontaneous increases in the access resistance due to partial resealing of the patch membrane. Select the appropriate C-Slow RANGE and start with CSlow set at a nonzero value. If the transient is not too rapid, you will be able to see the initial value of the transient change as you adjust R-Series; bring it to zero leaving no initial step in the transient, and then adjust C-Slow to reduce the overall size of the transient. After an iteration or two, it should be possible to reduce the transient to only a few percent of its original amplitude. However, if the cell has an unfavorable shape (for example, a long cylindrical cell or one with long processes), the cell capacitance transient will not be a single exponential, and the cancelation will not be as complete. If you are a novice to patch-clamping it is useful to perform the C-Fast and C-Slow compensation at least a couple of times manually before getting used too much to the convenience of the automatic routines. Doing so you will get a better feeling for the quality of a recording and how it is affected by the various parameters, especially the input resistance R-series. Series Resistance Compensation Series resistance (Rs ) compensation is important when the membrane capacitance is large or when the ionic currents are large enough to introduce voltage errors. To use Rs -compensation, you first adjust the transientcancelation controls (including C-Fast and τ -Fast if necessary) to provide the best cancelation. Then you turn on Rs -COMP by selecting the desired speed and turning up the %-COMP control to provide the desired degree of compensation expressed as a %. Note: The “R-series” control determines (along with the “%http://www.heka.com 7.1 Local Mode 65 comp” control) the amount of positive feedback being applied for compensation. It should be adjusted with some care, since too high a setting causes overcompensation (the EPC 800 Patch Clamp Amplifier will think that Rs is larger than it is); this can cause oscillation and possible damage to the cell under observation. Note: Practical Tips: How you should set the Rs -compensation controls depends on the approximate value of the uncompensated membrane-charging time constant τu , which you can calculate as the product of the C-Slow and R-Series settings (for example, suppose C-Slow is 20 pF and R-SERIES is 10 MΩ; τu is then 20pF * 10MΩ = 200 µs). If τu is smaller than about 500 µs, you should use the 2 µs setting of the Rs -compensation switch to provide the necessary rapid compensation; however, the slower settings will provide compensation that is less prone to high-frequency oscillations from misadjusting of the controls. How much compensation you can apply is also determined by τu . If τu is larger than about 100 µs, you can use any degree up to the maximum of 90% compensation without serious overshoot or ringing in the voltage clamp response. For smaller values of τu , the %-COMP setting should be kept below the point where ringing appears in the current trace. As in the case of patch recording, there is rarely need to use the full bandwidth of the Filter in whole-cell recording. This is because typical membrane charging time constants (even after Rs -compensation) are considerably longer than 16 µs, which is the time constant corresponding to a 10 kHz bandwidth. Thus, the current monitor signal is expected to contain no useful information beyond this bandwidth. In whole-cell recording, the voltage and current monitor signals follow the usual convention, with outward currents being positive. This is because the pipette has electrical access to the cell interior. http://www.heka.com ® 66 Using the EPC 800 Patch Clamp Amplifier with pCLAMP 7.1.4.5 Whole-Cell Voltage Clamp Once C-Slow and R-Series have been properly compensated you may wish to execute a whole-cell voltage clamp recording. In this mode, the transmembrane current is recorded in response to maintaining the cell to a desired “clamped” or commanded voltage. The current is monitored at the Current Monitor output of the EPC 800 Patch Clamp Amplifier and the value is displayed on the LCD display when in the I/VM ON position. In Clampex, the desired voltage clamp protocol will first have to be written in the Protocol dialog. It is not within the scope of this manual to cover the details of how to write such a protocol. The figures below simply illustrate a basic example of some of the steps for designing and executing a voltage ramp protocol from +30 mV to -70 mV. Figure 7.8: Example of how to write a typical whole-cell voltage clamp protocol. This example is of a voltage ramp from +30 mV to -70 mV. http://www.heka.com 7.1 Local Mode 67 Figure 7.9: Waveform Preview of the voltage clamp protocol designed in the previous figure. In the oscilloscope window figure below, the current and voltage traces are displayed. These two display signals are selected within the “Inputs” tab of the “Edit Protocol” dialog and have already been configured within the Lab Bench dialog where the I monitor was assigned to Analog IN #0 and the V monitor was assigned to Analog IN #1. The output signal was also pre-configured in Lab Bench with the Analog Out #0 Digitizer channel being assigned to the “V command” signal. The “V command” also has to be selected in the Outputs tab of the protocol editor window. http://www.heka.com ® 68 Using the EPC 800 Patch Clamp Amplifier with pCLAMP Figure 7.10: Execution of the voltage clamp protocol displayed in Fig 7.8 with both the voltage and current traces displayed on the scope. 7.1.4.6 Whole-Cell Current Clamp In this mode the resting potential or spontaneous action potentials can be measured in a whole-cell recording. A constant or time-varying current is applied and the resulting change in membrane potential caused by the applied current is measured. The voltage is monitored at the Voltage Monitor output of the EPC 800 Patch Clamp Amplifier and the value is displayed on the LCD display when in the I/VM ON position. As previously discussed with executing voltage clamp protocols, the desired current clamp protocol has to be written in the Protocol dialog of Clampex. The figures below illustrate a very simple example of some of the steps for designing and executing a current clamp protocol consisting of a 1nA current injection for 50 ms. http://www.heka.com 7.1 Local Mode 69 Figure 7.11: Example of how to write a typical whole-cell current clamp protocol. This example is of a 1 nA current injection for 50 ms. http://www.heka.com ® 70 Using the EPC 800 Patch Clamp Amplifier with pCLAMP Figure 7.12: Waveform Preview of the current clamp protocol designed in the previous figure. In the oscilloscope window figure below, the current and voltage traces are displayed. These two display signals are selected within the “Inputs“ tab of the “Edit Protocol“ dialog and have already been configured within the Lab Bench dialog where the I monitor was assigned to Analog IN #0 and the V monitor was assigned to Analog IN #1. The output signal was also pre-configured in Lab Bench with Analog Out #0 Digitizer channel being assigned to the “Icmd” signal. http://www.heka.com 7.2 Local + Telegraphing Mode 71 Figure 7.13: Execution of the current clamp protocol displayed in Fig 7.11 with both the current and voltage traces displayed on the scope. 7.2 7.2.1 Local + Telegraphing Mode Telegraphing Outputs The EPC 800 Patch Clamp Amplifier is equipped on the rear panel with telegraphing outputs for Gain, Filter Bandwidth, Amplifier Mode and CSlow. To take advantage of these telegraphing output capabilities, the amplifier has to be used with one of the Axon ’s Digidata® series of interfaces that are equipped with telegraphing inputs. The Digidata® 1440A, for example, can receive telegraphing inputs for variable gain, lowpass filter and whole-cell capacitance compensation (C-Slow). The telegraphing Mode output of the amplifier will not be used in this example due to a limitation of the software. When operated in this mode, the amplifier remains a manually controlled instrument with active front panel knobs, switches and potentiometers. The only difference between this mode and the local mode is that Clampex http://www.heka.com ® 72 Using the EPC 800 Patch Clamp Amplifier with pCLAMP Telegraphing Output of the EPC-800 USB Gain Bandwidth C-Slow ® Telegraphing Input of Digidata 1440A 0 1 2 Table 7.2: BNC connections from the telegraphing outputs of the EPC 800 Patch Clamp Amplifier to the telegraphing inputs of a Digidata® 1440A. will be able to receive telegraphed values and there are additional BNC cable connections to be made between the amplifier and Digidata® and additional configurations to be made within Clampex. The following BNC connections should be made from the telegraphing outputs on the rear panel of the EPC 800 Patch Clamp Amplifier to the telegraphing inputs on the rear panel of the Digidata® 1440A. Again, these are examples that can be changed as long as they are configured correctly from within the software. 7.2.2 Configuring Telegraphs in Clampex The hardware connections above now have to be configured from within the Clampex program. Clampex telegraphs are configured in the Configure → Telegraphed Instrument dialog. The first step is to select the “Telegraphed Instrument”. When the software is first loaded, the EPC 800 Patch Clamp Amplifier will not be included in the list of available telegraphing instruments so it will have to be added as a user defined telegraphed instrument to the UserDefinedInstruments.ini file. Once added, it will be visible to the user in the application’s telegraphed-instruments configuration box. The second step is to choose the digitizer channels to which the telegraphs are connected. These should match the physical connections listed in the previous table. http://www.heka.com 7.2 Local + Telegraphing Mode 73 Figure 7.14: Configuring telegraphs in Clampex. The EPC 800 Patch Clamp Amplifier is selected as the Telegraphed Instrument and the Telegraph Connections are chosen to match the physical BNC connections between the amplifier and the Digidata® 1440A. The third step is to correctly load the appropriate conversion charts for the amplifier gain and frequency and the conversion factor for telegraphed Cm values. Instructions on how to write these files can be found in the defaultuserdefinedinstruments.ini file which is located in the Molecular Devices pCLAMP® 10.2 folder that was created when the software was installed. The correct table for the EPC 800 Patch Clamp Amplifier has already been written and is provided below. This table should be copied and saved in the userdefinedinstruments file. The appropriate table for the EPC 800 Patch Clamp Amplifier is: Once all of the appropriate cable connections have been made and the software is configured properly to accept the amplifier as a telegraphed instrument, then the system is ready to be used with the Digidata® 1440A and Clampex. The amplifier can be used in the same way as previously discussed in the tutorial steps for local mode. A very simple test to see if the telegraphing outputs are being read correctly is to manually turn the Gain and Filter knobs on the front panel http://www.heka.com ® 74 Using the EPC 800 Patch Clamp Amplifier with pCLAMP [Instrument0] Name = HEKA EPC-800 USB Attributes =“CMPos=10,CMNeg=-100” Settings0 Name=gain Settings0 0=0.0,0.005 Settings0 1=0.5,0.01 Settings0 2=1.0,0.02 Settings0 3=1.5,0.05 Settings0 4=2.0,0.1 Settings0 5=2.5,0.2 Settings0 6=3.0,0.5 Settings0 7=3.5,1 Settings0 8=4.0,2 Settings0 9=4.5,5 Settings0 10=5.0,10 Settings0 11=5.5,20 Settings0 12=6.0,50 Settings0 13=6.5,100 Settings0 14=7.0,200 Settings0 15=7.5,500 Settings0 16=8.0,1000 Settings0 17=8.5,2000 Settings1 Name=frequency Settings1 0=0.0,100 Settings1 1=1.0,300 Settings1 2=2.0,500 Settings1 3=3.0,700 Settings1 4=4.0,1000 Settings1 5=5.0,3000 Settings1 6=6.0,5000 Settings1 7=7.0,7000 Settings1 8=8.0,10000 Settings1 9=9.0,30000 Settings1 10=10.0,100000 Table 7.4: Conversion chart for EPC 800 Patch Clamp Amplifier gain, frequency and telegraphed Cm values http://www.heka.com 7.3 Remote Control through Soft-Panel 75 of the amplifier and check to see if the same values are being displayed in the “Telegraphs” section in Clampex. Likewise, you can turn the C-Slow potentiometer on the front panel; the same number on the LCD display should be displayed in “Telegraphs” under the heading Cm. Figure 7.15: Display of telegraph values in Clampex 7.3 Remote Control through Soft-Panel The EPC 800 Patch Clamp Amplifier can also be used with Clampex software in such a way that the basic amplifier functions are controlled remotely through software. For traditional Axon users, the equivalent of this would be the MultiClamp commander software for controlling their automatic amplifiers. HEKA’s EPCMaster remote control software program consists of a virtual front panel of the EPC 800 Patch Clamp Amplifier. It is a free program with no requirement for a software protection dongle and is used for controlling and testing the EPC 800 Patch Clamp Amplifier. It can be thought of a “soft panel” for the EPC 800 Patch Clamp Amplifier and it provides a further level of full integration of the amplifier with pCLAMP® software. EPCMaster will enable control of the EPC 800 Patch Clamp Amplifier settings but it has no functions for data acquisition or analysis; in this case Clampex and Clampfit will be used for these purposes. The program, http://www.heka.com ® 76 Using the EPC 800 Patch Clamp Amplifier with pCLAMP however, is very useful in that it provides users the option of setting the parameters of the EPC 800 Patch Clamp Amplifier from a software panel instead of manually using the front panel controls. Another important point is that the program contains a notebook window, allowing the user to see the communication message stream being sent and received for any parameter that changes something. In this regard, the program is a useful tool for users to test both the functions of the amplifier as well as the message stream. In the example given below, the EPC 800 Patch Clamp Amplifier is being used with a Digidata® 1440A and Clampex software with the EPCMaster control window open. In this configuration, the red “REMOTE” LED on the front panel of the amplifier should be on. For the most part, the knobs, switches and potentiometers on the amplifier front panel are inactive. The exception to this is the LCD display switch and the VHOLD , IHOLD and LF V CHOLD potentiometers. The fact that these potentiometers are active means that users have to be very careful when setting holding values for their experiments. In the case of VHOLD , for example, there are now three input sources where the holding potential can be set: (i) the front panel VHOLD potentiometer, (ii) the “V-membrane” dialog of the amplifier panel in EPCMaster and (iii) the “holding” setting from within the Clampex program. It is suggested that when using EPCMaster in combination with Clampex to control the amplifier in remote mode, that the front panel VHOLD potentiometer be set to 0 mV and not touched. Note: The parameter values displayed on the front LCD panel of the amplifier will correspond to the values set from within the amplifier window of EPCMaster. Even if the VHOLD potentiometer were inadvertently turned, or a holding setting was set from within Clampex, these would not show up on the display. Users should be very cautious of this. When a voltage clamp protocol is executed, for example, it is a good idea to check the voltage trace on the oscilloscope screen to ensure that the commanded potentials match the recorded potentials. If there is a discrepancy, than in all likelihood there is a command voltage input inadvertently set. http://www.heka.com 7.3 Remote Control through Soft-Panel 77 Figure 7.16: Remote control of the EPC 800 Patch Clamp Amplifier with EPCMaster in combination with Clampex. In this example, EPCMaster was used to set the holding potential, Gain, Filter and perform Auto V POF F SET , Auto C-Fast and Auto C-Slow compensations. http://www.heka.com ® 78 Using the EPC 800 Patch Clamp Amplifier with pCLAMP http://www.heka.com 8. Using the EPC 800 USB patch clamp amplifier with PatchMaster The EPC 800 Patch Clamp Amplifier was designed primarily as a versatile stand-alone amplifier that can easily be used with any AD/DA interface and compatible acquisition software. This manual has already covered the example of using the amplifier with a Digidata® and pCLAMP® software. Another option is to use the amplifier with any of the InstruTECH / HEKA series of interfaces in conjunction with HEKA’s PatchMaster software. This chapter examines the various modes of operation and particulars of the EPC 800 Patch Clamp Amplifier when used with this hardware and software combination. For a complete description and operating instructions for PatchMaster users should consult the PatchMaster user manual directly. 8.1 Software Installation The latest version of PatchMaster for Windows and Mac operating systems can always be downloaded and installed directly from the downloads sections of our website at www.heka.com. It is suggested using this as the source for the latest software version releases rather than on any CD-Rom provided. Download and installation of the software should be very straightforward and self-explanatory. Instructions, if needed, can be found in the PatchMaster users manual and any concerns about software compatibility issues are addressed in the downloads → donelist section of the website or by contacting the HEKA support hotline. Using the EPC 800 USB patch clamp amplifier with PatchMaster 80 8.1.1 Dongle driver To be able to use PatchMaster, a software protection key or Dongle is required. HEKA provides one universal USB port dongle per PatchMaster license that can be used on either Windows or Mac. Please install either the “USB dongle” (Windows) or “HASP dongle” (Mac) drivers from the downloads → Dongles section of the HEKA website BEFORE connecting the USB dongle. After successfully installing the driver, the USB dongle can be connected. Note: Windows does not allow you to install a driver, if you do not have administrative rights. Please ensure to login as “Administrator” before performing any driver installation! 8.2 Software Startup and Configuration Upon starting PatchMaster will be prompted to set the correct default settings of amplifier type and interface used. http://www.heka.com 8.2 Software Startup and Configuration 81 Figure 8.1: Selecting the amplifier as part of the default settings. When using PatchMaster, the amplifier can be run in either local or remote modes. Note: When first starting Patchmaster, the mode switch on the front panel of the amplifier has to be set to VC mode. If an alternative mode is selected, PatchMaster will prompt the user to switch to VC mode. Once PatchMaster is started, the BNC cable connections between the front panel of the amplifier and the AD/DA interface must match the settings in the Configuration → Hardware tab of PatchMaster. http://www.heka.com 82 Using the EPC 800 USB patch clamp amplifier with PatchMaster Figure 8.2: Configuring hardware and connections. Once saved, this information will become part of the PatchMaster.set file. Based on the software configuration shown above, the following cable connections should be made between the amplifier and interface. Front Panel of EPC 800 USB HEKA Interface Voltage Monitor Current Monitor External Input VC External Input CC A/D Input 0 A/D Input 1 T-connection to D/A Output 2 Table 8.1: Front panel BNC connections between the EPC 800 Patch Clamp Amplifier and a HEKA InstruTECH interface http://www.heka.com 8.3 Software Operation 8.3 83 Software Operation 8.3.1 Local Mode When operating the EPC 800 Patch Clamp Amplifier in local mode, all of the front panel controls of the amplifier are active and PatchMaster is constantly reading and interpreting the amplifier parameters. The Gain, Mode and Filter settings, for example, are all controlled by the front panel controls and the values are displayed in the amplifier window of PatchMaster. If you try to set these values directly from the software in this mode it will not work. Important note: It is recommended that the VHOLD , IHOLD and V POF F SET potentiometers all be set to read 0. If you try to use these front panel controls you will be prompted through the software not to use them. We suggest to use PatchMaster itself to set the holding potentials and the offset potential. With this approach you will ensure that all of the correct values will be stored with the PatchMaster data. In the case of V POF F SET , it is also suggested to use the Auto Vp from within PatchMaster. Although the EPC 800 USB has its own Auto V POf f set , it is not taken into account by PatchMaster. 8.3.2 Remote Mode The difference between this mode and the local mode is that in Remote mode, PatchMaster, besides constant reading of EPC 800 parameters, additionally allows commands to set parameters at the EPC 800 Patch Clamp Amplifier. The commands that are sent have no immediate effects on PatchMaster itself until the command is acted upon and the amplifier sends back the resulting status, which is then handled the same way as commands received in Local mode. In Remote mode, the front panel controls on the amplifier are inactive and amplifier settings are controlled through the software. http://www.heka.com 84 Using the EPC 800 USB patch clamp amplifier with PatchMaster PatchMaster is configured the same way as it is for Local mode except that “EPC 800, Remote mode” is now selected when choosing the amplifier for establishing the default configuration. The external cable connections are the same. When configured properly, the red REMOTE LED on the front panel of the amplifier will be lit. 8.4 The Amplifier control window of PatchMaster This section focuses on the EPC 800 control window of PatchMaster. The various buttons and commands within this window are discussed and related to the equivalent front panel knobs, switches and potentiometers that are located on the front panel of the amplifier. The description of all of the front panel controls on the amplifier itself have already been discussed in chapter 4 - Description of the Hardware starting on page 17. The acquisition software PatchMaster provides the controls and the graphical representation of the EPC 800 Patch Clamp Amplifier by a “virtual panel” with “buttons”. In Remote mode, PatchMaster can control all amplifier functions and in Local mode the front panel knobs and switches of the EPC 800 Patch Clamp Amplifier are active and the values are displayed in the software amplifier window. In the Notebook window of PatchMaster the exchange of communication commands are listed, both being sent and received. This scrolling can be stopped to be read by pressing on the “HELP” menu heading of PatchMaster. A list of the EPC 800 patch clamp amplifier commands used to signal communication between the amplifier and PatchMaster are provided in the Appendix. Note: Alternatively to using the mouse, most of the controls in PatchMaster can also be changed directly by the keyboard. You can see the actual keyboard assignments, when you select Show Keys from the Help menu. Note: Users that may be unfamiliar with some of the controls within PatchMaster, may find the control descriptions to be helpful. The description for any given control is displayed when http://www.heka.com 8.4 The Amplifier control window of PatchMaster 85 the mouse is placed over the item and you have selected Show Tooltips from the Help menu. 8.4.1 Main Controls The EPC 800 window provides the amplifier control functions, such as gain and filter settings and it enables access to the automatic compensation routines of the EPC 800 Patch Clamp Amplifier. The virtual amplifier window is essentially the same in both Local and Remote modes of operation with one exception. In Local mode, C-Fast and C-Slow automatic compensations can NOT be performed through PatchMaster and, therefore, the yellow “Auto” buttons in the amplifier window in Local mode are grey and can’t be executed. Figure 8.3: PatchMaster amplifier window for remote mode of operation. Gain: Sets the scaling of the current monitor output. The range is 0.005 to 2000 mV/pA and can be set by dragging the mouse or by pressing the http://www.heka.com 86 Using the EPC 800 USB patch clamp amplifier with PatchMaster up- and down-keys on the keyboard. The gain setting automatically selects one of the three available current-measuring feedback resistors in the probe (5 M Ω, 500 M Ω, and 5 GΩ), corresponding to low, medium and high gain ranges. A full written description and table summarizing the main features and limitations of the gain ranges can be found in Chapter 4 - Description of the Hardware. Figure 8.4: Gain and V-membrane control Clipping Indicator: A blinking box labeled “Clip” in the Gain title indicates saturation of amplifiers in the current monitor circuitry. Like the Clipping LED on the EPC 800 main unit, this is a warning that excess artifacts or noise may occur due to the saturation of amplifiers. Note: This indicator may appear to be more sensitive than the LED on the EPC 800 Patch Clamp Amplifier. It is not; it just latches the clipping status longer than the LED light. V-membrane: The V-membrane control should be used to set a holding http://www.heka.com 8.4 The Amplifier control window of PatchMaster 87 potential in Voltage Clamp mode. The “V-membrane” label is converted to “I-hold” in Current Clamp mode and is used for setting the holding current. Although the front panel of the EPC 800 Patch Clamp Amplifier has potentiometers for VHOLD and IHOLD , when the amplifier is being used with PatchMaster, these should be manually set to read 0 and the holding potential and current should be set in the amplifier window of PatchMaster. I-mon: Displays the actual measured pipette current. V-mon: Displays the actual measured pipette voltage after correcting for liquid-junction potentials and offsets (provided the zero-current potential has been set correctly). This may differ (temporarily) from the holding voltage (e.g., during long stimulation pulses) as it indicates the average sum of V-membrane and the scaled stimulus voltage. R-memb: The Seal Resistance (R-membrane) is determined from the current sampled during the baseline and the second half of the test pulse. R-membrane can be encoded into a tone using the Sound feature (see below). Figure 8.5: I-mon, V-mon and R-membrane values within PatchMaster One of the more powerful features of PatchMaster is the ability to write and record your own protocols, previously referred to as Macros, as a sequence of commands. Virtually all of the buttons and features within the software can be used in the recording of protocols. The protocols can be saved, named and edited and called upon whenever needed; they are essential tools towards automation. The protocol file for the EPC 800 Patch Clamp Amplifier is called “Epc800.pro” and this file will be located within the PatchMaster folder when the software is loaded. This file should be properly configured in the PatchMaster file configuration window as illustrated. http://www.heka.com 88 Using the EPC 800 USB patch clamp amplifier with PatchMaster Figure 8.6: File Configuration. The EPC800.pro file contains information about the preset and user-defined protocols. Protocols themselves are created, named, saved and edited from within the protocol editor window of PatchMaster. When PatchMaster is first loaded and configured for use with the EPC 800 Patch Clamp Amplifier, there are already some predefined protocols that have been created as part of the overall Epc800.pro file. http://www.heka.com 8.4 The Amplifier control window of PatchMaster 89 Figure 8.7: The protocol editor window of PatchMaster showing predefined protocols as part of the EPC800.pro file. As shown in the top row, numbered 1 through 6, of the figure above, there are predefined protocols called “Example1”, “Example2”, “Link”, “Buffer”, “SETUP” and “SEAL”. In this picture the commands comprising the “Example2” protocol are displayed; it is a protocol that will execute an automatic C-Slow compensation prior to a series and will abort if the value of R-Series exceeds 8 MΩ. Additionally there is a protocol called “WHOLE-CELL” in position 7. These protocols can freely be edited and new protocols can be created all from within the protocol editor window. For a complete description of all of the protocol editor features within PatchMaster, users are encouraged to consult the PatchMaster users manual. A link to the predefined protocols called “SET-UP”, “SEAL” and “WHOLE-CELL” are also present from within the amplifier window of PatchMaster. Figure 8.8: “SET-UP, “SEAL” and “WHOLE-CELL” protocols. “Set-Up”: This protocol, when executed, sets the default recording mode to whole-cell, sets the gain of the amplifier to 5 mV/pA, create a rectanguhttp://www.heka.com Using the EPC 800 USB patch clamp amplifier with PatchMaster 90 lar test pulse, and then performs an automatic compensation of the voltage offsets. PROTOCOL ‘‘SET-UP" E Mode: 3 E Gain: 10 E PulseAmp: 5.0mV E PulseDur: 5.0ms E AutoZero: E PulseOn: TRUE ; ; ; ; ; ; whole cell set gain to 5.0 mV/pA (medium range) set test pulse amplitude set test pulse duration compensate voltage offsets Switch on test pulse Note: PatchMaster has a built-in protocol interpreter that executes command lines of the form “Window Control[: parameter; comment]”. E.g., the line “E Gain: 10” would instruct PatchMaster to set the gain popup in the EPC 800 window to the 10th value (5 mV/pA). The predefined protocols are stored in a text file called Epc800.pro and can be edited with any text editor. Please, refer to the PatchMaster manual for a detailed description on how to record and modify protocols. Important note: In Local mode it is advised NOT to use the “Set-Up” protocol of PatchMaster. The reason being is that in this mode the Gain of the amplifier is set through the front panel knob. After executing the protocol, the Gain displayed in the amplifier window of PatchMaster will read 5 mV/pA, regardless of what the true Gain is according to the front panel knob. In addition, an Auto V POf f set will be executed but the front panel Auto LED will not be lit. Use of the “Set-Up” protocol makes more sense when the amplifier is operated in Remote mode when the front panel knobs and switches are inactive and there wouldn’t be a mismatch between the front panel controls and the software readings. “SEAL”: This protocol will automatically set the default recording mode to whole-cell and change the gain to 20 mV/pA. PROTOCOL ‘‘SEAL" http://www.heka.com 8.4 The Amplifier control window of PatchMaster E E Mode: Gain: 3 12 91 ; whole cell ; set gain to 20.0 mV/pA “Whole-Cell”: This protocol will automatically set the default recording mode to Whole-Cell and adjust the gain to 10 mV/pA. PROTOCOL E Mode: E Gain: ‘‘WHOLE-CELL" 3 ; whole cell 11 ; set gain to 10.0 mV/pA Important note: Execution of the “SET-UP”, “SEAL” and “Whole-Cell” predefined protocols only make sense when the EPC 800 Patch Clamp Amplifier is operated with PatchMaster in Remote mode. If these protocols are called when operated in Local mode it may lead to confusion because there will likely be a mismatch between the actual gain set by the front panel knob of the amplifier (as shown in the oscilloscope window of Patchmaster) and what is actually displayed in the gain field within the amplifier window of Patchmaster. http://www.heka.com 92 Using the EPC 800 USB patch clamp amplifier with PatchMaster Figure 8.9: Setting the AD inputs and recording mode within Patchmaster Input ADC: The oscilloscope can display the following signals: AD 0..15 : Any of the AD channels. The AD channel connections have to be configured in the Configuration Hardware section of PatchMaster. In the example above, the voltage monitor is connected to AD 0 and the current monitor is connected to AD 1. These match the external connections discussed earlier in this chapter. Recording Mode: Sets the Recording Mode. In Out - Sets the Inside Out mode. On Cell - Sets the On Cell mode. Out Out - Sets the Outside Out mode. Whole Cell - Sets the Whole Cell mode. C-Clamp - Sets the Current Clamp mode. http://www.heka.com 8.4 The Amplifier control window of PatchMaster 93 Note: For cell-attached or inside-out patch configuration, positive pipette voltages correspond to a hyperpolarization of the patch membrane, and inward membrane currents appear as positive signals at the Current Monitor outputs. The Patchmaster program compensates for this by inverting digital stimulus and sampled values in these recording configurations such that the stimulation protocols, holding voltages, and displays of current records in the oscilloscope all follow the standard electrophysiological convention. In this convention, outward currents are positive and positive voltages are depolarized. However, the analog current and voltage monitor outputs are not inverted in these recording modes. Test pulse: Test pulses are added to the holding potential and applied to the pipette; the current responses are sampled and displayed. Two builtin test pulse types are available: single or double pulse. Additionally any user-defined pulse pattern can be used as a test pulse. Test pulses are applied at maximal rates depending on the duration specified. Amplitude / Length: Duration and amplitude of the built-in test pulses can be specified in the dialog. The minimum pulse duration is 1 ms with 100 points sampled per pulse, i.e., the sampling interval is 1/100 times the pulse duration. Noise: The Noise button can be used to measure the internal noise of the amplifier (with shielded probe input) or the noise of the environment (with open probe input). When the noise mode is selected, the rms noise is continuously measured and updated. For the determination of the noise level there are no pulse outputs and the current is sampled via the active AD-channel using the current filter setting. It is sampled in sections of 10 times 256 points with a sample interval of 100 µs, i.e., a total length of 256 ms. The noise level depends on the gain range and on the current filter setting. Reasonable noise values are given in chapter 11 - Low-Noise Recording. http://www.heka.com 94 Using the EPC 800 USB patch clamp amplifier with PatchMaster Figure 8.10: Setting the test pulse parameters within Patchmaster Liquid junction (LJ): LJ is a variable, to be set by the user, which allows to correct for liquid junction potentials and other offsets. It works in conjunction with the V0 operation. An online correction requires an Auto-V0 operation to be performed before seal formation and LJ to be set to an appropriate value. No correction is performed if LJ = 0. LJ can be adjusted within ±200 mV by dragging the mouse or typing after a double-click. Note: LJ is not changed by the RESET function, and cannot be set by protocols. This restriction is imposed to avoid unintentional offset corrections. LJ should be 0 mV when using identical pipette and bath solutions. It may be changed to any desired value within ±200 mV in case asymmetrical solutions are used or the bath solution is changed during an experiment. For the standard liquid junction potential correction, the polarity of the entered value should be such that it represents the potential of the bath with respect to the pipette solution. For example, if the pipette solution contains glutamate or aspartate (with chloride in the bath), then the polarity of LJ should be positive (+10 mV). After an Auto-V0 operation, V-membrane will be changed to -10 mV (in Whole Cell and Out Out Recording Modes) or +10 mV (for On Cell and In Out Recording Modes), which corresponds to the true zero-current potential. Figure 8.11: Liquid Junction and pipette offset features of PatchMaster V0 (Pipette Offset): V0 displays the offset voltage (a voltage which is added to V-membrane to obtain the pipette command voltage). It should http://www.heka.com 8.4 The Amplifier control window of PatchMaster 95 be set either by the Auto-V0 operation or by manually dragging the mouse after clicking into the item. Furthermore, V0 is changed automatically by the controlling program whenever the user changes the variable LJ. This is necessary for LJ and the Auto-V0 operation to interact properly. Note: It is not recommended that the user change V0 manually by turning the V POf f set potentiometer, because this interferes with the software features for automatic offset correction. V POf f set should be set to read 0 on the front panel display. Auto-V0 : The Auto-V0 button calls a procedure for automatic zeroing of the pipette current. Thereby, an offset voltage (V0 ) to the pipette potential is systematically varied until pipette current is zero. Range of V0 is ±200mV. Auto-V0 is typically performed before seal formation. It works properly only when a pipette is inserted into the bath. The Auto-V0 procedure interacts with the variable LJ to provide for online correction of liquid junction potentials and other offsets (see Chapter 6 - Compensation Procedures. This requires that V-Membrane is set to the value of LJ (for On Cell and In Out Recording Modes) or to the opposite polarity of LJ (for Whole Cell and Out Out Recording Modes), before the actual zeroing operation is performed. Auto-V0 does this automatically and leaves V-MEMBRANE at that value. Note: V0 is not changed by the Reset function. Figure 8.12: C-Fast compensation within Patchmaster C-Fast: This is used to cancel fast capacitive currents that charge the pipette and other stray capacitances (range: 0-15 pF). With nothing connected to the probe input, cancelation is typically obtained at a setting of 1-1.5 pF due to the residual input capacitance of the current-measuring amplifier. The compensation can be performed manually by dragging the mouse or typing. http://www.heka.com 96 Using the EPC 800 USB patch clamp amplifier with PatchMaster In the upper box, the total C-Fast value is displayed. τ -Fast determines the time constant of C-Fast (up to 8 µs). The value of τ -Fast may be adjusted by dragging the mouse, or typing, or automatically by selecting the Auto function. Auto C-Fast: Selection of this button in Remote mode performs an automatic compensation of C-Fast and τ -Fast. The procedure uses a routine that applies a number of small pulses (5 mV), averages the resulting currents and fits an exponential to deduce the capacitance compensation values required to cancel the current. Note: In Remote mode ONLY, C-Fast compensation can be performed automatically through PatchMaster by pressing the yellow “Auto” button in the amplifier window. The C-Fast and τ -Fast values will be displayed in the PatchMaster amplifier window as well as on the LCD display of the EPC 800 Patch Clamp Amplifier. The asterisk symbol in the LCD display is indicative of the results being obtained through an automatic procedure. The Auto C-Fast, in this situation, can NOT be disabled by pressing and holding the Auto C-Fast button on the EPC 800 Patch Clamp Amplifier. It has to be turned off through PatchMaster by changing either the C-Fast or τ Fast values. C-Slow: This is used to cancel slow capacitive currents that charge the cell membrane in the whole-cell configuration. The 30, 100 and 1000 pF ranges actually allow capacitance values to be compensated in the ranges of 0.12-30 pF, 0.4-100 pF and 4-1000 pF, respectively. The adjustment range is also limited by the program in order to make the time constant R-series · C-Slow greater than 5 µs to prevent oscillations. In Local mode, C-slow compensation is activated by selecting the appropriate range on the front panel knob. Compensation can be done manually by turning the C-Slow and R-Series potentiometers or by pressing the Auto button on the front panel of the amplifier. A complete description of the C-Slow ranges and gain limitations can be found in chapter 4 - Description of the Hardware. In Remote mode, compensation is activated by selecting the range from http://www.heka.com 8.4 The Amplifier control window of PatchMaster 97 the Range field. Compensation can be done by changing the “C-Slow” and the “R-Series” values by clicking and dragging the mouse, by selecting the Auto button in the C-Slow section of the amplifier control panel for an automatic compensation of C-Slow and R-Series or by executing the predefined “Whole-Cell” protocol. Figure 8.13: C-Slow compensation within Patchmaster Note: When operating the EPC 800 Patch Clamp Amplifier in Remote mode, the C-Slow range knob on the front panel does NOT have any effect on activating C-Slow. The range has to be set through PatchMaster. R-series: Adjusts the resistance in series with the slow capacitance (range: 0.1 MO - 10 GO) to determine the time constant of the C-slow transient and also for Rs -compensation. Adjustment is limited by the capacitance values and the range as described above. In Remote mode, the value can be changed manually by dragging the mouse, or typing, or automatically by clicking on Auto. In Local mode, R-series is adjusted by the front panel potentiometer or by executing an Auto C-Slow compensation from the front panel button. Auto C-Slow : Selecting this function, in Remote mode, performs an automatic compensation of C-slow and R-series. These settings are used by the Rs -compensation circuitry as the measure of series resistance. Autocompensation works best when C-Fast is canceled beforehand in the cellattached configuration. Note: In Remote mode ONLY, C-Slow compensation can be performed automatically through PatchMaster by pressing the yellow “Auto” button in the amplifier window. The C-Slow and R-Series values will be displayed in the PatchMaster http://www.heka.com Using the EPC 800 USB patch clamp amplifier with PatchMaster 98 amplifier window as well as on the LCD display of the EPC 800 Patch Clamp Amplifier. The asterisk symbol in the LCD display is indicative of the results being obtained through an automatic procedure. The Auto C-Slow, in this situation, can NOT be disabled by pressing and holding the Auto C-Slow button on the EPC 800 Patch Clamp Amplifier. It has to be turned off through PatchMaster by changing either the C-Slow value or range. Rs-Comp : The series resistance compensation corrects for membrane voltage errors under conditions of high access resistance between pipette and cell interior (see Chapter 6 - Compensation Procedures. The amount of compensation can be changed by dragging the mouse or typing (range 0-95%). The compensation is based on the value of R-series and will be effective only when Rs -comp is not Off, i.e., set to a speed value. A description of the various settings determining the feedback of compensation can be found in chapter 4 - Description of the Hardware. Figure 8.14: Setting the Rs compensation speed within Patchmaster Stimulus Filter : The stimulus can be filtered (2-pole Bessel) to reduce the amplitude of fast capacitance transients when the speed of potential changes is not critical. Two settings are available: 2 µs 20 µs Usually a setting of 20 µs is sufficient, unless very fast currents such as N a+ currents are studied. The filter range of the EPC 800 Patch Clamp Amplifier is from 100 Hz to 100 kHz. In Local mode, the filter setting should be controlled through http://www.heka.com 8.4 The Amplifier control window of PatchMaster 99 Figure 8.15: Setting the external stimulus filter within PatchMaster the front panel current filter switch. In Remote mode, this switch is not active and filter settings should be set through this button in the amplifier window. A description of the EPC 800 filters can be found in 4 - Description of the Hardware. Figure 8.16: Zap, sound and reset buttons within PatchMaster Zap : A high voltage pulse is applied to the pipette in order to rupture the patch membrane. The parameters of the ZAP pulse (duration and amplitude) can also be specified in the amplifier window. In the configuration window of PatchMaster it can be specified whether Zap is always enabled or whether it is restricted to the On Cell recording mode (see Zap On Cell only). Sound : If this control is On, a sound is played with its frequency coding for R-membrane. On Windows computers a sound board with MIDI capabilities is required to be able to use the audio monitor feature. HEKA also provides a PSA-12 sound generator. If a HEKA LIH 8+8 interface is used in conjunction with the EPC 800 Patch Clamp Amplifier, the builtin sound capabilities of this interface can be used. In all cases, the sound source has to be correctly configured within the PatchMaster “Hardhttp://www.heka.com Using the EPC 800 USB patch clamp amplifier with PatchMaster 100 ware Configuration” section. Reset: Selecting this button will reset the EPC 800 Patch Clamp Amplifier to its initial default configuration. It is only applicable for use of the amplifier in Remote mode. 8.4.2 “Show All” Controls When the “Show All” tab of the amplifier window is selected there are additional features present on the right-hand side of the panel. Figure 8.17: Low frequency voltage clamp (LFVC) settings within PatchMaster Low Frequency Voltage Clamp LOW-FREQ. VC: The low frequency voltage clamp mode is a modified current clamp mode, which allows for the measurement of potential deflections, such as action potentials or synaptic potentials, while the average potential is kept constant at a value chosen by the user (LFVC V-memb). The circuit thus works like a current clamp for fast signals and like a voltage clamp for low frequency signals. To achieve this, the measured membrane potential is low-pass filtered and compared to the LFVC V-memb potential. Then a current is injected into the cell to keep the membrane potential at the chosen LFVC potential. Since the cell does not distinguish currents entering through the pipette from currents crossing the membrane, the low frequency voltage clamp circuit can be considered an additional membrane conductance. The time constants and speeds of regulation are described in Chapter 5 - Recording modes of the EPC 800 Patch Clamp Amplifier. Note: When operating in Local mode, LFVC is turned on, and http://www.heka.com 8.4 The Amplifier control window of PatchMaster 101 the speed of regulation is selected, by the front panel “Mode” switch. Although the LF V CHOLD potentiometer controls the LFVC potential, it is suggested to set this value through the LFVC V-memb within PatchMaster. Figure 8.18: Setting sound features within PatchMaster R-memb - R-pip This feature enables the value of R-memb to be copied into the R-pip. This is used to store the pipette resistance in the data file before forming a seal. Overlay and One Pulse When the “Overlay” button is selected, the test pulse traces will be overlaid in the oscilloscope window. The “One Pulse” button exceutes one test pulse. This is useful when test pulses are off and simply one test pulse is to be outputted. Sound Figure 8.19: Setting sound features within PatchMaster SOUND Settings: Sensitivity (HzM Ω) and volume (in %) of the sound encoding of R-membrane can be specified here. To enable the sound option press the Sound button. The sound function also has to be correctly configured in the PatchMaster “Hardware Configuration” section. I-Scale and V-Scale Figure 8.20: I-Scale and V-Scale settings of the test pulse within PatchMaster http://www.heka.com 102 Using the EPC 800 USB patch clamp amplifier with PatchMaster I-Scale and V-Scale can be used to determine the display scaling for the test pulse. The value of 1 (no display gain) corresponds to full scale (±10.24V) of the built-in AD/DA converter. Thus, without display gain, one can easily see when the input signal saturates the AD converter. If, however, amplification is needed you should enable the setting Scale Test Pulse in the Misc section of the Configuration window. Range Figure 8.21: Hardware scaling of the ITC-18 interface This feature is only present if the EPC 800 Patch Clamp Amplifier is used in conjunction with the InstruTECH / HEKA ITC-18 interface. It enables the use of the hardware scaling of the ITC-18. For example, it is possible to change the measuring range of any of the AD inputs from ±10V to ±1V. 8.4.3 Current-Clamp Recording In Current Clamp mode, the cell membrane potential is recorded, which can be monitored at the Voltage Monitor output of the EPC 800 Patch Clamp Amplifier and seen on the I/VM ON display. If C-Slow has been compensated up to this point, switch from voltage clamp to current clamp recording either by choosing the CC+Bridge mode on the front panel (Local mode) or switch into the Current Clamp mode by selecting C-Clamp from the Mode popup in the amplifier window of PatchMaster (Remote mode). In Current Clamp mode, you should use I-membrane in PatchMaster http://www.heka.com 8.4 The Amplifier control window of PatchMaster 103 to set a holding current, and you can apply stimulus pulses via External Stim. INPUT CC. The scaling of the External Stim Input CC is automatically set depending on the selected current clamp OUTPUT gain. For a review of the characteristics of the two possible current clamp OUTPUT gain ranges of the EPC 800 Patch Clamp Amplifier see chapter 5 - recording Modes of the EPC 800 Patch Clamp Amplifier. It should be stressed that this automatic use of appropriate scaling is unique for use of the amplifier with PatchMaster and EPCMaster software. With other software programs, such as pCLAMP® , scaling is set manually. When you switch to the CC+Bridge mode, the following things happen inside the EPC 800 main unit: C-Slow is turned off, the maximum Gain is 20 mV/pA, the maximum Filter setting is 10 kHz and the RS-compensation will now act as a “bridge balance”. For the user, these changes may be of little consequence and are mainly designed to make current clamp recording simple and reliable. The voltage monitor Vmon should automatically be selected to become your active channel displayed in the oscilloscope. Note, that the unit of the test pulse amplitude changes from “mV” to “pA” as soon as you switch from Voltage Vlamp (VC) into Current Clamp (CC) mode. PatchMaster uses two different amplitudes for VC and CC modes, therefore the test pulse is set to “0 pA” initially. Now you need to inject current into the circuitry, 100 pA should be a reasonable value. The current injection will charge the “membrane” of the “model cell” at a time constant X τ = Rm · Cm = 500 M Ω · 22 pF = 10 ms to a final value of Vmax = Rm · X I = 500 M Ω · 100 pA = 50 mV Due to the slower time constant compared with voltage clamp conditions it takes much longer to reach Vmax, therefore you should increase the duration of the test pulse to a more appropriate value of 100 ms. Note: In contrast to voltage clamp conditions, were τ is proportional to the access- or series resistance (Rs ) of the pipette, in current clamp experiments τ depends on the membrane resistance (Rm). http://www.heka.com 104 8.4.3.1 Using the EPC 800 USB patch clamp amplifier with PatchMaster Bridge Compensation Bridge Compensation in Current Clamp mode acts similar to the Rs compensation in Voltage Clamp mode. It basically compensates the voltage drop via the series (access) resistance of the electrode (Rs ). With the standard HEKA model circuit this effect is rather difficult to see, since the voltage drop across the 5.1 MΩ is small. The voltage drop across Rs is seen as an instant step in the voltage trace when injecting a current step into the cell. With the model circuit we expect the size of this voltage step to be Rs * i-step. With Rs = 5.1 MΩ and i-step = 100 pA, this initial voltage drop is just 0.51 mV in amplitude. In order to reveal this step on the oscilloscope the length of the test pulse should be decreased to 1 ms, C-Fast set to 0 pF and the resolution of the voltage scaling increased (e.g. use V-mon * 100 and V-scale = 20). Figure 8.22: Current injection to MC-10 model circuit with Bridge Compensation OFF In order to compensate this initial voltage step, please turn the Rs -comp ON (called Bridge Compensation in current clamp) and set the %-comp knob to 100%. Now the circuitry compensates 100% of the value set with the Rs control of the C-Slow compensation. http://www.heka.com 8.4 The Amplifier control window of PatchMaster 105 Figure 8.23: Current injection to MC-10 model circuit with Bridge Compensation ON In case a little step will reappear during the current clamp experiment, you can readjust the Bridge Compensation by changing the Rs setting in the C-Slow section. This way you have a direct measure of the absolute value of the electrode resistance in Current Clamp mode. Note: The effect of Bridge Compensation becomes much more prominent when using high resistance electrodes for recording voltage changes. 8.4.3.2 Voltage Bandwidth in Current Clamp Recordings The bandwidth of the voltage signal in a current clamp recording is limited by the time constant Rs * C-Fast. With the MC-10 model circuit, this time constant calculates to about 30 µs. http://www.heka.com 106 Using the EPC 800 USB patch clamp amplifier with PatchMaster Figure 8.24: Power Spectra of voltage recordings from MC-10 in Current Clamp mode. No C-Fast compensation (lower trace), 4 pF C-Fast compensation (upper trace). When increasing the C-Fast compensation to e.g. 4 pF you can already observe in the power spectrum of the voltage trace the increase in recording bandwidth. Important note: The setting of C-Fast is very critical with respect to oscillation. Please be careful and do not overcompensate C-Fast in Current Clamp mode. C-Fast must be set correctly for proper Current Clamp mode operation. http://www.heka.com 9. General Patch-Clamp Setup Practices 9.1 Mounting the Probe For low-noise recording, the pipette holder must be attached directly to the EPC 800 USB probe. Although the probe amplifier can tolerate the additional capacitance of a short connecting cable without instability or oscillations, we find that the dielectric and electrostrictive properties of coaxial cables introduce excessive noise. In typical setups, the probe is therefore mounted directly on a 3-axis micromanipulator. The EPC 800 USB probe is supplied with a standard plastic mounting plate for mounting on a flat surface (see Fig 4.2). Holes can be drilled through the protruding surfaces for attachment to a matching plate or other surface. The headstage also comes with a dovetail plate that will fit connections supplied by most leading micromanipulator companies. Please remember, that the metal case of the probe must remain insulated from ground; this is very important. Because of the extreme sensitivity of the EPC 800 Patch Clamp Amplifier, special care must be taken in grounding all surfaces that will be near the probe input in order to minimize line-frequency interference. Even one millivolt of AC on a nearby surface, which can easily arise from a ground loop, can result in significant 50 or 60 Hz noise. A high-quality ground is available at the Gnd terminal of the probe; this is internally connected through the probe’s cable directly to the Signal Gnd in the main unit. The Gnd terminal on the probe is best used for the bath electrode, and perhaps for grounding nearby objects such as the microscope. 108 9.2 General Patch-Clamp Setup Practices Ground Wires It is a good idea to run a separate ground wire from the Signal Ground jack on the main unit to ground large objects such as the isolation table, Faraday cage, etc. It is best to have the high quality ground wire run parallel to the probe’s cable in order to avoid magnetic pickup and ground loop effects. Besides 50 or 60 Hz magnetic pickup, there may be some 35 kHz pickup from the magnetic deflection of the computer monitor. This pickup becomes visible only when the EPC 800 USB filter is set to high frequencies; it can usually be nulled by changing the orientation or spacing of the ground wire from the probe cable. 9.3 Grounding the Microscope In most cases, the patch clamp is used in conjunction with a microscope; it and its stage typically constitute the conducting surfaces nearest the pipette and holder. In a well-grounded setup, the microscope can provide most of the shielding. Make sure there is electrical continuity between the various parts of the microscope, especially between the microscope frame and the stage and condenser, which are usually the large parts nearest the pipette. Electrically floating surfaces can act as “antennas”, picking up line-frequency signals and coupling them to the pipette. Make sure the lamp housing is also grounded. It is usually not necessary to supply DC power to the lamp, provided that the cable to the lamp is shielded and that this shield is grounded at the microscope. 9.4 External Shielding Especially when an unshielded pipette holder is used, some electrostatic shielding of the experimental setup is necessary to avoid line-frequency pickup from lights and power lines in the room. Most experimenters use a table-top Faraday cage with a closable front, and lead all of the cables (e.g., from the microscope lamp, probe, cooling system, ground lines) through a hole in the cage to an equipment rack mounted outside. If the pipette http://www.heka.com 9.5 Pipette Holder and Electrode 109 holder is somewhat exposed, or if the Faraday cage has an open front, a small grounded screen placed near the pipette holder may help. 9.5 Pipette Holder and Electrode The pipette holder that was shipped with the amplifier is made of extremely low-noise polycarbonate having low dielectric loss. It is equipped with a BNC connector to fit the headstage of the EPC 800 Patch Clamp Amplifier. The design of the pipette holder is such that it virtually eliminates pipette movement and air leakage by virtue of elongation of the screw cap and the addition of a third O-ring. The choice of materials used in the design of any pipette holder are very important. The insulating parts of the holder should be of a low-loss material and should have a hydrophobic surface to prevent the formation of conducting water films. Polycarbonate fulfills these criteria better than any material we have tried. The noise level of the pipette holder can be tested by mounting it (with the electrode wire installed, but dry) on the probe input, and measuring the noise using the NOISE option on the front panel of the EPC 800 Patch Clamp Amplifier. The headstage should be in a shielded enclosure, so that no line-frequency pickup is visible on an oscilloscope connected to the current monitor output at a bandwidth of 3 kHz or less. A good holder increases the rms noise only by about 10% , e.g., from 95 to 105 fA. Noise sources are discussed further in Chapter 11 - Low-Noise Recording. The pipette electrode is simply a thin silver wire that is soldered onto the pin that plugs into the probe’s BNC connector. The chloride coating on the wire gets scratched when exchanging pipettes, but we find that this does not degrade the stability very much; the wire does need to be rechlorinated occasionally, perhaps once per month. A wire for the standard electrode holder should be about 4.5 cm long; after it is chlorinated an Oring is slipped onto it and the wire is inserted into the holder. Chlorinating can be done by passing current (e.g., 1 mA) between the wire and another silver or platinum wire in a Cl-containing solution (e.g., 100 mM KCl, or physiological saline). Current is passed in the direction which attracts Cl-ions to the electrode wire; this produces a gray coating. http://www.heka.com 110 9.6 General Patch-Clamp Setup Practices Bath Electrode The main requirements for a bath electrode are that it have a stable electrode potential and that it does not disturb the composition of the bathing solution. A bare, chlorinated silver wire makes a good bath electrode; however Ag-ions are tolerated only by some types of cells, such as muscle cells. A good alternative is an electrode incorporating an agar salt bridge, as illustrated below. Figure 9.1: Example of agar salt bridge reference electrode The body of the electrode is a 1 ml plastic syringe body that has been heated and pulled to form a small, bent tip. The electrode proper is a chlorinated Ag wire that is first inserted with the plunger into the fluidfilled body; then hot agar is sucked into the tip by withdrawing the plunger partially. The filling solution can be a typical bath solution or something similar, such as 150 mM NaCl. More concentrated salt solutions are not necessary, and they can leak out, changing the composition of the bath solution. http://www.heka.com 10. Patch-Pipettes 10.1 Glass Capillaries Procedures for fabricating pipettes are presented in detail in the paper Improved patch clamp techniques for high-resolution current recording from cells and cell-free membrane patches (O.P Hamill et al. Pflügers Arch. 391, 85-100). This chapter is a basic summary of some helpful tips. The main steps in pipette fabrication are to form a smooth tip on the pipette (to allow seals to be formed without damaging the cell membrane) and to coat the pipette with a suitable insulating coating to reduce the background noise. Pipettes can be made from many different types of glass. Our impression is that different types of glass work better on different cell types. Glass capillaries are available from soft (soda glass, flint glass) or hard glasses (borosilicate, aluminosilicate). Some sources of glass pipettes: Soft Glass (Supplier) Non-heparinized hematocrit tubing any scientific supplier Drummond Microcaps Drummond Scientific, Bloomall, PA, U.S.A. Table 10.1: Soft glass pipette sources OD 1.3 mm 1.4 mm 112 Patch-Pipettes Hard Glass (Supplier) Kimax 51 Kimble Products, Vineland, NJ, U.S.A. Boralec 100 Rochester Scientific, Rochester, NY, U.S.A. Corning Sealing Glass (# 7052, # 7040) Dow Corning, Midland, MI, U.S.A. GCASS 150-4 (aluminum glass) A-M Systems, Everett, WA, U.S.A. OD 1.7 mm 1.7 mm 1.6 mm 1.5 mm Table 10.2: Hard glass pipette sources Soft-glass pipettes have a lower melting point (800°C vs. 1200°C), are easily polished, and can be pulled to have a resistance of 1-2 MΩ. They are often used for whole-cell recording, where series resistance rather than noise is the limiting criterion. The large dielectric relaxation in soft glass sometimes results in additional capacitive-transient components that interfere with good capacitance compensation. Hard-glass pipettes often have a narrow shank after pulling and consequently a higher resistance. Hard glasses tend to have better noise and relaxation properties, however: the important parameter here is the dielectric loss parameter, which describes the AC conductivity of the glass. Although the DC conductivity of most glasses is very low, soft glasses in particular have a conductivity around 1 kHz; that is sufficiently high to become the major source of thermal noise in a patch clamp recording. We find that Kimax glass is a good compromise for whole-cell recording. Borosilicate and, especially, aluminosilicate glasses (Rae and Levis, 1984) have low dielectric loss and are desirable for the lowest-noise recordings. They do not necessarily form the best seals, however; this might be due to evaporation of metal onto the glass surface during the high-temperature pulling and polishing steps. 10.2 Pulling Pipettes are pulled in two stages: the first to thin the glass to 200-400 µm at the narrowest point over a 7-10 mm region, and the second to pull the two halves apart, leaving clean, symmetrical breaks. Both halves can be http://www.heka.com 10.3 Coating 113 used. The length of the first pull and the heat of the second pull are the main determinants of the tip diameter of the final pipette. A number of commercial pullers can be used to make pipettes. For reproducibility, however, a regulated current supply to the heater coil is best. A mechanical stop to set the length of the first pull is also important for reproducibility. 10.3 Coating The capacitance between the pipette interior and the bath, and also the noise from dielectric loss in the glass, can be reduced by coating the pipette with an insulating agent such as Sylgard (Dow Corning Corp., Midland, MI, U.S.A.). Sylgard is pre-cured by mixing the resin and catalyst oil and allowing it to sit at room temperature for several hours (or in an oven at 50 °C for 20 min) until it begins to thicken. It can then be stored at -18 °C for many weeks until use. The Sylgard is applied around the lower few mm of the electrode to within 10-20 µm of the tip and then rapidly cured by a hot-air jet or coil. Coating should be done before the final heat-polishing of the pipette, so that the heat can evaporate or burn off any residue left from the coating process. 10.4 Heat Polishing Heat polishing is used to smooth the edges of the pipette tip and remove any contaminants left on the tip from coating. It is done in a microforge or similar setup in which the pipette tip can be observed at a magnification of 400-800x. The heat source is typically a platinum or platinum-iridium wire; to avoid metal evaporation onto the pipette, the filament is coated with glass at the point where the pipette will approach it. To produce a steep temperature gradient near the filament (which helps make the pipette tip sharply convergent), an air stream can be directed at the filament. The amount of current to pass through the filament must be determined empirically for each type of glass, but a good place to start is with sufficient current to get the filament barely glowing. The typical practice is to turn http://www.heka.com 114 Patch-Pipettes on the filament current and move the filament toward the pipette (which, being stationary, should remain in focus). Since the opening in the pipette tip is usually at the limit of resolution of viewing, you might not see the change in shape at the tip, but instead only a darkening of the tip. You can tell whether you have melted the tip closed, and also get an idea of the tip diameter, by blowing air bubbles in methanol with air pressure supplied by a small syringe. 10.5 Use of Pipettes Pipettes should be used within 2-3 hours after fabrication, even if stored in a covered container; small dust particles from the air stick readily to the glass and can prevent sealing. However, with some easy-sealing cells we have made the experience that pipettes may even be used the next day. It is very important to filter the filling solutions (e.g., using a 0.2 µm syringe filter). Pipettes can be filled by sucking up a small amount of solution through the tip. This can be done by capillary force (simply dipping the tip for a few seconds in a beaker containing the pipette solution), or by applying negative pressure at the back of the pipette (e.g., using a 5 ml syringe). Thereafter, the pipette is back-filled; the pipette should only be partially filled, just far enough to make reasonable contact with the electrode wire (the pipette holder is not filled with solution, but is left dry). Overfilling the pipette has disastrous consequences for background noise because the solution can spill into the holder, wetting its internal surfaces with films that introduce thermal noise. Bubbles left in the pipette from filling can be removed by tapping the side of the pipette. For low-noise recording, the electrode holder should be cleaned before each experiment with a methanol flush, followed by drying with a nitrogen jet. Before you insert a pipette into the holder, it is a good idea to touch a hand to a metal surface of the setup to discharge any static electricity that you may have picked up. Be sure to tighten the holder firmly enough that the pipette does not move (on a scale of 1 µm) when you give suction. Then, when you change pipettes during an experiment, check the noise level of the empty holder using the Noise Test function; if it increases, solution has probably spilled inside the holder; in this case the holder should be cleaned again and dried thoroughly. http://www.heka.com 11. Low-Noise Recording 11.1 Measuring the Noise of the Amplifier The EPC 800 Patch Clamp Amplifier has a particularly low background noise level. The noise level is in fact low enough that in most experimental situations it can be neglected in view of other background noise sources that make larger contributions to the total. The intrinsic noise of the amplifier can easily be checked. First, remove anything from the probe and shield its input with the metallic cap. Second, the display knob on the front panel of the amplifier should be in the “NOISE” position. The LCD display will show the rms noise current present in the current monitor signal. Select the highest feedback resistor of the preamplifier, which has the lowest intrinsic noise, by switching into a gain of 50 mV/pA or greater. The action of the internal filters on the background noise level and the temporal response can be observed by changing the filter setting; a filter setting of 3 kHz is suggested. In this configuration, with a gain of 100 mV/pA, you should read a noise value below 100 fA. Note: Because of poor dielectric properties in the internal switch, the model circuit introduces excess random noise above the level that can be obtained with a gigaseal. There shouldn’t be anything attached to the probe other than the shielding cap 11.2 Noise of the Recording Set-Up As we consider sources of noise other than the amplifier itself, it should be made clear that in this section we are concerned with random noise, which is fundamentally due to the thermal motion of electrons and ions; we assume that any user who is interested in low-noise recording has shielded 116 Low-Noise Recording and grounded his setup sufficiently well to take care of any synchronous noise due to line-frequency pickup, computer power supplies, TV cameras, etc. Synchronous noise can be readily identified as stationary features on an oscilloscope trace when the oscilloscope is triggered by the appropriate signal source, for example, line-frequency triggering. Grounding and shielding is discussed in chapter 9 - General Patch-Clamp Setup Practices. Tip: If you wish to ground your setup you should now attach the pipette holder to the probe, insert a glass pipette, bring the pipette tip into the recording position near the recording chamber and power on every piece of equipment that introduces noise (lamps, oscilloscope, camera, ...). In a well grounded setup all these components should introduce no more than about 100 fA of additional noise. Starting from an intrinsic noise reading of 80-100 fA, one observes increments in the noise level when the holder and pipette are installed and when an actual recording is made. By analyzing these increments, you can see where there is the most room for improvement in your technique. Under the best conditions (i.e., with a clean holder, an aluminosilicate pipette, etc.), we have observed the noise reading increase to about 130 fA when the holder and pipette are present, and 160 fA when the pipette tip is in the bath, sealed on a cell. These are rms current values, which means that they are equal to the standard deviation of the fluctuating current. Since the noise sources in the patch clamp amplifier, pipette holder, pipette and patch membrane are statistically independent, their contributions to the total noise do not add linearly; instead, their variances (the squares of the standard deviations) add. This means that the rms reading on the EPC 800 display represents the square root of the sum of the squares of the rms currents from each source. Taking this into account, one can calculate the relative contributions from the amplifier, pipette holder, and the combination of pipette immersion and patch noise. The table below shows the relative contributions calculated in this way for the “optimum” situation just described. http://www.heka.com 11.2 Noise of the Recording Set-Up Noise Source Amplifier Holder Pipette + Patch Contribution 35 % 21 % 44 % 117 rms Current 95 fA 73 fA 105 fA Table 11.1: Noise contributions of the EPC 800 USB Patch Clamp Amplifier, holder and pipette in an experimental set-up. The contributions to the variance from the three sources are seen to be comparable in size, and improvements in the amplifier noise level will not help very much, unless corresponding improvements are made in the other noise sources. As it is, rms noise values as low as those quoted here are obtained only with considerable care. Some of the important considerations are outlined below. As we mentioned in chapter 9 - General Patch-Clamp Setup Practices, for low noise, the pipette holder must be made from a low-loss, hydrophobic plastic; polycarbonate is one of the best, and plexiglas one of the worst materials. (For our purposes, low-loss materials are those that show little dielectric relaxation in the frequency range of a few kHz. Dielectric relaxation involves the reorientation of dipoles within the material; since any dipoles will be in thermal motion, thermal reorientation in this frequency range will result in current fluctuations coupled capacitively into the pipette.) It is very important that the pipette holder be kept clean and dry. Noise can be coupled into the pipette from the thermal motion of ions in films of aqueous solution, especially on the inside of the pipette. A good practice for low-noise work, is to connect a valve to the pipette-suction line, and arrange for dry air or nitrogen to flow into the suction line during the time while you change pipettes. This will dry out any such aqueous films and keep the noise level low. Films of aqueous solutions and dielectric relaxation are also serious problems with pipette glass. Coating with Sylgard helps because it is hydrophobic and because it has good dielectric properties. Also, its thickness helps to reduce the capacitance between the pipette interior and the bath. This is mainly important because it reduces the coupling of the glass’s dielectric noise into the pipette interior. Clearly, making thicker coatings (especially in the tip region) and coating closer to the tip will reduce the pipette http://www.heka.com 118 Low-Noise Recording noise. The best glass type we know of is aluminosilicate; this glass requires fairly high temperatures in pulling, and does not necessarily give the best gigaseals; but its dielectric relaxation appears to be about a order of magnitude smaller than soft glass. Some improvement is probably to be gained by taking steps to prevent formation of aqueous films on the back end of the pipette. It is a good idea to wipe the outside of the pipette to remove any spilled solution, fingerprints, etc. before inserting it into the holder. It might also help to treat the inside of the pipette to prevent the formation of a film, for example, by shooting some dimethyl-dichlorosilane vapor (caution: nasty stuff!) into the back of the pipette before or after filling it. Lower noise is obtained by immersing the pipette a shorter distance into the bath: this reduces the coupling of noise currents arising in the pipette glass. A significant amount of noise seems to arise in the sealed membrane itself and is probably lower in higher-resistance seals. This noise is generally more than one would calculate from the resistance of the gigaseal. The usual goal of low-noise recording is better time resolution: if the noise level is lower, you can use a wider filter bandwidth to observe singlechannel events of a given amplitude. Judicious use of filtering can improve the time resolution of your analysis. For example, if you are using the 50% -threshold-crossing analysis technique to analyze channel open and closed times, the best filter bandwidth is the one that makes the rms background noise about 1/10 of the channel amplitude. Since one rarely wants to go through the process of choosing the optimum bandwidth during an experiment, the best procedure is to record the data at a wide bandwidth and perform any necessary filtering (analog or digital) later, during analysis of the data. In typical voltage clamp, whole-cell recordings the predominant noise source arises from the combination of the access resistance Rs and the cell membrane capacitance Cm Above 1 kHz or so, the current variance from this source increases with this resistance and capacitance as σ 2 = αRs Cm so that it is clearly desirable to keep Rs as small as possible, and, even more important, to select small cells, if one is interested in low noise. See http://www.heka.com 11.2 Noise of the Recording Set-Up 119 the chapter by Marty and Neher (1983) for a more complete description of this and other fine points of whole-cell recording. http://www.heka.com 120 http://www.heka.com Low-Noise Recording 12. Appendix 12.1 Supported States Figure 12.1 shows the states that the device supports. 12.2 USB Descriptor The following is the USB descriptor information enabling communication with the EPC 800 USB amplifier via USB. HEKA’s officially registered USB device constants HEKA VID = 0x16B2; (*vendor ID*) EPC800 PID = 0x1003; (*product ID*) EPC800 VER = 0x0000; (*version number*) 12.3 List of EPC 800 USB Commands The following table shows the complete lines of USB commands to control and set the EPC 800 USB functions. Command set remote set mode set filter Mode both remote remote set gain set rsrange remote remote Arguments or Return Value on, off vc, cc, lfvc1, lfvc3, lfvc10, lfvc30, lfvc100 100, 300, 500, 700, 1000, 3000, 5000, 7000, 10000, 30000, 100000 in hertz 0.005 to 2000 in mV/pA 0, 2e-6, 10e-6, 100e-6 in seconds 122 set rscomp set cslowrange set cslowvalue set cfast set rseries set tfast set ihold set vp set vhold set lfvc set exstim auto offset auto cslow auto cfast Appendix remote remote remote remote remote remote remote remote remote remote remote remote remote remote http://www.heka.com 0 to 120% of selected rseries value 0, 30e-12, 100e-12, 1000e-12 in farads 1 to 1000e-12 in farads 0 to 10e-12 in farads 1e5 to 999e6 in ohms 0 to 8e-6 in seconds -1e-9 to +1e-9 in amperes -2.0e-1 to +2.0e-1 in volts -5.0e-1 to +5.0e-1 in volts -2.0e-1 to +2.0e-1 in volts off, 2e-6, 20e-6 in seconds on, off (on = start, off = deactivate function) on, off (on = start, off = deactivate function) on, off (on = start, off = deactivate function) 12.3 List of EPC 800 USB Commands soft reset remote 123 any auto functions are aborted and the amplifier is re-initialized. The status of the EPC800 after the soft reset is: Gain = 1mV/pA Mode = VC RS Comp = off Current filter = 3 KHz EXT. STIM =20 µs %-Comp = 0 Cslow = 1 pF Cf ast = 0 R-Series = 5 M Ω C-Slow Range = off tau-fast = 0 VHold = 0 IHold = 0 VPoffset = 0 LFVChold = 0 Auto Cslow LED = off Auto Cf ast LED = off Auto V Pof f set LED = off http://www.heka.com 124 Appendix hard reset remote get remote get mode get filter get gain get rsrange get rscomp get cslowrange get cfastvalue get cfast get rseries get tfast get ihold get vp get vhold get lfvc get extstim get noise get imon get vmon get clipping get serialno get revision both both both both both both both both both both both both both both both both both both both both both remote get change both equivalent to powering the EPC800 off and on. Remote is off and all parameters are set based on the current front panel settings. string vc, cc lfvc1, lfvc3, lfvc10, lfvc30, lfvc100 number in Hz number in mV/pA number in s number in percentage number in F number in F number in F number in Ω number in s number in A number in V number in V string string A A V string string string, Firmware revision is returned in the following format: X.Y.Z no argument. reports the value of the last parameter changed as it applies to: cfast, cslowrange, cslowvalue, extstim, filter, gain, lfvc, mode, rscomp, rseries, rsrange, tfast, ihold, vhold, vp. clipping is reported if none of these parameters have changed since the last inquiry. The USB string “unit busy” is returned when a command is received while and auto function is performing. http://www.heka.com 12.3 List of EPC 800 USB Commands 125 Figure 12.1: States http://www.heka.com 126 Appendix If a command is send but the argument is illegal the FW will return the command name and the current state. If a command is send but the argument is out of range the FW will choose the closest value of the parameter that is possible. If the differences of the value specified by the user and the two valid values are identical the smaller valid value will be used. A getcommand will always be answered by the command and the value. Table 12.2 illustrate some examples. Command hello world ! FW response Remarks unknown command command is unknown hello world set mode cv set mode vc command is known, argument not valid, return current value set cslowvalue -10 set cslowvalue 0 command is known, argument out of range, return closest value get mode get mode VC command is known, current value returned Table 12.2: USB Command handling http://www.heka.com 12.4 Telegraphing Translation 12.4 127 Telegraphing Translation Gain in mV/pA 0.005 0.01 0.02 0.05 0.1 0.2 0.5 1 2 5 10 20 50 100 200 500 1000 2000 Telegraphing Output in V 0 0.5 1.0 1.5 2.0 2.5 3.0 3.5 4.0 4.5 5.0 5.5 6.0 6.5 7.0 7.5 8.0 8.5 Table 12.3: Gain telegraphing values, deviation ±0.1V Cslow in pF Telegraphing Output in V Dial off 30 100 1000 0 0..3 0..10 0..-10 0..10 0..10 0..10 Range for Cslow in pF 0 0..30 0..100 0..1000 Table 12.4: Cslow telegraphing values, deviation ±0.3V http://www.heka.com 128 Appendix Filter in Hz 100 300 500 700 1K 3K 5K 7K 10K 30K 100K Telegraphing Output in V 0 1 2 3 4 5 6 7 8 9 10 Table 12.5: Filter1 telegraphing values, deviation ±0.3V Mode VClamp CClamp LFVC 100 LFVC 30 LFVC 10 LFVC 3 LFVC 1 Telegraphing Output in V 1 2 3 4 5 6 7 Table 12.6: Mode telegraphing values, deviation ±0.3V http://www.heka.com 12.5 Technical Data 12.5 129 Technical Data Head Stage High range: 50 GΩ Medium range: 500 MΩ Low range: 5 MΩ Largest measurable currents +/- 200 pA (50 GΩ range) +/- 20 nA (500 MΩ range) +/- 2 µA (5 MΩ range) Input connector Standard BNC Other connections Ground sense input Noise measured with open input, 8-pole DC to 1 kHz: < 0.03 pA RMS Bessel filter, high gain range DC to 3 kHz: < 0.08 pA RMS DC to 10 kHz: < 0.225 pA RMS Current measuring resistors Gain Bandwidth Filters C-Fast C-Slow Injection tors R-Series Capaci- Current Monitor Signal 0.005 ↔ 2000mV/pA 100 kHz (med. and low range) 60 kHz (high range) Filter 1 is a 5-pole, 10 to 100 kHz Bessel pre-filter. Filter 2 is a 4-pole, tunable 20 kHz Bessel filter. Filter range is controlled by software or from the front panel switch. Current Monitor signals are the sum of Filter 1 and 2. Filter 2 is bypassed when the filter knob is set to either 30 or 100 kHz. Capacitance Compensation 0 ↔ 15 pF, 0 to 8µs time constant 30 pF range (1.0 ↔ 30 pF) 100 pF range (1.0 ↔ 100 pF) 1000 pF range (1.0 ↔ 1000 pF) C-Fast compensation signal is injected via 1 pF capacitor. C-Slow compensation signals are injected via a 10 pF capacitor in medium and low gain and via a 1 pF capacitor in high gain range 0.1 MΩ ↔ 200 MΩ (1000 pF range) 1.1 MΩ ↔ 200 MΩ (100 pF range) 3.5 MΩ ↔ 200 MΩ (30 pF range) http://www.heka.com 130 Adjustment Equivalent Time Constants Range In CC Mode Holding potential Pipette offset Potential monitor output Appendix RS Comp Manual, range is dependent on cell capacitance off/ 2 µs / 10 µs / 100 µs 0 ↔ 95% RS Comp serves as Bridge Compensation with a range of 0 ↔ 120% Pipette Potential Control +/- 500 mV +/- 200 mV 10x Input and Output Specification Minimum Load at Telegraphing 500 M Ω Output Impedance at Telegraphing 50 Ω Output Range at Telegraphing ±10.24 V Minimum Load at Vmon 500 M Ω Minimum Load at Imon 500 M Ω Input Impedance at VC input 1 MΩ Input Impedance at CC input 1 MΩ Output Impedance at Vmon input 20 KΩ Output Impedance at Imon input 20 KΩ Output Range at VC ±10.24 V Output Range at CC ±10.24 V http://www.heka.com 12.5 Technical Data Holding current Low Gain Range Medium Range Gain Low Frequency Voltage Clamp (LFVC) 131 CC + Bridge Mode +/- 1000 pA Available when switching from VC mode in low gain range (0.005 mV/pA - 0.2 mV/pA). IM AX = +/- 100nA CC Stim Scaling = 10 pA/mV IHOLD +/- 50 nA in Local Mode IHOLD +/- 100 nA in Remote Mode Available when switching from VC mode in medium gain range (0.5 mV/pA - 20 mV/pA). IM AX = +/- 1nA CC Stim Scaling = 0.1 pA/mV IHOLD +/- 500 pA in Local Mode IHOLD +/- 1 nA in Remote Mode Automatic current tracking readjusts the membrane potential to compensate for any slow voltage drift while in CC mode. Range: +/- 200 mV (τ of 1, 3, 10, 30 or 100 µs) Ground Lines Power Requirements Power requirements are 125 Watts. Power supply automatically switches the voltage range. Operational range is from 90-130 V or 210-250 V at line frequencies of 50 or 60 Hz Signal ground (GND) is isolated from the chassis by a 10 Ω resistor to avoid ground loops. It is accessible via a Banana plug on the front panel and also via a connector on the headstage. A chassis ground (CHAS) is accessible via a Banana plug on the front panel and is connected to the ground line of the power cord. Head Stage Controller Dimensions DxWxH 90x17x14.5 mm (3.54x0.67x0.57 in.) DxWxH 31.1x48.3x14.5 cm (12.3x19x5.7 in.) mountable, 11.4 kg (24.8 lbs) Power Supply rack http://www.heka.com Index Appendix, 121–131 EPC 800 USB Commands, 121 Supported States, 121 Technical Specifications, 129–131 USB Descriptor, 121 Auto C-Fast, 27, 59, 96 Auto C-Slow, 28, 62, 97 Bath Electrode, 110 Bridge Compensation, 49, 104 Capacitance Compensation Controls, 26–29 τ -Fast, 28 C-Fast, 27 C-Slow, 28 C-Slow Range, 28 R-Series, 29 Chassis GND, 32 Clipping Indicator, 21, 86 Command Signals, 24 Command signals, 26 IHOLD , 24 LFVCHOLD , 26 VHOLD , 24 VPOF F SET , 25 Compensation Theory, 41–49 Bridge Compensation, 49 Capacitance Compensation, 44 Offset Compensation, 41–44 Series Resistance Compensation, 45–49 Current Monitor, 21 Description of the Hardware, 17– 33 Display Selector, 30 Dongle Driver, 80 EPC DLL, 5 EPCMaster, 6, 75 External Input CC, 20 External Input VC, 20 External Shielding, 108 Filter, 24 Firmware Version, 6 Front Panel, 52 Gain, 21, 85 Grounding, 108 I-mon, 87 I-Scale and V-Scale, 101 Input ADC, 92 Introduction, 3–11 Knob-Sensitivity, 31 Liquid Junction Potential, 42, 94 Local + Telegraphing Mode, 4, 71 Local Mode, 4, 51, 83 Low Frequency Voltage Clamp LFVC, 39, 100 Low-Noise Recording, 115–119 Amplifier, 115 Set-Up, 115 INDEX Main Controls, 85 MODE switch, 23 Model Circuit, 55 Naming Conventions, 9 Noise, 30, 93, 115 Overlay, 101 Patch-Clamp Setup, 107–110 Patch-Pipettes, 111–114 Coating, 113 Glass Capillaries, 111 Polishing, 113 Pulling, 112 Usage, 114 Pipette Holder, 109 Pipette Offset, 94 Power Switch, 31 Practical Tips, 58–61, 63–65 Probe, 17–18, 20, 107 Adapter Plates, 18 Gnd Connector, 18 Input Connector, 17 R-memb, 87 R-memb - R-pip, 101 Recording Modes, 35–39 Current Clamp, 36 Low Frequency Voltage Clamp, 39 Voltage Clamp, 35 References, 7–8 Book Chapters, 8 Further Reading, 7 Original Articles, 7 Remote LED, 31 Remote Mode, 5, 83 133 Safety Guidelines, 1–2 Seal Mode, 30 Series Resistance Compensation, 29, 64, 98 Show All Controls, 100 SIGNAL GND, 20 Sound, 33, 99, 101 Static Electricity, 15 Stimulus Filter, 98 Support Hotline, 9 Telegraphing Outputs, 32, 71 Test pulse, 93 Unpacking and Installation, 13– 15 USB connector, 32 Using the EPC 800 Patch Clamp Amplifier with PatchMaster, 106 Amplifier Window, 84–102 Current-Clamp Recording, 102 Bridge Compensation, 104 Voltage Bandwidth, 105 Local Mode, 83 PatchMaster Protocols, 89 Recording Modes, 92 Remote Mode, 83 Software Configuration, 80 Software Installation, 79 Using the EPC 800 Patch Clamp Amplifier with pCLAMP® , 51, 77 Configuring Lab Bench, 53 Inputs, 53 Outputs, 53 http://www.heka.com 134 Hardware Connections, 52 Front Panel, 52 Local Mode, 51 Remote Control, 77 Software Installation, 52 Telegraphing Configuration, 72 Telegraphing Connections, 71 Tutorial, 55–71 V POF F SET , 57 Gigaseal Formation, 59 Whole-Cell Configuration, 61–65 Whole-Cell Current Clamp, 68–71 Whole-Cell Voltage Clamp, 66–68 Using the EPC 800 Patch Clamp Amplifier with pCLAMP® Remote Control, 75 Using the EPC 800 USB patch clamp amplifier with PatchMaster, 79 V-membrane, 86 V-mon, 87 Voltage Monitor, 21 Zap, 99 http://www.heka.com INDEX List of Figures 2.1 EPC 800 USB Patch Clamp Amplifier . . . . . . . . . . . . 3 4.1 EPC 800 patch clamp amplifier probe . . . . . . . . . . . . 17 4.2 Headstage standard plate . . . . . . . . . . . . . . . . . . . 19 4.3 Headstage dovetail plate . . . . . . . . . . . . . . . . . . . . 19 4.4 EPC 800 patch clamp amplifier main unit . . . . . . . . . . 19 4.5 Bottom Row of Amplifier . . . . . . . . . . . . . . . . . . . 20 4.6 Gain knob . . . . . . . . . . . . . . . . . . . . . . . . . . . . 22 4.7 Mode knob . . . . . . . . . . . . . . . . . . . . . . . . . . . 23 4.8 Filter knob . . . . . . . . . . . . . . . . . . . . . . . . . . . 24 4.9 Command potentiometers . . . . . . . . . . . . . . . . . . . 25 4.10 Compensation potentiometers . . . . . . . . . . . . . . . . . 27 4.11 Multi-parameter display . . . . . . . . . . . . . . . . . . . . 31 4.12 Telegraphing outputs . . . . . . . . . . . . . . . . . . . . . . 32 5.1 Voltage clamp mode schematic . . . . . . . . . . . . . . . . 36 5.2 Current clamp mode schematic . . . . . . . . . . . . . . . . 37 6.1 Series resistance compensation schematic . . . . . . . . . . 46 7.1 Configuring “Lab Bench” inputs . . . . . . . . . . . . . . . 53 7.2 Configuring “Lab Bench” outputs for voltage clamp . . . . 54 7.3 Configuring Lab Bench outputs for current clamp . . . . . . 55 136 LIST OF FIGURES 7.4 Model circuit schematic . . . . . . . . . . . . . . . . . . . . 56 7.5 Before and after V POF F SET in Clampex . . . . . . . . . . . 58 7.6 Before and after C-Fast compensation in Clampex . . . . . 59 7.7 Before and after C-Slow compensation in Clampex . . . . . 63 7.8 Example voltage clamp protocol in Clampex . . . . . . . . . 66 7.9 Waveform preview of voltage clamp protocol in Clampex . . 67 7.10 Acquired voltage and current traces of voltage clamp protocol in Clampex . . . . . . . . . . . . . . . . . . . . . . . . 68 7.11 Example current clamp protocol in Clampex . . . . . . . . 69 7.12 Waveform preview of current clamp protocol in Clampex . . 70 7.13 Acquired voltage and current traces of current clamp protocol in Clampex . . . . . . . . . . . . . . . . . . . . . . . . 71 7.14 Configuring telegraph signals in Clampex . . . . . . . . . . 73 7.15 Display of telegraph values in Clampex . . . . . . . . . . . . 75 7.16 EPCMaster soft panel in combination with Clampex . . . . 77 8.1 Hardware default settings within PatchMaster . . . . . . . . 81 8.2 Hardware configuration settings within PatchMaster . . . . 82 8.3 PatchMaster amplifier window for remote mode of operation. 85 8.4 Amplifier gain settings within PatchMaster . . . . . . . . . 86 8.5 I-mon, V-mon and R-membrane values within PatchMaster 87 8.6 Loading the EPC800.pro file within PatchMaster . . . . . . 88 8.7 The protocol editor window of PatchMaster showing predefined protocols as part of the EPC800.pro file. . . . . . . . . 89 8.8 “SET-UP, “SEAL” and “WHOLE-CELL” protocols. . . . . 89 8.9 Setting the AD inputs and recording mode within Patchmaster 92 8.10 Setting the test pulse parameters within Patchmaster http://www.heka.com . . . 94 LIST OF FIGURES 137 8.11 Liquid Junction and pipette offset features of PatchMaster . 94 8.12 C-Fast compensation within Patchmaster . . . . . . . . . . 95 8.13 C-Slow compensation within Patchmaster . . . . . . . . . . 97 8.14 Setting the Rs compensation speed within Patchmaster . . 98 8.15 Setting the external stimulus filter within PatchMaster . . . 99 8.16 Zap, sound and reset buttons within PatchMaster . . . . . . 99 8.17 Low frequency voltage clamp (LFVC) settings within PatchMaster . . . . . . . . . . . . . . . . . . . . . . . . . . . . . . 100 8.18 Setting sound features within PatchMaster . . . . . . . . . 101 8.19 Setting sound features within PatchMaster . . . . . . . . . 101 8.20 I-Scale and V-Scale settings of the test pulse within PatchMaster . . . . . . . . . . . . . . . . . . . . . . . . . . . . . . 101 8.21 Hardware scaling of the ITC-18 interface . . . . . . . . . . . 102 8.22 Current injection to MC-10 model circuit with Bridge Compensation OFF . . . . . . . . . . . . . . . . . . . . . . . . . 104 8.23 Current injection to MC-10 model circuit with Bridge Compensation ON . . . . . . . . . . . . . . . . . . . . . . . . . . 105 8.24 Power spectra of voltage recordings in Current Clamp mode 106 9.1 Example of agar salt bridge reference electrode . . . . . . . 110 12.1 States . . . . . . . . . . . . . . . . . . . . . . . . . . . . . . 125 http://www.heka.com 138 http://www.heka.com LIST OF FIGURES List of Tables 4.1 Gain ranges of the EPC 800 Patch Clamp Amplifier . . . . 22 4.2 Filter settings of the current monitor . . . . . . . . . . . . . 25 5.1 Features of current clamp gain ranges of the EPC 800 Patch Clamp Amplifier . . . . . . . . . . . . . . . . . . . . . . . . 39 6.1 Typical LJ values for different solutions . . . . . . . . . . . 42 6.2 Relationship between Rs %-comp settings and membrane time constants . . . . . . . . . . . . . . . . . . . . . . . . . 49 Front panel BNC connections between the EPC 800 Patch Clamp Amplifier and a Digidata® interface . . . . . . . . . 52 Telegraphing BNC connections between the EPC 800 Patch Clamp Amplifier and a Digidata® 1440A . . . . . . . . . . 72 Conversion chart for EPC 800 Patch Clamp Amplifier gain, frequency and telegraphed Cm values . . . . . . . . . . . . . 74 Front panel BNC connections between the EPC 800 Patch Clamp Amplifier and a HEKA InstruTECH interface . . . 82 7.1 7.2 7.4 8.1 10.1 Soft glass pipette sources . . . . . . . . . . . . . . . . . . . 111 10.2 Hard glass pipette sources . . . . . . . . . . . . . . . . . . . 112 11.1 Noise sources and relative contributions . . . . . . . . . . . 117 12.2 USB Command handling . . . . . . . . . . . . . . . . . . . . 126 12.3 Gain telegraphing values, deviation ±0.1V . . . . . . . . . . 127 140 LIST OF TABLES 12.4 Cslow telegraphing values, deviation ±0.3V . . . . . . . . . 127 12.5 Filter1 telegraphing values, deviation ±0.3V . . . . . . . . . 128 12.6 Mode telegraphing values, deviation ±0.3V http://www.heka.com . . . . . . . . . 128