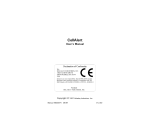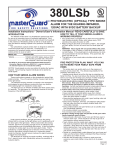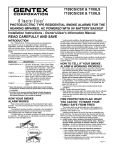
1
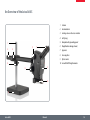
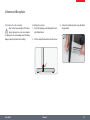
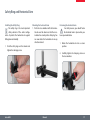
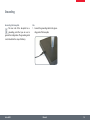
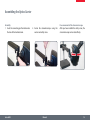
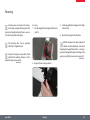
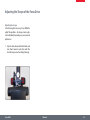
Leica A60 S
Manual
Table of Contents
The Leica A60 S
Congratulations!
An Overview of the Leica A60 S
13
14
Assembling the Leica A60 S
Column and Baseplate
Safety Ring and Horizontal Arm
Grounding
Assembling the Optics Carrier
Fastening the Leica A60
Assembling the Illuminator
16
17
18
19
20
21
Leica A60 S
Using the Leica A60 S
Adjusting the Working Height
The Correct Interpupillary Distance
Focusing
Magnification Display
Dioptric Correction and Parfocality
Adjusting the Resistance of the Focus Drive
Leica A60 LED Ring Illuminator
Replacing the Protective Glass
23
25
26
27
28
29
30
31
Dimensions
Dimensions
33
Optical Data
Optical Data
36
Manual
2
Safety Instructions
Leica A60 S
Manual
3
Symbols used in this operating manual
Warning! Safety hazard!
This symbol indicates especially important information that is mandatory to
read and observe.
Failure to comply can cause the following:
ϘϘ Hazards to personnel
ϘϘ
Instrument malfunctions and damage
Danger due to hot surface
This symbol warns against touching
accessible hot surfaces, e.g. those of
light bulbs.
Important information
This symbol indicates additional information or explanations that are intended
to provide clarity.
Warning of hazardous electrical voltage
This symbol indicates especially important information that is mandatory to
read and observe.
Failure to comply can cause the following:
ϘϘ Hazards to personnel
ϘϘ
Instrument malfunctions and
damage
Leica A60 S
Manual
4
Important Notes
Description
The Leica A60 S stereomicroscope meets
today's state of the art of technology. Nevertheless, hazards may still arise during operation.
The potential risks are described below.
Before installing, operating or using the
instrument, it is mandatory to read this
user manual. In particular, please observe all
safety instructions.
Leica A60 S
User Manual
This user manual includes important instructions related to operating safety, maintenance
and accessories.
includes
Your Leica A60 S stereomicroscope
an interactive CD-ROM
with all relevant user manuals. Keep it in
a safe place, and readily accessible to the
user. You can also download user manuals and updates from our website at
www.leica-microsystems.com
Manual
Legal requirements
Adhere to general and local regulations relating to accident prevention and environmental
protection.
EC Declaration of Conformity
Electrically operated accessories are constructed based on the state of the art of technology
and are provided with an EC Declaration of
Conformity.
5
Instructions on use
Intended use
The Leica A60 S stereomicroscope is an optical instrument for improving the visibility of
objects through magnification and illumination.
The stereomicroscope may be used only in
closed rooms and must be placed on a solid
substrate.
The Leica A60 S stereomicroscope can be used
in clean rooms.
Place of use
Use the stereomicroscope in closed, dust-free
rooms at +10 °C to +40 °C. Protect it from oil,
chemicals and extreme humidity. Install electrical devices at least 10 cm from the wall and
away from flammable substances.
the
In warm and warm-damp climatic zones,
individual components require
special care in order to prevent the build-up of
fungus.
5-15P) or unscrew any mechanical
Never install any other plug (NEMA
components unless expressly instructed to do
so in the instructions.
bed in this user manual have been tested
The instruments and accessories descri-
Always position the stereomicroscope
so that you can disconnect the illumination from the power supply at any time.
The power cable must remain accessible at all
times, because the power cable is intended as a
power disconnect device.
Leica A60 S
Non-intended use
Using the stereomicroscope in any way
other than that described in the user
manual may result in personal injury or damage
to property. Doing so can impair the functions
of the protective measures provided.
for safety and potential hazards.
Manual
6
Instructions on use (continued)
The responsible Leica affiliate must be
consulted whenever the instrument is
altered, modified or used in conjunction with
non-Leica components that are outside of the
scope of this manual!
Unauthorized alterations to the instrument or noncompliant use shall void all
rights to any warranty claims.
Leica A60 S
Transport
If at all possible, use the original packaging for
shipping or transporting individual modules.
In order to prevent damage from vibrations, the
customer should disassemble all moving parts
according to the user manual and pack them
separately.
Integration in third-party products
When installing Leica products into third-party
products, the manufacturer of the complete
system or its dealer is responsible for following
all applicable safety instructions, laws and
guidelines.
Disposal
Disposal must comply with locally applicable
laws and regulations.
Manual
7
Health risks and dangers of use
Health risks
Workplaces with stereomicroscopes facilitate and improve the viewing task, but
they also impose high demands on the eyes
and holding muscles of the user. Depending on
the duration of uninterrupted work at such a
workplace, impaired vision and problems with
the musculoskeletal system may occur. For this
reason, appropriate measures for reduction of
the workload must be taken:
ϘϘ
Optimum workplace layout
ϘϘ
Frequent changes of activity
ϘϘ
Thorough training of the personnel, giving
consideration to ergonomic and organizational aspects
Leica A60 S
The ergonomic optical design and construction
of the Leica stereomicroscopes are intended to
reduce the exertion of the user to a minimum.
Dangers during use
ϘϘ The stereomicroscope must be connected
to a grounded outlet.
Danger of infection
Direct contact with eyepieces is a
potential transmission method for
bacterial and viral infections of the eye.
ϘϘ
The stereomicroscope may be used when it
is in proper working condition only.
using personal eyepieces for each indiviThe risk can be kept to a minimum by
dual or detachable eyecups.
Manual
8
Information for the person responsible for the instrument
Information for the person responsible for
the instrument
ϘϘ Ensure that the stereomicroscope is used
only by persons qualified to do so.
ϘϘ
Ensure that this manual is always available
at the place where the stereomicroscope is
in use.
ϘϘ
Carry out regular inspections to make
certain that the authorized users are
adhering to safety requirements.
ϘϘ
When instructing new users, do so
thoroughly and explain the meanings of
the warning signs and messages.
ϘϘ
Assign individual responsibilities for starting, operating and servicing the instrument and monitor the observance of these
responsibilities.
Leica A60 S
ϘϘ
Only use the stereomicroscope in proper
condition.
ϘϘ
Inform your Leica representative or Leica
Microsystems (Schweiz) AG, Industry Division, 9435 Heerbrugg, Switzerland, immediately of any product defect that could
potentially cause injury or harm.
ϘϘ
If you use accessories from other manufacturers with the stereomicroscope, make
sure that these manufacturers confirm that
the combination is safe to use. Follow the
instructions in the user manual for those
accessories.
ϘϘ
Modifications to or service on the stereomicroscope may be carried out only by
technicians who are explicitly authorized
by Leica to do so.
ϘϘ
Only original Leica replacement parts may
be used in servicing the product.
Manual
ϘϘ
After service work or technical modifications, the device must be readjusted in
accordance with our technical specifications.
ϘϘ
If the unit is modified or serviced by
unauthorized persons, is improperly
maintained (as long as maintenance was
not carried out by us), or is handled improperly, Leica will not accept any liability.
ϘϘ
The electric installation in the building
must conform to the national standard, e.g.
current-operated ground leakage protection (fault-current protection) is suggested.
9
Care instructions
General Instructions
ϘϘ Protect the stereomicroscope from moisture, fumes and acids and from alkaline,
caustic and corrosive materials. Do not
store chemicals in the vicinity.
ϘϘ
Protect the stereomicroscope from oil and
grease. Never grease or oil mechanical
parts or sliding surfaces.
ϘϘ
Follow the instructions of the disinfectant
manufacturer.
ϘϘ
We recommend concluding a service
contract with Leica Service.
Leica A60 S
Cleaning coated parts and plastic parts
ϘϘ Dust and dirt particles should be removed
with a soft brush or lint-free cotton cloth.
ϘϘ
ϘϘ
ϘϘ
Cleaning glass surfaces
Remove dust using a fine, dry and greasefree brush made from hair, by blowing with
a squeeze blower, or by using a vacuum.
ϘϘ
Remove coarse debris with a moistened
disposable cloth.
ϘϘ
Remove dirt using a clean cloth that has
been moistened with distilled water.
Acetone, xylene or nitro-containing thinners must NOT be used.
ϘϘ
Remove tough dirt using alcohol, chloroform or petroleum ether.
Never use chemicals to clean colored
surfaces or accessories with rubberized
parts. This could damage the surfaces, and
specimens could be contaminated by abraded particles.
Manual
10
Accessories, maintenance and repair
Accessories
Only the following accessories may be used
with the stereomicroscope:
ϘϘ
The Leica accessories described in this user
manual.
ϘϘ
Other accessories, provided that these have
been expressly approved by Leica Microsystems as being technically safe in this
context.
Leica A60 S
Maintenance
ϘϘ The Leica A60 S stereomicroscope is basically maintenance-free. To ensure that it
always operates safely and reliably, we
recommend that you take the precaution
of contacting the responsible service organization.
Repairs and service work
ϘϘ Only original Leica Microsystems spare
parts may be used.
ϘϘ
Before opening the instruments, switch off
the power and unplug the power cable.
ϘϘ
Touching the live circuit can cause injury.
You can arrange for periodic inspections
or, if appropriate, conclude a maintenance contract with them.
ϘϘ
We recommend concluding a service
contract with Leica Service.
ϘϘ
For maintenance and repair, only OEM
spare parts may be used.
Manual
11
The Leica A60 S
Leica A60 S
Manual
12
Congratulations!
You have just purchased a Leica A60 S - an
excellent choice! The outstanding features of
this stereomicroscope are its flexible design, its
ease of use and absolutely maintenance-free
performance. Sturdy and reliable, it is exceptionally well suited to manufacturing tasks, materials testing, quality control and other industrial
applications.
Leica A60 S
In developing the Leica A60 S, we have placed
great emphasis on simple, self-explanatory
operation. However, please take the time to
read the user manual and the notes on operating safety to learn about all the features and
capabilities of your stereomicroscope so that
you can use it to its best advantage. Should
you have any questions, please consult your
local Leica representative. We are gladly at your
service!
Manual
13
An Overview of the Leica A60 S
1 Column
2 Horizontal arm
3 Locking screw on the cross-member
4 Safety ring
5 Baseplate with grounding point
1
2
6
3
6 Magnification changer (zoom)
7
7 Eyepieces
8 Focusing drive
9 Optics carrier
10 Leica A60 LED Ring Illuminator
4
9
8
10
5
Leica A60 S
Manual
14
Assembling the Leica A60 S
Leica A60 S
Manual
15
Column and Baseplate
Instructions for safe assembly
Due to the heavy weight of the baseplate, improper use can cause injuries
or damage to the surrounding area. Therefore,
always request assistance for assembly.
Leica A60 S
Installing the column
1. Push the tapping screw through the baseplate from below.
3. Screw the column in place using the Allen
key provided.
2. Fit the serrated lock washer onto the screw.
Manual
16
Safety Ring and Horizontal Arm
Installing the Safety Ring
The safety ring is the most important
safety element of the entire configuration. It protects the horizontal arm against
falling down accidentally.
Mounting the horizontal arm
1. Push the cross-member with the horizontal arm over the column so that the crossmember lies securely on the safety ring. You
can now rotate the horizontal arm in any
direction desired.
1. Slide the safety ring over the column and
tighten the clamping screw.
Fastening the horizontal arm
For safety reasons, you should fasten
the horizontal arm in place when you
leave your workstation.
1. Rotate the horizontal arm into a secure
position.
2. Carefully tighten the clamping screw on
the cross-member.
Leica A60 S
Manual
17
Grounding
Grounding the baseplate
The rear side of the baseplate has a
grounding point that you can use to
ground the configuration. The grounding cable
is not included in the scope of delivery.
Leica A60 S
Use
1. Connect the grounding cable to the grounding point of the baseplate.
Manual
18
Assembling the Optics Carrier
Assembly
1. Insert the connecting pin from below into
the bore of the horizontal arm.
Leica A60 S
2. Fasten the stereomicroscope using the
washer and safety screw.
Manual
Free movement of the stereomicroscope
After you have installed the safety screw, the
stereomicroscope can be rotated freely.
19
Fastening the Leica A60
Fastening
The swing-arm stand is designed so that
the Leica A60 S can be moved as desired.
However, it may also be logical in some instances to fasten the stereomicroscope in place.
1. Carefully tighten the side clamping screw.
This fastens the stereomicroscope in its
current position.
Leica A60 S
Manual
20
Assembling the Illuminator
Illuminator assembly
The Leica A60 LED ring illuminator is
installed with a single screw on the
bottom of the microscope.
The ring illuminator can be installed in
any side position desired to accommodate the personal preferences of left and righthanded users.
Assembly
1. Connect the power supply cable to the ring
illuminator.
2. Push the ring illuminator as far as it will go
and screw it into place.
The standard delivery of the illuminator
includes two Velcro strips that you can
use to guide the cable along the horizontal arm.
The optional diffuser is attached and
screwed in below the ring illuminator.
3. Connect the power supply to the socket.
Leica A60 S
Manual
21
Using the Leica A60 S
Leica A60 S
Manual
22
Adjusting the Working Height
D
B
A
Working distance
The working distance means the distance
between the objective and the specimen
in focus. For the Leica A60 S, this is 122 mm.
20
25
5
30
10
10
5x
F1
1x
122 mm
30x
www.leica-microsystems.com
C
Help for
the setup
During setup, use the distance bar provided in
the "Quick Start Guide" for orientation:
ϘϘ Without illuminator, the distance between
5
F2
Max
Safety measures
After each time the working height is
adjusted, you have to retighten the
safety ring. Otherwise, accidental lowering can
cause damage to the specimen or stereomicroscope.
20
25
30
100 mm
122 mm
100 mm
1x
G2
G1
H
Max
122 mm
In addition, the focusing arm of the Leica A60 S
provides a travel path of 50 mm that is used
for focusing on the specimen. This provides
you with plenty of freedom to focus on locations with different heights on a printed circuit
board, for example.
Leica A60 S
the bottom section of the microscope and
the specimen should be 122 mm.
ϘϘ
With the illuminator installed, the distance
between the bottom section of the illuminator and the specimen should be 100 mm.
Manual
23
Adjusting the Working Height (continued)
Adjusting the working height
1. Hold the horizontal arm securely and
release the safety ring.
3. Tighten the locking screw on the crossmember.
5. Loosen the locking screw on the crossmember so that the horizontal arm can be
moved freely again.
2. Move the horizontal arm to the desired
height.
Leica A60 S
4. Guide the safety ring to the cross-member
and tighten the clamping screw.
Manual
24
The Correct Interpupillary Distance
The interpupillary distance is correctly set if you
see a single circular image field when looking
at a specimen.
the eyepieces together or separate them
until you see a circular image.
3. Slowly approach the eyepieces with your
eyes until you can see the complete image
field without corner cutting.
If you are still a novice stereomicroscope user,
you may need a short time to become accustomed to this. Not to worry—after a little while, it
will become automatic.
✗
If you wear glasses, fold the eyecups back
– otherwise, fold the eyecups forwards.
✓
Adjusting the interpupillary distance
1. Look into the eyepieces.
2. Hold the eyepieces with both hands. Push
Leica A60 S
Manual
25
Focusing
microscope using the focusing drive. The
Focusing raises and lowers the stereo-
specimen is brought into sharp focus as soon as
it is in the focal point of the optics.
Focusing
1. Set the magnification changer to the lowest
level (5).
4. Use the focusing drive for fine focus.
remains constant (parfocal) even when
After the sharpness has been adjusted, it
either left- or right-handed.
The focusing drive can be operated
changing the magnification levels – as long as
you have configured the diopter settings on the
eyepiece correctly for your eyes (see page 28)
whether the working distance is in the
If precise focusing is not possible, check
permitted range (see page 23).
Leica A60 S
3. Set the magnification changer to the highest level (30).
2. Begin to focus on the specimen.
Manual
26
Magnification Display
tion on the right-hand rotary knob.
You can read the configured magnifica-
including object field diameter, refer to
For the tables with the optical data,
page 36.
Leica A60 S
Manual
27
Dioptric Correction and Parfocality
Parfocality
Like all other Leica stereomicroscopes,
the Leica A60 S is parfocally matched.
The prerequisite for this is the correct setting of
the diopters for the respective user. The following adjustments have to be carried out only
once by each user.
Adjusting
1. Set the dioptric correction for both eyepieces to "0".
2. Select the lowest magnification and focus
on a flat specimen.
Leica A60 S
3. Select the highest magnification and readjust the sharpness.
9. Look through the right eyepiece and repeat
item 8.
4. Select the lowest magnification again, but
do not look into the eyepieces.
10. Select the highest magnification and refocus if necessary.
6. Rotate the eyepieces counterclockwise in
the "+" direction as far as they will go (+5
diopter settings).
Now, if you adjust the magnification from the
highest to the lowest level, the specimen is
always brought into sharp focus. If not, repeat
the process. The microscope is now parfocally
matched to your eyes.
7. Look through the left eyepiece only.
8. Turn the eyepiece slowly in the “–” direction
until the specimen appears sharp.
Manual
11. Write down your values and configure
them BEFORE each time you begin work.
Check the diopter settings at regular intervals.
28
Adjusting the Torque of the Focus Drive
Adjusting the torque
Is the focusing drive too easy or too difficult to
adjust? No problem - the torque can be adjusted individually depending on your personal
preferences:
1. Grip the drive knobs with both hands and
turn them towards each other until the
desired torque is reached during focusing.
Leica A60 S
Manual
29
Leica A60 LED Ring Illuminator
The light of the Leica A60 LED ring illuminator can be very bright. Therefore,
always switch on the illuminator before you
look through the eyepieces! Avoid looking
directly into the LEDs.
Leica A60 S
number of advantages you will not want
The ring illuminator offers a great
to do without:
ϘϘ
Constant color temperature (daylight)
throughout the entire lifecycle
ϘϘ
Long service life of up to 50,000 hours on
average
ϘϘ
Absolutely maintenance-free; no lamp
replacement required.
ϘϘ
Extremely low power consumption
Manual
Using the keypad
ϘϘ Use the
button to switch the illuminator
on or off.
ϘϘ
Use the
and
buttons to adjust the
brightness in 10 increments.
ϘϘ
Touch either of the two buttons to adjust
the quantity of light in small increments.
ϘϘ
Hold the button pressed to change the
quantity of light more quickly.
30
Replacing the Protective Glass
The protective glass protects the optics
from dirt and possible damage. Never
use the Leica A60 without the protective glass,
as otherwise dust and dirt can get into the
optics.
consumable. Order number: 10 446 324
The protective glass is considered a
Replacing the Protective Glass
1. Remove the Leica A60 LED ring illuminator
(see page 21).
2. Remove the protective glass by carefully
turning the bottom of the stereomicroscope.
Make sure to install the new protective glass as quickly as possible and at
a clean location so that no dust or dirt can get
inside the microscope.
3. Screw in the new protective glass.
Leica A60 S
Manual
31
Dimensions
Leica A60 S
Manual
32
Dimensions
500
356
257
ø 35
402
ø 34.8
176
32
100
384
174
192
230
792
266
792
Leica A60 S
Manual
33
Optical data
Leica A60 S
Manual
34
Optical data
Optical data:
Zoom Position
Total
Magnification
Object Field Diam.
mm
Depth of Field*
0.5
5.0
46.0
13.62
0.63
6.3
36.5
9.03
0.8
8.0
28.8
5.89
1.0
10.0
23.0
3.96
1.25
12.5
18.4
2.66
1.6
16.0
14.4
1.71
2.0
20.0
11.5
1.15
2.5
25.0
9.2
0.76
3.0
30.0
7.7
0.54
* according to Berek
Leica A60 S
Manual
35