1
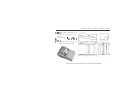
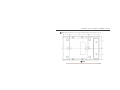
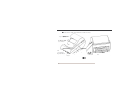
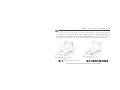
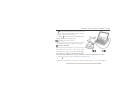
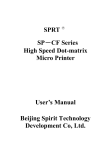
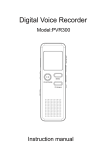
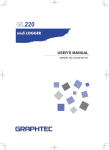
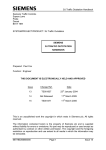
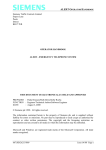
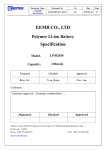
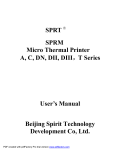
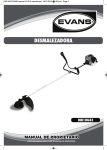
Chapter 2 System Installation of Platform Style
2.1 Outline Dimension and Function
2.3 Paper Roll Instation
2.4 Power Connection
Chapter 3 Buttons and Indicators
1.5 Paper Roll Instation
1.3 Power Supply Connection
1.2 Installation Method
1.1 Installation Dimension
Chapter 1 System Installation of Faceplate Style
Content
Chapter 1 System Installation of Faceplate Style
Installation Dimension
1-
Installation and Use Manual of WH Micro Printer
style printer’s outline dimension is
as the Fig.2-3-1 and Fig.2-3-2 shows.
(unit: mm)
Outline dimensio:
the maximal diameter of the paper roll
that the printer admiting is 50mm.
-2-
3-
style printer’s dimension to rivet on the wall and the table-board is as Fig.2-3-2 shows.
Installation and Use Manual of WH Micro Printer
-4-
style printer’s outline and configuration is as Fig.2-4 shows.
Paper Depository
Movable
Head
Cover of Printer
Upper Cover
Infrared ray Port
Bottom Cover
Other
Communication Port
!
SEL
LF Button
Button
Power Indicator
Paper Lack Indicator
SEL Indicator
5-
Power Socket
Communication Port
Installation and Use Manual of WH Micro Printer
Installing Robbin Cassette (T1 style)
As Fig.2-12 shows, open up the movable cover panel, push it ahead according to the arrow direction as Fig.2-13
shows, then take it down gently (notice: In the course of pushing, taking down or putting on the movable cover,
please protect the tooth which is used to rip the paper from damnification); The operation to the robbin cassette is
&# %
'
-6-
(
%&
$
# "
"
Opening up the Movable Pover panel
same to T0 style, put on the movable cover panel after checking installing well, then close the movable cover panel.
Installing Paper Roller
Installing Paper Roller (T0 Style)
Installing paper roller needs open up and close the movable cover panel of the print shell too, the course is same to
step1 and step4 mentioned in last section. There are two ways to provide paper about WH printers, one is putting the
paper roller inside the print shell as the appearance at ex-factory; another is providing paper outside the print shell.
Installing paper according to the following steps:
! Take down the movable cover panel, is same to last section.
Cut the paper end like Fig.2-14 shows. For paper roll placed inside the case: As Fig.2-15 shows, place the paper
roll outside the print shell first, then insert the paper end downwards into paper-in slot on rear of printer mechanish. It
is unreasonable Fig.2-16 shows that insert the paper end upwards into. For paper roll placed outside the case: As
Fig.2-17 shows, firstly put paper through the narrow orifice that is at the back of printer shell, then make paper face the
paper-in slot.
Turn on +5V power supply.
Press the button SEL and the SEL indicator will be turned off. Press the button LF to run the print head, and
theninsert the paper into the paper-in slot, and the paper will be loaded into the print head and come out from the front
for a certain seemly length.
7-
Installation and Use Manual of WH Micro Printer
Press LF or SEL button again or turn the power off.
Put paper end through the paper-out slot that on the
movable cover panel, and close the movable cover panel.
The way is same to step 4 in last section.
Installing paper roll about T1 style
)
Notice Notice the direction of the paper when
using Thermal series. (See Fig.2-15)
As Fig.2-12 shows, only to open the movable cover panel,
Power Connection
-
+ *
,
other operation is same to T0 style, there is no repeat here.
/
that matches well to the printer, so that you can directly
WH micro printer is recommended to use the power connector
connect the plug of connecter to the socket of printer. Notice:
If use other power supply, it is different for the electric
current and voltage of different style, so please consult the User’s Manual which is suitable to the style.
The polarity of the power shouldn’t be connected incorrectly
.
Caution
For WH printers, the column end is positive pole (+), and the board end is negative pole (-), as shown in Fig.2-17
-8-
Caution: Don’t connect AC220V with the power socket of the printer directly!
The whole system connection is as Fig.2-18 shows:
Fig.2-17 Power Polarity Sketch Map
9-
1 0
,
Installation and Use Manual of WH Micro Printer
Buttons and Indicators
There is an on-line indicator and two buttons (SEL and LF) on the control panel of WH printers. (Add a power
indicator and a lack paper indicator to T0 style, add a lack paper indicator to A3 style) The indicators denote the current
On/off line mode:
23
status of the printer.
The on-line indicator (green light) lights denotes that the printer is online and waiting to receive datas. If the
32
BUSY signal line is on the low level signal, user’s host computer could send datas to printer via the interface connection.
The on-line indicator (green light) goes dark indicates the printer is offline or the printer is desposing the datas.
32
At this time, the BUSY signal line is on the high level, user’s host computer couldn’t send datas to the printer.
Thermal indicator (green light) glinting fleetly indicates there is no paper in the printer. At this time ,the BUSY
signal line is on high level, user’s host computer couldn’t send datas to the printer.
After powered on or exited self-test mode, printer goes in online mode, on-line indicator (green light) lights, holding
down SEL button could make the printer switch from one status to another status.
Another function of SEL button is realizing pause during the course of printing. If hold down SEL when printing is
going on, then release it, the printer will pause after finished printing the current line, at this time paper feeding mode can
be selected. Hold down SEL button again and release it, the printer will continue printing.
4
Style has a lack paper indicator (red light), the indicator lights indicate that there is paper in the printer, and if the
- 10 -
indicator goes dark, there is no paper in the printer.
Style
have a lack paper indicator(yellow light), the indicator lights indicate that there is paper in the printer,
and if the indicator goes dark, there is no paper in the printer.
Note: Because some new styles would be produced continuously, so there are some differents about
the function or use of the button and the indicator in order to reach some especial demands. please
consult the User’s Manual which is suitable to the style.
11 -
Self-test mode:
Installation and Use Manual of WH Micro Printer
When the printer goes into self-test mode, the on-line indicator goes dark, and the BUSY signal line is on high level,
the host computer could not send datas to the printer. The content of self-test receipt includes the characters and Chinese
characters. After self-test, the printer is in on-line status and can receive the datas from the host computer. Normal
6
5
self-test indicates the printer barring interface connection
works normally , otherwise it needs to repair.
23
7
There are two ways to make the printer go into self-test mode:
Hold down SEL button first, then switch on the power, the printer will begin to self-test print after releasing the
32
SEL button.
When printer works normally, press SEL button to make the indicator go dark, then hold down the LF button,
32
and then hold down the SEL button, the printer would begin to print self-test receipt after the two buttons were released.
When thermal series printer works normally, hold down the LF button and don’t release it, then hold down SEL
button, the printer begins to print self-test receipt after releasing the two buttons.
23
The printer will exit self-test mode of itself after the self-test receipt printed out.
32
7
There are two ways to exit self-test mode:
Shut off the power supply.
Paper feeding mode: When SEL indicator is dark, hold down LF button, then release it, the printer will feed paper
emptily, but won’t print. Hold down LF button and release it again, the print will pause. Hold down SEL button at this
- 12 -
moment, the printer will restore to on-line status. There is single printer that the function of SEL button and
LF button is same, the printer will feed paper after pressing random button and the printer will pause
feed paper after pressing random button again; some styles have the self-loading formfeed function ,
or there are some changes about to the two buttons, please consult the User’s Manual which is suitable to
the style.
13 -