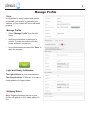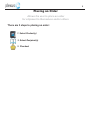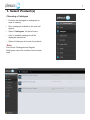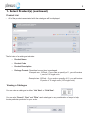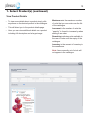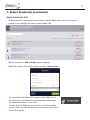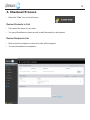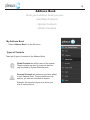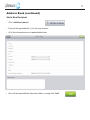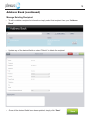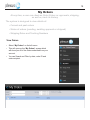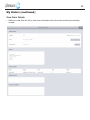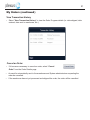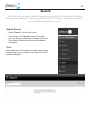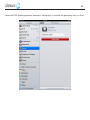
1
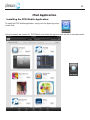
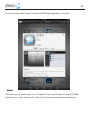
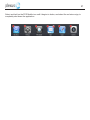
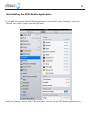
Plexus Promotional Gateway
User Guide
(Web Browser Rep Order Application and PPG Mobile iPad App)
Creating Orders and Managing your Address Book
Plexus 360
l Training and Development Department
l Oakville, ON
Table of Contents
Plexus Promotional Gateway............................................. 3
Description.................................................................................................. 3
Login................................................................................... 4
Manage Profile.................................................................... 5
Placing an Order................................................................. 6
1. Select Product(s)
Choosing a Catalogue................................................................................ 7
Product List................................................................................................. 8
Add a Product to Cart............................................................................... 11
2. Select Recipient(s)
Choosing Recipients................................................................................ 12
3. Checkout Process
Review Products in Cart........................................................................... 14
Review Recipients List............................................................................. 14
Shipping Notes.......................................................................................... 15
Submit Order............................................................................................. 15
Address Book.................................................................... 16
Add a New Recipient................................................................................. 17
Manage Existing Recipient....................................................................... 18
My Orders.......................................................................... 19
View Orders............................................................................................... 19
Cancel an Order........................................................................................ 21
Search............................................................................... 22
iPad Application................................................................ 23
Installing the PPG Mobile Application................................................... 23
Closing/Stopping the PPG Mobile Application..................................... 25
Uninstalling the PPG Mobile Application.............................................. 28
3
Plexus Promotional Gateway (PPG)
Description
The Plexus Promotional Gateway Rep Application is a web-based system for sales
representatives to easily and quickly order promotional materials. It is available online through a
web broswer, and through the PPG Mobile iPad App.
Note: Adobe Flash version 11.1 is required to use the Plexus Promotional Gateway through your
web browser.
The PPG Mobile iPad App can be downloaded from the Apple App store. The first time using the
App you will be prompted for the Company ID, which your System Administrator can provide.
The following are instrcutions for the PPG Rep Application accessed through both a web browser
and the PPG Mobile iPad App.
The Process
The ordering process takes about 5 minutes and your order will be delivered to the designated
address in 3 to 5 days.
• As delivery time is 3-5 days, please ensure that you plan and place your orders accordingly.
• In cases of urgency, materials can be shipped overnight. However it will require contacting your
system administrator.
To start
New users will receive a welcome email with a link to the site. In addition you will be provided with a
temporary password to access the application for the first time.
Important
• New users will be prompted to change their temporary password to a permanent one of your
choice.
If you are experiencing any problems, please contact
your System Administrator
4
Login
Login to the PPG Application
• Click on the URL contained within the
welcome email to access the site.
Or
• Select the PPG Mobile App icon on your iPad
Note: Bookmarking this URL is
recommended for ease of future access.
User Login
• Enter your username (company email)
and password.
• Click Login.
Welcome Screen
• Upon successful login you will be greeted with the welcome screen.
• On the left you will see a menu with the following links: Home, Catalogues, Address Book,
My Orders, Manage Profile, Search and Logout.
5
Manage Profile
Note:
It is important to verify (correct and update
as needed) your profile, in particular your
address, or your orders will not be delivered
properly.
Manage Profile
• Select “Manage Profile” from the left
menu.
• Verify the information in the boxes is
correct. To make corrections click the
boxes and make corrections.
• Once corrections are made click “Save” to
save the changes.
Light and Heavy Addresses
The Light Address is your home address.
The Heavy Address, if different, is usually a
locker address for larger orders.
Shipping Notes
Note: Shipping Notes set as part of your
profile, will appear on ALL orders placed to
you.
6
Placing an Order
Allows the user to place an order
for shipment to themselves and/or others.
There are 3 steps to placing an order:
1. Select Product(s)
2. Select Recipient(s)
3. Checkout
7
1. Select Product(s)
Choosing a Catalogue
• Products are arranged in catalogues for
ease of viewing.
• Only catalogues available to the user will
appear.
• Select “Catalogues” on the left menu.
• A list of available catalogues will be
displayed (see below).
• Select a Catalogue to browse for products.
Note:
Free Goods Catalogues and Regular
Catalogues cannot be combined on the same
order.
8
1. Select Product(s) (continued)
Product List
• All of the products associated with the catalogue will be displayed.
The list view of a catalogue includes:
• Product Name
• Product Code
• Product Description
• Package Format: Describes how an item is packaged.
Example one: 10/Pack - If you order a quantity of 1, you will recieve 1 pack of 10 single units.
Example two: 10/Pack - If you order a quantity of 10, you will recieve 10 packs of 10 single units (100 single units).
Viewing a Catalogue
You can view a catalogue in either “List View” or “Grid View”.
You can also “Search”, “Sort” and “Filter” each catalogue in any combination of ways to help
locate particular products for your order.
9
1. Select Product(s) (continued)
Product Icons
As well as code, name and description, some products also have icons providing further details on
the product.
New Product
(Added within the last 90 days)
Orders with these products will be sent to the Product Manager
for approval before shipping. All products in the same order not
requiring approval, will ship immediately.
Refers to the language of the product
[from left to right: English, French, Both/Bilingual, Other]
(Some products are available in multiple languages, ensure you
select the correct one)
10
1. Select Product(s) (continued)
View Product Details
• To view more details about a product simply click
anywhere on the desired product in the catalogue.
• This will direct you to the product details page.
• Here you can view additional details on a product
including full description and a larger image.
Maximum sets the maximum number
of units that you can order over the life
of the catalogue.
Increment is the number of units the
“quantity” is forced to increase by when
adding to an order.
Remaining indicates units available to
the user to order until the expiry of the
catalogue.
Inventory is the amount of inventory in
the warehouse.
Note: Items currently out of stock will
not appear in the catalogue.
11
1. Select Product(s) (continued)
Add a Product to Cart
• To add a product to your shopping cart simply click the “Add” button next to the desired
product in the catalogue list view or product detail view.
• This will prompt the “Add to Order” popup to appear.
• Select the quantity of the given product and click “Add to Order”
• You may notice that the product counter on the “Cart” icon in
the bottom left was incremented by the quantity added when
you added the product to your order.
• You can click the “Cart” icon at any time to view the products
in your current cart. We will discuss the cart screen more in the
“Check Out” section.
12
2. Select Recipient(s)
Choosing Recipients
• Select the “Cart” icon on the left menu.
• To add yourself to the order select “Add Myself”.
• If you have a different “Light” and “Heavy” address for your profile a prompt will appear for you
to select which address you wish to add. If both your “Light” and “Heavy” addresses are the
same, you won’t see the prompt and your address will simply be added to the recipients list.
• If you want to ship the order to other recipients then select “Add Recipient”.
13
2. Select Recipient(s) (continued)
• From here, simply click the “Add” button next to the recipient to add them to the recipients list.
Note:
If the recipient is not in your address book, you may add them by selecting “Add New Address”.
This will be covered in the “Address Book” section.
14
3. Checkout Process
• Select the “Cart” icon on the left menu.
Review Products in Cart
• First review the items in your order.
• You can still add/remove items as well as edit the quantity to be shipped.
Review Recipients List
• Next review the recipients to whom the order will be shipped.
• You can still add/remove recipients.
15
3. Checkout Process (continued)
Shipping Notes
• You can enter any shipping notes you wish to accompany your order.
Note:
Shipping notes for an order will appear on every recipients packages for that order.
Submit Order
Once you have reviewed your order, you may submit by pressing
“Submit Order” button or “Cancel” the order to start over.
You have now placed your order!
• A pop up box will appear giving you the Order Number.
• You may wish to make a note of the Order Number for
tracking purposes.
• You will receive an email when the order has been
processed advising you of the tracking number.
16
Address Book
From your address book you can:
• Add New Contacts
• Update Contacts
• Delete Contacts
My Address Book
• Select “Address Book” on the left menu.
Types of Contacts
There are 2 types of contacts in the Address Book.
Global Contacts are all the users of the system.
These contacts are seen by everyone and can
only be edited by System Administrators.
Personal Contacts are recipients you have added
to your Address Book. These contacts are only
seen by you and can be edited at anytime.
Example: An important physician to whom you
wish to send products.
17
Address Book (continued)
Add a New Recipient
• Click “Add New Address”
• Enter all the required fields (*) for the new recipient.
• All of this information can be updated/edited later.
• Once all the required fields have been filled in, simply click “Add”.
18
Address Book (continued)
Manage Existing Recipient
• To edit or delete a recipient’s information simply select that recipient from your “Address
Book”
• Update any of the desired fields or select “Delete” to delete the recipient.
• Once all the desired fields have been updated, simply click “Save”.
19
My Orders
At any time, a user can check an Order Status re: approvals, shipping,
as well as, track its history
The system is designed to view details of:
• Current and past orders
• Status of orders (pending, awaiting approval or shipped)
• Shipping Dates and Tracking Numbers
View Orders
• Select “My Orders” on the left menu.
• This will open up the “My Orders” screen which
will show you all of the orders submitted from your
account.
• You can Search and Filter by date, order ID and
order recipient.
20
My Orders (continued)
View Order Details
• Select an order from the list to view more information about the order including the tracking
number.
21
My Orders (continued)
View Transaction History
• Select “View Transaction History” to view the Order Progress details. (ie. date shipped, date
ordered, date sent to warehouse, etc.).
Cancel an Order
• If it becomes necessary to cancel an order, select “Cancel
Order” from the Order Details page.
• An email is automatically sent to the warehouse and System administrators requesting the
order be cancelled.
• If the warehouse has not yet processed and shipped the order, the order will be cancelled.
22
Search
Not only can you search while browsing a catalogue to find products within
that specific catalogue, but you can also use the “Search” screen to search all
the available catalogues at once.
Search Screen
• Select “Search” from the left menu.
• This will open the “Search” screen. From here
you can use any combination of Search, Filter and
Sort criteria to find products across all available
catalogues.
Note:
When searching in this manner, a product may appear
multiple times in your results list as it may be found in
multiple catalogues.
23
iPad Application
Installing the PPG Mobile Application
To install the PPG Mobile application, simply visit the Apple App store
on the iPad.
Using the search bar, search for ‘PPG Mobile’ and select the app icon from the list of returned results.
24
From here, simply select “Install” to install the PPG Mobile Application on the iPad.
Note:
Remember you will need to enter your “Company ID” upon your first login into the PPG Mobile
Application. If you don’t know this ID, speak to you System Administrator about acquiring it.
25
Closing/Stopping the PPG Mobile Application
Note:
Completely shutting down and restarting the PPG Mobile Application, is a good troubleshooting
method if you ever experience an issue with the Application.
To fully shutdown the PPG Mobile application (or any iPad application); from the iPad home screen
place 4 fingers at the base of the iPad screen and slide them upwards.
26
A black bar will appear across the bottom of the iPad screen showing all of the Applications currently
running on the iPad.
27
Select and hold on the PPG Mobile icon until it begins to shake, and select the red minus sign, to
completely shut down the application.
28
Uninstalling the PPG Mobile Application
To uninstall and remove the PPG Mobile Application from the iPad, select “Settings”. Under the
“General” tab, select “Usage” from the right menu.
Under the “Storage” section, select “Show all Apps” and look for the PPG Mobile Application icon.
29
Select the PPG Mobile Application, and select “Delete App” to uninstall the application from you iPad.