1
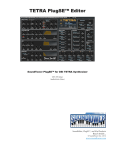
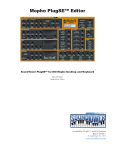
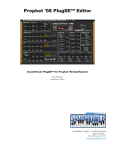
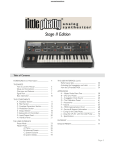
Moog Voyager PlugSE Editor
PlugSE for the Moog Voyager
VST (PC/Mac)
AudioUnits (Mac)
SoundEditor, PlugSE, and iPad Products
Reach Inside...
© SoundTower Inc. 2012
www.soundtower.com
Special Thanks to…
Mike Adams
Steve Dunnington
Amos Gaynes
Kris Gorzelnik
Greg Kist
Till Kopper
Cyril Lance
Mark Lanoszka
Rudolf Linhard
Laurent Thompson
Trent Thompson
Moog Voyager PlugSE V1.0
Table of Contents
Installation
VST/Audio Units............................................................................ 1
Mac OSX Users.............................................................................. 2
Authorization
Older versions of Cubase............................................................... 2
Configure MIDI
MIDI Configuration........................................................................ 3
Confirm Connections and Test
Editor/Hardware Interaction........................................................... 3
Record/Playback MIDI Data........................................................... 3
Record/Playback Automation Data................................................. 3
Voyager PlugSE Operation
Parameter Panel............................................................................. 4
Parameter Panel Buttons and Functions.......................................... 4
BANK............................................................................................ 4
Use Loaded Data........................................................................ 4
FILE............................................................................................ 5
MIDI.......................................................................................... 5
PRESETS..................................................................................... 5
FILE................................................................................................ 5
EDIT.............................................................................................. 5
MIDI.............................................................................................. 5
HOST............................................................................................ 5
Send.............................................................................................. 5
Receive.......................................................................................... 6
WRITE........................................................................................... 6
ADVANCED ................................................................................. 6
ABOUT.......................................................................................... 6
CHANNEL..................................................................................... 6
Additional features of the Parameter Panel
Keyboard....................................................................................... 6
LCD Screen.................................................................................... 7
Finale.............................................................................................. 7
Moog Voyager PlugSE V1.0
Welcome!
Thanks for purchasing the Moog Voyager PlugSE Editor plug-in, developed by SoundTower Inc.
This proprietary plug-in is installed in your audio software as a Virtual Instrument (VST Instrument or AudioUnits) and will control all of the functions found on the Voyager.
Stunning graphics, intuitive functions and easy-to-use menus make tweaking the Voyager hardware with the
Voyager PlugSE Editor fun and easy.
Most importantly is the ability to automate every function of the Voyager for synchronized playback with your
session. Adjusting the timing and the values of all automation data allows you to perfect the performance prior
to committing the audio to disk.
The Moog Voyager PlugSE Editor features:
• Editing of all Voyager program parameters.
• Automation of all Voyager panel parameters.
• Direct MIDI connection.
• Fully resizable editing panels.
• Load/Save of Program Banks.
• Transmitting and receiving of Program Bank data.
• Full Moog Voyager System Exclusive implementation.
• Flexible routings of parameter changes (Automation parameters and MIDI tracks.)
• Recording of real-time parameter changes using automation or MIDI continuous controllers.
The Editor works with any Digital Audio Workstation (DAW) or audio software that supports VST or Audio
Units (AU) plug-ins, including Cubase, Nuendo, Ableton, Digital Performer, Logic and many others.
Real Time AudioSuite (RTAS) users:
The Moog Voyager PlugSE Editor has not been tested with VST-to-RTAS wrappers and may not work in this
configuration. An RTAS version of the Moog Voyager PlugSE Editor is currently in development..
Installation
VST/Audio Units
Download the version of the Moog Voyager PlugSE Editor for your computer platform (PC or MAC) and audio
workstation (VST or AU). Downloads are available from:
www.moogmusic.com/products/apps/voyager-plug-se
Once you’ve download and decompressed the .zip file, you will either have a .dll file for PC VST, a .vst file
for Mac VST or .component file for Mac AudioUnits.
Moog Voyager PlugSE V1.0
1
Various DAWs have different requirements for the installation of plug-ins. Some have a plug-in folder in the
same root folder as the application, while others have plug-in folder(s) in a generic location, allowing multiple
applications to share the same plug-ins. Refer to your DAW User Manual for the appropriate installation of the
PlugSE Editor.
Mac OSX Users
All Intel OS X Macs have a plug-ins folder in two locations. At the root/library/audio/plug-ins and also at user/
library/audio/plug-in. Just drop the version of the plug-in that you are installing into one of these locations,
restart your DAW and you should be ready to go!
For Mac users that wish to install the VST or AU version of the PlugSE file on a Mac running Lion (OSX 10.7),
you will discover that the user Library folder is hidden. To access this folder, hold the Option key while selecting the Go menu from the Finder.
Authorization
With the plug-in properly installed, open your DAW and prepare a track in the same way you would to use
any other virtual instrument. Select “Voyager PlugSE”.
Upon opening the PlugSE Editor for the first time you will be presented with a screen that gives you the opportunity to authorize your plug-in. If you’ve already registered the plug-in, enter your name and registration
code exactly as indicated. If you haven’t yet registered, or simply wish to check out the PlugSE Editor, select
“DEMO” and you will run in demo mode with a restricted features set.
The demo limitations are:
• No file saving
• No writing to the Voyager
• No transmitting presets to the Voyage.
• Parameter changes are enabled only for first top five controls: LFO rate – Osc frequency.
Once you have authorized or selected demo mode, the main PlugSE screen will appear.
Older versions of Cubase
Some older versions of Cubase will not allow you to type your name and number in the registration window.
This is a limitation of Cubase. A work-around here is to use a word processor or text editor to assist in the operation as follows:
Open the word processor and type in your name. Highlight the name and copy it, and then return to the Editor registration window and paste the information into the ‘Name’ field. Repeat this process for the registration
code.
Moog Voyager PlugSE V1.0
2
Configure MIDI
It isn’t practical to provide specific instructions covering all the possible MIDI interfaces or configurations
that are available. Instead, we will provide an example of a typical MIDI configuration using a MIDISport 2x2
MIDI interface.
MIDI Configuration
Make sure the Voyager’s MIDI In and MIDI Out is connected to the MIDISport interface. Returning to the
PlugSE Editor, click the MIDI button at the top of the Editor window.
In the MIDI In Port and MIDI Out Port select the MIDI interface and the port that the Voyager is connected
to. Once the appropriate input and output ports are selected, click the Poll button. An ON-LINE message will
appear at the top of this window confirming proper connection. Finally, click the THRU button to ON, and
then click the OK button to exit.
Confirm Connections and Test
Editor/Hardware Interaction
Confirm that changes made using the PlugSE Editor affect the Voyager by adjusting a few controls in the Editor
window; these changes should be reflected on the Voyager hardware.
Record/Playback MIDI Data
Create a new MIDI track in your DAW. Select the MIDI interface port that the Voyager is connected to as your
MIDI destination. Record and playback a few test notes.
Record/Playback Automation Data
Test the writing and reading automation data as you would any other VI in your software. Enable the track to
Write, start playback and tweak some controls on the PlugSE Editor or twist some data controls on the Voyager.
Rewind, put the automation track into Read and start playback and confirm that automation data is communicating with the Voyager
Voyager PlugSE Operation
The Voyager PlugSE allows to you ‘reach inside’ the Moog Voyager with total control of all the functions built into
the instrument – not only the front panel controls, but also the ‘hidden’ functions found in the Voyager menus. The
following is a description of the Voyager PlugSE’s panels and functions.
Moog Voyager PlugSE V1.0
3
Parameter Panel
The Voyager PlugSE Editor displays a faithful reproduction of the Voyager’s front panel. Every knob, switch,
and rotary control is exactly as you would find it on the Voyager, and all of the Editor controls are interactive
and functional. Changes made anywhere on the Parameter Panel will cause corresponding changes to be made
on the connected Voyager hardware. These changes are also sent to the DAW (host) automation while recording.
At the top of the Parameter Panel window are a series of buttons that select functions or display drop down
menus. From left to right: BANKS, FILE, EDIT, MIDI, HOST, Send, Receive, ADVANCED, WRITE, ABOUT and
CHAN.
Parameter Panel Buttons and Functions
BANK
Click on the BANK button and the Parameter Panel splits into two sections: a reduced panel view on the righthand side, and a new view containing a scrollable list of program banks on the left-hand side. There are seven
banks with 128 programs in each bank (arranged just like the seven banks in the Voyager), and each bank entry
contains both a program name and its corresponding sound category.
Click the A, B, C, D, E, F or G buttons to select the desired bank, and then use the scroll bar on the right to
scroll through the list (you can also scroll through the list using the wheel on your mouse, if so equipped). Simply select a bank you wish to explore and click on a Program name you wish to recall. The selected program
will appear in the Parameter Panel window.
Right clicking on any Program name within any bank will open a window that will allow you to COPY that
program to the clipboard, SAVE the program to disk, LOAD a program from a disk into this location, or INITIALIZE the current program.
The yellow CATEGORY button will present you with a list of 32 categories from which to select a specific type
of sound program. This method makes it easy to quickly identify a desired program. Simply select a category
from the list and a specific group of the available sounds from all banks will appear.
If you wish to change the category of any sound, right click on the Category name (beside the Program name)
and select a new category from the displayed list.
Now let’s take a look at the buttons that appear at the top of the BANK window.
Use Loaded Data
When Use Loaded Data is enabled, any program that is selected in the BANKS window will also be sent to the
Voyager’s EDIT buffer, where it can be auditioned. Note that this does not overwrite the program that is stored
at the Voyager’s currently selected location. If you wish to write the program to the Voyager, use the WRITE
button (described below).
Moog Voyager PlugSE V1.0
4
FILE
FILE opens a dialog window that allows you to LOAD a previously saved Program Bank into the currently
selected Program Bank, or SAVE the current Program Bank to a hard drive.
MIDI
MIDI gives you a number of options for sending and receiving full banks of sounds to and from the Voyager.
You have the option to Receive Program Bank A, B, C, D, E ,F or G, Receive All Banks, Transmit Program Bank
A, B, C, D, E ,F or G or Transmit All Banks. Clicking any of these options will begin the operation and present
you with a progress bar indicating the current status of the transfer.
PRESETS
PRESETS opens a menu that allows you to reset any of the banks back to the factory programs. Note that this
only loads the data into the Editor, not to the Voyager. If you wish to send the banks to the Voyager, use the
commands in the MIDI menu. To recall a bank of factory sounds, click PRESETS and select bank A, B, C, D, E,
F or G in the Factory Presets window. You can also INITIALIZE a program bank from this menu.
To close the Bank window, click on the BANK button.
FILE
The FILE button appears next to the BANK button at the top of the Editor window. FILE produces a menu that
allows you to Load a Single Program, or Save Preset to save the current Program.
EDIT
EDIT provide a menu allows you to copy and paste the current program to a different location.
MIDI
Although the main function of the MIDI button was covered above in the Configuration section, there are two
additional buttons that appear in the MIDI window:
When enabled, the Clock ON/OFF button synchronizes the EDITOR with the host MIDI clock.
When enabled, the THRU button allows the host (DAW) to transmit thru the Voyager PlugSE during playback.
HOST
HOST allows you to send programs to the VST patch list. Select a Program you wish to save. Click HOST. You
will be presented with a dialog indicating the current host VST program selected. While this dialog is open,
click on the VST patch list and select the slot you wish to save the Voyager program to. Click OK. Go back to
the VST patch list and click on the same slot and the patch will appear.
Send
The Send button presents three options:
• Current Preset – Sends the program that is currently loaded on the Editor panel.
• FX Bank Preset – Sends the unmodified current VST program to the Voyager, allowing you to reset the
program if you return to the beginning of the son and need to undo any changes that automation may
have made to the sound.
• Send Automation preset – Sends a stream of all of the possible automation parameters to the DAW (host).
Moog Voyager PlugSE V1.0
5
Receive
The Receive button gets the currently selected Program from the Voyager.
WRITE
The WRITE button opens a dialog box that allows you to send the current Program to the Voyager and to be
written into the Voyager’s memory. You can change the Program name prior to saving it by right clicking in the
Name field and entering a new Program name. You can also save the Program to a differnet location using the
Bank and Program location buttons.
ADVANCED
The ADVANCED button accesses a new panel that allows you to control all the additional settings not available on the front panel of the Voyager, including modulation PGMs, Pot Mapping, Keyboard Triggering and
Touch Surface options. Additionally, this panel allows you to adjust the Filter and Volume envelope parameters
simply by clicking and dragging on the ADSR segments of these screens.
To close this screen and return to the Parameter Panel, click on ADVANCED button or use the OK button.
Please refer to the Voyager manual for complete details of all ‘under the hood’ parameter functions.
ABOUT
The ABOUT button produces a splash screen showing the version number and registration information (if the
product has been registered). To exit, click anywhere on the splash screen.
CHANNEL
The CHAN (Channel) button produces a drop down menu to select the MIDI channel for the automation
information.
Additional features of the Parameter Panel
Keyboard
The keyboard window duplicates the Voyager’s 44-note (F to C) keyboard with Pitchbend and Modulation
controls and Glide and Release switches. A drop down menu on the far right selects the velocity of the notes
played from this keyboard.
Moog Voyager PlugSE V1.0
6
LCD Screen
The LCD screen on the Interface Panel has two hot spots to assist in selecting a desired program. Clicking
anywhere in the Program number field (A:001 at the top) produces a listing of all of the programs in the current bank from which to make a selection. You can also change the bank and select from any program within
that new bank.
Clicking anywhere in the Category field (Sync at the bottom) produces a list of the available categories from
which a new category can be assigned.
Finale
We hope you will enjoy using this software. The Moog Voyager PlugSE Editor brings dynamic and exciting
automation possibilities to your Moog Voyager synth, and we expect you will spend many happy hours exploring all this program has to offer.
If you require more in-depth editing and/or unique program generation through the use of SoundTower’s
proprietary Program Morphing and Program Genetics, please download the full Pro Editor to demo and discover the additional available features. Programs developed in the full Pro Editors are fully compatible with
the PlugSE Editor.
For more information, please visit:
www.moogmusic.com/products/apps/voyager-plug-se
Moog Voyager PlugSE V1.0
7