1
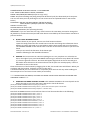
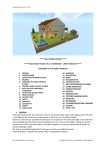
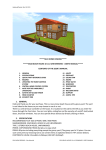
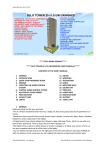
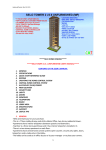
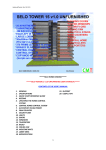
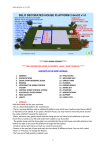
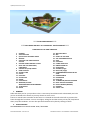
Updated/Posted: Dec 9, 2011
*****SELO HOME DESIGNS*****
*****SELO BEACH HOUSE 1 v3.0 FURNISHED - USER’S MANUAL*****
CONTENTS OF THE USER’S MANUAL
1.
2.
3.
4.
5.
6.
7.
8.
9.
10.
11.
12.
13.
14.
15.
16.
17.
18.
GENERAL
SPECIFICATIONS
QUICK START REFERENCE GUIDE
REZZING
UPDATING THE HOME CONTROL
SYSTEM
CENTRAL HOME CONTROL SYSTEM
NOTE FOR THE LANDLORDS /
LANDLADIES
AVATAR KEY (UUID) FINDER
PRIM COUNTER
SECURITY ORB
LIGHTS
FIREPLACE
CEILING FAN
DOORS
FENCE GATES
WINDOWS, ROUND
WINDOWS&SEMI-SOLID WINDOWS
TELEPORTERS
RADIO
19.
20.
21.
22.
23.
24.
25.
26.
27.
28.
29.
30.
31.
32.
33.
34.
35.
36.
37.
38.
WELCOME MATS
BED
PLANTS IN THE YARD
ART PAINTINGS&PHOTOS
POOL
FOUNTAIN
LIVING ROOM SETS
DINING ROOM SET
STUDY DESK
SHOWER (single)
BATH TUB (single)
GAZEBO&GARDEN BENCH IN THE
YARD
GARDEN BENCH
CHANDELIER
PATIO SET
TV MONITOR/TEXTURE CHANGER
RUGS-TEXTURE CHANGING
PHOTO FRAMES (MESHED)
SUPPORT
USEFUL TIPS
1. GENERAL:
Hello and thank you for your purchase. This is a two-storey beach house with a decorated yard. The
yard is not linked to the house so you may choose to use it or not.
There is a central house controller at the house. It is located on the wall to the left as you enter the
house through the front door. You can turn lights, ceiling-fan and the security orb on/off, lock/unlock
doors, tint/clear windows. You can also operate these devices by directly clicking on them.
2. SPECIFICATIONS
RECOMMENDED PLOT SIZE & PRIMS: 4096 / 960 PRIMS
SELO HOME DESIGNS – Selo Wozniak
SELO BEACH HOUSE 1 v3.0 FURNISHED- USER’S MANUAL
Updated/Posted: Dec 9, 2011
NAME&VERSION: SELO BEACH HOUSE 1 v3.0 FURNISHED
TYPE: THREE-STOREY BEACH HOUSE, FURNISHED
PERMS: COPY/MOD/NO TRANS (Scripts are copy only!)
PRIMS: 164 prims including everything except the decorated yard. (The decorated yard is 43 prims.
You can save some prims by choosing not to use certain items as explained below in TIPs section
below.)
FOOTPRINTS: HOUSE: 30mx30m=900sqm (90’x90’=8,100sqf)
YARD: 50x50m=2,500sqm (150’x150’=22,500sqf)
HEIGHT: 18 meters (54’)
CEILING HEIGHT: 6 meters (18’)
ID_Number, 09122011 (The operating channel).
IMPORTANT: If you rez more than one copy of the house on the same SIM, you need to change this
ID_Number in the Central Control pad and other devices controlled by the central home controller to
prevent conflicts.
3. QUICK START REFERENCE GUIDE
-Rez the house on your parcel, move it to its final location and Save.
-Open the config notecard in the central home controller and change the information there.
Replace my name and UUID, my e-mail address and the prims quota with your information.
-Click UPDATE SYSTEM on the central home controller on the wall to the left as you enter the
house.
-Now you can use all the functions of the house right.
-Read the following for the detailed information.
4. REZZING: The house comes in a Rez-Faux package so it is very simple to rezz. Place the rez
box on the edge of your parcel with FRONT side facing you and move it up about half a meter
(2’) from the ground. Click on it. Rez menu will appear. Right click on the rez box and go to
Edit mode. Now click Rez on the menu and wait until all parts are rezzed properly. It will rez
behind the rez box in the center.
Place the house to its final location by dragging the rez box, the rezzed house will follow it. When you
are happy with the location, click Save or Store on the menu.
I would recommend you to rez the house on a separate parcel and not with any other buildings on
the same parcel so it can have its own media (TV and radio).
*****AFTER SAVING THE HOUSE, YOU NEED TO UNLINK THE SECURITY ORB! SEE TIPS BELOW FOR
UNLINKING A PRIM!*****
5. UPDATING THE HOME CONTROL SYSTEM: Click UPDATE SYSTEM on the control panel on the
wall to the right as you enter the house. Wait until it checks all devices.
[00:41] SELO HOME CONTROLLER-SHC: Preparing to poll devices...
[00:41] SELO HOME CONTROLLER-SHC: Polling devices... please wait until timer expires in 20 seconds...
[00:42] SELO HOME CONTROLLER-SHC: Polling complete... controller ready
Now click on REPORT STATUS. You should see chats in local chat window like in the following:
[00:42] SELO HOME CONTROLLER-SHC: Door 1, count = 1
[00:42] SELO HOME CONTROLLER-SHC: Door 2, count = 1
[00:42] SELO HOME CONTROLLER-SHC: Door 3, count = 2
[00:42] SELO HOME CONTROLLER-SHC: Light 1, count = 2
[00:42] SELO HOME CONTROLLER-SHC: Light 2, count = 3
[00:42] SELO HOME CONTROLLER-SHC: Window 1, count = 2
[00:42] SELO HOME CONTROLLER-SHC: Window 2, count = 2
[00:42] SELO HOME CONTROLLER-SHC: Window 3, count = 2
[00:42] SELO HOME CONTROLLER-SHC: Window 4, count = 1
[00:42] SELO HOME CONTROLLER-SHC: Fire 1, count = 2
SELO HOME DESIGNS – Selo Wozniak
SELO BEACH HOUSE 1 v3.0 FURNISHED- USER’S MANUAL
Updated/Posted: Dec 9, 2011
[00:42] SELO HOME CONTROLLER-SHC: Radio 1, count = 1
[00:42] SELO HOME CONTROLLER-SHC: Security 1, count = 1
[00:42] SELO HOME CONTROLLER-SHC: Tp 1, count = 5
[00:42] SELO HOME CONTROLLER-SHC: Fan 1, count = 1
If you see all those devices as shown above, then you can start using your house. If the SIM is laggy
and you don’t see all those devices there as shown, then, increase the polling delay on the config
notecard inside the Controller as shown below or even a higher value:
Polling Delay,20 >>>>> Polling Delay,30
6. CENTRAL HOME CONTROL SYSTEM: I have used my own Home Control System, SELO HOME
CONTROL SYSTEM, in this house. The home control pad is on the wall to the right as you
enter the house through the front door. You can control the devices by directly clicking on
them or you can use the Central Home Control System panel. Using the panel would be more
convenient if you wanted to close/open all the windows, lock/unlock all the doors or turn
on/off all the lights at the same time, for example.
You must edit the notecard in the controller panel before you use the house by entering your own
information. Open the config notecard in the controller at the house and remove my name&UUID
and add yours and add your e-mail and change the prims quota as it is shown there. You need to
enter the renters’ names and UUIDs (Avatar keys) into the notecard in the controller where my name
is so their prims can be counted by the system.
The Central Home Controller in the house controls the lights inside and outside, the radio, the
teleporters, the security, the doors (including the fence gates), ceiling fan and the windows. You can
also operate them by directly clicking on them.
7. NOTE FOR THE LANDLORDS/LANDLADIES: When someone rents this house, just add the
renter’s name and UUID (Avatar key) as a user on the config notecard in the Controller. The
Controller will read the Notecard and reset itself and the the renter can start using the
house/the system. He/she will be able to use all the devices controlled by that Controller at
the house. Add a renter as shown below, one user on one line and no space before or after
commas!
User,Selo Wozniak,026a59e2-ef34-4eb4-8e39-ec3edf7e7a5c
If necessary, update the controller as explained above.
8. AVATAR KEY (UUID) FINDER: An avatar key (UUID) finder is added to the package and it will
rez in front of the Controller panel in the house. Just click it and you will see your UUID in
local chat.
9. PRIM COUNTER: Central Home Controller panel is also a prim counter. You see the prims
over the panel as a hovertext. You need to add renters as users into the controllers and their
prims will be counted. You may not want to add your name on the renters’ controllers as
you only need to see their prim usages. When the allocated quota is exceeded, the hovertext
goes red. When the prims are normal, it is white.
10. SECURITY ORB: The black round device on the ceiling on the first floor inside the house is the
security orb. It is configured already. Just click to turn it on (it is red then) or off (it is black).
11. LIGHTS: Lights: There are lights inside and outside the house. You can turn them on/off by
clicking on them. You can change the light colors by editing the values on the config
SELO HOME DESIGNS – Selo Wozniak
SELO BEACH HOUSE 1 v3.0 FURNISHED- USER’S MANUAL
Updated/Posted: Dec 9, 2011
notecards inside the lights. The lights are sculpted. Please see the TIPS section for sculpted
prims.
12. FIREPLACES:
FIREPLACE 1 (with no chimney): Just click on the fireplaces to turn it on or off.
FIREPLACE 2 (with the chimney): Just click on the grate to turn it on or off. You can also turn it on by
clicking on the shell. If you click on the shell after it is turned on, you will turn on or off the crackling
fire sound.
13. CEILING FAN: There is a ceiling fan in the house. Click on the ceiling fan to get the menu. It
has Gentle-Slow-Medium-Fast speed levels to start the fan. You can also turn it off. Please
NEVER link ceiling fans to the building!
14. DOORS: The swing doors and the fence gates will open automatically when you walk into
them. There are 9 door textures for the house doors and 10 textures for fence gates to
choose from. Click on the door and keep it clicked for 15-20 seconds (depending on how
laggy the SIM is at that time) and release. You will see the menu. Just try a different texture
on inner/outer/edge surfaces. After you have finished, remember to click DONE. You can add
any door textures using the existing ones as a sample/guide.
Using doors via the Controller: Click on DOOR on the Controller… (select the door, for example, 1 or
ALL…) Lock or unlock the door.
15. FENCE GATES: There are ten different textures for the fence gates to choose from. Change
textures as explained above in “Doors” section.
16. WINDOWS, ROUND WINDOWS & SEMI-SOLID WINDOWS:
WINDOWS: There are tinting windows in the house. You can click on windows to tint/clear them. You
can open/close them all at once through the Central Home Controller.
Using windows via the Controller: Click on WINDOW on the controller… ALL… Open or close all the
windows.
ROUND WINDOWS: There are 2 round Windows and you can change their textures in the same way
as explained in DOORS section above. There are ten interior window textures and ten matching
exterior window textures to choose from.
SEMI-SOLID WINDOWS: There are two windows to the left and the right of the round windows and
they are clear on the inside permanently and they are solid walls on the outside permanently.
17. TELEPORTERS: Click on any TP pad and choose your destination (Downstairs, Upstairs,
Balcony, FrontYard and BackYard) on the menu that will pop up. There are 5 TP pads at the
house.
18. RADIO: The radio is located on the wall to the right as you enter the house through the front
door. Click on the radio and choose a station (URL) from the menu that will pop up. You can
add a radio station (URL) into the radio by adding your URL onto the Channels notecard as
shown below:
Slow Radio=http://streams.slowradio.com/mp3/128
19. WELCOME MAT: There is a scripted welcome mat at the front doorstep. You can change the
texture by clicking on them and selecting Next or Previous from the menu that will pop up.
There are 10 different welcome mat textures to choose from.
SELO HOME DESIGNS – Selo Wozniak
SELO BEACH HOUSE 1 v3.0 FURNISHED- USER’S MANUAL
Updated/Posted: Dec 9, 2011
~~The welcome mat, the ceiling fan, the fireplaces and the garden lamps are not linked so you can
make copies and use more around the house.~~
20. BED: Click the bed and select 3 categories. A sub menu will appear and also pose balls will
appear on the bed. Right click and select LOVE. When it asks you “Animate your avatar?”
Select “Yes”. Have fun! When it is not in use, click bed… STOP. The poseballs will disappear.
You can take the bed topper if you don’t want to use it and save 3 prims. To change the
textures of the cover, pillows, mattress and the bed base: Click on the headboard. There is
also a separate notecard with detailed information about the bed added in the rez box for
you to read.
21. PLANTS IN THE YARD: They are not linked and they are phantom so they won’t be a problem
while you are walking around them. Please don’t link anything phantom to the house or the
yard platform.
22. ART PAINTINGS&PHOTOS: There are 5 photographs of beautiful sceneries hung on the walls
and they are not linked to the house. You can hang them anywhere you like if you choose to
use them.
23. POOL: There is a 2 prims pool in the corner of the yard and it is for decoration only but you
may wnat to add some animated poseballs and use.
24. FOUNTAIN: There is a nice fountain added in the yard. Click the marble part and choose from
10 different marble textures. It is not linked so you can move it anywhere you like around the
house. It is copy/mod so you can add more fountains or resize it. I leaft it “phantom” so you
can walk around it easily but you can uncheck phantom if you like.
25. LIVING ROOM SETS: Just right click and sit. The living room set upsairs has a texture changer.
There are 11 different leather and sating textures to choose from. Just click to change the
textures.
26. DINING ROOM SET: There is a nice dining room set with 4 chairs.
27. STUDY DESK: There is a nice study desk (Escritoire) with a chair downstairs.
28. SHOWER (single): Click the shower door to open/close it. Click poseball in the shower cabin
to sit and turn on/off the water by clicking on the valve to have a shower! Have fun!
29. BATH TUB (single): Right click and Sit to start having a bath. Left click and select 8 marble
textures.
30. GAZEBO&GARDEN BENCH IN THE YARD: There is a nice gazebo with ivies in the yard. There
is also a nice garden bench under the gazebo and 2 people can sit on it.
31. GARDEN BENCH: There is another single garden bench in the yard. You can change the
textures of that single bench by clicking on it. There are ten different wood textures to
choose from.
32. CHANDELIER: There is a nice chandelier over the dining room set. Click on the chandelier to
turn on/off or use Previous/Next buttons to change the chandelier textures. There are 18
chandeliers to choose from. It is not linked to the house so you can move it around the
house.
SELO HOME DESIGNS – Selo Wozniak
SELO BEACH HOUSE 1 v3.0 FURNISHED- USER’S MANUAL
Updated/Posted: Dec 9, 2011
33. PATIO SET: There is a nice patio set with 4 chairs on the balcony. You can use it anywhere
you like around the house. Right click and sit. You can cange their textures by clicking and
using the menu that will pop up. There are 9 different rattan and bamboo textures to chose
from.
34. TV MONITOR/TEXTURE CHANGER: There are two TV monitors/texture changers, upstairs
and downstairs on beautiful TV stands. You can buy a TV from a reputable TV stores like
ICARUS, Visitec, NHC MEDIA CENTER, DAMANI or any other TV store and place it at your
home. You can use these 2 TVs as monitors (dummy TVs). Click on screen… Video. You can
also use them as texture changers. Place textures (pictures) into its content. Click on the
screen… Pictures… Loop… it will change the pictures every 30 seconds or Pictures… Browse…
Back or Next to view them manually.
35. RUGS-TEXTURE CHANGING: You can click on the rugs and change textures. There are 10
different textures to choose from for the interior rugs and the rug on the balcony has no
texture changer but you may want to make a copy of one of the interior rugs and replace
that rug there.
36. PHOTO FRAMES (MESHED): I have placed two meshed photo frames with two beautiful
angel pictures on them. You can replace those pictures with any picture you like. They are
not linked so you can move them around or resize as you need. You need a mesh-enabled
viewer to see them right. See TIP 9 below.
37. SUPPORT:
*You can get support for my creations indefinitely for free.
**Future updates will be delivered to you for free.
***If Marketplace or my rez vendors fail to deliver the item you buy, send me an IM inworld or an email to: [email protected] with the number and date of the purchase and I will redeliver the
product to you directly.
**** All sales are final as this is a copy/mod-no trans building and no money will be refunded.
SELO HOME DESIGNS may offer support for any modifications you may have made on the purchased
build. In case of any texture loss, malfunctioning of scripts because of unlinking components or any
other malfunction due to manipulation will not be repaired by SHD. Please rezz a fresh copy of your
SHD prefab in case you can't fix the error you caused.
38. USEFUL TIPS:
TIP-1: After you have rezzed and saved the building, take some values for future reference. If you
need to rezz the building at exactly the same location, you can use these values.
POSITION: X:
Y:
Z:
ROTATION: X:
Y:
Z:
TIP-2: How to unlink a prim: Right click on that prim… Edit… check the Edit linked parts box on top…
now left click on the prim to be unlinked… Go to Tools menu on top of SL screen… click Unlink. The
prim is unlinked.
TIP-3: You can resize all prims including mega prims at this house now! You can also change their
textures and colors.
SELO HOME DESIGNS – Selo Wozniak
SELO BEACH HOUSE 1 v3.0 FURNISHED- USER’S MANUAL
Updated/Posted: Dec 9, 2011
TIP-4: You can get someone’s UUID number (Avatar Key) by having them click on a UUID (Avatar key)
finder supplied to you in the rez box. If you use Phoenix or Firestorm Viewer, then, you can see
someone’s UUID number when you check their profile. The UUID Finder will rez in front of the
central controller when you rez the building (in the lobby for the towers).
TIP 5: You can save some prims by choosing not to use some items like lights, welcome mat, ceilingfan, palm-trees, etc. However, I would recommend you keep them as they add to the house.
TIP 6: If you mess up the house badly, rezzing a fresh copy is always better than trying to fix it.
TIP 7: Sculpted prims (Now any prim larger than 64mx64mx64m is a mega prim-if used) (sculptured
prims, sculptees or sculpties) are being used in SL more and more not only to save prims but also to
make the buildings look more beautiful and realistic. In order to minimize sculpted prim and texture
distortion, do the following and please pass this information around:
*On the top SL menu, go to Advanced (Press Ctrl+Alt+D if it isn't already there),
*Click on Debug Settings,
*In the window that opens, type (or cut and paste): RenderVolumeLODFactor (as one word) on the
topline,
*Change the numerical value below it to 4.
And also make sure renderdynamicLOD = false in Debug Settings. Now the sculpts and textures will
not distort when viewing from a distance.
TIP 8: If you rez the building on or near the edge of the SIM border, your building may not rez right or
some parts may be returned to your Lost and Found folder by the system. Rez it far from the SIM
border and then drag it to your parcel and locate it to its final location. Also, sometimes it may be
necessary to move the rez box up and down slightly in order for all parts rez and position right.
TIP 9: Meshed items: If there are any meshed items at your buidling, you must have a mesh-enabled
viewer to see them right like the latest version of SL Viewer, Firestorm, etc.
P.S. 1 I am also the owner of SELO RENTALS (Ashmore Island) and I rent out beautiful private houses
and apartments on the ground and in sky. Please feel free to stop by and check my SIM if you also
need a rental home.
P.S. 2 I would highly recommend you to use this building on your own land and not on someone
else’s land or on Group owned land. I would not provide support for any of my builds used on Group
land, you can use them at your own risk. If you use this build on a Group land, after you save the
building, just deed the radio to the Group of the land and it should work fine.
Please feel free to contact me if you need any help with this building.
Selo Wozniak
SELO HOME DESIGNS – Selo Wozniak
SELO BEACH HOUSE 1 v3.0 FURNISHED- USER’S MANUAL