1
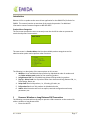
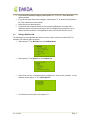
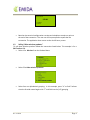
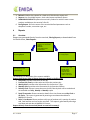
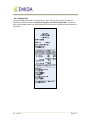
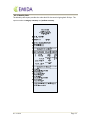
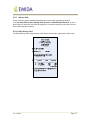
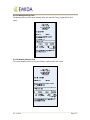
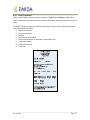
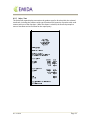
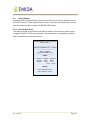
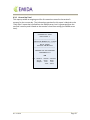
 Omni 37xx/Vx Menu Driven Software User Guide Debisys 4.13 Release User Manual Release 4.10D
Table of Contents INTRODUCTION .................................................................................................................. 2 Product Menu Categories ............................................................................................. 2 1. PROCESS A WIRELESS OR LONG DISTANCE PIN TRANSACTION .................................. 2 1.1 SELLING A WIRELESS PIN .............................................................................................. 3 1.2 SELLING "OTHER WIRELESS PRODUCTS" ...................................................................... 4 1.3 SELLING A LONG DISTANCE PIN .................................................................................... 5 2. SELLING "TOP UP ‐ OTHER PRODUCTS" ..................................................................... 6 3. SELLING A LD CARD ................................................................................................... 7 4. PRODUCT LIST ........................................................................................................... 8 5. ADMINSTRATIVE FUNCTIONS .................................................................................... 8 6. REPORTS ................................................................................................................... 9 6.1 Overivew ....................................................................................................................... 9 6.2 Sales Report ................................................................................................................ 10 6.2.1 Daily Sales ............................................................................................................... 11 6.2.2 Previous Day Total ................................................................................................... 12 6.2.3 Weekly Sales ........................................................................................................... 13 6.2.4 Monthly Sales .......................................................................................................... 14 6.2.5 Sales by Clerk ........................................................................................................... 15 6.2.5.1 Daily Sales by Clerk ............................................................................................... 15 6.2.5.2 Weekly Sales by Clerk .......................................................................................... 16 6.2.5.3 Monthly Sales by Clerk ......................................................................................... 16 6.2.6 Detail Transaction .................................................................................................... 17 6.2.6.1 Detail Transaction by Clerk ................................................................................... 17 6.2.6.2 Detail Transaction All Clerks ................................................................................ 17 6.2.7 Sales / Cost .............................................................................................................. 18 6.3 Closing Reports ........................................................................................................... 19 6.3.1 Current Batch Total .................................................................................................. 19 6.3.2 Current Day Total ..................................................................................................... 20 6.3.3 Batch Close ............................................................................................................... 21 7. AUTOMATIC UPDATES ............................................................................................ 22 8. RETURNS ................................................................................................................. 22 Rev: 05XX08
Page 1
Introduction Release 4.13 is an update to the menu driven application for the OMNI 37xx/Vx Series for EMIDA. This manual contains an overview of the terminal operation. For additional information contact Customer Support at 800.650.8787. Product Menu Categories The first screen prompts the user to correctly enter the clerk ID in order to operate the terminal and process a transaction: The next screen is a Product Menu that lists the available product categorizes and an administration option used to perform other functions: The following is a description of the menu options on this screen: 1. Wireless: List of available wireless products by alphabetical order of vendors and any Other wireless prod option for the remaining vendors 2. Long distance PIN: List of available long distance PIN providers by product 3. Top Up – Other Prod: List of products other than wireless and long distance PIN, i.e., Telcel Amigo, Boost, etc. 4. Swipe Card: Hard card products, i.e., LD cards, gift cards, etc. 5. Full product list: List of ALL products in alphabetical order 6. Admin: Administrative tools such as reports, terminal configuration and setup parameters, etc. 1
Process a Wireless or Long Distance PIN Transaction The following overview outlines the steps to process a PIN transaction on the terminal for either a wireless or long distance PIN: • Enter the clerk ID Rev: 05XX08
Page 2
•
•
•
•
If you know the product category, select option “1”, “2” or “3”. Then select the correct product If you do not know the product category, select option “5” to access the full product list. Then select the correct product Select the correct denomination Transaction will complete. Based on the terminal configuration a receipt and a duplicate receipt can print; a setting can also be configured to prompt the user to repeat the last transaction. The application returns to the clerk ID entry screen 1.1
Selling a Wireless PIN The following is a more detailed description on how to sell / process a wireless PIN. This example is for a Boost $30 transaction: • Select option “1” for Wireless from the Product Menu: • Select option “1” for Boost from the Product List: • Select from the list of denominations available for that service provider. In this example, select option “2” for a Boost $30 PIN • To confirm the transaction, select option “1”. Rev: 05XX08
Page 3
Boost $30.00
$30.00
1. Confirm
2. Cancel
•
Based on the terminal configuration a receipt and a duplicate receipt can print at the end of the transaction. The user can also be prompted to repeat the last transaction. The application then returns to the clerk ID entry screen 1.2
Selling “Other wireless products” To sell these wireless products follow the instructions listed below. This example is for a $30 Tracfone PIN. • Select 1 for Wireless from the Product Menu: • Select 5 for Other wireless products • Select from an alphabetical grouping. In this example, press “4” to find Tracfone since the Provider name begins with “T” and falls into the (V‐Z) grouping Rev: 05XX08
Page 4
•
The screen will display the (V‐Z) providers. Locate the correct provider. In this example, select option “4” for Tracfone: •
Select the product denomination. In this example select option “1” for a Tracfone $19.99 PIN: •
The selected provider and denomination are displayed. To cancel the transaction, select option “2”. To confirm the transaction, select option “1”. Based on the terminal configuration a receipt and a duplicate receipt will be generated. The application then returns to the clerk ID entry screen 1.3
Selling a Long Distance PIN This process is the same as in Section 1.1 and 1.2, but select option “2” from the Product Menu. The products displayed will be Long Distance PIN products. As a note all PIN products sold will have the PIN number on the customer receipt and the duplicate receipt. Rev: 05XX08
Page 5
2
Selling “Top up – Other Products” “Top Up – Other Products” provides a list of top up and other products that are not wireless or long distance. Boost Pay Go/RTR is an example of this other type of product. Follow the same process as outlined in Section 1.0 following the provided menus and prompts to complete a transaction. To Process a Boost Pay Go / RTR follow the steps below… First select option “3” from the Product Menu ‐ Top UP ‐ Other products 1. Wireless
2. Long Distance PIN
3. Top Up – Other Prod
4. Swipe Card
5. Full product List
6. Admin
Press 1 for Boost TopUp Top Up – Other Products
1. Boost Topup
2. Test
The terminal will request the end user’s account number (“phone number”)… Please enter the account number and press enter Enter Account #
**Note, when prompted “Enter Account #” for a top up product please always enter the telephone number with area code first On the next screen the terminal will allow you to confirm the account number for the transaction. If the account number is correct, please press enter to continue if not, just press the RED key to back to the beginning of the sequence where you chose Boost Topup. Rev: 05XX08
Confirm
Account #
9495551212
Page 6
On the next screen, the terminal will allow you to choose the denomination for the transaction 1.Paygo $10-$19
2.Paygo $20-$99
Next the terminal will request the amount for the transaction… Please enter the correct dollar amount and press enter. ENTER AMOUNT
Next the terminal will ask to confirm or cancel the transaction… You can press 1 to confirm and continue with the transaction or 2 to cancel the transaction. Boost TopUp $10.00
$10.00
1.confirm
2.cancel
3
Processing Swipe Card Products Follow the same process as outlined in Section 1.0 following the provided menus and prompts to complete a transaction. However, first select option “4” from the Product Menu: 1. Wireless
2. Long Distance PIN
3. Top Up – Other Prod
4. Swipe Card
5. Full product List
6. Admin
The next menu will prompt you to select either 1. Sale 2. Balance or 3. Refund. To activate a card, select 1. Sale, swipe the card and then select the amount to be added. To get a Rev: 05XX08
Page 7
balance on an activated card, select 2. Balance and swipe the card. To request a refund on n activated card select 3. Refund, swipe the card and follow the menus. 4
Full Product List If option “5”, Full Product List, is selected from the Product Menu, all products offered by that terminal are displayed alphabetically. The below example shows the Virgin Mobile $10 PIN purchase transaction: 1. Wireless
2. Long Distance PIN
3. Top Up – Other Prod
4. Swipe Card
5. Full product List
6. Admin
1. Products (A - G)
2. Products (H – N)
3. Products (O – U)
4. Products (V – Z)
1. Verizon
2. VIVA
3. Cingular
4. Virgin Mobile
5. Widgate
1. Virgin $10
2. Virgin $20
3. Virgin $30
4. Virgin $50
5
Administrative Functions The terminal configuration settings/options are available through option 6. Admin on the Product Menu. After selecting option “6” a menu appears with the most commonly utilized functions available as options “1” through “6”: 1. Wireless
2. Long Distance PIN
3. Top Up – Other Prod
4. Swipe Card
5. Full product List
6. Admin
1. Reprint Last Receipt
2. Repeat Last transaction
3. Refund
4. Reports
5. DOWNLOAD PRODUCT
6. Config Report
7. Other Admin
The following is a description of each of these options: 1. Reprint Last Receipt: Selecting this option will reprint a copy of the receipt for the last transaction that was processed on the terminal 2. Repeat Last Transaction: Selecting this option will process a duplicate of the last transaction without having to re‐key all the steps for the transaction. *Note that this will not be available if the batch report has been closed since the last transaction. Rev: 05XX08
Page 8
3. Refund: Initializes the request for a hard card, PIN refund or topup void 4. Reports: List of available reports – both sales reports and batch reports 5. DOWNLOAD PRODUCT: update the terminal’s product list with the most current products available per the terminal’s Site ID 6. Config Report: Prints the status of the terminal‐defined parameters such as telephone number, connection type, etc. 6
Reports 6.1
Overview Reports are generated directly from the terminal, Closing Reports, or downloaded from the Emida server, Sales Reports: 1. Reprint Last Receipt
2. Repeat Last Transaction
3. Refund
4. Reports
5. Download Product
6. Other Admin
1. Sales Report
1. Sales Report
2. Closing Report
2. Closing Report
1. Daily Sales
1. Current Batch Total
2. Previous Day Total
2. Current Day Total
3. Weekly Sales
3. Batch Close
4. Monthly Sales
5. Sales by Clerk
6. Detail Transaction
7. Sales / Cost Report
The following is a description of the reports available. Reports from Server (note all Server reports are based on Pacific time): 1. Daily Sales: provides sales total for the day 2. Previous Day Total: provides sales total from the previous day 3. Weekly Sales: provides sales information for the previous 7 days 4. Monthly Sales: provides sales information for the previous 30 days 5. Sales by Clerk: If there is more than one clerk ID, sales by clerk can be tracked and are available as a Daily, Weekly or Monthly report 6. Detail Transaction: Shows transaction details for a time frame entered By Clerk or All Clerks. This report is generated by entering a start date and end date in MMDDYYYY format. 7. Sales / Cost Report: Shows products sold, type of product sold , quantity of product sold, retail amount and cost to the merchant. This report is generated by entering a start date and end date in MMDDYYYY format. Reports directly from the terminal (based on terminal’s memory): Rev: 05XX08
Page 9
1. Current Batch Total: This report displays sales since the last “batch close” was processed and shows all sales by product 2. Current Day Total: This report is commonly used to “close” the shift, or finalize sales, at the end of the day. The information contained in this report is identical to the “Daily Sales” report that is pulled from the server except that it is based off of the terminal’s memory. All sales included in this report are from the current day (based on the terminal’s local time) 3. Batch Close: This report closes all shifts and batches since the previous “batch close” was processed. **It is recommended to process this report frequently since it is required to clear the terminal’s memory. NOTE that if you do not process this report, your terminal will accumulate memory over time and will cease to function properly *As a general note, all available merchant reports on the terminal include credit, void and return transactions. 6.2
Sales Reports Sales Reports are downloaded from the Emida server and provide actual sales‐to‐date either in summary or detail, as well as the type of product, quantity sold, retail amount, cost to the merchant and merchant profit. 6.2.1 Daily Sales Rev: 05XX08
Page 10
The daily sales report displays all sales for the current day. The report is broken out into two sections: summary by category and summary by product. Summary by Category displays the transactions by category type (Wireless, LD, Top Up, etc.). The amount collected for the sale and the profit amount (based on the merchant’s commission rate) are both displayed. Finally, the amount the merchant owes (TOTAL COST) for the sales is provided in this section, and is calculated by taking the amount collected and subtracting the merchant’s profit. Summary by Product displays the transactions by product type. This section of the report includes the product ID as well as the amount collected for the product and the profit amount. The sales date covered by the report is displayed under the title – “DAILY SUMMARY REPORT”. The date & time in which the report was generated are listed at the very bottom of the report. A reference number is provided as well. Rev: 05XX08
Page 11
6.2.2 Previous Daily Total The Previous Day Total report provides the sales results from the previous day. Rev: 05XX08
Page 12
6.2.3 Weekly Sales This report displays the sales for the previous 7 days. Like the daily report, the report is broken out into two sections: summary by category and summary by product. As you can see by the example below, the report displays the time frame it references clearly below the report title. Rev: 05XX08
Page 13
6.2.4 Monthly Sales The Monthly sales report provides the sales detail for the terminal going back 30 days. The report contains a category summary and product summary. Rev: 05XX08
Page 14
6.2.5 Sales by Clerk There are three reports available that allow you to view sales organized by clerk ID, including Daily Sales by Clerk, Weekly Sales by Clerk and Monthly Sales by Clerk. In cases where there is more than one clerk ID assigned to a terminal; sales by a particular clerk can be tracked using these reports. 6.2.5.1 Daily Sales by Clerk The Daily Sales by Clerk report displays sales for the current day, organized by clerk name: Rev: 05XX08
Page 15
6.2.5.2 Weekly Sales by Clerk The Weekly Sales by Clerk report displays sales over the past 7 days, organized by clerk name: 6.2.5.3 Monthly Sales by Clerk This report displays sales over the past 30 days, organized by clerk name: Rev: 05XX08
Page 16
6.2.6 Detail Transaction There are two Detail Transaction reports available ‐ By Clerk and All Clerks. When either report is selected, the terminal prompts to enter a Start Date and an End Date for the report query. The Detail Transaction reports provide the following information about all sales processed over the selected time frame: • Date of transaction • Time of transaction • Product • Sale amount (retail value) • Profit amount (based on merchant’s commission rate) • Total retail amount • Total profit amount • Total cost Rev: 05XX08
Page 17
6.2.7 Sales / Cost The Sales/Cost report displays transactions by product type for all sales within the selected timeframe, including the products sold, type of product sold, quantity of product sold, retail amount and cost to the merchant. When the report is selected, the terminal prompts to enter a Start Date and an End Date for the report query. Rev: 05XX08
Page 18
6.3
Closing Reports Closing Reports are generated from the terminal itself; they are driven by data from the terminal’s memory. These reports allow the user to see the current batch total, current sales for the day as well as process the BATCH CLOSE report. 6.3.1 Current Batch Total This report provides all transaction information stored in the terminal’s memory since the previous BATCH CLOSE was processed. The transactions are displayed by product with a cumulative total near the bottom. CURRENT BATCH TOTAL REPORT
Batch Number: 3
--------------------------------------------------PRINT DATE: MM/DD/YYYY 12:00:00
--------------------------------------------------Site ID: 1234567
Site Name: ABC Merchant
--------------------------------------------------SALES
QTY
1
1
PRODUCT
AllTel 35
Wildgate 5
AMOUNT SUBTOTAL
$35.00
$35.00
$5.00
$5.00
TOTAL….$40.00
TOTALS
TOTAL TRANSACTIONS...2
TOTAL AMOUNT…$40.00
Rev: 05XX08
Page 19
6.3.2 Current Day Total This report provides an ongoing total for all transactions stored in the terminal’s memory for the current day. The information contained in this report is identical to the “Daily Sales” report that is pulled from the EMIDA server, but it is generated from the terminal’s memory and is based on the terminal’s local time setting (not EMIDA server time). CURRENT DAY TOTAL
Batch Number: 3
--------------------------------------------------PRINT DATE: MM/DD/YYYY 12:00:00
--------------------------------------------------Site ID: 1234567
Site Name: ABC Merchant
--------------------------------------------------CURRENT DAY TOTAL REPORT
FOR MM/DD/YYYY
PIN
QTY
1
1
PRODUCT
AllTel 35
Wildgate 5
AMOUNT SUBTOTAL
$35.00
$35.00
$5.00
$5.00
TOTAL….$40.00
Rev: 05XX08
Page 20
6.3.3 BATCH CLOSE This report closes the current batch of transactions and clears the terminal’s memory; once this report is published, the transaction information will no longer be available locally from the terminal’s memory. The report displays each item that was sold during the batch and additional detail for the sale is provided including the local transaction ID from the terminal that the product appears on. The total transaction count is given for the batch/shift as well as the total dollar amount for the products sold. **It is recommended to process this report frequently since it is required to clear the terminal’s memory. NOTE that if you do not process this report, your terminal will accumulate memory over time and will cease to function properly **Note that this sample is based on a JOURNAL BATCH CLOSE report. There is also a condensed version and a summary version which show less detail. BATCH REPORT
Batch ID Number 2
MM/DD/YYYY
12:00:00
SALES
PRODUCT: AV TEST $10
INV
$AMT
TRANS ID
3
$10.00
2,1
9
$10.00
2,1
TOTAL $20.00
PRODUCT: Telcel TEST
INV
$AMT
TRANS ID
4
$10.00
3,1
5
$10.00
3,1
TOTAL $20.00
PRODUCT: Boost TEST $20
INV
$AMT
TRANS ID
6
$20.00
2,1
TOTAL $20.00
PRODUCT: Buzz TEST $50
INV
$AMT
TRANS ID
7
$50.00
2,1
TOTAL $50.00
PRODUCT: BNH TEST $2
INV
$AMT
TRANS ID
10
$2.00
2,1
TOTAL $2.00
TOTAL TRANSACTIONS 7
GRAND TOTAL $112.00
Rev: 05XX08
Page 21
7
Automated Reports There are two automated transaction reports available for D413 – auto batch report and auto sales/cost report. These can be requested on the terminal’s configuration when it is initially processed by EMIDA. Note that you can also enable or edit both of these reports by entering the Verifone SYSTEM MODE MENU (press F2 & F4 at the same time and enter the password). You can enable the report parameters (listed in the sections below) within FILE GROUP 7. The parameters must be set to military time in HHMM format – so 12:30am is 0030. Please remember that the reports are triggered by the terminal’s local time setting. 7.1 Auto Batch Report The auto batch report is controlled by the #STIME parameter in File Group 7. When the terminal’s local time reaches the value for the #STIME parameter (ie. 0100 hours), it will trigger the BATCH CLOSE report automatically. This is ideal for ensuring that your terminal’s memory is regularly wiped clean preventing any performance issues. If you want to disable the auto batch report, you can set the #STIME parameter to 2500 (or any value above 2400 hours). 7.2 Auto Sales/Cost Report The auto sale/s cost report is controlled by the #R421TIME parameter in File Group 7. When the terminal’s local time reaches the value for the #R421TIME parameter (ie. 0100 hours), it will trigger the SALES/COST report automatically. Remember that the sales/cost report is generated by data from the EMIDA servers therefore it requires a live dial‐up or IP connection. If you want to disable the auto sales/cost report, you can set the #R421TIME parameter to 2500 (or any value above 2400 hours). 8
Refunds/Voids Version D413 supports refunds for pin sales and voids for topups. 8.1 PIN refunds 1.
Choose 6. Admin 2.
Choose 3. Refund 3.
Choose 3. Pin Request 4.
Enter pin number 8.2 Topup Voids 1.
Choose 6. Admin Rev: 05XX08
Page 22
2.
3.
4.
5.
6.
7.
Choose 3. Refund Choose 4. Void Enter Transaction number (reference number on sales receipt) Enter Mobile number Enter Amount of the sale Transaction will be voided or denied depending on response from provider Rev: 05XX08
Page 23