1
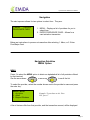
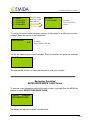
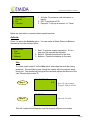
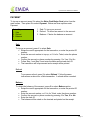
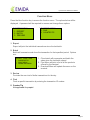
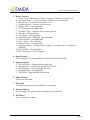
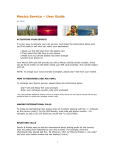
Lipman Nurit 8320 User Manual
Lipman Nurit 8320
User Manual
Page 1
Lipman Nurit 8320 User Manual
Table of Content
Navigation Guideline………………………………………………………………........ 3
Menu Option……………………………………………………………………… 3
Enter Prod/Swipe Card Option…………………………………………………. 4
Activate………………………………………………………………….... 5
Sales………………………………………………………………. 5
Refund………………………………………………………..…… 6
Balance………………………………………..………………..... 6
PIN……………………………………………………………………….... 6
Sales………………………………………………………………. 6
Refund………………………………………………………..…… 6
Payment............................................................................................. 6
Sales…………………………………………………….………... 7
Refund………………………………………………………..…… 7
Balance………………………………………..………………..... 7
Function Menu…………………………………………………………………………... 8
Terminal Menu…………………………………………………………………………… 9
Page 2
Lipman Nurit 8320 User Manual
Navigation
The start up menu allows for two options to select from. They are:
1. MENU
2-ENTER
PROD/SWIPE CARD
1. MENU – Displays a list of providers for you to
select from.
2. ENTER PROD/SWIPE CARD – Allows for a
card activation transaction.
Below are instructions to process a transaction after selecting 1. Menu, or 2. Enter
Prod/Swipe Card.
Navigation Guideline
MENU Option
MENU
Press 1 to select the MENU option to obtain an alphabetical list of all providers offered
by that terminal.
FORCED
RETURN
Use the arrow-down
or arrow-up
to scroll the list.
To select the provider, select the number shown next to the provider’s name and press
the enter key.
Select Carrier:
1. Air Voice
2. Alltell
3. Beyond Wireless
Example: To purchase an Air Voice
PIN press 1.
A list of choices offer from that provider, and the transaction amount, will be displayed.
Page 3
Lipman Nurit 8320 User Manual
Press the arrow down key to view
more options
Air Voice:
1. AirVoice$10
2. AirVoice$20
3. AirVoice$30
Air Voice:
4. AirVoice$50
Example:
To purchase $20,
Press 2.
To confirm the correct value has been selected, it will prompt for a dollar amount to be
entered. Enter the amount of the transaction.
Enter Amount:
0.00
Example:
Enter 2000 for $20.00.
You will be asked for your clerk ID number. Enter this number and press the enter key.
Clerk ID:
The terminal will connect, process the transaction, and print a receipt.
Navigation Guideline
ENTER PROD/SWIPE CARD Option
To process a card transaction without the need to select a provider from the MENU list,
press 2 to select ENTER PROD/SWIPE CARD.
1. MENU
2-ENTER
PROD/SWIPE CARD
The display will ask you to select from the below:
Page 4
Lipman Nurit 8320 User Manual
Prepaid Service
1. Activate
2. Pin
3. Payment
1 Activate: To process a card transaction or
inquiry.
2 PIN: To purchase a PIN.
3 Payment: To top-up an account, ie. Telcel.
Below are instructions to process these prepaid services.
Activate
Press 1 to select the Activate option. You can create a Sales, Refund or Balance
transaction from the Activate option.
Select Activate
1. Sale
2. Refund
3. Balance
1. Sale: To process a sales transaction. If it is a
new card, the card will be activated.
2. Refund: Refunds the amount to the card.
3. Balance: Checks the balance on the card.
Sale
To create a sale, press 1 for the Sale option, and swipe the card after being
prompted. The card has to pass through the reader with the magnetic stripe
facing out. The terminal will recognize the card and request the amount of the
sale, followed by the clerk ID.
SALE AMOUNT:
0.00
Step 1
Enter the sales amount.
Example 2000 for $20.00
CLERK ID:
Step 2
Enter the Clerk ID
This will complete the transaction and the terminal will print out a receipt.
Page 5
Lipman Nurit 8320 User Manual
Refund
To refund an amount back to the card, press 2 to select the Refund option.
Follow the same instructions as Step 1 and Step 2 above. A refund will be
issued to the card and a receipt will be printed.
Balance
To obtain the balance of a card, press 3 to select the Balance option. It will
request the card to be swiped and the entry of the Clerk ID before displaying and
printing the balance on the card.
PIN
To purchase a PIN, from the main menu press 2 to select the PIN option. Below are
two types of PIN transactions.
Select PIN Type
1. Sale
2. Refund
1. Sale: To process a PIN sale.
2. Refund: Returns the PIN for refund.
Sale
After pressing 1 to select the Sales option, enter the product ID number. This
product ID list should have been provided to you by the ISO.
PRODUCT ID:
Enter Product ID number
Follow Step 1 and Step 2, noted above, to complete transaction. After
completing the transaction, a receipt will be printed.
Refund
To return a PIN and obtain a refund, press 2 to select Refund. Follow the same
instructions as Step 1 and Step 2 above, and enter the PIN number. A refund
will be noted and debited back to the merchant.
Page 6
Lipman Nurit 8320 User Manual
PAYMENT
To top-up an account press 2 to select the Enter Prod/Swipe Card option from the
main screen. Then press 3 to select Payment. Below are three options under
Payment:
Select Payment:
1. Sale
2. Refund
3. Balance
1. Sale: To top-up an account.
2. Refund: To refund an amount to the account.
3. Balance: Checks the balance an account.
Sale
To top-up an account, press 1 to select Sale.
• Swipe the card if appropriate for the transaction, or enter the product ID
number.
• Enter the account number to top-up, or if it is for Telcel, enter the phone
number.
• Confirm the account or phone number by pressing 1 for Yes, 2 for No.
• Follow Step 1 and Step 2 and enter the sales amount and clerk ID.
• The transaction will be processed and a receipt will be printed.
Refund
To process a refund, press 2 to select Refund. Follow the same
instructions as above for a Sale transaction. A refund will be recorded.
Balance
To obtain the balance of the account, press 3 to select Balance option.
• Swipe the card if appropriate for the transaction, or enter the product ID
number.
• Enter the account number, or if it is for Telcel, enter the phone number.
• Confirm the account or phone number by pressing 1 for Yes, 2 for No.
• Enter the clerk ID.
• The balance will be noted on the terminal and printed on the receipt.
Page 7
Lipman Nurit 8320 User Manual
Function Menu
Press the blue function key to access the function menu. The options below will be
displayed. A password will be required to access and change these options.
FUNCTION MENU
1. REPORT
2. BATCH
3. PREVIEW
FUNCTION MENU
5. FIND
6. COUNTER TIP
1. Report
Report will print the individual transactions since the last batch.
2. Batch
Batch will summarize and close the transaction for that specified period. Options
are:
SELECT FUNCTION
1. CLOSE BATCH
2. PRINT MENU
3. DOWNLOAD MENU
1. Close batch will summarize and batch the
sales since the last batch closed.
2. Print Menu will print a list of all the products
offered by the terminal.
3. Download Menu will update the menu on the
terminal.
3. Review
Provides the sum total of dollar transactions for the day.
4. Find
Finds a specific transaction by entering the transaction ID number.
5. Counter Tip
Not applicable for prepaid.
Page 8
Lipman Nurit 8320 User Manual
Terminal Menu
To change the terminal setup press the red MENU button to access the options below .
Accessing and modifying these options will require a password. Note that some options
which are specific for the terminal and not applicable for prepaid transactions,
MENU SCREEN:
1. Display Trans.
2. Merch. Params
3. Merch. Options
Continue to scroll down the list using the arrow keys to view other options on the menu
list.
MENU SCREEN:
4. Hosts Params
5. System Options
6. Radio Params
MENU SCREEN:
7. Download
8. Communication
9. NOS Menu
Definitions
1. Display Trans.
Historical transactions can viewed by:
1. Scroll All – scrolling through all the transactions on the terminal.
2. By Trans. # - by a specific transaction number.
3. By Card Num. – by entering the card number.
2. Merch Params.
1. Authorization – Do not change this option, unless instructed by Emida.
2. Security Level – Do not change this option, unless instructed by Emida.
3. Edit Header – Do not change this option, unless instructed by Emida.
4. Edit Trailer – Do not change this option, unless instructed by Emida.
5. Set Cash EDC – Not applicable
6. Merchant Fee – Not applicable.
7. Set Batch Time – Sets a time for automatic daily batching of the transaction.
8. Ind. Prompts – Allows you to request for Clerk and Invoice ID.
9. Site ID – The site ID for the terminal. Do not change this ID number.
Page 9
Lipman Nurit 8320 User Manual
3. Merch. Options
1. Paper Type – Select type of paper: single ply, double ply, customized.
2. No-Paper Mode – Turn the no-paper mode on, off, or automatic.
3. Buzzer Set – Turn the key buzzer on or off
4. Operation Mode – Normal or demo mode
5. Battery Saver – Not applicable
6. Prt Disclaimer – Not applicable
7. Set Menu Type – Allow for auto or manual scroll
8. Set Halo – Not applicable
9. Print Setup – Not applicable
10. Store&Forward – Disabled. Not applicable.
11. Check Reader – Not applicable
12. Sign. Option – Not applicable
13. Bridge Comm – Not applicable
14. Language Setup – Change screen display, or receipt to print, in English or
Spanish.
15. Ext.CardRdr – Not applicable
16. ISP Connection – Do not change.
4. Hosts Params
Do not change the hosts parameters unless instruction by Emida.
5. System Options
1. Set Time/Date – Change the time and date
2. Set Batch No. – Change the number of the batch
5. Edit Database – Do not change this entry.
6. Working Mode – Not applicable
7. Test Mode – Sets terminal in test mode
6. Radio Params
Option not applicable.
7. Download
To update the provider list available for this terminal.
8. System Options
Do not change the system options installed on this terminal.
9. NOS Menu
Do not change this option.
Page 10