1
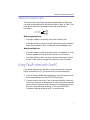
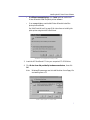
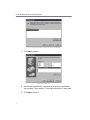
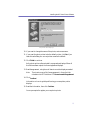
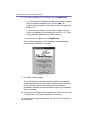
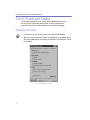
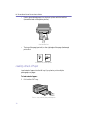
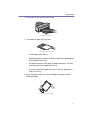
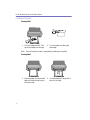
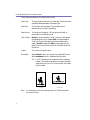
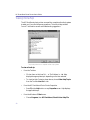
Introduction
Your HP PhotoSmart photo printer prints high-quality photographs suitable
for framing, putting into a photo album, or sharing with your family and
friends. It can also be used for creative projects such as making your own
collages, calendars, greeting cards, postcards, and invitations.
System Requirements
The HP PhotoSmart photo printer and its software are designed to work with
an IBM PC compatible computer running Microsoft® Windows® 95 or later.
Specific requirements are as follows:
Component
Minimum
Recommended
Processor
486-66 MHz
Pentium or better
RAM
16 MB
32 MB or more
Free hard disk
space*
80 MB
120 MB
Monitor/video
640 x 480, 256 colors
CD-ROM
Double-speed
Quad-speed or better
Sound card
Not required
8-bit Sound Blaster or
equivalent
800 x 600, high color
(16-bit)
* Applications used to create photo projects may require an additional 50 MB
to 100 MB of hard disk space.
1
HP PhotoSmart Photo Printer User’s Guide
Getting to Know Your HP PhotoSmart
Photo Printer
Top Door
Photo Cartridge
Door
Manual Feed
Door
Lights
Power Button
Paper Exit
OUT Tray IN Tray
2
•
Photo Cartridge Door - use this door to access the inside of the photo
printer to change photo cartridges or clear a paper jam.
•
Top Door - use this door to access the inside of the photo printer to clear
a paper jam.
•
Lights - indicate the status of the photo printer (such as ready to print).
•
Power Button - push this button to turn the photo printer on and off.
•
OUT Tray - pull this tray out to access the IN tray for loading paper, then
leave it out when you print (it holds the printed page).
•
IN Tray - pull this tray out to load a stack of paper.
•
Manual Feed Door - open this door to manually feed a single sheet of
paper into the photo printer. When the door is open, the manual feed tray
is available.
•
Paper Exit - the printed page comes out here.
Using Two Printers with One PC
Reading the Indicator Lights
The photo printer has two lights that show the general status of the printer.
Icons next to these lights help to indicate if the status is “good” or “bad.” If the
photo printer has an error, a message on the screen provides more
information.
Red light
Green light
When the green light is on:
•
If the light is steady (not blinking), the printer is ready to print.
•
If the light is blinking, the photo printer is busy (warming up or shutting
down, receiving data, printing, or waiting for the printed page to dry).
When the red light is on:
•
If the light is steady (not blinking), there is a user-correctable error. Check
the error message on the screen to find out how to correct the error.
•
If the light is blinking, there is an error that requires the photo printer to
be reset. Check the error message on the screen for more information.
Using Two Printers with One PC
If you already have a printer, and want to use the photo printer as a second
printer connected to one PC, you can do this any of the following ways:
1. If your PC has an available (extra) parallel port, use it for the photo printer.
Be sure the parallel port you use is IEEE 1284 compliant.
2. Connect one printer at a time. If you will be using the photo printer only
for photo projects, you can disconnect your other printer and connect the
photo printer only when you need it. When you’re using the photo printer,
be sure to use the cable that came with it. This ensures IEEE 1284
compliance, enabling the printer and PC to communicate.
3
HP PhotoSmart Photo Printer User’s Guide
3. Add a second parallel port. These ports are inexpensive and are usually sold
at computer supply stores. Be sure the port is IEEE 1284 compliant.
4. Use a switch box (sometimes called an A/B box). See details below.
Caution: Check your other printer’s warranty to be sure it can be used with
a switch box.
Using a Switch Box
If you are using more than one printer with a single computer, one way to
switch back and forth is to use a switch (A/B) box. You connect both printers
to the switch box and then use it to select which printer you want to use.
This is how your system will be set up using a switch box
Note:
When you switch from the photo printer to another printer, be sure the HP
PhotoSmart Toolbox is closed.
Connecting the Photo Printer Using a Switch Box
You will need the following cables:
4
•
Power cord for the other printer. (You probably already have this.)
•
Cable for connecting the other printer to your PC. (You probably already
have this.)
•
Cable for connecting the switch box to the computer. (Be sure the cable is
IEEE 1284 compliant.)
•
Cable and power cord that came with the photo printer.
Using Two Printers with One PC
To connect the photo printer using a switch box:
1. Shut down and turn off your computer and your current printer.
2. Disconnect your current printer cable from your computer.
3. Connect both printers to the switch box. (Use the cable that came with the
photo printer to connect it to the switch box.)
4. Connect the switch box to your PC.
5. Connect a power cord to the back of each printer.
6. Connect each power cord to a grounded electrical outlet.
7. On the switch box, turn the switch to the selection for the HP PhotoSmart
photo printer.
8. Turn on both printers.
9. Turn on your PC.
10. Install the HP PhotoSmart photo printer software (see “Installing the HP
Photo Printer Software” on page 6 for instructions).
Printing through a Switch Box
To print a photo:
1. Be sure the photo printer is turned ON.
2. Be sure the photo printer is selected on the switch box.
3. Begin printing.
Note:
The HP PhotoSmart photo printer, as well as some other HP printers,
includes a Toolbox that monitors the printer status. These printers use bidirectional communication between the PC and the printer to allow
printer information to be sent back to the PC. The HP PhotoSmart
Toolbox displays messages if the photo printer needs attention (such as if
it’s out of paper or not connected). For this Toolbox to work, the photo
printer must be selected on the switch box. Switching the switch box to the
other printer while the photo printer is busy or the Toolbox is running will
cause printer errors.
5
HP PhotoSmart Photo Printer User’s Guide
To switch printers:
Note:
In these instructions, replace “printer A” and “printer B” with the names
of your printers.
1. Be sure printer A is finished printing/drying.
2. If printer A has a Toolbox or Status Monitor, close it.
3. Turn the switch to select printer B.
4. Select printer B in your software application’s printer setup.
Installing the HP Photo Printer Software
When you connect your photo printer and start your computer, Windows 95
should recognize the new printer and prompt you to install its software (see
below). If Windows 95 does not automatically begin the installation, you can
install the software using the Add Printer Wizard (see “Add Printer Wizard”
on page 10).
Windows 95 Plug and Play
Windows 95 Plug and Play searches your system for new hardware at startup.
If it finds any, such as a new printer, it automatically prompts you to install
the software.
Note:
Connect the photo printer to your computer, and set it up, BEFORE
installing the software. See the Getting Started instructions, Steps 1-4,
for details.
To use Windows 95 Plug and Play:
1. Turn on the HP PhotoSmart photo printer.
2. When the green light on the photo printer remains ON (not blinking), turn
on your computer.
When Windows 95 starts up, it finds the new printer and displays the New
Hardware Found message, shown on the following page.
6
Installing the HP Photo Printer Software
•
If a different message displays, click Cancel and then use the Add
Printer Wizard to install the photo printer software.
•
If no message displays, use the Add Printer Wizard to install the
photo printer software.
See “Add Printer Wizard” on page 10 for instructions on installing the
photo printer using the Add Printer Wizard.
Windows 95 recognizes the new printer
3. Insert the HP PhotoSmart CD into your computer’s CD-ROM drive.
4. Click Driver from disk provided by hardware manufacturer, then click
OK.
Note:
Windows 95 assumes you want to install the driver from a floppy. We
are installing from a CD.
Enter or select your CD-ROM drive
7
HP PhotoSmart Photo Printer User’s Guide
5. Replace A:\ with the letter of your computer’s CD-ROM drive (this is
usually the D:\ drive). Type it in or use Browse to select it. Then click OK.
The Add Printer Wizard screen displays.
Add Printer Wizard
6. If you want to change the name of the printer, enter a new name.
7. If you want the photo printer to be the default printer, click Yes. If you
leave this set to No, your current printer remains the default.
8. Click Finish.
As the photo printer software installs, a progress bar displays. When all the
files have been copied, the license agreement displays.
9. Read the agreement, using the scroll bars to move the display as needed.
Note:
There is also a copy of this license agreement in the online Help
included on the HP PhotoSmart CD. Be sure to read this agreement.
10. Click Continue.
Information on how to get help while using your new photo printer
displays.
11. Read the information, then click Continue.
You are prompted to register your new photo printer.
8
Installing the HP Photo Printer Software
12. If you want to register your photo printer now, click Register Now.
•
If you have a modem installed and operating, and you want to register
online, complete the registration form, and click Send. The
registration program uses a toll-free number to send your registration
directly to HP.
•
If you do not have a modem, or do not want to register online, you
can print the registration form and either fax or mail it to HP. The fax
number and mailing address are included on the form.
If you do not want to register now, click Register Later.
After you have completed or quit the registration, a message displays,
indicating that the installation is complete.
Installation is complete
13. Click OK to clear the message.
The HP PhotoSmart multimedia presentation begins. This presentation
contains several different sections to help you get to know your new photo
printer. Instructions are provided. When you finish viewing the
presentation, remember to complete the setup by printing a Performance
Page (the next step).
14. Print a Performance Page to verify the photo printer is set up correctly. See
“Printing a Performance Page” on page 39 for instructions.
You’re ready to begin using your new photo printer. See “Printing” on page 27 for
more information.
9
HP PhotoSmart Photo Printer User’s Guide
Add Printer Wizard
If your system does not automatically recognize the HP PhotoSmart photo
printer, you can add it using the Add Printer Wizard in Windows 95.
Note:
Connect the photo printer to your computer, and set it up, BEFORE
installing the software. See the Getting Started instructions, Steps 1-4,
for details.
To install the software using the Add Printer Wizard:
1. From the Windows 95 Start menu, choose Settings.
2. Choose Printers.
3. Double-click Add Printer.
First page of the Add Printer Wizard
4. Click Next.
Note:
10
The HP PhotoSmart photo printer must be attached directly to a
computer, not a network. If the computer you are using for the photo
printer is on a network, an additional screen displays—select Local
Printer and then click Next.
Installing the HP Photo Printer Software
The Add Printer Wizard lists possible printers.
Printer drivers included in Windows 95
5. Click Have Disk.
Note:
Windows 95 assumes you want to install the driver from a floppy. We
are installing from a CD.
Windows 95 displays the floppy drive letter
6. Replace A:\ with the letter of your computer’s CD-ROM drive (this is
usually the D:\ drive). Type it in or use Browse to select it. Then click OK.
11
HP PhotoSmart Photo Printer User’s Guide
The HP PhotoSmart Photo Printer is the only one available
7. Click Next to continue.
Select the printer port
8. Select the port where the HP PhotoSmart photo printer is connected to
your computer. This is usually LPT1 but may be any of the LPT ports listed.
9. Click Next to continue.
12
Installing the HP Photo Printer Software
The printer name displays
10. If you want to change the name of the printer, enter a new name.
11. If you want the photo printer to be the default printer, click Yes. If you
leave this set to No, your current printer remains the default.
12. Click Finish to continue.
As the photo printer software installs, a progress bar displays. When all
the files have been copied, the license agreement displays.
13. Read the agreement, using the scroll bars to move the display as needed.
Note:
There is also a copy of this license agreement in the online Help
included on the HP PhotoSmart CD. Be sure to read this agreement.
14. Click Continue.
Information on how to get help while using your new photo printer
displays.
15. Read the information, then click Continue.
You are prompted to register your new photo printer.
13
HP PhotoSmart Photo Printer User’s Guide
16. If you want to register your photo printer now, click Register Now.
•
If you have a modem installed and operating, and you want to register
online, complete the registration form, and click Send. The
registration program uses a toll-free number to send your registration
directly to HP.
•
If you do not have a modem, or do not want to register online, you
can print the registration form and either fax or mail it to HP. The fax
number and mailing address are included on the form.
If you do not want to register now, click Register Later.
After you have completed or quit the registration, a message displays,
indicating that the installation is complete.
Installation is complete
17. Click OK to clear the message.
The HP PhotoSmart multimedia presentation begins. This presentation
contains several different sections to help you get to know your new photo
printer. Instructions are provided. When you finish viewing the
presentation, remember to complete the setup by printing a Performance
Page (the next step).
18. Print a Performance Page to verify the photo printer is set up correctly. See
“Printing a Performance Page” on page 39 for instructions.
You’re ready to begin using your new photo printer. See “Printing” on page 27 for
more information.
14
Troubleshooting Printer Setup
Re-installing the Photo Printer Software
If you need to re-install the photo printer software, first un-install it then run a
new install.
1. From the Windows 95 Start menu, choose Programs.
2. Choose HP PhotoSmart.
3. Choose Photo Printer Uninstaller.
4. Install the software using the Add Printer Wizard. See “Add Printer
Wizard” on page 10 for details.
Troubleshooting Printer Setup
If the computer is having problems connecting to the photo printer, check the
following:
1. Turn OFF the photo printer and computer. Next, turn ON the photo
printer, wait until the green light is on (not blinking), then turn on the
computer. If the computer is missing the printer driver or other needed
software, it will ask for it when it starts up and “sees” the photo printer.
Note that if the photo printer is not connected properly, the computer will
not be able to detect it—continue to Step 2.
2. Are you using a switch box? If so, try disconnecting the switch box and
connecting the photo printer directly to the computer. If this works you
know something is wrong with your switch box setup.
3. Be sure the cables are connected tightly. Check the back of the computer,
the back of the photo printer, and the power connection. If you are using
a switch box, check those connections also.
4. Run a cable test: From the HP PhotoSmart Toolbox, choose the
Maintenance tab, then choose Test the connection between computer and
printer.
15
HP PhotoSmart Photo Printer User’s Guide
The HP PhotoSmart Toolbox
The Toolbox provides “how-to,” status, and troubleshooting information for the HP PhotoSmart photo printer. It also includes maintenance functions such as checking the status of the photo cartridges.
Displaying the Toolbox
•
Double-click on the Toolbox icon on your Windows 95 desktop.
•
While you are printing, the Toolbox icon appears on your taskbar, along
with a short description of the photo printer status. Click the icon to view
the Toolbox.
The HP PhotoSmart Toolbox
16
Loading Paper
Using the Toolbox
•
To view How Do I..., Printer Activity, The Problem Is..., or Maintenance
topics, select the corresponding Toolbox tab.
•
To view the HP PhotoSmart multimedia presentation, click PhotoSmart
CD.
•
To view the Toolbox options, click Options.
Toolbox Options
•
To close the Toolbox, click Close.
Loading Paper
Paper Loading Tips
When you are loading paper, using either the IN tray or manual feed, keep in
mind the following guidelines:
•
The photo printer prints on the face-up side of the page in the IN tray or
manual feed; the printed photo faces up in the OUT tray.
•
Place paper into the IN tray with all sheets facing the same direction (for
example, glossy side up). Glossy sides should not be facing each other.
•
Always place the page short-side first (the long edge of the paper is against
the long edge of the IN tray or the right edge of the manual feed slot).
Tip:
Some of the HP PhotoSmart papers have the HP PhotoSmart logo on
them to help you determine which way to insert the paper. See the
instructions in the paper package for details.
17
HP PhotoSmart Photo Printer User’s Guide
•
Feed or place tabbed paper into the photo printer with the tab first
(toward the back of the photo printer).
Feed the tab first
•
The top of the page (portrait) or the right edge of the page (landscape)
prints first.
Orientation of printed photos
Loading a Stack of Paper
Load a stack of paper into the IN tray if you plan to print multiple
photographs or pages.
To load a stack of paper:
1. Pull out the OUT tray.
The OUT tray catches your printed photo
18
Loading Paper
2. Remove the IN tray from the photo printer.
Remove the IN tray
3. Place a stack of paper into the IN tray.
Load paper into the IN tray
•
Load the paper print side up.
•
Always load paper in the portrait direction, with the long edge against
the long edge of the IN tray.
•
Be careful not use too much paper (20 sheets, maximum). The stack
should be below the top edge of the IN tray.
•
Use one kind and size of paper at a time. Do not mix paper types or
sizes in the IN tray.
4. Adjust the paper guides to fit close to the edges of the paper, without
bending the paper.
Adjust the paper guides
19
HP PhotoSmart Photo Printer User’s Guide
5. Place the IN tray back into the photo printer and push it all the way in so
that the handle rests in the slot.
6. When you print, leave the OUT tray in the out (open) position, to catch the
paper.
Note:
You may also need to change the printer settings. See “Choosing Printer
Settings” on page 30 for details.
Manually Feeding Paper
Use manual feed to print one sheet of paper at a time, or to print the second
side of a double-sided page.
To manually feed paper:
1. Pull out the OUT tray.
The OUT tray catches your printed photo
2. Open the manual feed door.
Manual feed door
20
Loading Paper
3. Place a sheet of paper into the manual feed slot. Position the paper against
the right side of the manual feed door and slide it under the paper guides.
•
Load the paper print side up. For example, if you are printing a photo
on HP PhotoSmart Glossy Photographic Paper, you will want the
photo to print on the glossy side of the paper—load the paper with
the glossy side up.
•
Always load paper in the portrait direction, with the long edge against
the right side of the manual feed door.
Place the paper under the guides
4. Adjust the left paper guide to fit close to the edge of the paper, without
bending the paper.
Adjust the paper guide
21
HP PhotoSmart Photo Printer User’s Guide
5. Guide the paper into the manual feed slot until you feel the rollers grab the
paper.
•
Use the right side of the manual feed door to guide the paper as you
feed it into the photo printer.
•
The photo printer feeds the paper all the way in before it begins
printing.
6. When you print, leave the OUT tray in the out (open) position, to catch the
paper.
Note:
You may also need to change the printer settings. See “Choosing
Printer Settings” on page 30 for details.
Double-Sided Printing
If you are printing on both sides of the paper, keep in mind the following:
•
If one side has text and one side has an image, print the image on the
glossy side of the paper and the text on the reverse (non-glossy) side.
•
Print the glossy side first.
•
Use manual feed to print the second side.
For example: If you are printing a greeting card with a photo on the front and
text on the inside, print the outside of the card first, using the glossy side of the
paper. When this side is completely dry, print the inside of the card using the
reverse side of the paper and manual feed.
Note:
22
The following illustrations show how to print a double-sided page, such as
a flyer. Specifics may vary depending on the software you are using, as well
as the type of project you are printing. You may want to do a test using
plain paper to be sure you are feeding in the second side of the page
correctly for your project.
Loading Paper
Portrait Orientation
Printing Side 1
1. Print the image side first. The
image appears upside-down
when the page comes out of the
printer.
Note:
2. Turn the paper over along the
long edge.
Be sure the photo on side 1 is completely dry before printing side 2.
Printing Side 2
1. Place the paper into the manual
feed slot, blank side up to print
the second side.
2. Print the text side. The text
appears upside-down when the
page comes out of the printer.
23
HP PhotoSmart Photo Printer User’s Guide
Landscape Orientation
Printing Side 1
1. Print the image side first. The
top of the image is to the right.
Note:
2. Turn the paper over along the
short edge.
Be sure the photo on side 1 is completely dry before printing side 2.
Printing Side 2
1. Place the paper into the manual
feed slot, blank side up to print
the second side.
24
2. Print the text side. The top of the
text is to the right.
Using HP Custom Papers
Using HP Custom Papers
HP PhotoSmart papers are designed specifically for use with the HP
PhotoSmart photo printer. The papers are available in the types and sizes
listed below. The part numbers for all of these papers are included in the HP
PhotoSmart online Help.
Note:
Some of the HP PhotoSmart papers may not be immediately available in
all areas. Although there are papers currently available for all types of
projects, additional papers will be available in the future. Check with your
dealer for availability of all papers.
HP PhotoSmart Glossy Photographic Paper
This is a high-quality photographic paper that gives results similar to regular
(developed) glossy photographs. Prints on this paper are suitable for framing.
The greeting cards and note cards can be printed on both sides, allowing you
to make your own, customized cards.
Name
Sizes
Letter
U.S.: 8.5” x 11”
A4
Metric: 210 mm x 297 mm
Postcard
This paper includes an additional tear-off tab.
U.S.: 4” x 6” finished size
Metric: 102 mm x 152 mm finished size
Greeting Card
U.S.: 8.5” x 11” scored (folds to 8.5” x 5.5”)
Metric: A4 (210 mm x 297 mm) scored (folds to 210
mm x 148 mm)
Note Card
U.S.: 5.5” x 8.5” scored (folds to 5.5” x 4.25”)
Metric: 148 mm x 210 mm scored (folds to 148 mm x
105 mm)
Calendar Kit
This kit comes with the paper and binding to make a
calendar.
U.S.: 8.5” x 11”
Metric: A4 (210 mm x 297 mm)
25
HP PhotoSmart Photo Printer User’s Guide
HP PhotoSmart Matte Photographic Paper
This is a high-quality photographic paper that gives results similar to regular
(developed) matte photographs. Prints on this paper are suitable for framing.
Print only on the matte side of this paper—do not print on the back side.
Name
Sizes
Letter
U.S.: 8.5” x 11”
A4
Metric: 210 mm x 297 mm
Postcard
This paper includes an additional tear-off tab.
U.S.: 4” x 6” finished size
Metric: 102 mm x 152 mm finished size
HP PhotoSmart Photo Project Paper
This is HP’s most versatile photo paper, designed to be used for all types of
projects. You can print on both sides of this paper.
If you are printing double-sided, use the guidelines described in “DoubleSided Printing” on page 22.
Name
Sizes
Letter
U.S.: 8.5” x 11”
A4
Metric: 210 mm x 297 mm
Postcard
This paper includes an additional tear-off tab.
U.S.: 4” x 6” finished size
Metric: 102 mm x 152 mm finished size
HP PhotoSmart Photo Hagaki Paper
This paper measures 100 mm x 148 mm (finished size) and is only available in
Japan.
26
Printing
Printing
Turning the Photo Printer ON/OFF
To turn on the photo printer:
1. Be sure the photo cartridge door is closed.
2. Press and release the power button to turn the printer ON.
Wait about a minute, until the green light stops blinking and remains on.
This means the photo printer is ready to print.
Use the power button to turn the photo printer on and off
To turn off the photo printer:
•
Press and release the power button to turn the photo printer OFF.
The green light blinks for a few seconds as the photo printer completes its
shut-down sequence. When the green light turns off the photo printer is off.
Note:
To get maximum use from your photo cartridges, do not unplug the photo
printer, or turn off the power source (such as a power strip), until the
photo printer indicator lights are off.
27
HP PhotoSmart Photo Printer User’s Guide
Printing to the Photo Printer
Note:
Before you print, be sure the photo printer is turned ON. If you are using
a switch box, be sure the photo printer is selected.
To print to the HP PhotoSmart photo printer:
1. Pull out the OUT tray.
Leave the OUT tray out (open) when printing
2. Load paper into either the IN tray or the manual feed slot. See “Loading
Paper” on page 17 for details.
Note:
Load the paper print side up.
3. In the software application that you used to create the document, select
Print. Details on how to do this depend on the application you are using.
4. Most applications prompt you for some printer settings, such as the
number of copies. If yours does this, choose the settings and then click OK.
5. You are asked to select the paper type. Choose the type of paper you are
using, and then click OK.
28
Printing
Select the type of paper you are using
Note:
You can keep this reminder from displaying by choosing the Do Not
Display... checkbox at the bottom of the message. You can also turn
this reminder on/off in Toolbox Options. See “The HP PhotoSmart
Toolbox” on page 16 for more information about the Toolbox. If you
turn off this reminder, be sure to ALWAYS select the paper type in
your software application before you print.
6. If you selected HP PhotoSmart Glossy Photographic Paper or HP
PhotoSmart Photo Project Paper in step 5, select the side of the page you
are using: Glossy (front) or Reverse (back).
The application generates the photograph. It may take a few minutes before
printing begins. While the photograph is printing and drying, the green light
on the front of the photo printer blinks. The photograph is finished printing
and drying when the Toolbox Printer Activity changes to Ready and the green
light on the photo printer is on (stops blinking).
Printing and drying may take a few minutes. The Toolbox Printer Activity
message will tell you when you can remove the wet page and click Start Next
Page to bypass the dry time and start printing the next page.
29
HP PhotoSmart Photo Printer User’s Guide
Choosing Printer Settings
Printer settings such as the paper type and size are defined in HP PhotoSmart
Photo Printer Properties. To get the expected results, always use the correct
printer settings.
•
If you want to specify the printer settings for a particular project, do this
in the software application you are using for the project. How you do this
depends on the application.
•
If you want a new printer setting to be the default any time the photo
printer is used, set it in HP PhotoSmart Properties (located in the
Windows 95 Printers folder). See “Changing the Properties” below.
•
Use the Print Quality setting to change between Normal and Best mode.
•
Each time you print, a message prompts you to select the paper type.
•
If the paper type you are using is already selected, select OK.
•
If you are using a different type of paper, change the paper type, then
select OK.
•
You can turn off this reminder. See the note on page 29 for more
information.
Note:
It is very important to select the Paper Type that matches the paper you
put into the printer, each time you print. If the correct paper type is not
selected, the print quality may not be what you expect.
Changing the Properties
To change the HP PhotoSmart photo printer Properties:
1. Display the Properties:
From the Windows 95 Start menu:
•
Choose Settings, then Printers.
The printers window displays.
•
30
Using the right mouse button, click on the HP PhotoSmart Photo
Printer icon, then choose Properties.
Printing
From within your project software:
•
When you choose Print, or Print Setup from within a software
application, a dialog appears that allows you to specify various printer
settings. This dialog also includes a button that accesses the
Properties. The button name depends on the application—it’s usually
Properties, Printer Settings, or Setup.
2. Select either the Options or Color tab, depending on what you want to
change. These tabs contain the settings specific to the HP PhotoSmart
photo printer.
3. Select the new setting (see descriptions on the following page).
4. Click OK to accept your changes and close the Properties.
HP PhotoSmart Photo Printer Properties
31
HP PhotoSmart Photo Printer User’s Guide
Printer settings available on the Options tab include:
Paper Type
The type of paper, as shown on its package. The photo printer
makes adjustments based on this paper type.
Paper Size
Choose the size of the paper. The available sizes are
determined by the Paper Type setting.
Paper Source
The location of the paper—IN tray (automatic feed) or
manual feed (one sheet at a time).
Print Quality
Normal is recommended for “draft” printing or jobs where
the highest quality is not needed. Best is recommended for
“final” printing or jobs requiring the best possible photo
quality. Normal is faster than Best and, depending on the
quality of your source files, may result in suitable quality for
final prints.
Copies
The number of copies to print.
Orientation
Select Portrait to print your project in portrait (tall) format.
Select Landscape to print in landscape (wide) format.
Tip: The PC processes portrait images faster than landscape
images. If your software allows you to rotate a landscape
image so that you can print in portrait mode, the images
will print faster.
Portrait
Note:
32
Landscape
For a description of the Color settings, see the HP PhotoSmart photo
printer online Help.
Understanding the Output Quality
Understanding the Output Quality
The quality of the print from the HP PhotoSmart photo printer depends on
the quality of the source (scanner, digital camera, etc.). It also depends on the
size of the image, the printer settings, and the type of paper you use. The
following sections will help you understand these issues so that you can get the
best possible quality in all of your prints.
Photo Sources
There are many excellent sources of photos for your projects. Each has its
advantages—some are easier to use than others, some cost more, some give
better output quality. This section describes the possible photo sources and
how you can use them to get the best quality output from your photo printer.
Scanner
Color scanners are becoming more common as they come down in price. This
is a good input source if you want to use your own photographs in projects
but like to have the developed photos as well.
There are scanners on the market now (such as the HP PhotoSmart photo
scanner) that can scan negatives and slides as well as photos. You can scan a
photo and then do touchups, cropping, color adjustments, and more, using
the software that comes with the scanner. You can even scan in old or
damaged photos and repair them so that when they are printed they look like
the originals. Note that you will get the best quality prints, especially
enlargements, if you use negatives or slides as your input source for the
scanner.
Digital Camera
These types of cameras do not use film (they store photos in memory). They
plug directly into your computer, allowing you to take a photo and bring it
into your PC almost immediately. The HP PhotoSmart digital camera uses a
removable/reusable memory card—you can carry extra memory with you just
as you might carry a spare roll of film. After you download the photos to your
computer you can erase the memory and then reuse it.
33
HP PhotoSmart Photo Printer User’s Guide
Most digital cameras allow you to set the image quality when you take a photo.
Higher quality photos need more memory in the camera and more disk space
on your computer, but they will result in better prints.
Photos taken with digital cameras may not be well-suited to enlargement.
They usually look best printed at typical photo (3½ x 5 or 4 x 6 inch) size.
Internet
Because the Internet is an on-screen medium its graphics are typically very low
resolution. In most cases you will want to use Internet graphics at their
original size, or even shrink them (don’t enlarge them). There are exceptions,
however, so you may find graphics on the Internet that look great when they
are enlarged.
Clip Art
You can buy clip art in most computer stores or by mail order. Just about
every software application that uses graphics comes with at least some clip art.
These images are typically very low resolution so do not make good
enlargements. When used at their original size they are an excellent source for
adding interest to a flyer or decorating a calendar.
FlashPix™ Format
Several industry leaders (including HP) worked together to create this format
for storing photos. Some digital cameras and scanners use this format. There
are also services that will scan your existing photos and store them on a CD
using this format.
Photo CD™
This format, from Kodak®, is for storing photos on a CD. You can have your
photos stored on Photo CD when you have your film developed, or you can
have existing photos scanned and stored on a Photo CD.
34
Understanding the Output Quality
Source File Storage Tips
Some types of sources (such as scanners and digital cameras) offer you a
“quality” choice when you save a photo for later use. This setting may be
called “resolution,” “quality,” or something similar. Consider the following
factors when choosing the quality for photos to be used in your print project.
•
High quality images require more disk space than low quality images. If
you will be storing images on your computer and you have limited disk
space, use the lowest possible quality setting that still yields good prints.
•
Large files or high resolution images require more memory to print. This
means that you will have to wait longer to return to your application. It
also means that printing will take longer.
•
When you start out with a new input source, try using the default settings.
Do a test print and then make adjustments as needed. For example, if
you’re scanning in a photo, use the defaults, print the photo, then adjust
the settings in the scanner software if needed.
•
If your photos look jagged (diagonal lines look like stair steps), select a
higher resolution or quality setting on the input source or print the photo
at a smaller size.
Printer Settings
To get the expected results, you need to use the correct printer settings.
Printer settings include the paper size and paper type, the orientation (portrait
or landscape), and the paper source (IN tray or manual feed).
You can set these options either in the software you are using for your project,
or in the photo printer Properties. Use the following guidelines:
•
If you are using a different type or size of paper just for one project, set it
up in your software application. How you do this depends on the
application.
•
If you use the same type and size of paper most of the time, set it up in HP
PhotoSmart Properties. It then becomes the default for any project you
create. For information on how to access the photo printer Properties, see
“Choosing Printer Settings” on page 30.
35
HP PhotoSmart Photo Printer User’s Guide
Tips on Getting the Expected Output Quality
The following guidelines apply to any project you print using the HP
PhotoSmart photo printer.
•
Be sure to select the paper type (in your application or in Properties) that
matches the type of paper you are using to print.
•
Use HP PhotoSmart papers to get the best output quality.
•
Use the correct printer settings.
•
Select Best Print Quality for your final printouts; use Normal for
preliminary drafts or faster printing. Choose this in Properties (see
“Choosing Printer Settings” on page 30).
Getting Low Cost/Draft Output
While you are working on creating your project, or when you just want to do a
test print to get a preliminary idea of how the project is looking, you can save
printing time and money by printing drafts on plain paper.
•
Use the Normal Print Quality setting.
•
Use the default Color options.
•
Use plain paper, it’s less expensive than photo quality paper. Be sure to
select Plain Paper as the Paper Type.
Note:
For details on changing the above settings, see “Choosing Printer
Settings” on page 30.
Getting the Best Print Quality
To get the highest possible quality print:
36
•
Use a good quality source. For example, if you are using a digital camera
to take a photograph, use the highest possible quality setting. For more
information, see your input source documentation, and “Photo Sources”
on page 33 of this User’s Guide.
•
Use the Best Print Quality setting.
Photo Cartridges
•
Use HP PhotoSmart papers. These papers are designed to work with the
HP PhotoSmart photo printer to give you the best quality prints.
•
When you print, be sure to select the paper type that matches the paper
you have in the photo printer.
Photo Cartridges
Photo cartridges are the new generation of what you might know as the “ink
cartridge.” The HP PhotoSmart photo cartridges were developed specifically
for use with HP’s PhotoSmart photo printer—it’s a new way of putting ink on
the page to get low-cost high-quality photographic prints.
The HP PhotoSmart photo printer uses two photo cartridges. Each one
contains some of the colors needed to produce high quality photo prints. Each
photo cartridge is marked with a color (orange or purple) and a symbol (star
or moon) so you can match it to its correct position in the printer.
HP PhotoSmart photo cartridges
Selecting the Correct Photo Cartridges
Use only HP PhotoSmart photo cartridges with your HP PhotoSmart photo
printer. The part numbers are as follows:
•
Star (orange) cartridge - part number C3844A
•
Moon (purple) cartridge - part number C3845A
37
HP PhotoSmart Photo Printer User’s Guide
Determining if a Photo Cartridge is Out of Ink
When a photo cartridge is low on ink you will probably notice it in the print
quality. You may start seeing too much of one color in a print, or a color may
be missing. There could be other causes for this too, so the best way to check
the status of your photo cartridges is to print a Performance Page. For details
on printing and reading the Performance Page, see “Printing a Performance
Page” on page 39.
Note:
For more information about the photo cartridges, see the HP PhotoSmart
photo printer online Help.
Troubleshooting
The HP PhotoSmart photo printer is designed to be easy to use. When there is
a problem, you have several resources for finding a solution.
Handling Printer Status Messages
If there is a problem during printing, a message displays on your computer
screen. This message describes the error and gives possible solutions to the
problem.
Sample error message
38
Troubleshooting
When you see an error message, you can:
•
Click Show Me to display the Help topic for the status message. Help is
where you can find more information on how to solve the problem.
•
Click Cancel Job to clear the data from the printer. If you do this, you will
need to send the job again after you have corrected the problem.
Some error messages include an additional option. In this case the option is
described on the error message, or you can click Show Me to see an
explanation.
Printing a Performance Page
Print a Performance Page any time you want to check the status of your photo
cartridges. You may do this when you install new photo cartridges, or when
you have a problem with print quality. The Performance Page explains how to
tell if there is a problem with one of the photo cartridges or if a photo
cartridge is out of ink.
Note:
Use plain paper to print the Performance Page.
To print a Performance Page:
1. Open the HP PhotoSmart Toolbox.
2. Select the Maintenance tab.
3. Click Print a Performance Page.
Print Performance Page
Note:
An example Performance Page is shown on the inside back cover of this
User’s Guide. It shows how your Performance Page will look if the photo
cartridges are installed and working correctly. See the HP PhotoSmart
photo printer online Help for examples of Performance Pages that show
possible problems with the photo cartridges.
39
HP PhotoSmart Photo Printer User’s Guide
Viewing Online Help
The HP PhotoSmart photo printer comes with a complete online Help system
to assist you if you should have any questions. This online Help contains
“how-to” information as well as troubleshooting suggestions.
The photo printer has a complete online Help system
To view online Help:
•
•
From the Toolbox:
•
Click an item on the How Do I... or The Problem Is... tab. Help
displays the appropriate topic depending on the item selected.
•
To view the Help Contents, shown above, choose Other Help Topics
from the Toolbox How Do I... tab.
From the HP PhotoSmart Photo Printer Properties:
•
•
From the Windows 95 Start menu:
•
40
Press F1 or the Help button on any Properties screen. Help displays
the applicable topic.
Choose Programs, then HP PhotoSmart, Photo Printer Help File.
Getting Technical Support
Getting Technical Support
Hewlett-Packard has worldwide support services, including a World Wide
Web site, faxback answers and telephone support. Listed below are some of
the support services available. For a complete listing of HP’s support services,
see the online Help, accessible from the HP PhotoSmart Toolbox or the
Windows 95 Start menu.
Note: When calling, replace the + with your international telephone access code.
United States HP FIRST Faxback: (800) 333-1917
Internet: www.hp.com/go/photosmart
Customer Support Center: (208) 376-FOTO (3686)
Canada
Customer Support Center, Western Canada: (800) 361-9791
Customer Support Center, Eastern Canada: (800) 268-1221
Australia
Customer Support Center: (+61 3) 9272 8000
Singapore
Customer Support Center: (65) 272-5300
Europe
HP FIRST Faxback
United Kingdom: 0800 960271
France: 05 905900
Germany: 0130 810061
Customer Support Centers
United Kingdom: 0171 512 5202
France: 04 50 43 9853
Germany: 0180 5 25 81 43
English language support from other European countries:
+44 171 512 5202
Elsewhere in
the World
Contact your local dealer or nearest HP Sales and Support
Office for information about obtaining technical assistance
or hardware repair services.
41
HP PhotoSmart Photo Printer User’s Guide
HP PhotoSmart Photo Printer Specifications
The specifications for the HP PhotoSmart photo printer are included in the
online Help. In the Help Contents, choose the first book: Your HP
PhotoSmart Photo Printer, then choose the last page: Photo Printer
Specifications.
Regulatory Notices
The regulatory notices for the HP PhotoSmart photo printer are included in
the online Help. In the Help Contents, choose the last book: Regulatory
Notices/License, then choose the first page: Regulatory Notices.
42