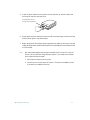
1
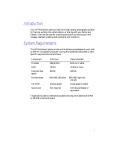
HP PhotoSmart
S20 Photo Scanner
Basics
© Copyright 1999 Hewlett-Packard Company
All rights are reserved. No part of this document may be photocopied, reproduced, or
translated to another language without the prior written consent of Hewlett-Packard Company.
The information contained in this document is subject to change without notice. HewlettPackard Company shall not be liable for errors contained herein or for consequential damages
in connection with the furnishing, performance, or use of this material.
Portions of the software are copyright © LEAD Technologies, Inc. 1991-1998. ALL RIGHTS
RESERVED.
HP, the HP logo, PhotoSmart, and the PhotoSmart logo are property of Hewlett-Packard
Company.
Microsoft and Windows are registered trademarks of Microsoft Corporation.
Pentium and MMX are registered trademarks of Intel Corporation.
Adobe and Acrobat are registered trademarks of Adobe Systems Incorporated.
Table of Contents
Chapter 1 - Introduction .......................................................................................................3
Checking the System Requirements ............................................................................................................................................3
Unpacking Your Photo Scanner .................................................................................................................................................... 4
What’s Next? ............................................................................................................................................................................................ 6
Chapter 2 - Quick Setup ......................................................................................................7
Installing the Software ........................................................................................................................................................................7
Connecting Your Photo Scanner .................................................................................................................................................. 8
Calibrating Your Photo Scanner ................................................................................................................................................. 10
Registering Your Photo Scanner ................................................................................................................................................. 10
Installing Adobe Acrobat Reader ............................................................................................................................................... 10
What’s Next? .......................................................................................................................................................................................... 10
Chapter 3 - Scanning Photographs ..............................................................................11
Running the Scanning Software ................................................................................................................................................... 12
Setting the Photo Scanner for the Photographic Format ................................................................................................. 13
Setting the Photo Scanner for Mounted Film ..............................................................................................................14
Setting the Photo Scanner for a Film Strip ...................................................................................................................14
Setting the Photo Scanner for a Print ..............................................................................................................................14
Orienting Photographs for Insertion .......................................................................................................................................... 15
Inserting and Scanning Photographs ........................................................................................................................................16
Inserting and Scanning Mounted Film ...........................................................................................................................16
Inserting and Scanning Film Strips ..................................................................................................................................18
Inserting and Scanning Prints ........................................................................................................................................... 20
Inserting and Scanning Small Prints and Paper Clippings .................................................................................. 22
Manually Ejecting Photographs .................................................................................................................................................24
Learning More About Your Photo Scanner ............................................................................................................................25
Chapter 4 - Getting Help for Your Photo Scanner ..............................................27
Accessing the HP PhotoSmart Website .................................................................................................................................... 27
Viewing Online Help ......................................................................................................................................................................... 27
Getting Technical Support .............................................................................................................................................................29
http://www.photosmart.com
1
Appendix A - Cleaning Your Photo Scanner ..........................................................31
Appendix B - Uninstalling Your Photo Scanner ...................................................35
Uninstalling the Software ............................................................................................................................................................... 35
Disconnecting the Photo Scanner .............................................................................................................................................. 35
Glossary ................................................................................................................................... 37
Index ........................................................................................................................................... 41
2
HP PhotoSmart S20 Photo Scanner Basics
Chapter 1 - Introduction
Welcome to the HP PhotoSmart S20 Photo Scanner Basics guide. The S20 photo
scanner is a compact scanner designed specifically for scanning photographs.
It can scan these photographic formats:
•
Mounted film — 35 mm mounted slides and mounted negatives
•
Film strips — 35 mm negative strips and slide strips, up to 5 frames scanned
at a time
•
Prints — up to a maximum size of 5 inches x 7 inches (or 127 mm x 178 mm)
The S20 photo scanner also comes with the HP PhotoSmart scanning software for
adjusting and storing scanned images with your PC.
This Basics guide helps you quickly set up the HP PhotoSmart scanning software and
S20 photo scanner with your PC. This guide then explains how to scan mounted film,
film strips, and prints with your photo scanner.
Note:
For information on using the scanning software, please see the HP PhotoSmart
Scanning Software Quick Reference and the online Help.
Checking the System Requirements
Both the HP PhotoSmart S20 photo scanner and the HP PhotoSmart scanning software
work with PCs running either Microsoft® Windows® 95 or Windows 98. The specific
system requirements for the photo scanner and scanning software are as follows:
Component
Minimum Required
Recommended
Processor
Pentium® 90 or equivalent
Pentium MMX® or equivalent
RAM
16 MB
32 MB or more
Free hard disk space
100 MB
120 MB
Monitor/video
640 x 480, 256 colors
800 x 600 or more, 16-bit color
CD-ROM drive
Sound card/speakers
Double-speed (2X)
Not required
Quad-speed (4X) or better
16-bit or better
Pointing device
Mouse or compatible
Windows pointing device
Mouse or compatible
Windows pointing device
USB interface
Available USB port
Available USB port
http://www.photosmart.com
3
Unpacking Your Photo Scanner
To unpack your S20 photo scanner, do the following:
1.
Remove all the contents from the HP PhotoSmart S20 photo scanner box. You
should find the following items in the box along with the photo scanner.
This Basics guide for the
S20 photo scanner and
the Quick Reference for
the HP PhotoSmart
scanning software
HP PhotoSmart CD-ROM with
the scanning software and
multimedia tutorials
USB interface cable
calibration card *
photo sleeve *
cleaning brush
air bulb
power cable
* Note that both the calibration card and the photo sleeve are packaged in the special pocket inside
the back cover of this Basics guide.
If you notice any damage while unpacking the contents, please notify the retailer
where you purchased your photo scanner.
2.
4
Remove the plastic wrapper from around the photo scanner.
HP PhotoSmart S20 Photo Scanner Basics
3.
Remove the tape from the photo scanner lid.
4.
Hold the bottom of the photo scanner with one hand and pull up on the photo
scanner lid with your other hand.
5.
Open the photo scanner lid carefully and remove the foam insert.
http://www.photosmart.com
5
6.
Close the photo scanner lid by pressing down firmly until it snaps into place.
Note:
Do not connect the S20 photo scanner to your PC. You must install the
HP PhotoSmart scanning software on your PC (as explained in the next
chapter) before you connect the photo scanner to your PC.
What’s Next?
You are now ready to set up the HP PhotoSmart scanning software and S20 photo
scanner with your PC. To do this, go on to the next chapter, “Quick Setup.”
Note:
If you ever need help while using the photo scanner, see Chapter 4 starting on
page 27 in this guide. Chapter 4 explains how to access the HP PhotoSmart
website, view the online Help, and get technical support from Hewlett-Packard
Company for your photo scanner.
In addition, if you come across a particular term in this guide that you don’t
understand, please refer to the Glossary of definitions starting on page 37.
6
HP PhotoSmart S20 Photo Scanner Basics
Note:
You must install the HP PhotoSmart scanning software on your PC
before you connect the S20 photo scanner to your PC.
This chapter helps you quickly set up the HP PhotoSmart scanning software
and S20 photo scanner with your PC. By following these simple steps, you’ll
be ready to scan photographs right away with your photo scanner.
Installing the Software
Quick Setup
Chapter 2 - Quick Setup
First, install the HP PhotoSmart scanning software on your PC, as follows:
1.
Put the HP PhotoSmart CD into the CD-ROM drive of your PC. Within a
minute or so, you will see the HP PhotoSmart setup screen displayed.
Note:
If the HP PhotoSmart setup screen does not display: Click the Start
button in the Windows taskbar and choose Run. Type the drive letter
for your CD-ROM drive and the file name setup.exe (for example,
D:\setup.exe). Then click OK.
2.
Click Install Software.
3.
Follow the directions on the screen to have the setup program copy the
scanning software onto your PC’s hard disk.
4.
Once the software copying process is complete, the setup program
prompts you to restart your computer. If you choose to restart your
computer now, it will take a minute or two to do so.
5.
The HP PhotoSmart Setup Wizard next prompts you to connect the
photo scanner to a power outlet and to your PC. Go on to the next page
for specific instructions on how to do this.
http://www.photosmart.com
7
Quick Setup
Connecting Your Photo Scanner
When the HP PhotoSmart Setup Wizard prompts you to do so, connect your
photo scanner to a power outlet and to your PC, as follows:
1.
Connect the small end plug of the power cable to the power connector
on the back of your photo scanner. (The power connector is to the left
of the USB connector on the back of the photo scanner.)
2.
Plug the other end of the power cable into a power outlet.
3.
Locate the USB connector (or port) on the front or back exterior of your
PC. The USB connector looks like this, and should have the distinctive
USB symbol printed by it (usually above the connector), as shown here:
USB symbol
USB connector
8
HP PhotoSmart S20 Photo Scanner Basics
Connect the rectangular end of the USB interface cable to the USB
connector on the front or back exterior of your PC.
5.
Connect the square end of the USB interface cable to the USB connector
on the back of your photo scanner. (The USB connector is to the right of
the power connector on the back of the photo scanner.)
Note:
6.
Quick Setup
4.
The S20 photo scanner does not have a power switch. Thus, the
photo scanner is always on while it is plugged into a power source.
The photo scanner does, however, have a “sleep” mode for low
power consumption when it is not in use.
Click the Connected button in the HP PhotoSmart Setup Wizard dialog
box, and then go on to the next page.
http://www.photosmart.com
9
Quick Setup
Calibrating Your Photo Scanner
The Scanner Calibration Utility now prompts you to calibrate your S20
photo scanner.
Get the calibration card from the special pocket inside the back cover of this
Basics guide. Then, with the calibration card face up and with the arrows
pointing toward the photo scanner, insert the calibration card into the photo
insertion slot of the photo scanner.
photo insertion slot
When the calibration is complete, be sure to put the calibration card back
into the pocket of this Basics guide so you will have it for future use.
Registering Your Photo Scanner
The setup program now prompts you to register your S20 photo scanner
online, if you wish. If you choose to register it now, simply follow the
directions on the screen to complete the registration. If you do not wish to
register now, click Cancel, and you will be reminded to register in 2 weeks.
Installing Adobe Acrobat Reader
The setup program now prompts if you want the Adobe® Acrobat® Reader
software installed on your PC. Acrobat Reader will allow you to read the
HP PhotoSmart hardcopy documentation online, if you wish. If you choose
to have Adobe Acrobat Reader installed, it will take a few seconds to do so.
What’s Next?
You have now successfully set up the HP PhotoSmart scanning software
and S20 photo scanner with your PC. Go on to the next chapter, “Scanning
Photographs,” to learn how to use your photo scanner.
10
HP PhotoSmart S20 Photo Scanner Basics
Chapter 3 - Scanning Photographs
This chapter explains how to scan your photographs — mounted film, film strips, and
prints — with the HP PhotoSmart S20 photo scanner.
Scanning photographs consists of these simple steps:
•
Running the HP PhotoSmart scanning software on your PC
•
Setting the photo scanner for the format of the photograph you want to scan
•
Orienting the photograph for insertion into the photo scanner
•
Inserting and scanning the photograph
Each of these steps is explained in this chapter. By following these simple steps, you
will quickly gain professional-quality scanned images of your photographs from your
S20 photo scanner.
Caution:
Note:
Do not attempt to scan either small prints (less than 2 inches x 2 inches, or
50 mm x 50 mm) or paper clippings (such as magazine or newspaper
clippings) without inserting them in the photo sleeve that came with your
photo scanner. They may jam the photo scanner or may be destroyed by it.
See “Inserting and Scanning Small Prints and Paper Clippings” starting on
page 22 for more information.
If you ever need to eject a photograph from the photo scanner during the
scanning process, see “Manually Ejecting Photographs” starting on page 24.
http://www.photosmart.com
11
Running the Scanning Software
You must first run the HP PhotoSmart scanning software on your PC so that your
S20 photo scanner will recognize and then scan the photograph you insert into it.
To run the scanning software, either:
•
Double-click the HP PhotoSmart scanning software icon on your Windows
desktop (if you had the setup program place such an icon, or shortcut, on your
Windows desktop during software installation).
OR:
•
Click the Start button in the Windows taskbar, and then choose Programs >
HP PhotoSmart > S20 Photo Scanner > Scanning Software.
Note:
12
You can also start the HP PhotoSmart scanning software from inside another
software program that supports TWAIN. This allows you to be in the other
program and use TWAIN to bring the images you scan with the S20 photo
scanner into that other program. For more information, see the online Help.
HP PhotoSmart S20 Photo Scanner Basics
Setting the Photo Scanner for the Photographic Format
The next step in scanning photographs is to set the S20 photo scanner for the format of
the photograph you will scan. To do this, you will use the Photo Format button on the
photo scanner’s front panel. The Photo Format button sets the photo insertion slot so
it will accept the photographic format — mounted film, film strip, or print — that you
will scan.
The photo scanner has three icons on its front panel which correspond to the three
photographic formats: the mounted film icon, the film strip icon, and the print icon.
Below the icons is a row of three indicator lights.
film strip icon
mounted film icon
print icon
photographic format
indicator lights
photo insertion slot
Photo Format button
To set the photo scanner for the correct photographic format, press the Photo Format
button until the indicator light is blinking under the icon for your photographic format.
As shown on the next page, the size of the photo insertion slot changes accordingly to
accommodate the photographic format you choose.
http://www.photosmart.com
13
Setting the Photo Scanner for Mounted Film
photo insertion slot
set for mounted film
indicator light
Setting the Photo Scanner for a Film Strip
photo insertion slot
set for a film strip
indicator light
Setting the Photo Scanner for a Print
photo insertion slot
set for a print
indicator light
14
HP PhotoSmart S20 Photo Scanner Basics
Orienting Photographs for Insertion
When orienting a photograph for insertion into the S20 photo scanner, you must first
determine:
•
Which is the emulsion side or picture side (face), and which is the back side of the
mounted film, film strip, or print
•
Which edge is the top of a print
picture side and top edge of the print
Insert prints
picture side up
Insert mounted film
and film strips
emulsion side down
To orient your photographs properly for scanning, remember to:
•
Center the mounted film, film strip, or print in the photo insertion slot.
•
Insert prints with the picture side up.
•
Insert mounted film and film strips with the emulsion side down. (The emulsion
side is dull compared to the shiny base side.)
Tip:
For more information on determining the emulsion side of mounted film and
film strips, see the online Help.
http://www.photosmart.com
15
Inserting and Scanning Photographs
You insert and scan mounted film, film strips, prints, and small prints and paper
clippings in different ways with the S20 photo scanner. Please refer to the appropriate
subsection for the photographic format you wish to scan.
Inserting and Scanning Mounted Film
Notice that mounted film has
short sides and long sides.
To scan mounted film with the S20 photo scanner, your mounted film must be:
•
A 35 mm, single-frame slide or negative mounted in a paper or plastic mount.
The mount must not be more than 1.8 mm thick.
•
Clean and dust-free. (See the online help for information on cleaning mounted
film.)
•
Inserted with a short side pointing into the photo insertion slot and with the
emulsion side down. (The emulsion side is dull compared to the shiny base side.)
Note:
You cannot scan an unmounted or a glass-mounted, single-frame slide or
negative in the photo scanner. (You can scan multiple-frame film strips,
however. See the next subsection.)
To insert and scan your mounted film, follow these steps:
16
1.
Press the Photo Format button on the photo scanner until the photo insertion slot
is set properly for mounted film, as shown in “Setting the Photo Scanner for the
Photographic Format” on page 13.
2.
Hold the mounted film by its mounting with the emulsion side down. (The
emulsion side is dull compared to the shiny base side.)
HP PhotoSmart S20 Photo Scanner Basics
3.
Insert a short side of the mounted film into the photo insertion slot.
Insert a short side of the
mounted film
4.
Gently push the mounted film into the slot until the scanner light comes on and the
photo scanner pulls in the mounted film.
The photo scanner pulls in
the mounted film
5.
Begin using the HP PhotoSmart scanning software to adjust or store your scanned
image, as explained in the HP PhotoSmart Scanning Software Quick Reference and
the online Help.
http://www.photosmart.com
17
Inserting and Scanning Film Strips
You can scan only 35 mm film strips
with the S20 photo scanner — it will
not properly scan film strips from
either 110 or APS sources.
To scan a film strip with the S20 photo scanner, your film strip must be:
•
A 35 mm negative strip or slide strip.
•
Clean and dust-free. (See the online Help for information on cleaning film strips.)
•
Free of any paper labels.
•
Flat — that is, not curled more than shown here:
•
Inserted with the emulsion side down. (The emulsion side is dull compared to the
shiny base side.)
Note:
The S20 photo scanner can only scan up to 5 frames of a particular film strip at
a time. If your film strip has more than 5 frames, once you scan the first 5
frames, you will need to turn the film strip around and insert it into the photo
scanner again to scan the remaining frames.
To insert and scan your film strip, follow these steps:
18
1.
Press the Photo Format button on the photo scanner until the photo insertion slot
is set properly for film strips, as shown in “Setting the Photo Scanner for the
Photographic Format” on page 13.
2.
Hold the film strip by its edges with the emulsion side down. (The emulsion side is
dull compared to the shiny base side.)
HP PhotoSmart S20 Photo Scanner Basics
3.
Gently push the film strip into the slot until the scanner light comes on and the
photo scanner pulls in the film strip.
The photo scanner
pulls in the film strip
4.
Begin using the HP PhotoSmart scanning software to adjust or store your scanned
images, as explained in the HP PhotoSmart Scanning Software Quick Reference
and the online Help.
http://www.photosmart.com
19
Inserting and Scanning Prints
Notice that a print has either a
landscape orientation (wider than
it is tall), or a portrait orientation
(taller than it is wide).
To scan a print with the S20 photo scanner, your print must be:
•
No larger than 5 inches x 7 inches (or 127 mm x 178 mm), and no smaller than
2 inches x 2 inches (or 50 mm x 50 mm). (If you have a smaller print you wish
to scan, use the photo sleeve as explained in the next subsection.)
•
Clean and dust-free. (See the online Help for information on cleaning prints.)
•
Inserted picture side up, with the top edge pointing to the right for landscape
prints, or with the top edge pointing in for portrait prints.
To insert and scan your print, follow these steps:
1.
Press the Photo Format button on the photo scanner until the photo insertion
slot is set properly for prints, as shown in “Setting the Photo Scanner for the
Photographic Format” on page 13.
2.
Hold the print by its edges with the picture side up.
•
For a landscape print, orient the top edge of the print to the right side of the
photo insertion slot, as shown here.
Orient a landscape print
face up, top pointing right
20
HP PhotoSmart S20 Photo Scanner Basics
•
For a portrait print, orient the top edge of the print directly into the photo
insertion slot, as shown here.
Orient a portrait print
face up, top pointing in
3.
Gently push the print into the slot until the scanner light comes on and the photo
scanner pulls in the print.
4.
Begin using the HP PhotoSmart scanning software to adjust or store your scanned
image, as explained in the HP PhotoSmart Scanning Software Quick Reference and
the online Help.
http://www.photosmart.com
21
Inserting and Scanning Small Prints and Paper Clippings
The photo sleeve
The photo sleeve, which is included in the special pocket inside the back cover of
this guide, allows you to scan small prints (less than 2 inches x 2 inches, or 50 mm x
50 mm) or paper clippings (such as magazine or newspaper clippings).
Caution:
Never scan small prints or paper clippings without inserting them in the
photo sleeve. They may jam the photo scanner or may be destroyed by it.
To insert and scan a small print or paper clipping, follow these steps:
22
1.
Lift the clear cover of the photo sleeve.
2.
Insert the print or paper clipping inside the photo sleeve, picture or face side up, as
squarely aligned as possible.
•
Insert a landscape print or paper clipping with its left edge toward the photo
sleeve’s seam.
•
Insert a portrait print or paper clipping with its top edge toward the photo
sleeve’s seam.
3.
Close the clear cover over the print or paper clipping.
4.
Press the Photo Format button on the photo scanner until the photo insertion
slot is set properly for prints, as shown in “Setting the Photo Scanner for the
Photographic Format” on page 13.
HP PhotoSmart S20 Photo Scanner Basics
5.
Insert the photo sleeve into the photo insertion slot face up, with the seam end
pointing into the slot, as shown here:
Insert the photo sleeve
face up, seam pointing in
6.
Gently push the photo sleeve into the slot until the scanner light comes on and the
photo scanner pulls in the photo sleeve.
7.
Begin using the HP PhotoSmart scanning software to adjust or store your scanned
image, as explained in the HP PhotoSmart Scanning Software Quick Reference and
the online Help.
Note:
HP recommends against scanning prints smaller than 2 inches x 2 inches (or
50 mm x 50 mm) without using the photo sleeve. If you must scan a smaller
print without the photo sleeve:
1. Set the photo insertion slot for prints.
2. Insert the print into the center of the slot. (The sensor that detects prints
is located in the middle of the slot.)
http://www.photosmart.com
23
Manually Ejecting Photographs
You can manually eject a photograph from the S20 photo scanner at any time during
the scanning process. To do so, simply press the Stop/Eject button, as shown:
Stop/Eject button
•
If you press the Stop/Eject button while a photograph is moving into the photo
scanner, the photograph will stop moving. You must press the button again to eject
the photograph.
•
If you press the Stop/Eject button while a photograph is being scanned, the
scanning will stop and the photograph will be ejected.
If your photograph does not eject from the photo scanner after you press the Stop/
Eject button several times, you will need to open the photo scanner lid and remove the
photograph, as follows:
24
1.
Hold the bottom of the photo scanner with one hand and pull up on the photo
scanner lid with your other hand.
2.
Open the photo scanner lid carefully about 2 inches and then remove your
photograph. Be sure you do not touch any of the glass windows inside the
photo scanner.
HP PhotoSmart S20 Photo Scanner Basics
3.
Close the photo scanner lid by pressing down firmly until it snaps into place:
Learning More About Your Photo Scanner
You’ve now learned all the basics for using the HP PhotoSmart S20 photo scanner to
scan your photographs. For more information on using your S20 photo scanner:
•
Go through the Imaging Essentials Multimedia tutorials that are provided on the
HP PhotoSmart CD. To run the tutorials, from the Windows Start menu choose
Programs > HP PhotoSmart > S20 Photo Scanner > Imaging Essentials Multimedia. You will
be prompted to insert the HP PhotoSmart CD into a CD-ROM drive of your PC.
•
Look in the online Help. The online Help contains “how to,” reference, and
troubleshooting information for your photo scanner, including some multimedia
video clips on particular topics. To learn how to view the online Help, see “Viewing
Online Help” starting on page 27 in this guide.
To learn how to use the HP PhotoSmart scanning software, see the HP PhotoSmart
Scanning Software Quick Reference and the online Help. Multimedia tutorials for
the scanning software are also included on the HP PhotoSmart CD.
Finally, if you ever need help with your S20 photo scanner, see the next chapter.
Chapter 4 explains how to access the HP PhotoSmart website and how to get
technical support from Hewlett-Packard Company for your S20 photo scanner.
http://www.photosmart.com
25
26
HP PhotoSmart S20 Photo Scanner Basics
Chapter 4 - Getting Help for Your Photo Scanner
The HP PhotoSmart S20 photo scanner is designed to be easy to use. When there is a
problem, you have several resources for finding a solution.
This chapter explains how you can get help for your S20 photo scanner, including:
•
Accessing the HP PhotoSmart website for project ideas, troubleshooting
assistance, and updated software
•
Viewing the online Help for “how to,” reference, and troubleshooting information
for your photo scanner
•
Getting technical support from Hewlett-Packard Company for your photo scanner
Accessing the HP PhotoSmart Website
You can get project ideas, troubleshooting assistance, and updated software from the
HP PhotoSmart website. For up-to-date information, check here first whenever you
have a question about your photo scanner. The address for the website is:
http://www.photosmart.com
Viewing Online Help
The HP PhotoSmart S20 photo scanner and scanning software come with a complete
online Help system. The online Help is context-sensitive and provides “how-to,”
reference, and troubleshooting information for your photo scanner and scanning
software.
To view the online Help while the scanning software is running, do any of the
following:
•
Click the Help button in a dialog box to get Help about that dialog box.
•
Click the ? button in a tool to get Help about that tool.
•
Right-click a control (such as a button) to get “pop-up” Help about that control.
Some online Help topics also have multimedia video clips that you can watch. To view
any of these video clips, simply click the Movie button for that online Help topic:
Note:
Some multimedia video clips require the HP PhotoSmart CD. You will be
prompted for the CD if it is needed and is not already in a CD-ROM drive on
your PC.
http://www.photosmart.com
27
You can also access the Help Topics dialog box, which lists all the topics in the online
Help system. To display the Help Topics dialog box, either:
•
Click the Help Topics button at the top of any Help window (except “pop-up” Help
windows).
•
From the Windows Start menu, choose Programs > HP PhotoSmart > S20 Photo Scanner >
Help Topics.
The Help Topics dialog box opens, as shown:
tabs
Help
sections
The information on the Contents tab of the Help Topics dialog box is organized into
numerous sections, which are designated as books. Simply double-click a book to
open that section, and then double-click the Help topic you want.
You can also click on the other tabs to go to the online Help’s Index and Find utilities.
Then follow the instructions displayed at the top of each tab to access the online Help
information you want.
Note:
28
The reference information provided in the online Help includes the limited
warranty, as well as all specifications and regulatory notices for your S20
photo scanner.
HP PhotoSmart S20 Photo Scanner Basics
Getting Technical Support
No matter where you are or when you need it, Hewlett-Packard Company’s technical
support is there to help you get the most from your HP products. Whether it’s making
products easier to use or providing you with innovative new ways to tackle your
important projects, HP’s technical support helps you be a confident and creative user.
If you do encounter a problem with your HP product, don’t worry. HP’s technical
support will deliver fast, accurate solutions to you.
HP has Customer Support Centers worldwide, some of which are listed below.
For a complete listing of HP’s technical support services, please see the online Help.
HP’s Customer Support Centers
Note:
Replace a + with your international telephone access code.
United States
(208) 376-FOTO (3686)
Canada
English language support: (208) 376-FOTO (3686)
French language support: (800) 387-3867
Europe
United Kingdom: 0171 512 5202
France: 04 50 43 9853
Germany: 0180 5 25 81 43
English language support from other European countries:
+44 171 512 5202
Australia
(+61 3) 9272 8000
Singapore
(65) 272-5300
http://www.photosmart.com
29
30
HP PhotoSmart S20 Photo Scanner Basics
Appendix A - Cleaning Your Photo Scanner
If you get streaks in a scanned image that are not in the original photograph you
scanned, you may need to clean your HP PhotoSmart S20 photo scanner. This
appendix explains how to clean your photo scanner by removing accumulated dust
from the glass windows inside it.
Before performing the cleaning procedure in this appendix, try calibrating the
photo scanner to see if that clears up the problem. For information on photo
scanner calibration, see the online Help.
Tip:
Caution:
Be aware of the following so that you do not damage your photo scanner
while cleaning it:
• Do not use any liquids to clean the inside of the photo scanner.
• Do not touch the glass windows inside the photo scanner. You may leave
fingerprints that will appear in your scanned images.
• Do not use a cloth or brush to clean the glass windows inside the photo
scanner. You may scratch the glass, and the scratches will appear in your
scanned images.
Note:
You will need the air bulb that came with your S20 photo scanner for the
following cleaning procedure.
To clean your S20 photo scanner, do the following:
1.
Press the Photo Format button on the photo scanner’s front panel until the photo
insertion slot is set properly for prints, as shown:
photo insertion
slot set for prints
indicator light
for prints
http://www.photosmart.com
31
2.
Hold the bottom of the photo scanner with one hand and pull up on the photo
scanner lid with your other hand.
3.
Open the photo scanner lid carefully about 3 inches and then lay the photo scanner
on its side on a flat surface.
Caution:
4.
32
Do not touch the glass windows inside the photo scanner with the air
bulb.
Use the air bulb that came with your photo scanner to blow the dust off the small
glass window in the front bottom of the photo scanner between the rollers.
HP PhotoSmart S20 Photo Scanner Basics
5.
Use the air bulb to blow the dust off the long glass window in the front top of the
photo scanner.
6.
Turn the photo scanner back onto its base, and close the photo scanner lid by
pressing down firmly until it snaps into place.
http://www.photosmart.com
33
34
HP PhotoSmart S20 Photo Scanner Basics
Appendix B - Uninstalling Your Photo Scanner
This appendix explains how to uninstall your HP PhotoSmart S20 photo scanner. This
process includes uninstalling the HP PhotoSmart scanning software from your PC, as
well as disconnecting the S20 photo scanner from the power outlet and from your PC.
Uninstalling the Software
To uninstall the HP PhotoSmart scanning software from your PC, do the following:
1.
From the Windows Start menu, choose Settings > Control Panel.
2.
In the Control Panel, double-click the Add/Remove Programs icon.
3.
In the Install/Uninstall tab of the Add/Remove Programs Properties dialog box,
scroll down in the list of programs until you see HP PhotoSmart S20 Scanner Software.
4.
Click on HP PhotoSmart S20 Scanner Software, and then click the Add/Remove button.
5.
In the Confirm File Deletion dialog box, click the Yes button to remove the
scanning software.
The HP PhotoSmart scanning software is uninstalled from your PC’s hard disk.
Disconnecting the Photo Scanner
To uninstall the S20 photo scanner, disconnect its power cable from the power outlet
and disconnect its USB cable from the USB connector on your PC.
You have now uninstalled the HP PhotoSmart scanning software and S20 photo
scanner from your PC.
http://www.photosmart.com
35
36
HP PhotoSmart S20 Photo Scanner Basics
Glossary
calibration card
A card used to calibrate the HP PhotoSmart S20 photo scanner for scanning prints. (The
calibration card is packaged in the special pocket inside the back cover of this Basics guide.)
The calibration card contains both black and white reference sections so that the photo
scanner can be properly calibrated. See also photo scanner calibration.
CD-ROM
Compact disk read-only memory. A round disk containing data that can be read by a computer,
but cannot be modified.
CD-ROM drive
The drive in a computer which can read the data on a CD-ROM.
click
To press and release a mouse button once. (If not specified, this means the left mouse button.)
connector
See USB connector.
double-click
To click the left mouse button twice in rapid succession.
emulsion
The light-sensitive silver that is coated on the clear acetate film base, and which forms the
photograph when you take a picture and then have the film developed.
film strip
Negatives or slides produced on multiple frames (a strip) of 35 mm print film or slide film,
respectively. You can use a negative strip or a slide strip (up to 5 frames at a time) to create
scanned images via the HP PhotoSmart S20 photo scanner. See also negative strip and slide strip.
hard disk
The disk drive in a computer, which usually contains all the installed software programs as well
as data files produced by the computer’s user(s).
image
An electronic version of a photograph that can be displayed on a computer screen and saved to
a computer disk. The HP PhotoSmart S20 photo scanner can translate an original photograph
(mounted film, film strip, or print) into an image that a computer will recognize.
http://www.photosmart.com
37
landscape
The orientation of a photograph or image that is wider than it is tall. (If it is
taller than it is wide, then it has a portrait orientation.)
mounted film
A negative or slide produced on a single frame of 35 mm print film or slide film, respectively,
and mounted in a standard 35 mm slide mount. You can use mounted film to create a scanned
image via the HP PhotoSmart S20 photo scanner. See also mounted negative and mounted slide.
mounted negative
A reversed photograph produced on a single frame of 35 mm print film and mounted in a
standard 35 mm slide mount. You can use a mounted negative to create a scanned image via
the HP PhotoSmart S20 photo scanner. See also mounted film and mounted slide.
mounted slide
A transparent photograph produced on a single frame of 35 mm slide film and mounted in a
standard 35 mm slide mount. You can use a mounted slide to create a scanned image via the
HP PhotoSmart S20 photo scanner. See also mounted film and mounted negative.
negative
A reversed photograph produced on a frame of 35 mm print film. You can use either a
mounted, single-frame negative or a multiple-frame, negative film strip (up to 5 frames at a
time) to create either one scanned image or several scanned images, respectively, via the
HP PhotoSmart S20 photo scanner. See also film strip, mounted film, mounted negative, and
negative strip.
negative strip
Reversed photographs produced on frames (a strip) of 35 mm print film. You can use a
negative strip (up to 5 frames at a time) to create scanned images via the HP PhotoSmart
S20 photo scanner. See also film strip, negative, and slide strip.
peripheral
An electronic device that is connected to a PC and performs a particular task or set of tasks,
such as printing, scanning, telephony, faxing, and so forth. The HP PhotoSmart S20 photo
scanner is one such peripheral.
photograph
The original mounted film, film strip, or print. (The electronic version of a photograph is called
an image.)
photographic format
The physical characteristics of a particular photograph. The HP PhotoSmart S20 photo scanner
can scan photographs of the following photographic formats: mounted film (35 mm mounted
slides or mounted negatives), film strips (35 mm negative strips or slide strips), and prints.
38
HP PhotoSmart S20 Photo Scanner Basics
photo scanner
A computer peripheral capable of converting photographs into electronic images which can
then be displayed, adjusted, and stored by a computer, as well as printed from a computer.
photo scanner calibration
The process that adjusts the color or black and white values in a scanned image to compensate
for the effects a photo scanner has on the image. The HP PhotoSmart S20 photo scanner is
automatically calibrated each time either mounted film or a film strip is scanned, but must be
periodically calibrated for prints using the photo scanner’s calibration card. See also calibration
card.
photo sleeve
The white card with a clear cover attached which is used for inserting small prints (smaller
than 2 inches x 2 inches, or 50 mm x 50 mm) or paper clippings (such as magazine or
newspaper clippings) into the HP PhotoSmart S20 photo scanner for scanning. (The photo
sleeve is packaged in the special pocket inside the back cover of this Basics guide.)
port
See USB connector.
portrait
The orientation of a photograph or image that is taller than it is wide. (If it is
wider than it is tall, then it has a landscape orientation.)
print
A photograph produced from print film. You can use a print no larger than 5 inches x 7 inches,
or 127 mm x 178 mm, to create a scanned image via the HP PhotoSmart S20 photo scanner.
Prints that are smaller than 2 inches x 2 inches, or 50 mm x 50 mm, may be scanned by the
S20 photo scanner if they are inserted in the photo sleeve. See also photo sleeve.
processor
The main computing unit of a computer. The HP PhotoSmart S20 photo scanner requires a PC
with a Pentium or equivalent processor.
slide
A transparent photograph produced on a frame of 35 mm slide film. You can use either a
mounted, single-frame slide or a multiple-frame, slide film strip (up to 5 frames at a time) to
create one scanned image or several scanned images, respectively, via the HP PhotoSmart
S20 photo scanner. See also film strip, mounted film, mounted slide, and slide strip.
slide strip
Transparent photographs produced on frames (a strip) of 35 mm slide film. You can use a slide
strip (up to 5 frames at a time) to create scanned images via the HP PhotoSmart S20 photo
scanner. See also film strip, negative strip, and slide.
http://www.photosmart.com
39
taskbar
The Windows toolbar that docks on the edge of the desktop. The taskbar includes the Start
button, buttons for each open computer program, and a status area.
TWAIN
A standard protocol (method of communication) that programs can use to send instructions to
other programs or hardware, and receive data back from them (such as images). If you are
using a program that supports TWAIN, you can start the HP PhotoSmart scanning software
directly from that program.
USB connector
The connector (or port) on the USB interface installed in a PC to which the HP PhotoSmart
S20 photo scanner can be connected. The USB connector is on either the front or back exterior
of the PC.
USB interface
The Universal Serial Bus hardware and its associated software drivers. A USB interface
installed in a PC and connected to the HP PhotoSmart S20 photo scanner enables the photo
scanner to talk to the PC.
40
HP PhotoSmart S20 Photo Scanner Basics
Index
A
Air bulb, cleaning S20 photo scanner with 32
C
Cables
connecting power 8
connecting USB interface 9
power 4
USB interface 4
Calibrating the S20 photo scanner 10
Calibration card 4, 10
CD-ROM, HP PhotoSmart
installing the software from 7
tutorials on 25
Cleaning brush 4
Cleaning the S20 photo scanner 31
Connecting
power cable 8
S20 photo scanner to PC 8
S20 photo scanner to USB 9
USB interface cable 9
Connector, USB 8
Customer Support from HP 29
D
Disconnecting S20 photo scanner from PC 35
E
Ejecting a photograph manually 24
Emulsion side of photographs, determining 15
F
Film strip
icon on S20 photo scanner 13
inserting and scanning 18
orienting for insertion 15
setting the S20 photo scanner for 14
Find utility in online Help 28
H
Help for the S20 photo scanner 27
Help Topics dialog box in online Help 28
http://www.photosmart.com
HP Customer Support 29
HP PhotoSmart CD-ROM
installing the software from 7
tutorials on 25
HP PhotoSmart S20 photo scanner
box contents 4
calibrating 10
cleaning 31
connecting to PC 8
disconnecting from PC 35
getting help for 27
icons on front panel 13
installing 8
learning more about it 25
limited warranty 28
multimedia video clips 27
online Help 27
Photo Format button 13
photographic formats supported 3
registering 10
regulatory notices 28
setting for photographic format 13
sleep mode 9
specifications 28
Stop/Eject button 24
system requirements 3
technical support from HP 29
uninstalling 35
unpacking 4
HP PhotoSmart scanning software
installing 7
learning how to use 25
online Help 27
registering 10
running 12
uninstalling 35
HP PhotoSmart website, accessing 27
I
Icons on front panel of S20 photo scanner 13
Index utility in online Help 28
Indicator lights for photographic format 13
41
Inserting and scanning
film strips 18
mounted film 16
paper clippings in photo sleeve 23
prints 20
small prints in photo sleeve 23
Installing
S20 photo scanner 8
scanning software 7
L
Landscape orientation 20
Learning more about the S20 photo scanner 25
Limited warranty for S20 photo scanner 28
M
Magazine clippings, scanning 22
Manually ejecting a photograph 24
Mounted film
icon on S20 photo scanner 13
inserting and scanning 16
orienting for insertion 15
setting the S20 photo scanner for 14
Multimedia tutorials on HP PhotoSmart CD 25
Multimedia video clips in online Help 27
N
Newspaper clippings, scanning 22
O
Online Help
Find utility 28
Help Topics dialog box 28
Index utility 28
limited warranty for S20 photo scanner 28
multimedia video clips in 27
regulatory notices for S20 photo scanner 28
specifications for S20 photo scanner 28
viewing 27
Orienting photographs for insertion 15
P
Paper clippings, scanning 22
Phone numbers for HP Customer Support 29
Photo Format button, using 13
Photo insertion slot, changing size of 13
Photo sleeve, using 22
42
Photographic format, setting S20 photo scanner for
13
Photographic formats supported 3
Portrait orientation 20
Power cable 4
Power, sleep mode 9
Print
icon on S20 photo scanner 13
inserting and scanning 20
inserting and scanning small in photo sleeve 22
orienting for insertion 15
setting the S20 photo scanner for 14
R
Registering the S20 photo scanner 10
Regulatory notices for S20 photo scanner 28
Running the scanning software 12
S
S20 photo scanner
box contents 4
calibrating 10
cleaning 31
connecting to PC 8
disconnecting from PC 35
getting help for 27
icons on front panel 13
installing 8
learning more about it 25
limited warranty 28
multimedia video clips 27
online Help 27
Photo Format button 13
photographic formats supported 3
registering 10
regulatory notices 28
setting for photographic format 13
sleep mode 9
specifications 28
Stop/Eject button 24
system requirements 3
technical support from HP 29
uninstalling 35
unpacking 4
HP PhotoSmart S20 Photo Scanner Basics
Scanning
film strips 18
mounted film 16
paper clippings with photo sleeve 22
photographic formats supported 3
prints 20
small prints with photo sleeve 22
small prints without the photo sleeve 23
steps involved in 11
Scanning software
installing 7
learning how to use 25
online Help 27
registering 10
running 12
uninstalling 35
Setting the photographic format 13
Setting up
S20 photo scanner 8
scanning software 7
Small prints, scanning 22
Specifications for S20 photo scanner 28
Stop/Eject button, using 24
Streaks in scanned images 31
Support from HP 29
System requirements 3
W
Warranty for S20 photo scanner 28
Website, accessing HP PhotoSmart 27
T
Technical support from HP 29
Telephone numbers for HP Customer Support 29
Troubleshooting information 27
Tutorials on HP PhotoSmart CD 25
U
Uninstalling the S20 photo scanner and scanning
software 35
Unpacking the S20 photo scanner 4
USB
cable 4
connecting S20 photo scanner to 9
connector (or port), locating 8
disconnecting the cable 35
symbol 8
V
Video clips in online Help 27
http://www.photosmart.com
43
44
HP PhotoSmart S20 Photo Scanner Basics