1
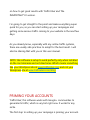
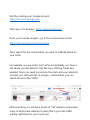
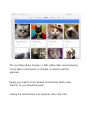
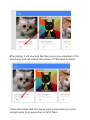
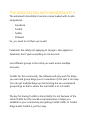
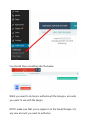
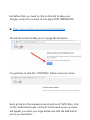
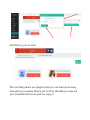
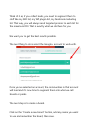
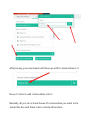
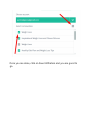
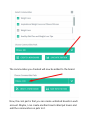
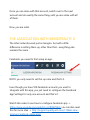
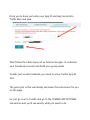
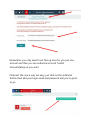
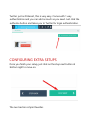
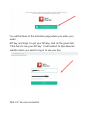
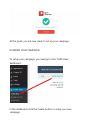
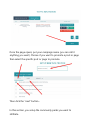
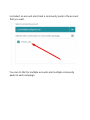
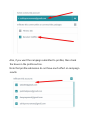
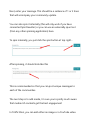
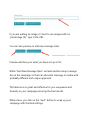
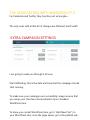
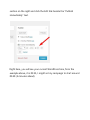
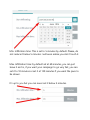
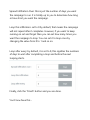
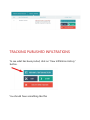
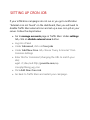
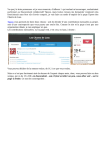
The IMMORTALITY X User Manual By Precious Ngwu Customer Support: www.PagedSupport.com Hey Precious here and thank you for jumping onboard with us on Traffic Elixir. This manual is meant to layout the perfect guidelines on how to get great results with Traffic Elixir and The IMMORTALITY X version. I’m going to get straight to the point and make everything super quick for you, so you can start setting up your campaigns and getting some serious traffic coming to your website in the next few days. As you already know, especially with any online traffic systems, there are usually safe practices to adopt for the best result. I will also be sharing that with you in this user manual. NOTE: this software is setup to work perfectly only when installed on the root domains and not directories. Which means something like your Wordpress site at www.trafficelixir.com and not your Wordpress site at www.trafficelixir.com/blog. PRIMING YOUR ACCOUNTS Traffic Elixir; this software works with Google+ communities to generate its traffic, which is very hot right now. It works for any niche The first step to setting up your campaign is priming your account. Start by creating your Google account: https://accounts.google.com/ Then sign in to Google+: https://plus.google.com/ Once, you’re inside Google+, go to the communities section. https://plus.google.com/communities Then, search for the communities you want to infiltrate based on your niche. For example, you are in the “pet” niche and probably, you have a site where you sell items for cats like toys, clothing, foods and whatnot. Since you need to promote the site to sell your products or build your cat lovers list, in Google+ communities, you can search for terms like “CATS”. After searching, you will see a bunch of “cat” related communities; many of which have millions of users (that is your free traffic waiting right there for you to pick up). The cool thing about Google+ is that unlike other social networks, to join these communities is a breeze, no need to wait for approval. Rarely, you might run into locked communities which is less than1%; so, you should be good. Joining the communities is as simple as click, click, click… After joining, it will now look like this (you’re now a member of the community and can unleash the power of Traffic Elixir on them). Follow this simple step and join as much communities you want and get ready to go super elixir on all of them. SAFE BETS TO PRIMING YOUR ACCOUNTS 1. The more communities you join, the more traffic you will generate. 2. To get better traffic, do not bother with communities that have low number of members especially those with less than 100 members. In my experience, they are not worth it. 3. Do not use 1 Google+ account to join and post in like 200 communities in the same niche if you want to be play safe. What you should do is, take for example10 accounts and break it down to 20 communities per account. That is your safety net. If you are in multiple niches like “pet, fitness and marketing” and you have 10 Google+ accounts to use and you want to join at least 200 communities in each niche. It will become a total of 600 communities, which means that each of the accounts will get 60 communities assigned to it. (20 on pet, another 20 fitness and the other 20 on marketing per account). So, do not use one account to join hundreds of communities in one niche, you need to evenly space it out. Even if each of your accounts joined 100s of communities, let it be across different niches. THE ASSOCIATION WITH IMMORTALITY X The advanced Immortality X version comes loaded with 4 extra integrations… - Facebook - Tumblr - Twitter - Pinterest So, you need to set them up as well. Facebook: the safety net applying to Google+ also applies to Facebook, don’t pack everything in one account. Join different groups in the niche you want across multiple accounts. Tumblr: for this community, the software will only work for blogs you own and group blogs you’re a member of, this part is too easy. You can get multiple blogs up and running but we recommend group blogs as that is where the real traffic is at in Tumblr. The key for having Tumblr in Immortality X is not because of the instant traffic but the overall social dominance it helps you establish in your community and getting Tumblr traffic to Tumblr blogs inside Tumblr is just too easy. Twitter: with twitter, comes the great social exposure and then some… what you want here is to have multiple social accounts running under you and touting your content all there all the time. The key here is using HASHTAGS that are getting traffic, popular hashtags and probably trending hashtags as well and get in the mix, I will tell how to leverage these hashtags in Traffic Elixir – IMMORTALITY X. Pinterest: again, just like Twitter, the key here is the hashtag as well but unlike other social communities, you just need 1 account here to make the magic happen LOADING UP YOUR ELIXIR Once everything is setup, you have created Google+ accounts and joined lots of Google+ communities in your niche, the next step is loading everything inside Traffic Elixir. I believe by now you must have installed and activated the plugin on your site. First thing you need to do is go to Manage Accounts inside Traffic Elixir… You should have something like the below. What you need to do here is authorize all the Google+ accounts you want to use with the plugin. NOTE: make sure that you’re signed in to the Gmail/Google+ for any new account you want to authorize But before that, you need to click on this link to allow your Google+ account to connect to new apps (VERY IMPORTANT) https://www.google.com/accounts/UnlockCaptcha The link above should take you to a page like the below You just have to click the “CONTINUE” button and you’re done. Next, go back to the manage accounts section of Traffic Elixir, click on the “Authorize Google+ Account” button and a pop up screen will appear, you enter your login details and click the Add button just as you see below. And that’s it, you’re done. The cool thing about our plugin is that you can load up as many accounts as you wants, there’s just no limit. We help you max out your potential, that is our goal. So, enjoy it. Now, you are done with authorizing accounts. Time to really hit things up. You click on Sleeper Infiltration. Over at “Sleeper Infiltration” tab, this is where you segment the communities in the software so that the software infiltrates only the targeted communities on each campaign and you get the most targeted visitors. Think of it as, if you collect leads, you need to segment them to stuff like my SEO list, my WP plugin list, my Facebook marketing list. That way, you will always send targeted promos to each list for the maximum ROI. That is exactly what we did here for you. We want you to get the best results possible. The next thing to do is select the Google+ account to work with. Once you’ve selected an account, the communities in that account will load and it’s now time to segment them into what we call boards or packs. The next step is to create a board. Click on the “Create a new board” button, add any name you want to use and remember the board, then save. After saving, your new board will show up with 0 communities in it. Now, it’s time to add communities into it… Basically, all you do is check boxes of communities you want to be inside this box and there’s also a check all function… Once you are done, click on Save Infiltration and you are good to go. The communities you checked will now be added to the board. Now, the cool part is that you can create unlimited boards in each account. Maybe, I can create another board called pet lovers and add the communities on pets to it. Once you are done with that account, switch over to the next account and do exactly the same thing until you are done with all of them. Now, you are solid. THE ASSOCIATION WITH IMMORTALITY X The other networks work just as Google+ but with a little difference in setting them up, other than that… everything else remains the same. Facebook: you need to first setup an app… NOTE: you only need to set this up once and that’s it. Even though you have 100 Facebook accounts you want to integrate with this app, you just need to configure the Facebook App Settings for only one account and that’s it. Watch this video to see how to configure Facebook app -> https://www.youtube.com/watch?v=HIf0JW7JhcE, you can also read this for more idea -> http://support.qualityunit.com/172666-Howtosetup-Facebook-application Once you’re done, just enter your App ID and App Secret into Traffic Elixir and save. Then follow the other steps just as listed in Google+ to authorize your Facebook accounts and build your group packs. Tumblr: just as with Facebook, you need to setup Tumblr App ID first… The good part is that we literally laid down the instructions for you on the page. So, just go over to Tumblr and go to the TUMBLR APP SETTINGS sub section and you’ll see exactly what you need to do. Remember, you only need to set this up once for you just one account and then you can authorize as much Tumblr accounts/blogs as you want. Pinterest: this one is way too easy, just click on the authorize button then add your login email and password and you’re good to go. Twitter: just as Pinterest, this is very easy. Comes with 1 way authentication and you can add as much as you need. Just click the authorize button and takes you to Twitter for login authentication. CONFIGURING EXTRA SETUPS Once you finish your setup, just click on the step next button at bottom right to move on. The next section is Spin Rewriter. Firstly, I want to remind you that this feature is optional (though recommended) but Traffic Elixir does not need nor depend on this feature to function properly. However, it is highly recommended you integrate a Spin Rewriter account. This will help in spinning your content published in the communities so that each one can look unique. If you do not have an account with Spin Rewriter yet, then click on the red button that says “Buy Spin Rewriter Now” to get your membership, it is affordable and will be useful in your overall online business. It is one of the marketing tools that we have used for a long time. If you already have an account, just click on the green button. You will be taken to the activation page where you enter your email API key, and login. To get your API key, click on the green text “Click here to see your API key”. It will redirect to Spin Rewriter website where you need to log in to see your key. That is it. You are connected. At this point, you are now ready to set up your campaign. RUNNING YOUR CAMPAIGN To setup your campaign, you need go to the Traffic Elixir dashboard… In the dashboard, click the Create button to setup your new campaign. Once the page opens, put your campaign name (you can call it anything you want). Choose if you want to promote a post or page then select the specific post or page to promote. Then click the “next” button… In this section, you setup the community packs you want to infiltrate. Just select an account and check a community pack in the account that you want. You can do this for multiple accounts and multiple community packs in each campaign. Also, if you want the campaign submitted to profiles, then check the boxes in the profile section. Note that profile submission do not have much effect on campaign results. Next, enter your message. This should be a sentence of 1 or 2 lines that will accompany your community update. You can also spin it internally (this will only work if you have connected Spin Rewriter) or you can use an externally spun text (from any other spinning application) here. To spin internally, you just click the spin button at top right… After spinning, it should look like this This is recommended so that you can post unique messages to each of the communities. The next step is to add media, I’m sure you’re pretty much aware that media rich contents get the best engagement In Traffic Elixir, you can add either an image or a YouTube video. If you are adding an image, it’s best to use images with no “percentage (%)” sign in the URL. You can also preview or add new message class. Preview will show you what you have set up so far. While “Add New Message Class” will add another setup message box in the campaign so that can add extra message or media with probably different and unique approach. This feature is so great and effective for you uniqueness and diversity in your campaign ensuring the best results. When done, you click on the “next” button to wrap up your campaign with the final settings. THE ASSOCIATION WITH IMMORTALITY X For Facebook and Twitter, they function just as Google+. The only ones with a little bit of changes are Pinterest and Tumblr. EXTRA CAMPAIGN SETTINGS I am going to walk you through it all now. Start Infiltrating: this is the date and time that the campaign should start running. To make sure your campaign runs successfully, always ensure that you setup your time few minutes ahead of your standard WordPress time. To know you current WordPress time, go to “Add New Post” (in your WordPress site); once the page opens, go to the publish sub- section on the right and click the Edit link beside the “Publish immediately” text. Right here, you will see your current WordPress time, from the example above, it is 05:35, I might set my campaign to start around 05:40 (5 minutes ahead). Min. Infiltration time: This is set to 5 minutes by default. Please, do not reduce it below 5 minutes. I will even advise you don’t touch it. Max. Infiltration time: by default set at 60 minutes, you can just leave it as it is, if you want your campaign to go very fast, you can set it to 10 minutes or set it at 120 minutes if you want the pace to be slower. It’s up to you but you can never set it below 5 minutes. Spread Infiltration Over: this is just the number of days you want the campaign to run. It is totally up to you to determine how long or how short you want the campaign. Loop this infiltration: set to 0 by default, that means the campaign will not repeat after it completes. However, if you want to keep running on set and forget then you can set how many times you want the campaign to loop. You can set it to loop once by changing the value from 0 to 1 and so on. Loop after every: by default, it is set to 0, this signifies the numbers of days to wait after completing a loop and before the next looping starts. Finally, click the “Finish” button and you are done. You’ll now have this… TRACKING PUBLISHED INFILTRATIONS To see what has been posted, click on “View Infiltration History” button. You should have something like this You can click the “View” button and you will be taken to the community where the post was made. SETTING UP CRON JOB If your infiltration campaigns do not run or you get a notification “External cron not found” on the dashboard, then you will need to disable Traffic Elixir external cron and set up a new cron job in your server. Follow the steps below: Go to manage accounts page in Traffic Elixir. Under settings tab, click on disable external cron button. Log into cPanel Under Advanced, click on Cron jobs Under Add New Cron Job, choose “Every 5 minutes” from Common Settings Enter this for Command (changing the URL to match your site): wget -O /dev/null http://yoursite.com/wpcron.php?doing_wp_cron Click Add New Cron Job Go back to Traffic Elixir and restart your campaign. Good luck and we wish you great results. Cheers Precious Ngwu