1
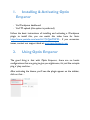
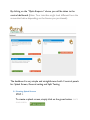
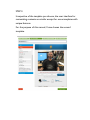
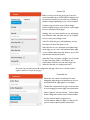
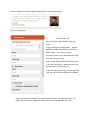
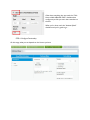
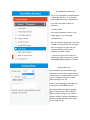
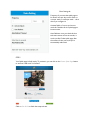
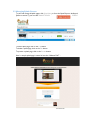
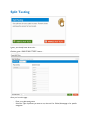
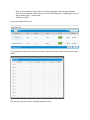
Optin Emperor + X USER MANUAL By Precious Ngwu And the Paged Marketing Team Customer Support Desk About this manual. This user manual is specially designed to detail the plugin’s functions and features ofboth Optin Emperor and Optin Emperor X (Developers license). NOTE: some functions and features discussed in this training manual might not be available to customers using basic Optin Emperor and not the Advanced Optin Emperor X version. Please read this manual before using the plugin to ensure optimum output. Descriptions are based on the plugin’s default settings. Images and screenshots may differ in appearance from the actual product. Available features may vary depending on the version or license purchased. Legal By reading this E-book you have agreed to the following terms and conditions. Under no circumstances should this E-book be sold, copied or reproduced in any way. “Optin Emperor” and all of its contents are protected by copyright law. Copyright information contained in this product may not be reproduced, distributed or copied publicly in any way, including Internet, e-mail, newsgroups, or reprinting. Any violator will be subject to the maximum fine and penalty imposed by law. Purchasers of this product are granted a license to use the information contained herein for their own personal use only. Any violators will be pursued and punished to the fullest extent of the law. All earnings described in this product and shown on our website are accurate to the best of our knowledge, and should not be considered “typical”. As with any business, your results may vary, and will be based on your background, dedication, desire and motivation. We make no guarantees regarding the level of success you may experience. Any testimonials and examples used are exceptional results, which do not apply to the average purchaser, and are not intended to represent or guarantee that anyone will achieve the same or similar results. You may also experience unknown or unforeseeable risks which can reduce results. We are not responsible for your actions. The author and publisher of Optin Emperor and the accompanying materials have used their best efforts in preparing Optin Emperor. The author and publisher make no representation or warranties with respect to the accuracy, applicability, fitness, or completeness of the contents of Optin Emperor. The information contained in Optin Emperor is strictly for educational purposes. Therefore, if you wish to apply ideas contained in Optin Emperor you are taking full responsibility for your actions. The material contained in this book in STRICTLY CONFIDENTIAL. There are NO Resell rights for Optin Emperor. There are NO Private label rights for Optin Emperor. You may NOT distribute this report in away way (paid or free). Distribute Optin Emperor illegally and you WILL be subject to the maximum fine/penalty imposed by law. 1. Installing & Activating Optin Emperor - Via Wordpress dashboard - Via FTP upload (this option is preferred) Follow the basic instructions of installing and activating a Wordpress plugin to install this, you can watch this video here for hints: https://www.youtube.com/watch?v=7jLQp6OVZ90... if you encounter issues, contact our support desk at www.pagedsupport.com 2. Using Optin Emperor The good thing is that with Optin Emperor, there are no hectic configurations that are going to give you nightmares, it’s just like a simple plug n’ play machine… After activating the theme, you’ll see the plugin appear on the sidebar, click on that… By clicking on the “Optin Emperor” above, you will be taken to the control dashboard (Note: Your interface might look different from the screenshot below depending on the license you purchased). The dashboard is very simple and straightforward with 3 control panels for: Splash Screen, General setting and Split Testing. 2.1 Creating Splash Screens STEP 1. To create a splash screen, simply click on the green button SPLASH SCREEN. CREATE STEP 2. The “New Splash Screen” page comes up. Enter the Name of the new splash screen you want to create under New Splash name. Choose any of the available templates (the number of available templates might differ depending on the license you purchased) and click Save & Continue button at the bottom right of the screen to go to the next step. STEP 3. Irrespective of the template you choose, the user interface for customizing contents are similar except for some templates with unique features. For the purpose of this manual, I have chosen the second template. Style Tab: Background Settings: This is where you can change the background image of your splash page or if you don’t want to use background image then mark the “Remove BG Image” checkbox. When that is done, you can use the Color box to choose any color you want to use as background for your splash page. Allow Skip Link Settings: every optimized splash page has an option to skip the page and continue to website, with this… you can configure how you want you skip link to look like, font size, color etc. Powered by Link Settings: just like the Skip link, you can added you Powered By link to the splash page, maybe if you want to credit your brand name, you say… “Powered By: Brand Name”, you can style the look. Button Settings: if you want to change the button at Autoresponder, this is where you configure it, just click Upload Image to upload a Call to Action button that will be shown when you add your auto-responder code. You can also mark the “Remove Button Image” checkbox and use the options available to configure a Call to Action. Content Tab Before, I show you how this works, let me say this… we’ve practically built an INTELLIGENT software were, the functions and tabs you see inside our LIVE Editing platform changes depending on your chosen template. Company Logo: just click on the “Upload Image” button to upload a logo just like how you insert images into your Wordpress posts/pages. Heading: this is you enter the title on your splash page and remember under the Styles tab, you can configure how you want your heading to look. Video ID: I think this part is self-explanatory and we have option for Auto Play Video or not. Allow Skip: this is a very important of the Splash Page technology, you can’t run a well optimized splash page on your website without the Skip function so you must keep that box checked at all times. Allow Skip Text: you need to configure you’re the text for Skip, I like using “SKIP => Continue to site…” similar what Forbes uses too and don’t forget that under the Style tab, you configure the looks. Of course, we have the Powered By configuration although I don’t use it a lot but I think it might be useful to a couple of you guys… Testimonial tab Remember, this software is built based to work intelligently, depending on the template you choose, this testimonial tab might appear or not appear. Testimonials are paramount to high conversion rates in most campaign hence we highly recommend them. When it appears, you have 3 boxes… Author Name, Author Designation and the actual Testimonial Box. We also have the Author Image which is recommended at 100px by 100px or 150px by 150, you just need to upload a profile sized picture. Here’s a sample of one of the configured testimonials in my LIVE splash page… Don’t you just dig that? Autoresponder tab Now, this is where Optin Emperor gets even cooler… It works with ALL Auto Responders… Aweber, MailChimp, GetResonse, Self-Hosted, Custom HTML scripts… you name it, we got it! As usual just paste in your Autoresponder HTML code and you’re good to go… If you’ve used Optimize Press, WP Leads Gorilla or any other WP plugin or theme that works this way then this is an easy pie for you. It does not require any coding, once you paste the code, the rest of the boxes gets auto-completed Now, in some special cases like those using Campaign Monitor autoresponder service, you might need a bit of extra configuration which won’t be automatically filled up for you… Other than everything else, just mark the “Click Here to Add Additional Fields” checkbox then configure it just like you see in the screenshot on the site. When you’re done, mark the “Activate Splash” checkbox and you’re good to go… STEP 4. Configure Functionality On this stage, what you see depends on the License you have. Crowd Match Activation tab This is one of the MOST powerful features in this plugin, with this… you can build hyper-targeted and super responsive lists. If you want you splash to show for everybody… >>Check Global If you want the splash to show for only people going to your home page… >>Check Home But if you want the splash page to show to a specific crowd of people, you can target them via categories on your site, only visitors accessing content in those categories can see the splash… …and you can choose more than one category per splash, this way you go after even MORE targeted leads for you niche. Exclusion Rules tab With this feature, you can excludes pages, posts where you don’t want a splash to show up even when it’s in Global mode or when it’s active in a Category that post is in when traffic if coming to your site. Maybe it’s your salespage or something, we just want you to have MORE control. After chosing what to exclude, homepage, pages or post, enter the referral URL(s), maybe it’s traffic coming to your site from Google or CNN or Forbes or Wikipedia or ANY site, just enter the URL of the Site(s) and you’re good to go. Extra Setting tab Frequency: if you want the splash page to be shown once per day to each visitor or once per week, or twice per week… this is where you configure it! Activate Splash: of course you have to mark this checkbox for the splash page to become active. Auto Redirect: once you check this box and enter amount of time in seconds, it works just like Forbes splash page, after the amount of time you set, they are automatically redirected. STEP 5. Your Splash page is finally ready. To preview it, you can click on the Preview Splash Page button to see how it will work on frontend. Click on Save & Exit to finish the setup and save. 2.2 Managing Splash Screens To view and manage all splash pages, click Splash listing or from the Optin Emperor dashboard, (Refer to section 2.) you can click MANAGE SPLASH SCREEN To edit a splash page, click on the Edit button. To delete a splash page, click on the Edit button. To preview a splash page, click on the Preview button. Here’s a sample splash page I created in less than 3 Minutes FLAT… Split Testing I guess, you already know what to do… Click the green “CREATE SPLIT TESTS” button… Once you’re on this page… - Enter your split testing name Select the Type of split test you want to run, where it’s for Global, Homepage or for specific categories - Once you’ve selected the Type of split test, all the splash pages under that type will appear Then enter your Number of Test cases, if you enter 400 and they are 10 splash pages, each one will get a share of 40… simple as that. And you can SAVE! It gets even simpler here on out… To get a full data of the amount of visitors received, conversions and more then click the green “View” button… This was just a test site so wasn’t a full split testing case study. General Settings And finally, we got the General Settings tab, it’s pretty much everything you configure when under functions when building your Splash page. What really happens is that when you don’t customize the Functional settings of a Splash Page, it automatically adopts the behavior you configured General Settings. So… that’s pretty much everything YOU NEED! If you have any issues, please contact our support desk to get our customer representatives to resolve it for you… www.PagedSupport.com – we’ve also got LIVE support in place, you can chat with our agents on the go! Cheers Precious