1
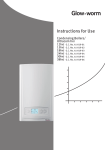
Instructions for Use
To b e l e f t w i t h t h e u s e r
Clearly Solar System
including
Fluropro
Solar Differential Controller
1
www.glow-worm.co.uk
WARNINGS
SAFETY
The fluropro must be installed by a competent person, who is responsible for adhering to
the existing standards and regulations.
ALTERATIONS
Under no circumstances should you ever attempt to make alterations to these
components or any other part of the system
SEALED COMPONENTS
Under no circumstances must the user interfere with or adjust sealed parts.
IMPORTANT
Danger of death by electric shock! All live parts of the system may be installed, serviced and repaired only by a competent
person. Risk of overvoltage! Earth the solar circuit as potential equalisation and protection against overvoltage! Attach
earthing pipe clips to the solar circuit pipes and connect the clips to a potential rail with a 16mm2 copper cable.
Glow-worm service call: 01773 596510 Technical helpline: 01773 828300
General and Sales enquiries Tel: 01773 824639 Fax: 01773 820569
Glow-worm is a licensed member of the Benchmark Scheme which aims to
improve the standards of installation and commissioning of domestic heating and
hot water systems in the UK and to encourage regular servicing to optimise safety,
efficiency and performance.
Benchmark is managed and promoted by the Heating and Hotwater Industry
Council. For more information visit www.centralheating.co.uk
2
Important Information
Documents
Servicing
Please retain these user instructions and all related documents in a safe place for future reference.
To ensure the continued efficient and safe operation of the
product it is recommended that it is checked and serviced
at regular intervals. The frequency of servicing will depend
upon the site conditions and usage, but in general, once a
year should be enough.
If you vacate the premises in which this system is installed,
please give the documents to the new owner.
Testing and Certification
These products are tested and certificated for safety and
performance. It is therefore, important that no alteration
is made to the products, without permission, in writing, by
Glow-worm.
CE Mark
Cleaning
The Fluropro and Flurocyl can be cleaned using a mild liquid
detergent with a damp cloth.
The CE mark on the Fluropro solar control and Flurocyl
twin coil cylinder indicates that these products comply with
the basic requirements of the applicable directives.
Do not use any form of abrasive or solvent cleaner as you
may damage the surfaces.
General Note
These products comprises many recyclable parts.
Servicing/maintenance should be carried out by a competent person in accordance with the rules in force in the
countries of destination.
3
To obtain service, please call your installer or Glow-worm’s
own service organisation using the telephone number on the
inside front cover of this booklet.
Recycling
The packaging and the content of the package shall not be
disposed of with general domestic waste but according to
the current regulations.
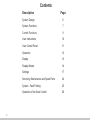
Contents
4
Description
Page
System Design
6
System Functions
7
Control Functions
9
User Instructions
10
User Control Panel
11
Operation
12
Display
13
Display Modes
14
Settings
17
Servicing, Maintenance and Spare Parts
24
System - Fault Finding
25
Operation of the Solar Control
26
System Design
These instructions are an integral part of the controller and
must, to comply with the current issue of the Gas Safety
(Installation and Use) Regulations, be left with the user.
Please ensure that the installer has fully completed the
Benchmark Checklist in the centre pages of the installation
instructions supplied with the product and that you have
signed it to say that you have received a full and clear
explanation of its operation. The installer is legally required
to complete a commissioning checklist as a means of
complying with the appropriate Building Regulations
(England and Wales).
All installations must be notified to Local Area Building
Control either directly or through a Competent Persons
Scheme. A Building Regulations Compliance Certificate
will then be issued to the customer who should, on receipt,
write the Notification Number on the Benchmark Checklist.
Please read these instructions and follow them carefully for
the safe and economical use of this product.
Solar system
The solar system is intended for the provision of solar heated domestic hot water. Any other use is considered to be
improper and the manufacturers / suppliers are not liable for
any resulting damage.
IMPORTANT: We accept no liability for any damage or injuries caused by improper use.
5
Flurocyl twin coil unvented cylinder
The Flurocyl is an unvented, indirectly heated hot water
cylinder for use with solar systems and suitable boilers.
This cylinder is intended to supply domestic hot water and
may only be used for this purpose.
Compartment or Cupboard Installations
Ventilation is not required for compartment or cupboard
installations. Do not use the compartment or cupboard for
storage.
Fluropro solar control
The Fluropro monitors the temperature within your cylinder
and solar panel and controls the solar system accordingly.
This control is also able to determine if the boiler is
required to provide further heat.
The Fluropro solar control works on the principal of
differential temperature control. The control always
switches on the collector pump when the difference in
temperature (collector temperature - cylinder temperature)
is greater than the programmed activation difference.
The controller switches off the collector pump when the
difference in temperature (collector temperature - cylinder
temperature) is less than the programmed deactivation
difference.
System Functions
Solar gain
The installation engineer activates and configures the
solar gain function within the Fluropro installer menu.
The solar gain is determined from:
l The difference of temperature between the collector flow
and return.
l The flow rate setting of the flow rate adjuster.
l The operating time of the collector pump.
During installation the engineer sets the actual flow rate
and enters the setting into the solar control. The solar gain
is calculated and displayed by the solar control. The total
gain can be called up and reset in the installer menu.
Solar gain modulation
The rate of solar gain can be modulated to ensure the solar
heat at the bottom of the cylinder has sufficient time to
dissipate to the top of the cylinder. This maintains demand
for solar energy and prevents excessive on and off periods
that are inefficient.
The modulation is achieved by means of more frequent on
and off operations of the solar pump during solar demand.
6
The pump is switched on and off and the rate depends
upon the difference between the collector temperature
and lower cylinder sensor. When the activation difference
is reached, the function is started (if activated) with an
activation duration of 50 % - i.e., the pump is switched on
for 30 seconds and then switched off for 30 seconds. If the
difference in temperature increases, the activation duration
is prolonged (e.g., 45 sec. on, 15 sec. off). When the
difference in temperature decreases, the activation duration
is reduced (e.g., 20 sec. on, 40 sec. off). The period length
is always a minute.
Solar circuit protection function
If the solar heat exceeds the current heat requirement,
i.e. the cylinder is fully charged, the temperature in the
collector array can rise steeply.
To protect the solar circuit (solar pump, valves, etc.) from
overheating, if the protection temperature at the collector
sensor is exceeded, the collector pump is shut down and is
prevented from restarting even when there is a demand for
solar reheating. The solar pump is switched on again once
the system has cooled down. This function is performed
independently for each collector array. The control will
show “PROT” whilst this function is active.
System Functions
Cylinder reheat
The cylinder reheat function allows the cylinder to heat up
to the required temperature during a set time window, even
if the solar gain is insufficient. In this case the water can be
reheated using an external boiler or the immersion heater.
You can set up times for reheating the solar cylinder, refer
to Settings section in Instructions for Use.
Reheat delay
To prevent unnecessary cylinder reheating by a boiler or
an immersion heater, the Fluropro solar control includes
a reheat delay function. This function delays the cylinder
reheat by up to 30 mins if solar gain is available.
If the solar pump is off and the desired cylinder
temperature is not reached after the delay period, the
cylinder will be reheated using an external boiler or the
immersion heater.
The reheat delay function is activated by an engineer within
the Fluropro installer menu.
Legionella protection
The Legionella protection function is designed to kill germs
in the cylinder system.
When the function is activated, the cylinder, the hot water
pipes, and the circulation pump (if installed), are brought to
a temperature of 70°C on the programmed day(s) and at
the programmed time.
In doing so, the cylinder temperature is raised to 70°C
and the corresponding circulation pump is switched on
(if installed). First, an attempt will be made using solar
gain alone to reach the target temperature over a 90 min.
7
period. If this is not successful, the Legionella protection is
carried out using an external boiler or an immersion heater,
whichever has been set up for this thermal protection. The
Legionella protection function will stop once a temperature
of at least 70°C has been maintained for a period of 30
minutes.
The installation engineer activates the Legionella protection
function within the Fluropro installer menu and specifies
whether the thermal disinfection should take place at 3:30
p.m. or at 4:00 a.m., i.e. mininal offset gain at 3:30 p.m.
versus cheaper electricity at 4:00 a.m.
Anti-seize protection for pumps
If no pumping has occurred for 23 hours, all installed
pumps are switched on for approx. 3 seconds to prevent
pumps from seizing.
Secondary recirculation
The Fluropro solar control includes a programmer channel
for a DHW secondary return. A secondary return should not
be used with Glow-worm twin coil unvented solar cylinders.
Calendar
The controller is equipped with a calendar so that it can
automatically adjust by 1 hr between GMT and BST. To
activate it, an engineer can simply enter the current date
within the Fluropro installer menu.
NOTE: In the event of a power failure, the controller only
has a power reserve of 30 minutes. After 30 minutes, the
internal clock stops and the calender will not automatically
resume function once power has been restored. In this
case the time and date will need to be reset.
Control Functions
Special functions
Please refer to Settings section for information on how to
activate the following special functions.
l
Party function
When the party function is activated, the cylinder reheat is
activated until the next programmed off period. This means
that the cylinder DHW temperature setting will be maintained by the auxiliary cylinder reheating if necessary.
l
One-time cylinder reheat
When this function is activated, the cylinder is reheated to
DHW temperature setting ONCE ONLY.
l
Holiday function
When this function is activated, the operating mode is
switched to “Off” for the set holiday period (1 to 99 days).
This deactivates both the solar heating and the cylinder reheat.
8
User Instructions
General Note
Operation of the solar cylinder
We recommend declaring the solar system as an increase
in value to your insurance and insuring it against lightning.
The unvented Flurocyl solar cylinder is provided with connections for a solar system as well as an auxiliary cylinder
reheat system.
Operation of the solar system
Once the solar system is commissioned it will work automatically, you do not even need to make any adjustments when
you go on holiday.
IMPORTANT: The collectors and pipes can become very
hot – avoid touching them!
IMPORTANT: You must not make any changes to the Flurocyl cylinder, Fluropro control, pipework, power supply, wiring, pressure relief valves or expansion relief valves. The
system operates automatically.
IMPORTANT: Do not switch off the solar system – even
when you go on holiday or assume an error has occurred,the
only exception is if, the solar panels have been damaged,
resulting in a pressure drop in the solar system or solar fluid
escaping.
Do not take out the fuse or switch off the fuse box.
Do not under any circumstances empty or fill the solar circuit
yourself.
9
How to control the solar system is described in the manuals
for each controller.
NOTE: In the event of leaks in the water pipework close the
main cold water stop valve. This is usually located under a
kitchen sink.
IMPORTANT: A thermostatic mixing valve must be fitted to
the outlet of the cylinder and can be adjusted to the desired
domestic hot water temperature by an installation or service
engineer. Otherwise there is a risk of scalding as the cylinder outlet temperature at the taps could be up to 85°C.
IMPORTANT: Risk of damage! Do not remove or modify any
components of the solar cylinder.
In the unlikely event of a malfunction occurring of the Flurocyl, such as hot water flowing out of the temperature and
pressure relief valve, switch off the boiler and the immersion
heater and contact Glow-worm or your installer.
14722
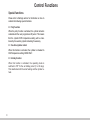
User Control Panel
Display
Button
Button
Button
Button
Diagram 1
10
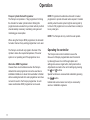
Operation
Fluropro Cylinder Reheat Programmer The Fluropro incorporates a 7 day programmer for timing
the domestic hot water cylinder reheat. Utilising this
programmer also ensures that your boiler will only be fired
when absolutely necessary, maximising solar gain and
minimising gas consumption.
When using the Fluropro DHW programmer, the domestic
hot water channel of any existing programmer is not used.
The Fluropro control will only signal to the boiler if the
cylinder is below the required temperature, if the solar
system is not operating and if the programmer is on.
Alternative DHW Programmer However there are circumstances when the Fluropro
domestic hot water programmer cannot be used due to
installation limitations or where the householder is familiar
with an existing domestic hot water programmer and does
not want to revert to the Fluropro programmer. In such
cases an alternative DHW programmer can be used.
NOTE: Programme the alternative domestic hot water
programmer to provide hot water when required. Consider
carefully when the solar system might be running and try
to time to HW programmer to run when there is unlikely to
be any solar gain.
NOTE: The Fluropro will only control the solar system.
Operating the controller
The Fluropro solar control is similar to use as the Glow-worm Climapro programmable room thermostat
by allowing the user to scroll through options and
settings menus via a single button, multi press function.
Adjustments are made to the control settings by pressing
the
and
buttons.
Special functions are accessed and activated by pressing
the
button.
Installer and service menus must only be accessed by
service or installation engineers.
11
Display
Display overview
13
12
1
2
3
9
8
Key
1 Programming menu
2 Service/diagnostic menu
3 Cylinder reheat
4 Not used
5 Info menu
6 Solar gain (blinks if solar gain is available)
7 Units
8 Cursor
9 Multifunction display
10 Days of the week
11 Target/actual value
12 Operating modes
13 Special functions
12
Timer programs:
5
4
11
10
Display symbols
Cylinder reheat
Not used
Operating modes:
6
Cylinder reheat function in timed mode
Cylinder reheat function in constant mode
No cylinder reheat
7
Solar pump(s) not activated
No cylinder reheat
Special functions:
Party function
One time cylinder reheat
Holiday function
Diagram 2
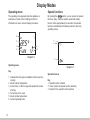
Display Modes
Operating menu
The operating menu appears when the appliance is
switched on. Please refer to Settings section for
information on how to set and change the values.
Special functions
By pressing the
button, you can access the special
functions: party, one-time cylinder reheat and holiday
function. After approximately ten seconds, the selected
function is activated and the display returns to the main
operating screen.
6
3
2
5
1
4
3
2
Diagram 3
1
Operating menu
Key
1 Indicates that solar gain is available (collector pump is
running)
2 Actual collector temperature
3 Current time, or LEG for Legionella protection function
(if active)
4 Current day of the week
5 Actual cylinder temperature
6 Current operating mode
13
Diagram 4
Special functions
Key
1 Special function activated
2 Cursor (marks the special function selected)
3 Symbol for the special function selected
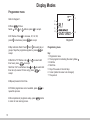
Display Modes
Info menu
To access the info menu press and hold
button.
The display initially appears as seen in the diagram below.
You can call up additional information by pressing the
info buttons again (see Settings section). The information
called up appears on the display for approximately five
minutes, then the display returns to the main operating
menu.
1
4
2
3
Diagram 5
Info menu
Key
1
2
3
4
14
Info menu
Solar gain indicator (collector pump is running)
Solar gain in kWh
Not used
Display Modes
Programmer menu
1
2
Refer to Diagram 1.
l Press
Select
with
5 times.
or
buttons, press
7
6
5
4
to accept.
to increase, H1, H2, H3, l H1 flashes. Press
press
to decrease, press
to accept.
Diagram 6
and
to select day or
l Day indicators flash. Press
group of days the programme applies to, press
to
accept.
or
to select start
l Start time "hh" flashes. Use
time hours, press
to accept.
Start time "mm" now flashes. Use
or
to select start
time mins (to nearest 10 mins only), press
to
accept.
l Repeat process for End time.
l If further programmes are to be added, press
repeat the process.
l On completion of programme setup, press
to return to main running screen.
15
3
to
button
Programming menu
Key
1 Programmer menu
2 Timer program for reheating the solar cylinder
3 End time
4 Start time
5 Day of the week or block of days
6 Cursor (marks the value to be changed)
7 Time period
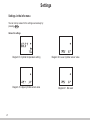
Settings
Settings in the Operating menu
Changing the operating mode
Changing the current day
Diagram 7
From the main screen press the mode button once. The
operating mode icons are then displayed on screen.
The current operating mode symbol flashes. To change
the operating mode press the
or
button. The
operating modes available are detailed in section 5.3
“Display Overview”. Press mode button repeatedly until
the main screen is again displayed.
16
Diagram 8
From the main screen press the mode button two times.
The current day of the week is flashing. To change the
current day press the
or
buttons. When the
required day is flashing press mode to accept. Press mode
repeatedly until the main screen is displayed again.
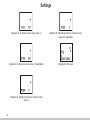
Settings
Settings in the Programmer menu
Changing the current time hh:mm
Settings in the Programmer menu
Diagram 9
button three times.
From the main screen press the
The current hour then flashes. You can adjust the hour by
pressing the
or
buttons. Press
once. The
current minute indicator flashes. Again using the
or
buttons adjust the minute indicator. When the required
time is displayed, press mode. Press
repeatedly
until the main screen is displayed again.
17
You can create a DHW program with up to three time periods for reheating the solar cylinder. The Fluropro includes
a default program which can be customised to meet your
individual needs.
Time window
Weekday /
Block of days
Start time
End time
H1
H2
H3
MO - SU
—
—
6:00 — —
22:00
—
—
Table 1. Default cylinder reheat program
Settings
There are four steps to setting the times you require.
1. Select the time period for reheating
2. Select a weekday or block of days
3. Set the start time
4. Set the end time. You can specify up to three time periods. The time periods
cannot overlap each other, see below:
From the main running screen, press
button 5 times.
The programming screen is displayed, the cursor is flashing
beside the reheat (tap) symbol.
Diagram 10
The cursor marks the block of days display, which also
flashes. Select a block of days or a single day of the week
by repeatedly pressing the
or
buttons. Press
button once when required block is selected.
The cursor marks the start time and the hour display
flashes. Select the start time by using the
and
buttons. Press the
button when the required hour
is selected.
Press the
button once. The cursor moves to beside
“H1” which is now flashing. To change the number of time
periods, use the
and
buttons. When adjusted as
required press
button once.
Diagram 11
18
Diagram 12
Diagram 13
Settings
The cursor marks the start time and the minute display
flashes. Select the start time minutes by using the
and
buttons. Press the
button when the required
minutes are selected.
NOTE: The minutes will increase and decrease in 10
minute steps.
The cursor marks the end time and the hour display
flashes. Select the end time by using the
and
buttons. Press the
button when the required hour
is selected.
Diagram 14
The cursor marks the end time and the minute display
flashes. Select the end time minutes by using the
and
buttons. Press the
button when the required
minutes are selected.
NOTE: The minutes will increase and decrease in 10
minute steps.
19
Settings
Special functions
Party function
Press the
button once, the party symbol flashes for
approximately ten seconds in the display, then the function
is activated.
The function is deactivated automatically when the next
reheating period begins.
If you want to deactivate the function before, simply
reselect the function.
The function can only be activated in the reheating
operation mode.
Holiday function
Press the
button three times, the holiday function
symbol flashes in the display for approximately ten
and
seconds. To set the number of holidays use
buttons to increase or decrease, as required.
Finally, the function is activated for the set time.
If you want to deactivate the function before, simply
reselect the function.
If the anti-Legionnaire’s disease function is activated, the
protection will be carried out on the last holiday.
Diagram 17
Diagram 15
One-time reheating
Press the
button twice, the one-time reheating
symbol flashes in the display for approximately ten
seconds, then the function is activated.
If you want to deactivate the function before, press
Diagram 16
20
.
Settings
Settings in the info menu
You can call up values for the settings successively by
pressing
.
Values for settings
21
Diagram 18. Cylinder temperature setting
Diagram 20. Lower cylinder sensor value
Diagram 19. Upper cylinder sensor value
Diagram 21. Not used
Settings
Diagram 22. Collector sensor value (array 1)
Diagram 25. Operating hours for collector pump
(array 2 if applicable)
Diagram 23. Collector sensor (array 2 if applicable)
Diagram 26. Not used
Diagram 24. Operating hours for collector pump
(array 1)
22
Servicing, Maintenance and Spare Parts
General Note
Frost protection of the solar cylinder
Servicing/maintenance should be carried out by a competent person in accordance with the rules in force in the
countries of destination.
Make sure the central heating remains switched on and the
temperature in all rooms and the installation room of the Flurocyl solar cylinder are protected from freezing, especially if
you are absent for long periods.
If this appliance is installed in a rented property in the UK
there is a duty of care imposed on the owner of the property.
To obtain service, please call your installer or Glow-worm’s
own service organisation using the telephone number on the
inside front cover of this booklet.
The cylinder must be completely drained if its is to be shut
down for a long period of time in an unheated room (e.g.
winter holidays etc.).
Cleaning the collectors
Sealed Water Systems
The collectors do not have to be cleaned.
The draining, re-filling and pressurising MUST be carried out
by a competent person, contact your Installation/Servicing
company or Glow-worm Service.
Solar collectors become dirty in the same way as roof windows, they are cleaned sufficiently by rain.
Solar system fluid The solar system should be checked for frost protection
once a year by your installer or Glow-worms own service
organisation.
Do not refill the solar circuit with fluid. Do not mix the solar
fluid with other fluids.
23
IMPORTANT: Risk of frost!
Spare Parts
REMEMBER, When replacing a part on this product, use
only spare parts that you can be assured conform to the
safety and performance specification that we require. Do not
use reconditioned or copy parts that have not been clearly
authorised by Glow-worm.
If replacement parts are required contact Glow-worm’s own
service organisation using the telephone number on the inside front cover of this booklet.
System - Fault Finding
Fault
Action
… fluid drips out of the system?
Collect it (in a bucket) if possible and notify a qualified servicing company.
… the fluid level rises in the collecting container under the solar Notify a qualified servicing company.
pump unit?
… fluid or steam comes out of the expansion relief valve?
Notify a qualified servicing company.
… “Sensor defective” or “Broken cable” is displayed on the Notify a qualified servicing company.
controller?
… the pressure on the pressure gauge falls below minimum Notify a qualified servicing company.
operating pressure?
… no temperature difference is visible between the flow and Wait five to ten minutes. If the system is then still running,
return thermometer at the solar pump unit?
the system may be defective.
Notify a qualified servicing company.
… the pane of a flat plate collector has been damaged?
Do not touch the collector interior. Cover the collector with a
canvas as protection against rain.
Notify a qualified servicing company.
... the cylinder does not deliver enough hot water?
Check the hot water thermostat mixer setting (approx.
60°C recommended). If the settings are correct, the cylinder
maybe calcified.
In this case notify a qualified servicing company.
If an error message is displayed ('Err') on the Fluropro
solar control, notify a qualified service company.
24
25
26
27
0020055015-04 02.09
0020055015
Because of our constant endeavour for improvement, details may vary slightly from those shown in these instructions.
Glow-worm, Nottingham Road, Belper, Derbyshire. DE56 1JT
28