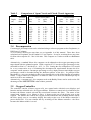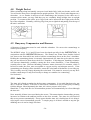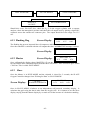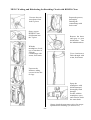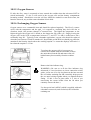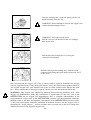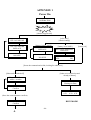
1
INSPIRATION Closed Circuit Rebreather User Instruction Manual ! WARNING Life support equipment, which includes the INSPIRATION Rebreather, requires specialist training before use. Several problems may arise when using a rebreather, many of which, if not dealt with properly, may have fatal consequences. It is, therefore, essential that you understand exactly how this rebreather works, the maintenance which must be carried out, the purpose of every component and the operational requirements. This manual is not the definitive guide to rebreather diving and is no substitute for proper training and closed circuit rebreather experience. Build up your experience gradually. Do not expect to be a good rebreather diver straight away. It takes time and practise to perfect buoyancy control and to become aware of the idiosyncrasies of rebreather diving and of the apparatus. Most of the problems you can experience are referred to in this instruction manual. It is in your interest that you take the time to read and study it. 1997-2003 This manual remains the copyright of Ambient Pressure Diving Ltd and cannot be reproduced without prior written approval. Author: Martin Parker SEP 2003 02/03 -1- Buzzer Exhale T piece with integral water-trap Inhale T piece Pull-dump exhaust valve for Wing BC Exhale counterlung Dump/over pressure relief valve (not shown) Inhale counterlung Weights to counter hose buoyancy Pull knob for manual dump from counterlung Wing Buoyancy Compensator Manual oxygen inflator Manual diluent inflator Auto Air, BC inflator, deflator, diluent 2nd stage, diluent pressure relief valve Open/Close Mouthpiece Diluent cylinder valve readily accessible Oxygen cylinder pressure gauge Pull knob for dumping gas from BC when inverted On switches Diluent cylinder pressure gauge ppO2 displays, oxygen controllers Manufactured in the UK by Ambient Pressure Diving Ltd , Unit 2C, Water-ma-Trout Industrial Estate, Helston, Cornwall TR13 0LW. Telephone: 01326 563834 Fax: 01326 573605 For details of diver and instructor training telephone Ambient Pressure Diving. EC Type approved by SGS YICS Ltd, SGS House, Camberly, Surry, GU15 3EY. Notified Body number 0120, assisted by DERA (Defence Equipment Research Agency, now QinetiQ), Alverstoke. The INSPIRATION is CE approved to 50m using an air diluent and 100m using an Heliox or Trimix (with a max. END of 30m at 70m, reducing to an END of 24m at 100m), though it is recommended to limit your depth to 40m when using an air diluent. -2- CLOSED CIRCUIT SURVIVAL Rule No 1.Know your ppO2 at all times. - This cannot be over emphasised. When you dive closed circuit you need to change the way you think: When you dive with conventional or open circuit equipment you need to know: “Will I have something to breathe?” But when you dive with closed circuit equipment you need to know: “What am I breathing?” - Never breathe from any rebreather without knowing what you are breathing. ! Warning If you fail to watch your ppO2 and understand the implications - you will die, it is only a question of where and when. The primary warning device for ppO2 is the Master/Slave hand displays. The audible warning device is purely an additional safety aid and warns of excessive changes in ppO2 only. All divers, not just those with a hearing impediment, must watch the displays and never rely on just the audible warning. If you are unable or unwilling to monitor your ppO2 displays regularly then you must not use the INSPIRATION. Attitude keeps you alive: Normally, closed circuit rebreathers are used by experienced open-circuit divers. This can bring a level of over-confidence which can lead to serious problems. You are a novice again, please accept that and build your rebreather experience gradually. -3- Vision Test Your eye-sight must be checked before using the INSPIRATION, wearing your normal dive mask. MUST BE READ LESS THAN 16 INCHES (40cm) FROM EYES INSPIRATION Confirm 69 hrs ELAPSED TIME DIVE NOW? CALIBRATE Yes No Confirm OPEN O2 VALVE CHECK DILUENT LOW OXYGEN MASTER 0.70 0.21 0.19 0.20 HDIM7AN ETWO APQBC DIUWNM J BX XJKZ XKA7JSNXC SNCC NSCHKC CHSJ55 DC FHSD UFAHAA LNBZNCZC SDHC XBCBC SDHCA SDN9CMC A1JC NSDCM PWI Z3NCMVC -4- CONTENTS Section 1 1.1 1.2 1.3 1.4 1.5 1.6 1.7 1.8 1.9 1.10 1.11 1.12 1.13 1.14 1.15 1.16 1.17 1.18 1.19 1.20 1.21 Important Information Gas Weighting Buoyancy Control Familiarity of Controls and Harness Understanding ppO2 Setpoint Selection Descending Mask Clearing and Pressure Equalisation Mouthpiece Ascending Breathing Resistance Counterlung Choice Gas Consumption System Integrity - Leaks System Integrity - Indications Batteries Surface Swimming Surface Buoyancy & Trim Quick Post-Dive Checks Practise Solenoid Operation & the main oxygen risks during the dive 9 Section 2 Definitions 18 Section 3 3.1 3.2 3.3 3.4 3.5 3.5.1 3.5.2 3.5.3 3.5.4 3.5.5 3.5.6 3.5.7 3.6 3.6.1 3.6.2 3 .7 Operational Considerations General Gas Consumption Oxygen Benefits Decompression Oxygen Controller Accuracy of Oxygen Controller Oxygen Cell Life Interpreting the ppO2 Displays Effect of Moisture on the Cells Setpoint Selection Pulmonary Oxygen Toxicity Oxygen Limits for Diving Operations Duration of the CO2 Scrubber How do I know when the CO2 absorbent can no longer absorb CO2? Extra CO2 considerations Symptoms Associated with Low and High Oxygen levels, High CO2 Levels and Oxygen Toxicity 20 -5- Section 4 4.1 4.2 4.3 4.4 4.5 4.6 4.7 4.8 4.9 4.10 4.11 4.12 Apparatus Components Schematic Diagram Counterlungs Over-Pressure Exhaust Valve Mouthpiece Valve Breathing Hose Connectors Colour Coding of Convoluted Hose Connections Diluent and Oxygen Inflators Automatic Diluent Valve (ADV) Weight Pocket Buoyancy Compensator and Harness Auto Air Audible Warning Device Oxygen Solenoid 31 32 Section 5 5.1 5.2 5.3 5.4 5.5 5.6 5.7 Power On General Switching On and Off Oxygen Cell Check Battery Check Elapsed On Time Check Diluent The Slave Oxygen Controller 39 Section 6 6.1 6.2 6.3 6.4 6.5 6.6 6.7 6.8 6.9 6.10 6.11 6.12 6.13 6.14 6.14.1 6.14.2 6.14.3 6.14.4 6.14.5 Calibration Must Calibrate! Calibrate? Ambient Pressure Oxygen % Open Mouthpiece Open O2 Valve Flushing Bag No Oxygen - Check Valve Cell Stuck Out of Range Flushing bag Master Slave Verification of ppO2 Indicators to look for during calibration Periodic Calibration Check Linearity Check Checks prior to each use Verifying the ppO2 during the dive 42 Section 7 7.1 7.2 7.3 Dive Mode High/Low Setpoint Switch Slave Oxygen Controller Backlight 50 -6- Section 8 Menu Mode User Adjustable Setpoints Backlight Brightness/Screen Contrast Elapsed On Timer – RESET 52 Section 9 9.1 9.2 9.3 9.4 Warnings and Remedies Low Oxygen Warning High Oxygen Warning Cell Warning/Error Two faulty cells occurring simultaneously, resulting in low oxygen or high oxygen risks Low Battery Master Oxygen Controller - Power Failure Reset Other Unit Error Assessment 53 9.5 9.6 9.7 9.8 Section 10 Maintenance 10.1 CO2 Absorbent Replacement 10.2 Gas Cylinders 10.3 First Stages 10.4 Low Pressure Oxygen Hose 10.5 Post-Dive Maintenance 10.5.1 Cleaning and Disinfecting the Unit 10.5.2 BUDDY Clean Disinfectant 10.5.3 Lubrication 10.5.4 Washing and Disinfecting the Breathing Circuit with BUDDY Clean 10.5.5 Oxygen Sensors 10.5.6 Exchanging Oxygen Sensors 10.6 Storage 10.7 Precautions When Using High Pressure Oxygen 10.8 Service Intervals 57 Section 11 11.1 11.2 11.3 11.4 11.5 11.6 11.6.1 11.6.2 11.6.3 Emergency Procedures Bail-Out (Emergency Breathing) Emergency Procedures Diluent Flush Emergency Rescue of an Unconscious Inspiration Diver Flooded Loop Manual Control of ppO2 Manual addition of O2 and O2 flush method Manual addition of diluent Using the Inspiration as a pure oxygen rebreather 72 Section 12 12.1 12.2 Briefing Open Circuit Dive Partners The Rebreather Diver- What to Expect, What to Do Classic Problems, Causes and Resolutions 76 Section 13 Warranty 78 Section 14 Important Cautionary Notes 79 -7- Section 15 Technical Data 80 Section 16 Dangers Introduced by User Modification 83 Power On Determining the Oxygen Purity (when the gas quality is not certified) Self Check Questions Decompression Tables Buddy Clean Data Sheet Sofnolime Transportation Declaration Trimix in the Rebreather Export License Requirements Pre-Dive Checklist Pre-Breathe Sequence Checklist In Water Checks and Important Procedures 84 86 88 90 91 92 94 95 96 Appendices Appendix 1 Appendix 2 Appendix 3 Appendix 4 Appendix 5 Appendix 6 Appendix 7 Appendix 8 Appendix 9 -8- SECTION 1 IMPORTANT INFORMATION This Section describes some of the problems you may encounter in the early stages of using the INSPIRATION ! READ THIS SECTION BEFORE ENTERING THE WATER ! 1.1 Gas There are two 3 litre cylinders on board. One contains oxygen and the other a diluent or dilutant. Normally, the oxygen is fed into the breathing circuit via a solenoid operated oxygen valve; the diluent is fed in manually. The oxygen is added to replace metabolised oxygen and to maintain the oxygen pressure during ascents and is an automatic process requiring you, the diver, to simply monitor it. The purpose of the diluent is to dilute the oxygen concentration to enable us to safely breathe the mixture in the breathing circuit (or loop) below 6m and also maintain the counterlung volume during the descent. Once at your target depth the diluent is no longer used, that is until you accidentally exhale through your nose- losing loop volume, or you descend again. This leaves a useful reserve of gas for BC inflation, suit inflation, oxygen cell checks and OC (open circuit) bailout. The correct type of diluent is essential. Ideally, it should be breathable throughout the entire dive. So, at the start, use normal diving quality breathing air in the diluent cylinder. This is suitable for all depths down to your air diving limit (35 to 50m). Using a setpoint of 1.3, 50m is the maximum depth with an air diluent. Below 40m Heliox or Trimix (with a max. END of 30m at 70m, reducing to an END of 24m at 100m) is strongly recommended. Below 50m, Heliox or Trimix is essential. But, let’s not consider diving deep with it just yet though. Let’s get the basics right first. Build up your Closed Circuit experience gradually. ! NEVER, NEVER use pure gases in the diluent cylinder such as pure Helium or pure Nitrogen when something as simple as a manual diluent flush could and most likely will render you unconscious. The diluent must always contain a sufficient oxygen percentage to sustain life. 1.2 Weighting How much lead is required? When experienced you will find that you only need to carry the same weight as you do when you dive with a single 15 litre cylinder. You would probably find it more comfortable though, to move 2-3 kg from your weight belt and put it in the weight pocket on the top of the unit. This aids in-water trim helping to keep you horizontal. During your first dives you may experience problems descending, so insert 2-3 kg in the weight pocket in addition to your normal weight belt. Using the counterlungs at minimum volume, i.e. just enough gas to take one full breath, brings many advantages including a minimum lead requirement, a better swimming position with reduced back strain and early warning of gas usage from the loop. 1.3 Buoyancy Control Buoyancy control will be different from open circuit and, whilst not being difficult, it does require some thought. When you breathe from a rebreather your buoyancy does not change. -9- Consequently the dry suit or BC must be used for buoyancy control, as minor adjustments cannot be made by inhaling or exhaling. If a dry suit is worn then we recommend using only the dry suit for buoyancy control and we recommend fitting a variable exhaust valve so this can be set for automatic venting during the ascent. These are particularly good when used on membrane dry suits. If operating at a constant depth, buoyancy control is much easier than open circuit, but the problems start when you conduct “saw-tooth” profiles. With any obstruction in your path you should now consider swimming around it, rather than over it. To go over the obstruction will almost certainly require venting of gas during ascent and inflation on return to the original depth. 1.4 Familiarity of Controls and Harness Adjust all the straps to fit you prior to reaching the dive site. Ensure the inflator hose from your dry suit, connected to the LP port of the diluent cylinder’s first stage, has a long enough hose to reach your dry suit inflator. Practise locating and operating all the rebreather and BC controls including: i) opening and closing the mouthpiece ii) opening and closing the oxygen cylinder valve iii) opening and closing the diluent cylinder valve iv) operating the diluent inflator v) operating the oxygen inflator vi) operating the variable exhaust valve (use the high pressure setting (rotate clockwise fully) when testing for leaks and use the low pressure setting (rotate anticlockwise fully) during the dive) vii) operating the BC’s inflator and exhaust valves viii) locating and using the emergency open circuit regulators (both diluent and oxygen) ix) switching from low to high setpoint on the oxygen controller x) ensure the counterlungs will be held down on your shoulders and will not float up when in the water 1.5 Understanding ppO2 The ppO2, or oxygen pressure, in the breathing circuit is what keeps you alive. A thorough understanding of ppO2 is the most important aid to safe rebreather diving. You need to know what happens to your ppO2 when you descend, when you ascend, when your work rate increases and what risks are present at different stages of the dive. The following self check questions are designed to validate your understanding of the system and its use. Answers are included in Appendix 3. a. What are the risks when you first enter the water? b. What risks may become apparent during a surface swim prior to the dive? c. During the descent what is usually seen on the ppO2 display? d. How often do you expect the solenoid to operate during the descent? e. Once below 20m what would be the effect of staying on the low (0.7bar) setpoint? - 10 - f. Once on the bottom how often would you expect the solenoid to operate and for how long would the oxygen inject? g. What is the effect on the ppO2 of adding diluent to the loop, for example after mask clearing? h. If a diluent flush is carried out at: 10m what will be the ppO2 in the loop? 20m what will be the ppO2 in the loop? 30m what will be the ppO2 in the loop? 40m what will be the ppO2 in the loop? i. How often should you check your ppO2 whilst on the bottom? j. Why is it important to check your ppO2 prior to the ascent? k. As you ascend how often would you expect the solenoid to operate and for how long? l. How would this vary with ascent speed? 1.6 Setpoint Selection At first, use the INSPIRATION’s default settings of 0.7 bar for the low setpoint and 1.3 bar for the high. Use the low setpoint at the surface and for the whole descent, this helps to prevent the ppO2 from spiking. On the bottom, or once below 20 to 30m, switch to the high setpoint. If you attempt to surface whilst using the High Setpoint Mode, continual inflation will be experienced as you approach the shallows. If the high setpoint is 1.3, then from 3 m upwards the O2 controller will be continually injecting oxygen. If your setpoint is 1.5 then it will be continually injecting from 5 m upwards. This continual inflation will bring you to the surface unless gas is purged from the breathing loop. The cure is to select the Low Setpoint Mode before reaching the critical depth, at approximately 6 m, or when you are about to leave the 4 m decompression stop. If the ppO2 is much lower than the setpoint, a quantity of oxygen is fed into the breathing loop, which may make you positively buoyant. This problem is experienced when the high setpoint is selected during shallow dives, down to 10m . During these dives it is easier to continue to use the Low Setpoint Mode. If the high setpoint is definitely required at these shallow depths, then gas will have to be purged from the loop when positive buoyancy is experienced, until the gas in the loop is close to the required setpoint. Be sure to switch to the High Setpoint Mode once on the bottom, this is extremely important on dives below 10m. Be sure to monitor the ppO2 to ensure that it is close to the setpoint. Variations away from the setpoint will affect your dive planning for decompression. Remember: check the ppO2 display every minute. Know your ppO2 at all times! - 11 - 1.7 Descending At first you may find it difficult to submerge. The problem is that air is held in four locations: the dry suit; the BC; the counterlungs; and in your own lungs. Whilst on the surface, concentrate on removing air from the BC and dry suit. Once this is done then the only air to be vented is that in your lungs and the rebreather’s counterlungs. By continually breathing in through your mouth and out through your nose, you will quickly deplete the retained gas and reduce the buoyancy. Depending upon your weighting, it may at this time be necessary to do a “duck dive” in order to submerge. At a depth of 1 to 2 m you will attempt to take your first breath. You will probably be unable to do so because of the external pressure squashing the counterlungs. At this time you should press the diluent inflator with your left hand, operating it in short bursts until you have sufficient gas volume to take full, deep breaths. Practise the use of the diluent inflator before entering the water. If the optional Automatic Diluent Valve is fitted and connected to the diluent supply, the diluent addition will take place automatically on descent or whenever the loop volume is insufficient for inhalation or to be more accurate the diluent addition will take place whenever the pressure in the counterlung is substantially lower than the ambient pressure. Descend slowly to avoid ppO2 overshoot. Normal descent speeds are possible using the low setpoint but extreme caution must be taken if the high setpoint is used during descent. At the 6m point carry out a check of your equipment for leaks by looking upwards for tell-tale bubbles. 1.8 Mask Clearing and Pressure Equalisation During the descent the pressure in your mask will have to be equalised by exhaling through your nose. However, exhaling through the nose depletes the counterlung volume and should, therefore, be kept to a minimum. During your instruction you will have been advised not to exhale through the nose. However, it is beneficial to do so during familiarisation with the apparatus, in a safe environment, to experience the effect this has on the counterlung’s volume, your ability to take another breath and the importance of being able to properly locate the diluent inflator. Remember: if you continually breathe out through your nose you are effectively on open circuit and your gas endurance will be greatly diminished. 1.9 Mouthpiece It is important to close the mouthpiece before removing it, both underwater and on the surface. Failure to do so will result in loss of buoyancy and water entry. Practise opening and closing this valve before entering the water. 1.10 Ascending To prevent lung damage during the ascent when using open circuit equipment, you would simply breathe out . Unfortunately, with a rebreather this will only increase the volume of gas in the counterlungs. Unless air is vented during the ascent you will notice both the counterlungs inflating and an increase in exhalation resistance. Eventually the variable exhaust valve will vent. The low pressure setting on the exhaust valve has a release pressure below that which would over pressurize a human’s lungs. However, you will find it difficult to control your ascent speed if you rely entirely on this valve. It is therefore best to vent the loop yourself, before the overpressure valve operates. The aim is to maintain neutral buoyancy and retain enough gas in - 12 - the breathing loop for one full, deep breath. When possible, practise your first ascents up a shot or anchor line. There are three ways to manually vent gas from the loop: 1) Dump air periodically using the pull cord knob on the dump valve, the same method as used with a buoyancy compensator. 2) Exhale through the nose. This is effective for dumping gas from your lungs but the pressure in the counterlungs will continue to increase as you ascend, so it is important to continually breathe gas from the counterlung and out through your nose. In practise, it is easier to exhaust air around the outside of the mouthpiece, whilst exhaling. This dumps air from both the counterlung and from the lungs simultaneously. 3) One of the easiest methods is to simply hold the dump valve open for the complete ascent. As the gas volume increases it is exhausted from the counterlungs automatically. However, you must continue breathing. Do not forget to vent gas from your dry suit and buoyancy compensator during the ascent. 1.11 Breathing Resistance The Work of Breathing of the INSPIRATION is under 3 joules per litre at 50m. This is the limit specified for open circuit diving regulators. The counterlungs are in the best possible position for overall ease of breathing in each orientation of the diver. The work of breathing is well under 3 joules per litre at 100m when Heliox is used in the diluent cylinder. Please note that the volume of gas in the counterlungs greatly affects the breathing characteristics. The volume of gas in the counterlungs is controlled by you. Too much gas will make it difficult to exhale and with too little it will be difficult to inhale. The ideal method is to retain only just enough gas in the counterlungs for one deep breath. Gas may be added to the counterlungs by using the diluent inflator located on the left counterlung, the inhalation counterlung. Be sure to use this inflator and not the oxygen inflator on the right or your dry suit inflator. Be sure to rehearse the operation of the diluent inflator before entering the water. This is very important. Apart from the fact that it needs to be second nature to find it, you need to ensure gas is flowing to this inflator before submerging. 1.12 Counterlung Choice The breathing bags/counterlungs are available in two sizes - medium and large. Select the counterlungs according to your body size. See section 4.1 for more details. 1.13 Gas Consumption Normally, for a 1 to 1 1/2 hour dive, the gas consumed from each cylinder will only be 30-40 bar per dive. Much more than this and your close circuit diving techniques should be examined. Exhaling through your nose: If you carelessly exhale often through your nose you lose gas from the breathing circuit (the loop), you then have to add diluent to allow you to breathe, this lowers the ppO2 and so the oxygen controller opens the solenoid to bring the ppO2 back up to setpoint, so in fact you use gas unnecessarily from both cylinders. Swimming over objects uses gas: swimming over an object often requires a vent of gas from the buoyancy compensator and/or counterlungs. If a vent from the counterlungs is necessary - 13 - then diluent addition will be required as you descend again back to your original level which weakens the ppO2 , so the oxygen controller compensates by adding oxygen to bring it back up to setpoint. Again you use gas from both cylinders. Swim around objects if you can rather than swim over. Ascents: The time when the system uses most oxygen is during the ascent. The ppO2 drops with the decreasing ambient pressure and the oxygen controller opens the solenoid often and for longer periods than during other times on the dive. You must vent the loop during the ascent but if you vent the loop around your mouth then virtually all of the fresh oxygen added by the solenoid is dumped overboard, a big waste of gas. What you should do, particularly if the oxygen supply is diminished is use the pull cord dump valve to vent the loop. This way some of the fresh oxygenated gas is used for metabolism and some goes back around the loop to raise the ppO2 around the oxygen sensors, reducing the opening time of the solenoid for the next injection and increasing the time between injections. Dry Suit: your dry suit dump valve may be exhausting accidentally when you roll over. Learn to look out for gas leakage in addition to often checking the gauges. Do not be lulled into a false sense of security and do check the gauges regularly. 1.14 System Integrity - Leaks It is extremely important to cure any leaks before diving. A small leak is irritating and saps confidence. Be aware that it is very unusual to lose buoyancy or gas from the breathing loop. If there is a constant need to inject diluent to breathe from the bag then it is very likely that there is a leak in the system. The other problem is that this constant injection of diluent lowers the ppO2 in the loop, making your decompression schedule invalid. Test the complete apparatus for positive pressure leaks by closing the exhaust valve by rotating it clockwise to the pre-dive/test position and either inflate by mouth, closing the mouthpiece afterwards, or by using the diluent inflator. One of the most practical methods of testing for leaks is to inflate the system using the diluent inflator until the pressure relief valve operates. If the counterlungs remain firm for over 40 minutes then there are no significant positive pressure leaks on the system. Ensure the exhaust/pressure relief valve is set to the low pressure position (fully anti-clockwise) prior to diving. Test with negative pressure by sucking a vacuum on the apparatus, crush one or two of the convoluted hoses whilst sucking the vacuum and then close the mouthpiece. If air leaks into the system the crushed hoses will spring back towards their original shape. It is extremely important to find any small leaks and rectify them before diving. Water will ingress into the apparatus through the smallest of leaks. Water in the exhale tube will be apparent because of an audible gurgling noise. If, despite continually clearing it by closing the mouthpiece, holding the mouthpiece overhead and shaking it, water is still apparent, it may be entering around the outside of the mouthpiece. Also confirm the mouthpiece is fully open. As the mouthpiece is opened and closed, an O ring seal which is used to seal the inner tube against the outer, will be seen. If the mouthpiece valve is only partially open, an O ring will be visible when viewed through the mouthpiece and water will be allowed to enter the loop from the water vent. Finally, ensure the mouthpiece ty-rap is secure. Incorrect tensioning during replacement could result in a leak. - 14 - 1.15 System Integrity - Indications Know your ppO2 at all times! Learn how to evaluate the information provided by the oxygen controllers - Section 3.5 to 3.5.6, Sections 6, 7 and 9. Listen out for the solenoid. It should be operating in short bursts. If you think it has been open longer than normal or it has not been heard for a long while - it is time to take a look at the ppO2 display. Compare the cell readings. While breathing, the cell readings change. Bearing in mind that these oxygen cell readings are shown in real time, the ability to see all three sensors simultaneously is a great diagnostic aid. If one is failing to react as quickly as the others, there may be water on the cell’s sensor face. The modifications made to the sensors prevent large quantities of moisture reaching the face and affecting the internal circuitry. It is, therefore, essential to use only oxygen cells supplied by Ambient Pressure Diving. 1.16 Batteries Each oxygen controller has its own battery and circuitry. However, both batteries share the same battery box door, so it is imperative to ensure this door is fastened properly. The 6 volt Lithium batteries Energizer EL223AP.CRP2 are readily available and last for approximately 35 hours when used for the Master controller and approximately 70 hours when used for the Slave. The controller does not power down when not in use. It is, therefore, very important to ensure that both controllers are switched off after use to preserve battery life. 1.17 Surface Swimming When swimming forward, face down, on the surface, only partially inflate the BC. Over inflation will cause increased body angle and extra drag. Deflate the BC and adopt a horizontal, head down, streamlined swimming position. 1.18 Surface Buoyancy and Trim By rotating the counterlung’s pressure relief valve to the high pressure setting, and with the mouthpiece closed the counterlungs can be inflated and used for additional surface buoyancy. The volume of gas admitted to the BC must be regulated to ensure an upright floating position. 1.19 Quick Post-Dive Checks Check the exhale counterlung for residual water by unscrewing the oxygen inflator, see Section 4.6. If water is present, drain and check the downstream side of the first water trap. If water is present, remove the scrubber and check the Sofnolime at the bottom of the scrubber. If it is soaked replace the Sofnolime before the next dive. It is important to keep the unit upright if water is suspected to have entered the scrubber. This prevents the Sofnolime and water from damaging the oxygen sensors. 1.20 Practise Learn to ascend without adding diluent. This enables you to surface normally, even in the event of having lost your diluent gas for some reason, perhaps you’ve given it to your dive buddy? - 15 - Learn to operate the system with the solenoid failed in the closed position. This may be achieved by manually adding O2 to reach a ppO2 of 0.9 when a ppO2 of 0.7 is selected. Learn to operate the system with the solenoid failed in the open position. Practice this in the swimming pool by selecting a high set point of 1.5 and controlling the injection of O2 by opening and closing the cylinder valve. 1.21 Solenoid operation and the main oxygen risks during the dive PHASE NORMAL SOLENOID OPERATION Surface breathing Closed 6 secs, Open < 1 sec when the ppO2 is close to and below the setpoint Jumping In Closed 6 secs, Open < 1 sec when the ppO2 is close to and below the setpoint On the surface OXYGEN RISKS POSSIBLE CAUSES CONCLUSION Hypoxia – HIGH risk Hypoxia – oxygen cylinder valve closed, oxygen cylinder empty, solenoid jammed shut, oxygen controllers switched off. Before the decent there is only one oxygen risk – Hypoxia or low oxygen pressure. Hypoxia can occur within a minute or so when on the surface. Look often at the ppO2 displays! Listen for the oxygen injecting. Hyperoxia – NO risk Closed 6 secs, Open < 1 sec when the ppO2 is close to and below the setpoint Hypoxia – No risk Descending Closed * Hyperoxia – SLIGHT risk Bottom portion of dive Ascending Closed 6 secs, Open < 1 sec when the ppO2 is close to and below the setpoint Hypoxia – LOW risk Closed 6 secs, Open > 1 sec Hypoxia – HIGH risk Surface swimming Closed 6 secs, Open < 1sec when ppO2 is close to and below the setpoint Hypoxia – LOW risk Closed 6 secs, Open < 1 sec when the ppO2 is close to and below the setpoint Hypoxia – High risk Hypoxia – oxygen cylinder vale closed, oxygen cylinder empty, solenoid jammed shut, oxygen controllers switched off. Hyperoxia – manual addition of oxygen or solenoid jammed open. Hypoxia – the ascent is potentially a very dangerous time. Check your ppO2 BEFORE the ascent and then often during. Listen for the solenoid, you expect long bursts of oxygen addition – the opening time will vary with your ascent speed but at normal ascent speeds it will be approx. 4 or 5 seconds followed by 6 seconds closed. This can rise to 17 seconds open, 6 seconds closed! Hyperoxia – there is a reducing risk of hyperoxia as you ascend. Hypoxia is a low risk simply because it takes so long to happen and you should be looking at the ppO2 displays, ensuring your ppO2 is close to the (HIGH) setpoint to ensure you don’t suffer decompression stop – ensure you stay within the NO AA CNS guideline. Hyperoxia – MEDIUM Hyperoxia – NO risk The main risk during the descent is the diluent. Is the diluent switched on? – Check this before you get in the water! Are you pressing the diluent button or the oxygen button? Left hand is diluent. (LEAN – left, RICH – right) Listen for the solenoid, it shouldn’t be opening. If it does, check the ppO2 displays. Hypoxia is a low risk simply because it takes so long to happen and you should be looking at the ppO2 displays, ensuring your ppO2 is close to the (HIGH) setpoint to ensure you don’t suffer decompression sickness. Listen for the solenoid, you expect short bursts with 6 closed periods. If it is adding oxygen for longer than a fraction of a second then check your ppO2 displays. Hyperoxia – HIGH risk Hyperoxia – MEDIUM risk Decompression Stop * Hypoxia – No risk, providing the oxygen content of the diluent is suitable for the shallows. Hyperoxia – manual addition of oxygen or solenoid jammed open Hypoxia – oxygen cylinder valve closed, oxygen cylinder empty, solenoid jammed shut, oxygen controllers switched off. Hypoxia can occur within a minute or so when on the surface. Look often at the ppO2 displays! Listen for the oxygen injecting. Do use the checklists at the back of this manual to aid preparation. - 16 - - 17 - SECTION 2 DEFINITIONS AMBIENT PRESSURE: That pressure surrounding the diver/rebreather. Rough values are 1.0 bar at the surface, 2 bar at 10m, 3 bar at 20m, 4 bar at 30m etc. When calibrating the cells prior to diving, the ambient pressure is the atmospheric pressure on the day. This varies with altitude and weather. BAILOUT: An emergency breathing system. BREATHING LOOP: The entire breathing gas pathway including the diver’s lungs and airways; the mouthpiece; the counterlungs; the convoluted hoses; and the scrubber. CALIBRATION: All the oxygen cells have to be calibrated before use. This is a fairly simple procedure; it takes about 25 seconds to complete and is done on the complete unit prior to the dive. CARTRIDGE: Sofnolime is retained in a diver-refillable container/cartridge which is inserted into the scrubber. CCR: Closed Circuit Rebreather. CNS OXYGEN TOXICITY: Central Nervous System Oxygen Toxicity. Oxygen toxicity is a combination of oxygen pressure and time. The exposure limits are shown later in this manual. DILUENT: Gas used to dilute the oxygen in the breathing circuit to reduce the ppO2 and allow dives below 6m. Usually air for dives to 40m. E N D: Equivalent Nitrogen Depth, used for determining the narcotic element of Trimix and critically determines the density of the gas in the breathing circuit. LOOP: The Breathing Loop, or breathing circuit, includes the diver’s lungs, the mouthpiece, all convoluted hoses, counterlungs and scrubber. LOW OXYGEN: This is displayed when the ppO2 in the loop is 0.4 bar or less. HELIOX: Gas used as a diluent consisting of Oxygen and Helium. HIGH OXYGEN: This is displayed when the ppO2 in the loop is 1.6 bar or higher. HYPERCAPNIA: An excess of carbon dioxide. HYPEROXIC: For the purposes of this manual, hyperoxic is classed as all breathing mixtures with a ppO2 greater than 1.6 bar. - 18 - HYPOXIC: When the ppO2 is less than 0.16 bar. OTU: Oxygen toxicity unit. OXYGEN CELLS: Cells or sensors used to monitor the ppO2 in the breathing circuit (loop). ppO2/PO2: Partial pressure of oxygen. ppO2 is used throughout this manual. SCRUBBER/CANISTER: The complete, back mounted, canister used for CO2 removal and, in this rebreather, oxygen analysis and oxygen addition. SETPOINT: The pre-selected setting about which the oxygen controller attempts to maintain the actual ppO2 in the breathing loop. SOFNOLIME: The absorbent used in the scrubber to remove CO2 from the exhaled gases. TRIMIX: Gas used as a diluent, consisting of oxygen, helium and nitrogen. See Appendix 7. LUBRICATION: Any approved oxygen compatible grease. DO NOT USE silicone or hydrocarbon based grease or oil on high or medium pressure oxygen fittings. - 19 - SECTION 3 OPERATIONAL CONSIDERATIONS 3.1 General The INSPIRATION is a closed circuit rebreather (CCR) in which the exhaled gases are recirculated within the apparatus so the diver can breathe them again and again. A CO2 scrubber chemically removes the CO2 whilst the oxygen controller monitors the exhaled gases and, when necessary, injects oxygen to maintain the oxygen partial pressure (ppO2) at preset levels, known as setpoints. Oxygen is supplied directly from a cylinder containing pure oxygen. As the diver descends, gas needs to be added to maintain the breathing volume. Providing this gas has a lower oxygen content, this gas dilutes the oxygen and is known as a dilutant or diluent. By diluting the oxygen the diver can go deeper than the 6 m limit set for pure oxygen closed circuit rebreathers. The INSPIRATION’s depth limit is governed by three factors. The first is the gas used as the diluent, the second is the volume of bail out/emergency breathing gas and the third limit is the greatest depth at which the rebreather has been formally tested - 100m, (depth is a significant factor affecting the duration of the scrubber). If air is used as a diluent then the INSPIRATION can be used at all depths down to the air diving limit, normally 40 to 50m. Air is the diluent of choice for normal sport diving depths. Normal diving-quality compressed air is used. Beyond 40m, Heliox or Trimix are preferred diluents. Deeper than 50m a diluent of Heliox or Trimix (with a max. END of 30m at 70m, reducing to an END of 24m at 100m, see Appendix 7) is essential. If Trimix or Heliox is used as a diluent then, as with open circuit diving, the gas mixture limits the depth. It is not the intention of this manual to teach the diver how to dive using a pre-mixed helium based diluent, a separate course should be undertaken for that, but it is essential to prepare a diluent with a suitable Equivalent Nitrogen Depth (END) and a ppO2 lower than setpoint if the diluent were to be breathed open circuit on the bottom or manually flushed through the breathing circuit. The volume and type of bailout gas carried is extremely important in determining the depth range. It must be sufficient in order to breathe at depth and bring you back to the surface. Some deep mixes will not be respirable near the surface when breathed open circuit and in these circumstances an additional means of breathing life support gas must be provided. See Appendix 7 for Trimix and HeliAir mixes. The INSPIRATION is CE approved to 50m using an air diluent and 100m using an Heliox diluent or Trimix (with a max. END of 30m at 70m, reducing to an END of 24m at 100m), though it is recommended to limit your depth to 40m when using an air diluent. The INSPIRATION is designed to be used only with a separate face mask and mouthpiece. It must not be used with an oral/nasal full face mask. If experimenting with full face mask configurations the diver must ensure the INSPIRATION’s original mouthpiece is retained and inserted in the diver’s mouth. - 20 - 3.2 Gas Consumption Only a fraction of the air we inhale, approximately 4% at the surface, is used, most of which is converted into CO2 and exhaled along with the 96% of the gas not used. By recirculating the exhaled gases, removing the CO2 waste product and replenishing the oxygen, we can limit the gas removal from the oxygen cylinder to the same volume that we consume for metabolism, between 0.5 and 3.5 litres per minute depending on the person and work rate. Mr. Average consumes approximately 1 litre of oxygen per minute, women generally less. This means the 3 litre cylinder filled to 200 bar contains 600 litres of oxygen and will last 10 hours, not allowing for extra O2 used during ascents or reserves. The other incredibly significant benefit for the diver is that the amount of oxygen consumed is the same at all depths as shown in Table 1. Table 1. Comparison of Gas Consumption between Open Circuit and Closed Circuit Apparatus (for a diver with a breathing rate of 25 litres per min) Depth (m) 0 10 20 30 40 50 60 70 80 90 100 Absolute Pressure (bar) Gas consumption (litres/min.) 1.0 2.0 3.0 4.0 5.0 6.0 7.0 8.0 9.0 10 11 Open Circuit Closed Circuit 25 50 75 100 125 150 175 200 225 250 275 1.11 1.11 1.11 1.11 1.11 1.11 1.11 1.11 1.11 1.11 1.11 Diluent is used for volume make-up during descent phases. Once at the target depth no more diluent is used unless the breathing volume is reduced by gas wastage such as mask clearing or exhaling through the nose at which time more diluent will need to be added to the counterlungs to enable the diver to breathe without restriction. Diluent usage therefore, for the rebreather, is minimal. Typically, if the diluent is used for BC inflation, dry suit inflation as well as counterlung inflation a diver will only use 30 bar from the 3 litre cylinder per dive. Diving with a full 3 litre cylinder, filled to 232 bar, it is clear the remaining 200 bar of this 3 litre is available as emergency reserve or open circuit bailout. Diluent usage should be monitored and recorded during the training dives to use for future gas planning. Oxygen usage varies with diver work-rate, but is independent of depth, and is approx. 0.044 times the diver’s Respiratory Minute Volume (RMV). - 21 - Extra oxygen is injected into the breathing circuit during ascent phases to maintain the ppO2. and must be allowed for. Again 30 bar is a typical consumption rate for a one hour dive and 50 bar for a two hour dive. However, your own O2 usage should be monitored and recorded during the training dives to use for future gas planning. 3.3 Oxygen Benefits Background: Air at the surface is approximately 21% oxygen, 79% Nitrogen. The Absolute Pressure at the surface is approximately 1 bar. According to Dalton the partial pressure of oxygen (ppO2) is 0.21 bar and the partial pressure of the Nitrogen (ppN2) is 0.79 bar: 0.21 + 0.79 = 1.0 bar. Referring to Table 2 you can see the ppO2 and ppN2 at the different depths when breathing open circuit SCUBA. The ppN2 is simply derived from multiplying the ppN2 at the surface by the ambient pressure, i.e. at 10 m, the ppN2 = 0.79 x 2 = 1.58. The ppO2 is calculated in exactly the same way, at 10 m the ppO2 = 0.21 x 2 = 0.42. The oxygen partial pressure in the INSPIRATION is monitored by three oxygen cells. As the diver is consuming the oxygen through metabolism, the partial pressure drops. Once it drops below a predetermined level, known as the setpoint, a solenoid valve is opened and oxygen is added. By controlling the pressure of oxygen in the loop we have the opportunity to maintain higher ppO2 levels than that experienced on open circuit, decreasing the decompression obligations and giving us either increased no-stop time or an increased safety margin. Table 2 shows a comparison between a diver on SCUBA, breathing air, and a diver on closed circuit rebreather with a setpoint of 0.70 bar on the surface and a setpoint of 1.3 bar for the dive. Comparing the ppN2 of open circuit AIR and the ppN2 when on closed circuit it can be seen that the closed circuit diver has a lower nitrogen loading at all depths down to 50m. But it can also be seen that the breathing mixture becomes richer in oxygen whilst ascending, reaching 100% oxygen at 3m. This has the positive effect of giving the diver oxygen-rich decompression on every dive, resulting in quicker off gassing of nitrogen. - 22 - Table 2 Comparison of Open Circuit and Closed Circuit Apparatus Depth (m) Absolute Pressure (bar) ppO2 (bar) 0 3 6 10 20 30 40 50 1.0 1.3 1.6 2.0 3.0 4.0 5.0 6.0 0.21 0.273 0.336 0.42 0.63 0.84 1.05 1.26 Open Circuit (AIR) O2 ppN2 N2 % (bar) % 21 21 21 21 21 21 21 21 0.79 1.027 1.264 1.58 2.37 3.16 3.95 4.74 79 79 79 79 79 79 79 79 ppO2 (bar) 0.70 1.3 1.3 1.3 1.3 1.3 1.3 1.3 Closed Circuit O2 ppN2 % (bar) 70 100 81 65 43 32 26 21 0.3 0 0.3 0.7 1.7 2.7 3.7 4.7 N2 % 30 0 19 35 57 68 74 79 3.4 Decompression Constant ppO2 decompression can be calculated using a software program such as Proplanner, or DD-Plan or V-planner. A set of tables, showing no-stop times, are at Appendix 4 of this manual. These have been calculated on Proplanner for the standard 1.3 bar setpoint. It can be seen that the no-stop time for 20m with a setpoint of 1.3 bar is 140 mins. This compares to 51 mins on AIR on a Buhlmann table. Alternatively, a standard Nitrox dive computer can be adjusted to the oxygen percentage at the target depth with the planned setpoint. With a setpoint of 1.3 bar the oxygen percentage in the rebreather at 30m is 1.3 divided by 4 = 0.32, i.e. 32%. Setting the dive computer to 32% would be a very conservative way of calculating the decompression requirements because the dive computer would assume a constant gas percentage at every depth, whereas much higher oxygen percentages would be breathed during the shallower phases of the dive. In practical terms though this is a very easy method to achieve long duration dives with all the benefits of breathing Nitrox. Using a Nitrox dive computer is of most use when 3 or 4 dives are scheduled per day or multi-level dives are conducted. Alternatively, a constant ppO2 dive computer such as the Buddy Nexus can be used to take full advantage of the INSPIRATION’s reduced-deco potential. 3.5 Oxygen Controller The controller consists of three oxygen cells, two control units with their own displays and batteries and one solenoid valve for oxygen addition. Whichever control unit is switched on first becomes the Master control unit and the second unit becomes the Slave. The status of the control unit, whether it is a Master or Slave, is shown at the top of the display next to the setpoint. The Master unit controls the oxygen solenoid and hence the breathing mixture whilst the Slave purely acts as a secondary display but ready to take over if the Master controller’s power should fail. You can simulate this by switching off the Master controller - the Slave becomes the Master within 1 second. - 23 - 3.5.1 Accuracy of the Oxygen Controller The oxygen controller displays the ppO2 as measured by all three cells. The accuracy is ± 0.05 bar and this should be taken into consideration when dive planning. If the setpoint is 1.3 bar, assume 1.25 bar when calculating decompression and 1.35 bar when calculating oxygen toxicity time limits. See section 6 for further information. 3.5.2 Oxygen Cell Life The cell life is not guaranteed by the manufacturer, Teledyne, as it varies with usage. It is expected to last for up to four years in air or 10 months in oxygen. In the INSPIRATION it is expected that the cells will last between 1 and 2 years. This largely depends on their treatment. Vibration, excess temperature, excess moisture and direct sunlight can adversely affect the cells. It is not recommended to store the oxygen cells in a sealed bag or in an inert gas. (When travelling to remote spots it is advised to take spare oxygen cells and batteries.) 3.5.3 Interpreting the ppO2 Displays On initial power up, the output from the cells is compared. If they are outside the expected range, cell failure warnings are displayed and the oxygen controller will not proceed to dive mode. The oxygen controllers display the ppO2 measured by all three oxygen cells and display in the range 0.0 to 2.55 bar. Remember that the ppO2 level must remain between 0.16 and 2.0 bar to sustain life. If 2.55 bar is seen on the display - do not hesitate - perform a diluent flush immediately and consider reverting to open circuit. 2.55 bar on the display could indicate either a malfunction in the electronics or a very high ppO2. In the latter case the ppO2 level could be very high indeed e.g. 6 bar at 50m ! MASTER 1.30 1.28 1.29 1.31 MASTER 1.30 1.35 1.33 1.30 MASTER 0.70 0.35 0.37 0.35 During the dive the oxygen controller controls the oxygen partial pressure in the breathing loop by averaging the nearest two cell output readings, i.e. if you have one cell reading 1.28, another 1.29 and the other 1.31, the cell displaying 1.31 will be ignored and the ppO2 assumed to be 1.285. As it is below the setpoint, the solenoid will open for a fraction of a second. In this example the ppO2 is assumed to be 1.34 bar, i.e. above the setpoint, so the solenoid will not open. In this example the ppO2 is assumed to be 0.35 bar. Here it is a long way below the setpoint so the solenoid will open for a number of seconds. The advantage of measuring the ppO2 in this manner is that if one cell is faulty it is ignored, that is until the difference is greater than 0.2 bar in which case a cell error warning will be displayed and the buzzer sounded. The oxygen controller will continue to control the ppO2 because it only needs two functioning cells to work properly. Because all three cells are displayed - 24 - simultaneously you can assess the warning and see if it was just a pocket of oxygen affecting one sensor or the problem is ongoing. Although the controller will function normally with one faulty cell and continue to maintain the ppO2, if the problem persists, the diver should abort the dive. ! Because the system averages the nearest two cells, it is important to be aware that Warning in the unlikely event of two cells failing simultaneously then the only good cell will be ignored. Remember though, once one cell shows a difference greater than 0.2 bar a cell error warning will be displayed. See Section 6.12 (Verification of ppO2) and 9 (Warnings and Remedies) for more details. By displaying all three cells simultaneously it allows you to instantly diagnose the problem. Any slow reacting cells can be spotted, along with any physical faults such as a faulty connection to a cell. If a cell reads 0.0 bar then a wire or connector has become disconnected. If a cell is inoperative abort the dive and consider manual operation or bailing out. Excess oxygen in the loop may be prevented by controlling the oxygen cylinder’s valve. If more oxygen is required, press the oxygen inflator. See Section 11 - Emergency Procedures. 3.5.4 Effect of Moisture on the Cells In use the atmosphere in the scrubber is virtually always humid. When the scrubber lid is removed, after the dive, condensation and moisture will be evident. This cannot be avoided due to the moisture created by the Sofnolime reacting with and removing the CO2 from the atmosphere in the loop. Humidity levels have been considered when determining the accuracy of the information provided to the diver, in the same way an allowance has been made for the effects of the inherent ± 1% accuracy of the cell outputs. The accuracy of the oxygen controller’s reading is ± 0.05 bar, allowing for all normal use errors. However, large drops of water either on the front cell face or in the back of the cell may affect the readings. Water on the cell’s sensor face tends to slow down the reaction of the cell to changing ppO2 and water in the back of the cell tends to push the ppO2 read out higher. The cells used on the INSPIRATION have been modified to help eliminate both of these problems. When fitting replacements ensure only original parts are used. 3.5.5 Setpoint Selection There are two setpoints. A low setpoint used when on the surface and for the descent and a high setpoint used when on the bottom and for most of the ascent. The switch from low to high and back again is done manually with the centre push button on the display (see Section 5 for details). The setpoints are user selectable to match the type of diving planned. However, begin by using the default values: a low setpoint of 0.70 bar and a high setpoint of 1.3 bar. With a ppO2 in the loop of 1.3 bar, the maximum duration of the set is 3 hours per exposure or 3.5 hours per day, when using the NOAA oxygen toxicity limits. The Absolute Pressure at the surface is approximately 1.0 bar, if a higher setpoint than this is selected whilst still at the surface, the unit will continually inject oxygen, trying to reach the setpoint. Since this cannot be achieved the result would be a waste of oxygen and battery power. Look out for this and make sure a low setpoint is selected when at the surface. - 25 - In your Nitrox training you will have learnt about CNS oxygen toxicity and the NOAA exposure limits. When selecting setpoints be sure to consider the oxygen toxicity limits as this is the primary factor affecting the dive duration with the INSPIRATION, see Table 3. NOAA - CNS oxygen toxicity exposure limits Table 3 ppO2 (bar) Exposure Limit per Dive 1.6 1.5 1.4 1.3 1.2 1.1 1.0 0.9 0.7 Exposure Limit per Day (mins) 45 120 (2 hours) 150 (2 ½ hours) 180 (3 hours) 210 (3 ½ hours) 240 (4 hours) 300 (5 hours) 360 (6 hours) 570 (9 ½ hours) 150 (2 ½ hours) 180 (3 hours) 180 (3 hours) 210 (3 ½ hours) 240 (4 hours) 270 (4 ½ hours) 300 (5 hours) 360 (6 hours) 570 (9 ½ hours) 3.5.6 Pulmonary Oxygen Toxicity Prolonged exposure to oxygen in excess of 0.5 bar can lead to pulmonary toxicity which affects the whole body. Normally sport divers would never achieve such high exposures. However, with a rebreather such high levels may be achievable and it is necessary to ensure the limits are not exceeded. As a rough guide - if you stay within the NOAA CNS guidelines then pulmonary oxygen toxicity is only of concern during long duration dives over multiple days. e.g. 6 hours diving per day, every day, (using a ppO2 of 0.9) for 14+ days. Check your dive times for risk of pulmonary oxygen toxicity by consulting one of the technical diving organisations’ (IANTD or TDI) work books. Using the higher ppO2 levels of 1.35, 1.45 and 1.55 the CNS clock is the limiting factor in all cases. 3.5.7 Oxygen Limits for Diving Operations ppO2 LEVEL EFFECT 0 - 0.10 0.10 0.12 0.16 0.21 0.40 0.70 1.30 1.40 1.60 COMA OR DEATH Unconsciousness Serious signs of Hypoxia Minor signs of Hypoxia Normal air environment at the surface INSPIRATION LOW OXYGEN warning INSPIRATION Default Low Setpoint INSPIRATION Default High Setpoint Recommended recreation limit INSPIRATION HIGH OXYGEN warning ----------------------------------------------------------------------------------------------------------------------------------------------------------------------------------------------------------------------------- - 26 - 3.6 Duration of the CO2 Scrubber The CO2 duration is determined using the DERA/QinetiQ unmanned test facility at Alverstoke. A breathing rate of 40 l/min (1.6lpm CO2 ) has been determined by QinetiQ, as an average breathing rate, averaging out work and rest cycles. Rule No 1 - Dive Planning The Sofnolime must be replaced after 3 hours of use for CO2 produced at a rate of 1.6 lpm Multiple Dives The INSPIRATION’s scrubber can be used for multiple dives, providing the Sofnolime is not soaked during a dive, bearing in mind the total timed used must not exceed 3 hours (for CO2 produced at 1.6 lpm ). Effect of Depth In DERA trials depth has proven to significantly reduce the scrubber’s CO2 absorption capability. Rule No 2 - For dives deeper than 20m, the diver must leave the bottom when the total time breathed from the unit reaches 140 minutes (for CO2 produced at 1.6 lpm). e.g. If dive 1 is for 100mins and the 2nd dive is deeper than 20m, the bottom time of the 2nd dive must not exceed 40 mins. Check the decompression times for the 2nd dive to ensure the dive durations, when added together, do not exceed 3 hours! Rule No 3 - For dives deeper than 50m the diver must leave the bottom when the total time breathed from the unit reaches 100 minutes (again this applies to CO2 produced at 1.6 lpm.). e.g. If dive 1 is for 90mins and the 2nd dive is deeper than 50m, the bottom time of the 2nd dive must not exceed 10 mins. Check the decompression times for the 2nd dive to ensure the dive durations, when added together, do not exceed 3 hours! ! Warning 1) 2) 3) 4) 5) 6) 7) 8) 9) This information is based on using the 1.0 - 2.5 mm diving grade Sofnolime and tested using a water temperature of 50C and an average CO2 production rate of 1.6 litres per minute. Some people produce more than 1.6 litres per minute of CO2 and usage times must be shortened. Conduct personal oxygen consumption trials at work and rest to determine your own CO2 production before use. Calculate your approximate CO2 production by multiplying your oxygen consumption by 0.9 . Never expect the Sofnolime to last longer because you are in warmer water but do expect it to last for a shorter period if used in colder temperatures than 5 oC. The design of the scrubber, not just the weight of Sofnolime, is a major factor in the duration, so these performance figures cannot be used for determining the duration of another make of scrubber. If other scrubber materials are used, such as 2.5 - 5.0mm Sofnolime, then these duration figures are invalid. The performance of the scrubber was tested by the Royal Navy’s DERA test centre on a fresh batch of material, taken straight from the manufacturer’s packaging. Material that has been left exposed to the atmosphere can appear to be satisfactory but in reality may only work for a short period. The efficiency of the material may vary slightly from batch to batch. The information given applies to Air, Trimix (with a max. END of 30m at 70m, reducing to an END of 24m at 100m) and Heliox diluents. - 27 - 3.6.1 How do I know when the CO2 absorbent can no longer absorb CO2? If fresh Sofnolime of the correct grade is used, then the time used can be recorded and compared to the three rules above. Recording the time used is most important! It is the only practical way of predicting the remaining absorbent life. ! Warning DO NOT RELY ON COLOUR CHANGE Some Sofnolime changes colour as it is used but this is only a guide as the material returns to the natural colour after a time and is also temperature dependent. Replace the Sofnolime if the material is soaked, do not attempt to dry it out. 3.6.2 Extra CO2 Considerations Avoid leaving the absorbent open to the atmosphere or this will reduce its operational life. If you intend to use the absorbent again, once the scrubber is dried, seal up the scrubber using the convoluted hoses. Do not remove and repack partially used absorbent as CO2 breakthrough will occur much earlier than expected. When absorbent is removed from the CO2 cartridge, dispose of it immediately. The CO2 cartridge is easily refilled by the diver. The normal weight of Sofnolime required is 2.45 kg of 1 - 2.5mm (8-12 mesh) granule size, 797 diving grade, Sofnolime. Some settling of Sofnolime will occur. A small amount of settling will be taken up by the spring loaded base plate. Care must be taken if a long journey is undertaken between packing the cartridge and diving with it. Always inspect the cartridge before the dive. ! ! Warning Hypercapnia, an excess of CO2 at cellular level, can become a problem in any form of closed circuit rebreather diving. Reduced efficiency of the absorbent, channelling of breathing gas through the absorbent due to poor packing of the absorbent during refill or if the absorbent becomes wet, can lead to increased CO2 levels which can result in Hypercapnia. Other possible causes include damaged or misplaced scrubber components or inverted non-return valves in the mouthpiece. Be aware of an increased breathing rate, symptoms of confusion. If you don’t remove yourself from the breathing circuit to an open circuit bail out for instance the following symptoms or signs will ensue very quickly: severe tremors, loss of balance, dissociation or unconsciousness. Warning Early CO2 warnings, such as respiratory distress, are often not detected when breathing oxygen at pressures higher than 0.21 bar and in particular, rebreathing CO2 in 1.0 to 1.3 bar of oxygen is known to offer virtually no physical warning to the diver and escalate quickly to severe tremors and unconsciousness! - a good reason to remain within the scrubber times stated earlier, do proper pre-breathes and to not dive alone. Maintenance of the apparatus, including disassembly of the scrubber, is detailed in Section 10. - 28 - 3.7 Symptoms Associated with Low and High Oxygen Levels, High CO2 Levels and Oxygen Toxicity The following is intended to be a brief overview. For further information we recommend studying the IANTD, or similar, training organisation manuals. Hypoxia Symptoms (Lack of oxygen) Hypoxia is extremely dangerous and is potentially fatal. The warning signs are very slight and hardly noticeable. Once the ppO2 drops below 0.1 bar, the diver will become unconscious. It is, therefore, essential to monitor the oxygen controller at all times. Oxygen should be administered to a victim as soon as possible but may not always be successful. Hyperoxia Symptoms (excess ppO2) Spastic Convulsions are not always preceded by warning symptoms. It is, therefore, essential to monitor the oxygen controller at all times. Central Nervous System (CNS) Oxygen Toxicity Symptoms: Visual problems (focus, tunnel, spotty etc.) Ears (ringing, abnormal) Nausea (spastic vomiting) Twitching (facial) Irritability Dizziness Whole Body Oxygen Toxicity Symptoms: Dry cough Shortness of breath Increased breathing resistance Discomfort in chest Hypercapnia Symptoms ( excess CO2) CO2 convulsions are easily confused with oxygen convulsions and in an elevated ppO2 (above 0.21 bar) convulsions and unconsciousness are rarely preceded by warning symptoms. It is therefore essential to change the sofnolime regularly and ensure correct assembly and operation of components such as scrubber cartridge O ring, spacer and mouthpiece non-return valves. - 29 - Rare warning signs Shortness of breath * Headache * Dizziness * ! Onset of these symptoms can occur very quickly and without warning: Severe Tremors Loss of Balance Dissociation Unconsciousness * Warning: The first symptoms are not always evident when breathing oxygen above 0.21 bar. Wartime testing by the Admiralty’s Experimental Diving Unit proved that oxygen breathed at 1.0 bar whilst exhaled CO2 was rebreathed resulted in severe respiratory distress in only 3 out of 18 tested. The remaining 15 subjects suffered acute nervous symptoms or signs i.e. severe tremors with loss of balance, dissociation & unconsciousness. These all occurred between 200 and 380 secs from commencement. Don’t take risks with CO2!!! - 30 - SECTION 4 APPARATUS COMPONENTS - 31 - 4.1 Counterlungs Two sizes of counterlungs are available: medium and large. Both have sufficient volume for breathing. Select the breathing bags/counterlungs according to your body size. When wearing trousers with a belt and a T-shirt, measure from the lower edge of the belt at the front over your shoulder and down to the lower edge of your belt at the back. Take the measurement on inhale. Under 115cm - Medium Counterlungs Over 115cm - Large Counterlungs It is essential to keep the breathing bags/counterlungs down on your shoulders. They are prevented from floating upwards by the Fastex buckle located on the lower edge of each counterlung. These can be fastened to the special connection points on the INSPIRATION Harness. If these do not allow the counterlungs to remain on the shoulders then either a smaller breathing bag, or the use of crutch straps, must be considered. 4.2 Over-Pressure Exhaust Valve This is a two position valve with an additional manual override. Fully closed (clockwise) is the high pressure setting, used for detecting leaks on the system and for providing positive buoyancy when at the surface with the mouthpiece closed. Fully open (anticlockwise) is the low pressure setting, used throughout the dive. On this setting the loop pressure is kept below the maximum lung overpressure of 60 mbar. During the ascent, this setting may be too high for comfortable exhalation so the valve has a pull cord exhaust fitted which can be either operated intermittently or continuously during the ascent. The latter option has the advantage of keeping the breathing loop volume at a minimum eliminating the possibility of the expanding gas in the loop from adversely increasing the buoyancy. The other alternative is to exhale around the outside of the mouthpiece during the ascent or to breathe out through your nose. If this hands free approach is preferred then it is best to exhale around the outside of the mouthpiece as this exhausts gas from your lungs and the counterlungs simultaneously. Low Pressure Setting - DIVE High Pressure Setting: for leak testing - 32 - 4.3 Mouthpiece Valve If the mouthpiece is removed while in the water, either underneath or at the surface, water may enter the loop. The INSPIRATION is tolerant of small quantities of water entering but excessive quantities should be avoided by closing the mouthpiece before removing it from the mouth. When reinserting into the mouth, blow out to remove the water from the water vent and, while continuing to blow, open the mouthpiece valve. The opening and closing of this valve is very important and must be practised on the surface prior to diving. Unlike any other mouthpiece on the market, the central body section rotates and moves independently of the two outer sections which move together with the inner tube of the mouthpiece valve. It is easier to hold the mouthpiece still, as this is often in your mouth, and rotate the outer rings. They are prevented from unscrewing by the two cross-head screws located underneath. When servicing, do not attempt to unscrew the outer sections without first removing the screws. Attempting to do so may damage some components. Located at each end of the inner tube is a non-return valve. These are keyed to prevent incorrect assembly. However, it is good practice to check the direction of gas flow and check the proper operation of the non-return valves prior to using the rebreather. This can be easily carried out by disconnecting the hose connectors from the T piece and gently blowing and sucking against the connector. The direction of gas flow for the INSPIRATION rebreather is clockwise when looking down on the unit. i.e. you exhale over your right shoulder. Therefore, when blowing into the right hand side hose connector the non return valve will close and it should open when air is sucked from the connector. The non return valve on the other end of the mouthpiece inner tube should close when air is sucked from the left hand connector and open when air is blown into the connector. After reassembling the hose to the unit check for correct operation by alternately squeezing the inhale and exhale tubes as you inhale and exhale. Gas must come from the left and go out to the right. You must not be able to inhale gas from the exhale side and exhale gas into the inhale tube. 4.4 Breathing Hose Connectors The hose nuts are simply unscrewed. The connections to the scrubber and the T pieces are piston type seals and seal even when slightly loose. These connections should be hand tightened onto the shoulder to prevent accidental unscrewing. Ensure the O rings are lightly lubricated and not damaged before re-assembly. Each hose nut is fastened to the convoluted hose using screw on connectors. These are larger versions of the connectors used to clamp the convoluted flexible rubber hose on the range of BUDDY Buoyancy Compensators. They allow easy removal for maintenance, they allow the hose to swivel at these joints and they provide an extremely secure connection. - 33 - 4.5 Colour Coding of Convoluted Hose Connections The blue rings all signify fresh oxygenated gas from the scrubber. The left shoulder T- piece located on the inhale counterlung has blue identification rings, as do the hoses connecting to it and the connection in the centre of the scrubber lid. The non-return valve in the inhalation side of the mouthpiece is also coloured blue. 3 1 2 4 5 4.6 Diluent and Oxygen Inflators All inflators, oxygen, diluent and Buoyancy Compensator, are low pressure inflators, sometimes referred to as medium pressure inflators. They are designed to work with a maximum feed pressure of 15 bar. See the First Stage Interstage Pressures, Section 10.3. The inflator hoses connect to the low pressure ports on the first stages. It is essential not to confuse the oxygen components with their diluent counterparts. See Section 10.7, Precautions When Using High Pressure Oxygen. Both the diluent and oxygen systems must be checked for leaks prior to the dive and this is best done by dipping the valve in a water bath. The oxygen inflator has special lubrication and seals and has undergone special cleaning to make it suitable for use with oxygen. It must only be connected to a hose supplying oxygen. As the apparatus is worn the oxygen inflator must be on the right hand, on the exhale counterlung and the diluent inflator must be on the left hand, on the inhale counterlung. Both inflators are secured into a base fitting with a large, hand tight, moulded ring. By unscrewing this ring slightly the inflator can be rotated to best align the feed hose. - 34 - The identification badge can also be rotated clockwise to ensure the writing is up the right way. If these identification labels are lost over time, the type of inflator can be identified by the markings on the underside. After any adjustment, tighten the outer ring. By unscrewing the outer ring completely the inflator valve can be removed. Care must be taken when removing it, as there is a large O ring seal underneath it. Removing the inflator reveals a very useful drain valve which should be used after every dive to drain any water that has entered the counterlungs. This port can also be used to help with washing and disinfecting the inner bags of the counterlungs. 4.7 Automatic Diluent Valve (ADV) The ADV is an optional feature. It replaces the inhale Tee piece on the left shoulder counterlung and is usually fitted with the diaphragm facing the diver’s head. The ADV is activated by a pressure differential across the diaphragm and it supplies gas to the loop (breathing circuit) whenever a substantial negative pressure is experienced within the inhale counterlung. The gas supply hose connects with a 3/8”UNF thread to the low pressure port on a first stage or into the diluent portion of the INSPIRATION’s manifold and connects to the ADV’s 300o swivel. The swivel allows for the hose to be fed from the rear e.g. from the manifold, or from the front, from a side mounted diluent cylinder. If the side mounted cylinder needs to be removed in water the optional in-water quick release connector is available. The ADV is an upstream valve and can be used with 1st stages delivering 7 to 11 bar (nominal 9.5 bar) above ambient and requires no adjustment. The elastomeric diaphragm cover allows manual operation. During descents it is normal for the ADV to add gas on nearly every inhalation. However, this is most abnormal during all other phases of the dive. Normally the ADV adds gas to make the counterlung volume breathable and then stops. ! WARNING: If the ADV operates on every inhalation this is an indication of either poor rebreather diving practice like exhaling through the nose or is a sign of some other leak from the loop. Any extra diluent addition usually has the effect of reducing the ppO2 within the breathing circuit and would be countered by the oxygen controller adding oxygen to regain the setpoint. The danger of inadvertently using excess gas from both diluent and oxygen cylinders is higher when using an ADV and extra monitoring of cylinder contents gauges should take place. Located on the left shoulder, rolling left side down may force the ADV to add gas to the loop as will rotating head down, when the gas in the counterlungs migrates upwards away from the ADV and causes a negative pressure on the inside of the diaphragm. Whenever these manoeuvres are undertaken you may need to run the counterlungs with a higher gas volume than normal. - 35 - 4.8 Weight Pocket When swimming along horizontally on open circuit inhale fully, hold your breath, and lie still. You will notice that you are brought into an upright position. This is exactly what happens on a rebreather. As we breathe in and out of the counterlungs, the buoyancy at the chest area is constant which means you may find that you are constantly being brought into an upright position. To counteract this effect, up to 3kg of lead can be inserted in the weight pocket on the top of the rebreather. Normally, removing 2 kg from your weight belt and putting it on the top of the unit is sufficient. 4.9 Buoyancy Compensator and Harness A Buoyancy Compensator must be used with this rebreather. Do not use the counterlungs to control your buoyancy. The BUDDY wings 13, 16 and 22 have been developed specially for the INSPIRATION, in conjunction with the INSPIRATION harness. The harness has 25mm Fastex buckles located low down at the front which are used to hold the counterlungs down on the diver’s shoulders. Holding the counterlungs down is extremely important and care must always be taken to ensure they are not allowed to float above the diver’s shoulders. If this happens, breathing resistance will increase dramatically, probably causing the diver some discomfort - if not immediately, certainly after a time. Increased breathing resistance means increased CO2 retention, which is believed to make the diver more susceptible to oxygen toxicity and nitrogen narcosis. If the counterlungs are floating off the shoulders, ensure the waist band of the harness is not riding up. This is usually cured by simply adjusting the waist band. If it cannot be secured, you may have to add a crutch strap or it may be necessary to change to a smaller size counterlung. See Section 4.1. 4.10 Auto Air The Auto Air is fitted as standard to the buoyancy compensator. It is a multi-function valve, not only is it the BC inflator, it can also be used for BC deflation as well as emergency breathing from the diluent. Most importantly the Auto Air is also a pressure relief valve: Should the 1st stage leak, the rise in intermediate pressure will automatically be relieved through the Auto Air. Note: normally, diluent is not used during the ascent. This means that the intermediate pressure increases in relation to the ambient pressure as the diver ascends. The Auto Air will bleed off this excess pressure automatically. It may appear that the Auto Air is leaking but all it is doing is relieving the excess intermediate pressure. A simple purge is all that is needed to stop the gas dribbling out or it can be simply left alone. - 36 - ! WARNING: it is essential that the Auto Air feed hose is not disconnected. If the Auto Air continues to leak after a purge then simply close the cylinder valve, opening it whenever you need diluent and then after the dive, check the intermediate pressure before adjusting the Auto Air. ! WARNING: disconnecting the Auto Air hose during a dive may result in an intermediate pressure hose bursting – DO NOT DISCONNECT, simply close the cylinder valve. ! WARNING: if the Auto Air is replaced with a conventional inflator and a conventional 2nd stage, be sure to fit a downstream 2nd stage. If an upstream 2nd stage is fitted or a flow control device such as the AP “Flowstop” is used then be sure to fit an additional pressure relief valve to the intermediate pressure. The RB17 (14bar) is an example of a suitable automatic pressure relief valve. 4.11 Audible Warning Device The audible warning device or buzzer is located on the left shoulder T-piece and is directed towards the divers head. This is only a secondary device, the primary warning device being the ppO2 displays, and is not to be used as the diver’s only warning system. All warnings: High O2, Low O2, Low Battery, Cell Warning have the same sequence - 1 second on, 1 second off and continue while the fault is occurring. The only exception to this is the Cell Warning is deactivated when the solenoid is open. When the buzzer is heard it is then the diver’s responsibility to assess the problem by interpreting the ppO2 displays. 4.12 Oxygen Solenoid In DIVE mode the oxygen solenoid is activated ONLY when the ppO2 is below the setpoint. The oxygen solenoid is opened for a variable time, from 0.2 to 17 secs, depending on how far the ppO2 is below the setpoint. Larger pressure drops, such as during the ascent, prompt longer solenoid opening times to regain steady state setpoint as soon as possible. This variable open time is then always followed by a 6 seconds close period, hence a slight delay (up to 6 secs) may be noticed before expected solenoid activity but this is quite normal. The “solenoid” consists of two major components: The solenoid itself which is black and the chromed oxygen valve, the stem of which is inserted through the solenoid and held in place by a circlip. The solenoid is a simple coil requiring an input of 6 volts for activation. The solenoid draws approx. 350mA and as such is the largest power consumer, the backlight being the 2nd heaviest power drain. The oxygen valve is an “upstream” design. The gas pressure closes the gas outlet and holds it closed. The gas pressure is critical for proper operation of the solenoid. On the outlet of the oxygen solenoid a chromed restrictor buffers the oxygen flow into the scrubber lid to prevent oxygen surges when the solenoid initially opens. This is particularly necessary during deep dives. The restrictor should not be removed for diving. Occasionally the restrictor should be unscrewed and checked for blockage. If the flow is restricted too much then - 37 - calibration times will be extended and solenoid activity will be increased to maintain a constant ppO2 , reducing battery life. - 38 - SECTION 5 POWER ON Before you switch the electronics on, open the oxygen cylinder valve. The battery test is more effective if there is gas supplied to the solenoid valve. 5.1 General The INSPIRATION has two oxygen controllers, located in separate handsets, with separate batteries. Whichever controller is turned on first becomes the Master controller. It is the Master controller which controls the ppO2 in the breathing loop by monitoring the oxygen partial pressure and opening the solenoid when necessary. During the dive the setpoint can be changed from low to high and back to low ONLY on the Master controller. The Menu mode can only be entered from the Master controller when in LOW setpoint dive mode. The flow charts detailed in Appendix 1 should be used in conjunction with this Section. 5.2 Switching On and Off Switch On Switching on requires two actions : Firstly push the lever switch towards the screen. Then push the left slider towards the screen. This starts the display. Switch Off There are two techniques for switching off a handset, both hardware. If the centre and the right sliders are pushed towards the screen and held for a second, the handset will switch off. When switched off like this though, there is still a power drain of 5mA, so the lever switch should be used if the unit is not going to be used for a few hours. Pushing the lever away from the screen isolates the display from the power supply. Screen Display - A.P.DIVING INSPIRATION When the unit is first switched on, the screen display shows INSPIRATION and the buzzer gives two quick beeps. This is the quick confirmation that the buzzer is functioning so listen out for it - your life may depend on it. At this stage switch on the Slave controller. - 39 - 5.3 Oxygen Cell Check Screen Display - CELL n FAILURE REPLACE CELL n FAILURE MISSING NO DIVE The health of the three cells is checked on start up. If a fault is detected the screen will display CELL n FAILURE, MISSING or CELL n FAILURE, REPLACE, where n is the particular cell in which the fault has been detected. An open circuit or failed cell will result in the screen displaying the message NO DIVE. More extensive cell analysis takes place during calibration. 5.4 Battery Check If the oxygen cells are functioning correctly the apparatus then carries out a check of the Master’s battery. If the voltage is insufficient a low battery warning is shown. The Slave checks its own battery when switched on. Screen Display- BATTERY WARNING REPLACE DIVE NOW? Yes No On switch on, there are two levels of battery warning. At approx. 5.1 volts -BATTERY WARNING- is displayed with an option to dive requiring a YES or NO decision. It is recommended that if a near the limits dive is planned, or if the apparatus had been stored at a low temperature, the battery should be replaced. If the second battery level warning - LOW BATTERY - is displayed during power up, the oxygen controller will not continue into dive mode and the dive could not commence. This 2nd warning comes in at approx. 4.7 volts. Screen Display - NO DIVE LOW BATTERY REPLACE For low battery warning when in dive mode and temporary cure, see Section 9, Warnings and Remedies. 5.5 Elapsed On Time Screen Display - ELAPSED ON TIME nnHRS nnMINS DIVE NOW? CONFIRM The display indicates the length of time, in hours and minutes, that the unit has been switched on since the timer was last reset to zero. This elapsed time is reset from the menu system once the controller is in DIVE MODE. This elapsed timer can be used to time any one of a number of events, such as time since last battery change, or time since last scrubber change. This timer must only be used as a guide, as the elapsed timer relies on the user resetting it. Also, as it may be reset at any time, care must be taken to ensure that no-one inadvertently resets the timer without your knowledge. - 40 - The system requires confirmation, by pressing the middle button, to proceed to the next stage, CALIBRATION. 5.6 Check Diluent Screen Display - CHECK DILUENT CONFIRM The controller then prompts Check Diluent. Open the diluent cylinder valve fully and press the diluent inflator whilst watching the diluent pressure gauge. This checks all connections and that you actually have gas to that valve. If the HP gauge needle moves when you press the diluent inflator then the cylinder valve is closed and should be opened. 5.7 The Slave Oxygen Controller This must be on at this time. The Slave’s battery and oxygen cell connections will be checked and the same screen messages as shown in 5.2 and 5.3 will be displayed in the event of an error. Whichever controller you turn on first is the Master, and the Master controls the oxygen level in the loop. If the Master is not yet in dive mode and you turn the Slave on - the Slave checks the oxygen cells and battery and then displays: Screen Display - SLAVE WAITING FOR DATA When the Master enters DIVE MODE and the solenoid is closed, the calibrated cell readings are taken from the Master by the Slave. The Slave then uses these figures as the reference to selfcalibrate. The ppO2 for all three cells is displayed on the bottom line with SLAVE 0.7 on the top line. The Slave simply takes the mVolt outputs from the same three cells as the Master controller. It calculates the ppO2 values for itself, so it is common to see the Slave display varying from the Master by ± 0.01 bar. If at any time the Master is switched off or powers down, the Slave recognizes this and automatically becomes the Master, taking control of the solenoid. ! Warning The Slave MUST display “Waiting for Data” BEFORE the Master goes into DIVE MODE. If the Master is already in DIVE MODE when you turn the Slave on, the Slave will not perform the following vital checks: oxygen cells, connections and battery checks. It will simply take the calibration figures from the Master and enter SLAVE MODE. (The reason why the designers have allowed the Slave to skip these checks is to allow the Slave to be activated whilst underwater, even if a fault like a low battery or faulty cell exists. The diver then has the chance to verify which cells are giving accurate readings and which ones aren’t and to add oxygen or diluent manually to maintain a life supporting breathing mixture.) - 41 - SECTION 6 CALIBRATION The mVolt outputs from the cells vary with the ppO2. If the ppO2 is higher, the voltage will be higher. Even in storage a cell is continually working, measuring the oxygen partial pressure. This gradually and continually lowers the output voltage. Consequently, the oxygen cells need to be calibrated at regular intervals. On the INSPIRATION this is a simple procedure, taking about 25 seconds. Every time it calibrates, the calibration factors are stored for future analysis of cells. Eventually the output voltage of the cell is too low and it will need to be replaced. Calibrate every day of use. The calibration sequence involves surrounding the cells with oxygen at a known pressure. It is normal to calibrate before every dive. Valuable cell checks are included in the automated calibration procedure. 6.1 Must Calibrate! Screen Display - MUST CALIBRATE YES NO The stored calibration coefficients of the cells are used to compare the current cell outputs. If calibration is required the screen displays-MUST CALIBRATE! YES or NO. Normally, YES is selected by pushing the button under YES. There are occasions though when NO would need to be selected. For instance, if both controllers were switched off underwater and then back on again, unit calibration would be disastrous. The calibration routine involves flushing the loop with pure oxygen. Feeding pure oxygen into the loop at depth would result in a catastrophically high ppO2! Calibrate on land, never in the water and never underwater. If you do switch the handsets off underwater and turn them back on, you will be asked whether you want to calibrate. Always select NO. If you accidentally press YES, then switch the handsets off immediately and start the switch on sequence again. 6.2 Calibrate? Screen Display - CALIBRATE? YES NO If the cell outputs were very close to the previously stored values then the screen display shows CALIBRATE? YES or NO. If the apparatus had only recently been calibrated then there would be little point in recalibrating, but the option to calibrate is given. It is essential though to recalibrate at least every 3 hours of diving. - 42 - 6.3 Ambient Pressure Screen Display - AMBIENT PRESSURE DOWN 1000mB UP On selecting YES, the AMBIENT PRESSURE in mbars is requested. The default value is 1000 mbar ( 1 bar) every time the apparatus is switched on. The value may be increased or decreased using the UP and DOWN buttons respectively. To accept the displayed figure press the centre button once. ! Warning It is important to understand the implications of the selection. If an ambient pressure of 1000 mbar is selected when the ambient pressure is really 850 mbar (0.85 bar), for instance when diving at altitude, then the oxygen controller would be displaying a ppO2 of say 1.3 but the actual ppO2 in the loop would be 1.10 with the consequent effect of increasing the Nitrogen loading. If this error was added to worst case accuracy of -0.05 the ppO2 level would be only 1.05 bar! If the decompression times were calculated assuming a ppO2 of 1.25 bar decompression sickness could result! The opposite is also true. If the ambient pressure is 1050 mbar (1.05 bar) and the default value of 1000 mbar accepted then, in the worst case, this error together with the system tolerance of ± 0.05 bar, an indicated value of 1.3 bar in the loop could in reality be as much as 1.37 bar. At the lower ppO2 settings this is not as critical but if a setpoint of 1.5 bar was selected, for which the CNS Oxygen toxicity time limit is 2 hours, but there is actually 1.6 bar in the loop, for which the time limit is 45 minutes, oxygen toxicity problems could arise. 6.4 Oxygen % Screen Display - OXYGEN % DOWN 99% UP On accepting the ambient pressure value, the OXYGEN % is requested. It is requesting the oxygen % in the scrubber lid after the oxygen inject takes place during calibration. This is as important as the ambient pressure. If there is 80% oxygen in the lid and 100% is entered, then the oxygen controller will always display the ppO2 1.25 times higher than its actual value. Again, a bend is likely to occur. Typically a value of 98% would be entered when the oxygen cylinder contains 100% O2 , the exact value can be determined- see section “Verification of ppO2 .” ! Warning The INSPIRATION is designed to be used with 100 % oxygen. Buying 100% oxygen is not too difficult in the UK. Diving oxygen is guaranteed by BOC or Air Products to be 99.99% pure and is certified as such. Welding oxygen is not analysed. Care must be taken with Medical oxygen as its oxygen content may vary depending on whether it will used by midwives or by paramedics, or for other uses. There are grades of medical oxygen which contain CO2! Specify diving oxygen. To determine the oxygen purity (when the gas quality is not certified) - see Appendix 3 6.5 Open Mouthpiece Screen Display OPEN MOUTHPIECE CONFIRM Once the oxygen percentage has been selected and confirmed by pressing the centre button, the controller prompts OPEN THE MOUTHPIECE valve. The reason for this is to enable the cells to calibrate to ambient pressure and this would not be possible if the mouthpiece was closed. Ensure the mouthpiece is open then confirm by selecting the centre button. - 43 - 6.6 Open O2 Valve Screen Display - OPEN O2 VALVE CONFIRM The controller then prompts OPEN OXYGEN VALVE. Ensure the oxygen cylinder valve is open by turning anticlockwise one or two turns then confirm with the centre button. FLUSHING BAG 0.34 0.27 0.40 6.7 Flushing Bag Screen Display - The displayed ppO2 readings from the three cells will be seen to climb as the solenoid is opened and oxygen is fed into the loop. Do not worry that all three are different - they will not be the same until they are calibrated. The oxygen controller makes a number of checks during this phase: 6.8 No Oxygen - Check Valve Screen Display NO OXYGEN CHECK VALVE If the oxygen cylinder valve has not been opened then the mVolt outputs will not climb up to the expected values and the controller would display the following warning: NO OXYGEN, CHECK VALVE, NO CALIBRATION, NO DIVE. Opening the valve will allow the calibration to proceed. ! Warning Be aware - it is possible to fool the oxygen controller! After use there is a high oxygen content in the loop. If the oxygen valve has been turned off and a second recalibration is selected, the oxygen controller will recalibrate despite the fact that the oxygen cylinder valve is closed. This will give an inaccurate calibration. What is more, the dive is about to be commenced with the oxygen cylinder valve closed! You must ensure the gas mixture in the loop is close to 0.21 bar before calibration! This is easily done by either breathing from the loop or by flushing with diluent. 6.9 Cell Stuck Screen Display - CELL STUCK This is displayed if the oxygen controller has seen no change in millivolt reading from a cell during calibration. Flush the loop with air and then do the calibration again. If the same error message is displayed the cell must be replaced before diving. 6.10 Out of Range Screen Display - OUT OF RANGE This is displayed during calibration if one or more cells’ output voltages are too low or too high. This prevents diving with cells with abnormal readings at atmospheric pressure and also prevents inadvertent calibration whilst underwater. - 44 - CELL n FAILURE OUT OF RANGE CELL n FAILURE NO CALIBRATION REPLACE NO DIVE Should this occur, DO NOT dive, check the O2 % in the oxygen cylinder with a separate analyser, check the atmospheric pressure and check the cell output in air by placing a digital DC voltmeter across the outside two connector pins. The output should be in the range 8 to 13.5 mV. 6.11 Flushing Bag Screen Display FLUSHING BAG 0.34 0.27 0.40 The flushing bag process lasts until the cell outputs are stable. Once the controller is satisfied with the cell outputs then the CALIBRATING message is shown. Screen Display 6.12 Master Screen Display: CALIBRATING MASTER 0.70 0.71 0.69 0.70 Once calibrated the display shows MASTER 0.70 on the top line and the three calibrated outputs from the three cells below. These should all agree within ± 0.02 bar. This is called ‘DIVE MODE’. 6.13 Slave Once the Master is in DIVE MODE and the solenoid is closed for 5 seconds, the SLAVE Oxygen Controller changes from “Waiting for Data” to SLAVE MODE. Screen Display: SLAVE WAITING FOR DATA SLAVE 0.70 0.71 0.69 0.70 Once in SLAVE MODE it behaves as an independent, self-powered, secondary display. It calculates the ppO2 using the data it takes from the oxygen cells. It is common to see the Slave display varying from the Master display by as much as 0.01bar because of calculation rounding. - 45 - 6.14 Verification of ppO2 Rule No.1 with any rebreather is “KNOW YOUR ppO2 - know what you are breathing”. Never, ever, breathe from a rebreather unless you know what you are breathing. There are three ways of knowing your ppO2 when diving a Closed circuit system. i) Breathe from a pre-analysed open circuit supply. i.e. don’t use a rebreather ii) Look at a ppO2 display or iii) Flush the loop with fresh gas, usually a known diluent that is life sustaining at your depth. Methods (i) and (iii) we can use in emergencies, so in normal use we have to use the ppO2 display to warn of changes in ppO2 . The ppO2 you breathe is important not just for keeping you alive but slight reductions in ppO2 may cause you to suffer decompression sickness ( you’ll get a bend). Hopefully by now, you understand the importance of looking at the ppO2 display, so now it is important to verify that the display is giving you accurate information. 6.14.1 Indicators to look for during calibration i) Cell Reaction time?: Start with air in the loop. As oxygen is injected during calibration compare the three cell displays to see whether they are all changing value at the same rate. If you have a slow reacting cell, then it will result in a “cell warning” during the dive, especially during diluent flushes. ii) Cell values prior to the “calibrating” message shown on the display: The cell readings must be stable for a calibration to occur. Just prior to “calibrating” being shown on the display, read off the values for all three cells and make a note of them - perhaps in the back of this manual. The cell values are likely to be different and should lie between 0.7 and 1.35. When you do the calibration, compare these “end” values with those recorded in your manual. In this way you can see whether the sensor face is occluded or if the cell is starting to deteriorate (as we expect them to near the end of the cells life). iii) Cell Evaluation During Calibration: When they are new, the Oxygen cells used in the INSPIRATION have an output of between 7.6 and 13 mVolts. With the new cell validation routine, the calibration will be discontinued if the cell’s output is outside the range 7 to 13.5 mVolts. If you see “cell out of range” on the display, the cell MUST be changed prior to diving. If both handsets are switched off, accidentally or on purpose, whilst underwater, an option to calibrate will be displayed. Either - “Calibrate Y or N” or “Must Calibrate Y or N” - you MUST select “No”. If you accidentally say “Yes”, simply switch off and then switch back on again, go through the selections until you reach the option to calibrate again. This time select “No”. If you leave it to do the calibration the “Cell out of range” message will be shown, “No calibration”. This prevents accidental calibration whilst underwater. At this point you should shut the handsets down and either go onto open circuit or go through the switch on routine again, being sure to select “No” to the calibration question. Please be aware though that during all this the oxygen pressure is not being maintained by the oxygen controller, the ppO2 is dropping in the loop as you breathe - so do not spend too long adjusting, get the display back into dive mode where Master 0.7 is displayed on the top line. - 46 - The reason why you MUST NOT calibrate underwater : During calibration a quantity of pure oxygen is flushed into the loop. If you are at 50m you will be breathing 6 bar ppO2! Convulsions will occur quite quickly. Do the calibration procedure only when you are on land, mouthpiece open, and NOT breathing from the loop. The previous versions of electronics do not have the software to actually stop you doing a calibration underwater so on these models, it is a limitation of use that you must understand. YOU MUST NOT CALIBRATE UNDERWATER ! iv) Time taken to calibrate: Due to the fact that the cell readings must be reasonably stable for a calibration to take place, the time taken to calibrate will vary depending on the ppO2 in the loop prior to calibration. A lower ppO2 at the start (0.21) will result in a longer calibration time than when starting with a higher ppO2 in the loop. It is best to start with air in the loop and so you get a good indication of how the cells are reacting to changes in ppO2 . 6.14.2 Periodic Calibration Check During constant depth phases of the dive the ppO2 at the mouthpiece is held within a very tight band, typically within ± 0.02 bar of the mean. (You will see bigger swings on the displays because they show the oxygen pressure in the mixing chamber (the scrubber lid)). However, the accuracy of the mean ppO2 depends on the calibration information you give it. If you enter the wrong values, the ppO2 will still show that the oxygen level is around the setpoint (1.3) but the true O2 pressure will be offset from the displayed value and this could be dangerous. The degree of danger depending on the value of the offset and on the type of dive you are doing. If you are doing a “push it to the limits” decompression dive, then you may get bent. The accuracy of the calibration depends on the percentage of oxygen in the cylinder and the injection rate of O2 into the scrubber lid. The oxygen injection varies slightly from rebreather to rebreather but is something that is easily checked. After calibration open the mouthpiece slightly and operate the oxygen inflator. Keep pressing the button until the ppO2 stops rising. Release the button and wait for 5 seconds before reading the values on the display. These should be reading the same as the atmospheric pressure. Often, the readings will be slightly higher than that, so switch off the handsets, flush the system with air and do the calibration again. This time entering a lower oxygen % than you did last time. Repeat until you find the correct oxygen % to enter for your rebreather. Once you find the correct oxygen% to enter for your rebreather, use that value from them on. Test it again at monthly intervals and test whenever you change oxygen supplier or have any reason to doubt the percentage of oxygen in the mixing chamber. Important: the oxygen % asked for is the oxygen % in the mixing chamber ( the scrubber lid), NOT the oxygen % in the cylinder. This method improves the accuracy of the ppO2 display but you should continue to use values of setpoint ± 0.05 bar for calculating decompression and oxygen toxicity. e.g. If the setpoint is 1.3, use 1.25 for deco planning and 1.35 for oxygen toxicity planning. This takes into account other factors that affect the accuracy, such as humidity. 6.14.3 Linearity Check The oxygen cell output is linear at the oxygen pressures we breathe, but nevertheless it is prudent to check the linearity periodically and especially after a scrubber flood and clean up. Flush with oxygen, see if the ppO2 reaches the atmospheric pressure and then flush with air and see if the - 47 - display reads 0.21 bar. Any variation outside the range 0.19 to 0.23, the cells should be considered faulty and should be removed for further analysis. Following this, leave the electronics switched on with a setpoint of 1.0 bar, close the oxygen cylinder valve, close the mouthpiece and leave for 20 minutes. If the ppO2 decays rapidly, despite there being no gas addition to the loop, and no leaks in the loop then again the cells can be regarded as having come to the end of their life and must be exchanged before diving. 6.14.4 Checks prior to each use Prior to diving, press the diluent inflation button. The displayed ppO2 values will drop. Check that all cells change value quickly (a slow change indicates moisture on the front face of that cell). Once the ppO2 drops below 0.4 bar the low oxygen warning will display and the warning buzzer sounds. After a delay of up to 6 seconds, the oxygen solenoid will open and O2 will be injected to bring the ppO2 back up to and just over the set point of 0.70 bar. Check to ensure that all 3 sensors reach the 0.70 bar set point without any individual cell lagging behind the others. Manually inject oxygen and ensure that all 3 cells reach atmospheric pressure without any individual cell lagging the others, have similar values and react at roughly the same speed. During the pre-breathe sequence ensure the ppO2 values drop as you exhale into the loop and then ensure all cell values are brought back to setpoint as oxygen is injected. 6.14.5 Verifying the ppO2 during the dive The computer makes the assumption that the nearest two cells must be correct - it is a simple voting logic system. However, do not be lulled into thinking the same way as the computer. For each of the three oxygen cells, the cell’s mVolt output is simply converted to a ppO2 and is shown in real time. Because the INSPIRATION displays raw data in real time, the reaction time of the display is instantaneous and this “reaction rate” is a good visual indicator as to the health of the oxygen cells and electronics. Remember this: As the ppO2 in the loop changes - the display for all 3 cells SHOULD change ! Check on every dive to see if all cells are reacting to gas changes. By forcing changes in ppO2 you can examine the health of the cells at any stage of the dive. Simply add a little oxygen to bring the ppO2 0.05 to 0.1 bar above the setpoint and then add a little air/diluent which should lower the ppO2 below the setpoint. This proves whether or not all three cells are responding to changes in ppO2 and are capable of displaying above and below the setpoint. - 48 - If any cell refuses to display above the setpoint, the dive MUST be aborted and the cell replaced. If they are all the same age - replace all three. Additionally the ppO2 values may be checked during the dive by flushing with O2 in the shallows (less than 6m) or by flushing with air/diluent when deeper. At depth you expect the following ppO2 when you flush with air: 10m - 0.42 bar 20m - 0.63 bar 30m - 0.84 bar 40m - 1.05 bar 50m -1.26 bar. It is advisable to write the ppO2values for your diluent for every 10m on your decompression slate. This is used as a rough check to see which sensors are giving proper readings should you ever be in any doubt regarding the displayed information. It can only be regarded as a rough check because of the variations between depth gauge readings and different divers’ abilities to do effective gas flushes but nevertheless it is still an excellent check and at the same time changes the ppO2 in the loop to a known value. - 49 - SECTION 7 DIVE MODE When first breathing on the INSPIRATION, a rapid drop in ppO2 will be seen. This occurs because the exhaled breath contains about 17% oxygen. It will take about 3 minutes of breathing to bring the ppO2 of both the lungs and the breathing loop to a steady state 0.70 bar. Due to the response time of the cells there may be up to a 6 second delay before the solenoid is actuated to inject oxygen into the loop. Once at the setpoint the controller will maintain the ppO2 very close to the setpoint. In independent tests it is proven to be maintained within ± 0.02 bar during the dive. During ascent the ppO2 will drop due to decreasing ambient pressure but steady state setpoint is achieved at the mouthpiece within 20 seconds of reaching a decompression stop. 7.1 High/Low ppO2 Setpoint Switch (Master Oxygen Controller only) By selecting a LOW setpoint (0.70 bar) the diver can descend with less risk of the ppO2 spiking high. By switching to a HIGH setpoint (1.30 bar) decompression obligations can be minimised. When in dive mode, pressing and holding the middle button of the MASTER for two seconds will switch the Setpoint from LOW to HIGH. Releasing and pressing for another two seconds will switch back to the LOW setting. This 2 second hold time is to help prevent accidental operation during the dive. MASTER 0.70 0.71 0.69 0.70 Low setpoint dive mode (press and hold the centre button for two seconds) MASTER 1.30 0.71 0.69 0.70 High setpoint dive mode, when first switching over. (oxygen is now injected until the ppO2 reaches 1.30 bar) MASTER 1.30 1.29 1.30 1.29 (press and hold the centre button for two seconds) MASTER 0.70 0.71 0.69 0.70 High setpoint dive mode (The ppO2 will only reach the 1.3 bar setpoint, providing you are deeper than 3m.) Low setpoint dive mode As mentioned Warning: earlier selecting the HIGH setpoint when at the surface, will result in oxygen being injected to bring the ppO2 in the loop up to meet the HIGH setpoint. If the HIGH setpoint is set above the ambient pressure the controller will continue to inject oxygen until either the LOW setpoint is selected, the power is switched off or the INSPIRATION runs out of oxygen or battery power! i.e. 1.3 bar in the loop cannot be achieved until the apparatus is deeper than 3 m! When surfacing the low setpoint should be selected between 6m and the surface, depending on the value of the high setpoint. - 50 - 7.2 Slave Oxygen Controller 0.71 SLAVE 0.70 0.69 0.70 In Dive mode, the slave, independent of the Master, calculates the ppO2 from its own readings of the oxygen cells and the master displays the ppO2 in real time. The slave monitors the master and takes control of the solenoid operation should the Masters Processor stop e.g. if the Master is switched off or the power to the Master fails. The white slider buttons on the Slave ONLY activate the backlight and the Slave switch off. The setpoint cannot be changed using the Slave buttons. 7.3 Backlight Backlight activation is done by pushing any white slider towards the screen and releasing it. By pushing the left slider the backlight is activated for 5 seconds. By pushing either the centre slider or the right slider (NOT BOTH) towards the screen, the backlight is active for 15 seconds. Use of the backlight reduces the battery life. The brightness of the backlight can be adjusted to allow for varying climatic and ambient light conditions. Increasing the brightness reduces the contrast. Alteration of the brightness/contrast setting has no effect on the battery life. Turning the brightness up to maximum in some conditions will make it impossible to read the display due to insufficient contrast between the figures and the background. Turning the brightness down to minimum in some conditions will result in black squares being displayed making it impossible to read the figures. A good starting point for UK conditions is to set the brightness between 20 and 40. The Brightness is an option in the Menu Mode. You enter the Menu Mode on the Master when the low setpoint is selected and by pushing the left and right sliders (the outside two) simultaneously towards the screen. See Section 8. If both Master and Slave are on when you adjust the brightness the new value will not be stored for future dives. In order to make a permanent adjustment to the brightness, have only one handset switched on, alter the brightness, leave for 30 seconds, switch off, switch on the other handset and set the brightness on that one to the desired setting. Leave on for at least 30 seconds and switch it off. The new values for each handset will then be stored for future use. If you do use the brightness adjustment underwater, please remember oxygen is not being added when you are in the Menu mode so the ppO2 is dropping all the time, dropping slowly but still dropping. Do not spend too long adjusting the brightness, get it done and get out of the Menu mode. The Menu mode has a time out, if you don’t press a button for 15 seconds you are automatically bounced out to Dive mode, so please don’t keep pressing one button every 14 seconds. Eventually, you will just go hypoxic. Slave - Previously the sliders on the Slave didn’t have any purpose. Now they operate the backlight for the slave. - 51 - SECTION 8 MENU MODE By using the Menu mode you can alter the high and low setpoints and you can reset the Elapsed ON Time timer. The default setting are 0.70 bar for the Low setpoint and 1.30 bar for the High setpoint. Once the Master controller is in dive mode with the LOW sepoint selected, the menu system may be entered by pressing and holding the left and right buttons simultaneously. This can be done underwater if necessary but only when the LOW setpoint is selected. When in menu mode, the controller is not controlling the ppO2 in the loop so there is a time limit on this operation of 15 seconds from last button press. Exceed 15 seconds and it will automatically switch to Dive Mode. (press the outside two buttons simultaneously) Important Notes: 1) The default settings are re-instated every time the oxygen controller is turned off, so if you change the setpoints for one dive and require those same setpoints for the next dive then you will have to change the settings again. HIGH SETPOINT Down 1.30 Up 2) The Slave controller takes the setpoints from the Master automatically. So, if you change the setpoints on the Master unit then there is no need to alter the setpoints for the Slave. MASTER 0.70 0.69 0.71 0.70 (adjustment range: 1.0 Bar to 1.50 Bar) (Enter by pressing the center button) (adjustment range: 0.50 bar to 1.0 bar) (adjustment range: 0-99, 30 recommended. As the brightness decreases the contrast increases) LOW SETPOINT Down 0.70 Up 4) To prevent the unit accidentally entering the Menu mode whilst underwater, the Menu mode is only accessible when the controller is in the LOW setpoint dive mode. BRIGHTNESS Down 30 Up 5) The advanced user can change the setpoints underwater. The unit must be switched to the LOW setpoint. Whilst in the Menu mode the oxygen controller is not monitoring the oxygen level and not maintaining the ppO2. Therefore, there is a time limit of 15 seconds for each phase. If you have not pressed a button for 15 seconds the display automatically reverts back to dive mode and automatic oxygen control. Elapsed ON Time 2 hrs 23 mins 2.5 secs. RESET NOW? Yes No Elapsed ON Time 00 hrs 00 mins MASTER 0.70 0.69 0.70 0.69 3) The two outside buttons must be pressed at the same time, within 0.5 seconds of each other. It is the action of pressing them, not holding them down that activates the Menu mode. So if you are unsuccessful, ensure you are in the LOW setpoint mode, release both buttons and press them both again, simultaneously. 6) The timer increases only when the unit is switched on. The timer does not reset when you switch off the unit. In this way, the timer shows the total time that the unit has been switched on since it was last reset by the user. The timer can only be reset from the menu mode. If the timer is never reset, the timer will reach a maximum of 255 hours, and stay on 255 hours, and the minutes will reach 59 and then start again at 00. When the timer is reset both handsets must be ‘on’ for two minutes before switching off. The memory is updated only once per minute, so if the handsets are switched off the timer will not reset. DIVE MODE - 52 - SECTION 9 WARNINGS AND REMEDIES 9.1 Low Oxygen Warning Screen Display – LOW OXYGEN 0.39 0.38 0.39 BEEP The LOW OXYGEN warning is activated when the ppO2 drops to 0.4 bar. The buzzer sounds and the display flashes LOW OXYGEN for one second, flashing back to the dive mode where the setpoint is displayed for one second, then the buzzer will sound again and the LOW OXYGEN warning will be displayed. The display will continually alternate until the ppO2 rises above 0.4 bar. In dive mode at the surface, this can be tested by flushing the loop with diluent forcing the ppO2 below 0.4 bar. The warning will be displayed and the buzzer activated until the oxygen controller returns the ppO2 to above 0.4 bar. A Actions to take when LOW OXYGEN is displayed and buzzer sounds: Low oxygen can occur for a number of reasons. The most likely cause is that the oxygen cylinder’s valve is closed. The oxygen contents gauge will register empty if that is the case. Simply opening the valve may cure the problem. A second possibility is that all the oxygen has been consumed - check the pressure gauge. If the pressure gauge shows empty and the cylinder valve is definitely open, injecting diluent into the loop will rapidly bring the ppO2 up to reasonable levels. It is easy to flush the loop with diluent by pressing the diluent inflator at the same time as pulling the exhaust valve’s dump knob. If there is oxygen in the cylinder but it is not being supplied to the loop by the oxygen controller and solenoid, the best way to increase the ppO2 is to use the oxygen bypass/inflator located on the exhale counterlung. If this situation arises do not panic - there is sufficient time to recover the situation. MOST IMPORTANTLY you should NOT ascend immediately. During ascent the ppO2 in the loop will drop extremely quickly. Ascent from 30 m straight to the surface, starting with only 0.4 bar in the loop would result in unconsciousness before reaching the surface! 9.2 High Oxygen Warning b Screen Display – HIGH OXYGEN 1.61 1.65 1.63 BEEP The HIGH OXYGEN warning is set at 1.6 bar. Actions to take when the HIGH OXYGEN warning is displayed Look at the display to assess whether the ppO2 has momentarily spiked because the descent was too rapid, or if the ppO2 is climbing rapidly. If it is climbing rapidly, close the oxygen cylinder valve and flush the loop with diluent to reduce the ppO2, by operating the pull cord dump valve and the diluent inflator simultaneously, then breathe again. When reopening the cylinder valve - 53 - observe the ppO2. If it climbs rapidly again it is probable that the solenoid valve is jammed open and the oxygen cylinder valve must be closed again. Open and close the valve in short bursts to manually control the ppO2. The rebreather may be used in this manner for as long as necessary but open circuit bailout should be considered. It is advisable to only open the oxygen cylinder valve by one or two turns. It can then be closed quickly if required. However, if you breathe from this cylinder via the open circuit 2nd stage at 6 m and shallower, higher gas flows will be required and the valve will need to be opened more fully. 9.3 “Cell warning”, early versions called this “Cell Error” A Cell Warning occurs if one cell deviates from the average of the closest two by more than 0.15 bar. The Cell Warning test is disabled when the solenoid is operating. This keeps the nuisance beeps to a minimum. CELL WARNING 1.30 1.29 0.0 BEEP This display would tell you that there is a faulty connection to cell 3. This system works fine in the event of you experiencing one faulty cell. But, in the case of having two faulty cells then it is very important to be able to interpret what the display is telling you. 9.4 Two faulty cells occurring simultaneously, resulting in low oxygen or high oxygen risks Low Oxygen Risk CELL WARNING 1.31 1.00 1.30 BEEP With a setpoint of 1.30 for example, If two cells are stuck on 1.31 and 1.30, the assumed ppO2 is 1.305 so the solenoid will not open. As you continue to breathe the ppO2 drops and the warning buzzer will sound when the third cell is 10% adrift. The warning buzzer will sound for 1 second, then go off for 1 second, then on for 1, then off for 1 for as long as the cell is adrift from the other two. DO A DILUENT FLUSH. Consider bailout. - 54 - High Oxygen Risk Partial CELL WARNING 1.65 1.28 1.30 Partial BEEP With a setpoint of 1.30 for example, if two cells are stuck on 1.28 and 1.30, the assumed ppO2 is 1.29 so the solenoid will open. As you continue the actual ppO2 will rise and will be indicated by the one good cell rising in value up to a maximum displayable figure of 2.55 bar, above this the actual ppO2 will depend on the depth you are in (e.g. 5 bar in 40m!). Remembering that the Cell warning function is inoperative when the solenoid is open, the warning buzzer will only sound when the solenoid is closed. Knowing the closing and opening sequence of the solenoid helps here. The controller always closes the solenoid for 6 seconds before making another decision whether to open the solenoid again, so in this instance it is only in these 6 second closed periods that a cell warning will be displayed and buzzer activated. The fact that the solenoid is operating too often and the fact that it is giving you a buoyancy control problem are also good indicators that all is not well. DO A DILUENT FLUSH. Consider bailout. 9.5 Low Battery LOW BATTERY BEEP Should a Low Battery warning occur on the Master during the dive it is quite in order to manually switch off the Master unit. This would cause the Slave to become the Master and assume control of the solenoid and ppO2 in the breathing circuit. If the original Master is switched back on, it will start up as the Slave and act as a secondary display which requires very little power compared to the Master which provides the power for the solenoid. You should consider aborting this dive and it is important to change the battery before the next dive. 9.6 Master Oxygen Controller - Power Failure BEEP BEEP 9.7 Providing both Master and Slave are in Dive mode - If the power to the Master fails completely, the Slave display would automatically take over as Master. This is accompanied by a double “Beep” as the Slave becomes the Master controller. Reset other unit RESET OTHER UNIT This is displayed in the Slave display if the Master has failed as a Master but is still switched on and you turn the Slave off then on again. If this occurs, follow the screen instruction - Reset other unit, by turning it off then on again. Remember: if you are underwater select “NO” to calibrate. - 55 - 9.8 Error Assessment The display alternates every second between the error message and the Dive mode. If more than one error exists then the display alternates between the errors and the dive mode. For instance, if there is a cell error and a low battery at the same time the display would alternate as follows: Master dive mode, Cell Error message, Master Dive mode, Low Battery message, Master Dive mode etc. When the error is displayed the buzzer is active! - 56 - SECTION 10 MAINTENANCE This must not be undertaken without prior training! ! Warning Do not alter or modify the apparatus in any way without prior written approval from Ambient Pressure Diving Ltd. Any such action may affect the effectiveness of the apparatus and may affect the warranty. 10.1 CO2 Absorbent Replacement The CO2 cartridge is easily refilled by the diver. The normal weight of Sofnolime required is 2.45kg of 1-2.5mm (8-12 mesh) granule size. Use Sofnolime 797-Diving Grade, preferably “non-colour indicating”. The procedure for replacing the Sofnolime is as follows (refer to illustrations on following pages): a) Remove the CO2 scrubber canister from the casing. Unscrew the 4 chromed securing nuts and remove the lid complete with the hoses. b) Remove the spacer ring and the O ring. c) Using the retaining nut on top of the cartridge pull the cartridge from the canister. d) Empty the used Sofnolime into a suitable container for disposal. e) Ensure the filter is clean before refilling. Fill the cartridge to about halfway. Whilst filling tap the canister gently on four sides to aid settling. Continue to fill to within 6 mm of the top edge. f) Place filter sheet next to the Sofnolime and replace the pressure spider. Screw retaining nut on hand tight only. Tap the sides of the cartridge to settle the Sofnolime and tighten the retaining nut until the pressure spider is flush with the top of the cartridge. Overtightening will crush the Sofnolime. g) Before re-inserting the cartridge check to see if the bore of the canister where the O ring will seal is clean and damage free. Carefully re-insert the canister ensuring that you do not scratch components. h) Inspect the loose, large O ring for damage and ensure it is lightly lubricated. This O ring is extremely important it prevents CO2 bypassing the Sofnolime. Place the O ring in the chamfer on top of the cartridge and the large plastic spacer ring on top of the O ring. i) Replace the lid of the canister aligning the recess in the lid with the down pipe on the side of the canister. Fasten the four retaining bolts hand tight so the faces of the lid and the scrubber body are butted against each other. Over-tightening will result in damage to the body. Under-tightening will result in the unit leaking. - 57 - ! Warning The O ring which fits between the cartridge and the pressure ring, prevents CO2 in the expired gas from bypassing the Sofnolime. If the bore is scratched, the O ring is damaged or not lubricated or not replaced after a service, then CO2 will be inhaled! Further Precautions: Do not attempt to partially fill the cartridge. It must be filled completely otherwise the spring loaded packing system will not function, which can result in absorbent material falling out of the cartridge. Do not leave the cartridge open to the atmosphere and expect the Sofnolime to be effective enough for diving. Instead, once it is certain the scrubber cartridge is dry inside, seal it up by inserting it back into the canister, reconnecting all the hoses and breathing bags, and be sure to remember to close the mouthpiece! Sofnolime is mildly alkaline so appropriate safety measures should be implemented. Protective gloves, goggles, overalls and nuisance dust masks should be worn when handling Sofnolime granules irrespective of whether they are in a fresh or used state. The granules or any entrained dust should not be allowed to come into prolonged contact with the skin and contact with the mucous membranes and the eyes must be totally avoided. Residual or waste Sofnolime will contain some residual alkalinity but can normally be disposed of at a suitable landfill site. Granules will bleach boat decks, so avoid spilling and be sure to clean up afterwards. Always inspect the cartridge prior to diving. - 58 - Removing the CO2 Scrubber and Sofnolime Cartridge Unscrew the scrubber hose fittings at the Tpiece Unscrew the lid securing nuts. Remove lid by pulling upwards Remove spacer Squash the hoses to remove them from the casing Remove large O ring ! Warning:Handle With Care & keep safe Remove the cartridge Turn the cartridge over and unscrew the retaining nut Remove scrubber, hoses and electronic units from the casing Remove the spring/ pressure plate assembly - 59 - Refilling the Sofnolime Cartridge Ensure there is a 6mm gap at the top Ensure the filter scrim is clean and undamaged. Push it into the cartridge as far as it will go Ensure the scrim is clean and undamaged The filter scrim must be located properly in the bottom with no gaps around the edges or the centre column. Its purpose is to retain the Sofnolime granules and keep water out Store Sofnolime in the manufacturers sealed containers, following their storage instructions Fit the spring loaded pressure spider Fasten the centre hand wheel Fill to approximately half way and tap gently on the sides to level the granules Do not over-tighten Fill to within 6mm of the top and tap gently on the sides to level the granules - 60 - Mistakes to avoid when filling the sofnolime cartridge Do not overfill. Over-filling combined with over-tightening makes the sides of the cartridge bulge and prevent the springs from pushing the cartridge against the O ring Do not under-fill, this allows CO2 to by-pass the whole cartridge as pressure is no longer applied to the O ring Do not over-tighten If you over-tighten it the top may distort and may come adrift from the parallel sides. If this happens return to the factory for repair - 61 - Re-fitting the Cartridge and Complete Scrubber Assembly Ensure the O ring seal on the canister lid is undamaged, clean and properly located After inspecting the bore for damage or dirt - Insert the cartridge carefully taking care not to scratch any components Slide the canister lid on carefully Push down and ensure the cartridge is free to move up and down and check for the spring loading effect of the pressure spider Fasten the four screws gently and evenly until the mating surfaces join. Do not use excessive force at any time Ensure this O ring is undamaged, clean, lightly lubricated and properly located Check the top of the cartridge for dirt or damage and place O ring on top, inserting it into the chamfered groove around the top of the cartridge When re-inserting the scrubber assembly ensure the Velcro band passes between the scrubber wall and the down pipe Ensure the spacer ring is clean and undamaged and place carefully onto the O ring - 62 - The scrubber locates on the back frame and is held in place by the Velcro band. The inlet pipe MUST sit underneath the cylinder against the backframe. Squash the convoluted hoses to insert them into the back frame, ensuring they spring back into shape and do not impede the gas flow. Ensure the breathing hoses are not kinked where they pass through the back casing Re-fasten the hoses. Nip them up hand tight. Excessive force does not improve the sealing effect 10.2 Gas Cylinders The two gas cylinders are each secured to the carrying frame by a single band in the centre of the cylinder. When securing the cylinders into the carrying frame - pass the band through just one of the slots in the buckle, tighten the band and fasten the Velcro. Do not use cylinder mesh or other protective cover on the cylinders. The band and rubber antislip pads must be in contact with the painted cylinder surface to function properly. The oxygen cylinder is located on the right hand side of the user and the diluent on the left. The diluent cylinder will be on the same side as the buoyancy compensator’s inflator. Both cylinders are marked according to their contents. From new, the oxygen cylinder and oxygen components, such as the first stage, hoses, contents gauge and inflator, are oxygen clean and compatible. ! Warning It is recommended that the condition of the cylinder is assessed at 6 monthly intervals. In particular, if the oxygen cylinder is contaminated with salt water then it must be cleaned without delay otherwise corrosion will rapidly occur in an oxygen rich environment. The diluent cylinder, first stage and components, however, are NOT oxygen clean as the diluent used is normally compressed air. If it is intended that this rebreather is to be used with a Trimix - 63 - or Heliox diluent and the fill method is by partial pressure blending, then it will be necessary to oxygen clean both the cylinder and cylinder valve. Contact Ambient Pressure Diving, as some of the valve components and the lubricant must be replaced. 10.3 First Stages After closing the cylinder valve and purging the hoses, unscrew the DIN handwheel. If this is difficult, ensure all the pressure is released from the system. In time you will need to re-lubricate this connection - only use an oxygen compatible grease. DO NOT USE SILICONE GREASE OR OIL. Un-do the webbing band Both the oxygen and diluent cylinders use a first stage pressure reducer. Both are marked accordingly and must not become mixed up. i.e. do not use the oxygen 1st stage on the air cylinder and vice versa. The oxygen 1st stage has been specially prepared using oxygen compatible O rings and lubricants - the diluent cylinder has not. It is only prepared for use with Normoxic gas (21% oxygen). The practice of relying on the diver inserting the correct valve into the correct cylinder is common in the technical diving communities on both sides of the Atlantic, the DIN thread being the preferred connection. The responsibility for connecting the 1st stages to the correct cylinders is the responsibility of the diver - YOU. Both are adjustable diaphragm types but the following set up pressures must be adhered to when servicing: Oxygen 1st Stage - Interstage Pressure: Diluent 1st Stage - Interstage Pressure: 7.5 bar. Under no circumstances must the interstage pressure be increased above 8.0 bar! The interstage pressure should be adjusted with only 50 bar in the cylinder. 9.2 to 9.5 bar. The interstage pressure of the diluent cylinder may be altered to suit the open circuit 2nd stage fitted - maximum pressure - 13 bar. - 64 - 10.4 LP Oxygen Hose Connect the low pressure (8 bar) oxygen hose to the solenoid valve in the top of the scrubber. Finger tighten using the knurled ring. DO NOT USE A WRENCH - It is extremely common for divers to use far too much force. Over-tightening does not improve the seal, it simply risks damaging other components. 10.5 Post-Dive Maintenance The breathing bags and mouthpiece should not be completely stripped down after every use. You are more likely to create problems for yourself. 10.5.1 Cleaning and Disinfecting the Unit We advise users to disinfect their rebreather after each day of use. Only in this way can its cleanliness be ensured. However, disinfecting involves some disassembly and if not carried out with care, leaks may be introduced into the system during re-assembly. It is important that leaks are rectified if the reliability and integrity of the system is to be restored. If the rebreather is shared with another diver the system should be thoroughly disinfected before use. After each dive the mouthpiece should be rinsed in fresh water, taking care not to allow large quantities of water to enter the loop. Providing the rebreather is standing upright, all the water will enter the exhale counterlung and this is easily drained. Take care not to allow too much to enter while the scrubber hoses are still connected. At the end of each day’s diving remove the hose and the mouthpiece as an assembly, rinse in a disinfectant solution such as BUDDY Clean and rinse thoroughly in warm fresh water. ! Warning Do not use solutions of Milton or other baby bottle sterilising solutions. These discolour and rot the inner and outer bags. After every 6 hours total diving, disinfect the mouthpiece, hoses, counterlungs and inside the canister. Inspect the counterlungs for foreign matter. The outer bag of each counterlung has a zip to aid inspection of the inner. Do not leave components soaking in cleaning solution for more than 30 minutes. 10.5.2 BUDDY Clean Disinfectant BUDDY Clean Disinfectant has been specially formulated for its ability to destroy a wide variety of bacteria, viruses and fungi including Legionella, Weil's disease, Tuberculosis, HIV and also for its very low hazard risk. See Appendix 5. 10.5.3 Lubrication It is essential when lubricating seals or O rings on the rebreather and oxygen valves, that an oxygen compatible grease is used. Recommended greases include Fomblin RT15, Halocarbon 25-5S grease and Oxygenoex FF250. - 65 - 10.5.4 Washing and Disinfecting the Breathing Circuit with BUDDY Clean Repeat the process, thoroughly flushing the counterlungs with fresh water Unscrew the rear most hoses from both T-pieces Spray or pour BUDDY Clean disinfectant into the T-piece Remove the hoses and spray or pour disinfectant into the inhalation hose With the mouthpiece closed, use a clean hose to fill both counterlungs with warm, fresh water Use a clean hose to flush through with warm, fresh water Unscrew the inflators, taking care not to lose the O rings Spray the mouthpiece with disinfectant and thoroughly flush through. Do this with the mouthpiece open and closed to wash the water drain Always check the non-return valves for proper operation after washing. (see Section 4.3) - 66 - 10.5.5 Oxygen Sensors If, after the dive, water is suspected to have entered the scrubber then the unit must NOT be stored horizontally. To do so will result in the oxygen cells and the battery compartment becoming soaked. Should this occur the cell face should be washed in warm fresh water, the batteries removed, any residue removed and the lid air dried. 10.5.6 Exchanging Oxygen Sensors Oxygen sensors are a consumable item and should be replaced regularly. The life of a sensor varies with the temperature and the ppO2 it is exposed to; assuming they don’t fail due to vibration, shock, fast pressure changes or external force. The higher the temperature or the higher the ppO2 the oxygen cell is stored at, the shorter the life of the cell. Simply leaving the oxygen cells in the lid at a temperature between 5oC and 25oC in AIR is sufficient to aid a reasonably long life. Typically in the rebreather application, oxygen cells should be replaced when they are between 12 and 18 months old. Beyond this period the diver should pay particular attention to the linearity checks above the working setpoint. i.e. ensure the displays will reach 1.4 bar when the setpoint is 1.3 bar. To replace the oxygen cells it is necessary to remove the scrubber from the rebreather, remove the outlet hose from the lid and remove the cell holder/battery box assembly from the scrubber lid. Remove the blue indicator ring. ! WARNING: (Be sure to re-fit the blue indicator ring afterwards; it’s not just there as a hose connection colour guide, it also acts as a slip ring between the hose nut and the cell holder retaining nut and essentially helps prevent the two nuts locking together when you tighten the hose fitting. If this is not in place there is a risk of you unscrewing the sensor holder from the lid when you routinely remove the hose.) Use the special tool (AP203) which is supplied with each rebreather to unscrew (anti-clockwise) the cell holder retaining nut. - 67 - Once the retaining nut is removed gently pull the cell holder assembly from the lid. ! WARNING: Do not attempt to unscrew the oxygen cells without disconnecting the wires. ! WARNING: Do not pull on the wires Pull the red cover off the back of the cell, sliding it back up the wire. Pull out the black locking device, leaving the connector still attached. Hold the locking leaf moulding away from the white connector body and gently pull on the white body, NOT on the wires. Once disconnected the oxygen cell is free to unscrew and be replaced. Sometimes the oxygen cells are supplied with an O ring on the M16 thread – this is not required and could be removed. The original oxygen cells were installed with a blue or white extension tube fitted to the front face. These components are no longer required with the new cells and should be discarded. ! WARNING: Only oxygen cells supplied by Ambient Pressure Diving should be used. Most oxygen cell manufacturers think they manufacture a replacement for the ones used in the INSPIRATION but no oxygen cell manufacturers have a complete understanding of the requirements for oxygen cells in the INSPIRATION, whether it be environmental conditions, methods of use or the static and dynamic requirements of the INSPIRATION electronics and it is only with extra quality assurance performed at Ambient Pressure can the oxygen cells be determined as “fit for purpose”. Several accidents have occurred due to the diver fitting nonAmbient Pressure Diving supplied oxygen cells. - 68 - Re-assembly: 1) Carefully screw the replacement oxygen cell into the holder, taking care not to cross the thread. 2) Inspect the gold pins in the white Molex connector looking for poor connection to the wires, discoloration of wires or pins, or misshapen pins. Only the outside two pins are used for cell voltage measurement. Gently tug on the wires and ensure the pins are held securely in the white connector body. If in doubt have new pins and connectors fitted. Contact the factory for details. ! 3) Re-attach the white Molex connector ensuring the small white lugs are around the retaining leaf. WARNING: ALWAYS screw the oxygen cell holder into the holder prior to attaching the white Molex connector. 4) Slide the black locking device into place using the minimum force. It is designed to only fit in one way and when correctly positioned, the white Molex connector should stand perpendicular to the back of the cell. If it is leaning over excess strain is be exerted on the cell’s pins and this may result in intermittent connection! 5) Push the red cover gently back onto the oxygen cells taking care not to put strain on the wires and their connections to the gold pins. 6) Inspect the O ring in the inside of the lid, checking for dirt or damage and replace if necessary. Lubricate lightly with silicone grease or oxygen compatible grease. 7) Insert the holder back into the scrubber lid ensuring none of the cables are trapped between the cell holder and the inside of the scrubber lid. ! 8) Line up the flat on the cell holder with the flat in the centre hole of the scrubber lid and whilst holding the fitting firmly and squarely against the inside of the lid, replace the retaining nut – always maintaining constant pressure to hold the cell holder against the inside of the lid. WARNING: Ensure the two flats stay in line. If the cell holder is allowed to twist round, it will be impossible to make this seal waterproof. 9) Tighten the cell holder retaining nut with the special tool and replace the blue indicator ring pushing it down to the lowest visible thread. ! WARNING: do a positive and a negative pressure test and check for leaks prior to diving. - 69 - 10.6 Storage The INSPIRATION should be stored upright or lying on its counterlungs. If you lay the rebreather on its back at the end of the dive then you risk water running onto the face of the no. 2 oxygen cell. This may result in a cell failure when you next switch the unit on and the oxygen controller will not enter dive mode - preventing you entering the water. Cell 2 should then be removed and allowed to dry naturally before use. Repeated or excessive soaking will reduce the life of the cell. The oxygen cells can be stored down to -20oC without consequence, unless freezing and thawing cycles are repeated, in which case the electrolyte seals may be damaged with the possibility of leakage of the electrolyte. Intermittent exposure to temperatures of 50oC are acceptable, though continuous exposure to high temperatures will shorten cell life. After cleaning, store the apparatus upright, out of direct sunlight, with the BC and counterlungs partially inflated, in a cool, (5-15oC), dry and dust free place. Avoid exposure to direct ultraviolet radiation and radiant heat. 10.7 Precautions when using High Pressure Oxygen Open valves slowly. Use only oxygen clean components and oxygen compatible materials. Ensure there is no oil or grease contamination. See Section 10.5.3 for suitable lubricants. 10.8 Service Intervals Maintenance is an ongoing task with all rebreathers and users must check for proper operation before every dive. Additionally some components must be serviced at periodic intervals: Diluent Cylinders: As supplied from the factory these are prepared ready for normal quality diving air and as such are NOT specially oxygen cleaned. The same applies to the cylinder valve. The inspection and hydrostatic testing regulations for this cylinder will vary from Country to Country. In the UK, the current requirements are for internal inspections every two years with a hydrostatic test each fourth year. Oxygen Cylinders: Supplied from the factory, these cylinders are oxygen clean. Although the legal requirement in the UK is for an internal inspection every two years with hydrostatic testing each fourth year, it is strongly advised to have this cylinder internally inspected every year. 1st stages: The 1st stages should be dive shop serviced on an annual basis. Auto Air: The Auto Air should be dive shop serviced annually. - 70 - Oxygen Cells: The life of the oxygen cells will vary from cell to cell and user to user. Between dives the loop should be flushed with air. Leaving the cells in a high oxygen % shortens the life of the cells dramatically. The cells should be replaced every 12-18 months. They should be replaced immediately if signs of deterioration are present, regardless of age. Under no circumstances should you use the oxygen cells beyond 18 months from date of manufacture. Oxygen cells constantly deteriorate and have a finite life, even in the sealed packaging. If you hold a spare oxygen cell this should be discarded 18 months from the date of manufacture even if unused. - 71 - SECTION 11 EMERGENCY PROCEDURES 11.1 Bail-Out (Emergency Breathing) Never dive without sufficient open circuit bail out During a dive, very little diluent gas should be used. Typically only about 30 or 40 bar will be consumed from the 3 litre cylinder. The diluent cylinder provides gas for counterlung volume during the descent, for lung volume adjustments throughout the dive, for BC inflation and for dry suit inflation. (If a Heliox diluent is used it is recommended that a separate cylinder is carried for suit inflation). Because so little diluent is used, the diluent cylinder may provide sufficient gas for bailout. To take advantage of this an Auto Air is fitted to the BC. The Auto Air is also an overpressure relief valve should the 1st stage HP seat leak. If the Auto Air is removed it must be replaced with a suitable open circuit breathing system and suitable overpressure valve. For emergency breathing at 6 m and shallower, an oxygen clean 2nd stage can be used to breathe from the 3 litre oxygen cylinder. However, an isolator should be fitted in the line so that the oxygen supply to this 2nd stage is normally switched off to prevent accidental gas leakage from this 2nd stage and also to help prevent your diving partner from accidentally using this mouthpiece at depths greater than 6 m. For extreme air dives and mixed gas dives the volume and type of bail out gases must be reassessed. For instance, you may decide to carry a 5 litre cylinder containing Bottom mix or 40% Nitrox or it may be best to carry two 7 litre cylinders hip or back mounted, one with Bottom mix and one with 80% or, depending on the dive scenario, it may be better to place bailout gas on the shot line. The bailout is just as much a limiting factor to your dive planning as the gas mix selected. Ensure you have sufficient volume of breathable, open circuit gas available at all stages of the dive. 11.2 Emergency Procedures What do you do in the event of a Low oxygen warning? What do you do in the event of a High oxygen warning? What do you do in the event of a battery warning? What do you do in the event of a battery failure? What do you do in the event of a flooded loop? What do you do in the event of a cell warning/cell error? - 72 - If in Doubt – Flush with diluent and considering switching to open circuit bailout. 11.3 Diluent Flush This very simple procedure is the cure, albeit temporary in some cases, for most of the above problems. If the O2 level is too low then flushing with diluent will raise the ppO2 to a breathable level. If the ppO2 level is too high, flushing with diluent will dilute the oxygen. If there is water on the cell face the diluent flush will aid evaporation. To perform a diluent flush press the diluent inflator, for approximately 10-15 seconds, whilst holding open the exhaust valve. 11.4 Emergency Rescue of an Unconscious INSPIRATION Diver DO NOT remove the mouthpiece. Flushing the system with diluent may assist in the recovery of consciousness. A skilled and experienced INSPIRATION user should be able to assess a buddy’s system to identify a problem and effect a cure eg. opening the O2 cylinder valve. If no probable cause can be identified then an assisted ascent may be carried out, regularly flushing the buddy’s system to ensure a respirable mix is present in the loop. 11.5 Flooded Loop The INSPIRATION is very tolerant of water entry. The action to take largely depends on the circumstances leading up to this problem and how much water has entered. If you have just dropped the mouthpiece without closing it and then re-inserted it, you will allow water into the exhale counterlung. Providing you stay reasonably upright you should be able to continue the dive, leaving the water in there. If you continue to do head down descents or somersaults, then water in the counterlung will find its way past the water trap and go into the bottom of the scrubber. This is noticeable by a more distant gurgling noise which becomes worse when you roll onto your right side. Depending on the quantity of water which has entered, this is not too serious a problem. You should, though, empty the water out at the end of the dive, dry the scrubber and change the Sofnolime. There is a water barrier at the bottom of the Sofnolime cartridge, but eventually water will permeate around the edge of this and be soaked up by the Sofnolime granules. Because of the water traps at the top of the scrubber and on the top of the inhale counterlung, there is virtually no chance of getting a “caustic cocktail”. However, if you do soak the Sofnolime excessively a faint chalky flavour may be noticed in the inspired gas. If this flavour becomes evident in conjunction with the gurgling when you are on your right side with an increase in breathing resistance, then the dive should be aborted, the system dried and Sofnolime changed. Excessive amounts of water can be vented by rotating so the overpressure valve is downwards and pressurising the loop so the excess water is forced out. This requires practice and usually allows water into the bottom of the scrubber. Pressurising the loop causes excess buoyancy and so the diver must fin downwards or hold onto something substantial. If you receive water down the inhale hose, then this is most likely to be due to residual water in the counterlung remaining there after washing. Rotating into a head up position should enable normal breathing to commence. If in doubt - bail out! - 73 - 11.6 Manual Control of ppO2 The ppO2 can be held within the life support range by adding either O2 or diluent. The gas may be supplied by on-board or off-board cylinders connected to the manual inflators on the counterlungs. 11.6.1 Manual addition of O2 and O2 flush method Providing the ppO2 displays are functioning and are monitored the ppO2 can be maintained easily, by manually adding O2 in short bursts. With practice it is possible to maintain a constant ppO2 without looking at the displays, but this involves timing the interval between oxygen injects or counting the number of breaths. However, this technique requires considerable practise and is only valid when the depth stays constant. This technique is deemed too dangerous. To do a fast oxygen flush (at 6m or shallower), press the oxygen inflator for several seconds and purge gas from around the mouthpiece at the same time. Take a few breaths, then repeat flush. This is a very quick method and is easily done without affecting buoyancy. 11.6.2 Manual addition of diluent Providing the ppO2 displays are functioning and are monitored the ppO2 can be maintained easily, by manually adding diluent in short bursts. Because you are adding inert gas to the loop, as well as oxygen, gas should be vented from the loop to maintain neutral buoyancy. Maintaining a life sustaining ppO2 is easy when adding diluent, even without a ppO2 display. It needs practise to make it efficient but it is a simple procedure. Practise , whilst monitoring the ppO2 display, in a shallow swimming pool using an air diluent, start by exhaling through your nose every third breath and then adding air to allow you to breathe from the counterlungs. Some divers may find, by practising while watching their ppO2 displays that they can exhale less often but please bear in mind the following warning: ! Warning It is important to find the number of breaths between exhales when in the shallows and when working moderately hard and then use this at all depths. Do not experiment at depth and then apply your technique in the shallows. If you are using the INSPIRATION in this semi-closed fashion as a bail-out, it is important that the oxygen content of the diluent will sustain life in this semi-closed manner all the way to the surface. Beware of trying to use a diluent with only 15% or less O2 content. - 74 - 11.6.3 Using the INSPIRATION as a pure oxygen rebreather It is easy to maintain a high oxygen content manually by monitoring the ppO2 displays but if the display is switched off or not functioning then at depths of 6m and shallower it is possible to use the INSPIRATION as a pure oxygen rebreather. The technique is to flush out all the Nitrogen so there is only pure oxygen in the breathing loop, which includes the diver’s lungs, and then add oxygen manually as the counterlung volume diminishes. ! Warning This technique is potentially very dangerous and must not be attempted without proper training and practise whilst monitoring the ppO2 displays. Complete oxygen flushing of the loop must be done thoroughly. If Nitrogen is present in the loop then there is a great risk of the diver going unconscious through hypoxia. Most Navies have accidents every year because the diver doesn’t do an adequate oxygen flush when using a pure oxygen rebreather. Particular attention must be paid to the oxygen flush technique. When 5 m or shallower select a low setpoint (0.7 bar), exhale through nose until counterlung volume diminishes - preventing the next inhale, add oxygen to counterlungs to allow next inhale. Breathe for a few breaths, and then repeat the process again three times. After that add oxygen when the counterlung volume diminishes enough to make breathing slightly difficult. Then add just enough oxygen to allow breathing. While you do this monitor the ppO2 displays. After practise you should be able to maintain a pretty constant ppO2. - 75 - SECTION 12 BRIEFING OPEN CIRCUIT DIVE PARTNERS 12.1 The Rebreather Diver – What to Expect, What to Do (Author: Stephen Bird) BASICS Closed Circuit (CC) Rebreather diving has a number of differences from Open Circuit (OC), but also a number of similarities. ON THE SURFACE - In any problem scenario once back on the surface the CC diver should be treated exactly the same as an OC diver. This includes all DCS occurrences, respiratory problems and any other diving related ailments. Use of CC does not preclude the use of Hyperbaric treatment. UNDER THE WATER – The CC diver will do things slightly differently to the OC diver. Things you will notice, that are quite normal are: · · · · Buoyancy – The CC diver will swim around objects rather than over them Computer Checks – The CC diver will check the computers at 30-second intervals, this is essential in monitoring the well being of the equipment. Bubbles – There are usually none. Exceptions are mask clearing, upward buoyancy adjustments and always on ascents. Busy – On descent and ascent the CC diver will look busy, these are times of high task loading, once at working depth only the computer checks may be evident. PRE-DIVE CHECKS – For the CC diver the usual buddy checks for buoyancy, air and releases is the same as OC, except that one source of gas (the closed circuit one) is checked as part of a unique CC check routine. This routine involves a complete, part computer guided, systems check the final part of which is a 3-minute breath test. DIVE MARSHALL LOG – Again essentially the same as an OC diver, but gas consumption will be about 1 litre / minute from the Oxygen cylinder and negligible from the Diluent cylinder which is used mainly for buoyancy and OC back up (bailout). So the extra information to be recorded is O2 contents, diluent contents, scrubber duration and PO2 setpoint. THINGS AN OC BUDDY SHOULD KNOW – How to open and close the CC mouthpiece, the operation of the diluent and O2 manual inject valves, (but normally leave the latter well alone), and recognise the terms and symptoms of hypoxia, hyperoxia and hypercapnia. This is within the skill-set of BSAC Sport Diver and above, but would possibly not be appropriate for anything less than a PADI Rescue Diver. - 76 - 12.2 Classic Problems, Causes and Resolutions The following table lists classic problems, the probable cause, the CC divers resolution and if required the buddy divers assisting action. It should be noted that nearly all problems could be resolved by a capable CC diver without switching to OC bailout, but that option always exists. For a rescuing buddy nearly all problems can be resolved with a diluent flush, but again the option to assist with OC bailout using on-board gas or his own OC octopus exists. The general rule is: IF IN DOUBT, BAIL OUT.U PROBLEM CAUSES CC DIVER RESOLUTION OC BUDDY RESOLUTION Fast ascent Add O2 manually or diluent flush, slow the ascent. Diluent flush or offer bailout / octopus, then diluent inject every third breath, then rescue to the surface. Diluent flush or offer bailout/ octopus, check O2 cylinder valve is on, then rescue to the surface. Diluent flush or offer bailout / octopus, then diluent inject every third breath, then rescue to surface. Diluent flush, slow the ascent, offer bailout / octopus, then diluent inject every third breath, then rescue to surface. Solenoid jammed open Diluent flush and switch O2 cylinder valve off, use valve to control injection of O2 Diluent flush and switch O2 cylinder valve off, offer bailout / octopus, then diluent inject very third breath, then rescue to surface. Accidental O2 manual injection Fast ascent Diluent flush Diluent flush, offer bailout / octopus, then rescue to the surface. Diluent flush, offer bailout / octopus, then rescue to surface. Full Electronics failure Water ingress, batteries flat, broken something etc Use diluent flush, then go to diluent based semi closed mode Diluent flush or offer bailout / octopus, then diluent inject every third breath, then rescue to the surface. Scrubber flood and caustic cocktail Leakage of water into scrubber housing Switch to OC bailout Offer bailout / octopus, then rescue to surface. Low Oxygen Solenoid Blocked Use O2 manual inject O2 cylinder valve switched off Switch back on O2 cylinder empty Use diluent flush, then or no access to O2 go to diluent based at all semi closed mode High Oxygen Diluent flush and slow the descent - 77 - SECTION 13 WARRANTY The INSPIRATION is warranted for the first purchaser for 12 months from date of purchase. Conditions: All warranty work must be authorised by Ambient Pressure Diving Ltd. Before returning the apparatus for any reason, please telephone the factory for advice. If it is deemed a factory repair is required the apparatus should be returned, postage and insurance paid, with a copy of the purchase receipt, directly to the factory, NOT TO THE DIVE SHOP. 1) Misuse, neglect or alteration renders all warranties null and void. 2) This warranty is not transferable. Your statutory rights are unaffected. Exclusions: 1) The batteries are not covered by the warranty. 2) The counterlung outer bag colours, even the black, will fade in time - especially if subjected to strong sunlight 3) The counterlung’s inner bags are not covered against punctures. 4) If a strong sterilising fluid is used then the inner bags may deteriorate. All products are sold only on the understanding that only English Law applies in cases of warranty claims and product liability, regardless of where the equipment is purchased or where used. - 78 - SECTION 14 IMPORTANT CAUTIONARY NOTES DO: Know your ppO2 at all times! DO: Read the instruction manual fully before using the INSPIRATION. DO: Carry out the pre-dive checks prior to each dive. DO: Use diving quality gasses. DO: Post-dive maintenance, particularly cleaning and disinfecting the breathing loop. DO: Have your INSPIRATION serviced annually by a competent person. DO: Insure all your dive equipment. DO: Keep a record of the usage of the apparatus, particularly the Sofnolime, batteries and oxygen cells. DO: Ensure that only original parts are used in the repair of the INSPIRATION. DO: Practice in a pool to increase familiarity with the operation and adjustments of the apparatus. DO: Handle the Sofnolime safely and store it in a dry, airtight container. DO: Only use the correct batteries and dispose of them immediately they are finished. DO: Take spare oxygen cells and batteries when travelling. DO: Connect blue to blue when reconnecting breathing hoses. DO NOT: DO NOT: DO NOT: DO NOT: DO NOT: DO NOT: DO NOT: DO NOT: DO NOT: DO NOT: DO NOT: DO NOT: DO NOT: ascend too rapidly. descend too rapidly. The ppO2 may increase to dangerous levels. mix up the diluent and oxygen fittings. use silicone grease or oil on the system. Use only oxygen compatible grease. reuse Sofnolime. partially refill the cartridge with Sofnolime. try to prolong the life of the oxygen cells by storing in a sealed bag or in an inert gas. recharge the batteries. switch off both oxygen controllers whilst submerged. calibrate the unit whilst submerged. fill the oxygen cylinder with Nitrox. fill the diluent cylinder with pure gasses such as Helium or Nitrogen. disconnect the Auto Air hose if the Auto Air leaks air, close the cylinder valve and check the Interstage pressure. - 79 - SECTION 15 Technical Data Atmospheric Range: Battery (6v Lithium): 700 - 1050 mbar The preferred brand is Energizer type EL223AP.CRP2. In use this battery has proven to have a greater capacity than other brands, giving proper solenoid operation within the voltage warnings provided by the electronics and for longer life. The battery box is designed for this battery. Buoyancy Compensator: CO2 scrubber: Wing style in 16kg and 22.5kg sizes. 2.45kg of 797 grade Sofnolime Micro-filters prevent dust from entering the breathing hoses. Water-traps virtually eliminate the possibility of a “caustic cocktail”. Medium - 11.4 litres (5.7 litres per counterlung) Large - 14 litres (7 litres per counterlung) Counterlung Volume: ! Depth Limits: 40m – maximum recommended depth with air diluent. 50m – maximum depth with air diluent. 100m – maximum depth at which all rebreather parameters are proven: CO2 endurance, O2 control and work of breathing. 100m – the limit of the CE approval. 110m – max. depth at which the work of breathing has been tested using Trimix diluent. 150m – max. depth at which the work of breathing has been tested with an Heliox diluent. 160m – depth at which all components are pressure tested during type approval – not during production. ! WARNING: Diving deeper than 100m carries the following additional risks: Deeper than 100m: Deeper than 110m: Deeper than 150m: Deeper than 160m: Design: Dimensions: Display accuracy: Display resolution: CO2 endurance unknown. Work of breathing with a Trimix diluent unknown. Work of breathing with an Heliox diluent unknown. Structural integrity of components unknown – the air cavity within the buzzer will implode eventually, and other components may fail. Rear mounted, with over-the-shoulder twin counterlungs 650mm (H) x 450mm (W) x 230mm depth (excluding harness/counterlungs and BC) 650mm (H) x 450mm (W) x 350mm approx. depth (incl. harness, c/lungs and BC) ±5% 0.01 bar - 80 - First stage (Oxygen): First stage (Diluent): Harness: Hydrostatic Imbalance: Oxygen Control: Oxygen sensors: Oxygen setpoint range (Low): Oxygen setpoint range (High): Oxygen warning level (Low): Oxygen warning level (High): Intermediate Pressure - 7.5 to 8.0 bar Intermediate Pressure - 9.0 to 9.5 bar Multi-adjustable harness in 4 sizes, Small, Medium, Large and X-Large. <1.0 kPa (10mbar) in all rotations. Two oxygen pressure setpoints, switchable from low to high and high to low as often as required, both underwater and on the surface. 3 Galvanic cells, Teledyne R22-2BUD 0.5 to 0.9 bar 0.9 to 1.5 bar 0.4 bar 1.6 bar Rebreather Operating Temperature Range: +4oC to + 32oC Short term air storage (hours): -10oC to +50oC Long term storage: +5oC to +20oC The rebreather operating temperature range is determined at the cold end by the CO2 duration trials which are done at 4oC(±1). Below this temperature the duration of the CO2 absorbent has not been empirically determined. If stored below 0oC the CO2 absorbent and electronics will need gentle pre-heating prior to use by placing in a warmer room or by submersing the assembled rebreather with mouthpiece closed (loop sealed) until the temperature of the equipment matches the ambient temperature. Below 0oC the liquid crystal displays in the handsets freeze to a solid black and are unusable. Water is an essential part of the CO2 absorption reactions (approx. 17% of Sofnolime is water), below freezing point the first reaction where CO2 and water react to form Carbonic acid cannot take place. If a pre-breathing method of warming the Sofnolime is used, this must be done on land under supervision. Shelf life of oxygen cells: Shelf life of unused rebreather: 18 months When stored in accordance with BS3574 the shelf life is 7 years ( derived from the hoses and seals.) Weight: Medium Counterlungs and Medium harness - 29.2kg Large Counterlungs and Large harness - 29.5kg - 81 - Sofnolime Data Shelf life: Refer to manufacturers packaging. Grade: 1 - 2.5 mm Sofnolime 797 - Diving Grade Storage: Sofnolime must be stored in a sealed container within a clean dry environment at a constant temperature (Ideally between 0 and 35oC). Storage at high temperature may cause reductions in the efficiency and effective life span of the material. Storage at sub-zero temperatures should be avoided. Correctly stored sofnolime should maintain absorption capacity for up to five years. Sofnolime must not be stored where it can become subject to the following: i) Strong Sunlight. ii) Contact with any other chemicals. iii) Contact with water. iv) Atmospheric conditions with higher than normal concentrations of acidic gases. Transport: Sofnolime contains less than 3.5% w/w sodium hydroxide and therefore is not classified as corrosive.1,2 Containers of Sofnolime do not need to be marked with any special hazard warning and they can be shipped by road, sea or air as non-hazardous product. Personal Protection: Sofnolime is mildly alkaline and care must be taken to avoid contact with skin and eyes and to avoid inhalation of dust. If spillage occurs granules should be swept or vacuumed up and Spillages and Disposal: disposed of appropriately. Any residue should be washed away with excess water. Exhausted or waste Sofnolime will contain residual alkalinity but may be disposed of in a suitable land fill site. Ambient Pressure Diving Ltd reserves the right to alter specifications without notice. Notes: 1. Recommendations on the Transport of Dangerous Goods, UN Forth Revised Edition, 1986. 2. CPL Regulations Authorised Approved List, Health and Safety Commission, UK, 2nd edition, 1988. - 82 - SECTION 16 DANGERS INTRODUCED BY USER MODIFICATIONS 1) Do NOT change the 1st stages for environmentally sealed Apeks 1st stages. These sealed 1st stages boost the Interstage pressure by more than ambient pressure when at depth. This will stop the oxygen solenoid working and gas will also be lost through the pressure relief valve (the Auto Air). 2) Do NOT use sealant or tape to “waterproof” the red oxygen cell covers. This prevents adequate pressure balancing leading to incorrect readings on the ppO2 displays. 3) Do NOT attach anything to the hoses leading to the handsets. These robust hoses protect the cables to the handsets and also keep the handsets at ambient pressure. If ty-raps (electrical ties), are used around these hoses, the pressure balancing can be affected resulting in physical damage during ascent or descent. 4) Do NOT change the mouthpiece for one with narrow bites. The bite determines how far apart the teeth are held open. If your teeth are not far enough apart the induced work of breathing is dramatic increasing retained CO2, which in turn increases susceptibility to Nitrogen Narcosis, Oxygen toxicity, and decompression sickness. 5) If the Auto Air is removed, it must be replaced with a suitable downstream 2nd stage. Additionally, if an isolator such as the APD Flowstop or Apeks Free-Flow Control device is fitted in line with the 2nd stage, a suitable Pressure Relief valve, such as the RB17(14bar) MUST be fitted to the 1st stage. - 83 - APPENDIX 1 Power On INSPIRATION BEEP BEEP [checks oxygen cells] [cells okay] [checks battery] CELL n FAILURE CELL n FAILURE REPLACE NO DIVE [battery level < LOW] LOW BATTERY REPLACE NO DIVE [battery level LOW] [battery ok] BATTERY WARNING REPLACE DIVE NOW? YES NO [Scans the communication link, looking for other unit] [Other unit switched on and already a Master] [Other unit switched off] Elapsed ON Time nn hrs nn mins SLAVE Waiting for Data DIVE NOW ? Confirm SLAVE 0.70 0.70 0.70 0.70 (Press the centre button to confirm) DIVE MODE CHECK DILUENT! Confirm A - 84 - A [Reads the cells and checks the calibration values] [If one cell’s output is out of range compared to the other two] [If all 3 cells are within range] CALIBRATE ? Yes No Ambient Pressure Down 1000mB Up MUST CALIBRATE! Yes No OPEN O2 VALVE! Confirm (700mB to 1050mB) (Pressing Centre button enters selection) OXYGEN % Down 96% Up Open Mouthpiece! Confirm OPEN O2 VALVE! Confirm FLUSHING BAG 0.34 0.27 0.40 MASTER 0.70 0.70 0.70 0.70 (21% to 100%, oxygen % in the scrubber lid during calibration) DIVE MODE Note: FLUSHING BAG: The solenoid valve is opened and oxygen injected until the cells are stable. This takes between 5 and 34 seconds, depending on initial ppO2 of the loop. Do not worry that all three cells are different at this stage. Once oxygen is injected and the cells become stable note the readings just before calibration. This gives a first level indication of the health of the cells. All cells should read between 0.70 and 1.30 which is the cell manufacturer’s tolerance specification at 1000 mbar atmospheric pressure. (Cell analysis during calibration) NO OXYGEN Check valve CELL STUCK NO CALIBRATION CELLnFAILURE Replace OUT OF RANGE NO DIVE CELLnFAILURE Replace CALIBRATING (this takes approx. 7 seconds) NO DIVE MASTER 0.70 0.70 0.71 0.69 DIVE MODE NO CALIBRATION - 85 - APPENDIX 2 Determining the Oxygen Purity (when the gas quality is not certified) Section A It is possible to analyse the gas using an independent oxygen analyser which has been calibrated on pure oxygen. However, when travelling, there is little point in taking another analyser with you when you already have three built into the INSPIRATION. Calibrate the INSPIRATION’s cells on a known gas source before departure and on reaching the destination, select NO to any calibration prompts. In the event of a MUST calibrate warning, select NO but then see Section B below. Flush with Oxygen: Open the mouthpiece and continually press the manual oxygen inflator, located on the exhale counterlung. When the cell readings have stabilised, which will take approx. 20 seconds of continual injection, record the cell readings on the oxygen controller. When the system is flushed with the available oxygen the three subsequent ppO2 readings, one for each cell, will show the product of the oxygen percentage and the ambient pressure. If the ambient pressure at the new location is known then the exact oxygen percentage in the gas supplied may be calculated as follows: Ambient Pressure (bar) x Oxygen Percentage in Gas cylinder 100 If: = Displayed ppO2 ppO2 displayed Ambient pressure Quality of gas supplied = = = 0.85 1036 mbar (1.036 bar) unknown = Z 1.036 x Z 100 Z = 0.85 = 0.85 x 100 1.036 82% (at the surface) = % A dive may be carried out using the stored calibration settings or the apparatus may be recalibrated using the now known oxygen content of the gas supplied. To recalibrate switch the controller off and then on again. When diving with less than 100% oxygen, buoyancy control will be more difficult as more gas must be injected via the solenoid valve and it may take the controller longer to reach the desired setpoints. - 86 - If the ambient pressure or the gas quality is not known assume the ambient pressure is 1 bar and then calculate the oxygen percentage of the gas supplied: 1.0 x Z = 0.85; so Z = 0.85/1.0 = 0.85. Whichever method is selected, the displayed figure will be 0.85 bar which is known to be accurate because recently calibrated cells have been used to measure it. The problem with using this last method is that if the ambient pressure changes due to atmospheric changes (usually obvious due to climatic changes) or if the intention is to do some diving in mountainous areas, then it would not be possible to rely on the system’s accuracy. A validation judgement would have to be made: i.e. know that the actual ppO2 is going to be less (in the case of going into the mountains) than that indicated and plan the decompression accordingly remembering that for every 50 mbar. (0.05 bar) drop in ambient pressure the ppO2 is 0.05 bar less than that indicated. Section B ‘MUST CALIBRATE’ warnings occur if one cell has drifted too far from the other two when compared back to the last calibration values. When you have flushed the loop with the unknown grade of oxygen, two of the three cells are likely to agree. The third giving a spurious reading. Ignoring the spurious reading, insert the ppO2 displayed in the above formula to find the quality of gas supplied. Use this data to then re-calibrate the oxygen cells. - 87 - APPENDIX 3 Self Check Questions and Answers a. What are the risks when you first enter the water? The biggest danger is jumping in with the oxygen controllers turned off. A quick look at the displays verifies that all is functional and the cell values change as you breath. It is not unknown for divers to jump in without turning on the diluent and ensuring the inflator hose is properly connected. Just before you jump in - always press the diluent inflator button. b. What risks may become apparent during a surface swim prior to the dive? Surface swims can be hard work. If the oxygen cylinder is empty or switched off or the oxygen solenoid valve is faulty the oxygen level can drop quite rapidly. It is essential to look at the oxygen display every minute. c. During the descent what is usually seen on the ppO2 display? The ppO2 will rise during the descent. d. How often do you expect the solenoid to operate during the descent? It is very rare for the solenoid to operate during the descent. The solenoid only operates if the ppO2 drops below the setpoint. The increasing ambient pressure keeps the ppO2 above the 0.7bar set point, effectively preventing the solenoid from opening. e. Once below 23m what would be the effect of staying on the low (0.7bar) setpoint? Below 23m the diver experiences more narcosis and has a greater decompression obligation than open circuit air! This is particularly dangerous if the diver’s decompression planning is based upon a 1.25 bar setpoint. f. Once on the bottom how often would you expect the solenoid to operate and for how long would the oxygen inject? When at a steady depth the oxygen controller only adds the oxygen that you metabolise, so you should expect short burst oxygen injections approximately every 30 seconds. The deeper you go the shorter the bursts and longer the interval. So if you hear a long oxygen inject look at the displays. g. What is the effect of the ppO2 of adding diluent to the loop, for example after mask clearing? Adding diluent reduces the ppO2 if the unit is running normally at 1.3 bar. The degree of reduction will vary with depth. - 88 - h. i. If a diluent flush is carried out at: 10m what will be the ppO2 in the loop? 0.42 bar 20m what will be the ppO2 in the loop? 0.63 bar 30m what will be the ppO2 in the loop? 0.84 bar 40m what will be the ppO2 in the loop? 1.05 bar How often should you check your ppO2 whilst on the bottom? Once per minute j. Why is it important to check your ppO2 prior to the ascent? During the ascent the ppO2 will drop. If you have a low ppO2 in the loop the simple act of rising 3m may be sufficient to lower the ppO2 sufficiently to cause a loss of consciousness. k. As you ascend how often would you expect the solenoid to operate and for how long and how would this vary with ascent speed? During the ascent the ppO2 drops, sometimes by as much as 0.2 bar. To counteract this the solenoid operates for longer. Typically you might hear 3 second bursts with 6 second intervals. During fast ascents the ppO2 drops more quickly, therefore, the O2 solenoid will open for longer bursts but still with the 6 second interval between oxygen injections. - 89 - APPENDIX 4 Decompression Tables The table below is reproduced from Proplanner. To purchase a copy of the Proplanner Constant ppO2 Decompression Program - contact Phoenix Oceaneering, Ferndown Industrial Estate, Ringwood, Dorset. Other examples of Constant ppO2 Decompression Programs are available, at time of publication: DDPlan – www.drogon.net & V-planner – www.v-planner.com Ascent speed - 10m/min Bottom time = time from leaving the surface to time leaving the bottom. Decompression is an inexact science. All formulae and tables in existence, including this one, cannot guarantee the user will not incur decompression sickness. Do the deepest dive first and avoid yo-yo dive profiles. Using ppO2 setting of 1.3 bar. Open Circuit Bail Out on Air, with (worst case accuracy assumed – ppO2 = 1.25 bar) a gas switch at 4.5m to 99% oxygen. Assuming INSPIRATION fails during the last minute of bottom time. DEPTH BOTTOM TIME 20m 140 150 170 1 2 2 3 4 60 70 80 90 100 120 1 1 4 6 9 12 17 1 3 6 8 11 13 17 30 40 50 60 70 1 1 3 8 11 16 1 1 3 3 5 9 12 16 30 40 50 1 2 5 10 15 1 3 4 6 10 15 25m 30m 35m 9m 1 6m 4.5m - 90 - 9m 1 4 6m 4.5m Appendix 5 Buddy Clean Data Sheet Section 6 – Toxicological Properties Section 1A – Product Identification Trade Name: Buddy Clean Disinfectant/ Cleanser Product Use: Hard Surface Disinfection and Cleaning Chemical Type: Degree of Hazard – Skin Contact: Low: Concentrate may act as a mild degreasant to sensitive skin Low: Will Cause Irritation but no serious damage Low: No significant hazard Low: No significant hazard Low: Substantial ingestion may cause irritation to mouth, throat and digestive tract – Eye Contact: – Inhalation Acute: – Inhalation Chronic: – Ingestion: Halogenated Tertiary Amine Section 1B – Supplies Identification Name and Address: Exposure Route: Ambient Pressure Diving Ltd. Water-ma-Trout Industrial Estate Helston, Cornwall, UK. TR13 0LW Section 7 – Preventative Measures Personal Protective Equipment: None required Telephone No.: 01326 563834 Eye Protection: Avoid contact with eyes Fax No.: 01326 573605 Leak & Spill Procedure: Soak up onto inert material or may be flushed to drain with copious amounts of water Hazardous Ingredients: None Handling Procedures: Ensure good industrial hygiene Percentage by Weight: N/A Storage Requirements: LD50 of Material: >4000mg/kg Store between 0-30oC in dry conditions Section 2 – Hazardous Ingredients Section 8 – First Aid Measures Section 3 – Physical Data State of Caution Physical State: Liquid Appearance & Odour: Colourless, slight natural colour, Available green with citrus fragrance Evaporation Rate: As Water Boiling Point: 110oC Freezing Point: -20oC % Volatile (by weight): >95% Solubility in Water (20oC): Soluble pH: 5 approximately Specific Gravity: 1.02 @ 20oC Inhalation: Non-Toxic: avoid long term inhalation of neat liquid. Remove to fresh air. Eye Contact: Rinse eyes with water. Seek medical advice if necessary. Skin Contact: Wash affected area with soap and water. Ingestion: Do NOT induce vomiting. Give copious milk or water. Seek medical advice where necessary. Section 9 – Concentration Buddy Clean is a neat solution and should be diluted: Dilution rate: Section 4 – Fire & Explosion Data Flammability: Non-Flammable If Yes, Under Which Conditions: None Light soiling - 1:100 Heavier soiling - 1:50 with 20 minutes soak period. If used in breathing circuits, rinse thoroughly with fresh water and allow to dry. Section 5 – Reactivity Data Chemical Stability: Stable Incompatibility: If mixed with strong Alkalis, may neutralise or reduce disinfectant qualities Hazardous Decomposition Products: If burnt may produce irritating fumes - 91 - Appendix 6 Sofnolime Transportation Declaration MOLECULAR PRODUCTS LTD MILL END THAXTED ESSEX CM6 2LT ENGLAND We hereby certify that the Soda Lime (Sofnolime) manufactured by Molecular Products Ltd contains less than 4% (Four Per Cent) Caustic Soda (NaOH) is classified as non-hazardous and that it is not restricted for transport. The label showing the corrosive symbol is a label for use of the product – not for transport. A Harding, Despatch Co-ordinator For Molecular Products Ltd - 92 - Intentionally Blank - 93 - APPENDIX 7 Trimix in the Rebreather This is a guide ONLY, pointing out the limitations of the equipment. It is not the intention of this manual to teach the diver how to dive using a pre-mixed helium based diluent, a separate course should be undertaken for that, but it is essential to prepare a diluent with a suitable Equivalent Nitrogen Depth (END) and a ppO2 of between 1.0 and 1.2 bar if the diluent were to be breathed open circuit on the bottom or manually flushed through the breathing circuit. ! ! Setpoint Considerations: The maximum setpoint should be 1.3 bar. Avoid using a higher setpoint. If a higher setpoint is used the high O2 alarm will be triggered occasionally – the deeper you are the more oxygen molecules are injected per solenoid inject, giving slightly larger spikes per injection than would be experienced at shallower depths. Additionally, a higher setpoint during the “bottom” phase of a dive gives minimal benefit in decompression times but significantly reduces the oxygen toxicity safety margin. Diluent Considerations: There are three considerations when choosing the diluent: 1) the ppO2 of the diluent at the deepest planned depth, must not exceed 1.3 bar to allow effective diluent flushing. 1.0 to 1.2 bar ppO2 is common. 2) the ppN2 of the diluent affects the Narcosis and affects the density of the gas within the loop. The increased density increases the work of breathing and reduces the scrubber duration. Increased work of breathing increases retained CO2 which in turn increases the effects of Narcosis, oxygen toxicity and decompression sickness. A ppN2 of 3.16 bar is suitable to 70m. Beyond 70m the ppN2 must be reduced: e.g. a ppN2 of 2.68 bar is suitable to 100m. The table below shows suitable Trimix and possible HeliAir mixes. Depth END Max. PN2 PO2 Trimix, (O2/Helium) HeliAir, (O2/Helium) 50 60 70 80 90 100 30 30 30 28 26 24 3.16 3.16 3.16 3.002 2.844 2.686 1.3 1.3 1.3 1.3 1.3 1.3 “21:26” “18:36” “16:44” “14:52” “13:59” "11:64" "15:29" "13:37" "11:45" "10:52" "9:58" "7:67" 3) the diver must carry a diluent that is life supporting (respirable) when breathed open circuit at the surface. The deeper mixes are NOT respirable at the surface so it is clear an additional cylinder with a higher oxygen content must be provided and care needs to be taken in configuration and marking to ensure the diver doesn’t use the deep diluent’s 2nd stage when close to the surface. - 94 - APPENDIX 8 EXPORT LICENSE REQUIREMENTS The Inspiration rebreather is a dual-use product and whether new or 2nd hand requires an export license if shipped outside the Country of use. Critically there is an exception to this requirement, detailed as a footnote in Category 8A002q. At September 2003 the UK’s Department of Industry specified the following: Section 8A 002q: self-contained, closed or semi-closed circuit (rebreathing) diving and underwater swimming apparatus. Note: 8A002q does not control an individual apparatus for personal use when accompanying its user. For the latest information see: http://www.dti.gov.uk/export.control/ Individual Countries may have alternative export license requirements and user’s should establish these requirements for themselves. - 95 - APPENDIX 9 Pre Dive Check List Perform the checks and tick the appropriate box prior to diving Analyse diluent and O2 cylinder Check diluent supply and oxygen cylinder pressures, and assemble into unit Assemble breathing hoses and mouthpiece, checking for any leaks Confirm correct operation of non-return valves Check operation of mouthpiece and direction of gas flow through convoluted hoses Carry out positive and negative pressure tests (see Section 1.14) Turn on gas supply and check function of valves and bailout regulator systems Switch on one Oxygen Controller ( Master ) Verify sufficient absorbent time remaining Switch on second Oxygen Controller and verify proper function Verify proper computer function Verify correct calibration of O2 sensors Check display for battery warnings. Flush with air and check for low oxygen warning display and buzzer - 96 - Pre-Breathe Sequence Prior to immersion the following pre-breathe check should be conducted to confirm the correct operation of the Rebreather. Select the LOW setpoint Ensure the ppO2 drops rapidly as you exhale into the loop and check for slow changing cell values Confirm the O2 control system properly maintains the setpoint for a minimum of 3 minutes Verify ppO2 values using backup display (Slave Controller) Confirm CO2 absorbent is functioning properly (pay attention for symptoms of hypercapnia) Confirm operation of diluent and oxygen inflators (and ADV, if fitted) Confirm operation of bailout systems Ensure both counterlungs are fastened down with the Fastex buckles Check the mouthpiece valve is fully open. Partially open will allow water in. In-Water Checks and Important Procedures After entering the water and before descending, ensure the oxygen controller is functioning. Ask your buddy to do a “bubble check” at 6m (20ft) on your equipment. It is easier to abort the dive at 6m (20ft) and surface to fix any leaks. Add DILUENT during the descent. It is dangerous to confuse the diluent and oxygen inflators. Adding oxygen will cause a high ppO2 in the breathing loop Once on the bottom, or below 20m, switch the setpoint to the HIGH setpoint. Ensure the HIGH setpoint is maintained throughout the dive and is appropriate for the planned decompression schedule. During the ascent, dump the expanding gas by pulling the exhaust valve override or by exhaling around the mouthpiece, or through the nose. At 4m, switch back to the low setpoints. KNOW YOUR ppO2 AT ALL TIMES ! - 97 -