1
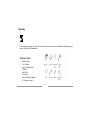
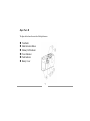
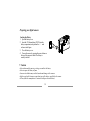
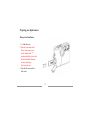
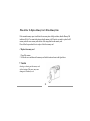
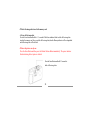
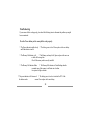
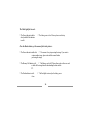
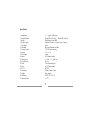
Digital Camera
User’s Manual
1
Table of Contents
FCC Information….…………………………………………………………………3
Safeguards …………………………………………………………………….....3
Introduction ……………………………………………………………………. 4
Unpacking
…………………………………………………………… .5
Major Parts ...............……………………………………………………………. 6
Preparing Your Digital Camera
.…………………………………… 8
Capturing Images with Your Digital Camera …………………….……………10
Capturing Images with The Self-Timer
..…………. .………….. 11
When & How to Replace/Delete Memory Data …………………………… …..13
Downloading The Pictures onto Your PC …………………………… …. 14
Troubleshooting……………………………………………………………………..15
Specification…………………………………………………………………….. ..17
System Requirements…………………………
…..18
2
FCC Information
This device has been tested and found to comply with the limits for a Class B digital device, pursuant to
Part 15 of FCC Rules. These limits are designed to provide reasonable protection against harmful interference
when the equipment is operated in a residential installation. This equipment generates, uses, and can radiate
radio frequency energy and if not installed and used in accordance with the instruction manual may cause harmful
interference to radio communications. However, there is no guarantee that interference will not occur in a particular
installation. If this equipment does not cause harmful interference to radio or television reception, which can be
determined by turning the equipment off and on, the user is encouraged to try to correct the interference by one or
more of the following measures:
• Reorient the receiving antenna.
• Increase the separation between the equipment and receiver.
• Connect the equipment into an outlet on a circuit different from that to which the receiver is connected.
• Consult the dealer or an experienced radio TV technician for help.
Safeguards
For safe operation and image quality, please carefully read all of the instructions below:
• To avoid risk of electrical shock, do not remove the camera’s cover or open any compartments except
as instructed in this User’s manual.
3
• To prevent fire or electrical shock, do not expose the camera to rain or moisture.
• To avoid electrical shock and poor image quality, please use the AC adapter specified for this camera.
• Do not store the camera near sources of bright light, direct sunlight, high humidity, heat, and excessive dirt
or dust, or where it will be exposed to strong vibrations or magnetic field.
• Do not use harsh or abrasive cleaners. Wipe off dust with a clean, dry cloth.
• To prevent eyes from the possible injury, do not take flash pictures of face at close distance.
Introduction
Thank you for purchasing Color Digital Camera which provides you not only a quick and easy way to transfer color
images to your personal computer but also an innovative tech to make you experience fascinating photography. This digital
camera features as both the portable camera as well as the tethered PC camera. You can either download pictures taken by
the camera functioning as the portable camera, or can preview, snap, and edit images under the Windows software when
connected to PC.
To familiarize yourself with each part and basic operation of the camera, please carefully read this manual before using the
camera.
4
Unpacking
Please unpack the package and verify the following items. If there is any one not included in the package, please
contact your local dealer immediately.
Package Content
ž
ž
ž
ž
ž
ž
ž
ž
Digital Camera
User’s Manual
One 3-V lithium battery
CD-ROM
Serial Cable
Wrist Strap
Protection Wallet ( optional )
AC Adapter ( optional )
5
Major Parts I
Please familiarize yourself with each part of the camera before operation.
Œ
•
Ž
•
•
‘
’
Shutter Release Button
Power ON/ OFF Button
Erase Button
Side Cover
AC Power Terminal
Replaceable Memory Card
Data Transmission Port
6
Major Parts II
The figure below shows the rear side of the digital camera.
Œ
•
Ž
•
•
‘
Viewfinder
Mode Selection Button
Memory Full Indicator
Power Indicator
Flash Indicator
Battery Cover
7
Preparing your digital camera
Loading the Battery
1. Open the battery cover
2. Insert the 3V lithium battery CR123A into the
battery compartment, and position the + / – ends
as shown in the figure.
3. Close the battery cover.
4. Turn on the camera by pressing the power button on
the top of the camera to check if the battery is
correctly installed.
! Caution
• Do not disassemble, puncture, recharge, or mutilate the battery.
• Do not expose the battery to flame.
• Incorrect installation may result in hazards and damages to the camera.
• Replace only with the same or equivalent types of the battery specified for the camera.
• Please follow the manufacturer’s instruction to dispose the used battery.
8
Preparing your digital camera
Memory Card Installation
1. Lift the side cover.
2. Make the arrow mark on the
sticker of the memory card
face the triangle mark “u”
positioned beside the slot or place
the cutted side in the direction
as shown in the figure.
Then insert the card.
3. Press the side cover until it is
fully closed.
9
Capturing Images with Your Digital Camera
The following description provides the brief tutorial on how to take pictures with your digital camera.
For correct operation, please take time to go through all the instructions below before using the camera.
1 Press the Power ON/OFF button to turn on the camera, and the power indicator will be lit to indicate that
the camera is powered on.
2 The Flash indicator will also be lit to indicate that the camera is in ready status.
3 Focus the preferred object or image with the viewfinder.
4 Press the Shutter Release button to take the picture of the object or image posing in focus. The sound of
“click” indicating successful snap will be heard.
5 The Power indicator will twinkle soon after the snap to indicate that the camera is transferring the
picture to the memory. You need to wait about 3 seconds to allow the camera finishes processing
the picture.
6 The Memory Full indicator will start blinking when the remained space of the memory is sufficient to
store about three more pictures of high resolution.
7 For higher resolution, please select the Fine mode when taking pictures.
8 This camera will automatically shut off when it is in stand-by status over 90 seconds.
10
Note
• Please keep the fore window glass of the lens clean to assure the best quality of the image.
• Clean the window glass by gently wiping the surface with a cotton cloth dampen with alcoholic cleaner.
Capturing Images with the Self-Timer
The function – Self-Timer allows you to take a picture of yourself. Please follow the instructions
below:
1. Press the Shutter Release Button and hold for about 3 seconds until the Power indicator blinks slowly.
2. The camera will automatically take the picture after about 10 seconds.
Note
• The camera will make the sound of clicking or flash as soon as you press the Shutter Release Button. Please
keep pressing the Shutter Release Button to activate the Self-Timer, then the camera will take the picture
after about 10 seconds.
11
When & How To Replace Memory Card / Delete Memory Data
If the remained memory space is insufficient for one more picture of high resolution, then the Memory Full
indicator will be lit. You cannot take pictures when the memory is full, therefore you need to replace the full
memory card with a new memory card or delete all the image data from the memory card.
Please follow the procedures below to replace / delete the memory card.
I Replace the memory card
1 Turn off the camera.
2 Lift the side cover and draw out the memory card in the direction as shown in the figure below.
! Caution
Inserting or drawing out the memory card
without turning off the power may cause
damages to the memory card.
12
II Delete the image data stored in the memory card
A. Erase all the image data
Press the Erase button and hold for 3 - 5 seconds till the Power indicator blinks to delete all the image data
stored in the memory card. Once you delete all the image data, then the Memory indicator will be extinguished
and all the image data will be deleted.
B. Erase the picture one by one
Press the Erase Button and then press the Shutter Release Button immediately. The power indicator
blinks indicating the last picture is deleted.
Press the Erase Button and hold 3-5 seconds to
delete all the image data.
13
Downloading the pictures onto your PC
Hardware Setup
You need to connect the camera to your PC before downloading pictures onto personal computer. Please follow
the steps to complete the connection.
1 Connect the 9-pin connector to the serial port on the back of the PC.
2 Lift the side cover and plug the other end of the 9-pin connector into the Data transmission port of the
camera. ( If the personal computer is equipped with only the 25-pin serial port, then you need a 9-pin male
to 25-pin female transmission adapter. )
3 If you have the specified AC adapter, you can use it as the power supply instead of the battery.
3 Turn on the camera.
! Caution
To avoid the possible explosion, electrical shock, or poor image quality, please use the specified AC adapter.
Please refer to the specification section on page 16.
Software Installation
• For device driver installation, please check the driver floppy disk or attached CD-ROM.
• For application software, please refer to the attached CD-ROM for detailed user’s guide.
14
Troubleshooting
If your camera fails to work properly, please check the following items to determine the problems you might
have encountered.
Press the Power button yet the camera fails to work properly.
? The Power indicator twinkles slowly
and Flash indicator is not lit.
F The battery power is low. Please replace with a new battery.
? The Memory Full indicator is lit.
F The Memory card may be full, please replace with a new one
or delete all the image data.
Check if the memory card is correctly installed.
? The Memory Full indicator blinks.
F The Memory Full indicator will start blinking when the
remained space of the memory is sufficient store less than
four pictures of high resolution.
? The power indicator is lit but none of F The battery power is too low to initiate the CPU of the
the buttons works.
camera. Please replace with a new battery.
15
The Flash light fails to work.
? The Power indicator twinkles
slowly and the Flash indicator
is not lit.
F The battery power is low. Please replace a new battery.
Press the Shutter button, yet the camera fails to take pictures.
? The Power indicator twinkles fast. F The camera is busy at processing the image. If you want to
capture another image, please wait until the camera finishes
processing the image.
? The Memory Full indicator is lit.
F The Memory card is full. Please either replace with a new card
or delete all the image data after downloading the data onto the
PC.
? The Flash indicator is not lit.
is low.
F The flash light is not ready or the battery power
16
Specification
1 Image Sensor
2 Image Resolution
3 Storage
4 Storage Capacity
5 Color Depth
6 Viewfinder
7 Exposure Control
8 Aperture
9 Focal Length
10 Shutter
11 Shutter Speed
12 Focus Distance
13 Flash
14 Power
15 PC 1/F
16 Dimensions
17 Weight
18 EMI Safety
19 Operating Temp.
1 / 3” ( approx. 350K pixels )
Normal 320 (H) X 240 (V) / Fine 640 (H) X 480 (V)
Flash Memory Card (2 MB)
26pictures ( Normal ) / 8 pictures ( Fine ) (approx.)
24 bits
the reversed Galilean viewfinder
TTL CCD sensor metering
f / 4 -----f / 11
6.3 mm
CCD electronic shutter
1 / 30 sec. -----1 / 10,000 sec.
40 cm - ∞
3 M ( effective distance )
one 3 V lithium battery
RS-232C
125mm x 60mm x 33mm
160g ( approx. )
FCC-B, CE, UL, C-UL
5 - 380 C
17
Specification of AC Adapter
1 Output : 1000 m A / 3 V (regulated)
2 Input : 120V ( For U.S. )
Model No. : AD310-A
230V ( For Germany ) Model No. : AD310-B
230V ( For U.K.)
Model No. : AD310-E
System requirements
1. 386 or higher IBM PC compatible model.
2. 3.5 – inch high density diskette drive
3. 2X CD ROM driver or above
4. Microsoft Windows TM 95 or later version
5. 8 Megabytes of RAM or more.
6. Available serial port RS232C (works with COM1,2,3,4)
7. Hi-Color or True Color capable video card and monitor strongly recommended.
18