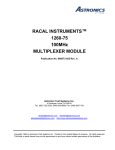
1
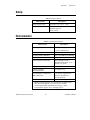
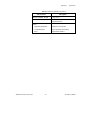
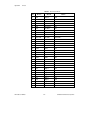
VXI-1500 User Manual March 1997 Edition Part Number 321510A-01 © Copyright 1997 National Instruments Corporation. All Rights Reserved. Internet Support [email protected] E-mail: [email protected] FTP Site: ftp.natinst.com Web Address: http://www.natinst.com Bulletin Board Support BBS United States: (512) 794-5422 BBS United Kingdom: 01635 551422 BBS France: 01 48 65 15 59 Fax-on-Demand Support (512) 418-1111 Telephone Support (U.S.) Tel: (512) 795-8248 Fax: (512) 794-5678 International Offices Australia 03 9879 5166, Austria 0662 45 79 90 0, Belgium 02 757 00 20, Canada (Ontario) 905 785 0085, Canada (Québec) 514 694 8521, Denmark 45 76 26 00, Finland 09 527 2321, France 01 48 14 24 24, Germany 089 741 31 30, Hong Kong 2645 3186, Israel 03 5734815 Italy 02 413091, Japan 03 5472 2970, Korea 02 596 7456, Mexico 5 520 2635, Netherlands 0348 433466, Norway 32 84 84 00, Singapore 2265886, Spain 91 640 0085, Sweden 08 730 49 70, Switzerland 056 200 51 51, Taiwan 02 377 1200, U.K. 01635 523545 National Instruments Corporate Headquarters 6504 Bridge Point Parkway Austin, TX 78730-5039 Tel: (512) 794-0100 Important Information Warranty The VXI-1500 mainframe is warranted against defects in materials and workmanship for a period of one year from the date of shipment, as evidenced by receipts or other documentation. National Instruments will, at its option, repair or replace equipment that proves to be defective during the warranty period. This warranty includes parts and labor. A Return Material Authorization (RMA) number must be obtained from the factory and clearly marked on the outside of the package before any equipment will be accepted for warranty work. National Instruments will pay the shipping costs of returning to the owner parts which are covered by warranty. National Instruments believes that the information in this manual is accurate. The document has been carefully reviewed for technical accuracy. In the event that technical or typographical errors exist, National Instruments reserves the right to make changes to subsequent editions of this document without prior notice to holders of this edition. The reader should consult National Instruments if errors are suspected. In no event shall National Instruments be liable for any damages arising out of or related to this document or the information contained in it. EXCEPT AS SPECIFIED HEREIN, NATIONAL INSTRUMENTS MAKES NO WARRANTIES, EXPRESS OR IMPLIED, AND SPECIFICALLY DISCLAIMS ANY WARRANTY OF MERCHANTABILITY OR FITNESS FOR A PARTICULAR PURPOSE. CUSTOMER’S RIGHT TO RECOVER DAMAGES CAUSED BY FAULT OR NEGLIGENCE ON THE PART OF NATIONAL INSTRUMENTS SHALL BE LIMITED TO THE AMOUNT THERETOFORE PAID BY THE CUSTOMER. NATIONAL INSTRUMENTS WILL NOT BE LIABLE FOR DAMAGES RESULTING FROM LOSS OF DATA, PROFITS, USE OF PRODUCTS, OR INCIDENTAL OR CONSEQUENTIAL DAMAGES, EVEN IF ADVISED OF THE POSSIBILITY THEREOF. This limitation of the liability of National Instruments will apply regardless of the form of action, whether in contract or tort, including negligence. Any action against National Instruments must be brought within one year after the cause of action accrues. National Instruments shall not be liable for any delay in performance due to causes beyond its reasonable control. The warranty provided herein does not cover damages, defects, malfunctions, or service failures caused by owner’s failure to follow the National Instruments installation, operation, or maintenance instructions; owner’s modification of the product; owner’s abuse, misuse, or negligent acts; and power failure or surges, fire, flood, accident, actions of third parties, or other events outside reasonable control. Copyright Under the copyright laws, this publication may not be reproduced or transmitted in any form, electronic or mechanical, including photocopying, recording, storing in an information retrieval system, or translating, in whole or in part, without the prior written consent of National Instruments Corporation. Trademarks Product and company names listed are trademarks or trade names of their respective companies. WARNING REGARDING MEDICAL AND CLINICAL USE OF NATIONAL INSTRUMENTS PRODUCTS National Instruments products are not designed with components and testing intended to ensure a level of reliability suitable for use in treatment and diagnosis of humans. Applications of National Instruments products involving medical or clinical treatment can create a potential for accidental injury caused by product failure, or by errors on the part of the user or application designer. Any use or application of National Instruments products for or involving medical or clinical treatment must be performed by properly trained and qualified medical personnel, and all traditional medical safeguards, equipment, and procedures that are appropriate in the particular situation to prevent serious injury or death should always continue to be used when National Instruments products are being used. National Instruments products are NOT intended to be a substitute for any form of established process, procedure, or equipment used to monitor or safeguard human health and safety in medical or clinical treatment. FCC/DOC Radio Frequency Interference Class A Compliance This equipment generates and uses radio frequency energy and, if not installed and used in strict accordance with the instructions in this manual, may cause interference to radio and television reception. Classification requirements are the same for the Federal Communications Commission (FCC) and the Canadian Department of Communications (DOC). This equipment has been tested and found to comply with the following two regulatory agencies: Federal Communications Commission This equipment has been tested and found to comply with the limits for a Class A digital device, pursuant to part 15 of the FCC Rules. These limits are designed to provide reasonable protection against harmful interference when the equipment is operated in a commercial environment. This equipment generates, uses, and can radiate radio frequency energy and, if not installed and used in accordance with the instruction manual, may cause harmful interference to radio communications. Operation of this equipment in a residential area is likely to cause harmful interference in which case the user will be required to correct the interference at his own expense. Notices to User: Changes or modifications not expressly approved by National Instruments could void the user’s authority to operate the equipment under the FCC Rules. This device complies with the FCC rules only if used with shielded interface cables of suitable quality and construction. National Instruments used such cables to test this device and provides them for sale to the user. The use of inferior or nonshielded interface cables could void the user's authority to operate the equipment under the FCC rules. If necessary, consult National Instruments or an experienced radio/television technician for additional suggestions. The following booklet prepared by the FCC may also be helpful: Interference to Home Electronic Entertainment Equipment Handbook. This booklet is available from the U.S. Government Printing Office, Washington, DC 20402. Canadian Department of Communications This Class A digital apparatus meets all requirements of the Canadian Interference-Causing Equipment Regulations. Cet appareil numérique de la classe A respecte toutes les exigences du Règlement sur le matériel brouilleur du Canada. For Your Safety Before undertaking any troubleshooting, maintenance, or exploratory procedure, read carefully the WARNING and CAUTION notices. This equipment contains voltage hazardous to human life and safety, and is capable of inflicting personal injury. • Mainframe GroundingThe VXI-1500 mainframe requires a connection from the premise wire safety ground to the mainframe chassis earth stud. The earth safety ground must be connected during use of this equipment to minimize shock hazards. Refer to the Connecting Safety Ground section of Chapter 2, Installation and Configuration, for instructions on connecting safety ground. • Live CircuitsOperating personnel and service personnel must not remove protective covers when operating or servicing the mainframe. Adjustments and service to internal components must be undertaken by qualified service technicians. During service of this product, the mains connector to the premise wiring must be disconnected. Dangerous voltages may be present under certain conditions; use extreme caution. • Explosive AtmosphereDo not operate the mainframe in conditions where flammable gases are present. Under such conditions this equipment is unsafe and may ignite the gases or gas fumes. • Part ReplacementOnly service this equipment with parts that are exact replacements, both electrically and mechanically. Contact National Instruments for replacement part information. Installation of parts with those that are not direct replacements may cause harm to personnel operating the mainframe. Furthermore, damage or fire may occur if replacement parts are unsuitable. • ModificationDo not modify any part of the mainframe from its original condition. Unsuitable modifications may result in safety hazards. Table of Contents About This Manual Organization of This Manual ........................................................................................ xi Conventions Used in This Manual................................................................................ xii Related Documentation................................................................................................. xii Customer Communication ............................................................................................ xii Chapter 1 Getting Started Unpacking..................................................................................................................... 1-1 What You Need to Get Started ..................................................................................... 1-1 Optional Equipment ...................................................................................................... 1-2 Key Features ................................................................................................................. 1-4 Chapter 2 Installation and Configuration Site Considerations ....................................................................................................... 2-1 Rack Mounting ............................................................................................................. 2-3 Installing or Removing the Mainframe Front Door ...................................................... 2-4 Setting Fan Speed ......................................................................................................... 2-5 Connecting Safety Ground............................................................................................ 2-5 Connecting to AC Mains Power and Testing Power Up............................................... 2-5 Installing VXI Modules ................................................................................................ 2-7 Installing Filler Panels .................................................................................................. 2-7 Routing Cables.............................................................................................................. 2-7 Remote Power Monitoring and Inhibit Interface .......................................................... 2-8 Receiver Interconnect Devices...................................................................................... 2-9 © National Instruments Corporation vii VXI-1500 User Manual Table of Contents Chapter 3 Maintenance Service Interval ............................................................................................................. 3-1 Preparation .................................................................................................................... 3-1 Cleaning ........................................................................................................................ 3-2 Interior Cleaning ............................................................................................. 3-2 Exterior Cleaning ............................................................................................ 3-2 Cleaning the Fan Filters................................................................................................. 3-3 Resetting the AC Mains Circuit Breaker ....................................................................... 3-4 Troubleshooting the VXI-1500 ..................................................................................... 3-4 Appendix A Specifications Electrical........................................................................................................................ A-1 Cooling .......................................................................................................................... A-3 Safety............................................................................................................................. A-5 Environmental ............................................................................................................... A-5 Backplane ...................................................................................................................... A-6 Mechanical .................................................................................................................... A-6 Appendix B Pinouts Appendix C Customer Communication Glossary Index VXI-1500 User Manual viii © National Instruments Corporation Table of Contents Figures Figure 1-1. Rack-Mount Slide Kit ............................................................................... 1-3 Figure 1-2. Front View of the VXI-1500 Mainframe .................................................. 1-5 Figure 1-3. Rear View of the VXI-1500 Mainframe ................................................... 1-6 Figure 2-1. VXI-1500 Mainframe Airflow Side View ................................................ 2-2 Figure 2-2. VXI-1500 Mainframe Airflow Rear View ................................................ 2-3 Figure 2-3. Removable Front Door.............................................................................. 2-4 Figure 3-1. VXI-1500 Thumbscrews ........................................................................... 3-3 Figure A-1. VXI Module Blocked Slot-Cooling Curve............................................... A-4 Figure A-2. VXI Module Open Slot-Cooling Curve ................................................... A-4 Tables Table 1-1. Power Cables .............................................................................................. 1-2 Table 2-1. Power Supply Voltages at Power Monitoring ............................................ 2-6 Table 2-2. DB-25 Connector Pinout ............................................................................ 2-8 Table 3-1. Troubleshooting.......................................................................................... 3-5 Table A-1. Table A-2. Table A-3. Table A-4. Table A-5. Table A-6. Table A-7. AC Input Specifications............................................................................. A-1 DC Output Specifications .......................................................................... A-2 Cooling Specifications............................................................................... A-3 Safety Specifications ................................................................................. A-5 Environmental Specifications .................................................................... A-5 Backplane Specifications........................................................................... A-6 Mechanical Specifications ......................................................................... A-6 Table B-1. P1 Connector Pinouts................................................................................. B-2 Table B-2. P2 Connector Pinouts for All Non-Slot 0 Locations.................................. B-3 Table B-3. P2 Connector Pinouts for VXIbus Slot 0 ................................................... B-4 © National Instruments Corporation ix VXI-1500 User Manual About This Manual The VXI-1500 User Manual describes the features of the VXI-1500 mainframe. This manual contains information about configuring the mainframe, installing the modules, and operating and using the VXI-1500. Organization of This Manual This manual is organized as follows: • Chapter 1, Getting Started, describes the key features of the VXI-1500, lists the contents of your kit, and lists optional equipment you can order from National Instruments. • Chapter 2, Installation and Configuration, describes the necessary procedures for correctly preparing and operating your VXI-1500 mainframe. • Chapter 3, Maintenance, describes basic maintenance procedures you can perform on the VXI-1500 mainframe. • Appendix A, Specifications, contains complete specifications for the VXI-1500 mainframe. • Appendix B, Pinouts, describes the P1 and P2 connector pinouts for the VXI-1500 backplane. • Appendix C, Customer Communication, contains forms you can use to request help from National Instruments or to comment on our products and manuals. • The Glossary lists abbreviations, acronyms, metric prefixes, mnemonics, symbols, and terms. • The Index contains an alphabetical list of key terms and topics used in this manual, including the page where you can find each one. © National Instruments Corporation xi VXI-1500 User Manual About This Manual Conventions Used in This Manual The following conventions are used in this manual: bold italic Bold italic text denotes a note, caution, or warning. italic Italic text denotes emphasis, a cross reference, or an introduction to a key concept. Related Documentation The following documents contain information that you may find helpful as you read this manual: • ANSI/EIA-310-D-1992: Cabinets, Racks, Panels, and Associated Equipment • ANSI/IEEE Std 1101-1987: IEEE Standard for Mechanical Core Specifications for Microcomputers • VXI-1, Revision 1.4 System Specification • VXIplug&play Systems Alliance VPP-8 Revision 2.0: VXI Module/Mainframe to Receiver Interconnection Customer Communication National Instruments wants to receive your comments on our products and manuals. We are interested in the applications you develop with our products, and we want to help if you have problems with them. To make it easy for you to contact us, this manual contains comment and configuration forms for you to complete. These forms are in Appendix C, Customer Communication, at the end of this manual. VXI-1500 User Manual xii © National Instruments Corporation Chapter 1 Getting Started This chapter describes the key features of the VXI-1500, lists the contents of your kit, and lists optional equipment you can order from National Instruments. Unpacking Caution: Removal of the mainframe from the shipping carton requires two people. Carefully inspect the shipping container and the mainframe for damage. Check for visible damage to the metal work. Check and make sure all handles, hardware, and switches are not damaged. Inspect the inner chassis for any possible damage, debris, or detached components. If damage appears to have been caused in shipment, file a claim with the carrier. Retain the packing material for possible inspection and/or reshipment. What You Need to Get Started The VXI-1500 kit contains the following items: ❑ ❑ ❑ ❑ © National Instruments Corporation VXI-1500 mainframe An assortment of filler panels Power cable (see Table 1-1) Removable front door 1-1 VXI-1500 User Manual Chapter 1 Getting Started ❑ ❑ Grommeting for cable access ways VXI-1500 User Manual Table 1-1. Power Cables Power Cable Reference Standards Standard 120 V (USA) ANSI C73.11/NEMA 5-15-P/IEC83 Switzerland 220 V SEV Australia 240 V AS C112 Universal Euro 240 V CEE (7), II, IV, VII IEC83 North America 240 V ANSI C73.20/NEMA 5-15-P/IEC83 United Kingdom 240 V BS 1363/IEC83 If you are missing any of the above items or if you have the incorrect power cord, contact National Instruments. Optional Equipment An optional rack-mount slide kit is available from National Instruments. As shown in Figure 1-1, this kit allows you to easily slide the VXI-1500 mainframe into and out of a standard 19 in. (482 mm) instrument cabinet. The slide kit is suited for instrument racks from 24 in. (600 mm) to 32 in. (800 mm) deep. Contact National Instruments if you want to order the VXI-1500 rack-mount slide kit. VXI-1500 User Manual 1-2 © National Instruments Corporation Chapter 1 Getting Started 3 1 2 1 Removable Handles 2 Mounting Brackets 3 Adjustable Slides Figure 1-1. Rack-Mount Slide Kit The VXI-1500 has been designed to work with standard interlocking receiver devices defined by the VXIplug&play Systems Alliance VPP-8 specification. Refer to the Receiver Interconnect Devices section of Chapter 2, Installation and Configuration, for information about preparing your mainframe for receiver installation. Contact National Instruments for more information about suppliers of interlocking receiver devices. © National Instruments Corporation 1-3 VXI-1500 User Manual Chapter 1 Getting Started Key Features The VXI-1500 combines a high-performance 13-slot backplane with a high-output power supply and a structural design that has been optimized for maximum usability in a wide range of applications. The mainframe’s modular design ensures the highest level of maintainability resulting in a very low mean time to repair (MTTR). The VXI-1500 fully complies with the VXIbus Specification Revision 1.4 and is VXIplug&play-compatible. The key features of the VXI-1500 include: VXI-1500 User Manual • Thirteen C-sized VXIbus slots (can accommodate A-sized and B-sized modules with appropriate adapters) • Auto bus grant daisy-chaining (no backplane jumpers required) • 1100 W (115 VAC input) or 1420 W (230 VAC input) of available power • 1100 W of heat dissipation by filtered forced-air cooling • Universal AC input: auto-voltage and auto-frequency ranging • Over-current protection via push-reset circuit breaker (no loose fuses to replace) • Removable modular power supply with a MTBF of 50,000 hours • Remote power monitoring and inhibit via a rear panel connector • On/Off switch located on the front panel for easy access and recessed to prevent accidental switching • Removable positive pressure modular cooling unit with a MTBF of 30,000 hours • Selectable fan speed for maximum cooling or quiet operation • Full compliance with the VXIplug&play Systems Alliance VPP-8 specification (requires rack-mount slide kit option) • Recessed module mounting surface for concealing cable backshells, terminal block carriers, and other accessories • Integrated lower cable management channel • Rack-mount or bench-top installation • Removable front door 1-4 © National Instruments Corporation Chapter 1 Getting Started Figures 1-2 and 1-3 show some of these key features and components of the VXI-1500 mainframe. Figure 1-2 shows the front view of the VXI-1500 mainframe and Figure 1-3 shows the rear view. 4 2 3 2 5 1 1 6 7 1 2 3 Removable Rubber Feet Hinges for Removable Door Jumperless Backplane 4 5 Recessed On/Off Switch Cable Access Way 6 7 Removable Cable Access Panel Slot 0 Figure 1-2. Front View of the VXI-1500 Mainframe © National Instruments Corporation 1-5 VXI-1500 User Manual Chapter 1 Getting Started 3 4 5 2 6 1 7 8 1 2 3 4 Circuit Breaker Universal AC Input Chassis Ground Stud Removable Power Supply Module 5 6 7 8 Remote Power Monitoring and Inhibit Connector Fan Speed Selector Removable Cooling Module Removable Cable Access Panel Figure 1-3. Rear View of the VXI-1500 Mainframe VXI-1500 User Manual 1-6 © National Instruments Corporation Chapter 2 Installation and Configuration This chapter describes the necessary procedures for correctly preparing and operating your VXI-1500 mainframe. Before connecting the mainframe to a power source, read this chapter and the For Your Safety section located at the beginning of this manual. Site Considerations The VXI-1500 is designed to operate on a bench or in an instrument rack. Determine how you want to use your VXI-1500 and follow the appropriate installation instructions. The mainframe weighs 62 lb (28.2 kg) with no modules installed. The maximum module weight is 4 lb (1.8 kg) per slot. This results in a possible loaded mainframe weight of 114 lb (51.8 kg). Make sure your bench or instrument rack can accommodate this load. Power supply and module cooling is facilitated through apertures in the rear and along both sides of the mainframe. Module cooling air enters through filters and fan inlets located in the lower rear of the mainframe and exits through the upper sections on both sides, as shown in Figures 2-1 and 2-2. Power supply cooling air enters in one side of the mainframe and exits out the other side, as shown in Figures 2-1 and 2-2. Place your VXI-1500 on a bench top or in an instrument rack in such a way as to allow adequate ventilation near the fan tray (air inlets) and near the air outlet apertures along both sides of the mainframe. Keep other equipment a minimum of 3.0 in. (76.2 mm) away from the air inlets. © National Instruments Corporation 2-1 VXI-1500 User Manual Chapter 2 Installation and Configuration 1 2 Module Cooling Air Intake 1 Module Cooling Air Outlets 2 Power Supply Air Inlet Figure 2-1. VXI-1500 Mainframe Airflow Side View VXI-1500 User Manual 2-2 © National Instruments Corporation Chapter 2 Installation and Configuration Module Cooling Air Exhaust Module Cooling Air Exhaust Power Supply Air Intake Power Supply Air Exhaust Module Cooling Air Intake Figure 2-2. VXI-1500 Mainframe Airflow Rear View Install your mainframe so that you can easily access the rear panel. This simplifies the replacement of the air filter, fan tray module, or power supply if necessary. Rack Mounting Rack-mount applications require the optional rack-mount slide kit available from National Instruments. Refer to the instructions supplied with the rack-mount slide kit for properly installing your VXI-1500 in an instrument rack. Note: You may wish to remove the rubber feet from your VXI-1500 for rack mounting. To do so, unscrew the rubber feet counterclockwise. © National Instruments Corporation 2-3 VXI-1500 User Manual Chapter 2 Installation and Configuration Installing or Removing the Mainframe Front Door The VXI-1500 comes standard with a removable front door, as shown in Figure 2-3. To remove the door, rotate both locking knobs counterclockwise, partially open the door, and lift straight up. To re-install the door, line up the hinges of the door with those on the mainframe and lower the door into position. Figure 2-3. Removable Front Door VXI-1500 User Manual 2-4 © National Instruments Corporation Chapter 2 Installation and Configuration Setting Fan Speed The fan speed selector switch is located on the rear panel of the VXI-1500. Refer to Figure 1-3 for a diagram of the fan speed selector. Select HI for maximum cooling effectiveness or LO for more quiet operation. Connecting Safety Ground The VXI-1500 requires connection from the premise wire safety ground to the mainframe chassis grounding stud located on the rear panel. Refer to Figure 1-3 for a diagram of the chassis grounding stud. To connect the safety ground, complete the following steps: 1. Connect a 16 AWG (1.3 mm²) or larger wire to the chassis (safety) grounding stud using a toothed grounding lug. The wire insulation must be green with a yellow stripe or non-insulated (bare). 2. Attach the opposite end of the wire to permanent earth ground using toothed washers or a toothed lug. The chassis is designed with a three-position NEMA 15-5 style plug which is internally connected to the chassis of the mainframe. To minimize shock hazard, the earth safety ground must be connected when the mainframe is powered on. Connecting to AC Mains Power and Testing Power Up Caution: Make sure the mains power switch located on the front panel of the VXI-1500 (upper right) is in the Off position (0). Refer to Figure 1-2 for a diagram of the mains power switch. Do not install VXI modules prior to performing the first power-on test. The power supply is universal, allowing the mainframe to connect to all standard worldwide input voltages. Refer to Chapter 1, Getting Started, for power cord specifications. Attach input power through the rear AC inlet using the appropriate line cord supplied. Refer to Figure 1-3 for a diagram of the IEC 320 inlet. © National Instruments Corporation 2-5 VXI-1500 User Manual Chapter 2 Installation and Configuration Switch the mainframe to the On (1) position. Observe that all fans become operational. Using a digital voltmeter, check all voltages to ensure they are within the allowable limits. Refer to Table 2-1 and connect one lead of the voltmeter to a supply pin on the remote power monitoring connector (25-pin D-sub) located on the rear panel. Refer to Figure 1-3 for a diagram of the remote power monitoring connector. Connect the reference lead of the voltmeter to one of the ground pins. Compare each voltage reading to the values listed in Table 2-1. Table 2-1. Power Supply Voltages at Power Monitoring DB25 Pin Supply VXI Acceptable Voltage Range 1 +5 V 4.875 to 5.25 V 3 -12 V -12.6 to -11.64 V 5 -24 V -25.2 to -23.28 V 7 -2 V -2.1 to -1.9 V 2 +12 V 11.64 to 12.6 V 4 +24 V 23.28 to 25.2 V 6 -5.2 V -5.46 to -5.044 V 14, 15, 16, 17, 18, 19, 20 Logic Ground N/A If the voltages are within the specified ranges, the mainframe complies with VXI voltage limit specifications. Note: VXI-1500 User Manual If fans or power unit fail to function properly, refer to the Troubleshooting the VXI-1500 section of Chapter 3, Maintenance. 2-6 © National Instruments Corporation Chapter 2 Installation and Configuration Installing VXI Modules Caution: Turn off the mainframe power before installing VXI modules. Install C-size modules directly into the 13 C-size slots of the mainframe by first placing the module’s card edges into the front module guides (top and bottom). Slide the module to the rear of the mainframe until the module connectors mate solidly with the backplane connectors. Secure the module’s front panel to the mainframe using the module’s front-panel mounting screws. Installing Filler Panels To optimize module cooling performance, you should install filler panels into unused or empty slots. Secure with the captive mounting screws. Your kit includes an assortment of filler panels of various widths. Use the widest filler panels first to minimize the number of panels that you need to install. To further improve cooling performance, you can install airflow blockers into unused slots. Routing Cables The VXI-1500 has a built-in cable channel providing a variety of options for instrument cable routing. The channel is located in the bottom section of the mainframe. Cables may be routed out the front by removing the cable access panel via the four thumbscrews. See Figure 1-2 for a diagram of the cable access panel. Likewise, cables can be routed out the rear by removing the rear cable access panel. See Figure 1-3 for a diagram of the rear cable access panel. Cable apertures are also located in the bottom of the chassis. Note: Use the extra grommeting included in your kit to help protect your cables from possible damage by the front or rear aperture edges. © National Instruments Corporation 2-7 VXI-1500 User Manual Chapter 2 Installation and Configuration Remote Power Monitoring and Inhibit Interface The VXI-1500 mainframe provides for remote power monitoring and inhibit via a 25-position female D-sub connector located on the rear panel. Table 2-2 shows the pinout of the DB-25 connector. Table 2-2. DB-25 Connector Pinout DB25 Pin 1 14 2 15 3 16 4 17 5 18 6 19 7 20 8 Function Output #1 +5 V (signal) Output #1 (return) Output #2 +12 V (signal) Output #2 (return) Output #3 -12 V (signal) Output #3 (return) Output #4 +24 V (signal) Output #4 (return) Output #5 -24 V (signal) Output #5 (return) Output #6 -5.2 V (signal) Output #6 (return) Output #7 -2 V (signal) Output #7 (return) Auxiliary Vcc +5 V 21 Auxiliary Ground 10 General Shutdown 11 Reset Module B1 (switch) 24 Reset Module B2 (switch 0v) 12 Remote AC Fail Signal To use the remote power output inhibit feature, connect the General Shutdown (pin 10) signal to Auxiliary Ground (pin 21). The power supply inhibits its DC output as long as the General Shutdown signal is pulled to ground. DC output resumes when the General Shutdown pin is VXI-1500 User Manual 2-8 © National Instruments Corporation Chapter 2 Installation and Configuration disconnected. For remote reset, connect a momentary switch between pin 24 and pin 11 of the DB-25 connector. Receiver Interconnect Devices Your VXI-1500 mainframe has been designed to meet the VXIplug&play Systems Alliance VPP-8 specification, VXI Module/Mainframe to Receiver Interconnection. The specification defines the required mounting structure to ensure that any VXIplug&play-compatible interface will mount to a VXIplug&play-compatible mainframe. For more information on interface devices contact one or more of the following suppliers: • MAC Panel: (910) 861-3100 • TTI Testron: (401) 766-9100 • Virginia Panel Corporation: (540) 932-3300 If you are planning to use a receiver interconnect device, you must have the optional rack-mount slide kit and you must remove the following accessories: • Front handlesRemove the screws holding the handles in place from behind the front mounting bracket (supplied with the rack-mount slide kit). • Mainframe front doorLift straight up to remove the door. • Door hingesRemove the bolts holding the hinges to the front bezel. The bolts can be accessed with a hex-key tool without removing any other parts. Follow the instructions provided with the receiver interconnect device for installation onto your VXI-1500 mainframe. © National Instruments Corporation 2-9 VXI-1500 User Manual Chapter 3 Maintenance This chapter describes basic maintenance procedures you can perform on the VXI-1500 mainframe. Service Interval Clean the mainframe fan filter at a maximum interval of six months. Depending upon the amount of use and ambient dust levels in the operating environment, the filters may require more frequent cleaning. Clean dust from the mainframe exterior (and interior) as needed, based on the operating environment. Periodic cleaning reduces instrument breakdown and increases reliability. Preparation The information in this section is designed for use by qualified service personnel. Read the For Your Safety section at the beginning of this manual before attempting any procedures in this chapter. Caution: Many components within the mainframe are susceptible to static discharge damage. Service the mainframe only in a static-free environment. Observe standard handling precautions for static-sensitive devices while servicing the mainframe. Always wear a grounded wrist strap, or equivalent, while servicing the mainframe. © National Instruments Corporation 3-1 VXI-1500 User Manual Chapter 3 Maintenance Cleaning Cleaning procedures consist of exterior and interior cleaning of the mainframe and cleaning the fan filter. Refer to your module user documentation for information on cleaning the individual VXIbus modules. Caution: Always power-off the mainframe and disconnect the power cord before cleaning or servicing the mainframe. Interior Cleaning Use a dry, low-velocity stream of air to clean the interior of the mainframe. Use a soft-bristle brush for cleaning around components. If you must use a liquid for minor interior cleaning, use a 75% isopropyl alcohol solution and rinse with deionized water. Exterior Cleaning Clean the exterior surfaces of the mainframe with a dry lint-free cloth or a soft-bristle brush. If any dirt remains, wipe with a cloth moistened in a mild soap solution. Remove any soap residue by wiping with a cloth moistened with clear water. Do not use abrasive compounds on any part of the mainframe. Caution: Avoid getting moisture inside the mainframe during exterior cleaning. Use just enough moisture to dampen the cloth. Do not wash the front- or rear-panel connectors or switches. Cover these components while cleaning the mainframe. Do not use chemical cleaning agents; they may damage the mainframe. Avoid chemicals that contain benzene, toluene, xylene, acetone, or similar solvents. VXI-1500 User Manual 3-2 © National Instruments Corporation Chapter 3 Maintenance Cleaning the Fan Filters The mainframe cooling filter is easily removed from the rear of the mainframe by removing the four thumb screws shown in Figure 3-1. 2 1 1 Thumbscrews 2 Fan Filter Figure 3-1. VXI-1500 Thumbscrews Clean the fan filter by washing in a mild soap solution, and then vacuuming or blowing air through the filter. Rinse the filter with water and allow to dry before replacing it in the mainframe. © National Instruments Corporation 3-3 VXI-1500 User Manual Chapter 3 Maintenance Resetting the AC Mains Circuit Breaker In the event that your VXI-1500 encounters an over-current condition, the circuit breaker located on the rear panel will trip to prevent damage to the mainframe. Complete the following steps to reset the circuit breaker: 1. Turn the front panel power switch to the Off (0) position. 2. Depress the circuit breaker to reset it. 3. Turn the front panel power switch to the On (1) position. If the circuit breaker trips again, complete the following steps: 1. Disconnect the mainframe from the AC mains power source. 2. Turn the front panel power switch to the Off position. 3. Remove all VXIbus modules from the mainframe. 4. Complete the test procedure described in the Connecting to AC Mains Power and Testing Power Up section in Chapter 2, Installation and Configuration. 5. If any voltages are outside the acceptable limits, contact National Instruments. 6. If all voltages are within the acceptable limits, verify that the power requirements of your VXIbus modules can be met by your VXI-1500. Overloading the chassis can cause the breaker to trip. Refer to Appendix A, Specifications. 7. The over-current condition that caused your VXI-1500 circuit breaker to trip may be due to a faulty VXIbus module. Refer to the documentation that was supplied with your VXIbus modules for troubleshooting your modules. Troubleshooting the VXI-1500 Refer to Table 3-1 to troubleshoot the VXI-1500 mainframe. The table lists possible causes why the power does not come on and gives recommendations for correcting the problem. VXI-1500 User Manual 3-4 © National Instruments Corporation Chapter 3 Maintenance Table 3-1. Troubleshooting Possible Cause What to Do VXI-1500 mainframe not connected to power source. Make sure that the VXI-1500 is connected to a live electrical outlet. Try operating another piece of equipment from this outlet. Power switch is not switched on. Set the front power switch to the On (1) position. Remote inhibit input on the rear panel of the mainframe is active. De-activate the remote inhibit control provided by your system. Circuit breaker is tripped. Reset the circuit breaker. Refer to the Resetting the AC Mains Circuit Breaker section in this chapter. Power supply failure. Contact National Instruments. © National Instruments Corporation 3-5 VXI-1500 User Manual Appendix A Specifications This appendix contains complete specifications for the VXI-1500 mainframe. Electrical Table A-1. AC Input Specifications Characteristic Description Input Voltage Range 85 to 264 VAC Input Frequency Range 47 to 500 Hz Over-Current Protection 15 A circuit breaker Inrush Current 30 A Rms at 115 VAC 60 A Rms at 230 VAC Line Regulation 0.2% maximum from 10% to full load Power Factor .99 at 115 VAC .98 at 230 VAC Efficiency 80% typical Transient Surge 1.2/50 µs; 3 kV pulse, 2 joules, no damage either polarity Power Disconnect © National Instruments Corporation Front-panel power switch. Rear-panel connection allows for remote inhibit operation. Power cord provides main power disconnect. The power switch must be in the On position prior to use of remote inhibit. A-1 VXI-1500 User Manual Appendix A Specifications Table A-1. AC Input Specifications (Continued) Characteristic Description Power Supply Conducted Emissions Below EN55022 Class B, FCC B Table A-2. DC Output Specifications Characteristic Description o Maximum Power Available to Modules 1100 W at 115 VAC input and 0 to o 40 C o 1420 W at 230 VAC input and 0 to o 35 C DC Current Capacity (IMP) Voltage IMP (Steady-State Current) +24 V 8.3 A +12 V 16.7 A +5 V 80.0 A -2 V 10.0 A -5.2 V 38.5 A -12 V 16.7 A -24 V 8.3 A Load Regulation .2% maximum from 10% to full load Maximum Ripple and Noise Voltage Ripple/Noise +24 V 100 mV pp +12 V 50 mVpp +5 V 50 mVpp -2 V 50 mVpp -5.2 V 50 mVpp -12 V 50 mVpp -24 V 100 mVpp Over-Current Protection 105% to 139% at > 5 V output; 125% at ≤ 5 V output VXI-1500 User Manual Over-Voltage Protection 115% to 135% of rated voltage Power Supply Unit MTBF 50,000+ hours A-2 © National Instruments Corporation Appendix A Specifications Table A-2. DC Output Specifications (Continued) Characteristic Description Power Supply Unit MTTR Replacement in under 5 minutes Cooling Table A-3. Cooling Specifications Characteristic Description Per Slot Cooling Capacity 85 W Figures A-1 and A-2 show the worst-case slot-cooling curves of the mainframe. Module Cooling System Forced air circulation (positive pressurization) via three 140 cfm fans with HI/LO speed selector Slot Airflow Direction P2 to P1, bottom of module to top of module Module Cooling Intake Bottom rear of mainframe Module Cooling Exhaust Along both sides of mainframe Power Supply Cooling System Forced air circulation via integrated fan Power Supply Cooling Intake Right side of mainframe (viewed from front) Power Supply Cooling Exhaust Left side of mainframe (viewed from front) Module Cooling Fan MTBF 30,000+ hours Module Cooling Fan MTTR Replacement of fan unit in under 5 minutes © National Instruments Corporation A-3 VXI-1500 User Manual Appendix A Specifications Figures A-1 and A-2 show the VXI module cooling performance curves for blocked empty slots and open empty slots, respectively. VXI Module Cooling Performance Curve (Worst Slot: #8, Empty Slots Blocked) Pressure Drop (in. water) 0.14 0.12 0.1 0.08 0.06 0.04 0.02 0 0.0 10.0 20.0 30.0 40.0 50.0 Airflow (cfm ) Figure A-1. VXI Module Blocked Slot-Cooling Curve VXI Module Cooling Performance Curve (Worst Slot: #8, Empty Slots Open) Pressure Drop (in. water) 0.035 0.03 0.025 0.02 0.015 0.01 0.005 0 0.0 5.0 10.0 15.0 Airflow (cfm ) Figure A-2. VXI Module Open Slot-Cooling Curve VXI-1500 User Manual A-4 © National Instruments Corporation Appendix A Specifications Safety Table A-4. Safety Specifications Characteristic Description Safety Characteristics EN61010-1 (UL 3111-1, c-UL) IEC Characteristics Installation Category II Pollution Degree 2 Safety Class 1 Environmental Table A-5. Environmental Specifications Characteristic Operating Temperature Description o o o o 0 to 40 C at full power 0 to 55 C at half power o o Storage Temperature -20 to 65 C Operating Relative Humidity 10% to 95% RH non-condensing Altitude 1.24 miles (2 km) Functional Shock (Operating) MIL-T-28800E CLASS 3 (Half-Sine Shock Pulse, 11 ms duration, 30 g peak) Random Vibration (Operational)* 5 to 500 Hz, 0.31 g Random Vibration (Non-Operational)* 5 to 500 Hz, 2.5 g Electromagnetic Compatibility (EMC) Emissions Refer to DOC supplied with chassis for compliance to relevant directives. EMI FCC Class A compliant * Random vibration profiles were developed in accordance with MIL-STD-810E Method 514. Test levels exceed those recommended in MIL-STD-810E for Category 1 (Basic Transportation, Figures 514.4-1 through 514.4-3. © National Instruments Corporation A-5 VXI-1500 User Manual Appendix A Specifications Backplane Table A-6. Backplane Specifications Characteristic Size Description C-sized, 13 slot, VXIbus Specification, Revision 1.4 Bus Grant/Interrupt Acknowledge Auto-configuring (jumperless) VXIbus CLK10 and CLK100 Distribution Differential tracking and line length equalization utilized to minimize signal skew. On-board socketed ECL buffers utilized for distribution. Backplane Bare-Board Material UL 94 V-0 recognized (File No. E 116551) 96-Pin Backplane Connectors Conform to IEC 603-2 and are UL 94 V-0 rated Mechanical Table A-7. Mechanical Specifications Characteristic Description Overall Dimensions Standard Mainframe (7U) Height 39.2 cm (15.45 in.) Width 43.7 cm (17.20 in.) Depth 71.3 cm (28.02 in.) Note: 1.27 cm (.5 in.) added to height when feet are installed. Weight VXI-1500 User Manual 28.18 kg (62 lb.) with no modules installed A-6 © National Instruments Corporation Appendix A Specifications Table A-7. Mechanical Specifications (Continued) Characteristic Description Maximum Module Weight 1.8 kg (4 lb.) Materials Sheet aluminum (5052-H32) and Cold Rolled Steel Finish © National Instruments Corporation Unpainted Aluminum Conductive Clear Iridite Cold Rolled Steel Clear Chromate Zinc Plating Paint Polyurethane Enamel A-7 VXI-1500 User Manual Appendix B Pinouts This appendix describes the P1 and P2 connector pinouts for the VXI-1500 backplane. Table B-1 shows the P1 connector pinouts for all slots in the VXI-1500. Table B-2 shows the P2 connector pinouts for all non-Slot 0 slots. Table B-3 shows the P2 connector pinouts for the VXIbus Slot 0. © National Instruments Corporation B-1 VXI-1500 User Manual Appendix B Pinouts Table B-1. P1 Connector Pinouts VXI-1500 User Manual Pin Row A Row B 1 2 3 4 5 6 7 8 9 10 11 12 13 14 15 16 17 18 19 20 21 22 23 24 25 26 27 28 29 30 31 32 D00 D01 D02 D03 D04 D05 D06 D07 GND SYSCLK GND DS1* DS0* WRITE* GND DTACL* GND AS* GND IACK* IACKIN* IACKOUT* AM4 A07 A06 A05 A04 A03 A02 A01 -12 V +5 V BBSY* BCLR* ACFAIL* BG0IN* BG0OUT* BG1IN* BG1OUT* BG2IN* BG2OUT* BG3IN* BG3OUT* BR0* BR1* BR2* BR3* AM0 AM1 AM2 AM3 GND SERCLK SERDAT* GND IRQ7* IRQ6* IRQ5* IRQ4* IRQ3* IRQ2* IRQ1* +5 V STDBY +5 V B-2 Row C D08 D09 D10 D11 D12 D13 D14 D15 GND SYSFAIL* BERR* SYSRESET* LWORD* AM5 A23 A22 A21 A20 A19 A18 A17 A16 A15 A14 A13 A12 A11 A10 A09 A08 +12 V +5 V © National Instruments Corporation Appendix B Pinouts Table B-2. P2 Connector Pinouts for All Non-Slot 0 Locations Pin 1 2 3 4 5 6 7 8 9 10 11 12 13 14 15 16 17 18 19 20 21 22 23 24 25 26 27 28 29 30 31 32 © National Instruments Corporation Row A Row B ECLTRG0 -2 V ECLTRG1 GND LBUSA00 LBUSA01 -5.2 V LBUSA02 LBUSA03 GND LBUSA04 LBUSA05 -5.2 V LBUSA06 LBUSA07 GND LBUSA08 LBUSA09 -5.2 V LBUSA10 LBUSA11 GND TTLTRG0* TTLTRG2* +5 V TTLTRG4* TTLTRG6* GND RSV2 MODID GND SUMBUS +5 V GND RSV1 A24 A25 A26 A27 A28 A29 A30 A31 GND +5 V D16 D17 D18 D19 D20 D21 D22 D23 GND D24 D25 D26 D27 D28 D29 D30 D31 GND +5 V B-3 Row C CLK10+ CLK10GND -5.2 V LBUSC00 LBUSC01 GND LBUSC02 LBUSC03 GND LBUSC04 LBUSC05 -2 V LBUSC06 LBUSC07 GND LBUSC08 LBUSC09 -5.2 V LBUSC10 LBUSC11 GND TTLTRG1* TTLTRG3* GND TTLTRG5* TTLTRG7* GND RSV3 GND +24 V -24 V VXI-1500 User Manual Appendix B Pinouts Table B-3. P2 Connector Pinouts for VXIbus Slot 0 Pin 1 2 3 4 5 6 7 8 9 10 11 12 13 14 15 16 17 18 19 20 21 22 23 24 25 26 27 28 29 30 31 32 VXI-1500 User Manual Row A Row B ECLTRG0 -2 V ECLTRG1 GND MODID12 MODID11 -5.2 V MODID10 MODID09 GND MODID08 MODID07 -5.2 V MODID06 MODID05 GND MODID04 MODID03 -5.2 V MODID02 MODID01 GND TTLTRG0* TTLTRG2* +5 V TTLTRG4* TTLTRG6* GND RSV2 MODID00 GND SUMBUS +5 V GND RSV1 A24 A25 A26 A27 A28 A29 A30 A31 GND +5 V D16 D17 D18 D19 D20 D21 D22 D23 GND D24 D25 D26 D27 D28 D29 D30 D31 GND +5 V B-4 Row C CLK10+ CLK10GND -5.2 V LBUSC00 LBUSC01 GND LBUSC02 LBUSC03 GND LBUSC04 LBUSC05 -2 V LBUSC06 LBUSC07 GND LBUSC08 LBUSC09 -5.2 V LBUSC10 LBUSC11 GND TTLTRG1* TTLTRG3* GND TTLTRG5* TTLTRG7* GND RSV3 GND +24 V -24 V © National Instruments Corporation Appendix C Customer Communication For your convenience, this appendix contains forms to help you gather the information necessary to help us solve technical problems and a form you can use to comment on the product documentation. When you contact us, we need the information on the Technical Support Form and the configuration form, if your manual contains one, about your system configuration to answer your questions as quickly as possible. National Instruments has technical assistance through electronic, fax, and telephone systems to quickly provide the information you need. Our electronic services include a bulletin board service, an FTP site, a Fax-on-Demand system, and e-mail support. If you have a hardware or software problem, first try the electronic support systems. If the information available on these systems does not answer your questions, we offer fax and telephone support through our technical support centers, which are staffed by application engineers. Electronic Services Bulletin Board Support National Instruments has BBS and FTP sites dedicated for 24-hour support with a collection of files and documents to answer most common customer questions. From these sites, you can also download the latest instrument drivers, updates, and example programs. For recorded instructions on how to use the bulletin board and FTP services and for BBS automated information, call (512) 795-6990. You can access these services at: United States: (512) 794-5422 Up to 14,400 baud, 8 data bits, 1 stop bit, no parity United Kingdom: 01635 551422 Up to 9,600 baud, 8 data bits, 1 stop bit, no parity France: 01 48 65 15 59 Up to 9,600 baud, 8 data bits, 1 stop bit, no parity FTP Support To access our FTP site, log on to our Internet host, ftp.natinst.com, as anonymous and use your Internet address, such as [email protected], as your password. The support files and documents are located in the /support directories. © National Instruments Corporation C-1 VXI-1500 User Manual Fax-on-Demand Support Fax-on-Demand is a 24-hour information retrieval system containing a library of documents on a wide range of technical information. You can access Fax-on-Demand from a touch-tone telephone at (512) 418-1111. E-Mail Support (currently U.S. only) You can submit technical support questions to the applications engineering team through e-mail at the Internet address listed below. Remember to include your name, address, and phone number so we can contact you with solutions and suggestions. [email protected] Telephone and Fax Support National Instruments has branch offices all over the world. Use the list below to find the technical support number for your country. If there is no National Instruments office in your country, contact the source from which you purchased your software to obtain support. Australia Austria Belgium Canada (Ontario) Canada (Quebec) Denmark Finland France Germany Hong Kong Israel Italy Japan Korea Mexico Netherlands Norway Singapore Spain Sweden Switzerland Taiwan U.K. Telephone 03 9879 5166 0662 45 79 90 0 02 757 00 20 905 785 0085 514 694 8521 45 76 26 00 09 527 2321 01 48 14 24 24 089 741 31 30 2645 3186 03 5734815 02 413091 03 5472 2970 02 596 7456 5 520 2635 0348 433466 32 84 84 00 2265886 91 640 0085 08 730 49 70 056 200 51 51 02 377 1200 01635 523545 Fax 03 9879 6277 0662 45 79 90 19 02 757 03 11 905 785 0086 514 694 4399 45 76 26 02 09 502 2930 01 48 14 24 14 089 714 60 35 2686 8505 03 5734816 02 41309215 03 5472 2977 02 596 7455 5 520 3282 0348 430673 32 84 86 00 2265887 91 640 0533 08 730 43 70 056 200 51 55 02 737 4644 01635 523154 Technical Support Form Photocopy this form and update it each time you make changes to your software or hardware, and use the completed copy of this form as a reference for your current configuration. Completing this form accurately before contacting National Instruments for technical support helps our applications engineers answer your questions more efficiently. If you are using any National Instruments hardware or software products related to this problem, include the configuration forms from their user manuals. Include additional pages if necessary. Name __________________________________________________________________________ Title ___________________________________________________________________________ Company ________________________________________________________________________ Address ________________________________________________________________________ ________________________________________________________________________________ Fax ( ____ )__________________________ Phone ( ___ ) ___________________________ Computer brand ___________________ Model ______________ Processor ________________ Operating system (include version number) _____________________________________________ Clock Speed ________ MHz Mouse ____ yes RAM __________ MB _____no Hard disk capacity ________ MB Display adapter ________________ Other adapters installed ______________________________ Brand ____________________________________________ Instruments used __________________________________________________________________ National Instruments hardware product model _____________________ Revision ____________ Configuration ____________________________________________________________________ National Instruments software product ___________________________ Version ____________ Configuration ____________________________________________________________________ The problem is ___________________________________________________________________ ________________________________________________________________________________ ________________________________________________________________________________ ________________________________________________________________________________ List any error messages ____________________________________________________________ ________________________________________________________________________________ ________________________________________________________________________________ The following steps will reproduce the problem _________________________________________ ________________________________________________________________________________ ________________________________________________________________________________ Hardware and Software Configuration Form Record the settings and revisions of your hardware and software on the line to the right of each item. Complete a new copy of this form each time you revise your software or hardware configuration, and use this form as a reference for your current configuration. Completing this form accurately before contacting National Instruments for technical support helps our applications engineers answer your questions more efficiently. National Instruments Products Complete Part Number ____________________________________________________________ Serial Number ___________________________________________________________________ Line Voltage ____________________________________________________________________ Fan Speed ______________________________________________________________________ Safety Ground Connected? _________________________________________________________ Rack-Mount or Bench-Top Configuration? ____________________________________________ Using Remote Power Monitoring? ___________________________________________________ Filler Panels Installed in Empty Slots? ________________________________________________ Other Products List and describe all devices installed in your mainframe. Indicate if any are receiver interconnect devices. Slot 0 1 2 3 4 5 6 7 8 9 10 11 12 Logical Address Interrupt Level Manufacturer, Description, and Function Documentation Comment Form National Instruments encourages you to comment on the documentation supplied with our products. This information helps us provide quality products to meet your needs. Title: VXI-1500 User Manual Edition Date: March 1997 Part Number: 321510A-01 Please comment on the completeness, clarity, and organization of the manual. ________________________________________________________________________________ ________________________________________________________________________________ ________________________________________________________________________________ ________________________________________________________________________________ ________________________________________________________________________________ ________________________________________________________________________________ ________________________________________________________________________________ If you find errors in the manual, please record the page numbers and describe the errors. ________________________________________________________________________________ ________________________________________________________________________________ ________________________________________________________________________________ ________________________________________________________________________________ ________________________________________________________________________________ ________________________________________________________________________________ ________________________________________________________________________________ Thank you for your help. Name __________________________________________________________________________ Title ___________________________________________________________________________ Company ________________________________________________________________________ Address ________________________________________________________________________ ________________________________________________________________________________ Phone ( ____ ) ________________________ Fax ( ____ ) ___________________________ Mail to: Technical Publications National Instruments Corporation 6504 Bridge Point Parkway Austin, TX 78730-5039 Fax to: Technical Publications National Instruments Corporation (512) 794-5678 Glossary Prefix Meaning Value µ- micro- 10-6 m- milli- 10-3 c- centi- 10-2 k- kilo- 103 M- mega- 106 Symbols ° Degrees. ≥ Equal or greater than. ≤ Equal or less than. % Percent. A A Amperes. AC Alternating current. ANSI American National Standards Institute. AWG American Wire Gauge. © National Instruments Corporation G-1 VXI-1500 User Manual Glossary B backplane An assembly, typically a printed circuit board, with 96-pin connectors and signal paths that bus the connector pins. A C-size VXIbus system will have two sets of bused connectors called J1 and J2. C C Celsius. cfm Cubic feet per minute. CFR Cooperative Fuel Research. CSA Canadian Standards Association. D daisy-chain A method of propagating signals along a bus, in which the devices are prioritized on the basis of their position on the bus. DC Direct current. E ECL Emitter-coupled logic. EIA Electronic Industries Association. EMC Electromagnetic Compatibility. F FCC Federal Communications Commission. G g VXI-1500 User Manual Unit of acceleration. G-2 © National Instruments Corporation Glossary H Hz Hertz; cycles per second. I IMP Mainframe peak current. IEC International Electrotechnical Commission; an organization that sets international electrical and electronics standards. IEEE Institute of Electrical and Electronics Engineers. in. Inches. L lb Pounds. M m Meters. MTBF Mean time between failure. MTTR Mean time to repair. N NEMA National Electrical Manufacturers Association. R RH Relative humidity. RMS Root mean square. A method used to measure electrical output in volts and watts. © National Instruments Corporation G-3 VXI-1500 User Manual Glossary S s Seconds. Slot 0 module A device configured for installation in Slot 0 of a VXIbus mainframe. This device is unique in the VXIbus system in that it performs the VMEbus system controller functions, including clock sourcing and arbitration for data transfers across the backplane. Installing such a device into any other slot can damage the device, the VXIbus backplane, or both. U UL Underwriter’s Laboratories. V V Volts. VPP Peak to peak voltage. VAC Volts alternating current. VPP VXIplug&play. VXI VMEbus Extensions for Instrumentation. VXIbus See VXI. W W VXI-1500 User Manual Watts. G-4 © National Instruments Corporation Index A precautions, 3-2 configuration and installation, 2-1 to 2-9 AC mains power connection, 2-5 to 2-6 airflow rear view (figure), 2-3 side view (figure), 2-2 cable routing, 2-7 fan speed selection, 2-5 filler panels, 2-7 power up testing, 2-5 to 2-6 rack mounting, 2-3 receiver interconnect devices, 2-9 remote power monitoring and inhibit interface, 2-8 to 2-9 removing mainframe front door (figure), 2-4 safety ground connection, 2-5 site considerations, 2-1 to 2-3 unpacking the VXI-1500, 1-1 VXI module installation, 2-7 weight of VXI-1500, 2-1 cooling system cleaning fan filters, 3-3 fan speed selection, 2-5 filler panel installation, 2-7 site considerations, 2-1 specifications, A-3 to A-4 VXI-1500 mainframe airflow rear view (figure), 2-3 AC mains power connecting to AC mains power, 2-5 to 2-6 power on test, 2-1 to 2-2 power supply voltages at power monitoring (table), 2-6 resetting circuit breaker, 3-4 B backplane connections P1 connector pinouts (table), B-2 P2 connector pinouts all non-Slot 0 locations (table), B-3 VXIbus Slot 0 (table), B-4 backplane specifications, A-6 bulletin board support, C-1 C cables power cables (table), 1-2 routing, 2-7 circuit breaker, resetting, 3-4 cleaning the VXI-1500, 3-2 to 3-3 exterior, 3-2 fan filters, 3-3 interior, 3-2 © National Instruments Corporation I-1 VXI-1500 User Manual Index M side view (figure), 2-2 customer communication, xii, C-1 to C-2 maintenance of VXI-1500, 3-1 to 3-5 cleaning, 3-2 exterior, 3-2 interior, 3-2 precautions, 3-2 fan filters, cleaning, 3-3 preparation, 3-1 service interval, 3-1 static discharge damage (caution), 3-1 troubleshooting (table), 3-4 to 3-5 manual. See documentation. mechanical specifications, A-6 to A-7 D DB-25 connector pinout (figure), 2-8 documentation conventions used in manual, xii organization of manual, xi related documentation, xii E electrical specifications, A-1 to A-3 AC input, A-1 to A-2 DC output, A-2 to A-3 electronic support services, C-1 to C-2 e-mail support, C-2 environmental specifications, A-5 equipment, optional, 1-2 to 1-3 N non-Slot 0 locations, P2 connector pinouts (table), B-3 O optional equipment, 1-2 to 1-3 F fan filters, cleaning, 3-3 fan speed selection, 2-5 Fax-on-Demand support, C-2 filler panels, installing, 2-7 front door, removing (figure), 2-4 FTP support, C-1 P P1 connector pinouts (table), B-2 P2 connector pinouts all non-Slot 0 locations (table), B-3 VXIbus Slot 0 (table), B-4 pinouts DB-25 connector pinout (figure), 2-8 P1 connector pinouts (table), B-2 P2 connector pinouts all non-Slot 0 locations (table), B-3 VXIbus Slot 0 (table), B-4 power cables (table), 1-2 power monitoring, remote, 2-8 to 2-9 DB-25 connector pinout (figure), 2-8 power on test, 2-1 to 2-2 G getting started with VXI-1500. See VXI-1500. ground, connecting, 2-5 I inhibit interface, 2-8 to 2-9 installation. See configuration and installation. VXI-1500 User Manual I-2 © National Instruments Corporation Index power supply connecting to AC mains power, 2-5 to 2-6 electrical specifications, A-1 to A-3 AC input, A-1 to A-2 DC output, A-2 to A-3 troubleshooting (table), 3-4 to 3-5 voltages at power monitoring (table), 2-6 T R V rack-mounted slide kit illustration, 1-3 installation, 2-3 overview, 1-2 receiver interconnect devices, 2-9 remote power monitoring and inhibit interface, 2-8 to 2-9 DB-25 connector pinout (figure), 2-8 requirements for getting started, 1-1 to 1-2 routing cables, 2-7 VXI modules, installing, 2-7 VXI-1500. See also specific components, e.g., power supply. features, 1-4 to 1-6 front view (figure), 1-5 optional equipment, 1-2 to 1-3 rear view (figure), 1-6 requirements for getting started, 1-1 to 1-2 unpacking, 1-1 VXIbus Slot 0, P2 connector pinouts (table), B-4 VXIplug&play Systems Alliance VPP-8 specification, 2-9 technical support, C-1 to C-2 telephone and fax support, C-2 troubleshooting the VXI-1500, 3-4 to 3-5 U unpacking the VXI-1500, 1-1 S safety ground, connecting, 2-5 safety specifications, A-5 Slot 0, P2 connector pinouts all non-Slot 0 locations (table), B-3 VXIbus Slot 0 (table), B-4 specifications backplane, A-6 cooling, A-3 to A-4 electrical, A-1 to A-3 AC input, A-1 to A-2 DC output, A-2 to A-3 environmental, A-5 mechanical, A-6 to A-7 safety, A-5 © National Instruments Corporation I-3 VXI-1500 User Manual