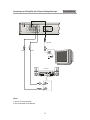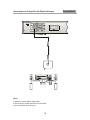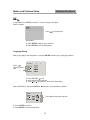
1
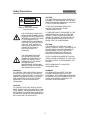
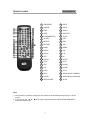
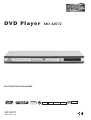
D VD Play e r
MD 42072
Instruction manual
Kodak
P H OTO
MD 42072
MSN 5001 4410
DVD+R
DVD – R
DVD+RW
DVD – RW
DOLBY
D I G I T A L
Content
Introduction
•
•
•
•
•
Safety Precautions..........................................................................................2
Important Safety Instructions ..........................................................................3
Features..........................................................................................................5
Front Panel and Rear Panel Illustration ..........................................................6
Remote Control...............................................................................................7
Connections
• Connecting to a TV set ...................................................................................8
• Connecting to an AV Receiver with 2 Channel Analog Audio Input ................9
• Connecting to an AV Receiver with Digital Audio Input.................................10
Basic Playback
• Basic Operation.............................................................................................11
Advanced Features
•
•
•
•
Modes and Features Setup...........................................................................12
Remote Control Operation ............................................................................17
MP3 Playback ...............................................................................................26
KODAK Picture CD playback........................................................................27
Others
• Troubleshooting ............................................................................................28
• Insert batteries ..............................................................................................29
• Specifications................................................................................................30
Please read this User Manual carefully to ensure proper use of this product and
keep this manual for further reference.
1
Safety Precautions
Introduction
CAUTION:
THE UNIT EMPLOYS A LASER SYSTEM. TO
EN-SURE THE PROPER USE OF THE UNIT,
READ THIS MANUAL CAREFULLY AND KEEP
IT FOR FUTURE REFERENCE.
CAUTION
Risk of electric shock
Do not open
CAUTION
RISK OF ELECTRIC SHOCK
DO NOT OPEN
IF THE UNIT REQUIRES SERVICING,
CONTACT THE SELLER OR SEE
"TROUBLESHOOTING".
TO PREVENT DIRECT EXPOSURE TO THE
LASER RADIATION, DO NOT OPEN THE
CABINET. VISIBLE LASER MAY RADIATE
WHEN THE CABINET IS OPENED OR THE
INTERLOCKS ARE DEFEATED. DO NOT
STARE INTO THE LASER BEAMS.
THE LIGHTNING FLASH WITH
ARRO-WHEAD SYMBOL WITHIN
AN EQUIL-ATERAL TRIANGLE IS
INTENDED TO ALERT THE USER
TO THE PRESEN-CE OF
UNINSULATED "DANGEROUS
VOLTAGE" WITHIN THE UNIT'S
CABI-NET THAT MAY BE OF
SUFFICIENT MAGNITUDE TO
CONSTITUTE A RISK OF
ELECTRIC SHOCK TO
PERSONS.
CAUTION:
THE DVD VIDEO PLAYER IS A CLASS 1
LASER PRODUCT. USE OF CONTROLS OR
ADJUST-MENTS OR PERFORMANCE OF
PROCEDURES OTHER THAN THOSE
SPECIFIED HEREIN MAY RESULT IN
HAZARDOUS RADIATION EXPOSURE.
THE EXCLAMATION POINT
WITHIN AN EQUILATERAL
TRIANGLE IS INTENDED TO
ALERT THE USER TO THE
PRESENCE OF IMPORTANT
OPERATING AND
MAINTENANCE (SERVICING)
INSTRUCTIONS IN THE MANUAL
ACCOMPANYING THE UNIT.
AS THE LASER BEAM USED IN THIS DVD
VIDEO PLAYER IS HARMFUL TO THE EYES,
DO NOT ATTEMPT TO DISASSEMBLE THE
CABINET.
REFER SERVICING TO QUALIFIED
PERSONNEL ONLY.
WARNING:
TO PREVENT FIRE OR ELECTRIC SHOCK,
DO NOT EXPOSE THE UNIT TO RAIN OR
MOISTURE. NEVER ATTEMPT TO OPEN THE
CABINET, DANGEROUS HIGH VOLTAGES
ARE PRESENTED IN THE UNIT. REFER
SERVICING TO QUALIFIED SERVICE
PERSONNEL.
WARNING:
FCC REGULATIONS STATE THAT ANY
CHANGE OR MODIFICATION TO THE
EQUIPMENT, NOT EXPRESSLY APPROVED
BY MAKER OR ITS AUTHORIZED PARTIES,
COULD VOID USER'S AUTHORITY TO
OPERATE THIS EQUIPMENT.
CAUTION:
TO PREVENT ELECTRIC SHOCK, MATCH
WIDE- BLADE PLUG WITH WIDE SLOT AND
FULLY INSERT. THE APPARATUS SHALL NOT
BE EXPOSED TO WATER AND NO OBJECTS
FILLED WITH LIQUID SUCH AS VASES SHALL
BE PLACED ON THE APPARATUS.
2
Important Safety Instructions
Introduction
1. Read Instructions
All the safety and operating instructions should
be read before the product is operated.
9. Power Sources
This product should be operated only from the
type of power source indicated on the marking
label. If you are not sure of the type of power
supply to your home, consult your product dealer
or local power company. For products intended
to operate from battery power or other sources,
refer to the operating instructions.
2. Retain Instructions
The safety and operating instructions should be
retained for future reference.
3. Heed Warnings
All warnings on the product and in the operating
instructions should be adhered to.
10. Power Cord Protection
Power supply cords should be routed so that
they are not likely to be walked on or pinched
by items placed upon or against them, paying
particular attention to cords at plugs, convenience
receptacles, and the point where they exit from
the product.
4. Follow Instructions
All operating instructions should be followed.
5. Cleaning
Unplug this product from the wall outlet before
cleaning. Do not use liquid cleaners or aerosol
cleaners. Use a damp cloth for cleaning.
6. Attachments
Do not use attachments not recommended by
the product manufacturer as they may cause
hazards.
7. Water and Moisture
Do not use this product near water for example,
near a bathtub, wash bowl, kitchen sink, or
laundry tub; in a wet basement; or near a
swimming pool; and the like.
8. Ventilation
Slots and openings in the cabinet are provided
for ventilation and to ensure reliable operation
of the product and to protect it from overheating,
and these openings must not be blocked or
covered. The openings should never be blocked
by placing the product on a bed, sofa, rug, or
other similar surface. This product should not
be placed in a built-in installation such as a
bookcase or rack unless proper ventilation is
provided or the manufacturer's instructions have
been adhered to.
3
Important Safety Instructions
Introduction
11. Object and Liquid Entry
Never push objects of any kind into this product
through openings as they may touch dangerous
voltage points or short-out parts that could result
in a fire or electric shock. Never spill liquid of
any kind on the product.
12. Servicing
Do not attempt to service this product yourself
as opening or removing covers may expose you
to dangerous voltage or other hazards. Refer
all servicing to qualified service personnel.
13. Damage Requiring Service
Unplug this product from the wall outlet and refer
servicing to qualified service personnel under
the following conditions:
A) If liquid has been spilled, or objects have
fallen into the product,
B) If the product has been exposed to rain or
water,
C) If the product does not operate normally by
following the operating instructions. Adjust only
those controls that are covered by the operating
instructions as an improper adjustment of other
controls may result in damage and will often
require extensive work by a qualified technician
to restore the product to its normal operation,
D) If the product has been dropped or damaged
in any way, and
E) When the product exhibits a distinct change
in performance this indicates a need for service.
14. Heat
The product should be situated away from heat
sources such as radiators, heat registers, stoves,
or other products (including amplifiers) that
produce heat.
4
Features
Introduction
Disc formats supported by this player:
DOLBY
Dolby Digital
Multi-angle
D I G I T A L
Kodak
Picture CD
KODAK picture CDs
CC
Closed Caption
MP3 files on
CD-R/CD-RW
32
Subtitle choices
DVD video
8
Audio choices
Parental Lock
16:9 LB
TV Aspect Ratio
modes
COMPATIBLE
VIDEO
R RESTRICTED
This product incorporates copyright protection technology that is protected by method claims of
certain U.S. patents and other intellectual property rights owned by Macrovision Corporation and
other rights owners. Use of this copyright protection technology must be authorized by and is
intended for home and other limited viewing uses only unless otherwise authorized by Macrovision
Corporation. Reverse engineering or disassembly is prohibited.
The product complies with the KODAK Picture CD format and will display KODAK Picture CDs.
The "KODAK Picture CD Compatible" logo is a trademark of Eastman Kodak Company and is
used with permission.
Manufactured under license from Dolby Laboratories."Dolby" and the double-D symbol are
trademarks of Dolby Laboratories. Confidential Unpublished Works. c 1992-1997 Dolby
Laboratories, Inc. All rights reserved.
5
Remote control
Introduction
1
39
2
3
4
5
6
7
8
9
10
11
12
13
14
15
16
17
18
19
20
A-B REPEAT
21
MUTE
POWER
22
23
24
25
26
27
28
29
30
31
32
33
34
35
36
37
38
39
40
PROG
TIME
STEP
0-9 NUMBER KEY
10+ KEY
REPEAT
RETURN
MARK
ANGLE
SETUP
LEFT
ENTER
STOP
PBC
N/P
PREV
NEXT
CLEAR
OPEN/CLOSE
AUDIO
SUBTITLE
ZOOM
OSD
RAN
VOL+
MENU
VOLL/R
UP
RIGHT
PLAY
DOWN
PAUSE
TITLE
SEARCH QUICKLY FORWARD
SEARCH QUICKLY BACKWARD
SLOW
Note:
1. Please note that reference numbers for the remote are described beginning on page 17 of this
manual.
2. In this manual,
will be used to represent different NAVIGATION ARROWS on
the remote respectively.
7
Connecting to a TV Set Connections
Connections
230V 50HZ
VIDEO IN
VIDEO
Connect either the Scart cable or the Cinch cable.
8
Connecting to an AV Amplifier with 2 Channel Analog Audio Input
230V 50Hz
YELLOW
RED
WHITE
VIDEO
Amplifier
V
O
LU
M
E
D
O
W
N
B
A
S
SM
IC
DVD IN
Notes:
1. Set the TV to the AVinput.
2. Set the Amplifier to the AVinput.
9
U
P
E
C
H
O
Connections
Connecting to an AV Amplifier with Digital Audio Input
230V 50Hz
Co axial cab le
U
P
Notes:
1. Select the Coaxial digital audio output.
2. Set the player's audio out to Raw or PCM mode .
3. Set the Amplifier to the AV input.
10
Connections
Modes and Features Setup
Advanced Features
In stop mode, press SETUP, and the TV screen will display the Setup
Menu as follows:
Press
to change items
Setup Menü
A. Press ENTER to display each submenu
B. Press SETUP to exit the Setup Menu
Language Setup
Select [Language] in the Setup Menu, and press ENTER to display the [Language] submenu:
Press
to
select the menu
item
A. Press ENTER or to set
B. Press to go back one menu
C. Press OR repeatedly to return to the Setup Menu
Select [OSD Menu], and press ENTER or
to display the [OSD Menu] submenu:
Press
A . Press ENTER to confirm.
B. Press SETUP to exit the Setup Menu.
12
to change your selection
Modes and Features Setup
Advanced Features
Language Setup
Select [Subtitle], and press ENTER or to display the [Subtitle] submenu:
Press
to change your selection
Note:
Subtitle languages vary by disc.
A. Press ENTER to confirm
B. Press SETUP to exit the Setup
Menu
Select [Audio],and press ENTER or
to display the [Audio] submenu:
Press
to change your selection
Note:
Audio languages vary by disc.
A. Press ENTER to confirm
B. Press SETUP to exit the Setup
Menu
Select [DVD Menu], and press ENTER or
to display the [DVD Menu] submenu:
Press
to change your selection
Note:
Menu languages vary by disc.
A. Press ENTER to confirm
B. Press SETUP to exit the Setup
Menu
13
Modes and Features Setup
Advanced Features
Video Setup
Select [Video] in the Setup Menu,and press ENTER to display the [Video] submenu:
Press
to select the
menu item
A. Pre ss ENTER or to set
B. Press to return to the Setup Menu
Select [TV shape], and press ENTER or
to display the [TV shape] submenu:
Press
to change your selection
A . Press ENTER to confirm
B. Press SETUP to exit the Setup Menu
[4:3 PS] - Pan and scan refers to pictures where part of pictures is cut off so it fills the whole screen.
[4:3LB] - Letter Box refers to pictures where black bands appear at the top and bottom.
[16:9] - The picture fills the screen of a wide-screen (16:9) television.
Note: Not all DVDs offer movies in Full Screen format. If not, the disc will override your
TV Display setting and the movie will be displayed in Letterbox format.
Select [TV system] and press ENTER or
to display the [TV system] submenu:
Press
to change your selection
A. Press ENTER to confirm
B. Press SETUP to exit the Setup Menu.
[NTSC] -Select if you are using NTSC signal system to match your TV set.
[PAL] -Select if you are using PAL signal system to match your TV set.
[AUTO]- Select if you are using AUTO signal system to match your TV set.
14
Modes and Features Setup
Advanced Features
Select [Video Output], and press ENTER or to display the [Video
Out] submenu:
A . Press ENTER to confirm
B. Press SETUP to exit the Setup Menu
Press to change your
selection
Audio Setup
The Audio menu allows you to set the analog and digital audio outputs to correspond with the
external components you have connected to the player. For example, if you connected the player
to a TV using the Stereo Audio jacks, you should set 2 channel to Enjoy downmixed stereo audio.
•
•
You can set the audio format for each of the following sources:
MP3, CD and . Others
DVD playback must be stopped in order to adjust the Audio setup.
Set Digital Out to:
PCM (default) To output 2 channel digital from the coaxial digital
audio outputs; e.g., to a Minidisc recorder.
RAW To output the raw 5.1 channel digital bitstream form the
coaxial digital audio outputs; e.g., to an external amplifier with
a Dolby Digital decoder.
Off To disable Dolby Digital decoder. Press SETUP to save and
exit.
PCM stands for Pulse Code Modulation, and is the standard 2-channel stereo format used
for audio Cds.
15
Modes and Features Setup
Advanced Features
System Setup
I The system menu allows you to block playback of
DVDs based on their ratings.
Setting the Password & Rating Level
The DVD player allows you to block playback of
inappropriate content with a password-protected
Rating system (not all discs are rated).
1:K id Sa fe
2:G
3:P G
4:P G- 13
5:P G- R
6:R
7:N C - 17
8:A du lt
A. From Stop mode, press SETUP.
B. Select LEVEL and press ENTER.
C. Select and press ENTER repeatedly to set the from 1 (most restrictive) to 8( least restrictive ).
If a password has already been set, the lock icon will be closed. You will not be
able to select until you SELECT the correct password using the 0-9 keys.
D. Select Password.
E. Use the 0-9 keys to SELECT a 4-digit password and press ENTER. The lock icon will
close to indicate that the and password are set.
F. Press SETUP to save and exit.
Not all DVDs are rated.
DVDs that are rated higher than the level you select will not play without SELECTING the correct
password.
If you forget your Rating password, select 8888 to clear the memory. Keep this password out of
reach of children as if will always unlock the Parental Control setting.
16
Remote Control Operation
Advanced Features
• During playback, press STANDBY to stop the player
and return to standby mode.
• While the player is in standby, press STANDBY
• To open the disc tray, press OPEN/CLOSE.
• To close the disc tray, press OPEN/CLOSE again.
• These keys are used to input the time, as well as title,
chapter and track numbers.
• When a numeric item is displayed on the screen, press
the 0-10+ keys to select the desired entry, and press
ENTER to confirm.
• During playback, press A-B to select point A.
• Press it again to select point B. The player will repeat
the section from A to B automatically.
• Press A-B third time to cancel A-B repeat and clear points
A and B.
Note:
1. During CD playback, points A and B must be within the same track. During
DVD playback, points A and B can be selected from different chapters.
.
2. This function is subject to the disc.
17
Remote Control Operation
Advanced Features
During playback, press OSD to display the current time counter position. Elapsed time of the
current track/chapter
Elapsed time of the current track
Press OSD again to display additional information about the playing disc.
Disc type
Disc type
Current title
Audio type
Subtitle
Elapsed time of the current track
Total tracks
Current track
Elapsed time of the current title
Angle
Current chapter
18
Remote Control Operation
Advanced Features
During playback, press TIME, and the [Track Search] menu will display as follows:
Notes:
1. Time searches for an exact time in the movie
2. In Title/Chapter mode, you cannot SELECT a
value outside the range of the
total number of titles or chapters
3. For some DVD discs, the Search function is
unavailable.
Use the number keys to input the desired Time, Title or Chapter, then press ENTER to
confirm.
Press TIME again , the [Disc Search] menu will display as follows:
19
Remote Control Operation
Advanced Features
•
During DVD or CD playback, press once >> to play the next chapter,
title or track.
•
During DVD or CD playback, press >> and hold to scan forward.
The player will review the disc at 2, 4, 8 and 20 times normal speed
as follows:
X2
X4
X8
X20
•
Press PLAY to resume normal playback.
•
During DVD or CD playback, press once << to play the previous
chapter, title or track.
•
During DVD or CD playback, press << and hold to scan in reverse.
The player will review the disc at 2, 4, 8 and 20 times normal speed
as follows:
X20
•
Press PLAY to resume normal playback.
•
Press PREV to skip to previous chapter or track.
•
Press NEXT to skip to the next chapter or track.
•
•
Press STOP once during playback to stop and hold playback.
Press PLAY to resume playback from the point you pressed
STOP.
Press STOP twice to stop playback completely.
•
Anmerkung:
The screen saver will automatically turn on if playback is stopped about 5
minutes(when Screen Saver is set to on)
20
Remote Control Operation
•
Press PLAY from stop mode to start playback.
•
Press PLAY during playback to replay the last 10 seconds.
This function is not available if the elapsed time of current track
is less than 10 seconds
Note:
MP3 discs and some DVD discs do not have a 10 second review
feature.
•
Press PAUSE during playback to pause playback.
•
Press PLAY to resume normal playback.
•
During DVD, playback , press MENU to return to the program
menu.
In the Setup Menu, press MENU to return to the main menu or
stop mode.
Any time, press MENU to cancel the current OSD or some
menus
•
•
Note:
This function is subject to the disc.
•
Note:
Advanced Features
During DVD playback, press TITLE to display the DVD title
menu or play the first title.
This function is subject to the disc.
21
Remote Control Operation
Advanced Features
While [PROGRAM] is on, press ENTER to display the [Program] submenu:
Input the track numbers in the order you would
like them to play. When finished, select [Play
Program] and then press ENTER to play the tracks
in the new programmed order.
Select [Clear All] and press ENTER to clear all
the numbers you have input.
Input the title number and the chapter number in
the desired order. Then select [Play Program] and
press ENTER to play the chapters in the order
you have set.
Select [Clear All] and press ENTER to clear all
the numbers you have input.
22
Remote Control Operation
Advanced Features
•
Press SLOW repeatedly to slow motion playback at variable
speeds.
•
Press STEP during playback to pause playback.
•
Press STEP repeatedly to play frame.
•
Press PLAY to resume normal playback.
•
During the playback of medion, without DVD´s
•
Press PBC (playback control) to switch the function on of.
•
Select to press REPEAT to select Repeat Title, Repeat chapter,
Repeat off During DVD playback.
•
Press REPEAT to select Repeat Single, Repeat All and Repeat
off ( CD or Others).
23
Remote Control Operation
Advanced Features
•
Press VOL+, to increas the loudness.
•
Press VOL-, to decreas the loudness..
•
Press MUTE to mute the Audio output
•
Press MUTE again to resume normal audio output
During DVD playback, press ZOOM to magnify the image as
ZOOM
Press during the playback ZOOM, to change the size of
? Duringthe
DVD
playback, press
pictures:
follows:
•
.
•
to magnify the image as
Press CLEAR to delete the choosen Tracknumber
Press once CLEAR to delete the Tracknumber.
To delete all number, hold the button pressed.
24
Remote Control Operation
Advanced Features
During DVD playback
• Press ANGLE to view scenes from different camera angles.
• Press ANGLE repeatedly to change from one camera angle to
another.
Note:
This function is disc specific.
Audio
During DVD playback
• Press AUDIO repeatedly to select from up to 8 audio
languages/formats.
Note:
This function is disc specific.
During DVD playback
• Press SUBTITLE repeatedly to select from up to 32
subtitle languages.
Note:
This function is disc specific.(languages will vary)
25
MP3 Playback
Advanced Features
Supported formats:
•
•
•
•
•
Disc format: ISO 9660, Joliet
Music file format: MP3
MP3 bit rate (data rate): 32 -192 kbps
Total number of music files and albums: around 350 per disc.
Sampling rate: (CBR)32kHz/44. 1kHz/48kHz/64kHz;
(VBR) 16kHz/22kHz/24kHz/32kHz (MPEG )
Note:
The player will not identify or play MP3 discs under the following conditions:
recording format is not supported, badly scratched or deformed disc, MP3 recorded
in CD-R or CD-RW which is not finalized, or a dirty pickup.
When a MP3 disc is loaded, the screen will display as follows:
Total tracks
Elapsed time of the current
track
current track
Directory
Directory
Screen
Press
to select the file when the cursor appears in the file window.
Press SELECT to play the current file selected by the cursor.
Press
Note:
to switch between the directory window and the file window.
During MP3 playback, Forward Scan and Reverse Scan are not available.
26
Kodak Picture CD Playback
Advanced Features
The introduction of KODAK Picture CD
A Kodak Picture CD has the size and shape of a regular CD. You can order a KODAK Picture CD simply
by checking the box on the photo finishing envelope when you drop off a roll of film (35 mm or Advanced
Photo System (APS) color print film) at the time of processingin Kodak Express store displaying "Kodak
Picture CD" sign. When your order is returned, you receive your prints, negatives, and your full roll of
pictures safely stored on your KODAK
Picture CD. Each KODAK Picture CD brings you the tools to enhance, share and manage your pictures
on your computer. You also can record the JPEG picture into CD-R or CD-RW with the CD-Rewriter
yourself.
Note:
1. The Max. Size of JPEG Picture can be supported: 3840X3840 pels
2. JPEG stands for Joint Picture Experts Group. It is the first International Standard on Still Picture Compressing:
ISO 10918-1, constituted by the Committee on Still Picture Compressing Standard of ISO. The pictures on
KODAK Picture CD are stored in this format (JPEG). This player can decode the JPEG pictures in KODAK
Picture CD and playback the pictures in different modes.
Now, you can playback Kodak Picture CDs on this player and view your wonderful pictures on your TV in
the comfort of your living room.
When a Kodak Picture CD is inserted on a player an automatic slide show is launched. Each picture in the
Kodak Picture CD will be displayed consecutively in a slide-show fashion and will be scaled to fit in the whole
TV screen.
General function:
• You can set slideshow transition modes for any pictures.
• Press PAUSE to stop playing.
• Press or to see the previous or next picture.
• Press PLAY to continue slideshow transitions.
• Press STOP to return to root menu.
Image Rotation:
There are three modes to rotate a picture: original, 90 Deg, and 180 Deg. These
operations are allowed only when a picture is being displayed normally and will be
cancelled automatically when a new picture is displayed. The ANGLE keys are
used to select the different rotation modes:
•
•
•
Press ANGLE
Press ANGLE again
Press ANGLE again
OSD display original.
OSD display 90 Deg.
OSD display 180 Deg.
Zoom Function:
This player provides both Zoom in/out and Zoom pan function. Press the ZOOM
consecutively, the picture will zoom in/out in turn as followings:
3
Note:
4
During the ZOOM function, slideshow transitions and image rotation
are disabled.
Q off: close zoom, press PLAY again to resume slideshow transition mode.
27
Troubleshooting
Others
If you have any questions, please consult the troubleshooting guide below.
NO PICTURE OR SOUND
• Ensure the power button is on.
• Ensure the power outlet is operational.
• Ensure the power cord is not damaged.
• Ensure the power plug is connected
firmly to the outlet.
PICTURE BUT NO SOUND
• Ensure the audio jacks are securely
connected.
• Ensure the audio connector is not damaged.
• Ensure the volume is turned up in VOL/CH
setup.
• Ensure you have set the player's AUDIO
settings correctly.
• Ensure you have ENTERed the correct
AV input for your TV.
• Ensure the audio is not set to mute.
SOUND BUT NO PICTURE
• Ensure the video jacks are securely
connected.
• Ensure you have ENTERed the correct
AV input for your TV.
• Ensure the video connector is not
damaged.
• Ensure you have set the player's VIDEO
settings correctly.
•
•
Ensure the disc format is compatible with
the player.
Please check whether you have tried to play
a software CD. If so, please restart the player.
REMOTE NOT WORKING
• Ensure the remote batteries are working.
• Point the remote control directly at the player's
IR sensor.
• Remove any obstacles between the remote
and the IR sensor.
UNIT NOT WORKING
• Turn off the power, and then turn it on again.
"NO DISC" DISPLAYED
• Ensure you have put the disc on the tray.
• Ensure the disc is not upside down.
• Ensure the disc is not distorted, stained or
scratched.
POOR PICTURE OR SOUND
• Ensure you have set the player's AUDIO
settings correctly.
• Ensure the disc is not scratched or stained.
• Ensure the AV connector or the output
terminal is not damaged.
"BAD DISC" DISPLAYED
• Ensure the disc is not warped, damaged
or deformed.
• Ensure the disc is not badly stained or
damaged.
28
Remote Control Operation
Insert batteries
1. Open the cover
Extra
Using the remote control
Point the remote control at the remote sensor.
(The pictures below are for reference only.)
POWER
DVD/SVCD/VCD/CD/CD-R/CD-RW MP3 PLAYER
OPEN/CLOSE
PLAY
STOP
N/P
R/L
2. Insert batteries
30 o
o
30
Make sure to match the "+" and "-" of the batteries
with the marks inside the battery compartment.
3. Close the cover
Notes:
Improper use of batteries may cause battery
leakage and corrosion. To operate the remote
control correctly,follow the instructions below:
Do not insert the batteries in the wrong direction.
• Do not charge, heat, open, or short-circuit the
batteries.
• Do not throw batteries into a fire.
• Do not leave dead batteries in the Remote
Control.
• Do not use different types of batteries together,
or mix old and new batteries.
• If you do not use the remote control for a long
period of time, remove the batteries to avoid
possible damage from battery corrosion.
• If the remote control does not function correctly
or the operating range becomes reduced,
replace all batteries with new ones.
• If battery leakage occurs, clean the battery
compartment, then insert new ones.
• Using the remote control
Remarks: Do not expose the remote sensor of
the DVD Player to a strong light source, such
as direct sunlight.
Notes:
• Point the remote control directly at the player's
remote sensor.
• Do not leave the remote control in an extremely
hot or humid place.
• Do not spill water or put anything wet on the
remote control.
• Battery life is ~1 year under normal conditions.
29
Specifications
Others
Type ...............................................................DVD PLAYER
Model .............................................................MD 42068
Video standard...............................................NTSC/PAL/AUTO
Compatible Discs
DVD+R/RW, DVD-R/RW, CD-R/RW, MP3-CD,
JPEG, VCD, SVCD
D/A converter .................................................96KHz/24bit
Digital audio output ........................................coaxial
Power requirements.......................................AC 230V ~ 50Hz
Power consumption .......................................25 W
Specifications are subject to change without notice.
30
D
GB
MTC Medion Technologie Center
Freiherr-vom-Stein-Str. 131
D-45473 Mülheim / Ruhr
Medion Electronics Ltd.
120 Faraday Park
Faraday Road
Dorcan
Swindon SN3 5JF
Wilts
Hot-Line: 0870 727 03 70
Fax: 017 93 71 57 16
E-Mail: [email protected]
Tel. 01805 / 633 633 • Fax 01805 /566 566
(0,12 Euro/Minute innerhalb des Festnetzes)
[email protected]
http://www.medion.com
F
I
Medion France
ZAC de La Bertraie
Route de Sablé
F-72270 VILLAINES SOUS
MALICORNE
Medion Service Center
Zona Industriale
Pianodardine
83100 Avellino-Italy
Tel.: 199 101 295
[email protected]
07-04
[email protected]
www.medion.fr
E
NL
Medion Service Center
Visonic S.A.
Alejandro Sanchez 95- 97
28019 Madrid
Hot-Line: 902 15 14 48
Fax: 914 60 47 72
E-Mail: [email protected]
Medion Service Center
J. F. Kennedylaan 16a
NL-5981 XC Panningen
Hot-Line: 0900 / 633 6330
Fax: 0900 / 665 5660
E-Mail: [email protected]