1
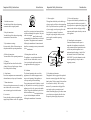
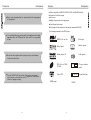
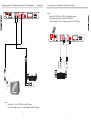
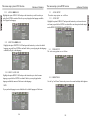
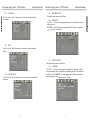
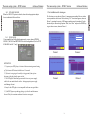
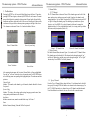
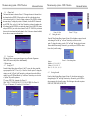
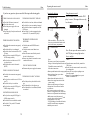
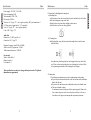
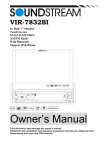
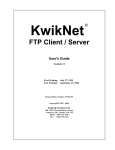
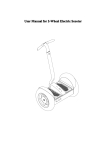
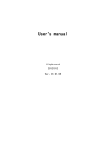
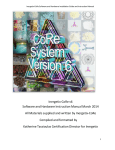
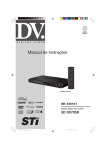
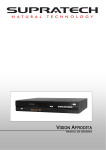
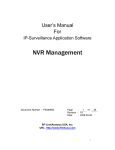
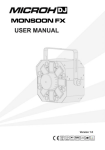
Table of contents
Important Safety Instructions
Introduction
Introduction
This appliance has two main functions. It can function as an access
terminal (Set-Top- Box) to receive Earth Satellite TV broadcasts
and it can also function as a DVD player.
Important safety instructions…………………………………………36
Precaution…………………………………………………………… 40
Features………………………………………………………………41
Front panel and rear panel illustration……………………...………..42
Connecting to a TV…………………………………………..............43
Connecting to an AV amplifier with analog 2.1 audio channel in…...44
Connecting to am AV Amplifier with Digital Audio Input.................45
Connecting USB or CARD port ......….....................…..................... 46
Remote control…………………………………............................... 47-48
ENCODING ......….............….......….....................…..................... 49
The menu set-up system – DVD section…………………………... 50-58
The menu set-up system – DVB-T section……………………….... 59-67
Playing MPEG4 / MP3 files………………….……………..............68
Playing Kodak Picture CDs…………………………………………69
Troubleshooting…………………………………………………… 70
Preparing the remote control……………………………………… 71
Specifications…………………………………………………….... 72
Maintenance..…………………………………………………….... 73
THE UNIT USES A LASER SYSTEM. FOR A
CORRECT USE OF THE UNIT, READ THIS
MANUAL CAREFULLY AND K EEP IT FOR
FUTURE REFERENCE. SHOULD THE UNIT
NEED TO BE RE PAIRED, CONTACT THE
SALESPERSON OR READ THE
“TROUBLESHOOTING” SECTION.
THE BOLT OF LIGHTENING SYMBOL
INSIDE AN EQUILATERAL TRIANGLE
REMINDS THE USER ABOUT THE
PRES ENCE OF NON-ISOLATED “HIGH
TENSION” CURRENTS INSIDE THE
APPLIANCE COVER, WHICH MAY BE OF
SUFFICIENT MAGNITUDE TO PRESENT
A RISK OF ELECTRIC SHOCK.
THE EXCLAMATION MARK INSIDE AN
EQUILATERAL TRIANGLE REMINDS THE
USER ABOUT THE PRESENCE OF IMPORTANT
OPERATING AND MAINTENANCE
INSTRUCTIONS IN THE MANUAL
ACCOMPANYING THE UNIT.
WARNING:
TO AVOID DIRECT EXPOSURE TO LASER
RADIATION, DO NOT OPEN THE APPLIANCE
COVER. LASER RADIATION MAY APPEAR
WHEN OPENING THE APPLIANCE COVER
OR BREAKING TH E PROTECTORS. DO
NOT LOOK AT THE LASER BEAM DIRECTLY.
THE DVD PLAYER IS A CLASS 1 LASER
PRODUCT. USE OF CONTROLS OR
SETTING OF FEATURES IN A WAY OTHER
THAN SPECIFIED IN THIS MANUAL MAY
RESULT IN HAZARDOUS RADIATION
EXPOSURE. AS THE LASER BEAM USED IN
THIS DVD PLAYER CAN DAMAGE YOUR
EYES, DO NOT ATTEMPT TO OPEN THE
APPLIANCE COVER. REFER ALL SERVICING
TO QUALIFIED SERVICE PERSONNEL.
TO AVOID FIRE OR ELECTRIC SHOCK, DO
NOT EXPOSE THIS APPLIANCE
TO RAIN OR MOISTURE. NEVER ATTEMPT
TO OPEN THE APPLIANCE COVER.
DANGEROUS HIGH TENSION CURRENTS
ARE INSIDE. SEEK THE ASSISTANCE OF
ASSISTANCE OF QUALIFIED SERVICE
PERSONNEL FOR REPAIRS.
PRECAUTION:
TO AVOID ELECTRIC SHOCKS, MATCH TH E
WIDE BLADE OF THE PLUG TO THE WIDE
SLOT AND INSERT FULLY . THE APPLIANCE
SHOULD NOT BE EXPOSED TO WATER AND
NO OBJECT EXPOSED TO WATER AND NO
OBJECTS CONTAINING LIQUIDS, SUCH AS
VASES, SHOULD BE PLACED ON TOP OF IT.
35
36
37
Important Safety Instructions
Introduction
1. Read the instructions
You should read all the safety and operating
instructions before using the product.
2. Keep the instructions
You should keep all the safety and operating
instructions for future reference.
3. Pay attention to warnings
You must strictly follow all the warn ings on
the product and in the operating instructions.
4. Follow the instructions
You must follow all the operating instructions.
5. Cleaning
Unplug the unit from the wall socket before
cleaning. Do not use liquid or spray cleaners.
Use a damp cloth for cleaning.
may fall over, causing serious harm to children
or adults, and damage to the product. Only use it
with a cart, support, tripod, bracket or table
recommended by the manufacturer or sold with
the product. Th e appliance must be mounted
following the manufacturer’s instructions and
should use a mounting accessory recommended
by the manufacturer.
9. Warning about a mobile cart
The appliance / cart combination should be
moved with care. Sudden halts, excessive
force or an irregular surface may result in
the appliance and trolley tipping over.
Introduction
Important Safety Instructions
13. Power cable protection.
11. Power supplies
The
power cables should be positioned in a way
This appliance should only work with the type
that
they cannot be trodden on or pierced by
of power supply specified on the corresponding
objects
placed on or against them , paying special
label. If you are unsure about your home’s type
atten
tion
to the cables on the plugs, multiple
of power supply, consult your supplier or the
connectors and the point where they come out
local electricity company. For products
of the appliance.
designed for operating on a battery or other
power supplies, consult the operating
instructions.
14. Grounding the exterior antenna
If an exterior antenna or cable system is
connected to the appliance, ensure that the
cable or antenna system is grounded in order
to offer some protection against rises in
tension and static discharges . Article 810 of
the National Electric Rule (United States)
ANSI NFPA 70 provides information on the
adequate grounding fo r the pole and its
supporting structure,
10. Ventilation
The slots and openings in the c over of the
appliance are for ventilation purposes and to
ensure a safe operating of the appliance, as
well as preventing it from overheating.
7. Water and moisture
These openings must not be blocked or covered
Do not use this product near water, for example up. They must not be covered up by placing the
near a bath or sink, or on a wet surface,
appliance on a bed, sofa, carpet or other similar
near a swimming pool or similar locations.
surface. The product should not be placed on a
built-in installation, such as a bookshelf unless
8. Accessories
it is provided with adequate ventilation
Do not place this product on an unstable cart,
following the manufacturer’s instructions.
support, tripod, bracket or table. The appliance
6. Complements
Do not use complements not recommended by
the manufacturer, as they may be hazardous.
38
12. Grounding or polarization
This appliance can be equipped with a polarized
alternative current (a plug with a blade longer
than the other. The plug can only be inserted into
the wall socket in one way.This is a safety
measure. If you cannot inse rt the plug all the
way into the socket, try turning it around.
around. Should the plug no t go in either, contact
your electrician to replace the old wall socket.
Respect the polarized plug safety measure.
39
Precaution
Introduction
Features
Introduction
● Totally
● Please
use the original packing box and materials for safe transportation
of this appliance.
compatible with MPEG 4,DVD,CD,CD-R and CD-RW (finalised)
● Progressive Scan Video output
● Screen saver.
● Multiple
● Coaxial
●
playing modes:search programme.
digital audio output
Video output:S-video,composite video and by components(Y,Pb,Pr)
Disc formats permitted for this DVD player
It is normal that thecover and rear panel of the appliance reach a high
temperature after the DVDplayer has been used for a long period
of time.
●
MPEG4 files on disc
Do not move this appliance while operating. Doing so could damage
the disc slot and the disc.
Subtitle options
Kodak picture CD
8
Audio options
MP3 files on CD-R /
CD-RW
16:9 LB
TV aspect relation
Video DVD
● Press
the OPEN/CLOSE button on the front panel or on the remote
control to open or close the disc slot. Do not press or touch the slot
when it is opening or closing.
modes
R RESTRICTED
HDMI output
40
Wide angle
32
Dolby Digital
●
9
USB2.0
41
Parental blocking
42
43
Connecting to an AV amplifier with analog 2.1 audio channel in
AC 110- 230V ~ 50/60Hz
Y
C b/P b
R
L
Modèle:LDT-1200
V ID E O
C r/P r
Connections
L E C T E U R D V D /M P E G 4 /U S B P V R /
C A R T E S M E M O IR E /H D M I/D V B -T
A udio o ut
C O A XIA L
D igita l out
H D MI
S -V ID E O
V ide o o ut
O P T IC A L
S C AR T O U T P U T
D igita l o ut
Connecting to am AV Amplifier with Digital Audio Input
Notes:
1.Select the COAXIAL or OPTICAL digital audio output.
2. Set the players audio out to RAW or PCM mode.
3. Set the Amplifier to the AV input connected to the DVD player.
T V Ae rial
AC 110- 230V ~ 50/60Hz
Y
C b/P b
R
L
Modèle:LDT-1200
V ID E O
C r/P r
L E C T E U R D V D /M P E G 4 /U S B P V R /
C A R T E S M E M O IR E /H D M I/D V B -T
C O A XIA L
D igita l out
A udio o ut
S -V ID E O
V ide o o ut
H D MI
optical
VOLUME
INPUT SELEC TOR
POWER
BYPASS
PRO LOGIC
3 STEREO
MODE
TEST
CHANNEL
KARAOKE
MUTE
UP
DOWN
1
MIC
2
1
MIC VOL
2
EXCITE
BASS
MIC
TREBLE
ECHO
VOLUME
INPUT SELEC TOR
POWER
BYPASS
PRO LOGIC
3 STEREO
MODE
TEST
CHANNEL
KARAOKE
MUTE
UP
DOWN
1
MIC
2
1
MIC VOL
2
BASS
EXCITE
MIC
TREBLE
ECHO
L
VIDEO
R
VIDEO
IN
Notes:
1. Connect the TV to the VIDEO IN of the DVD player.
2. Connect the amplifier to the 2.1 Audio channel IN of the DVD player.
44
45
O P T IC AL
D igita l o ut
S C AR T O UT P UT
46
47
ENCODING
FWD
Repeat
During DVD or CD/VCD playback, press <FWD> once to
play the next chapter, title or track.
During DVD or CD/VCD playback, press and hold <FWD>
to scan forward. The player will review
The disc at 2, 4, 8 and 20 times normal speed as follows:
X2
X4
X8
X 20
Press <REPEAT> to select Repeat Title, Repeat chapter,
Repeat off during DVD playback.
Press REPEAT to select Repeat Single, Repeat All and
Repeat off when PBC is off ( VCD, CD, SVCD ).
Press <PLAY> to resume normal playback.
When a CD is loaded, Press the SUBTITLE button to start encoding.
● Use the UP and DOWN arrow button to select speed, bitrate and choose the file you need.
Zoom
During VCD/SVCD/DVD playback, press <ZOOM> to
magnify the image as follows:
ZOOM2
ZOOM:OFF
ZOOM3
ZOOM4
ZOOM1/4
ZOOM1/3
ZOOM1/2
● Use UP and DOWN button to select the tracks you want to encode,press ENTER button to confirm.
Menu/PBC
During DVD, VCD or SVCD playback (with PBC on), press
<MENU> to return to the program menu.
In the Setup Menu, press <MENU> to return to the main
menu or stop mode.
Any time, press <MENU> to cancel the current OSD or
some menus.
Note:This function is subject to the disc .
During VCD playback,press <PBC> playback control to
select PBC on and off.
Program
In stop mode,press<PROG> to display the program submenu:
Input the track numbers in the order you would like them to play.
When finised,select [PLAY] and then press <ENTER> to play
the tracks in the new programme orer.Select [CLEAR] and press
<ENTER> tp clear all the numbers you have input.
Input the title number and the chapter number in the desired order.
Then select [PLAY] and then press <ENTER> to play the chapters
in the order you have set.Select [CLEAR] and press <ENTER> to
clear all the numbers you have input.
● Use LEFT and RIGHT button to the START interface,press ENTER button to start encoding.
Title
During DVD playback, press <TITLE> to display the DVD
title menu or play the first title.
Note:This function is subject to the disc
SETUP
Press <SETUP>,Menu list will appear on TV screen
● When highlighted the CHANGE SPEED, press ENTER button to change the encoding speed.
Use LEFT and RIGHT button to cancel.
A-B
During playback, press <A-B> to select point A.
Press it again to select point B. The player will repeat the
section from A to B automatically.
Press <A-B> third time to cancel A-B repeat and clear points
A and B.
Note: 1. During CD/SVCD playback, points A and B must
be within the same track.During DVD playback, points
A and B can be selected from different chapters.
2. This function is subject to the disc.
Time
During playback,press <TIME>,and the [Track Search] menu will display
Notes:
1.Time searches for an exact time in the movie.
2.In Title/Chapter mode, you cannot select value outside the range of the
total number of titles or chapters.
3.For some DVD discs, the Search function is unavailable.
Use the number keys to imput the desired Time,Title or Chapter,then press
<ENTER> to confirm.Press <TIME> again to exit time menu.
TV/Radio
Press <TV/Radio> to skip to TV or Radio functions
48
REFERENCE:
1.To protect your DVD player, the interval between turning the unit on and off,via the Main Power
button will take more than 30 seconds.
2.If the unit will not be used for an extended period of time,please disconnect the power plug
from the outlet.
3.The player should only be operated with the correct power supply that correspondsto the marking
label. The incorrect power supply could damage the unit.
4.The player may not be compatible with some encrypted discs.
49
The menu setup system-DVD Section
Advanced features
1. General steps of the menu setup
A) Press the setup key and the main menu setup will appear.
The menu setup system-DVD section
Advanced features
2. Introduction to the setup points
The system setup optins are the following:
SYSTEM SETUP
TV SYSTEM
According to the TV’s colour system,the TV system can be chosen.
AUTO
AUTO
B) Press the “left” and “right” keys to highlight the icon of the page you
want and then press the“down” or “right” key to activate the page.
For example,if you want to setup the video page,press “right” to highlight
the video icon and the video page will be shown on the screen
C) Press the “down” key to highlight the desired option.
Press Enter ot the “right” key to select.The option’s
possibilities appear on the right,For example,press “down”
key to highlight the option BRIGHTNESS,next press ENTER
to select and the brighness options will appear on the right.
2.1.2 SCREEN SAVER
The screen saver can be activated or un-activated at this point.
2.1.3 HDMI OUTPUT
HD output include: HD OFF;720P;1080I and 1080P
D) Press the function keys to highlight the option Exit setup,followed by ENTER
or SETUP once again to exit the setup menu.
50
51
The menu setup system – DVD Section
Advanced features
2.1.4 VIDEO
According to the TV type of line out connection, the choices are S-VIDEO,
YUV, P-SCAN, Y, Pb, Pr.
NOTE: Select P-SCAN only if your DVD player is connected to a
progressive scan TV with Y, Cb, Cr cables.
2.1.5 TV TYPE
According to the TV type, one can choose between 4:3 PS,4:3LB and 16:9
2.1.6 PASSWORD
The password option comes blocked from the manufacturer and the rating
cannot be established nor the password changed. For the rating to be able to
work, it is necessary to activate the password mode. If you want to establish
the rating limits, you must introduce the default password, which is 0000,
and then press ENTER to confirm. To change the password, you must
introduce th e old one followed by a new one. Introduce a 4 digit number as
your new password. Pl ease remember your password as choosing DEFAULT
will make the setup of your DVD play er return to its original settings excepting
the password.
52
The menu setup system – DVD Section
Advanced features
2.1.7 RATING
The “rating” feature is a limitation by rating system, as film rating. It works
with DVDs that have been assigned a rating. It helps to control the type
of DVDs your family watches.
2.1.8 DEFAULT
The DEFAULT setup option RESTORES the factory settings. It allows
your DVD player to work in the best possible condition.
player to work in the best possible condition.
When your DVD player does not work correctly, it may be due to introducing
some incorrect settings. Please try using the “restore factory values” function
to see if the unitcan return to its normal operating mode.
2.2
LANGUAGE SETUP
The language setup options are as follows:
2.2.1 OSD LANGUAGE
Highlight the option OSD LANGUAGE and press the function keys to select
the OSD language (software operating) you prefer. Press ENTER to
confirm and the options will be shown in that language.
53
The menu setup system-DVD Section
Advanced features
2.2.2 AUDIO LANGUAGE
ANG
Highlight the option AUDIO LANG and press the function key to selct the audio you
prefer.Press ENTER to confirm.If the disc you are playing has that language available,
it will play in that language.
2.2.3 SUBTITLE LANGUAGE
ANG
Highlight the option SUBTITLE LANG and press the function key to select the subtitle
language you prefer.Press ENTER to confirm.If the disc you are playing has that language
available,it will play in that language.
The menu setup system-DVD Section
Advanced features
2.3
AUDIO SETUP
The audio setup options are as follows:
2.3.1 AUDIO OUT
Highlight the option AUDIO OUT and press the function keys to choose the autio
out format you prefer.Press ENTER to confirm.There are three optinal audio output
modes:SPDIF/OFF,SPDIF/RAW and SPDIF/PCM
2.4
VIDEO SETUP
The video setup options are as follows:
2.2.4 MENU LANGUAGE
Highlight the option MENU LANG and press the function keys to select the menu
language you prefer.Press ENTER to confirm.If the disc you are playing has that
language available,the menu will be shown in that language.
2.4.1 BRIGHTNESS
Use the “up” and “down” function keys to move the control and adjust the brightness.
NOTE:
If your preferred language is not available,the disc’s default language will be shown.
54
55
The menu setup system – DVD Section
Advanced features
2.4.2 CONTRAST
Use the “up” and “down” function keys to move the control and adjust
the contrast.
The menu setup system – DVD Section
Advanced features
2.5
SPEAKER SETUP
The speaker setup options are as follows:
2.5.1 DOWNMIX
A) LT/RT
Choose this setting option when you are connected to a two-way
analog audio in.
B) STEREO Choose this setting option when the DVD player is connected to
a TV or therefore, a modulator.
2.4.3 HUE
Use the “up” and “down” function keys to move the control and adjust
the hue.
2.6
DIGITAL SETUP
The digital setup options are as follows:
2.4.4 SATURATION
Use the “up” and “down” function keys to move the control and adjust the
saturation.
56
2.6.1 OP MODE
LINE OUT: Choose this setting option to disconnect the signal in. It will be
more appropriate to choose this option for nighttime playing, as the sound out
tends to be low. RF REMOD: It is more appropriate to c hoose this option for
day time playing, as the sound out tends to be high.
57
The menu setup system – DVD Section
Advanced features
2.6.2 DYNAMIC RANGE
When the LINE OUT option is selected, choose this setting option to adjust
the out relation for different effects.
2.6.3 DUAL MONO
If your amplifier has Dolby digital output mode, you may choose STEREO,
MONO L, MONO R and MIX MONO for the decoding method. (For the DVD
KARAOKE with AC-3 only)
The menu setup system – DVB-T Section
1. First installation after turning on
The first time you setup the unit (Picture 1) amessage appears asking if the user wishes
to setup assistant to be activated. After selecting “Yes” a new frame appears, shown in
Picture 2, requesting the country, OSD language and time zone be introduced. Use the
function keys to choose the right options. Then, select “Next” and press the ENTER key
to go to the next screen, shown in Picture 3.
Select Area
OSD Langua
Do you want to start first
time installation wizard?
Picture 1
REFERENCE:
1. To protect your DVD player, the interval between turning on and turning
off, by the main ON button, should be over 30 seconds.
2. If the unit is not going to be used for a long period of time, please
disconnect the plug from the power socket.
3. The DVD player should only operate with the correct power supply,
which is the one marked on the sticker. An inappropriate power supply
could damage the unit.
France
English
Picture 2
Do you want to start Auto Scan?
Picture 4
Picture 3
4. It may be the DVD player is not compatible with some encrypted discs.
5. If the DVD player stops during play ing, eject the disc and disconnect
the unit. Wait for ten minutes and turn the unit on once again.
58
Advanced features
59
The menu setup system – DVB-T Section
Advanced features
2. The Main Menu.
Pressing the SETUP key will access the Main Menu, shown in Picture 5. From here,
pressing SETUP once again, or alternatively RETURN will exit the menu. The main
menu is divided into four principal selection points: Channel guide, System Config,
Installation and Game, shown on the left of the screen. Selecting one of these points,
a submenu will open, with the submenu points appearing on the right of the screen.
The submenus are shown in Picture 5 to 8 and are detailed as follows:
Picture 5:Channel Guide
Picture 6:System Config
The menu setup system – DVB-T Section
Advanced features
3. Channel Guide
3.1 TV Channels
The TV Channels Menu is shown in Picture 9.The channels appear on the left of the
menu, and a preview window appears on the right. From here, the channel can be
changed using the “up” and “down” function keys, ENTER to start viewing and “left”
or “right” to change the channel group. The channel groups include news, sports,
favourites, etc. Press DISPLAY to classify channels, which can be arranged in
alphabetical order (A-Z), inverted alphabetical order, free viewing at the top, coded at
the bottom, and by transponder (Picture 10).
Picture 9: TV Channels Menu
Picture 10: Channel Classification
3.2 Radio Channels
The Radio Channels Menu, shown in Figure 11, is similar to the TV Channels Menu.
The channels appear listed on the left. The channels can be changed using the “up”
and “down” function keys, and the groups can be changed using the “left” or “right”
function keys. Press DISPLAY to classify channels.
Picture 7:Instllation
Picture8:Game
After entering the main menu, the first point, Channel Guide, will appear highlighted.
Press the “up” or “down” function keys to select another point. Press ENTER to move
to the following menu corresponding to the highlighted point. The submenus and their
points are:
Channel Guide:
Includes: TV channels, radio channels, type of channels, channel edit and list of notes.
See picture 5.
System Config:
Includes: TV settings, video settings, audio settings, language, parental control, time
settings and system information. See Picture 6.
Installation:
Includes: automatic scan, manual scan and default setup. See Picture 7.
3.3 Type of Channels
Picture 11: Radio Channels Menu
From the Type of Channels Menu, shown in Picture 12, each channel can be classified
into a group. Pressing ENTER will add the series channels to the column category. Use
the TV / RADIO function key to alternate between TV channels and radio channels.
Note: Should there be no channels, the user will not be able to enter this menu.
Game:
Includes: Boxman, Burning Tetris and Hit Rat. See picture 8
Picture 12: Type of Channels Menu
60
61
The menu setup system – DVB-T Section
3.4
Advanced features
The menu setup system – DVB-T Section
Advanced features
Channel edit
The channel edit menu is shown in Picture 13. To change the name of a channel select
the channel and press ENTER. Following this, use the left or right function keys to
select a character and “up” or “down” to change a character. Press ENTER to confirm
the name change. To change the position of a channel, select the MOVE column and
press ENTER. Next, use the “up” and “down” function keys to change the number order
of the channel and the ENTER key to confirm the change. Select the DELETE column
and press ENTER if you wish to erase a channel. Use the TV / RADIO key to alternate
between television channels and radio channels. Note: If there are no channels available,
the user the user cannot access channel edit.
4.2
Picture 17: TV type
Picture 16: Video
Setting the video
From the Video Settings Menu, shown in Picture 18, the brightness, contrast, hue and
can be changed. Press the “up” or “down” function keys to select one of the
points. To change the settings, press the “left” and “right” function keys to alternate
between the different settings. Alternatively, you can also press ENTER to choose
from a list of possible settings.
3.5
List of notes
Picture 13: Channel edit menu
Will show all the notes on programs that appear in you Electronic Programmes
Guide (EPG) menu or that you have added manually.
4. System setup
4.1
Setting the TV
From the Settings Menu, shown in Picture 14, the TV system, the video out and the
aspect proportion of the TV. Press “up” or “down” to select the points. To change the
settings, press the “left” and “right” function keys to alternate between the different
settings, or press ENTER and then the “up” and “down” function keys to select a list
of options. The possible options are:
TV system: NTSC, PAL, Automatic. See Picture 15.
Video: YCbCr, TV-RGB, P-SCAN-YUV, PC-VGA, S-VIDEO. See Picture 16.
TV type: 4:3 Panoramic, 4:3 Letterbox, 16:9. See Picture 17.
Picture 14: TV settings menu
Picture 15: TV system
62
Settings:
Brightness: 0, 2, 4, 6, 8, 10, 12
Contrast: 0, 2, 4, 6, 8, 10, 12
Hue: +12, +10, +8, +6, +4, +2, 0
4.3
Picture 18: Video Settings Menu
Setting the audio
From the Audio Settings Menu, shown in Picture 19, the audio out option can be
changed using the “left” and “right” function keys. Alternatively, press ENTER to
choose amongst a list of possible settings. The following are the audio out options:
SPDIF OFF, SPDIF RAW, SPDIF PCM.
Picture 19: Audio Settings Menu
63
The menu setup system – DVB-T Section
4.4
Advanced features
Language
The Language Menu, shown in Picture 20, allows the user to change the language of
the system’s software (OSD). Use the “left” or “right” function keys to select a
language, or ENTER to choose amongst a list with a ll the possible languages.
OSD languages: English, Spanish and Italian.
The menu setup system – DVB-T Section
4.6
Setting the time
From the Time Setting Menu (Picture 25), the time zone and the sleep mode settings can
be changed. Use the “up” and “down” function keys to select a point, and the “left” and
“right” function keys to change the setting. Alternatively, you can press the ENTER
function key to choose amongst a list of possible options.
Picture 20: Language Menu
4.5
Advanced features
Picture 25: Time Setting Menu
Parental control
The Parental Control Menu (Picture 21) has two aspects: change of password (pin) and
channel blocking. When changing the password the user will be requested to introduce
the old password, the new one, and the new one once again (Picture 22). To change the
channel blocking, the user will first have to introduce the password, as shown in Picture
23. If the password is correct, the Channel lock Menu will appear (Picture 24). Use
the “up” and “down” function keys to select a channel, the ENTER function key to
block or unblock a channel and the TV / RADIO function key to alternate between
television channels and radio channels.
Picture 26
Picture 27
4.7
Picture 28: System Information
System information
The system information shows the firmware version and date, together with the receiver
and model information. See Picture 28.
5.
5.1
Picture 21: Parental Control Menu
Picture 22: Changing the Password
Installation
Auto Scan
The Auto Scan Menu or automatic search is shown in Picture 29. You must first select
the country using the “left” and “right” function keys. Next, press the “down” function
key to select “Start Scan” and press ENTER. Scanning will start after choosing
between “yes” or “no” (Picture 30).
Picture 24: Channel lock
Picture 23: Introducing the Password
Picture 30
Picture 29: Auto Scan Menu
64
65
The menu setup system-DVB-T Section
Advanced features
5.2
Manual Scan
The manual Scan Menu is shown in Picture 31.A channel scan or search can be done
establishing the following points:Country,Type of sear ch,Start with channel,Start with
frequency...,Finish with frequency and bandwidth.
If the search type is single channel,then the country and start channel can be set.If the
search type is range of channels,the the country,start channel and finish channel can
be set.
Use the “up” and “down” function keys to select a point and the “left” and “right”
function keys to change the settings.Once you have done this,start the search(Start Scan)
and press ENTER to confirm.
The menu setup system-DVB-T Section
Advanced features
7.USB Media Play
You can connect Ex-equipments via the USB. At present, system can support
usual USB media players and upgrade to system software.
This product supports the play of MP3, JPEG and MPEG-4( AVI).It can support
only the files displaying in the list and the file formate this product plays.
7.1 USB Movie
1). In main menu, press UP/DOWN to choose Movie option,Press OK key to confirm,
enter Movie directory.
2). Press OK key to enter next directory , every directory displays only movie file and
folder name.
3). Press UP/DOWN key to choose movie file name.Press OK key to play movies
4). Press EXIT key to exit movie play mode and return to the file directory .
7.2 USB Music
Picture 31: Manual Scan Menu
5.3
Default setup
A message frame will appear,as shown in Picture 32,asking whether the user wishes to
reset the factory settings system.After returing to the factory settings,the installation
message will appear for the first time.
1). In main menu, press UP/DOWN to choose Music option,to choose OK key to
confirm, enter Music main directory.
2). Press OK key to enter next directory, every directory can show music file and folder
name only.
3). UP/DOWN key to choose music file name, Press ENTER key to play music file.
7.3 USB Photo
1). In main menu, press
UP/DOWN to choose Photo option,press OK key to confirm,
enter Photo directory.
2). Press OK key to enter next directory, every directory can show photo file and folder
name only.
3). Press UP/DOWN key to choose photo file name, Press OK key to play Photo file ;
Picture 32:Default setup
6.Game
The Game Menu is shown in Picture 33.There are three games:Box Man,Buring
Tetris and Hit Rat.
4).Press PREV key to play previous Photo, NEXT key to play next Photo;
5). In full-screen play state:
(1). Press Left,Right key to rotate the photo clockwise/counterclockwise by 90 degrees;
(2). Press UP key to view lens photo vertically,Press DOWN key to view lend photo
horizontally.
6). Press EXIT key to exit play mode and return to file directory.
Picture 33:Game
66
67
USB PVR&Playing MPEG 4/MP3 files
Advanced features
8 .PVR Function
You must connect Ex-equipments via the USB before you want to record the program
8.1 Quick start recording
1).If you want to record the program,can press REC key only, the “REC” symbol will
show on the left-up of screen, then begin recording the program.
2).Press STOP(■ )key to stop the recorder;
3).If you want to playback the program which you record,can Refer to the chapter 7
(USB Media Play ---7.1 USB Movie)
When a disc whith MPEG4 or MP3 files is inserted,the screen will show the following:
Name of current MP3/JPEG file.
To play a JPEG file,the name must
have the JPEG extension
Name of the
current directory
File region type: shows the type of file
being played and its region
The file being played
is an audio MP3 file
The file being played is a JPEG
image file
Name of the current MPEG 4 file.To play
a MPEG 4 file,the name must have the mp4
extension
Name of the current
directory
Playing Kodak Picture CDs
Advanced features
The KODAK Picture CD is the shape and size of a normal CD.A KODAK Picture CD
can be requested simply by marking the corresponding box on the envelop handed in
when getting a file developed(35 mm colour file or with the Advanced Photo system
(APS)) when you drop it off at a Kodak Express shop with the KODAK Picture CD
symbol.When given your order,you will receive the copied of your photos,the negatives
and all the film’s photographs safely stored on your KODAK Picture CD.Each KODK
Picture CD will provide you with the tools to embellish,share and mange your photographs
on a computer.You can also record JPEG images yourselft on a CD-R or CD-RW with
a CD recorder.
1.The maximum JPEG image size the system permits is 3840X3840 pixels.
2.JPEG stands for Joint Picture Expert Group.It is the first international standard for still images
compression(ISO 10918-1) constituted by ISO Still images compression Standards Committee
(International Standardization Organization).The images on a KADAK Picture CD are stored in
this format(JPEG).This DVD player can decode the KADAK Picture CD JPEG images and play
the images in different modes.
You can now play KODAK Picture CD sin the DVD player and see your photographs on a TV
in the comfort of your living room.
When you insert a KODAK Picture CD in your DVD player,a slide show will appear
automatically.Each image of the KODAK Picture CD will be shown consecutively
resemblinga slide show and they will be show a way that they occupy the entire screen
of the TV
General functioning
?
?
?
?
Press
Press
Press
Press
PAUSE to stop playing.
… or … to see the next or previous picture.
PLAY to continue the slide show playback.
STOP to return to the root menu.
File region type: shows the type of file
played and its region
The file being played
is a video MPEG 4 file
The file being played is a
MPEG 4 file
Press
to select the file when the cursor appears in the files window. Press ENTER
to play the current file selected by the cursor, press
to change between the
directory window and the files window.
NOTE:The DVD player will not function correctly in the following cases:
1.The disc is very scratched,damaged or dirty.
2.The disc is not finised.
3.The DVD player does not allow the recording format.
68
Image rotation
function keys to rotate the picture as desired.
? Press the
Zoom function
This DVD player can enlarge and reduce pictures as well as show panoramic
zoom. Press the ZOOM function key
ey consecutively and the image will enlarge
or reduce in the following succession
Q2
Q3
Q4
Q1/2
QOFF
Q1/3
Q1/4
Note: During ZOOM function, the slide show and image rotation can not be
operated. Q OFF un-activates the zoom.Press PLAY to return to slide show mode
69
Troubleshooting
Other
If you have any questions, please consult the following troubleshooting guide
Preparing the remote control
Inserting the batteries
1
THERE IS NO IMAGE AND NO SOUND
THE MESSAGE “BAD DISC” APPEARS
●Check the ON button is connected
●Check the socket works
●Check the power supply cable is not
●Check the disc is not bent, broken or deformed
●Check the disc is not too stained or damaged
●Check the disc format is compatible with the
damaged
●Check the plug is firmly inserted into the
wall socket
DVD player
●Please check if you have attempted to play a
software CD. If so, turn the DVD player
Other
1. Open the cover
Using the remote control
Point the remote control towards the DVD
player’s sensor. (The images below are only
for reference).
LDT-1200
USB
S D /M M C /M S
2
2. Insert the batteries(2XAAA size
1.5V)
OPEN/CLOSE
DISPL AY POWER
TIME
+
THE REMOTE CONTROL DOES
NOT WORK
THERE IS IMAGE BUT NO SOUND
●Check the audio connections are properly
●Check the main unit POWER button is
connected
connected
●Check the audio key is not damaged
●Check the remote control batteries are
●Check the volume is activated in the VOL / working
CH setup
●Point the remote control directly towards
●Check you have setup the DVD player’s
the unit’s infrared sensor
AUDIO settings correctly
●Remove any obstacles between the remote
control and the sensor
●Check you have used the correct AV IN
on your television
●Check the audio is not in silent mode
THE UNIT DOES NOT WORK
(MUTE)
● Disconnect the power supply and reconnect
THERE IS SOUND BUT NO IMAGE
●Check the video connections are properly
connected
THE MESSAGE “NO DISC” APPEARS
your TV
●Check that you have placed the disc in the
VIDEO settings correctly
●Check that the disc is the right way up.
●Check that the disc is not deformed, stained
●Check you have used the correct AV IN on
●Check the video key is not broken
●Check you have setup the DVD player’s
tray.
or scratched.
DISTORTED IMAGE OR SOUND
●Check you have setup the DVD player’s
AUDIO settings correctly
●Check the disc in not scratched or stained
●Check the AV key or the OUT terminal
are not damaged
70
PROGRAM CL EA R SUBTITLE TITL E
Make sure that the + and – poles of the
batt eries coincide with the marks on the
inside of the battery compartment.
3
REPEAT
A -B
MENU/PBC V-MODE
RETURN
SETUP
ENTER
REC
USB /CA RD
PLAY/PAUSE STOP
L/R
LANGUAGE
REV
FWD
PREV
NEXT
HDMI
SL OW
VOL-
VOL+
DVD/DVB MUTE
ZOOM RADIO/TV
3. Close the cover
Note: Do not expose the remote control or
the DVD player to strong light such as
direct sunlight.
Notes:
Notes:
The incorrect use of batteries can produce
leakage of the inner liquid and corrosion. ●Point the remote control directly towards the
DVD player.
To handle the remote control safely,
●Do not leave the remote control in an excessively
follow these instructions:
hot or damp place.
●Do not put the batteries in the wrong way. ●Do not spill water or place anything wet on
the remote control.
●Do not recharge, heat, open or short●Battery life is of approximately one year in
circuit the batteries.
normal use conditions. 70
●Do not throw the batteries in the fire.
●Do not leave empty batteries inside the
remote control.
●Do not use different types of battery at
the same time. Do not mix new batteries
with old ones.
●If you are not going to use the remote
control for a long period of time, remove the
batteries to avoid potential corrosion damage.
●If the remote control does not work
correctly, replace with new batteries. or the
working distance is very short,
? If liquid leakage occurs inside the batteries,
carefully clean the battery compartment
and then put new ones in.
71
Specifications
Other
Power supply: 110-230V - 50 / 60 Hz
Power consumption: 20 W
Video standard: NTSC / PAL
Unit weight: 2,0 Kilos
Video out: 1,0 V (p-p) / 75? , sinc., negative polarity, RCA jack connection x 1
S - Video out key (signal out key, Y, C separated):
Y out: 1,0 V (p-p) / 75 ? , sinc., negative polarity
C out: 0,286 V (p-p) / 75?
Audio Out
Channel out: 2.1: RCA jack key x 3
Coaxial out: 0.5 V (p-p) 75?
Response frequency: from 20 Hz to 20 KHz
Audio / noise (S/N) proportion: ? 90 dB
Total harmonic distortion: ? 0,0025%
[Accessories]
Audio / video cable x 1
Remote control x 1
User manual x 1
Maintenance
Other
1. Precautions for handling and cleaning discs
a.) Handling discs
● To keep a disc clean; do not touch the play side (non-label side) of the disc.
● DO not attach paper or tape to the disc.
● Keep the disc away from direct sunlight or heat sources.
● Store the disc in a disc case after playback.
b.) Cleaning discs
● Before playback, wipe the disc outwards in straight lines, from the center
with clean cloth.
Keep dust away from the pickup lens by keeping the disc tray closed after
use. If there is dust on the pickup lens, use a cleaning disc to clean it. Refer
to the operating instructions of the cleaning disc you bought.
These specifications are subject to change without prior notice. Weight and
dimensions are approximate.
72
2.Condensation
The following circumstances may result in condensation on the pickup:
● If you have just turned on the heater or the cold air from an air conditioner
directly hits the unit.
● If you move the unit from an air conditioned room to a hot, humid room.
● The room is humid or damp.
If condensation occurs, the player will not operate properly, Remove the
disc, connect the power cord, turn on the player, and leave it for two or
three hours so the player can warm up and evaporate any moisture.
73