1
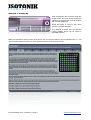
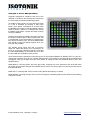
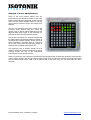
Oktopad 2 User Manual - CONTENTS
Overview - P2
Setting Up - P3/4
Scene ONE (Shuffler) - P5
Scene TWO (Stutters) - P6
Scene THREE (Buttons) - P7
Scene FOUR (DJ Utility) - P8
Scene FIVE (Looping) - P9
Scene SIX (Send/Return) - P10
Scene SEVEN (Faders) - P10
Scene EIGHT (Device) - P10
Frequently Asked Questions - P11
Isotonik Studios 2012 - Oktopad 2 - Page 1
www.isotonikstudios.com
Oktopad 2 - Overview
Oktopad utilizes the Launchpads User 2 mode to add 8 additional scenes of functionality to the Launchpad
whilst allowing the default functionality of the other modes to remain.
Each scene either offers an audio effect or a set of controls that can be mapped to parameters within
Ableton, in our template we have mapped many of these as a starting point but you’ll find when consulting
this manual that they are easily modified and configured to your own unique requirements.
Scene ONE (Shuffler)
Route audio to the Oktopad device and rearrange it on the fly, change the order of the slices and reverse
and mute them to create new patterns.
Scene TWO (Stutters)
This scene gives you progressive filter effects, turntable brake and rewind (of actual audio) and a unique
Beat Repeat style effect where you can choose which 1/8th of the last bar of audio is repeated and at what
rate, glitchy madness in the right hands!
Scene THREE (Buttons)
Ever wish you could edit the Launchpad? With this scene each of the buttons can have it’s lighting
configured and mapped to any parameter within Ableton. Set it’s on and off values and decide whether it acts
as a Toggle or Momentary, finally for advanced use choose how long in time it takes to reach your target
values for example to give the smooth introduction of an effect.
Scene FOUR (To Be Confirmed)
This scene is still under constrution and is planned to be a DJ Utility scene giving relative quantized beat
jumps, clip nudge, and control of the pitch of a clip across all eight tracks within the RedBox
Scene FIVE (Looping)
Traktoresque style looping over the clips playing within the RedBox, set a 1, 2 or 4 bar loop on the fly, halve
and double a set loop by moving the loop start or end point and even shift the loop brace forwards or
backwards by a bar at a time or by the loops length.
Scene SIX (Send/Return)
Choose to take control of a single send across 8 tracks and then switch to control the first 8 macros of a rack
within the corresponding Return track, you can even select on the fly whether the buttons act as momentary
to give short bursts of audio or toggle to sen audio to a Return and then modify the effect within it.
Scene SEVEN (Faders)
We’ve given you 8 banks of faders, mappable to any set of parameters within your set we’ve by default set
the first bank to control volume faders. Yes you can achieve this with the Mixer mode of the Launchpad but
with our device there’s a smooth control so that values rise and fall gradually rather than jumping to an
absolute value, who said you cant mix smoothly with buttons?
Scene EIGHT (Device)
Navigate around your set and take control of the in focus device, now you can use each column of buttons to
control the parameters of the device, you can even move between the banks of parameters and switch
between devices on a track. As with the Fader scene we’ve coded our smoothing functionality to give finer
control over Ableton
Isotonik Studios 2012 - Oktopad 2 - Page 2
www.isotonikstudios.com
Oktopad 2 - Setting Up
After downloading the LivePack ready file,
double click it and it will install directly into
Abletons Library and open a blank template
with a lesson displaying.
Within the lesson is a link to click which
opens the example template.
The Oktopad 2 device and the Oktopad
(Scene THREE) device can be found on
RETURN TRACK I.
Within the Oktopad 2 device (screen shot above) are 3 round grey buttons, the one labelled with a “?” will
open a floating window that acts as a user guide to the device and is shown below.
Isotonik Studios 2012 - Oktopad 2 - Page 3
www.isotonikstudios.com
Oktopad 2 - Setting Up (Control Surfaces)
Oktopad’s original design was inspired by a
desire to complement an APC40 or a second
Launchpad which as the primary device
would be used to launch clips. To achieve
this you’ll see two menus for Control
Surfaces (They are shown with APC40 as
the entry within the screen shot).
When first opening the template click the “1”
and “2” grey buttons to reset the menu selection for the Control Surfaces available on your computer.
As you hover over each menu an annotation will
give you instructions on what to select:
1, The Top Menu should be set to whichever
control surface you are going to use for launching
clips, various scenes within Oktopad are
programmed to follow this so if you select APC40
for example the looping functionality will sync to
the APC40’s Clip Launch Rectangle (RedBox)
2, The Bottom Menu should always be set to
display “Launchpad”
For best results the Launchpad should be set up
as a Control Surface in the first Control Surface
slot, if it’s the second then you need to ensure
that whichever surface you have selected in the
first slot is connected at all times when using
Oktopad.
Oktopad 2 - Setting Up (Lighting)
As the Launchpad offers so many different Lighting
options we’ve narrowed these down to three, for colour
blind users wishing to change the brightness or
orientation of the LED’s of the Launchpad simply adjust
the three number boxes (shown here as 3, 19 & 56), the
Launchpad will update with each change to indicate the
new lighting for each of the three states.
When you are happy with your control surface and lighting
settings save your Live Set and close and reopen Ableton.
Oktopad 2 - Setting Up (Manual Scene Change)
The final menu allows you to navigate through the scenes using the mouse, this is mainly useful when
learning the functionality of the device, to change scenes without the mouse hold down the USER 2 button
and one of the round side buttons (labelled Volume etc).
Pressing and holding the USER 2 button will toggle a floating window that displays the controls of the
currently selected scene.
Isotonik Studios 2012 - Oktopad 2 - Page 4
www.isotonikstudios.com
Oktopad 2 - Scene ONE (Shuffler)
Originally designed for Subfocus and part of the
Oktopad 2 Lite device this scene gives control from
the Launchpad of a Buffer Shuffler style effect.
To shuffle incoming audio you must first route audio
to it, this is achieved by pressing a side round
button. Each button corresponds to a track within
the RedBox and toggle it’s sends between sending
audio to Return I (where it is effected and sent to
the Master) and Return J (where the audio is simply
sent to the Master)
Pressing and holding the BANK UP button will reset
the slices of audio to play in their original order, this
is represented on the Launchpad by a diagonal line
from top left to bottom right. This is the default state
and should be how the settings appear when you
first open the template.
The Shuffler simply slices each bar of incoming
audio into 1/8ths and allows you to rearrange it on
the fly, if you press the buttons of the top row so that
the Launchpad displays a horizontal line you’ll hear
the first 1/8th slice repeated 8 times per bar.
You’ll see that with the transport running the top row of round buttons (BANK UP, DOWN, LEFT etc.) act as a
metronome to display which slice is currently being played. This metronome changes colour to indicate what
will happen when you change the order of the slices, to change modes use the BANK RIGHT, LEFT and
DOWN buttons
BANK RIGHT = Running Green: this is the play mode, changing any of the positions of the slices will make
each slice play forwards, and light the individual pad in Green. The second press of a Green pad will reverse
that particular slice
BANK LEFT = Running Red: this is reverse mode, pads lit Red will play in reverse
BANK DOWN = Running Orange: when a pad is lit Orange it is indicating that the slice will be muted creating
a drop out in audio.
Isotonik Studios 2012 - Oktopad 2 - Page 5
www.isotonikstudios.com
Oktopad 2 - Scene TWO (Stutters)
Some of the most popular effects from our
Isotonik device get advanced thanks to the extra
buttons offered by the Launchpad, as with the first
scene use the SIDE ROUND buttons to choose
which tracks of audio are sent to the device to be
effected.
The Top row of Buttons offer Filter Curves on the
incoming audio, buttons near the centre will
quickly move to the full effect whilst those at the
edge will take much longer. To the left (Red) is a
Filter Down effect with the opposite (Green)
The second row will be lit in a similar fashion with
the Red buttons representing different speeds of
Turntable style rewinds and the Green giving an
effect equivalent to pressing Stop on a Technics
1210 in the centre to the far right being similar to
switching the turntables rocker switch off...
The remaining rows of buttons should not be lit
unless pressed, the metronome lighting should be
running across the top of the Launchpad
indicating the current playing position.
When you press any of the buttons it will reference the last played bar of audio and repeat the corresponding
1/8th of audio. Buttons near the top will play back longer slices of audio (up to half a bar) whilst the bottom
row will repeat 1/64th slices. With a bit of practice and a nice drum loop you can really play this effect
musically.
Isotonik Studios 2012 - Oktopad 2 - Page 6
www.isotonikstudios.com
Oktopad 2 - Scene THREE (Stutters)
Whilst the Launchpad can be used with Novations Automap software
we’ve given even more control with this scene. Each of the CLIP
LAUNCH buttons can be edited with the easy configurator floating
window.
The SIDE ROUND buttons perform as they do in the Shuffler and
Stutter Scenes in routing the audio of each of the 8 tracks between
being sent to the Oktopad return track and the clean track.
The template comes pre-configured as standard giving control over
the “Punch FX” racks within the first 4 tracks, these give momentary
Beat Repeats (which can be toggled to become Echo Kills) along with
3 different progressive effects that change the longer you keep their
buttons pressed down for.
To recall the configured settings, and indeed your own after
you’ve made modifications and saved your set, you simply
need to click on the “Recall” button within the GUI of the
device (shown above).
On the (Scene THREE) device click on the “Closed”
button to bring up the floating window which has a
control for every one of the CLIP LAUNCH buttons. To
edit the settings first select a parameter you wish to
control, it’ll be indicated by a bracket around it (shown
left)
Now to assign this parameter to a
button simply click on the name (shown
right as “TWO 1/8”) and it will update to
show the track name and the parameter
description.
The two percentage number boxes
represent the range of values that the
button will move between, this is
effectively the values sent when
pressed (shown as 60%) and released
(shown as 0%).
The corresponding number boxes below these values represent the time in milliseconds that it will take
to reach each of the values, as such you could assign a button to a filter and set the time so that it
makes a sweep upwards when pressed and jumps back to zero instantly when the button is released.
Lighting of the buttons is controlled by the menu boxes (shown as one & three) in all cases the left
hand boxes control the reaction of the buttons when released whilst the right relates to when it’s
pressed.
Finally the box indicated as “M” in the screen shot indicate that this button is set to Momentary behaviour,
click on it to change it to “T” and toggle behaviour (one press for on and another for off).
WHEN YOU HAVE MADE ANY CHANGES SAVE YOUR SET SO THAT THE NEW VALUES OVERWRITE
EXISTING ONES THE NEXT TIME YOU OPEN YOUR SET!!
Isotonik Studios 2012 - Oktopad 2 - Page 7
www.isotonikstudios.com
Oktopad 2 - Scene FOUR (DJ Utility)
Our constant quest is to make Ableton more intuitive for DJ’s
making the move to a DAW. As such this scene brings back
features that a Vinyl DJ takes for granted.
NUDGE
To nudge a clip backwards or forwards within Ableton you would
need first to midi map the clip nudge functionality to two MIDI
buttons and then be able to focus on the clip you want to nudge,
then change the Global Quantization to zero.... Well you get the
idea.
The top and second row will nudge a clip forwards and
backwards, you can select how much of a Nudge it makes and
how often it’ll repeat this nudge with the button held down by
changing the values on the Main Device GUI as shown below.
PITCH
The next three rows will move the Pitch of a clip upwards (Green) reset it (Unlit) or move it downwards
(Red), this will allow you to change a clips pitch on the fly to bring it into tune with other tracks.
BEAT JUMPS
Sometimes you just miss your cue point and need to move a clip backwards or forwards in time by a beat or
so. The bottom 3 rows are dedicated to this with the Green row moving clips forwards and the Red row doing
the opposite and moving them back. The row in between will have a solitary Amber light to show the number
of beats that will be jumped with each press and this can be changed on the fly.
FINE TUNING OPTIONS
On the main Oktopad 2 device are a few additional boxes that allow fine tuning of this scene as it doesn’t
have it’s own floating window.
Nudge 0.01 shown to the left relates to 1/100th of a
beat will be nudged each time the button is pressed
The 255 is the milliseconds before this nudge will be
repeated if you keep the button held down.
Pitch 48 is the number of ct that a clip will change in
pitch when either of the Pitch buttons is held down .
121 is the number of milliseconds again between the
pitch changing again whilst these buttons are held
down.
Isotonik Studios 2012 - Oktopad 2 - Page 8
www.isotonikstudios.com
Oktopad 2 - Scene FIVE (Looping)
On the fly looping is one of the most requested
features on the Ableton forum, in fact Ableton
has some pretty decent looping functionality
that Oktopad is able to take to the next level.
The bottom 4 rows of the Launchpad are
dedicated to setting loops of defined lengths on
the fly, you’ll see from the Launchpad itself
which clips are playing as only these columns
will be lit and available for looping.
Once a loop is set the SIDE ROUND button will
light for the corresponding track, to turn the loop
off or turn a pre-set loop on simply use these
buttons.
As you can see from the screen shot of the
floating window, once a loop is set you have
further control over it.
The top two rows of buttons will move a loop
thats active either forwards (Green) or
backwards (Red), if no loop is set these buttons
have no functionality.
With BANK UP lit the move function will move the loop by it’s length, with BANK DOWN the move will be of
one bar only.
The second two rows will either Double (Green) or Halve (Red) an active loop, if no loop is set these buttons
have no functionality.
With BANK LEFT lit when doubling or halving a loop it will be the Loop Start point that gets moved, whilst
with BANK RIGHT lit it will be the loop end point that is adjusted.
Isotonik Studios 2012 - Oktopad 2 - Page 9
www.isotonikstudios.com
Oktopad 2 - Scene SIX (Send/Return)
This scene is very simple, you either control a Send for all 8
tracks within the Clip Launch rectangle (Press to light the
BANK LEFT button) or you can control the first rack on a
Return Track (Press to toggle the BANK RIGHT button to be
lit)
The Clip Launch grid controls the values of each of the 8
parameters in Return Mode or the amount of the Send on each
track in Send Mode.
To choose which Send and Return you are controlling simply
use the SIDE ROUND buttons.
To change the behaviour between Toggle and Momentary use
the BANK UP (Momentary) and BANK DOWN (Toggle)
buttons, as you move between Send and Return Mode the
settings are recalled for each Mode individually.
Oktopad 2 - Scene SEVEN (Faders)
Whilst the Launchpad has it’s Mixer Mode each button
press within it is treated as instant and so finer control
feels a little lacking.
We’ve marked in red the smoothing option in the screen
shot to the right, with this dial set high it will take a long
time to move between values. If you want to move slowly
up or down in value then press each button in turn that
are next to each other, to move quicker just press the
button that represents the destination value you want to
get to.
The template has no mapping for this scene as it’s
functionality is entirely up to you, to map it select a
parameter within Live and the click on one of the
Fader Names highlighted on the right.
Oktopad 2 - Scene EIGHT (Device)
The auto-mapping functionality of the APC40 comes to the Launchpad with the columns of faders
corresponding to the 8 macros of the currently in focus device.
BANK UP and BANK DOWN move between the banks of parameters.
BANK LEFT and RIGHT move between devices upon a track.
The SIDE ROUND buttons navigate to select the 8 tracks within the Clip Launch Rectangle.
Isotonik Studios 2012 - Oktopad 2 - Page 10
www.isotonikstudios.com
User 1: Drums
Track 8 of the Live template is loaded with a
drumrack filled with samples from Abletons library.
When pressing User 1 on the Launchpad,
Oktopad 2 changes the monitoring of the relevant
tracks so that Midi feedback is passed to the
Launchpad so that it flashes when pressed and
notes are played in Ableton.
As the Clip Launch buttons naturally send the midi
required to control the Drumrack the Oktopad
functionality is provided by the Side Round
buttons.
The bottom four buttons (STOP, TRK ON, SOLO
and ARM) decide the velocity of the next pressed
Clip Launch button giving you four levels of
control. The button for the current velocity setting
stays lit as a visual indicator. If you want to replace
the drum samples remember to map the velocity
for each sample to the first Macro of the drum
rack. You can choose the four separate levels of
velocity by cc by navigating to the Device found
within the xxxxx track (Track Number xx) as with
other settings in Oktopad remember to save your
template after making adjustments.
SND B when lit indicates that Ableton is in Midi
Overdub mode allowing you to play notes directly
into a playing Midi Clip on track 8. Pressing SND B
toggles between on and off.
As timing is something that doesn’t come naturally
to all of us we’ve programed SND A to toggle
between 1/16th Record Quantization (when lit) and
no Record Quantization (when unlit)
Permanently lit Red the VOL and PAN Buttons
perform different Delete functionality. Press PAN
and the Clip Launch grid buttons will light in Red
when a note is played, press one of these buttons
and that particular note will be deleted from the
playing Midi Clip and the Clip Launch grid will
return to Play mode.
Pressing the VOL Button will delete all of the notes within the playing clip allowing you to start again from
scratch.
All of the buttons are already Midi Mapped as part of the template so set up isn’t required.
Running along the top round buttons is a metronome, this is synced to Lives transport and changes on the
beat so a full run of lights represents two bars.
Isotonik Studios 2012 - Oktopad 2 - Page 11
www.isotonikstudios.com
Frequently Asked Questions
Q: I saw a step sequencer scene on the Oktopad video along with a utility scene, where are they?
A: Oktopad 2 currently doesn’t have these scene, Utility was troublesome to make work on anything but a
13” Macbook, we have some plans though to give the user the ability to choose an order any 8 scenes which
should see a return for the step sequencer
Isotonik Studios 2012 - Oktopad 2 - Page 12
www.isotonikstudios.com