1
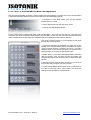
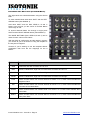
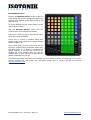
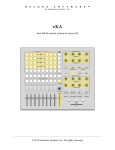
Isotonik 8 User Manual - CONTENTS
Overview - p2 / 3
Ableton Configuration - p4
Isotonik Master Device Configuration - p5
Isotonik Effects Module - p6
The Encoders (Standard Mode) -p7
The Encoders (Isotonik Mode) - p8 / 9
Isotonik Scenes - p10
•
One - Looping / Follow & Pitch - p11
•
Two - Slicer / Effects / Smart - p12 / 13
•
Three - Map it up - p14
•
Four & FIve - p15
APC40 Control Reference - p16 / 17
Frequently Asked Questions - p18
Isotonik Studios 2011 - Isotonik 8 - Page 1
www.isotonikstudios.com
I s o t o n i k 8: Overview
Isotonik 8 is designed to work in conjunction with Ableton, Max4Live and Akai’s APC40 to give the user a
powerful set of controls tailored for Live performance.
Built into a fully configured template this latest generation of the device now allows for complete configuration by the user to their own unique requirements.
Taking Control
The original functionality of the APC40 was to provide two separate sets of eight encoders, the Device
Control Encoders automatically mapped to the first eight parameters of whichever device was in focus of the
“blue hand” with the Track Control Encoders being dedicated to one of four banks, these by default control
the Pan, Send A, Send B and Send C of the eight tracks within focus of the the Clip Launch Rectangle.
Born out of it’s DJ template origins when switched into Isotonik mode the user should view the Encoders
grouped vertically in fours like a traditional DJ mixer giving four columns of four encoders.
Without using the mouse users can switch between up to eight different banks of sixteen encoders extending
the level of control available. Within this mode, where the encoders can be mapped to the users specific way
of playing, each column of four encoders can be reset to a predefined value at the press of a button. In
addition the user can switch back to standard APC40 “blue hand” mode and control whichever device is in
focus.
As per the standard Midi Mapping functionality a range of values can be set per encoder and in addition a
specific lighting style can be chosen based on what the encoder is mapped to, three styles are available
including a single led light, pan display and full volume display.
Additional Mouseless Functionality
With some of the standard DJ style functionality hidden away, and in some cases being un-mappable.
Isotonik brings a number of different options quickly to your fingertips without needing a mouse.
•
Change the Global Launch Quantization and nudge clips backwards or forwards to correct warping
issues or bring clips back into sync when removing the bass on one...
•
Sometimes you can miss that important point of time of when to trigger a clip, with Isotonik any playing
clip can be brought back into line with others with the beat jump functionality, you can even choose by
how many beats each jump will be without picking up the mouse...
•
Need to check where the playhead is within a clip, you’ll be able to quickly focus on the waveform of
the playing clip in a track or an un-playing clip within the Clip Launch Rectangle without triggering it to
play, you can also relocate the Clip Launch Rectangle at the same time, great for pre-cueing as well!
•
For the advanced users who really want to cross genres and destroy dancefloors we’ve given the
option to change the pitch of a clip on the fly, this can be used to bring two clips into a complementary
key to each other or even as an audio effect...
Get Detached from the Screen
Whilst the APC40 hasn’t got hundreds of LCD screens to tell you which clips are playing we can modify it’s
standard behaviour subtly to add to the DJ’ing experience.
The first touch is to light a Clip Stop Button with a solid light when a clip is playing within it’s track, If you’ve
got a large set it can become tricky to remember which tracks are active, no more pushing a fader only to
hear a clip you thought had finished half an hour ago.
Secondly, when a clip is set to looping and the playhead crosses into the Loop Brace the Clip Stop Button
will start pulsing in time to the current tempo.
Isotonik Studios 2011 - Isotonik 8 - Page 2
www.isotonikstudios.com
Isotonik Mode ONE: Looping...
This mode gives access to the looping functionality of the first four tracks of the Clip Launch Rectangle, as
you move this around your set the looping functionality moves with it.
You can set Loops on the fly of preconfigured lengths of 1, 2 or 4 Bars, with a set loop you can halve or
double the length by choosing to move either the loop start or loop end point.
When setting the loop you can choose whether the device sets the start point to the previous bar or the
previous beat for finer control.
With a clip set to loop you can then move the loop brace by a bar at a time or by it’s length, the choice of
which is highlighted on the APC40’s Clip Stop Buttons in this mode.
If you need to finely adjust the set loop then the faders can move the loop end point by the finest division
Ableton will allow.
Isotonik Mode TWO: Slicer and Effects...
Buffering the last two bars of audio you can re-trigger slices of the previous audio shortening or lengthening
the size of slice to glitch things up nicely. You can also cut the audio into 1/8th and reverse or mute slices...
Add to the arsenal turntable rewind and brake effects and a tempo synced Gater and you have a set of game
changing transition choices.
Isotonik Mode THREE: Map it up...
As the APC40 didn’t come with a midi editor we thought we’d try and come up with our own, with this mode
you can choose to:
•
assign each of the buttons and faders to any parameter within Ableton
•
choose how the LED lighting behaves
•
set the values sent when pressed and released
•
define the time it takes to get between values
•
choose how each control behave either on a momentary or toggle basis
Isotonik Mode FOUR: Drums...
Using the Clip Launch buttons to trigger drums, with velocity control as well you can really add another
dimension to your performances:
•
velocity control from fader five or the Clip Stop buttons
•
record quantization control with the Track Select buttons
•
toggle of overdub with LED feedback on the playing pads
•
delete all notes in the playing clip
•
delete just one note, Akai MPC style
Isotonik Studios 2011 - Isotonik 8 - Page 3
www.isotonikstudios.com
I s o t o n i k 8: Ableton Configuration
The device and template uses both a control surface and
midi mapping, to ensure the correct communication is
transferred between Ableton and the APC40 follow the
described steps exactly.
Step One: Open the System Preferences of Ableton
Step Two: Navigate to the Midi Sync Tab and in the first
Control Surface slot select the APC40 and set the inputs
and outputs to be the same
Step Three: In the Midi Preferences section of this tab
turn the Remote on for the input of the APC40 and the
Track on for the output
Your settings should now look like the screen shot to the
right.
Isotonik Studios 2011 - Isotonik 8 - Page 4
www.isotonikstudios.com
I s o t o n i k 8: Isotonik Master Device Configuration
The device and template uses both a control surface and midi mapping, to ensure the correct communication
is transferred between Ableton and the APC40 follow the described steps exactly.
1, Navigate to Track Nine where you’ll find the Isotonik
Master Device Located
2, Select the APC40 from the drop down menu
3, Click on the Midi Mapping Button
In this window when entering Midi Map mode (CTRL/CMD + M) you’ll see that the top 8 encoders are
mapped to the Track Control Encoders whilst in the Pan Bank, hover over the four buttons within this frame
and the labels will show that these are mapped to the four bank buttons Pan, Send A, B and C.
The other encoders require no midi mapping as they work
through the Control Surface.
4, To ensure everything is controlled is to right click on the
header of the Isotonik Master Device and select the option
“Lock to Control Surface 1 (APC40)” now when you select
different banks for the Device Encoders you’ll see that the
different banks of encoders in this window react.
4, Select SHIFT + Each of the Numbered buttons below the
device encoders you’ll find that the first four banks will
automatically map to the remaining sets of dials within this
window.
5, Having checked communication is working you can close
this window after configuring for the first time.
6, In the Isotonik Master Device click on the round button to
the right of the drop down menu which will recall the
settings for the encoders in Isotonik Mode.
Isotonik Studios 2011 - Isotonik 8 - Page 5
www.isotonikstudios.com
I s o t o n i k 8: Isotonik Effects Module
The Isotonik Effects Module can be found on
Return Track NINE, it’s purpose is primarily to
power the 5 modes of Isotonik which are described
later in this manual however we have also included
a number of additional features and configurability.
Across the bottom of the device you will see labelled buttons for the DETAIL VIEW, REC QUANTIZE, MIDI
OVERDUB and METRONOME buttons of the APC40. With these buttons toggled to blue the original default
functionality of the APC40 continues along with our added functionality, when greyed out as in the screen
shot their functionality is disabled leaving just the added functionality
Detail View
When held down for the Time value indicated in the blue box above the button the DETAIL VIEW button will
open and close the floating window for the encoders.
Rec Quantize
Hold down REC QUANTIZE and a TRACK SELECT button will light to indicate the number of beats the
playhead will jump by when you press a lit REC ARM button to jump backwards or an ACTIVATOR button to
jump forwards, only tracks with clips playing in them will be lit.
Midi Overdub
The MIDI OVERDUB button gives access to change the pitch of the clips playing in all eight tracks within the
Clip Launch Rectangle. When held down you can use the ACTIVATOR button to increase the pitch, the
SOLO button to reset it to it’s original state and finally the REC ARM button to reduce the pitch.
In the screen shot above you’ll see the number box that has a value of 48, this is the number of semitones
that the pitch change by each time you press a button. The 500 value is the number of milliseconds before
the pitch will be changed again whilst the ACTIVATOR or REC ARM buttons are held down.
Metronome
Hold down the Metronome and use the TRACK SELECT buttons to change the global launch quantize
values. With Metronome held the ACTIVATOR and REC ARM will light for each track that has a clip playing
within it, the value above of 0.01 is the number of milliseconds by which the playhead will be nudged
backwards (REC ARM) or forwards (ACTIVATOR).
The second 500.00 value box is the number of milliseconds that will pass before the nudge is repeated.This
feature is designed for tracks that even though perfectly warped just fall out of line when EQing live.
Isotonik Studios 2011 - Isotonik 8 - Page 6
www.isotonikstudios.com
Isotonik 8: The Encoders (Standard Mode)
Pressing SHIFT and the CLIP/TRACK button puts the
DEVICE CONTROL ENCODERS in to the standard
functionality whereby they’ll automap to the device or rack
currently in focus, to change the focus simply use the left
and right arrows beneath the encoders and you’ll see in
addition the title of Track TWO will change to reflect what
device is currently being controlled.
Track Control Encoders - Pan Bank
Press SHIFT and the PAN BANK button and the Track
Control Encoders will automap to the 8 sends of the track
in focus.
Without SHIFT depressed the Pan Bank button will reset
the sends on the track in focus to zero.
Track Control Encoders - Send A
Press SEND A and it’ll copy the focus of the device
currently being controlled by the Device Control Encoders
and transfers them to the Track Control Encoders, to then
take control switch to the bank by pressing SHIFT and
SEND A. This gives you a second set of device control
encoders which wont change each time you change
tracks.
Track Control Encoders - Send B & C
These currently have no programmed functionality, as
with Isotonik 7 we’re keen to work with Artists on custom versions of the template, if you believe you have a
unique requirement please do not hesitate to get in touch.
Whats being Controlled?
With the Encoders In either Standard or Isotonik mode the title of Track One will automatically change to
indicate which device is currently being controlled by the Track Control Encoders whilst the title of Track Two
will indicate what is being controlled by the Device Encoders.
Isotonik Studios 2011 - Isotonik 8 - Page 7
www.isotonikstudios.com
Isotonik 8: The Encoders (Isotonik Mode)
When clicking on the Encoders button in the Isotonik Midi Device you’ll see the Heads Up display appear,
once clicked you can continuously bring this window back to the forefront of you computers screen by
pressing and holding the DETAIL VIEW button.
This floating windows acts both as information of what you are currently controlling with the sixteen encoders
but also as a configurator should you wish to change the standard mappings.
Working from the left:
s / v / p defines how each encoder will light
•
•
•
s is a single LED
v defines volume behaviour
p gives you the equivalent of pan lighting
After you have changed the lighting to your own
preference save your set as the lighting along with the reset values etc are not recorded until a set is saved.
This saves greatly on CPU as it’s not constantly recording values into your set.
To change what’s being controlled by each encoder
first click on a parameter within Ableton, then click
on the text of the encoder you wish to map it to.
The min and max values are the top two numbers,
change these if you want to restrict the range of
values you can control.
The percentage box relates to the resettable value
that will be jumped to when the corresponding bank
button is pressed.
The Text Boxes at the top left are where you can store names of each
bank, they are then recalled when changing between them and are
used to give titles to Track ONE and TWO. The top box describes
what is being controlled by the Track Control encoders and titles
Track ONE whilst the bottom box refers to the Device Control
Encoders and titles Track TWO
Isotonik Studios 2011 - Isotonik 8 - Page 8
www.isotonikstudios.com
Isotonik 8: The Encoders (Isotonik Mode)
The eight banks are switched between using the APC40
itself.
To enter Isotonik Mode hold down SHIFT and the LEFT
ARROW button (also labelled 3).
Hold down SHIFT and the PAN, SEND A, B and C
buttons now will give you the choice of Encoder Banks
one through to four.
To access ISotonik Banks five through to eight press
SHIFT and the RIGHT ARROW button (also labelled 4).
The MODE BUTTONS (PAN, SEND A,B and C) act as
resets for each column of Encoders
With the ability to configure the encoder banks in anyway
you choose to you’re not limited in using the template in
the way we’ve imagined.
However if you’re wanting to use the template without
modification then here are the mappings for the 8
Banks....
Bank
Controls
ONE
3 band EQ and Gain for tracks One to Four
TWO
Reverb, Fade2Distort, High and Low Pass Filters for tracks One to Four
THREE
3 band EQ and Gain for tracks Five to Eight
FOUR
Reverb, Fade2Distort, High and Low Pass Filters for tracks Five to Eight
FIVE
Device Control bottom row controls Send A for tracks 1 to 4, Track Control handles the
Negotiator Rack
SIX
Device Control bottom row controls Send B for tracks 1 to 4, Track Control handles the
Dunstable House Mafia Rack
SEVEN
Device Control bottom row controls Send C for tracks 1 to 4, Track Control handles the 8
Dollar Rack
EIGHT
Device Control bottom row controls Send D for tracks 1 to 4, Track Control handles the
Delay Filter Rack
Isotonik Studios 2011 - Isotonik 8 - Page 9
www.isotonikstudios.com
Isotonik 8: Scenes
Pressing the MASTER SELECT button so that it’s
lit will disable the controls highlighted in green and
reassign them different functionality based on the
scene chosen.
To choose between the five scenes simply use the
Scene Launch buttons.
With the MASTER SELECT button unlit the
controls return to the standard functionality.
Scene One controls looping for the first four tracks
of the Clip Launch Rectangle.
Scene Two is a bank of powerful effects that
require audio to be routed to the Isotonik Effects
Module on Return E.
Scene Three gives you total control over the the
APC40 in choosing which parameters each button
and fader maps to. It comes pre-configured to
effects mapped on the first four tracks of the
template so works straight away but can be
changed later on when you want to add different
effects combinations to your set.
Scene Four and Scene Five are as yet unwritten and as at writing currently are uninspired, if you have a
specific function set that you’d like considered please get in contact through our website
www.isotonikstudios.com
Isotonik Studios 2011 - Isotonik 8 - Page 10
www.isotonikstudios.com
Isotonik 8: Looping (Scene ONE)
With MASTER SELECT lit SCENE LAUNCH ONE selects Looping
mode.
The image opposite shows track one and four of the clip launch
rectangle have loops set, tracks two and three have no loops set to on
as indicated by having no lighting in the clip launch grid.
When a loop is set the top row of the clip launch grid will double it’s
length whilst the second row will halve it, with TRACK SELECT FIVE lit
this will be done by moving the clip start point whilst with TRACK
SELECT SIX lit it will move the loop end point.
The middle row of the Clip Launch Grid indicates the playhead position
of a clip in relation to the loop brace, if lit green then the clip will loop but
it has’t yet reached the loop brace. An orange light indicates that the clip
is currently within the loop brace, in addition the relevant CLIP STOP
BUTTON will also flash to indicate this. Pressing this button will toggle
the loop state of the playing clip between on and off.
The fourth and fifth row move the loop brace forwards and backwards
respectively, with CLIP STOP SEVEN lit this will be by a bar at a time
whilst the movement will be of the loop length if CLIP STOP EIGHT is
lit.
TRACK SELECT BUTTONS in this scene have no functionality.
RECORD ARM, SOLO and ACTIVATOR BUTTONS set 1, 2 and 4 bar loops on the fly, the corresponding
FADER will then adjust the loop end point reducing it down to the lowest division possible.
Within the Isotonik Effects Module you’ll see a button for each of the five Isotonik Scenes, the top right button
controls the quantization for your loop setting and can be toggled to set between the nearest beat or nearest
bar, in each case it will set the start of the loop to the beat or bar that has just been passed.
Follow & Pitch
Located within the first four tracks of the template you’ll find one of our Modular devices which is designed to
complement those users who split whole tracks into
separate clips and want them to be triggered in
sequence.
With the FOLLOW and PITCH buttons highlighted as
per the picture to the right the device will perform two
actions.
Firstly when a clip reaches its end point it will trigger
the clip immediately below it, this enables you to set
loops on the fly and not have to worry about setting
follow actions.
Secondly as Isotonik gives access to changing a clips
pitch on the fly it will also grab the currently playing
clips coarse and fine pitch settings and copy them
across to the next clip as it is triggered.
The follow action works down to a launch quantization level of 1/8th and will only behave
consistently if you have cropped all of your clips.
Isotonik Studios 2011 - Isotonik 8 - Page 11
www.isotonikstudios.com
Isotonik 8: Slicer Effects (Scene TWO)
When MASTER SELECT is lit press SCENE LAUNCH TWO and you’ll
access the effects module, this works on the same basis as effects
channels in DJ Mixers whereby audio needs to be routed to it for it to be
effected.
Any track or combination of tracks can be sent to the module simply by
lighting the REC ARM button for the track, this updates with the
movement of the Clip Launch Rectangle so there’s no limit to the
number of tracks that can be selected.
1
2
3
4
There are a number of effects within the module, the first of which is the
Slicer effect which can operate in three distinct modes.
Mode ONE:
With the grid unlit a running metronome light highlights the current slice
being played, pressing a clip launch button will make the module repeat
this slice for a predetermined length adjusted by moving FADER FIVE.
Mode TWO:
Press and hold SCENE LAUNCH TWO for more than a beat and this
mode alternates between unlit and lit red with the buttons now acting on
a toggle basis so you can lock a slice to repeat and combine other
effects from the module.
Mode THREE:
Toggle BUTTON 4 between orange and green to select the third mode. With the clip launch grid lit green
each slice of audio can be toggle through three states, Green indicates to play the slice as normal, Off is to
mute the slice whilst Red reverses the slice.
Whilst in this mode pressing and holding SCENE LAUNCH TWO for more than a beat will reset all slices to
play / green.
Clip Launch Grid - Bottom Row
In the bottom row of the clip launch grid you’ll find an additional set of three effects, BUTTON 1 will act as a
Gater and will be synced with the last accessed slice size, this can be adjusted with FADER FIVE.
BUTTON TWO gives a turntable break style effect, the time it takes to fall to zero speed is adjusted by
operating FADER SIX.
BUTTON THREE is a turntable rewind, the speed ranges from reverse at same speed to double speed
which can be adjusted mid-effect with FADER SEVEN
Isotonik Studios 2011 - Isotonik 8 - Page 12
www.isotonikstudios.com
Isotonik 8: Slicer Effects
The four CLIP STOP and TRACK SELECT BUTTONS in this scene choose between 8 banks of Smart FX
controlled by FADER EIGHT.
Smart FX are a concept promoted by Matt Moldover and Ean Golden of the Controllerism community, the
principle is that one fader or encoder can modulate eight different parameters at different rates bringing
different elements of an effect in and out of the mix as the fader travels its length.
By pressing SCENE TWO in the Effects Module you’ll expose a floating window like the above, each of the
graphs represents the curve that a parameter will follow as the fader is moved. To draw in a new curve click
on the play button and use your mouse to draw in each of the graphs, by choosing a new Smart Bank or
pressing the PLAY button again you’ll store your modified settings.
The Smart FX are automatically mapped to a rack placed to the right of the Effects Module, each bank
corresponds in number to the cc of the chain selector in this rack. Open the rack and show the chain selector
whilst moving through the banks to see what we mean.
If you like the concept of Smart FX and want more within your set then have a look at the devices within our
Modular Series for further creative options.
TRACK SELECT, CLIP STOP ACTIVATOR and SOLO buttons currently have no programmed functionality
Isotonik Studios 2011 - Isotonik 8 - Page 13
www.isotonikstudios.com
Isotonik 8: Map it Up... (Scene THREE)
When the MASTER SELECT BUTTON is active and SCENE LAUNCH THREE is lit you access our latest
innovation.
In this scene we bring you one of the most requested features for the APC40, the ability to map buttons and
faders to any parameter in Ableton and dictate how they behave.
Open the floating window for this scene by
clicking on the SCENE THREE button
within the Effects Module.
Each of the controls of the right hand
side of the APC40 are now available to
be customized.
We’ve provided a set of effects in each of
the first four tracks that are controlled by
default, these can easily be modified to
your own taste.
Each control of the APC40 has it’s own
set of configurable actions. First click on
a parameter in Live and then on the
description (for example Isotonik 8
Maste... R3PEAT in the screenshot to the
right) this will then map the parameter to
the control.
The two percentage boxes represent the values that will be applied to the parameter when the control is
released and pressed.
The number boxes in the middle row represent the time in milliseconds it will take to get to the values above
them, the higher the number the longer it will take.
Beneath the tile, shown to the right in Cyan and Yellow, is a toggle button which switches between M,
meaning momentary and T, meaning toggle which dictates the behaviour of the button each time it’s pressed.
Finally for each of the Clip Launch Grid buttons you can select from each menu the lighting behaviour of
each button when they are pressed and released
For the four faders in this scene you can again set the min and max values that are applied when modulating
the control.
Default Settings
We’ve set the master template up with some effects that work on the first four tracks but as this is completely
configurable we’re excited to hear and see what you the users come up with for yourself.
Isotonik Studios 2011 - Isotonik 8 - Page 14
www.isotonikstudios.com
Isotonik 8: Drums (Scene FOUR)
When MASTER SELECT is lit press SCENE LAUNCH FOUR and you’ll
access the Drums module, in this scene the CLIP LAUNCH BUTTONS
control the Drumrack that’s located on TRACK EIGHT
Velocity Control:
There are two methods for controlling the Velocity that the CLIP
LAUNCH buttons put out when pressed. Firstly you can either use the
CLIP STOP BUTTONS to achieve a specific velocity. Working from left
to right 60cc, 80cc, 100cc and 127cc. Secondly you can use TRACK
FADER FIVE to control from 0cc to 127cc, notice that the CLIP STOP
BUTTONS will update to give a visual indication as well, useful when
first entering the Drums mode.
Record Quantization:
Using the TRACK SELECT BUTTONS chooses the level of record
quantization with Track Five selecting off and then to the right 1/16th,
1/8th and finally 1/4 when Track Eight is pressed and lit.
Clip Launch Buttons Lighting:
When Ableton has overdub turned off the feedback from a playing midi
clip in Track Eight is displayed on the APC40 by Green flashing pads,
when overdub is on the pads colour changes to orange so that you
know when you’re in practice mode and when you are committing notes
to the playing clip.
Overdub can be toggled on and off by pressing the ACTIVATOR button on Track Five
Mistakes:
When you record notes into the playing clip sometimes you’ll make mistakes even with Record Quantization
on. If you just want to delete all the notes and start again press the REC/ARM button on Track Five
However if it’s just one note that offends press the SOLO button on Track Five, it’ll light and you’ll see the
flashing pads have turned Red to indicate you are in Delete Note Mode.
The next CLIP LAUNCH button you press will choose which note you wish to delete and return the APC40 to
play mode.
Isotonik Studios 2011 - Isotonik 8 - Page 15
www.isotonikstudios.com
With the complete configuration of Isotonik 8 being down to you the user we figured it’d be a while before
you exhausted all the possibilities, whilst you do so though we’ll be working to write scene five for a later
release....
If you’ve got an idea that you think should be included then please get in contact through our facebook page
www.facebook.com/IsotonikStudios
Isotonik Studios 2011 - Isotonik 8 - Page 16
www.isotonikstudios.com
Isotonik 8: APC40 Control Reference
APC40 Control
Action
Additional Information
TRACK SELECT
Select waveform of currently
playing clip
Press and hold for one beat
whilst transport is running, does
not launch clip. With Relocate
turned on within the Effects
module this will also move the
Clip Launch Rectangle within
Ableton
CLIP/TRACK + CLIP LAUNCH
BUTTON
Selects the Waveform of any clip
within the Clip Launch Rectangle
This action does not launch the
clip so can be used to preview a
waveform
SHIFT + CLIP/TRACK
Assigns Device Control Encoders
to the device on the currently
selected track, mapping the eight
e n c o d e r s t o t h e fi r s t 8
parameters of the device
To move between devices on the
currently selected track use the
Left and Right Arrow buttons
(also labelled 3 and 4)
DEVICE ON / OFF
Assigns Device Control Encoders
to the device on the currently
selected track, mapping the eight
encoders to parameters 9 to 16
of the device currently in focus
To move between devices on the
currently selected track use the
Left and Right Arrow buttons
(also labelled 3 and 4)
SHIFT + LEFT ARROW
Assigns Track & Device Control
Encoders to banks 1 to 4 of the
Isotonik device
Switch between Banks using the
PAN, SEND A, B and C
SHIFT & RIGHT ARROW
Assigns Track & Device Control
Encoders to banks 5 to 9 of the
Isotonik device
Switch between Banks using the
PAN, SEND A, B and C
SHIFT + MODE BUTTONS
(ISOTONIK ENCODERS)
Cycle between the 8 Encoder
Banks of the Isotonik Device
The button will remain lit to
indicate which bank is in control.
When the PAN button is lit along
with the LEFT ARROW then itʼs
in control of Encoder Bank 1 if
the RIGHT ARROW is lit then itʼs
controlling Encoder Bank 4
MODE BUTTONS (ISOTONIK
ENCODERS)
Reset the Encoders to their
stored values
PAN resets column one, SEND A
column 2 etc.
PA N
BANK
(STANDARD)
Reset the sends on the currently
selected Track
BUTTON
Isotonik Studios 2011 - Isotonik 8 - Page 17
www.isotonikstudios.com
Isotonik 8: APC40 Control Reference
APC40 Control
Action
Additional Information
SEND A BUTTON (STANDARD)
Double the DEVICE ENCODERS
This makes the TRACK
CONTROL ENCODERS focus on
the device currently in focus, this
will not change unless you press
the SEND A BUTTON again
MIDI OVERDUB
Change the pitch of each playing
clip on the fly
ACTIVATOR increases the pitch,
SOLO resets it to the original
launch value whilst ARM reduces
the pitch
METRONOME
Global Launch Quantize and Clip
Nudge
ACTIVATOR nudges a playing
clip forwards, ARM nudges it
back. SOLO remains as CUE
DETAIL VIEW
Press and hold whilst the
transport is running to bring up
the encoders window
REC QUANTIZATION
Allows Beat Jumps to be made
for each playing clip
Isotonik Studios 2011 - Isotonik 8 - Page 18
Set the number of beats each
jump will be by using the TRACK
SELECT buttons, jump forwards
with the ACTIVATOR buttons,
backwards with the ARM buttons
www.isotonikstudios.com
Frequently Asked Questions
Q, I cant seem to get the encoders to work...
A, You’ll need to be on at least Ableton 8.2.5 and Max 5.1.9, follow the instructions in the configuration (p4)
carefully as the APC40 needs to be set up as a Control Surface and Midi Controller. Finally ensure that the
APC40 is locked as a control surface to the Isotonik Master Device. You can check the APC40 is
communicating with the device by opening the Midi Mapping window from the Master device in track NINE, if
for some reason the id’s of the parameters have not configured correctly upon opening the set for the first
time you will need to remap each of the encoders using the encoder window and the instructions within this
manual.
Q, I want to midi map some of the controls of the APC40...
A, As Isotonik uses the control surface functionality of Ableton to listen to the APC40 it means that if a button
or fader gets midi mapped to anything it ceases to part of the control surface functionality which could stop
Isotonik working correctly. The controls left for manual midi mapping are:
•
•
•
•
•
•
•
•
•
•
•
Bank Select Arrows
Tap Tempo
Nudge - / +
Cue Level
Stop All Clips
Master Fader
Play
Stop
Record
Device Control Encoders for banks 5 to 8
Crossfader
Q, Why is return F empty?
A, To avoid the the need to use phaze cancellation all audio tracks are routed to sends only, when using the
Rec Arm buttons the audio is toggled between return E where the Isotonik Effects module is placed and
return F which acts as the Master unaffected audio.
Q, I’ve changed the LED’s on the encoders but they keep reverting back?
A, To reduce CPU we’ve made all of the internal settings so that they are saved within your template rather
than to record all of the modulation, as such when you’ve finished configuring your changes you need to
save the template to your hard drive.
Q, My Master Select Button has become unlit?
A, We’ve found that entering either Midi or Macro Mapping mode will reset the APC40 upon exit so you’ll
need to press the Master Select Button again to re-engage the device
Isotonik Studios 2011 - Isotonik 8 - Page 19
www.isotonikstudios.com