1
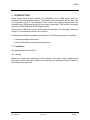
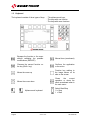
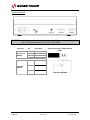
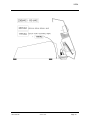
User’s Manual
VEGA
Football
Rugby
3412.514.02
Version 5.00
Edition August 2008
CAUTION
Protect the equipment against splashing, rain and excessive sun rays.
Never use the device if it is damaged or insecure.
Verify the selection of the power distribution.
Do not open the case; there is nothing that needs servicing inside it.
Nevertheless, if the case must be opened, you must call for some qualified
personnel. The power supply cable must be disconnected before opening the
case.
The information contained within this document may be modified without
warning.
Swiss Timing LTD cannot be held responsible for errors within this document
nor for any subsequent nor consequential damages (including loss of profit)
arising from its provision, nor performance or use of products described
herein, which will be covered by another guarantee, contract or other legal
document.
This symbol indicates that this product should not be disposed
with household waste. It has to be returned to a local authorized
collection system. By following this procedure you will contribute
to the protection of the environment and human health. The
recycling of the materials will help to conserve natural resources
(valid in the EU member states and in any countries with
corresponding legislation).
TABLE OF CONTENTS
1
INTRODUCTION ...................................................................................... 1
1.1
1.2
1.3
2
Installation ...............................................................................................................1
Set-up ......................................................................................................................1
Keyboard .................................................................................................................2
MAIN MENU ............................................................................................. 3
3
[CONSOLE SET] PARAMETERIZATION OF THE CONSOLE ........ 4
3.1
Ext Start/Stop – External Start/Stop........................................................................4
3.2
Test..........................................................................................................................4
3.3
Advance...................................................................................................................4
3.3.1
Languages........................................................................................................4
3.3.2
Bluetooth configuration ....................................................................................4
3.4
Name – Teams names, Players numbers, Players names ...............................5
3.4.1
Sending the teams names ...............................................................................5
3.4.2
Sending the players names .............................................................................5
3.4.3
Instant sending of the names...........................................................................5
3.4.4
Introduction of players names and numbers....................................................5
3.5
Update the software ..........................................................................................6
4
[TIME] DAY TIME .............................................................................. 7
5
[SELECT] GAME PARAMETERS..................................................... 8
6
5.1
[Settings] Choose the settings for a sport ........................................................8
5.2
[Save] Save the sport settings.......................................................................11
5.3
[Default] Change the standard settings for a sport........................................11
5.4
[All Def & Save] Reset the standard settings for all sports ...........................11
[PLAY] MATCH ............................................................................... 12
6.1
Sports with game time...........................................................................................13
6.1.1
Start the period...............................................................................................13
6.1.2
Modification of the scores ..............................................................................13
6.1.3
Modification of the period ...............................................................................14
6.1.4
Modification of game time during a game......................................................14
6.1.5
End of a period...............................................................................................15
6.1.6
Pause .............................................................................................................15
6.1.7
End of game ...................................................................................................15
7
DEFAULT VALUES................................................................................ 16
8
CONNECTION OF THE CONSOLE....................................................... 17
© Reproduction in any manner whatsoever without the written permission of Swiss Timing Ltd. is strictly forbidden.
© La reproduction de ce document, sous quelque forme que ce soit, et sans l’autorisation écrite de Swiss Timing Ltd., est strictement interdite.
© Die Vervielfältigung oder Wiedergabe in jeglicher Weise ist ohne schriftliche Genehmigung von Swiss Timing Ltd. strengstens untersagt.
SWISS TIMING LTD
P.O. Box 138, rue de l'Envers 1
2606 Corgémont, Switzerland
www.swisstiming.com
Phone
+41 32 488 36 11
Fax
+41 32 488 36 09
[email protected]
VEGA
1 INTRODUCTION
Swiss Timing offers a large selection of scoreboards of the VEGA range, which are
suitable for all external sports stadium. The selection of the scoreboard can be done from
one ergonomic console. The keyboard of the console has partially alphanumeric and
functional keys. This makes the use for the operator comfortable. This console can also be
used with the SATURN and ORION display boards.
This manual is valid for the version of the software mentioned on the title page. When you
switch on, you will see the version on the display.
Some peripheral devices complete the equipment of the VEGA scoreboard, for example:
• Bluetooth wireless transmission.
• External Start/Stop for all sports with game time
1.1
Installation
See installation manual 3412.515.
1.2
Set-up
Before you connect the scoreboard and the console to the power supply, please ensure
the power and the information cables are installed as per installation manual. Switch on
the console at the rear back.
3412.514.02
Version 5.00
Page 1
1.3
Keyboard
The keyboard consists of three types of keys:
Escapes the function or the menu
without validating the possible
modifications (ESCAPE)
Manual horn (scoreboard)
Chooses the second function on
the key (Shift + key)
Confirms the application
or the action.
Moves the cursor up
Function key relating to
the image shown on its
side on the screen
Moves the cursor down
Clears
the
current
operation or clears the
whole scoreboard when in
the main menu.
Alphanumeric keyboard
Page 2
- The alphanumeric keys.
- The keys with one function.
- The keys with more functions.
Version 5.00
Switch Start/Stop
0 = Stop
I = Start
3412.514.02
VEGA
2 MAIN MENU
When you switch on, the main menu appears.
It shows the selected sport, the time and date,
as well as the main menus:
Console set
Time
Select
Play
refer to chapter: 3
refer to chapter: 4
refer to chapter: 5
refer to chapter: 6
To choose one of the menus, press one of the keys with the function image.
[CONSOLE SET] PARAMETERIZATION OF THE CONSOLE
In this menu you can introduce the different settings of the console.
[TIME] DAY TIME
In this menu you can set date and day time.
[SELECT] GAME PARAMETERS
In this menu you can select and save the different sport settings.
[PLAY] MATCH
In this menu you can start a game.
3412.514.02
Version 5.00
Page 3
3
[CONSOLE SET] PARAMETERIZATION OF THE CONSOLE
In this menu you can configure the different settings of the console. The top of the screen
shows the console's software version.
3.1
Ext Start/Stop – External Start/Stop
You have the possibility to connect an external Start/Stop switch to the Jack plug socket
situated at the back of the console. Press the function key depending on the application:
external Start/Stop extern switched on.
external Start/Stop extern switched off (in this mode, a possible external
Start/Stop will only drive the ball possession time (shot clock).
3.2
Test
This function sends a test program to the scoreboard and appears on the display of the
console. Press the key to exit the program.
3.3
Advance
This menu allows the management of the language and the Bluetooth link.
3.3.1 Languages
Select menu language (English, Français, Italiano) pressing the function key.
3.3.2 Bluetooth configuration
The "BT" key allows you to select the Bluetooth scoreboards who have to be wireless
connected to this console. Do not use this function if your console is not equipped with the
internal bi-directional Bluetooth option.
If you want to change the Bluetooth scoreboards connected to this console:
• Power ON all the requested scoreboards.
• On the console, press the "Yes" key.
NEVER SWITCH OFF THE CONSOLE DURING THE CONFIGURATION !
•
•
•
•
•
Wait until question is displayed.
The name of the scoreboard is display. Answer "Yes" if the founded Scoreboard
has to be connected on the console, answer "No" to disconnect this scoreboard or
"V" to not change the configuration of this scoreboard.
Repeat the precedent point for each scoreboard founded.
Then the software automatically go back in the "Advance" menu. Press twice the
"ESC" key to go back in the main menu.
The day time must be displayed on the scoreboard (if not, wait about a minute for
Bluetooth connection).
Note: only Bluetooth scoreboard with the same password can be configured.
Page 4
Version 5.00
3412.514.02
VEGA
3.4
Name – Teams names, Players numbers, Players names
This menu allows the management of the teams names as well as the players names and
numbers.
3.4.1 Sending the teams names
If the "Send Team" box is ticked ( ), the teams names will be sent when entering the
match (the message "Wait for data transmission" will appear on the screen during a few
seconds).
Tick this box only if you have the optional module "Team Name".
3.4.2 Sending the players names
If the "Send Player" box is ticked ( ), the players names will be sent when entering the
match (the message "Wait for data transmission" will appear on the screen during a few
seconds).
Tick this box only if you have the optional modules "Players Names".
3.4.3 Instant sending of the names
Press key
to instantly send the teams and players names to the board. During the
sending, the text "Sending…" is displayed on the bottom of the screen. Press the
to Stop the transmission.
key
3.4.4 Introduction of players names and numbers
Using the "Modify Visitors" and "Modify Home" keys, you can introduce the team name as
well as players names and numbers, for the visitors and local team.
In this screen:
•
The "Team" key allows the edition of the team's name*.
•
•
•
The
and
keys allow to choose one of the players to be modified (N = 1 to 16).
When you first press on the "N Num Name" key, you can modify the player's number.
After confirmation of the player’s number, if you press a second time on the “N Num
Name” key, you will be able to edit the player’s name. After validation, the key
automatically goes to the next player (N = 1 to 16).
*: The
The
and
keys allow to move the cursor.
key allow to erase the letter preceding the cursor.
The
and
keys allow to introduce a letter or a number, the same way as for
a mobile phone (by pressing successively on the same key).
The
key allows to validate the modifications.
The
key allows to cancel the modifications.
It is possible to have up to 16 players per team.
3412.514.02
Version 5.00
Page 5
3.5
Update the software
The VEGA line allows the download of a new software version in case there are rule
changes in the different sports. Follow the procedure displayed on the screen.
Operating of the console:
• Connect the console to the serial port RS232 of the computer (Cable Sub-D 9 poles
male-female pin to pin, null modem [article ST No. 9051.1307]).
• Switch on the console.
• Select menu [Console set].
Press function key
. The screen shows the Swiss Timing logo, as well as the actual
software version installed.
Press function key
and follow the instructions:
Firmware upload
Actual version:
x.xx
1)Connect serial cable
2)Press Program Flash on PC
3)When completed, turn power OFF and ON
Operating of the computer
• Load the FlashSimple program (available on our internet site) and start.
• Press on the “Flash” menu then “Setting” and introduce following values (only for the
first use):
o H8S/2134F for Device name
o Direct Connection for Interface name
o Port com: X (according to your computer’s serial port)
o Baud rate 9600
o USER mode
Press OK to confirm the parameters.
• Press on the “Browse” button and download the software (Ex. OMEGA455.fpr)
• Press on the “FLASH program” button and wait for the loading of the software to be
finished; the message “The device was successfully programmed” must appear.
This operation lasts for about 4 minutes.
• When loading is finished, switch the console off, then turn it on again, and check the
update version (Ex. Ver 5.00).
• Press the Select button.
• Press on “All def. & Save” button and validate by pressing Yes in order to
initialize the console with the factory values.
This last operation will erase your specific parameters, but it is essential
to keep the new software version in correct working order.
Page 6
Version 5.00
3412.514.02
VEGA
4
[TIME] DAY TIME
This menu allows you to introduce the date and day time. Only the day time can be
transmitted to a VEGA scoreboard. Select the needed function key:
For the selection of the date
For the selection of the hours
For the selection of the month
For the selection of the minutes
For the selection of the year
To modify the value, use the alphanumeric keyboard or the keys
(plus 1) and
(minus
1), then press the
key to confirm the entry. To go back to the initial value, press on the
key instead of the
key. Repeat this procedure until all the values match your
requirements.
The synchronization of the clock must be done at 0 second by pressing the
key in the selection menu.
The display of the day time is automatically done when in the main menu of the console.
• An internal battery allows to keep the exact time and date during 30 days after
the last switch off.
• The parameters of the console and sports always remain in the memory (not
limited in time).
3412.514.02
Version 5.00
Page 7
5
[SELECT] GAME PARAMETERS
The selection and back up of the various games
parameters (duration of the period, horn,
direction of clock counting) is done in this menu.
Choose the required sport with the
and
keys. The scrolling is bigger than the size of the
display. Therefore, if you press on the
key
from the position Basket, other sports will also be
displayed.
5.1
[Settings] Choose the settings for a sport
When you have selected the desired sport, press on the
parameters. Use the
and
key [Settings] to change the
keys to see all the parameters.
• According to the selected sport, some parameters cannot be programmed.
• Each sport memorizes its specific parameters.
[Number period]
Number of match period. The actual number of periods is displayed on the
right followed by the number of extra periods [EP for Extra Period].
[Setting period & Pause]
Modification of the game times of the several periods, the number of extra
periods and duration of times out.
[Period]
Use the keys
(plus 1) and
(minus 1) to read the values of the several
periods.
[Min. xx] Value of the several periods in minutes.
[Sec. xx] Value of the several periods in seconds.
[Extra Period x] Selection of the number of extra periods.
[Pause] Introduction of the value of the two possible times out, following the
same procedure as for the duration of the periods.
The AUTO box allow to choose when the countdown of the pause must
start:
At the end of the period (for basket for example).
At the moment of the
key is pressed (when the last player go off
the ice in hockey for example).
[Stop Time clock]
Page 8
The play time is stopped at the end of the period.
The play time continue at the end of the period.
Version 5.00
3412.514.02
VEGA
[Total time]
The time of the first period is added to the time of the second
period.
The time of the first extra period starts at 0.00
The time of the first extra period is added to the time of the
second extra period.
All the period start at 0.00.
[Count up]
Changes the way of counting from ascending [Count up] into descending
[Count down].
[Visual 1/10]
The tenth of a second is displayed during the last minute of the descending
mode.
[Key +2 +3]
and
in the menu [Play]. These keys allow to increase
Displays the keys
the score of 2 or 3 points in one function only.
[Shot clock]
Selection menu of the ball possession timers' parameters.
[Shot clock]
Possession timers connected.
Possession timers not connected.
[Value in Seconds] Duration of the possession in seconds.
[No stop]
Does not stop the playtime when the possession time
reaches 0.
Automatically stops the game time when the possession time
reaches 0.
[Horn duration] Horn duration for the possession timers (introduce 0 if you do
not wish a horn at the end of possession time).
[Setup Time Out]
Selection menu of the time outs parameters.
[Time Out on Clock]
The time out is displayed instead of the game time.
The time out is displayed on the extra module.
Number of authorized times out (per period or per
[Number Time out]
match)
Duration of the time out in seconds.
[Sec. Time Out]
[Team Fouls]
Gives the quantity of the maximum authorized fouls per team for a period or for
the match. An erasing message comes on before the start of the new period.
3412.514.02
Version 5.00
Page 9
[Ad. Fouls/Score]
Activates the function of the personal fouls, penalties and goals scored by
player.
[Fouls Score]
[Fouls]
If the box is ticked ( ), the player’s number
is requested at the introduction of a foul.
Depending on the sport, you must activate
this box if you have either a 909, 919 or 929
board.
[Score]
If the box is ticked ( ), the player’s number
is requested at the introduction of a goal.
Depending on the sport, you must activate
this box if you have either a 919 or 929
board.
[Player Fouls x] Maximum quantity of fouls per player.
[Fouls time] If the box is ticked ( ), it is possible to give the expulsion
times. Depending on the sport, tick this box if you have a 908
(or number above) board.
[Select expulsion] Selection of the expulsion (1 to 6)
Use the keys
(plus 1) and
(minus 1) to read the values of
each expulsion.
Note:
• The duration of expulsion 6 will not be numerically
displayed on the board but will be indicated by a red
luminous dot (usually used in ice hockey for the 10
minutes expulsion).
[Minutes xx] Minutes value of the expulsion duration.
[Seconds xx] Seconds value of the expulsion duration.
Clears [Fouls Score] and [Fouls time].
[Clear All]
[Setting Horn]
Selection and duration of the horn at the end of a period, pause and timeout.
Duration in seconds of the horn (on the board) at the
[Period: x]
end of each period (introduce 0 if no horn is wished at
the end of each period).
[10 Sec]
If the box is ticked ( ),the horn will be activated for
one second, 10 second before the end of each
timeout.
[Pause & Timeout: x] Duration in seconds of the horn (on the board) at the
end of each pause and each timeout.
[Pause]
If the box is ticked ( ), the horn will be activated at
the end of each pause.
[Timeout]
If the box is ticked ( ),the horn will be activated at
the end of each timeout.
Page 10
Version 5.00
3412.514.02
VEGA
5.2
[Save] Save the sport settings
The last modifications of parameters in the several sports are saved in the console. A
confirmation message is displayed before the backup.
5.3
[Default] Change the standard settings for a sport
Downloads the standard settings for the selected sport. This operation does not save
those values in the memory. If you wish to use these parameters for the next competitions,
you must save the values as described in the above chapter.
5.4
[All Def & Save] Reset the standard settings for all sports
Downloads all the parameters of each sport and saves them in the memory. This function
downloads the standard settings of Swiss Timing (see chapter Standard Settings).
This function must be done after a firmware upload.
3412.514.02
Version 5.00
Page 11
6
[PLAY] MATCH
This menu allows you to start a game. You must first select the sport you want in the menu
[Select].
Arrange the keys
and on the sport you want and press . The VEGA software is
now activated in the main menu and the image of the selected sport is displayed in the
middle of the screen.
[Play] to start the game. The software first asks you if you wish to
Press on key
continue the previous game or start a new one:
Download previous game ?
Answers
to start a new game.
to continue the previous game.
When the switch start/stop is on start:
Move switch in off position !
To continue put the switch start/stop on STOP.
Depending on the chosen settings, the console
shows the values of the first period.
Page 12
Version 5.00
3412.514.02
VEGA
6.1
Sports with game time
The display is split in three parts:
A. The general display with regulation of Game Time:
Display
Description
Game Time
Game Time is stopped
Current period
Modify the period
Modifying the Game Time during the game
B. Display of the home team (HOME or a name introduced in the console’s settings).
C. Display of the visitors team (VISITOR or a name introduced in the console’s
settings).
Home
Visitors
Description
Home
Visitors
Scores
Description
Score +1
+
+
Score -1
6.1.1 Start the period
To start the period, put the START/STOP switch on START. The current time starts to
count up or down depending on the game settings.
• In START position, the display shows
Turn the switch to STOP, to stop the game time.
• In STOP position, the display shows
.
6.1.2 Modification of the scores
With the help of the function keys you can change the scores.
• Press one of the keys
to increase the score.
then
(it is the key
with functionality changed by
• Press the key
the score.
3412.514.02
Version 5.00
), to reduce
Page 13
6.1.3 Modification of the period
The period is not automatically increased at the end of a game in order to be able if
needed, to modify the score or any other setting before starting the next period. To go to
the next period or to modify its value:
• Press
to increase the period by 1.
to reduce the period by 1.
• Press the key then
See also chapter 6.1.5.
6.1.4 Modification of game time during a game
When the game time stopped, the key function
becomes active. Now you can modify
the current period and introduce a new time. Herewith you do not change the chosen
settings for the period. Regarding to the sport, some of the following functions are not
available.
• When you press the key , the correction menu appears for the game time.
• Chose the key [Minutes], to modify the minutes.
o Introduce the new values and validate with the key .
o Press to go out without saving.
• Press the key [Seconds], to modify the seconds:
o Introduce the new values and validate with the key .
o Press , to go out without validating.
• Choose the key
[1/10] to modify the tenth of a second:
o Introduce the new values and validate with the key .
o Press to go out without saving the new value.
• Press the key [Sec. 24] to modify the possession time:
o Introduce the new values and validate with the key .
o Press to go out without saving the new value.
• Press the key [HOME] to modify the expulsion time for the local team.
• Press the key [VISITORS] to modify the expulsion time for the visitors team.
• Press the key
[Pause] to introduce a pause at any time of the match (see chapter
6.1.6 for more details).
To go back to the menu [Play]:
• Press the key , to save modifications.
• Press the key , to go out without validating and saving.
Page 14
Version 5.00
3412.514.02
VEGA
6.1.5 End of a period
When the period finished, the following display appears:
Move switch in off position !
Turn the switch on to Stop.
If necessary, adjust score or other events that could have occurred.
Press the key
to go to the next period.
Then, choose whether a time out must be introduced or not. The duration of the two times
out available can be set in
[Settings] Choose the settings for a sport. Please note that
the count down of a time out will start as soon as key
is pressed (if "AUTO" is not
checked in the "Settings") or as soon as the period ended (if "AUTO" is checked). Press
to cancel the count down of a time out.
6.1.6 Pause
When the game is stopped and at any time, it is possible to introduce a count down (or
pause or time out) of a certain duration. This is very useful for example, to indicate the
beginning of the match or the remaining warm-up time.
then [Pause].
• Press the key
• Select the duration of the pause using
[Minutes] and [Seconds].
• Validate the duration of the pause by pressing the key . The duration of the pause
is now displayed on the screen and on the board.
• At the end of the pause the display and the board show the game time again.
• Press to cancel a pause in progress.
6.1.7 End of game
When the last period is finished, press on the key
extra period:
; a screen will ask you if you wish an
Extra period ?
Answers
to end the play. The console will show GAME OVER and it will not be
possible to start the game time again.
to enter the first extra time.
When the console shows GAME OVER or at any other moment, press the
the game:
key to exit
Would you exit the game ?
Answers
to stay in the game.
to leave the game.
To start a new game, it is essential to leave the current game first.
3412.514.02
Version 5.00
Page 15
Page 16
Version 5.00
3412.514.02
Display 1/10
Count up / down
Total Time
Stop time
Setting period pause
Number period
Description
7 DEFAULT VALUES
0 – (10 –
period)
1-2/0-99
Extra period /
time
Pause / Time
Auto
1-9/0-99:59
Period / Time
1-9
Allowed
values
P1 / 5:00
P2 / 10:00
P2 / 10:00
EP2 / 15:00
EP2 / 15:00
P1 / 15:00
EP1 / 15:00
2 / 40:00
2 / 45:00
EP1 /15:00
1 / 40:00
2
Rugby
1 / 45:00
2
Football
Custom
VEGA
8 CONNECTION OF THE CONSOLE
1
5
5
1
1
Console 3400.627
6
0
9
9
6
24
SCB
PC
WARNING:
•
•
•
When the console is equipped with the internal BlueTooth option, TX1 (pin 1 and 2 of
Scoreboard connector) IS NOT AVAILABLE.
When the "SCB on Bluetooth dis." box is checked (in the "Console set" menu) and no
internal Bluetooth exist, the pin 1 and 2 of the Scoreboard connector are input instead of
output (TX1RX1-, TX1+
RX1+).
It is so recommended to always connect the scoreboards on pin 3 and 4 of the Scoreboard
connector.
Connector
Scoreboard
(RS485)
SCB
Computer (RS232)
PC
Start/Stop
24
Start/Stop + Reset
Possession
3412.514.02
Pin
Description
1
2
3
4
2
3
5
1
2
3
1
2
TX1- (RX1-)
TX1+ (RX1+)
TX2TX2+
TX
RX
GND
Not used
Start/Stop
Common
Reset
Start/Stop
3
Common
1
2
3
Home
Visitors
Common
Version 5.00
START/STOP connector
& external RESET
2
3
1
2
3
1
2
3
Page 17
Console 3400.624
WARNING: when the console is equipped with the internal Bluetooth option, TX1 (pin 1
and 2 of Scoreboard connector) IS NOT AVAILABLE.
Connector
Scoreboard
(RS485)
Computer
(RS232)
Pin
Description
1
2
3
4
TX1TX1+
TX2TX2+
2
TX
3
RX
5
GND
External Connecteur START/STOP &
RESET
Jack stereo Ø3.5 mm
Page 18
Version 5.00
3412.514.02
VEGA
3412.514.02
Version 5.00
Page 19
SWISS TIMING LTD
P.O. Box 138, rue de l'Envers 1
2606 Corgémont, Switzerland
www.swisstiming.com
Phone
+41 32 488 36 11
Fax
+41 32 488 36 09
[email protected]