1
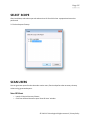
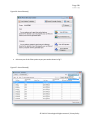
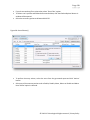
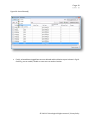
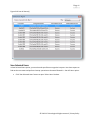
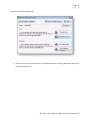
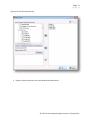
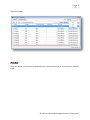
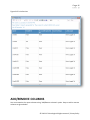
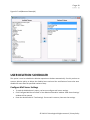
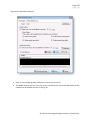
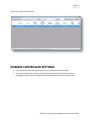
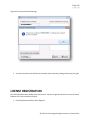
JiJi Technologies JiJi Active Directory Cleaner User Manual © 2012 JiJi Technologies All rights reserved. | Privacy Policy Page 02 Contents OVERVIEW .........................................................................................................................................3 FEATURES ..........................................................................................................................................3 SYSTEM REQUIREMENTS .....................................................................................................................3 INSTALLATION ....................................................................................................................................3 SELECT SCOPE ....................................................................................................................................7 SCAN USERS .......................................................................................................................................7 Scan All Users .................................................................................................................................7 Scan Selected Users ...................................................................................................................... 11 SCAN COMPUTERS............................................................................................................................ 14 EXPORT............................................................................................................................................ 14 PRINT............................................................................................................................................... 15 ADD/REMOVE COLUMNS .................................................................................................................. 16 USER DELETION SCHEDULER.............................................................................................................. 18 Configure Mail Server Settings ....................................................................................................... 18 Create Delete Policy...................................................................................................................... 19 DOMAIN CONTROLLER SETTINGS....................................................................................................... 21 LICENSE REGISTRATION..................................................................................................................... 22 © 2012 JiJi Technologies All rights reserved. | Privacy Policy Page 03 OVERVIEW JiJi Active Directory Cleaner is a simple housekeeping tool, used to maintain your Active Directory clean and secure. It is a major security threat to keep unwanted User/Computer accounts and expired data in Active Directory. Inactive, disabled Users/Computers turn to be a crap everyday. As thedays pass, these craps grow rapidly and affects the performance severel y. Housekeeping regulates Active Directory perfectly for the SOX compliance audits. JiJi Active Directory cleaner is very reliable and provides a cheaper clean up solution for your Active Directory. FEATURES Old users/computers cleanup. Old users’ folder and profile cleanup. Cleanup automation through schedules. Generating reports from the desired scope of Active Directory. Users can sort the columns of their interest. Reports can be exported to PDF, CSV, HTML and Excel formats. Helps to do actions like delete, move, disable, enable users/computers in bulk. SYSTEM REQUIREMENTS Dot Net Framework 3.5. Windows Active Directory Domain setup. Supports up to Microsoft Windows 7 and Microsoft Windows 2008 R2 systems. Both x86 & x64 platforms are supported. INSTALLATION Steps to install JiJi Active Directory Cleaner are given below. Double click the 'JiJi Active Directory Cleaner' setup to open the installation wizard. Select 'Install Active Directory Cleaner' and click 'Next'. © 2012 JiJi Technologies All rights reserved. | Privacy Policy Page 04 Figure 2.1. Installation(a) Read the License terms and click 'I agree'. © 2012 JiJi Technologies All rights reserved. | Privacy Policy Page 05 Figure 2.2. Installation(b) Select the installation path and click 'Install'. © 2012 JiJi Technologies All rights reserved. | Privacy Policy Page 06 Figure 2.2. Installation(c) Now, JiJi Active Directory Cleaner is installed successfully. Figure 2.2. Installation(d) © 2012 JiJi Technologies All rights reserved. | Privacy Policy Page 07 SELECT SCOPE After installation, select the scope such as domain or OU for which clean -up operations have to be performed. 2.5. Select Scope to Cleanup SCAN USERS You can generate reports for the selected or entire users, filter it and perform the necessary clean up actions using generated reports. Scan All Users o o Launch JiJi Active Directory Cleaner. Click 'Scan All Users' button to open 'Scan All Users' window. © 2012 JiJi Technologies All rights reserved. | Privacy Policy Page 08 Figure 2.6. Scan all Users(a) Select any one of the filter options as per your need as shown in Fig 7. Figure 2.7. Scan all Users(b) © 2012 JiJi Technologies All rights reserved. | Privacy Policy Page 09 If you do not need any filter actions then select 'Clear Filter' option. To delete user’s profiles and folders before user deletion, click 'User Delete Options' button. A window will be opened. Select the necessary options to delete and click 'Ok'. Figure 2.8. Scan all Users(c) To perform clean up actions, select the users from the generated report and click 'Actions' button. Select any of the necessary actions such as Enable, Disable, Move, Delete or Disable and Move. Here 'Delete' option is selected. © 2012 JiJi Technologies All rights reserved. | Privacy Policy Page 10 Figure 2.9. Scan all Users(d) Finally, selected Never Logged On users were deleted and the deletion report is shown in Fig 10. Similarly, you can enable, disable or move users to another location. © 2012 JiJi Technologies All rights reserved. | Privacy Policy Page 11 Figure 2.10. Scan all Users(e) Scan Selected Users In Scan Selected Users option, you can select the specific users to get their reports. Use those reports to find out the user status and perform cleanup operations as that was followed in Scan All Users option. Click 'Scan Selected Users' button to open 'Select Users' window. © 2012 JiJi Technologies All rights reserved. | Privacy Policy Page 12 Figure 2.11. Scan Selected Users(a) Select users from the Active Directory hierarchical structure or using samaccount name or by importing from CSV file © 2012 JiJi Technologies All rights reserved. | Privacy Policy Page 13 Figure 2.12. Scan Selected Users(b) Reports of those selected users were obtained as shown below. © 2012 JiJi Technologies All rights reserved. | Privacy Policy Page 14 Figure 2.13. Scan Selected Users(c) Now, you can follow the same steps as that followed to cleanup users using 'Scan all Users' option. SCAN COMPUTERS Similar to scanning users as seen in section 6, you can also scan computers as follows: Click 'Scan all Computers' or 'Scan Selected Computers' button to retrieve computer report of all or selected Computers from Active Directory. Use this generated report to filter and then clean-up Computers. EXPORT You can export the generated reports on user's account status and save it in any of the formats such as CSV, Excel, PDF, HTML. © 2012 JiJi Technologies All rights reserved. | Privacy Policy Page 15 Figure 2.14. Export PRINT Using this option, you can print the generated user account status reports. Print preview is shown in Fig15. © 2012 JiJi Technologies All rights reserved. | Privacy Policy Page 16 Figure 2.15. Print Preview ADD/REMOVE COLUMNS You can customize the report columns using 'Add/Remove columns' option. Steps to add or remove columns are given below. © 2012 JiJi Technologies All rights reserved. | Privacy Policy Page 17 Click 'Add/Remove Columns' button in 'Scan All Users' window. Add/Remove Columns window will be opened. To add columns, select the necessary columns and click '' to move from 'Available Colunms' to' Displayed Columns'. Figure 2.16. Add/Remove Columns(a) If you need to exclude some of the columns from the reports, you can select it from t he Displayed Colums and click the reports. to move it to Available Columns so that those colums will not be available in © 2012 JiJi Technologies All rights reserved. | Privacy Policy Page 18 Figure 2.17. Add/Remove Columns(b) USER DELETION SCHEDULER This option is used to schedule the deletion operation to be done automatically. For this you have to create a deletion policy to delete the disabled users and send the notification of users who were disabled for more than the specified number of days. Configure Mail Server Settings To send the disabled user's report, you have to configure mail server settings. Click 'Configure Mail Server' button in 'User Deletion Scheduler' window. 'Mail Server Settings' window will be opened. Enter the details and click ' Test Settings'. If test result is success, then save the settings. © 2012 JiJi Technologies All rights reserved. | Privacy Policy Page 19 Figure 2.18. Mail Server Settings Create Delete Policy After configuring the mail server settings, create a new policy to delete the users who were disabled for ‘n’ number of days. Click 'Create Delete Policy' button in 'User Deletion Scheduler' window. Type the policy description and select the scope to apply this policy. Select Delete settings to delete the disabled users and Notification Settings to send disabled users report. Both options can also be selected. In Delete settings, specify the number of days after which the disabled users can be deleted. If you have not made any changes with 'Delete Options' already, here you can select the options to delete the folders and profiles of the users who are to be deleted. In Notification settings, Select the number of days to find the users disabled for more than the specified number of days and then edit the e-mail text if necessary. Finally, add the e-mail id and save the settings. © 2012 JiJi Technologies All rights reserved. | Privacy Policy Page 20 Figure 2.19. Create Delete Policy(a) Now, you can change the daily schedule run time as per your wish. The added schedule will run every day at the time what you have mentioned. Details of this schedule can be viewed as shown in the Fig 20.. © 2012 JiJi Technologies All rights reserved. | Privacy Policy Page 21 Figure 2.20. Create Delete Policy(b) DOMAIN CONTROLLER SETTINGS Click 'Domain Controller Settings' button in JiJi Active Directory Cleaner window. Select any of the Domain Controller and click 'Set as Default Domain Controller' button. A message box will be opened, stating that the selected Domain Controller is set as default. © 2012 JiJi Technologies All rights reserved. | Privacy Policy Page 22 Figure 2.21. Domain Controller Settings You can also make any of the Domain Controller to be unused by clicking and moving it to right. LICENSE REGISTRATION Only limited features are available in the trial version. You have to get the license file to use the entire features of JiJi Active Directory Cleaner. Click 'Help' button and then select 'Register'. © 2012 JiJi Technologies All rights reserved. | Privacy Policy Page 23 Figure 2.22. Licence Registration(a) 'Machine Details' dialogue box will be opened. Figure 2.23. Licence Registration(b) © 2012 JiJi Technologies All rights reserved. | Privacy Policy Page 24 Copy the details given in the dialogue box and send it to [email protected] to get the license file. After getting the license file, open the registration window and browse the license file. Select the scope such as Domain, Organizational Unit or Group to be cleaned using JiJi Active Directory Cleaner and then close the window. Figure 2.24. Licence Registration(c) © 2012 JiJi Technologies All rights reserved. | Privacy Policy