1
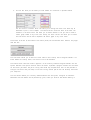
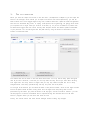
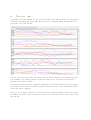
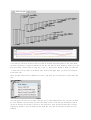
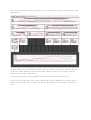
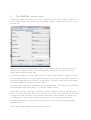
US E R M A N U A L Author: Richard Willems, Fiona Nielsen All comments and additions to this manual are more than welcome and can be sent to the address mentioned in the about section of the actual program. If you find any bugs, please report them by sending a mail to the CATCH- users mailing list. Please make sure to read the FAQ at the end of this manual to see if this bug is a known issue. (A LL SCRE EN SHOTS WERE CREATED IN A W IN DOWS V ISTA ENVIRON M ENT , OTHER OPERATING SYSTEMS MAY SHOW SLIGHTLY DI F F E R E NT SCRE EN S ) 1. TH E M A I N SC R E E N W h e n you first run C A T C H , you wi l l be greeted what we call the mai n interface. In this mai n interface you wi l l be able to perfo r m all of C A T C H ’ s functi o ns and vie w the results generated by the C A T C H algori t h m . The mai n interface looks like this: This is the mai n screen, when there are no datasets loaded (aligned or other w i se). There are four maj o r aspects whi c h are im p o rta n t to kno w right awa y. They are num be re d one throu g h four. 1. This list sho w s the unal i g ne d datasets. W h e n more than one set is loaded it wi l l allo w you to select the set you wish to use. A n unali g n e d dataset is a dataset that has not yet been run throu g h the C A T C H algori t h m and can contai n one or more tracks. Once loaded, the tab mar ke d ‘graphs’ wi l l beco m e acti ve and wi l l sho w all the tracks as graphs. 2. This list sho w s the aligned datasets. W h e n more than one set is loaded it wi l l allo w you to select the set you wish to use. A n aligne d dataset is a dataset that has been run throu g h the C A T C H algori t h m . Once an aligne d dataset is loaded or created (more on that later) the tabs ‘cluster vie w ’ and ‘branc h vie w ’ wi l l beco m e acti ve and allo w you to vie w the cluster tree created by the C A T C H algori t h m , as wel l as perfor m vari o us functi o n s on the result. These wi l l be discussed in more detail in the appro p r i ate chapter. 3. This box sho ws the full name of the loaded dataset if a dataset is loaded. The butto n to the left wi l l allo w you to make the box editable, and input a new name for the dataset. The change wi l l be conf i r m e d when you press the button again. This can be used for personal reference. 4. This list wi l l sho w you the tracks you have loaded. An illustrati o n is prov i de d belo w. The first colu m n is a button whi c h wi l l allo w you to change the name in the same wa y as descri be d in poi nt 3 of this chapter. The second colu m n sho w s the name of the track. The chec k b o x in the third colu m n wi l l allo w you to choose whet he r or not you want to make a track’s graph visi bl e in any of the vie w. Final l y, the fourth colu m n wi l l allo w you to choose the color whi c h wi l l be used to represent the track’s graph in any of the vie ws. The buttons to the left (in the mi d d l e of the contro l panel) wi l l be acti vated whe n releva nt, they mi g h t look like this: The first button allo w s you to add one or more tracks to the current l y acti ve unali g n e d dataset. If an acti ve dataset is current l y acti ve, this functi o n wi l l not be availabl e. The second button opti o ns selected in for the current job. conf i g u r e and start your com p u t er! starts the C A T C H algori t h m on the current l y selected unal i g ne d dataset, wit h the the opti o ns wi n d o w . W h e n the button is pressed a progress indi cato r wi l l be sho w n W he n this job is runni n g other tasks may be perfo r m e d, and it is also possi ble to a new job. Keep in mi n d that runni n g several jobs at once can severel y slo w do w n The final butto n deletes your currentl y selected dataset fro m the syste m, unali g n e d or other w i se. Re m e m b e r that the dataset wi l l be perm a n e n t l y gone, unless you saved to disk before deleti n g it! 2. T HE TOO L B A R The mai n tool bar wi l l allo w you to access a variet y of C A T C H ’ s functi o ns and tools fro m one locati o n. The tool bar looks like this, and is foun d in the top of the mai n interface: The first menu, the ‘file menu’, wi l l allo w you to perfor m vari o us progra m and file related tasks. The top-most opti o n you see wi l l open the file manager whi c h allo w s you to create new files for use in CAT C H. The second button, im p o rt dataset, wi l l allo w you to select one more processed wi g files (*.pwig) to use in a new dataset. The third butto n wi l l allo w you to select one more tracks (in the *.pwi g for m at) to add to the currentl y acti ve unali g n e d dataset. Bel o w the first separator you wi l l find the load and save C A T C H cluster butto ns. These wi l l allo w you to load a previ o u s l y saved processed dataset whi c h you have saved, or to save the current l y selected aligned dataset. Final l y, at the botto m of the file menu is the exit button whi c h does exactl y what you wou l d expect fro m such a butto n – close the progra m and return you to your OS. The second menu, the one called ‘expo rt functi o ns’ contai ns vari o us co m m a n d s to export C A T C H ’ s data into for m ats to be used in other anal yti ca l progra m s. The first one, ‘expo rt dataset’ wi l l store the processed wi g files with a prefi x you can speci f y. This wi l l allo w you to organi ze *.pwi g for future referen ce. The other buttons wi l l allo w you to store the currentl y selected aligned dataset in a variet y of for m ats; in this case NE W I C K , BE D and CS V. The scope of these file types wi l l not be discussed in this manual. Free reference material is wi del y availab l e on the internet. The third menu is called ‘opti o ns’ and allo w s you to change C A T C H ’ s opti o ns. M o r e infor m a t i o n on the opti o ns menu is availabl e in a later chapter. The last menu is the ‘help’ menu. In further versio n of C A T C H there wi l l be an interacti v e help functi o n, but in this versio n onl y the ‘about’ wi n d o w can be accessed here. This wi n d o w wi l l allo w you to marve l at the names of the wo n d e r f u l people who brou g h t you C A T C H . 3. TH E FI L E M A N A G E R W h e n you clic k the ‘im p o r t file’ button in the ‘file menu’ (as explai ne d in chapter 2) you wi l l open the C A T C H file manager, whi c h allo w s you to im p o rt and convert files. M o r e speci f i ca l l y: you wi l l be able to select one or more wi g g l e/signal/*.wi g files, co m b i n e these with a peak file *.bed and generate what we call ‘Processed W i g Files’, or *.pwi g (to be pron o u n c e d as [pee-wi g], not [pwi g] whi c h when you mispr o n o u n c e it mi g ht cause you to be hit in the face, try it if you do not belie ve us). These files are do w ns i z e d wi g g l e files fro m whi c h we onl y take the parts aroun d the relevant peaks as descri be d in your peak file. Yo u can add signal files and peak files by using the butto ns at the botto m of the wi n d o w as illustrated here: The loaded files wi l l be sho w n in the lists above the butto ns. Yo u may load as man y peak and signal files as you want. Ho w e v e r, in the lists you can onl y select as man y files as you want when wor k i n g with signal files. For every amou n t of signal files you may onl y select one peak file. This is fairl y straight f o r w a r d since every processed wi g file may onl y have one set of peaks. To the right of the wi n d o w you can select the wi dt h of the profi l e wi n d o w ; whi c h is ho w large the area aroun d the peaks shoul d be whe n cutti n g them fro m the signal files and putti n g them into the processed wi g file. W he n you press the butto n to the top-right, ‘con ve rt and add in C A T C H ’ you wi l l tell the progra m to convert the selected files to a processed wi g file and load them into the mai n C A T C H progra m where you can wor k with them as usual. Final l y, the ‘cancel’ button wi l l close the file manager wi th o u t mak i n g any changes. 4. T HE DAT A TABS To the right of the mai n interface you wi l l find the data tabs. These data tabs contai n all of the prof i l es contai ne d in the datasets you have loaded. W h e n you have an unali g n e d dataset selected wit h one or more tracks, it wi l l loo k like this: Yo u wi l l noti ce that ‘cluster vie w ’ and ‘branch vie w ’ are currentl y disabled. This is because this data is not availab l e in an unali g n e d dataset. To access this data you wi l l first need to run the C A T C H algori t h m as descri be d in chapter 1. This graph vie w itself sho ws you a graphi ca l representati o n of the selected prof i l es fro m your dataset. The intenti o n of this screen is to present the profi l es and allo w the user to veri f y these prof i l es before runni n g the C A T C H algori t h m . W h e n you run the C A T C H algori t h m the second and third tab beco m e availabl e and the first tab wi l l be disabled. The cluster vie w is a tree whi c h wi l l allo w you to visual i ze the entire cluster tree. It coul d look like this: In this tree you can hover the mouse over any node to visual i ze the profi l e pattern in this node. W h e n the node is clic ke d it is ‘mar k e d as interesti n g ’ and wi l l turn blue for future reference. Zoo m i n g can be done wit h either a mouse wheel or using the ‘+’ and ‘ — ‘ keys on your keyb oa r d. W he n you press the ‘r’ button the vie w wi l l return to the defaul t zoo m level to once again allo w you to have an over v i e w of the entire tree. W h e n the right mouse button is pressed on a node, it wi l l sho w you the ‘node menu’ whi c h loo ks like this: The first opti o n wi l l allo w you to open a sub tree. This is a new dataset whi c h wi l l start fro m the node you have selected. The tree vie w e r wi l l then reset itself to sho w a new tree wit h the selected node as the root of the tree. Al l the other functi o n s in the ‘node menu’ wor k the same as the export functi o ns explai ne d in chapter 2, wit h the differe n ce that these wi l l onl y save the tree fro m the node you have selected. The third and final tab wi l l sho w you the branch vie w. This is another versi o n of the tree vie w e r whi c h looks like this: The mai n differe n ce fro m the other tree vie w e r is that this one does not sho w the entire tree, but onl y the first four levels do w n w a r d s fro m the node. W hat it does do, is sho w you the content of all the nodes whi c h are visib l e in these levels. The profi l e at the botto m is a more detailed vie w of the node you hover the mouse over. W h e n you clic k or right- clic k a node, it wi l l reset the tree to sho w a deeper level of the tree with the clic ke d node as the new root of the tree. This wi l l also be reflected in the tree vie w e r in the cluster vie w. 5. T HE C A T C H OP T I O N P A N E L The C A T C H opti o ns are tools for you to further custo m i z e the results of your C A T C H algori t h m . It can be accessed throu g h the ‘opti o ns menu’ as descri be d in chapter 2. W he n you first open it, it may look like this: The first tab wi l l sho w you all the opti o ns releva nt for the C A T C H algori t h m , whi l e the second tab wi l l sho w you the opti o ns relevant for the dataset loadi n g. No w before we conti n ue we wi l l first explai n the wa y C A T C H opti o ns wor k. The opti o ns are stored in *.ini files, whi c h allo w you to quic k l y save and load your opti o ns for future use. This means that when you have fine tuned the opti o ns to your liki n g you can sim p l y save these to a new file and load the m the next time you run the progra m. To do this, use the buttons at the botto m of the screen labeled ‘load opti o ns’ and ‘save opti o ns’. The opti o n screen itself is fairl y straight f o r w a r d. Som e opti o ns allo w you to choose fro m a pre-defi ned list of the opti o ns, whi l e others allo w you to enter any nu m b e r you want. Please keep in mi n d that some opti o ns drastical l y increase or decrease the ti me the algori t h m takes to finish so if a certai n calculati o n takes very long and you onl y wish to vie w a quic k and dirty result you can play aroun d with the opti o ns a bit to see whi c h com b i n a t i o n is best suited for your dataset. The time the algori t h m actual l y takes is visib l e when it finishes, so this can be used as a reference. The second tab contai ns the ‘reference poi nt inter val ’ whi c h shoul d be set to the average distance bet wee n datapo i n ts. Further opti o ns mi g ht be added in future versi o ns of C A T C H . 6. F R E Q U E N T L Y AS K E D QU E S T I O N Q. W h y does C A T C H pop up a file chooser when I load the progra m? A. This is when the progra m cannot find the defaul t opti o ns file, whi c h is kno w n to occur on certai n versio ns of Li n u x. In the file chooser you are supposed to navi gate to where you have installe d C A T C H and select the setup.i ni file. This is a kno w n bug that wi l l be addressed in future versio n of C A T C H but does not occur very often. Q. Can I use the progra m when C A T C H is calculati n g? A. Yes you can. W h e n you have initiated a very big task, you can sim p l y put the progress wi n d o w aside and conti n ue using the progra m. Y o u can even start more tasks, but keep in min d that perfor m a n c e wi l l decrease when you have mul ti p l e tasks runni n g at once. This is especial l y true if your com p u te r is not equi p pe d wit h a mult i- core processor. Q. W h y am I able to load any sort of file I want? A. Current l y we have not yet perfected our file filter. Right no w it is the responsi b i l i t y of the user to make sure that onl y vali d files are selected for use with i n C A T C H . Also, file errors are min i m a l so if results are very unexpe cte d or the progra m crashes, veri f y that the files you use are vali d *.wig, *.pwi g or *.catch files, depend i n g on where you atte m p t to load these files. Q. I own a M ac and don’t have a right- mouse butto n, what do I do? A. Bu y a decent mouse. Seri ousl y, all progra m s these days requi re a right mouse button to functi o n. W h y Ap p l e does still suppl y one-butto n mice is beyon d us but we do not support them in C A T C H . Q. W h y am I not able to see the relati ve align m e n t of the tracks? A. W e are wor k i n g on this and it wi l l be added in future versi o n of C A T C H . Q. The C A T C H algori t h m is slo w. Can’t you make it faster? A. Yes we can, and we are in fact alread y wor k i n g a versio n of C A T C H that wi l l wor k wit h parallel processi n g. This means that by using a still secret and m ysteri o us process we wi l l eventual l y be able to increase the speed by a factor of 40 or more. Stay tuned for this. 7. F IN A L TH A N K S As a last wor d of than ks we wish to thank the people of the A T V tree vie w e r for allo w i n g us to make use of their wor k whi l e construc t i o n the tree vie w e r we use. We also wish to than k the peopl e wh o helped us test the appl i cati o n and wh o we did not stop buggi n g until we were sure we had mi l k e d their brains dry. W i t h o u t them, C A T C H wou l d not be the magn i f i c e n t piece of soft w a r e you see before you. We wo u l d also like to thank the mai n insti gato r of the project, Fiona Nielsen, for allo w i n g us to wor k with her and gain some valuab l e experie n ce wit h soft w a r e devel o p m e n t and mult i- threaded appl i cati o n devel o p m e n t. She coul d have said no . The mai n progra m m i n g team, Berr y Li j k l e m a M ar k Zandstra Richar d W i l l e m s