Transcript
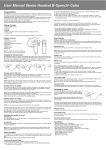
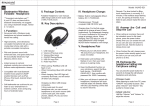
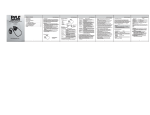
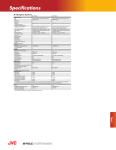
MightyMic W User Manual
Introduction
MightyMic W
iPhone Bluetooth
Wireless Microphone
User Manual
Thank you for choosing the MightyMic W Bluetooth
microphone. In order to use the MightyMic W as a wireless
Microphone you will need to use either the MoviePro App for video
recording or other voice recording Apps for audio recording. Please
visit our website for the latest info on Apps and features.
Safety Rules
· To ensure your safety before using the Bluetooth
Microphone please carefully read through this user manual.
· Be wary of any sharp edges, uneven surfaces, metal parts,
accessories and their packaging so as to prevent any
possible injuries to you or damages to the microphone.
· Do not modify, repair or dismantle this Bluetooth
microphone. Doing so may result in fire, electric shocks,
complete failure of this Bluetooth Device, etc. All of which,
are not covered under the warranty.
· Do not use any solvents or volatile liquids to clean the
Bluetooth Microphone
· Do not use the Bluetooth Microphone in a hazardous
location.
MightyMic W User Manual
Charging/3.5mm
Earphone jack
Microphone
Volume Up
Button
Volume Down
Button
Power On/
Pairing/
Multi-Function
Button
Factory reset
Buttons
General Functions
Desired Result
MightyMic W User Manual
Desired Result
Required Action
Volume Up
Button
Press the “+“ button to increase the playback
volume
Volume Down
Button
Press the “-“ button to decrease the playback
volume
Low Battery
Warning
The red LED will flash
Charging
Plug the charger cable into the headphone jack
(A red LED will be on while charging and turn to
blue when charging is complete)
Battery Power
Battery status will be shown on the top right
corner of the phone screen after paired. (Only on
IOS devices)
Factory reset
At the same time press the “pwr “ and “-” buttons
for 5 seconds during the pairing mode to clear
the paired device list
Required Action
Package Contents
Connection Diagram
Turn On
Press the “pwr“ button for 5 seconds when
the device is off. (Red LED flashes slowly)
Enter the pairing
Mode
When the device is off press the “pwr“ button
for 10 seconds. (The blue LED and red LED
will alternately flash quickly)
Pairing
Use a Bluetooth compatible iPhone, iPad, or
other IOS device to perform the pairing action
Turn Off
Press the “pwr“ button for 5 seconds when the
device is on. (All LED’s will glow and then shut
off)
Warning
· You must select a qualified charger from a reliable
manufacturer
· Do not use the USB charger cable on any other device
because of possible damage
· Unit contains Li-ion polymer batteries. Li-ion Polymer
batteries are volatile. Failure to read and follow the safety
instructions may result in fire, personal injury and damage
to property if charged or used improperly. By purchasing
and using this unit the buyer assumes all risks associated
with Li-ion batteries. Please dispose of properly.
1
MightyMic W User Manual
2
MightyMic W User Manual
Pairing to an iPhone or iPad device
Using the MightyMic W Microphone
To use your Bluetooth Microphone, you must first pair it with a
device. Once your Bluetooth Microphone is paired to a specific
device, they will remain paired and automatically recognize each
other whenever they are within range.
·
Pairing instructions:
· Turn on your iPhone and ensure the Bluetooth function
is activated
· Using the button on the bottom of the microphone set it to
the pairing mode (hold for 10 seconds)
· In the Settings App on the iPhone select the Bluetooth
option. Look for a Bluetooth device listed as “Ampridge”
· Select the device listed as “Ampridge” to pair it to the
microphone. The display should change from “Not Paired” to
“Connected”
Charging your Bluetooth Microphone
This Microphone uses a USB to 3.5mm 4pin charging cable. Use
a USB charger (not included) to charge your device. Make sure
that your device is full charged for at least 6 hours before initial
use. Insert one terminal of your charger cable to a USB charger or
USB port of a PC and connect the other terminal to the 3.5mm audio
jack. While charging, the red LED on the bottom will remain on.
When charging is completed, the LED will turn blue.
·
·
Make sure the MightyMic W is already paired to your
phone or other IOS device.
Make sure your phone is set to airplane mode otherwise
you may have recordings interrupted by unwanted calls.
To hear audio while the Bluetooth microphone is connected,
swipe from the bottom to open Control Center and select the
airplay button. Manually choose the iPhone speaker as option for
playback. This needs to be done only once.
·
Using the MightyMic W with MoviePro for video recording
1)
If the Bluetooth microphone is connected before the app starts,
on starting you will see the text "Bluetooth Microphone.”
If the Bluetooth microphone is connected after the app starts, the
microphone is changed to a Bluetooth microphone and the text
“Bluetooth Microphone” appears
If the Bluetooth Microphone is disconnected while the app is
active, the app switches to the built-in microphone and the text
“Built-in Microphone” appears.
To confirm the microphone is connected do a test recording or go
into the Settings section. Upon leaving the Settings section the
Bluetooth microphone will become active again and the
“Bluetooth Microphone” message will appear again.
Many updates are planned for Bluetooth options to further
enhance the features. Please check the website for updates
regarding this or other features.
2)
3)
4)
5)
·
Using the MightyMic W for audio recording
and
are registered trademarks of Apple Inc.
The Bluetooth® word mark and logos are registered
trademarks owned by Bluetooth SIG, Inc
1) The MightyMic W will support audio App’s designed to work with
external Bluetooth devices.
2) An audio App is needed such as Voice Recorder HD to do
Bluetooth audio recording. Please check our website for updates
regarding this or other supported Apps.
4
5
iPhone ®
iPad ®
1 Wireless Microphone
1 USB Bluetooth Dongle
1 USB Charging Cable
1 Carrying Bag
1 User Manual
3
MightyMic W User Manual
MightyMic W User Manual
Warranty/Product Information
Product warranty is limited to original defects in material and
workmanship for one year. Warranty does not cover
collateral damage due to misuse, abuse, incorrect charging
and other inappropriate uses of this product and are not
covered under the warranty. See details at ampridge.com.
Technical Specifications
Parameter
Bluetooth Specification
Value
Bluetooth 4.0
Bluetooth Profile
HFP1.6/A2DP1.2/AVRCP1.4/HSP1.2
RF Range
Approx 30 feet (10M)
Frequency Response
20Hz-20KHz
Receiver Output
20 mW
Signal to Noise Ratio
> 85dB
Distortion
< 1%
Playback Time
About 4-5 hours
Charging Time
About 2 hours
Dimensions(LxWxH)
58 x 16.6 x 12.7 mm
Weight
24g
Service and Support
USB Bluetooth 4.0 Windows PC
Setup Instructions
· Insert the USB adaptor into a USB slot on a PC
running Windows 7 or higher
· Wait for the drivers to be installed.
· When the Bluetooth icon shows in the tray rightclick on it and select Add A Device
· Place the mic into pairing mode. It should show
a display for the Ampridge Bluetooth headset
· Click on the Ampridge device and hit next
· When the device is paired successfully hit close
· To make the mic the input source or to adjust the
mic sensitivity right-click on the Bluetooth icon and
select Show Bluetooth Devices. You can also choose the
desired playback device here as well
· Right-click on the Ampridge device and select Sound
settings. Under Sound Settings select the Recording tab.
Choose Bluetooth Audio Input Device as the Default.
· Right-click on the Bluetooth Audio Input Device and
select Properties. Click the level tab and adjust the
sensitivity to the desired level using the slider.
· Click OK to close the settings screens.
· You are now ready to use the mic with popular programs
like Skype, Audacity, and Sound Recorder.
· A flashing blue LED on the adapter is normal
If your device is not performing as it should please visit our
website at ampridge.com or e-mail us at [email protected]
6
7